Geology Merit Badge — Complete Digital Resource Guide
https://merit-badge.university/merit-badges/geology/guide/
Introduction & Overview
Geology is the story of Earth written in stone. Every canyon wall, road cut, beach, mountain, and fossil bed holds clues about volcanoes, rivers, ancient seas, buried forests, and continents that moved over millions of years. When you study geology, you learn how to read those clues and explain how the world around you formed.
This merit badge matters because geology is not just about rocks in a display case. Geologists help communities find clean water, build safer roads, understand earthquakes and landslides, locate resources, and protect important fossil and mineral sites. If you like solving mysteries outdoors, geology gives you a way to turn curiosity into real investigation.
Then and Now
Then — Reading the Land Without Modern Tools
People have been noticing rock layers and landforms for thousands of years. Miners learned where useful ores were likely to be found. Farmers noticed which soils grew better crops. Builders figured out which stones were strong enough for roads, walls, and foundations. Long before satellites or drilling rigs, observers used streambeds, cliffs, cave walls, and mountain slopes to guess what lay underground.
In the 1700s and 1800s, scientists began comparing rock layers from place to place and realized Earth must be far older than anyone had imagined. Geologists such as James Hutton and Charles Lyell argued that slow processes happening today — erosion, deposition, uplift, and volcanism — could also explain many features from the distant past.
Now — Earth Science with Maps, Labs, and Technology
Modern geologists still use field notebooks and careful observation, but now they also work with aerial photos, GPS, digital maps, microscopes, chemistry labs, seismic tools, and computer models. They can trace faults hidden underground, date ancient rocks, study fossils under magnification, and model how groundwater moves through layers of sand, clay, and bedrock.
The big idea has not changed: clues in the present help explain the past. What has changed is the number of tools available to test ideas and gather evidence. Today geology connects outdoor fieldwork with technology, engineering, climate science, and natural resource management.
Get Ready! You do not need to know every mineral name or memorize a giant chart to begin. Start by noticing patterns: layer on top of layer, rounded pebbles in a stream, a road cut exposing folded rock, or shells preserved in stone far from the ocean. Those patterns are where geology begins.
Kinds of Geology
Geology includes several branches, and this badge lets you sample quite a few of them.
Physical Geology
Physical geology focuses on the materials and processes that shape Earth right now. It asks questions like: How do streams carry sediment? Why do mountains rise? What causes earthquakes? How do different kinds of rocks form? If you enjoy landforms, erosion, volcanoes, and plate tectonics, this is your lane.
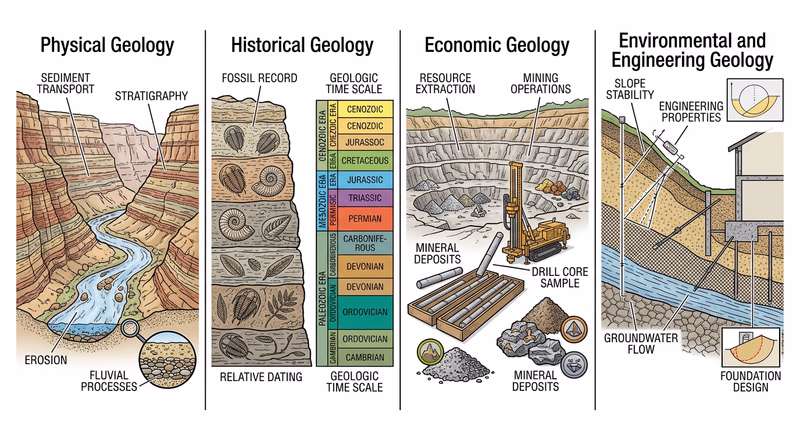
Historical Geology
Historical geology looks backward through deep time. Geologists use fossils, rock layers, and geologic maps to reconstruct ancient environments. A limestone full of marine fossils might show that your area was once covered by a shallow sea. A layer of volcanic ash can mark a dramatic event in the past.
Economic Geology
Economic geology studies useful Earth materials such as metals, sand, gravel, coal, oil, natural gas, stone, and industrial minerals. This branch matters whenever people build roads, generate electricity, produce concrete, or manufacture products that depend on mined materials.
Environmental and Engineering Geology
Environmental geologists study hazards and resources that affect people directly, such as erosion, sinkholes, contaminated groundwater, and unstable slopes. Engineering geologists help decide whether the ground beneath a building, bridge, or highway is strong and safe enough for construction.
Paleontology and Fossil Studies
Paleontology overlaps with geology because fossils are preserved in rock. Fossils help geologists estimate ages of rock layers, identify ancient environments, and understand how life changed over time. If you like extinct animals, ancient plants, or the mystery of how organisms were preserved, you will see that branch in the Earth History option.
Now that you know what geology covers, you are ready to start with the biggest idea of all: what geology is, how geologists gather evidence, and why the present helps explain the past.
Req 1 — What Geology Explains
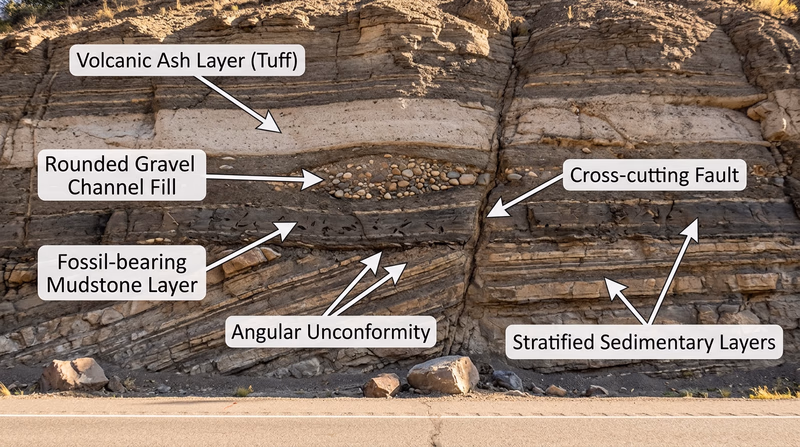
A cliff beside the highway can look like a stack of random colors, but to a geologist it is a timeline. One layer may be mud from an ancient sea. Another may be volcanic ash. Another may show a river channel that cut through older rock and filled with gravel. Geology is the science of Earth materials, Earth processes, and Earth’s history — and geologists learn to read those clues the way a detective reads evidence at a scene.
What Geology Means
At its simplest, geology is the study of the Earth. That includes:
- Materials such as rocks, minerals, sediments, fossils, soil, and groundwater
- Processes such as erosion, deposition, volcanism, mountain building, weathering, and plate movement
- History recorded in layers, structures, and fossils
- Resources and hazards that affect people, such as fuel, building stone, landslides, earthquakes, and erosion
Geology is not only about naming rocks. It is about asking how they formed, what happened to them later, and what they tell us about the place where you found them.
How Geologists Learn About Rock Formations
Geologists combine outdoor observation with lab work and mapping. They rarely trust a single clue by itself. Instead, they build explanations by comparing many kinds of evidence.
Field Observations
The first step is often simply going outside and looking carefully. Geologists examine the color, thickness, grain size, shape, and order of rock layers. They look for cracks, folds, faults, fossils, ripple marks, rounded pebbles, and mineral veins. They sketch what they see, take notes, mark locations, and photograph important details.
Mapping and Measuring
A geologic map shows where different rock units appear at the surface and how old they are thought to be. Geologists also measure the direction a layer tilts, trace faults, and compare one outcrop with another. A single hillside may not tell the whole story, but several outcrops across a larger area can reveal the shape of a buried fold or the path of an old lava flow.
Samples and Lab Work
Sometimes geologists bring back samples to study in more detail. In a lab, they may cut thin slices of rock to examine minerals under a microscope, test chemical composition, or compare fossils inside one rock layer with fossils in another. These clues help confirm how a rock formed and how old it may be.
Drilling and Geophysics
Not all geology is exposed at the surface. To learn what lies below, geologists may study drill cores, well logs, seismic data, or ground-penetrating methods. This matters when searching for groundwater, oil and gas, minerals, or stable ground for building.
What Geologists Look For
Clues that help explain a rock formation- Layer order: Which beds lie above or below others?
- Rock type: Is the rock sedimentary, igneous, or metamorphic?
- Structures: Are the rocks flat, folded, broken by faults, or cut by an intrusion?
- Textures: Are grains coarse, fine, rounded, sharp, or sorted by size?
- Fossils or features: Do shells, plant remains, ripple marks, or mud cracks reveal the environment?
Why the Present Helps Explain the Past
One of the most important ideas in geology is often summed up as “the present is the key to the past.” Geologists study processes happening now because the same kinds of processes shaped Earth long ago.
If a modern river carries sand, forms point bars, and cuts into its banks, then similar patterns in ancient rock may show where a long-vanished river once flowed. If mud cracks form today when wet sediment dries out, mud cracks preserved in stone suggest an ancient surface that dried in the air. If volcanic ash settles today after an eruption, ash layers in old rock point to eruptions in the past.
This idea does not mean the past was identical to the present. Ancient climates, ocean levels, and life forms were often very different. It means the physical rules of nature stay consistent. Water still flows downhill. Sediment still settles out by size. Heat and pressure still alter rock. That consistency lets geologists test explanations instead of guessing.
A Simple Example
Imagine you find sandstone with ripple marks and mudstone full of dried cracks. A geologist might compare those features with a modern tidal flat, river edge, or shallow lake shore. That comparison does not prove every detail, but it gives a strong, evidence-based starting point. Add fossils, map data, and the position of nearby layers, and the story becomes clearer.
The official videos below give you two strong introductions before you move on. Watch for examples of observation, mapping, and present-day processes that help explain older rocks.
Official Resources
🎬 Video: Defining Geology (video) — https://youtu.be/Kv_7jt0nvHQ
🎬 Video: Introduction to Geology (video) — https://youtu.be/qNiOXc6pSBQ
Now that you understand what geology is and how geologists think, you are ready to look at something very practical: the Earth materials people extract and use every day.
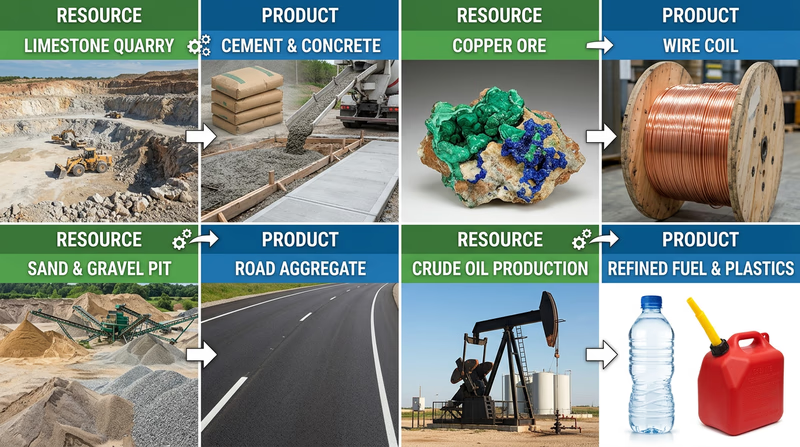
Req 2 — Resources From the Ground
Flip a light switch, drive on a highway, hold a phone, or drink from a glass bottle, and you are using geology. This requirement asks you to choose three Earth resources and tell the story of each one from discovery to processing. The best discussions do not try to cover everything on Earth. They follow three good examples in detail.
Good Resource Choices
Pick resources that are easy to explain and clearly important in daily life. Strong choices include:
- Sand and gravel for roads, concrete, and construction
- Iron ore for steel
- Copper for wiring and electronics
- Limestone for cement and crushed stone
- Coal, oil, or natural gas for energy and industry
- Lithium for batteries
- Clay for bricks, tile, and ceramics
Try choosing resources that come from different settings. For example, one metal ore, one construction material, and one fuel resource will give you more variety than picking three similar materials.
What “Discovered and Processed” Means
For each resource, be ready to explain four big steps:
- Where it forms — What geologic setting creates it?
- How it is found — What clues or tools lead geologists to it?
- How it is extracted — Is it mined, quarried, pumped, or dredged?
- How it is processed — What happens before people can use it?
Example 1: Limestone
Limestone usually forms in warm, shallow seas where shells, mud, and chemical sediments build up over time. Geologists may find it at the surface in cliffs, quarries, and road cuts or identify it on maps and drill logs. It is often quarried rather than mined underground. Once extracted, it may be crushed for road stone or heated in giant kilns to help make cement.
Example 2: Copper
Copper ore commonly forms when hot fluids move through rock and leave minerals behind. Geologists look for certain rock types, mineral stains, geophysical signals, and drill-core evidence. A copper deposit may be mined in an open pit or underground. The ore is then crushed, concentrated, smelted, and refined until the copper is pure enough for wiring and electronics.
Example 3: Sand and Gravel
Sand and gravel often come from river deposits, glacial deposits, old floodplains, and pits dug into loose sediment. They are usually easy to recognize because the grains and pebbles are visible. Extraction often happens in pits or dredged areas. Processing may include washing, sorting by size, and removing clay or unwanted material before the aggregate is sold.
Build Your Resource Discussion
Questions to answer for each of your three choices- How did this resource form? Tie it to a real geologic process.
- How do people locate it? Mention maps, surface clues, drilling, or geophysics.
- How is it removed from the ground? Name the extraction method.
- What processing makes it useful? Crushing, washing, refining, smelting, separating, or grading.
- How do people use it? Give everyday examples your counselor will recognize.
Discovery Is Part Geology, Part Problem Solving
Not every useful material is easy to spot. Some deposits are exposed right at the surface. Others are buried under soil, younger rock, or water. Geologists study maps, aerial images, stream sediments, rock chemistry, drill samples, and physical measurements from underground. They compare all of those clues before a company ever starts extraction.
Processing Changes a Raw Material Into a Product
A resource fresh out of the ground is rarely ready for immediate use. Gravel may need washing and sorting. Metal ore may need crushing, chemical separation, or melting. Oil and gas need drilling, separation, transport, and refining. That is why geology connects closely with mining, engineering, chemistry, transportation, and environmental planning.
The official video below is a good starting point because it shows that resource extraction is not one single process. Watch for how the geology of a deposit influences the way people recover it.
Official Resources
🎬 Video: Patterns of Mineral Extraction (video) — https://youtu.be/wQhFQFeYdJU
Next you will use a different geologist’s tool: the geologic map. It turns landforms, rock types, and structure into a picture you can interpret.
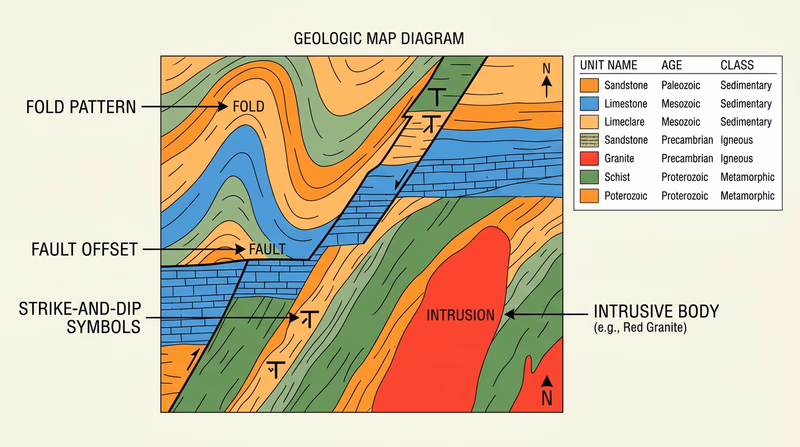
Req 3 — Geologic Maps
A geologic map can look confusing at first — bright colors, symbols, lines, and abbreviations spread across a landscape. But each color patch stands for real rock at the surface, and the symbols tell you how those rocks are tilted, broken, or related in age. Once you know how to read the legend and look for patterns, a geologic map becomes one of the most powerful tools in geology.
Start With the Legend
The legend is your translator. It explains what each color or pattern means and usually lists the rock unit name, its age, and often its rock type. Before you try to interpret anything else, find:
- The rock unit names
- The age labels
- Any notes about whether the rocks are sedimentary, igneous, or metamorphic
- Symbols showing faults, contacts, or strike and dip
Rock Classes on a Map
When you examine the units, sort them into the three major rock classes:
- Sedimentary rocks form from deposited material such as sand, mud, shells, or chemical precipitates. On maps these may appear as sandstone, shale, limestone, conglomerate, or similar units.
- Igneous rocks form from cooled magma or lava. These might appear as basalt, granite, rhyolite, diorite, and more.
- Metamorphic rocks started as older rocks but were changed by heat, pressure, or fluids. Schist, gneiss, quartzite, slate, and marble are common examples.
How to Estimate the Ages
Most maps place rock units in geologic order. Younger units may lie on top of older ones unless faulting, folding, or intrusion changed the pattern. The legend may use era and period names such as Cretaceous, Jurassic, Pennsylvanian, or Precambrian. You do not need to memorize every date, but you should notice whether your local rocks are relatively young or very old and which units are older or younger than others.
Recognizing Structure
This is where the map becomes a puzzle.
Horizontal Rocks
Horizontal rocks often appear as broad bands or areas that match the landscape without much repetition. The map may show little or no tilt in the symbols. If a sequence is not bent or broken, the pattern is usually simpler.
Folded Rocks
Folded rocks often repeat in curved or parallel bands. If layers have been bent into anticlines and synclines, the same units may show up again and again across the map. Strike-and-dip symbols may point in different directions on opposite sides of a fold.
Faulted Rocks
Faults are breaks where rocks moved. On the map they often appear as lines cutting across units and offsetting them. A rock layer that should continue smoothly may suddenly jump to a new position.
Intrusive Rocks
Intrusions are bodies of magma that pushed into older rock underground. On a map they may cut across surrounding layers instead of following them. That cross-cutting relationship is a big clue that the intrusion is younger than the rock it enters.
How to Read a Geologic Map
A step-by-step approach for your counselor discussion- Pick one map area. Do not try to interpret the whole state at once.
- Read the legend first. Match colors to rock names and ages.
- Sort the units. Decide which ones are sedimentary, igneous, or metamorphic.
- Look for patterns. Are units flat, repeated, offset, or cut by another body?
- Explain your evidence. Point to the map features that support your conclusion.
A Sample Explanation Style
A strong explanation sounds like this: “This unit is labeled limestone and dated to the Mississippian Period, so it is a sedimentary rock. The bands of rock repeat in a curved pattern, and the symbols show changing dip directions, so I think the rocks are folded. This igneous body cuts across the surrounding units, so it must be intrusive and younger than those rocks.”
That kind of answer is better than simply saying, “I think it is folded,” because it tells your counselor why you think so.
State geological surveys are often the best place to find maps, legends, and explanatory notes. Use the official resource below to locate the survey for your area or another approved area.
Official Resources
State Geological Surveys (website) Find state survey websites with geologic maps, legends, and background notes you can use for this requirement. Link: State Geological Surveys (website) — https://www.stategeologists.org/surveysYou have now practiced one of the core skills geologists use in the field. Next comes the biggest choice in the badge: which geology branch you want to explore in depth.
Req 4 — Pick Your Option
This requirement is where the Geology merit badge becomes personal. You will pick exactly one path, and each path shows a different side of geology:
- Surface and sedimentary processes focuses on streams, sediment, and land-shaping forces.
- Energy resources focuses on fuels, subsurface mapping, and exploration tools.
- Mineral resources focuses on rocks, minerals, mining, and useful materials.
- Earth history focuses on geologic time, fossils, plate tectonics, and ancient environments.
Your Options
- Req 4a — Streams Shape the Land: Run sediment experiments, calculate stream gradients, label stream features, and read clues left by flowing water. You will gain a strong feel for how erosion and deposition shape landscapes.
- Req 4b — Energy Underground: Learn how oil, gas, coal, and electricity resources connect to geology. You will gain practice with exploration tools, subsurface maps, and how geologists investigate buried resources.
- Req 4c — Rocks, Minerals, and Society: Study rock classes, mineral properties, collections, road materials, and mining or construction uses. You will gain practical rock-and-mineral knowledge that connects geology to everyday materials.
- Req 4d — Deep Time and Ancient Worlds: Explore the geologic timescale, plate tectonics, fossilization, ancient habitats, and fossil interpretation. You will gain the best look at Earth’s long history and how geologists reconstruct lost worlds.
How to Choose
Choosing Your Option
Match the path to your interests and resources- If you like hands-on outdoor observation: Option A is great because streams, sediment jars, and topographic maps are easy to work with.
- If you enjoy technology, maps, and hidden underground structures: Option B gives you the strongest exploration-and-engineering flavor.
- If you like collecting, classifying, and learning what materials are made of: Option C gives you the broadest rock-and-mineral foundation.
- If you love fossils, dinosaurs, ancient oceans, and Earth’s history: Option D gives you the deepest time perspective.
- If access matters: Option A and much of Option C can often be done with nearby natural areas and simple supplies, while some parts of Options B and D may depend more on counselor-provided data or approved visits.
| Option | Best For | Main Skills You Build |
|---|---|---|
| 4a | Scouts who like streams, field clues, and simple experiments | Erosion, deposition, topographic interpretation |
| 4b | Scouts curious about fuels and subsurface geology | Resource exploration, mapping, energy geology |
| 4c | Scouts who enjoy specimens and practical materials | Rock classes, mineral properties, mining uses |
| 4d | Scouts fascinated by fossils and deep time | Paleoenvironments, tectonics, Earth history |
No matter which option you choose, keep using the same geology habits you learned earlier: observe carefully, organize your evidence, and explain how you reached your conclusion.
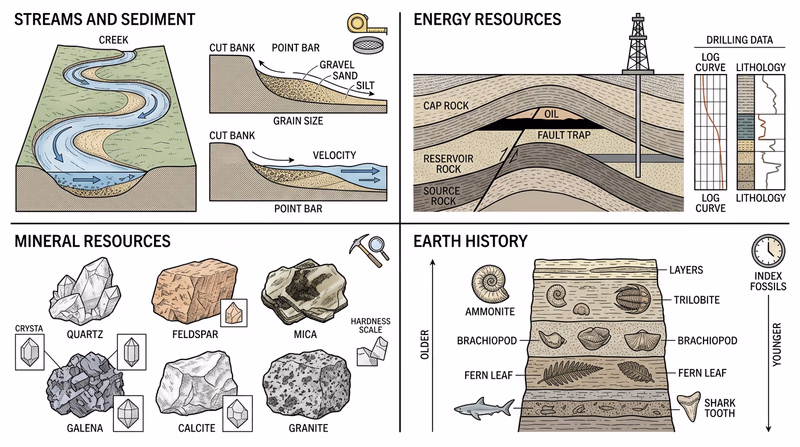
Req 4a — Streams Shape the Land
This option follows moving water from jar-sized experiments all the way to real stream channels. You will test how sediment settles, measure gradients, identify stream features, notice very fine suspended material, and then apply all of that to an outdoor observation.
What You’ll Complete
- Req 4a1 — Sediment Settling: Run a simple approved experiment to see how suspended sediment settles by size and weight. You will gain a visual understanding of sorting and deposition.
- Req 4a2 — Stream Gradients: Use topographic maps to calculate gradient for four stream types. You will gain practice connecting slope to speed and sediment transport.
- Req 4a3 — Reading Stream Features: Label cut banks, point bars, deltas, and bars on a stream diagram. You will gain vocabulary for how channels move and sort sediment.
- Req 4a4 — Tiny Sediment, Big Clues: Show that some water-carried sediment is too small to see without magnification. You will gain a better idea of how muddy water can still hide even finer particles.
- Req 4a5 — Clues in a Dry Streambed: Visit a stream and read the evidence of flow direction from the land itself. You will gain field-observation skills that pull the whole option together.
How to Work Through This Option
Start with the small-scale experiments first. They make the outdoor observations easier to understand later. As you go, keep a notebook with sketches, simple calculations, and short explanations of what each activity showed. That record will help when you discuss the option with your counselor.
Streams are some of the best geology teachers because they are always moving sediment and reshaping the land in visible ways.
Req 4a1 — Sediment Settling
Shake a jar of muddy water and, for a few seconds, it can look like one uniform mixture. Wait a little longer and the materials start separating. Gravel drops first, then sand, then silt, while the finest clay may stay cloudy for a long time. That simple experiment reveals one of the most important ideas in sedimentary geology: moving water sorts material.
What This Experiment Demonstrates
Suspended sediment does not all settle at the same rate. Larger, denser grains usually fall faster because gravity overcomes water resistance more easily. Smaller grains settle more slowly, and some may remain suspended for a long time if the water is still slightly moving.
That matters because natural water systems sort sediment constantly. Streams, lakes, and deltas create different layers and grain sizes depending on water speed and how long sediment stays in suspension.
A Simple Approved Setup
Your counselor may suggest a jar test, clear cylinder, bottle, or beaker. A common version uses a clear container filled with water and mixed sediment such as gravel, sand, silt, and clay-rich soil.
- Add water and sediment to the container.
- Shake or stir until the sediment is suspended.
- Set the container down and watch what settles first.
- Record what you see after a few seconds, one minute, five minutes, and later if needed.
- Sketch the layers that form.
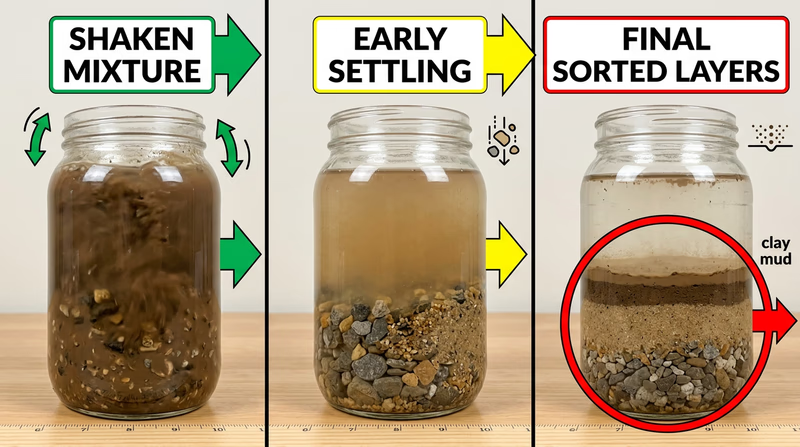
The point is not fancy equipment. The point is careful observation.
What to Record
Useful observations for your notebook- What materials were in the mixture? Gravel, sand, silt, clay, organic bits?
- Which grains settled first? Note the order.
- How long did the water stay cloudy? That shows how long the smallest particles remained suspended.
- Did distinct layers form? Describe or sketch them.
- What does this suggest about natural water? Connect the jar to streams, ponds, or deltas.
Why It Is Important
This experiment helps explain how sedimentary layers form in nature. Fast-moving water can carry bigger particles. When water slows down, those particles settle out first. That is why a river channel may deposit sand and gravel while a quiet lake bottom collects much finer mud. Over time those deposits can harden into rock.
It also helps explain why geologists pay attention to grain size. A rock made of coarse rounded pebbles tells a different story from a thin layer of fine clay. One suggests stronger current energy. The other suggests calmer water.
Explaining the Results to Your Counselor
A strong explanation might sound like this: “The coarsest grains settled first, and the water stayed cloudy because the finest sediment remained suspended longer. This matters because streams and lakes sort sediment by energy level. The size of the grains in a layer can tell us about how fast the water was moving when that layer formed.”
The official videos below show the same idea in action from a few different angles.
Official Resources
🎬 Video: Stream Erosion and Stream Deposition (video) — https://youtu.be/YoZZZQ2lxOc
🎬 Video: Sediment Settlement Lab (video) — https://youtu.be/p4K5N6WuVoA
🎬 Video: Separate Soil! (video) — https://youtu.be/BVWIspB8qWk
Now that you have seen sediment sorting in a container, the next step is to scale up and compare how different kinds of streams move across real landscapes.
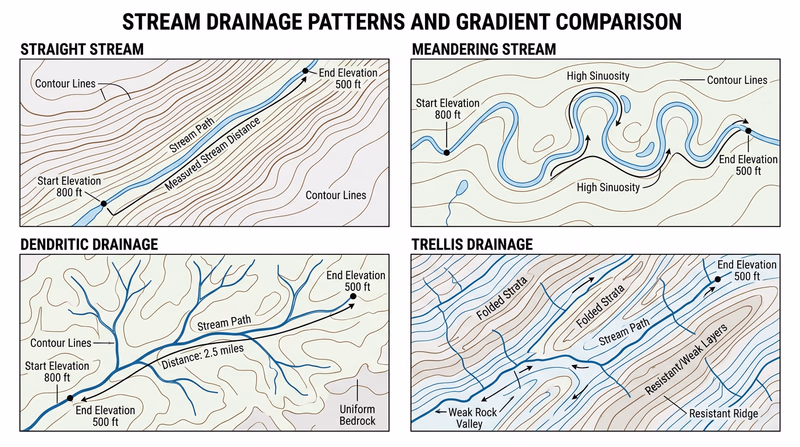
Req 4a2 — Stream Gradients
A stream does not need to look wild to be powerful. The slope of the land underneath it matters a lot. A stream dropping quickly over a short distance usually has more energy than one crossing a broad, gentle floodplain. Gradient gives you a way to compare that energy.
What Gradient Means
Gradient is the change in elevation divided by the distance over which that change happens. In simple terms, it tells you how steep the stream is.
- A high gradient stream drops a lot over a short distance.
- A low gradient stream drops only a little over the same distance.
Higher gradient often means faster water, more erosion, and a better ability to move larger sediment.
The Four Stream Patterns
Your maps may show four drainage styles named in the requirement:
- Straight — a relatively direct channel, often controlled by slope, structure, or confinement.
- Meandering — a winding channel with bends, common on flatter ground.
- Dendritic — a branching pattern that looks like tree limbs, common where rock types are fairly uniform.
- Trellis — a network with main streams and short side streams joining at near-right angles, often influenced by alternating hard and soft rock or folded terrain.
These names describe pattern, not just speed. That is why you need the map and gradient calculation together.
How to Calculate It
- Pick two points on the stream segment your counselor wants you to compare.
- Read the elevation at both points from contour lines or labeled elevations.
- Subtract the lower elevation from the higher elevation.
- Measure the distance between those points along the stream path.
- Divide elevation change by distance.
Gradient Workflow
Use the same method for all four stream types- Mark the start and end points clearly.
- Write down both elevations.
- Calculate the elevation drop.
- Measure the channel distance, not straight-line distance.
- Keep your units consistent. Feet per mile or meters per kilometer both work.
Which Streams Carry Larger Sediment?
In general, streams with more energy can carry larger grains. Energy depends on several things, but gradient is a major factor. A steep stream is more likely to move gravel, pebbles, or even cobbles than a slow lowland stream. A meandering stream on a gentle floodplain is more likely to deposit sand, silt, and mud in many locations.
That does not mean every straight stream is faster than every meandering stream. The pattern type alone does not answer the question. Your actual map measurements do.
How to Explain Your Conclusion
Your counselor is looking for reasoning, not just numbers. A good answer sounds like this: “This stream had the highest calculated gradient, so the water should flow faster and have more power to move larger grains. The lower-gradient meandering stream would lose energy more easily and deposit finer sediment.”
The official video below walks through the idea of slope calculation so you can check your math method.
Official Resources
🎬 Video: How to Calculate the Gradient of a Slope (video) — https://youtu.be/3QFJ_uv2mGw
Next you will move from maps to a stream diagram and identify the features produced by flowing water as channels bend and deposit sediment.
Req 4a3 — Reading Stream Features
A meandering stream is always doing two jobs at once: eroding in some places and depositing in others. If you can spot where the current is strongest and where it slows down, you can predict what features will form and what sediment size is most likely to collect there.
The Main Features
Cut Bank
A cut bank forms on the outside of a bend where water moves faster and erodes the bank. Because the flow has more energy there, finer material may be swept away and the bank may expose coarser layers or fresh sediment.
Fill Bank and Point Bar
A fill bank or point bar forms on the inside of a bend where water slows down and drops sediment. Point bars often contain sand and finer gravel because the current loses energy compared with the outside bend.
Medial Channel Bars
A medial channel bar forms in the middle of a channel or between split channels where sediment piles up. These bars often contain sand and gravel, especially where the stream still has enough power to carry coarse material but not enough to keep it moving all the way downstream.
Lake Delta
A delta forms where a stream enters a lake or other still body of water. The stream suddenly loses energy, so coarser material drops first near the mouth while finer silt and clay travel farther out into quieter water.
Relative Grain Size
The requirement asks for relative grain size, which means you are comparing one area with another rather than giving exact measurements.
| Feature | Typical Relative Grain Size | Why |
|---|---|---|
| Cut bank | Often coarser or mixed exposed material | Fast current erodes and removes finer particles more easily |
| Fill bank / point bar | Fine to medium sand, sometimes fine gravel | Slower water deposits sediment on the inside of bends |
| Medial channel bar | Sand to gravel | Sediment drops where the flow splits or slows enough in-channel |
| Lake delta near stream mouth | Coarse to medium near the front, finer outward | Energy drops quickly as stream water enters still water |
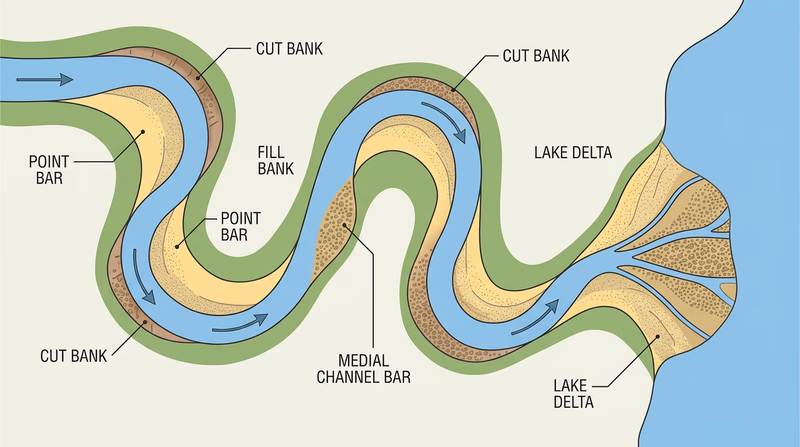
How to Explain It Clearly
A strong answer connects the feature to water energy. For example: “I put the point bar on the inside of the bend because the water slows there and deposits sediment. I would expect finer or medium grains there compared with the faster outside bank.”
The official video below is useful because it focuses specifically on two of the most important stream features in this requirement.
Official Resources
🎬 Video: Point Bars and Cut Banks (video) — https://youtu.be/gjIrApP2tt8
Next you will focus on a detail that is easy to miss in the field: sediment so fine that you may not notice it without magnification.
Req 4a4 — Tiny Sediment, Big Clues
A stream can look clear enough to wade, yet still be carrying a huge load of very fine sediment. Some grains are too small to pick out with your eyes alone, especially once they spread through moving water. This requirement helps you realize that what you cannot easily see can still matter a lot in geology.
Why Fine Sediment Matters
Very fine sediment such as silt and clay affects water color, settling behavior, habitat quality, and the kinds of layers that may later form into rock. It also changes how geologists interpret old deposits. A rock that formed from tiny grains tells a different environmental story from one made of visible sand or pebbles.
Experiment Ideas
Your counselor may approve a comparison such as:
- Water with visible sand versus water with very fine muddy sediment
- A dried sample examined with and without a hand lens
- A settling test that leaves a thin layer of fine material only visible up close
The key is to compare what you notice with your unaided eye and what becomes obvious when you use a magnifier or hand lens.

Observation Questions
Focus on what changed when you used magnification- Could you see individual grains before magnifying?
- What details appeared with the hand lens? Grain size, shape, color, or mixed materials?
- Did the fine material settle into a thin layer?
- How would fast or slow water affect whether this material stayed suspended?
The Geology Lesson
Fine sediment can travel farther than coarse sediment because it stays suspended more easily. That means a quiet pond, lake bottom, or floodplain may collect material too fine to notice in moving water. Over time, those tiny grains can build mud layers that preserve details about calm-water environments.
Explaining the Result to Your Counselor
You might say: “The water looked almost uniform at first, but the magnifier showed very fine particles that were hard to see with the naked eye. This matters because streams can carry tiny sediment that settles later in quieter water, creating fine-grained deposits.”
Official Resources
🎬 Video: Sediment in Streams (video) — https://youtu.be/-tDOu1vrNHY
Now you are ready for the field step in this option: visiting a real stream and reading the clues water leaves behind.
Req 4a5 — Clues in a Dry Streambed
An empty stream channel is not silent to a geologist. Even when the water is gone, the banks, gravel bars, ripple marks, and deposited branches can still show where the current moved and where it had enough energy to erode or deposit material.
Clues to Flow Direction
Look for evidence that points downstream or shows where the current was stronger.
- Point bars: These build on the inside of bends where water slows.
- Cut banks: These form on the outside of bends where erosion is stronger.
- Ripple marks or small dunes: Their shapes can show current direction.
- Imbricated pebbles: Flat pebbles may lean in a preferred direction in flowing water.
- Log jams and debris: Sticks and plant material often pile up on the downstream side of obstacles.
- Channel shape: Narrower, deeper zones may mark the stronger flow path.
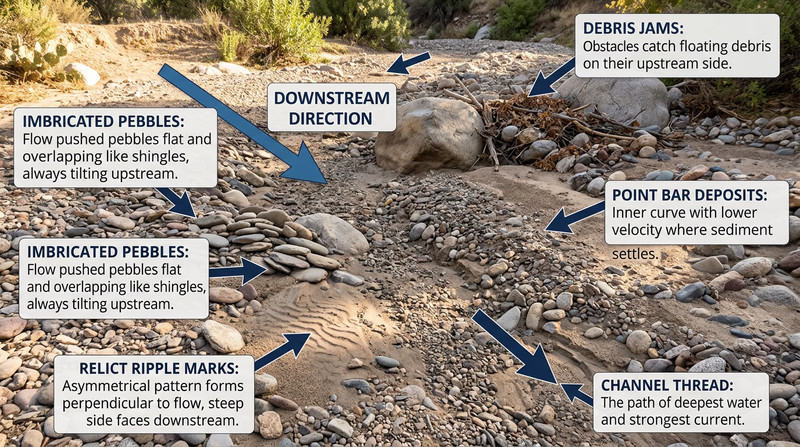
What to Put in Your Notebook
Record more than a sentence or two. Your notebook should help you reconstruct the site later.
Field Notes for This Visit
What to capture while you are on site- Date, time, and location
- Weather and recent rain conditions
- Whether water was flowing, standing, or absent
- At least three clues to flow direction
- A sketch of the channel or one important feature
- Your conclusion about the likely direction of flow
Sketches Matter
A sketch does not have to be artistic. It just needs to show what you noticed. Label the inside and outside of bends, bars, banks, ripple shapes, or debris piles. This is exactly the kind of field habit geologists use because sketches force you to look carefully.
The official resource below focuses on noticing current behavior and surface clues, which is exactly the habit you need here.
Official Resources
🎬 Video: How to Read Water (video) — https://youtu.be/jOQmN7EM5NE?si=bJIlc6F0lRcJR8oy
You have now finished the stream and sediment option. The next pages shift to a different geology path focused on energy resources underground.
Req 4b — Energy Underground
This option is about geology beneath the surface. You will connect energy use in the United States to the rocks and structures that hold fuels underground. You will also practice one of the most important exploration ideas in geology: using limited data to map what you cannot directly see.
What You’ll Complete
- Req 4b1 — Power Sources in the United States: Identify the major Earth resources used to generate electricity. You will gain national-scale context for energy geology.
- Req 4b2 — Source, Trap, and Reservoir: Learn the three-part system needed for oil and gas accumulation. You will gain the key vocabulary of petroleum geology.
- Req 4b3 — Tools for Finding Oil and Gas: Study exploration tools from seismic surveys to core samples. You will gain a look at how geologists investigate hidden structures.
- Req 4b4 — Subsurface Structure Maps: Build a map from counselor-provided data points. You will gain real practice turning numbers into a geologic picture.
- Req 4b5 — Show or Visit a Drilling Operation: Choose either a presentation path or an approved field visit. You will gain a chance to communicate or observe real-world exploration work.
How to Approach This Option
Keep a notebook page just for terms and diagrams. This option uses several technical words, and a labeled sketch of a trap, well log, or structure map will help more than trying to remember definitions in your head.
You are about to look at the geology behind the electricity people depend on every day.
Req 4b1 — Power Sources in the United States
This requirement sounds simple, but it is more useful than it first appears. It reminds you that geology is tied directly to modern energy systems. Electricity does not come from a wall outlet by magic. It comes from fuels and materials that were formed in Earth systems and then extracted for human use.
What Counts as an Earth Resource?
For this requirement, focus on resources that come from the Earth and are used directly or indirectly to produce electricity. A current top-five list may change over time, so use the most recent official data your counselor prefers. In recent years, major sources have commonly included:
- Natural gas
- Coal
- Uranium used in nuclear power
- Water used in hydropower
- Wind and other renewables may appear in broader electricity discussions, but this requirement specifically pushes you to think about Earth resources and geology-linked energy sources
Depending on how your counselor interprets the wording and the latest national data, you may want to discuss how natural gas and coal dominate fuel-based generation while uranium and water also matter.
Why This Matters in Geology
Each energy source connects to a different geologic story:
- Coal formed from ancient plant material buried, compressed, and altered over time.
- Natural gas formed from organic-rich source rocks and accumulated in traps.
- Uranium comes from mineral deposits that must be found and mined.
- Hydropower depends on landforms, drainage, and water movement shaped by geology.
Official Resources
Electric Power Monthly (website) Current U.S. electricity-generation data you can use to identify the major resources contributing to national power production. Link: Electric Power Monthly (website) — https://www.eia.gov/electricity/monthly/epm_table_grapher.php?t=table_es1aNow that you have the big-picture energy list, the next step is to understand what must happen underground before oil and gas can collect in one place.
Req 4b2 — Source, Trap, and Reservoir
Oil and gas do not just sit in giant underground caves waiting to be found. They are part of a geologic system. If one key piece is missing, the resource may never accumulate in a useful amount.
The Three Essential Parts
Source Rock
A source rock is the rock where the organic material originally built up and, under heat and pressure, was transformed into oil or gas. These are often fine-grained sedimentary rocks such as shale rich in ancient microscopic life or plant material.
Reservoir Rock
A reservoir rock is the rock that can store oil or gas. It needs enough porosity for fluids to occupy open spaces and enough permeability for fluids to move through connected spaces. Sandstone and some limestones are common examples.
Trap
A trap is the geologic arrangement that stops oil or gas from continuing to migrate upward. Without a trap, the fluids may escape. Traps can be structural, like an anticline or fault trap, or stratigraphic, where rock layers change in a way that blocks movement.
How the Pieces Work Together
- Organic-rich sediment becomes a source rock.
- Heat and pressure generate oil or gas.
- The fluids migrate through permeable pathways.
- The fluids collect in a porous reservoir rock.
- A trap and seal keep them from escaping farther upward.
If you are missing the source, there is no petroleum to begin with. If you are missing a good reservoir, there is nowhere practical for it to collect. If you are missing a trap, it may leak away.
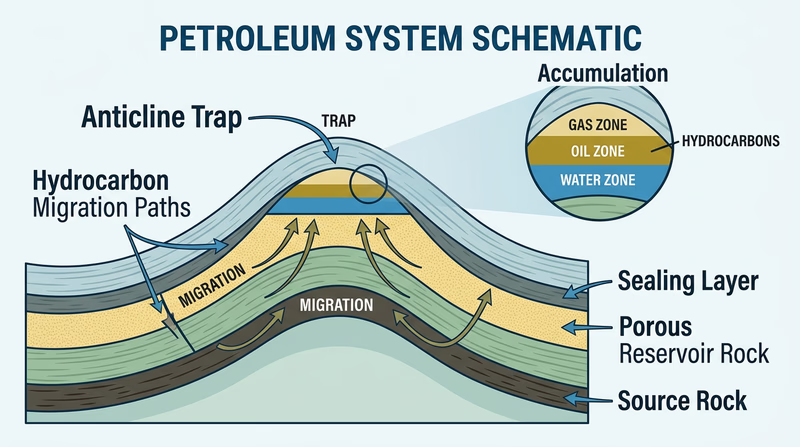
Three-Part Petroleum System
What to mention when you discuss this with your counselor- Source rock: where hydrocarbons form
- Reservoir rock: where hydrocarbons collect and can be stored
- Trap: what keeps them from migrating away
- Seal: often a low-permeability layer such as shale that helps hold the trap closed
Official Resources
🎬 Video: Formation of Reservoir Rock (video) — https://youtu.be/_PDOD_FEnNk
Up next, you will look at the tools geologists use to find these hidden systems underground.
Req 4b3 — Tools for Finding Oil and Gas
Geologists cannot usually see an oil or gas reservoir directly. Instead, they build an underground picture from many partial clues. Each tool in this requirement adds one piece of that hidden puzzle.
The Exploration Tools
Reflection Seismic
Reflection seismic sends energy waves into the ground and records how they bounce back from different rock layers. This helps geologists map buried structures such as folds, faults, and possible traps.
Electric Well Logs
Electric well logs measure properties inside a borehole, such as resistivity and natural radiation. These data help geologists identify rock types, fluids, porosity, and layer boundaries.
Stratigraphic Correlation
Stratigraphic correlation means matching rock layers from one location to another. Geologists compare rock type, fossils, well-log patterns, and position in the sequence to trace units across a region.
Offshore Platform
An offshore platform is not just a drilling structure. It is also a working place where geologists and engineers gather data, monitor drilling, and investigate offshore resources.
Geologic Map
A geologic map shows what is exposed at the surface. Even if the target resource is buried, surface patterns often reveal folds, faults, rock ages, and structures that continue underground.
Subsurface Structure Map
A subsurface structure map shows the shape or elevation of a buried layer. It helps geologists locate highs, lows, domes, and traps that may hold oil or gas.
Subsurface Isopach Map
An isopach map shows thickness variation of a rock unit. Thickness changes can reveal ancient channels, basins, depositional centers, and places where reservoir quality may differ.
Core Samples and Cutting Samples
Core samples are cylinders of rock brought up intact. Cutting samples are small rock fragments produced while drilling. Both let geologists examine the actual rock instead of only indirect data.
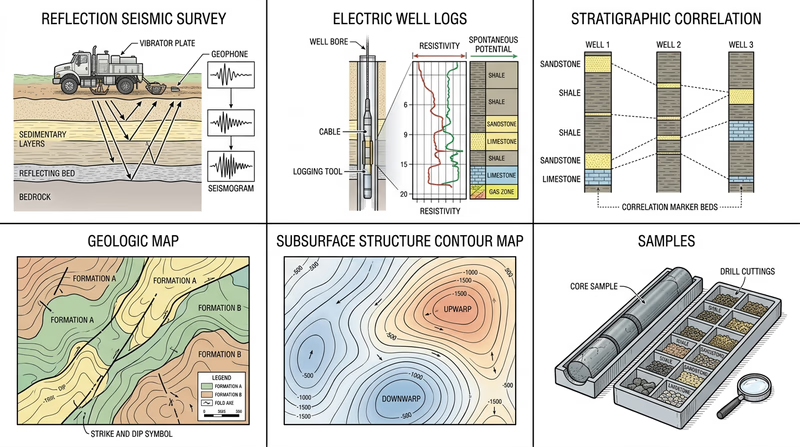
What Each Tool Answers
Think of exploration as a set of geology questions- What structures are underground? Reflection seismic, structure maps
- What rock is present in the well? Well logs, cores, cuttings
- How do layers connect regionally? Stratigraphic correlation, geologic maps
- How thick is the unit? Isopach maps
- How do offshore geologists gather direct data? Platforms, drilling, samples
Official Resources
🎬 Video: Using 3D Seismic Exploration to Find and Drill for Oil and Natural Gas Sources (video) — https://youtu.be/8h35KsRD0c0
Your next page turns this idea into action by having you build and interpret a subsurface structure map from real data points.
Req 4b4 — Subsurface Structure Maps
This is one of the most authentic geology tasks in the badge. You are taking scattered data points — probably depths or elevations from wells — and turning them into a map that shows the shape of a buried surface. That is exactly the kind of interpretation geologists use when searching for resources.
What a Structure Map Shows
A structure map connects equal values, often with contour lines, to reveal highs, lows, folds, and closures on a buried rock layer. If the buried layer arches upward into a dome or anticline and has the right rock properties, it may help form a trap.
Basic Workflow
- Plot each counselor-provided data point in the correct location.
- Write the value at each point.
- Look for the general pattern of increasing and decreasing values.
- Draw contour lines connecting equal values smoothly.
- Interpret the finished map.
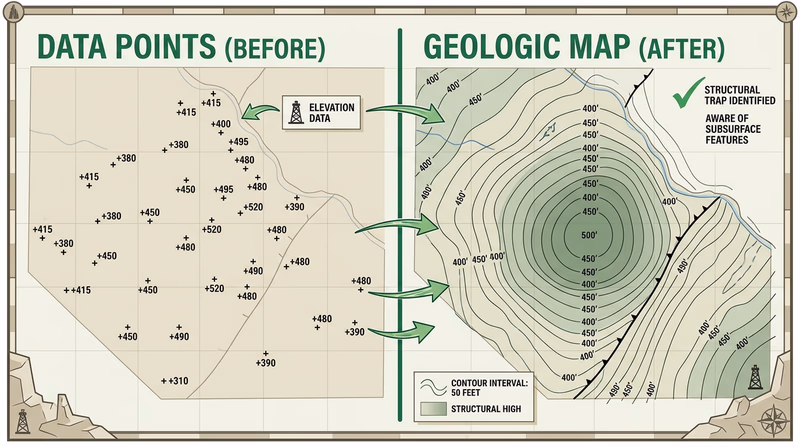
What to Look For
- Structural highs may be promising places for accumulated oil or gas.
- Structural lows can show basins or deeper parts of the subsurface.
- Closed contours may indicate domes or traps.
- Abrupt pattern changes may suggest a fault or other structure.
Explain Your Finished Map
What your counselor will want to hear- What buried surface did you map?
- Where are the highs and lows?
- Do the contours suggest a fold, fault, dome, or basin?
- Why could this matter for oil, gas, or coal?
- What additional data would make the interpretation stronger?
If you did Req 3 carefully, you already have a head start. Both geologic maps and subsurface maps depend on the same habit: turning patterns into explanations supported by evidence.
Official Resources
There is no official resource link for this page, so focus on your counselor’s data set and your own mapping work.
You are almost done with the Energy Resources option. The last step is choosing whether to present what you learned or visit a real drilling operation.
Req 4b5 — Show or Visit a Drilling Operation
You must choose exactly one of these two paths:
- Req 4b5a asks you to create and share a short display or presentation.
- Req 4b5b asks you to arrange an approved visit to an operating drilling rig.
Your Options
- Req 4b5a — Present How Fuels Are Found: Build a five-minute explanation of how oil, gas, or coal is found, extracted, and processed. This option is best if you like organizing information and teaching others.
- Req 4b5b — Visit a Drilling Rig: Observe real drilling work with parent or guardian and counselor permission. This option is best if you want first-hand exposure to industry work and field questions.
How to Choose
Presentation or Visit?
Compare the two choices- Time and access: A presentation is easier if you do not have a rig nearby.
- Direct experience: A visit gives you the strongest real-world view.
- What you gain: The presentation builds communication skills; the visit builds observation and interview skills.
- Preparation needed: Both require planning, but the visit depends on scheduling, permission, and site access.
Req 4b5a — Present How Fuels Are Found
This option asks you to teach the story of a resource from the ground to society. A good five-minute presentation does not try to cover everything. It follows a simple sequence that your audience can remember.
A Strong Presentation Structure
- What is the resource? Oil, gas, or coal
- Where does it come from geologically? Source rock, depositional environment, burial, and structure
- How is it found? Maps, seismic data, drilling, samples, or wells
- How is it extracted? Surface mine, underground mine, drilling, pumping
- How is it processed and used? Refining, cleaning, transport, electricity generation, manufacturing
Display Ideas
- A simple cross-section showing source, reservoir, and trap
- A sequence of pictures showing exploration, extraction, and processing
- A map of where the resource is common in the United States
- A short chart comparing how oil/gas differs from coal
Five-Minute Presentation Tips
Keep it organized and easy to follow- Lead with one clear topic. Do not switch between oil, coal, and gas unless you are comparing them carefully.
- Use geology words correctly. Explain source rock, reservoir, seam, trap, or basin in simple language.
- Show the process in order. Formation → discovery → extraction → processing → use.
- Practice out loud. Five minutes goes quickly.
Official Resources
There is no official resource link for this page, so build your presentation from the research and concepts you learned on the previous Energy Resources pages.
Even if you choose this presentation path, it helps to understand what a real drilling site looks like. That is what the next page covers.
Req 4b5b — Visit a Drilling Rig
A drilling rig visit can turn a textbook idea into something real fast. Instead of imagining buried formations, you get to see the machinery, samples, and decision-making that help geologists understand what is happening underground.
What to Observe Onsite
You may see drilling equipment, mud systems, logs, maps, sample trays, and safety controls. The geologist or mud logger may be watching cutting samples from the well, checking rock types, and comparing them with the expected subsurface sequence.
Good Questions to Ask
Questions for the Onsite Geologist
Pick a few and write down the answers- What formation are you drilling through right now?
- How do cutting samples help you know where you are underground?
- What signs tell you the rock type has changed?
- How are maps and well logs used during drilling?
- What safety rules are most important on this site?
Why Cutting Samples Matter
Cuttings are the small rock fragments brought up during drilling. They may not be as perfect as a core sample, but they still tell geologists what rock types the drill bit is passing through. That helps confirm whether the well is reaching the right depth or formation.
Official Resources
There is no official resource link for this page. Focus on your approved visit, the samples you see, and the answers you collect from the geologist.
You have now finished the Energy Resources option. The next branch turns to rocks, minerals, and materials used all around you.
Req 4c — Rocks, Minerals, and Society
This option moves from basic definitions to real-world use. You will study the three rock classes, learn how minerals are identified, choose a collection or identification path, connect geology to roads and construction, and finish with a visit or investigation that shows how society depends on Earth materials.
What You’ll Complete
- Req 4c1 — The Three Rock Classes: Define rock and compare igneous, sedimentary, and metamorphic origins. You will gain the core classification system of geology.
- Req 4c2 — What Makes a Mineral: Define mineral and learn the physical properties geologists use for identification. You will gain hands-on vocabulary for mineral testing.
- Req 4c3 — Collect or Identify Specimens: Choose a 10-specimen collection or a 15-specimen identification path. You will gain either a personal set of labeled materials or strong specimen-recognition practice.
- Req 4c4 — Road-Building Materials: Connect common materials in your area to quarrying, crushing, and construction use. You will gain a practical look at geology in everyday infrastructure.
- Req 4c5 — Visit or Investigate Resource Use: Choose a field visit or discussion path tying geology to mining, materials, or engineering. You will gain a direct connection between rocks and society.
How to Approach This Option
This branch works best if you keep labels, notes, and specimens organized from the start. A notebook table with name, rock or mineral, origin, properties, and where found will help across several pages.
The first step is learning the rock classes that geologists use as a foundation for almost everything else.
Req 4c1 — The Three Rock Classes
A rock is not just “a thing you pick up outside.” In geology, a rock is a naturally occurring solid material made of one or more minerals, mineraloids, volcanic glass, or fragments of older rocks. The important part is how it formed, because that is what places it into one of the three major rock classes.
The Three Rock Classes
Igneous Rocks
Igneous rocks form when molten material cools and hardens. If magma cools underground, crystals usually have more time to grow and the rock may be coarse-grained, like granite. If lava cools at the surface, crystals may stay tiny and the rock can be fine-grained, like basalt.
Sedimentary Rocks
Sedimentary rocks form from deposited material that is compacted or cemented over time, or from chemical or biological accumulation. Sandstone, shale, limestone, and conglomerate are classic examples. Sedimentary rocks often preserve layers, fossils, ripple marks, or mud cracks.
Metamorphic Rocks
Metamorphic rocks begin as older rocks but change because of heat, pressure, and chemically active fluids. The rock does not fully melt. Instead, its minerals recrystallize or realign. Slate, schist, gneiss, quartzite, and marble are common examples.
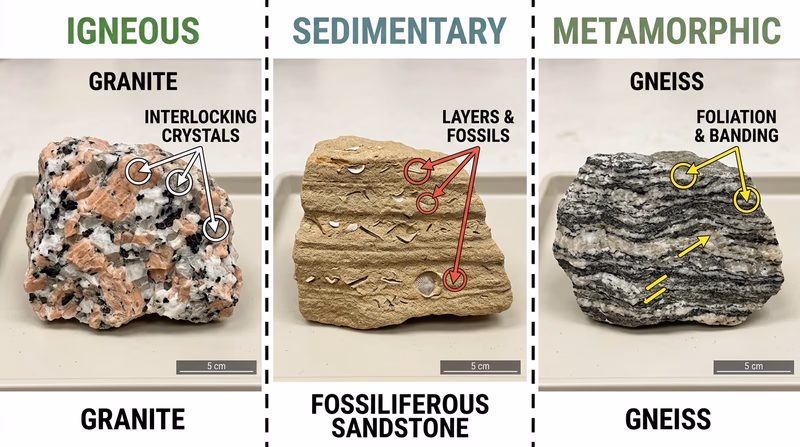
How to Tell Them Apart
Clues to Rock Class
Questions to ask when you hold a specimen- Are there visible layers or fossils? Often points to sedimentary rock.
- Are the crystals interlocked from cooling? Often points to igneous rock.
- Are the minerals stretched, flattened, or banded? Often points to metamorphic rock.
- Does the rock look like it changed from an older rock under heat and pressure? That supports a metamorphic origin.
Why Origin Matters
Two rocks can look similar at first glance but tell different stories. A fine-grained dark igneous rock and a dark metamorphic rock may both seem “black and hard,” but one records cooling magma while the other records pressure and heat acting on an older rock. Geology is always about the story behind the specimen.
Official Resources
🎬 Video: Rocks for Kids (video) — https://youtu.be/xsHPA2GNF9Q
🎬 Video: Types of Rocks (video) — https://youtu.be/KtbAEYwkC1E
Next you will zoom in from rocks to the minerals that make many rocks up and learn the property tests geologists use for identification.
Req 4c2 — What Makes a Mineral
A mineral is a naturally occurring, inorganic solid with a definite chemical composition and an ordered crystal structure. That sounds technical, but each part matters. Minerals form in nature, are not living, stay solid under ordinary conditions, have chemistry that fits within a specific range, and build their atoms in repeating patterns.
Where Minerals Come From
Minerals form in several ways:
- Cooling magma or lava can grow crystals such as quartz, feldspar, and olivine.
- Evaporating water can leave minerals such as halite and gypsum behind.
- Hot fluids underground can deposit ore minerals in cracks and veins.
- Metamorphism can create new minerals as heat and pressure change older rocks.
Mineral Identification Properties
Hardness
Hardness is a mineral’s resistance to scratching. Geologists compare hardness using the Mohs scale, where talc is very soft and diamond is hardest.
Specific Gravity
Specific gravity compares how heavy a mineral feels relative to an equal volume of water. Some minerals feel surprisingly heavy for their size.
Color
Color can be useful, but it is not always reliable because impurities may change it.
Streak
Streak is the color of the mineral’s powdered form when rubbed on an unglazed streak plate. It is often more reliable than surface color.
Cleavage
Cleavage describes the way a mineral breaks along flat planes related to its crystal structure.
Luster
Luster is how light reflects from a mineral surface — metallic, glassy, pearly, dull, and more.
Crystal Form
Crystal form describes the outward shape a mineral tends to grow when it has room. Quartz often forms six-sided prisms, while halite tends to form cubes.
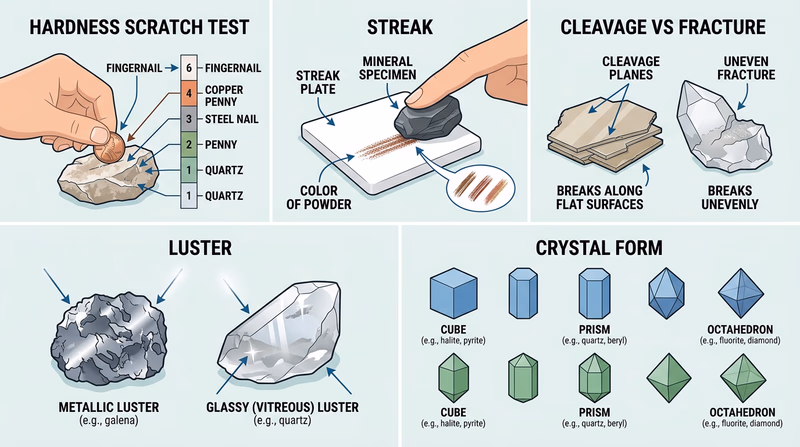
Best Mineral-ID Habit
Do not rely on only one property- Start with luster and hardness.
- Check streak if it is safe to test.
- Look for cleavage or fracture.
- Notice crystal form if visible.
- Use several clues together before naming the mineral.
Official Resources
🎬 Video: Rocks and Minerals (video) — https://youtu.be/24O79WgKZO8
🎬 Video: Identifying Rocks and Minerals - Using Physical Properties for Identification (video) — https://youtu.be/M4rzNUZFV4w?si=U7wiitA6iPA-bScM
The next page gives you a choice: build a collection of ten specimens or identify fifteen with your counselor’s help.
Req 4c3 — Collect or Identify Specimens
You must choose exactly one of these two paths. Both strengthen your observation skills, but they ask you to show them in different ways.
Your Options
- Req 4c3a — Build a 10-Specimen Collection: Gather and label ten rocks or minerals, record where each came from, and identify class, origin, composition, and properties. You will gain a personal reference collection.
- Req 4c3b — Identify 15 Specimens: Work with your counselor to identify fifteen rocks and minerals. You will gain more direct practice recognizing specimens accurately.
How to Choose
Collection or Identification?
Which path fits you better?- Choose 4c3a if you like organizing, labeling, and keeping a set of specimens.
- Choose 4c3b if you want more guided identification practice without building a permanent collection.
- What you gain: 4c3a builds recordkeeping and classification; 4c3b builds fast observation and comparison skills.
Req 4c3a — Build a 10-Specimen Collection
A good geology collection is not about owning the rarest or prettiest pieces. It is about building a set of specimens that teaches you something. Each specimen should have a label, a source, and a reason you chose it.
What to Record
For each specimen, include:
- Name
- Whether it is a rock or a mineral
- Rock class or mineral identity
- Origin
- Chemical composition if you can determine it
- Physical properties
- Where you obtained it
What Makes a Strong Collection
Try to include variety. A collection with ten different-looking pieces is good, but a collection that also represents several geologic processes is even better.
Collection Tips
Build a set that helps you learn- Include more than one rock class if possible.
- Write labels right away. Unlabeled specimens become mysteries fast.
- Use clear storage. Egg cartons, specimen boxes, or labeled bags can work.
- Keep location notes. “Found at creek gravel bar” is much better than “found outside.”
Official Resources
There is no official resource link for this page. Your notebook, labels, and specimen observations are the most important resources here.
Even if you choose this collection path, the next page is still worth understanding because it strengthens your specimen-identification skills.
Req 4c3b — Identify 15 Specimens
This option is about careful comparison. You do not need to own every specimen. You need to observe them closely enough to decide what they are and explain why.
A Good Identification Routine
- Decide whether the specimen is a rock or a mineral.
- If it is a rock, ask which class it belongs to.
- If it is a mineral, list the physical properties that support your identification.
- Record your answer clearly in your notebook.
Helpful Questions
- Does it look like one mineral or a mixture?
- Are there visible layers, crystals, or foliation?
- What is the hardness?
- Does it show cleavage, fracture, or streak?
- What is the luster?
Official Resources
There is no official resource link for this page. Work directly with your counselor and the specimens available to you.
The next requirement takes mineral resources out of the collection box and into everyday infrastructure by looking at road-building materials.
Req 4c4 — Road-Building Materials
Roads are geology you drive on. Under the pavement or concrete are crushed rock, sand, gravel, and other materials chosen for strength, drainage, and durability. This requirement asks you to connect a local road to the materials that make it possible.
Common Road Materials
Depending on your area, common materials may include:
- Crushed limestone or dolostone
- Granite or basalt aggregate
- Sand and gravel
- Asphalt mix components
- Concrete aggregate
What to Explain
For each material, tell:
- What it is
- How it is produced
- Where it fits in road building
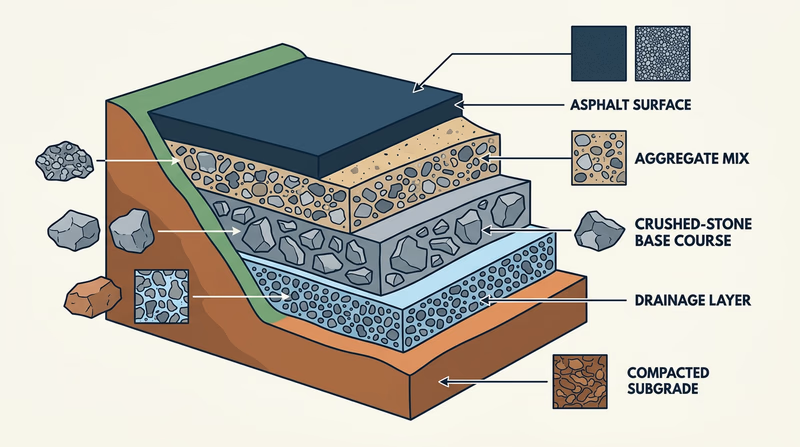
Example Roles in a Road
- Base course: Crushed stone that supports the load above
- Aggregate in asphalt: Rock fragments mixed with asphalt binder
- Aggregate in concrete: Sand and gravel or crushed stone mixed with cement
- Drainage layers: Coarser material that helps move water away
Three-Part Answer for Each Material
Keep your explanation organized- Material name
- How it is produced: quarried, blasted, crushed, screened, washed, or mixed
- How it is used: base, surface mix, concrete, drainage, or fill
The official resource below may not match your exact local materials, but it gives a good starting point for the kinds of rock commonly used in road construction.
Official Resources
Top Rock Types Used in Road Construction (website) A quick overview of common aggregate rock types and why certain materials work well in road building. Link: Top Rock Types Used in Road Construction (website) — https://roblarquarryllc.com/top-rock-types-used-in-road-construction/Next you will finish the Mineral Resources option with a choice among three real-world investigation paths.
Req 4c5 — Visit or Investigate Resource Use
You must choose exactly one of these final Mineral Resources paths:
- Req 4c5a visits an active extraction site.
- Req 4c5b compares two rocks and two minerals and how they are mined and used.
- Req 4c5c visits a civil engineer to see geology in construction.
Your Options
- Req 4c5a — Visit a Mine, Quarry, or Pit: Best if you can safely arrange an approved field visit and want to see extraction in action.
- Req 4c5b — Two Rocks and Two Minerals: Best if you want a discussion path that compares several materials and their social value.
- Req 4c5c — Geology in Construction: Best if you are curious how engineers use geology before building roads, structures, or foundations.
How to Choose
Pick the Best Path
Consider access, interests, and learning style- Choose 4c5a if you want the strongest field experience.
- Choose 4c5b if you like comparing materials without needing a site visit.
- Choose 4c5c if engineering and building projects interest you.
- What you gain: 4c5a emphasizes observation, 4c5b emphasizes comparison, and 4c5c emphasizes practical application.
Req 4c5a — Visit a Mine, Quarry, or Pit
A working extraction site makes geology feel immediate. You can see the material in place, the equipment used to remove it, and the huge scale needed to supply construction, manufacturing, or energy.
What to Observe
- What material is being extracted?
- Is it blasted, cut, dredged, scooped, or screened?
- How is the material sorted or processed onsite?
- Where does it go after leaving the site?
- What products or infrastructure depend on it?
Official Resources
There is no official resource link for this page. The site visit itself is your main source of evidence.
The next page gives an alternate discussion path if a site visit is not available.
Req 4c5b — Two Rocks and Two Minerals
This option works best when you choose materials with very different uses. For example, you might compare limestone and granite as rocks, then quartz and gypsum as minerals. The contrast helps you show how varied mineral resources really are.
A Strong Comparison
For each of your four examples, explain:
- Where the material comes from geologically
- How people mine or quarry it
- What processing it may need
- How it is used by society
Good Material Pairing Strategy
Choose examples that highlight different uses- One building rock such as limestone or granite
- One industrial or decorative rock
- One mineral used in manufacturing or technology
- One mineral used in construction, agriculture, or household products
Official Resources
There is no official resource link for this page. Your discussion should rely on the material knowledge you have built across this option and any counselor-approved research.
The next page shows the engineering-focused path in this requirement.
Req 4c5c — Geology in Construction
Before a road, bridge, school, or retaining wall gets built, someone has to ask what the ground underneath is like. That is where geology enters construction. Civil engineers and engineering geologists need to know whether the site is stable, how water moves through the ground, and what materials will support the structure safely.
Questions to Explore
- What rock or soil is under a proposed project?
- Is the ground strong enough for the design load?
- Will water cause settling, erosion, or drainage problems?
- Are there landslide, sinkhole, or fault concerns?
- What tests or borings are used before construction begins?
Official Resources
There is no official resource link for this page. Your visit and notes are the main evidence for this requirement.
You have now finished the Mineral Resources option. The next branch moves into deep time, fossils, and Earth’s long history.
Req 4d — Deep Time and Ancient Worlds
This option is the best fit for Scouts who want the biggest story geology can tell. You will move through geologic time, plate tectonics, fossilization, ancient environments, fossils as clues, and a final visit-or-presentation path tied to real fossil evidence.
What You’ll Complete
- Req 4d1 — Geologic Time in Your Region: Build a chart of eras and periods and connect it to rocks in your region. You will gain a timeline for Earth’s history.
- Req 4d2 — Plate Tectonics: Explain how plates move and why earthquakes, volcanoes, and mountain belts cluster where they do. You will gain the main engine of large-scale geologic change.
- Req 4d3 — Burial, Fossils, and Extinction: Learn how fossils form and why many species disappear from the record. You will gain the basics of preservation and loss.
- Req 4d4 — Fossils as Ancient Clues: Use fossils to infer environment, climate, geography, and food-gathering habitats. You will gain practice reconstructing ancient worlds.
- Req 4d5 — Collect or Identify Fossils: Work directly with fossil specimens. You will gain hands-on observation and classification experience.
- Req 4d6 — Visit, Observe, or Present Fossils: Finish with an approved visit or research-based presentation. You will gain a real-world connection to fossil interpretation.
How to Work Through This Option
Keep a notebook with three kinds of pages: one for timeline notes, one for habitat terms, and one for fossil observations. That way you will not have to hunt for information when you discuss the option with your counselor.
You are about to begin geology’s biggest challenge: turning scattered clues into a story that spans millions of years.
Req 4d1 — Geologic Time in Your Region
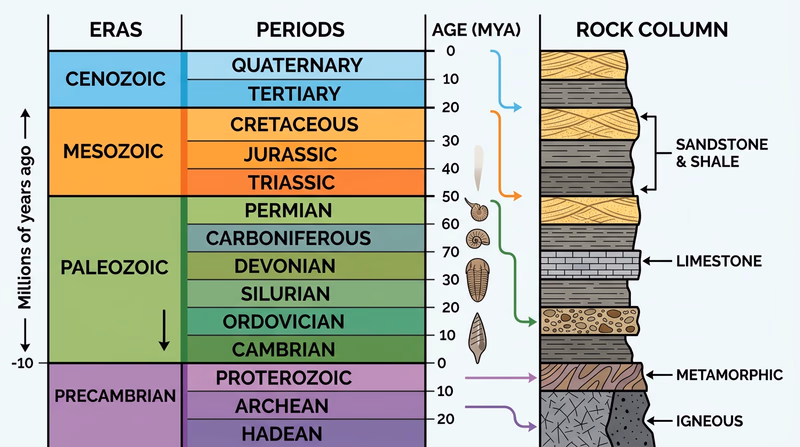
Human history feels long until geology enters the room. In geology, a road cut might expose layers that formed hundreds of millions of years before the first humans appeared. This requirement asks you to place your local rocks into that deep-time framework.
Build the Timeline First
A useful chart should include the major eras and the periods within them. You do not need every tiny subdivision. The point is to understand order and scale.
A simple chart often includes:
- Precambrian
- Paleozoic Era
- Mesozoic Era
- Cenozoic Era
Within those eras, include the major periods your counselor expects you to know or that appear on the maps and legends for your region.
Then Place Your Region’s Rocks
Use your local geologic map, state survey, or counselor-approved source to ask:
- What formation names appear in my area?
- What period or era are those formations assigned to?
- Are all the local rocks the same age, or do several ages appear?
If your region has mostly sedimentary rocks from one period, that suggests one major environment may have dominated for a long time. If your area includes rocks from many ages, the history may be much more complex.
Official Resources
🎬 Video: The Geological Timescale (video) — https://www.youtube.com/watch?v=5Prp5iYFu4w
Next you will add the driving force behind many of Earth’s biggest changes: moving tectonic plates.
Req 4d2 — Plate Tectonics
Earth’s crust is not one unbroken shell. It is divided into large plates that move slowly over the softer, deeper part of the mantle. That movement is small on a human time scale, but over millions of years it changes oceans, continents, mountain belts, and the locations of many major geologic hazards.
The Basic Idea
Plate tectonics explains that Earth’s outer rigid layer is broken into plates that move relative to one another. Their motion is driven by heat from inside Earth, which causes slow movement in the mantle and helps move the plates.
Plate Boundaries
Divergent Boundaries
At divergent boundaries, plates move apart. Magma rises, cools, and forms new crust. Mid-ocean ridges are the classic example.
Convergent Boundaries
At convergent boundaries, plates move toward each other. One plate may sink beneath another in a subduction zone, creating volcanoes and earthquakes. Or two continental plates may collide and build mountains.
Transform Boundaries
At transform boundaries, plates slide past each other. These boundaries are famous for earthquakes because stress builds and then releases suddenly.
Why Hazards Cluster Where They Do
Most volcanoes, earthquakes, and mountain belts are not scattered randomly. They cluster near plate boundaries because that is where the crust is being created, destroyed, deformed, or sheared.
- Volcanoes are common where plates separate or where one plate subducts under another.
- Earthquakes are common where plates collide, separate, or slide past.
- Mountain belts often form where plates converge and crust is compressed.
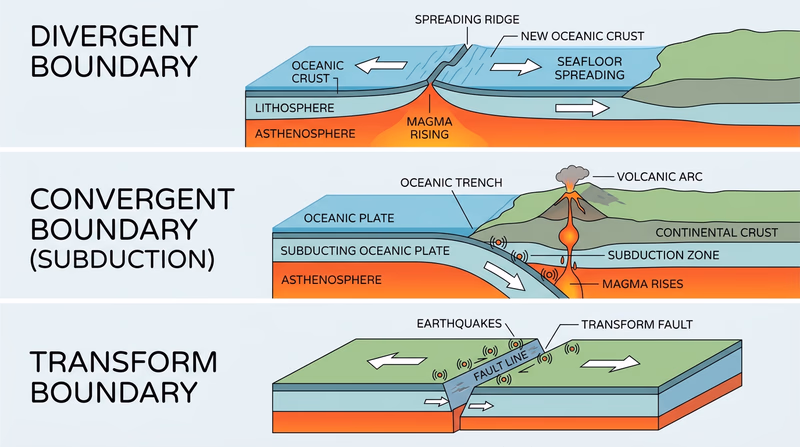
How to Explain Plate Tectonics
A simple structure for your chart or counselor talk- What are plates? Rigid pieces of Earth’s outer shell.
- Why do they move? Internal Earth heat drives motion.
- What happens at each boundary type? Divergent, convergent, transform.
- Why do hazards cluster? Plate interaction concentrates stress, melting, and deformation.
Official Resources
🎬 Video: How Plate Tectonics Work (video) — https://www.youtube.com/watch?v=xhcovHLA90s
The next page shifts from whole plates to individual organisms and asks how fossils get preserved in the first place.
Req 4d3 — Burial, Fossils, and Extinction
Most living things do not become fossils. They decay, get eaten, or break apart long before they can be preserved. That is why fossils are special. They represent the rare situations where burial and chemistry work in just the right way.
Burial Comes First
Rapid burial is often the key step. Sediment must cover an organism or its traces before weather, scavengers, and decay destroy them. Mud, volcanic ash, river sand, or seafloor sediment can all do the job.
Fossilization Paths
Fossils can form in more than one way:
- Permineralization: Minerals fill pore spaces in bones or wood.
- Replacement: Original material is replaced by new minerals.
- Molds and casts: The organism dissolves away but leaves an impression or a filled-in replica.
- Carbon films: Thin carbon remains preserve outlines of leaves or soft parts.
- Trace fossils: Tracks, burrows, and coprolites preserve behavior instead of body parts.
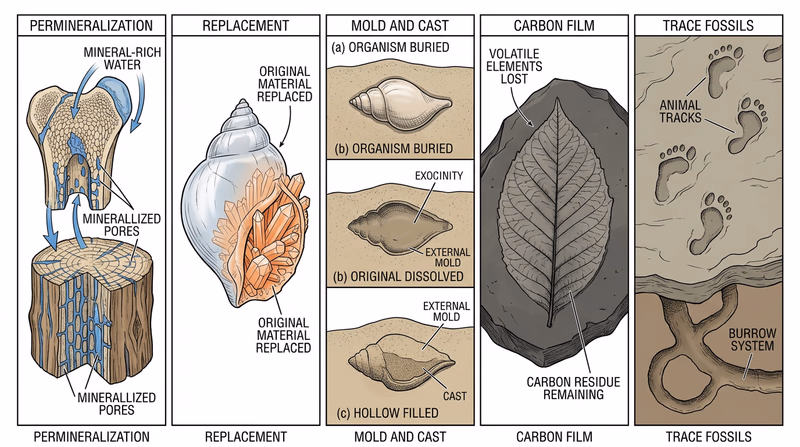
Extinction
Extinction happens when a species disappears completely. In the fossil record, extinctions may be linked to climate shifts, habitat loss, sea-level changes, volcanic events, asteroid impacts, competition, disease, or other environmental pressures.
Official Resources
🎬 Video: Fossilization Process Simply Explained (video) — https://youtu.be/7loCEh2mhoU?si=arwh3KhBoNiKI_rm
🎬 Video: Fossils 101 (video) — https://youtu.be/bRuSmxJo_iA?si=5GieblR2ahkpJlA7
The next requirement takes the next step: using fossils not just as preserved objects, but as evidence for ancient environments and food-gathering habitats.
Req 4d4 — Fossils as Ancient Clues
A fossil is more than a preserved shell, tooth, or leaf. It is a clue about an entire world. The shape of the organism, the rock around it, the other fossils nearby, and the environment suggested by the sediment all help geologists and paleontologists reconstruct what ancient places were like.
What Fossils Can Reveal
Fossils can tell you:
- Ancient life: what kinds of organisms lived there
- Environment: shallow sea, river, lake, desert, reef, shoreline, and more
- Climate: warm, cold, wet, dry, tropical, seasonal
- Geography: whether an area was once underwater, coastal, inland, or near certain habitats
A coral fossil in limestone suggests a warm shallow marine environment, not a mountain forest. Plant fossils in coal suggest lush swampy conditions. A trackway in ancient sand can suggest a dry land surface or shoreline.
Habitat Terms in This Requirement
Benthonic
Benthonic organisms live on or near the bottom of a water body. They may crawl, burrow, attach to surfaces, or filter food from passing water.
Pelagic
Pelagic organisms live in the open water column rather than on the bottom. They often swim, drift, or float and obtain food from plankton, other animals, or suspended material.
Littoral
The littoral zone is the near-shore area where water meets land. Organisms there may graze, filter-feed, or prey on animals in shallow, light-filled water.
Lacustrine
Lacustrine environments are lake environments. Animals may feed on plankton, plants, bottom material, smaller animals, or organic matter in calm freshwater settings.
Open Marine
Open marine settings are farther from shore in the ocean. Organisms may filter-feed, swim after prey, scavenge, or feed within the water column or on the seafloor.
Brackish
Brackish water is a mix of fresh and salt water, such as estuaries. Organisms there must tolerate changing salinity and may feed on plankton, detritus, plants, or small prey.
Fluvial
Fluvial environments are river and stream settings. Organisms may graze, scavenge, hunt, or filter food carried by moving fresh water.
Eolian
Eolian environments are shaped by wind, especially deserts and dune fields. Food sources may be sparse, so animals often rely on scattered plants, insects, seeds, or other animals.
Protected Reef
A protected reef environment often provides shelter and abundant food. Organisms may graze on algae, filter-feed, browse, or hunt smaller reef animals.
How to Talk About an Ancient Habitat
Use this structure with your counselor- What fossils are present?
- What environment do they suggest?
- What clues in the rock support that idea?
- How would animals there get food? Filter-feeding, grazing, hunting, scavenging, or drifting in the water column?
Official Resources
🎬 Video: Fossils and Rock Layers for Kids! (video) — https://www.youtube.com/watch?v=TjYU7ImWUjI
🎬 Video: Divisions of the Marine Environment (video) — https://youtu.be/J4cIRTU_vD8
🎬 Video: Benthos: Intertidal Zone (video) — https://youtu.be/Tk_c5dT9OV8?si=JGIGxYu9M2Vm5jfm
🎬 Video: Pelagic Zone (video) — https://youtu.be/RfXrj0E7EUc?si=0MGPJgylaHttKNEE
🎬 Video: What Is the Littoral Zone (video) — https://youtu.be/9bfzCsdScZQ?si=VZiOUGWnBI4aw7Ow
🎬 Video: Lacustrine Zone (video) — https://youtu.be/vHVbhHww0Iw?si=wLexq9xNjcEoMVCm
🎬 Video: Oceans 101 (video) — https://youtu.be/MfWyzrkFkg8?si=UU1WeNHU7RJe8Zog
🎬 Video: Fluvial Processes (video) — https://youtu.be/BhYDFg_BtSo?si=zL-GSJWaGfUC8PnG
🎬 Video: Weathering Environments Part 1: Fluvial Processes (video) — https://youtu.be/Ea47Gat0Oec?si=o48kIttwjrsHXCJl
🎬 Video: Weathering Environments Part 2: Aeolian Processes (video) — https://youtu.be/vOH7y-jKVSY?si=X-4o0WwjyzlU_LJo
🎬 Video: Coral Reef 101 (video) — https://youtu.be/ZiULxLLP32s?si=cf6ZuLcT8kpFd-DW
The next page turns from habitat ideas to actual fossil specimens by asking you to collect or identify examples and explain what they reveal.
Req 4d5 — Collect or Identify Fossils
This requirement turns you into a fossil investigator. Whether you collect ten specimens or identify fifteen, the goal is not just naming them. The real goal is using each fossil as evidence.
What to Record
For each fossil, include:
- Name or best classification
- Plant or animal
- Where you obtained it
- Likely habitat
- How it obtained food
- What else it reveals about environment, climate, or age
Thinking Beyond the Name
A brachiopod, trilobite, fern impression, ammonite, or coral all tells a different story. Ask yourself:
- Did this organism live on the bottom, swim, burrow, or drift?
- Did it filter-feed, graze, hunt, or photosynthesize?
- What kind of environment would support it?
- What does its presence suggest about the rock layer?
A Strong Fossil Entry
More than a label- What is it? Give your best identification.
- How did it live? Bottom dweller, swimmer, plant, reef builder, etc.
- How did it feed? Filter-feeding, grazing, predation, or photosynthesis.
- What environment does it suggest? Marine, freshwater, shoreline, swamp, desert, reef?
- What extra clue does it give? Relative age, climate, or geography.
Official Resources
There is no official resource link for this page. Your notebook, specimen observations, and counselor guidance are the key resources.
The final Earth History page lets you apply these fossil skills through a visit or presentation path.
Req 4d6 — Visit, Observe, or Present Fossils
You must choose exactly one final path:
- Req 4d6a visits a museum or university fossil collection.
- Req 4d6b studies fossils preserved in building stone.
- Req 4d6c visits a fossil-bearing outcrop.
- Req 4d6d creates a presentation on a state fossil.
Your Options
- Req 4d6a — Museum Fossil Visit: Best if you can arrange a guided visit and want to see fossil preparation and display.
- Req 4d6b — Fossils in Building Stone: Best if you enjoy urban geology and want to look for fossils in everyday places.
- Req 4d6c — Fossil Outcrop Visit: Best if you can safely reach a natural fossil site with approval.
- Req 4d6d — State Fossil Presentation: Best if a visit is difficult and you want a research-and-presentation path.
How to Choose
Choosing Your Final Fossil Path
Match the option to your access and interests- Best access to experts and displays: 4d6a
- Best local everyday geology option: 4d6b
- Best outdoor field experience: 4d6c
- Best research and presentation option: 4d6d
- What you gain: museum path builds museum-literacy, building-stone path builds observation, outcrop path builds field skills, and state-fossil path builds research and communication.
Req 4d6a — Museum Fossil Visit
Museums and university collections show fossils in context. Instead of one specimen in your hand, you may see how fossils are labeled, compared, prepared, and preserved for research or education.
What to Look For
- How are fossils cleaned and stabilized?
- What labels explain age, formation, or habitat?
- How are fragile specimens supported for display?
- What clues help experts identify the fossil?
- How does the display connect specimens to environments or extinction events?
Questions for a Curator or Guide
A few strong questions go a long way- How was this fossil prepared?
- How do you keep it from breaking down over time?
- How do you know how old it is?
- What does this fossil tell us about its environment?
Official Resources
Geology Museums to Visit in the United States (website) A starting point for finding geology and fossil museums you may be able to visit with approval. Link: Geology Museums to Visit in the United States (website) — https://whichmuseum.com/place/united-states-2682/t-geologyThe next page offers a clever fossil-hunting path that does not require a museum or natural outcrop.
Req 4d6b — Fossils in Building Stone
Geology does not only live in wild places. It also appears in polished floors, walls, columns, and building facades. Limestones used in buildings often preserve shells, crinoid pieces, coral fragments, or other fossils.
How to Investigate a Building
Look closely at:
- Floor tiles or polished wall panels
- Exterior stone facing
- Steps, pillars, or decorative slabs
- Older public buildings, churches, schools, or courthouses
Try to decide whether the stone is limestone, marble, or another material. Then look for visible fossil shapes or fragments.
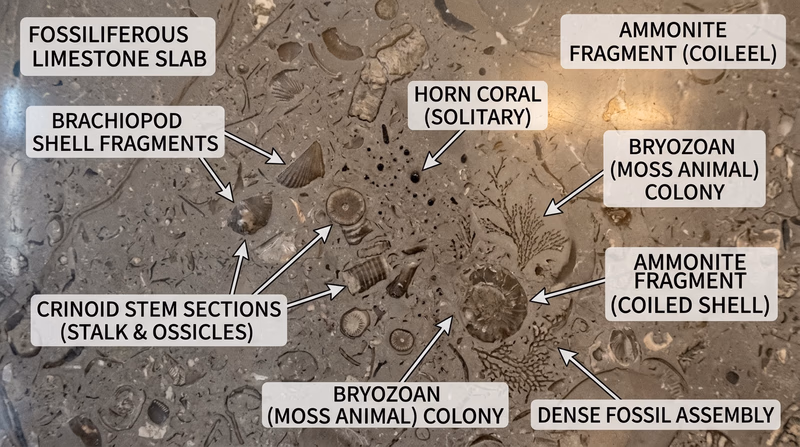
Official Resources
There is no official resource link for this page. Your observations from the building are the main evidence.
The next page shows the natural outcrop path if you want to look for fossils in place.
Req 4d6c — Fossil Outcrop Visit
A fossil-bearing outcrop lets you see fossils in their original geologic setting. That is powerful because the rock itself helps explain the environment and age, not just the fossil shape.
What to Observe at the Outcrop
- What kind of rock holds the fossils?
- Are fossils common throughout the layer or concentrated in certain spots?
- Are they whole, broken, flattened, or replaced by minerals?
- What does the surrounding sediment suggest about the environment?
Official Resources
There is no official resource link for this page. Your field notes, sketches, and observations are the key evidence.
If a fossil-site visit is not realistic, the final page shows the research-and-presentation option based on a state fossil.
Req 4d6d — State Fossil Presentation
This option lets you combine geology, paleontology, and communication. A good state-fossil presentation is not just a poster with a picture and a date. It explains why that fossil matters and what it tells you about the place where it was found.
What to Include
- Image of the fossil
- Name and classification
- Age or geologic period
- What kind of organism it was
- What environment it lived in
- Why it was chosen as a state fossil
Make It a Story
Instead of saying only, “This fossil is from the Devonian,” explain what that means. Was your state once covered by a shallow sea? Was the fossil part of a reef, swamp, lake, or coastal system? The best presentations help the audience picture the ancient environment.
State Fossil Presentation Formula
Keep your display clear and informative- Introduce the fossil. What is it?
- Place it in time. How old is it?
- Place it in environment. What kind of habitat did it live in?
- Explain its importance. Why does it matter scientifically or locally?
Official Resources
There is no official resource link for this page. Use counselor-approved research sources and your own presentation structure.
You have now completed the final Req 4 path. The next requirement brings the whole badge back to outdoor ethics and responsible field behavior.
Req 5 — Leave No Trace and the Outdoor Code
This requirement ties geology to outdoor ethics. You are not just learning how to read land and collect specimens. You are learning how to do it in a way that protects the place, respects other visitors, follows the law, and leaves good opportunities for future Scouts. Requirement 5 has two connected parts:
- Requirement 5a asks why Leave No Trace and the Outdoor Code matter in geology.
- Requirement 5b asks how you personally practiced those ideas while traveling and collecting.
Requirement 5a
Geology can put you in places that feel wild, empty, or tough enough to handle anything: streambeds, gravel bars, fossil sites, road cuts, desert washes, rocky beaches, and outcrops. But those places can be damaged surprisingly fast. A single careless hammer blow can ruin a fossil. Taking more samples than needed can strip an educational site. Walking off-trail on fragile slopes can increase erosion.
The Leave No Trace Seven Principles matter in geology because they help you work carefully:
- Plan ahead and prepare so you know where collecting is allowed and what hazards exist.
- Travel and camp on durable surfaces so you do not damage vegetation or fragile soil crust.
- Dispose of waste properly so field sites stay clean and safe.
- Leave what you find unless you have permission and a good reason to collect.
- Minimize campfire impacts if your geology trip includes camping.
- Respect wildlife because collecting rocks does not give you permission to disturb habitats.
- Be considerate of others by keeping sites safe, quiet, and available for learning.
The Outdoor Code strengthens the same message. Being clean, careful, and conservation-minded fits geology perfectly because the whole point is to learn from the land, not damage it.
Official Resources
Leave No Trace (video) A short overview of Leave No Trace ideas you can apply directly to field trips, specimen collecting, and geology observation. Link: Leave No Trace (video) — https://vimeo.com/1115216743/63b20c0b33?share=copyRequirement 5b
This is the part where you make the ideas personal. Your counselor wants to hear what you actually did, not only what the principles say. Good examples include:
- You checked whether collecting was allowed before taking a specimen.
- You stayed on established paths when approaching an outcrop.
- You collected only a small number of useful specimens instead of filling a bag just because you could.
- You photographed interesting rocks or fossils you were not allowed to remove.
- You filled holes, packed out trash, and left the site looking natural.
- You kept your group from climbing unsafe or fragile exposures.
- You avoided disturbing nests, plants, and streambanks while exploring.
How to Talk About Your Ethics
Examples you can share with your counselor- Before the trip: How did you prepare and check rules?
- At the site: How did you avoid damage or unsafe behavior?
- While collecting: How did you decide what to take and what to leave?
- After the trip: Did you label specimens, clean up, and keep good records instead of returning for unnecessary extra collecting?
Geology is about evidence, and outdoor ethics protects that evidence for the next person who comes along. Next you will finish the badge by choosing how geology might shape your future — as a career or as a hobby.
Req 6 — Career or Hobby Path
You must choose exactly one option for this final requirement. Both paths ask you to research and discuss geology beyond the badge, but they focus on different goals:
- Req 6a is about a professional path in geology or a related geoscience field.
- Req 6b is about using geology knowledge in a hobby, outdoor habit, or healthy long-term lifestyle.
Your Options
- Req 6a — Geology Careers: Research one real geoscience career, including training, education, costs, salary, duties, and advancement. You will gain a practical look at how geology becomes a job.
- Req 6b — Geology as a Hobby or Lifestyle: Explore rockhounding, museum visits, hiking for geologic features, fossil clubs, or similar interests. You will gain a plan for keeping geology in your life even if it never becomes your profession.
How to Choose
Which Path Fits You?
Use these questions to decide- Do you want to understand a job? Choose 6a.
- Do you want a hobby you can start now? Choose 6b.
- Do you enjoy interviews, research, and comparing education paths? 6a may be more rewarding.
- Do you enjoy field trips, collections, and outdoor exploration? 6b may fit better.
- What will you gain? 6a builds career-planning skills; 6b builds a lifelong interest you can practice right away.
The finish line of the badge is close. Pick the path that feels most useful and interesting, then be ready to explain your thinking to your counselor.
Req 6a — Geology Careers
Geology careers are much broader than “person who studies rocks.” Some geologists work outdoors mapping formations and collecting samples. Others work in labs, at computers, at construction sites, in museums, on drilling projects, or with environmental teams protecting water and land.
Career Ideas to Consider
You might research:
- Environmental geologist
- Hydrogeologist
- Engineering geologist
- Petroleum geologist
- Paleontologist
- Seismologist
- Volcanologist
- Geologic mapper or survey geologist
- Museum collections specialist
What Your Research Should Cover
The requirement tells you exactly what to gather:
- Training and education needed
- Costs of that path
- Job prospects
- Salary range
- Typical job duties
- Career advancement opportunities
Good Research Methods
A strong answer uses more than one source. Combine a career video with a professional website, college information, or an interview if possible. Then organize your notes so you can explain not only the facts, but also whether the job sounds interesting to you.
Career Research Template
Organize your notes before meeting your counselor- Career name
- What the person actually does
- Education and training path
- Typical work settings
- What sounds appealing to you
- What might be challenging
Official Resources
🎬 Video: 20+ Geoscience Careers & How Much Geoscientists Make $ (Why You Should Study Geology!) (video) — https://youtu.be/d22wgbrwmzA
🎬 Video: Geology Jobs: What You Can Do With a Degree in Geology (video) — https://youtu.be/FPY1q6oPmN8
The next page explores the non-career path: how geology can become a hobby or healthy long-term lifestyle.
Req 6b — Geology as a Hobby or Lifestyle
You do not need a geology degree to keep geology in your life. Many people turn it into a hobby through rockhounding, mineral collecting, fossil clubs, hiking with a geologic purpose, museum volunteering, photography of landforms, or travel focused on Earth science sites.
Hobby Paths to Consider
- Rockhounding
- Fossil collecting where legal and ethical
- Museum visits and volunteer programs
- Joining a gem and mineral club
- Geology-focused hiking and travel
- Keeping a specimen collection with labels and notes
What to Research
The requirement asks you to think practically:
- Training needed: maybe none, or perhaps club mentorship, safety knowledge, and basic identification skills
- Expenses: field guides, hand lens, specimen boxes, club fees, travel, museum admission
- Organizations: local clubs, museums, geological societies, park programs
- Goals: what you want to do in the short term and long term
Short-Term and Long-Term Goals
Short-term goals might include joining a club, learning ten common minerals, visiting a museum, or starting a notebook. Long-term goals might include building a regional collection, identifying fossils more confidently, planning geology trips, or helping younger Scouts notice Earth science in the field.
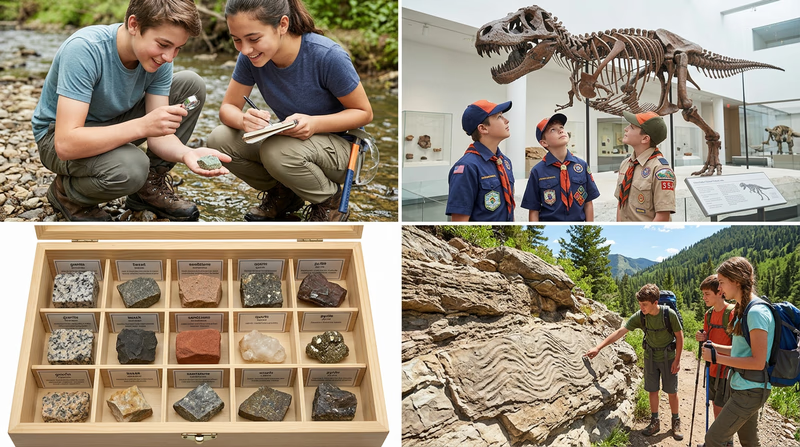
Hobby Planning Questions
Use these to shape your discussion- What part of geology do I enjoy most? Fossils, minerals, landforms, maps, field trips?
- What gear do I actually need to begin?
- Who could help me learn safely and legally?
- What is one goal for this month and one for this year?
Official Resources
🎬 Video: Why I'm So Obsessed With Geology (video) — https://www.youtube.com/shorts/sxTzwHxxEp8?feature=share
🎬 Video: What Is Geology and How Can Rock Collecting Become a Fascinating Hobby? (video) — https://youtu.be/oLomQG6P6tc
🎬 Video: Rockhounding 101: The Best Way to Find Minerals (video) — https://youtu.be/x4iptGa2eU4
🎬 Video: Michigan Geology Tourism Series (video) — https://youtu.be/75QB3OFbEi0
You have reached the end of the requirement pages. The final page goes beyond the badge and shows where geology can lead next.
Extended Learning
A. Congratulations
You finished a badge that asks you to think like a scientist outdoors. You learned how rock layers tell stories, how maps reveal buried structure, how streams move sediment, how fossils preserve ancient worlds, and how geology connects to resources people use every day. That is a lot more than “learning about rocks.”
The best part is that geology never really turns off. Once you start noticing grain size in a stream bank, fossils in building stone, or the angle of rock layers in a road cut, you begin seeing Earth history almost everywhere.
B. Deep Dive — Reading the Landscape Like a Geologist
A good next step is to practice reading whole landscapes instead of single specimens. Look at a valley and ask why it is wide or narrow. Look at a hill and ask whether its shape comes from hard rock resisting erosion or softer rock wearing away faster. Notice where streams meander, where gravel piles up, and where slopes slump after rain. Geologists constantly connect landforms to the materials beneath them.
You can practice this on ordinary walks. A creek near your home may show cut banks, point bars, sorted gravel, and flood deposits after storms. A highway road cut may show tilted bedding or different layers weathering at different rates. A building made from limestone or granite can become a clue about where that stone came from and why it was chosen. Over time, your brain starts turning scenery into evidence.
The goal is not to memorize a huge list of terms. The goal is to ask better questions. Why here? Why this shape? Why this material? Why in this order? That habit of observation is one of the biggest skills geology gives you.
C. Deep Dive — Water, Hazards, and Human Decisions
Geology affects safety and planning more than many people realize. Where does groundwater move? Which slopes are likely to slide? Which places flood often? What rock can support a highway bridge or school building? Environmental and engineering geologists help answer those questions.
If you want to go farther, start noticing how geology and weather work together. Heavy rain can trigger landslides where loose sediment sits on steep slopes. Coastal erosion changes beaches and threatens roads and homes. Earthquakes matter most where faults, population, and weak ground conditions overlap. Even the choice of where to build a neighborhood can depend on bedrock, soil thickness, and drainage.
This is why geology is not only about the ancient past. It is also about smart decisions in the present. Communities depend on geologists for hazard awareness, water protection, and safe construction.
D. Deep Dive — Collections, Museums, and Citizen Science
A geology hobby can go far beyond putting cool rocks on a shelf. Good collections tell a story. You might organize specimens by rock class, by mineral property, by geologic age, or by where they were found. A field notebook or digital catalog makes the collection much more valuable because it preserves location, date, and observations.
Museums are another powerful next step. Notice how displays connect fossils to habitat, age, and rock type instead of showing specimens without context. The same idea applies to personal collecting: context matters. A labeled fossil from a known formation teaches much more than an unlabeled fossil with no history.
You can also join geology clubs, museum programs, fossil festivals, and guided hikes. Many groups welcome beginners and love helping young collectors learn how to identify specimens responsibly. Those communities can help you build skill much faster than working alone.
E. Real-World Experiences
1. Visit a State Geological Survey Website
Download a geologic map for your county or region and compare it to the landforms you know. Try matching familiar hills, valleys, or rock exposures to the mapped units and structures.
2. Walk a Stream After a Rainstorm
Look for new gravel bars, muddy water, undercut banks, and places where sediment settled out. This is one of the easiest ways to watch geology happening in real time.
3. Study Building Stone in Your Town
Search for fossils, layering, or mineral crystals in courthouse steps, walls, monuments, or school buildings. Urban geology can be surprisingly rich.
4. Visit a Museum or University Collection
Pay attention to how specimens are labeled, classified, and interpreted. Notice how much context a good label adds to a fossil or mineral.
5. Attend a Rock, Gem, or Mineral Show
You can compare polished specimens, rough rocks, fossils, tools, and local experts all in one place. Shows are also a good way to learn how collectors organize and identify specimens.
F. Organizations
U.S. Geological Survey (USGS)
Federal science agency that publishes maps, hazard information, mineral data, and water resources research. https://www.usgs.gov/
American Geosciences Institute (AGI)
Education and career information across the geosciences, with student-friendly resources. https://www.americangeosciences.org/
Geological Society of America (GSA)
Major professional organization with articles, maps, and public Earth science resources. https://www.geosociety.org/
Paleontological Research Institution
Fossil and Earth history resources, including museum and educational materials. https://www.priweb.org/
Mindat
A giant online mineral database useful for learning mineral names, localities, and properties. https://www.mindat.org/
Your State Geological Survey
Most state surveys publish maps, local geology explanations, educational materials, and field-trip ideas that make geology feel more local and practical.
Visit the official survey directory here: https://www.stategeologists.org/surveys