Req 1 — Printing Processes
A pizza box, a concert T-shirt, a newspaper insert, and a candy wrapper may all look like “printed stuff,” but they were not necessarily made the same way. Graphic arts starts with recognizing that different printing processes solve different problems. Some are best for huge runs. Some are better for fabric. Some are fast for one-day jobs. Your goal in this requirement is to learn what each process does well and how to spot clues in real products.
Five Major Printing Processes
Offset Lithography
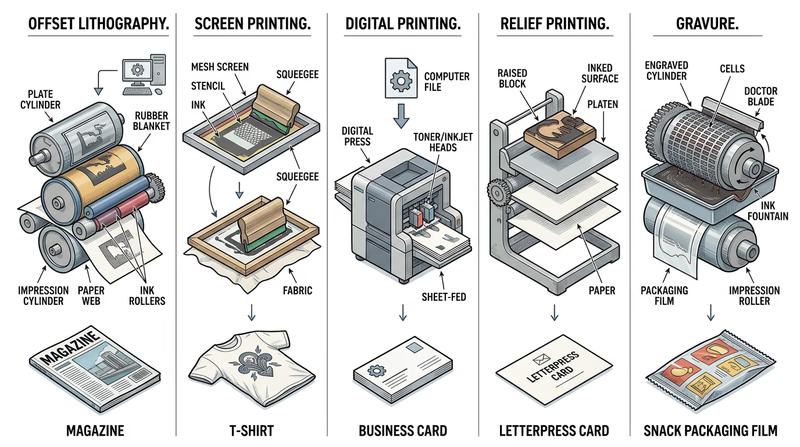
Offset lithography is one of the most common commercial printing methods for paper products like magazines, brochures, catalogs, and flyers. It works because oil-based ink and water do not mix. The image area on a plate accepts ink, while the non-image area attracts water and repels ink. The inked image moves from the plate to a rubber blanket and then onto paper.
Why use it? Offset printing is excellent for sharp detail, consistent color, and large quantities. Once the press is set up, it becomes efficient for long print runs. That is why so many books, mailers, and high-quality paper products are made this way.
Clues to look for: smooth coverage, clean text, and strong image quality on paper products printed in quantity.
Screen Printing
Screen printing pushes ink through a mesh screen, but only in the open areas of a stencil. The blocked areas do not let ink through, so the image appears only where the stencil allows it. A separate screen is often used for each color.
This process works especially well on materials that are hard to run through a traditional paper press, such as shirts, posters, signs, wood, glass, and some plastics. The ink layer is often thicker than in other methods, which can make colors look bold and feel slightly raised.
Clues to look for: strong, solid color areas, simple layered shapes, and printing on fabric or rigid materials.
Electronic or Digital Printing
Digital printing sends image data directly from a computer to a printer or press without making a traditional plate. This makes it great for short runs, quick turnaround, and variable printing, where each copy can be slightly different.
Think about school programs, troop flyers, short newsletters, and personalized event materials. If you only need a few dozen copies, digital printing usually makes more sense than spending time and money setting up plates or screens.
Clues to look for: short-run pieces, fast production, personalized names or numbers, and work produced directly from a digital file.
Relief Printing
In relief printing, the raised parts of a surface carry the ink. When paper presses against those raised areas, the image transfers. This is one of the oldest printing ideas in the world. Woodcuts, linocuts, rubber stamps, and early letterpress all use relief principles.
Relief printing is important to understand because it shows the basic idea of printing in a very visible way: raised image, ink applied, pressure used, print transferred. It is often taught in classrooms and studios because you can clearly see how the process works.
Clues to look for: impressed texture in some letterpress work, hand-crafted look, bold shapes, and slight variation from print to print.
Gravure
Gravure printing is almost the opposite of relief printing. Instead of raised image areas, the image is cut or etched into tiny recessed cells on a cylinder. Ink fills those cells, excess ink is wiped off the surface, and the remaining ink transfers to the material being printed.
Gravure is used for extremely long runs where speed and consistency matter, such as packaging, catalogs, decorative wraps, and some magazine work. The equipment is expensive, but it becomes worthwhile for huge commercial jobs.
Clues to look for: very consistent high-volume packaging and image reproduction designed for mass production.
How to Compare Them
Compare the Processes
These are the main differences your counselor will expect you to notice
- Best material: Offset and gravure are common for paper and packaging; screen printing handles fabric and specialty surfaces; digital works on many short-run jobs; relief often appears in art and specialty printing.
- Setup needed: Offset and gravure require more setup; digital needs the least; screen printing needs a prepared screen; relief needs a carved block, plate, or set type.
- Best quantity: Digital shines for short runs; offset and gravure become more efficient for larger runs; screen printing works well for moderate runs on specialty items.
- Look and feel: Screen printing often leaves thicker ink; relief can show texture; offset gives clean commercial results; digital offers speed and convenience; gravure emphasizes consistency at scale.
Collecting Your Three Samples
The requirement asks you to collect three products made by different processes, or draw diagrams if samples are hard to find. Good sample hunting teaches you to observe like a print professional.
Look around your home, school, troop meeting space, and local stores. A newspaper insert may suggest offset printing. A printed shirt or tote bag may show screen printing. A short-run event handout may be digital. A handmade art print could be relief. Packaging from a national brand may point to gravure or another large-scale commercial process.
Do not guess wildly. Instead, write down what clues led you to your conclusion. Ask questions like these:
- What material is this printed on?
- Does the ink sit on top of the surface or soak in smoothly?
- Is it obviously mass-produced or more hand-crafted?
- Would this job need thousands of copies or just a few?
- Does the product use bold flat color, detailed photos, or personalization?
Diagrams Work Too
If you cannot collect real products, draw simple process diagrams. Your diagrams do not need to look fancy. They just need to show the path of image, ink, and material. For example, an offset diagram might show plate → blanket → paper, while a screen printing diagram might show ink pushed through mesh onto fabric.
That kind of sketch helps you explain what makes each process different. It also gives your counselor something concrete to discuss with you.
The video above gives you a broad introduction to multiple printmaking methods. It is especially helpful if you want to see how different processes produce different visual results.
This second video is useful for noticing how tools, pressure, ink, and surface interact. Watch for the moments where the process itself shapes the final look.
What to Say to Your Counselor
Be ready to explain each process in plain language. You do not need to sound like an engineer. A strong explanation sounds more like this: “Screen printing uses a stencil and mesh to push ink onto a surface, which is why it works well for shirts” or “Digital printing skips plates, so it is better for short runs and quick jobs.”
This requirement also prepares you for Req 3 — Design Choices and Production Planning and Req 4 — Pick Your Production Path. Once you understand what the presses can do, you can start making smarter design decisions.
Now that you can identify the big printing methods, the next step is understanding the artwork those methods print.