Home Repairs Merit Badge — Complete Digital Resource Guide
https://merit-badge.university/merit-badges/home-repairs/guide/
Introduction & Overview
A sticking door in winter, a loose stair rail, or a faucet that will not stop dripping can turn an ordinary day into a real problem. Home Repairs teaches you how houses work, how to spot trouble early, and how to make smart, supervised fixes that protect both people and property.
This badge is not about becoming a professional contractor overnight. It is about learning safe habits, understanding basic systems, and building the confidence to handle common repairs with care, patience, and the right tools.
Then and Now
Then
For most of history, families had to repair their own homes because there was no quick call to a specialist. Farmhouses, cabins, and town homes were maintained with hand tools, local materials, and whatever skills parents, neighbors, and apprentices passed along. Knowing how to patch a roof, mend a fence, or keep water flowing was part of everyday life.
Early home repair work was slower and often harder on the body. Paint contained hazardous chemicals, ladders were less stable, electrical systems were simpler but not always safer, and plumbing repairs could mean digging, hauling, or replacing heavy parts by hand.
Now
Today, homes have more complicated systems, but they also have better safety gear, better materials, and better instructions. A Scout can learn to reset a breaker, clear a simple drain clog, patch drywall, or weatherstrip a door using modern tools designed to make the job cleaner and more accurate.
Modern home repair also focuses on prevention. Small tasks like sealing cracks, tightening hardware, and fixing leaks early can save money, reduce waste, and help a home stay comfortable and safe for everyone who lives there.
Get Ready!
You do not need a giant workshop to start learning home repairs. You need attention to detail, respect for safety, and the patience to do each step in the right order.
Kinds of Home Repairs
Home repair work covers many parts of a house and yard. As you move through this guide, you will see that different jobs call for different tools, materials, and safety rules.
Outdoor Maintenance
Outdoor repairs protect a home from weather and wear. Weatherstripping, caulking, screen repair, and patching concrete all help keep water, wind, and pests from turning small problems into expensive ones. Yard tool maintenance also fits here because outdoor tools work better and more safely when they are clean, sharp, and stored correctly.
Workshop and Structure Repairs
Some jobs focus on the places where you store tools or the structures you use every day. Building a workbench, fixing a fence, repairing furniture, or tightening a loose railing teaches you how wood, fasteners, and supports work together. These jobs reward careful measuring and steady hands.
Electrical Repairs
Electrical work may look simple from the outside, but it requires serious caution. Even basic jobs like replacing a switch or outlet start with shutting off power, confirming the circuit is dead, and understanding which wires connect where. In this badge, you focus on safe, supervised basics.
Plumbing Repairs
Water can damage floors, walls, and cabinets surprisingly fast. Plumbing basics include shutting off the main water supply, fixing leaks, clearing simple clogs, and keeping sprinklers or hoses working. These repairs teach you to act quickly, keep parts organized, and test carefully before declaring the job finished.
Interior Finish Repairs
Paint, flooring, drywall, curtain rods, frames, and cabinet hardware all affect how a home looks and functions. Finish repairs often require patience more than strength. Clean surfaces, careful alignment, and neat cleanup matter just as much as the repair itself.
Repair Skills for the Future
Home repair knowledge can grow into a career, a practical hobby, or simply a lifelong way to help at home. Many people discover that they enjoy diagnosing problems, working with tools, and improving a space with their own hands.
You have the big picture. Next, start with the skill that matters most in every repair job: staying safe.
Req 1 — Safety Basics
This requirement covers the two habits that matter before any repair begins: spotting hazards and practicing safe routines. First you will learn what can go wrong around tools, ladders, glass, dust, electricity, and sharp edges. Then you will build a safety mindset you can carry into every project in the rest of this badge.
- Requirement 1a focuses on likely hazards, protective clothing, and safety gear.
- Requirement 1b focuses on everyday safe practices that prevent injuries before they happen.
Requirement 1a: Hazards, Safety Gear, and Clothing
A home repair project can feel harmless right up until something slips, shatters, sparks, or falls. Most injuries do not happen because a person meant to be careless. They happen because someone rushed, guessed, or forgot that a house is full of edges, loads, power, chemicals, and moving parts.
Common Hazards You May Encounter
Cuts and punctures happen when you work with utility knives, broken glass, sheet metal, nails, staples, or splintered wood. You prevent them by keeping blades sharp, cutting away from your body, wearing gloves when appropriate, and cleaning up debris immediately.
Eye injuries can happen when paint chips, rust, concrete dust, sawdust, or bits of wire fly upward. Safety glasses matter even on small jobs because one fast-moving chip can cause a serious injury in an instant.
Falls are one of the biggest home repair dangers. A shaky ladder, wet step, cluttered floor, or overreaching from a stool can turn a quick task into an emergency. Stable footing, three points of contact on ladders, and keeping both feet planted prevent many accidents.
Electrical shock is especially dangerous because you may not always see the risk. Outlets, switches, lamp cords, and breaker panels all carry current. Before doing any electrical repair, turn off the correct circuit, test that power is actually off, and never work around standing water.
Dust, fumes, and chemicals can irritate your lungs, skin, and eyes. Paint, solvents, adhesives, cleaners, and even drywall dust need ventilation and careful handling. Open windows when possible, read labels before use, and never mix cleaning chemicals.
Strains and crush injuries happen when lifting heavy items, moving furniture, or trying to force a part into place. Bend your knees, lift with your legs, and ask for help before a load becomes awkward or unsafe.
Hazard Scan Before You Start
Ask these questions before touching a tool- What can cut, pinch, shock, burn, or fall? Look for sharp edges, live circuits, hot surfaces, loose ladders, and unstable objects.
- What should be moved first? Remove rugs, cords, toys, clutter, and anything that could trip you.
- What protective gear do I need? Match your safety glasses, gloves, hearing protection, or mask to the specific job.
- What is my shutoff plan? Know where the breaker, water shutoff, or tool power switch is before work begins.
- Who is supervising? Make sure your parent, guardian, or counselor knows the task and can step in if needed.
Anticipate, Prevent, and Respond
To anticipate hazards, slow down and inspect the area before you start. Look at the floor, the walls, the ladder feet, the cords, and the path you will walk while carrying tools or materials.
To mitigate and prevent hazards, set up the job correctly. That may mean clamping a workpiece, shutting off water, placing a drop cloth, opening a window, or moving pets and younger children out of the work area.
To respond well when something goes wrong, stop the work first. Turn off the tool, step back from the hazard, and tell the supervising adult what happened. A cut may need cleaning and pressure. A broken outlet cover may mean the breaker stays off until the repair is finished. A tipped ladder means the project pauses until the setup is made safe again.
🎬 Video: Avoid These 9 Worst DIY Injuries/Accidents From Common Tools! (video) — https://youtu.be/AjlWEb-xbhk?si=771ghgOjwxKPkH4K
The video above is useful because it shows how normal tools can become dangerous when they are misused. As you watch, pay attention to the pattern behind many accidents: poor setup, distraction, or trying to save a few seconds.
Appropriate Safety Gear and Clothing
Good safety gear does not make you invincible, but it gives you a margin of protection when something unexpected happens.
- Safety glasses or goggles protect your eyes from dust, chips, and splashes.
- Work gloves protect your hands when handling rough lumber, screen frame, broken materials, or garden tools. Do not use loose gloves around tools where fabric could catch.
- Closed-toe shoes protect your feet from dropped tools, broken glass, and sharp debris.
- Long pants and fitted sleeves protect skin, but clothing should never be baggy enough to catch on tools or hardware.
- Hearing protection is smart when working around loud power tools.
- Dust mask or respirator may be appropriate for sanding, drywall dust, or strong fumes, depending on the material and label instructions.
🎬 Video: DIY Home Maintenance | Ladder Safety (video) — https://youtu.be/JL0hj-VAeBg?si=k6vPGJ6xmjspfCrr
Ladder safety deserves special attention because ladders show up in many home repair tasks. Notice how proper angle, level footing, and not overreaching matter more than speed.
Requirement 1b: General Precautions and Safe Practices
Safe repairers build habits, not just knowledge. You do not want to make one good decision by luck. You want a repeatable routine that protects you on a paint job, a plumbing fix, a workshop project, or a simple hinge adjustment.
Ten Safe Practices Every Home Repairer Should Use
- Read the whole task before starting. Know the steps, tools, and materials before you begin.
- Use the right tool for the job. A screwdriver is not a chisel, and a butter knife is not a scraper.
- Inspect tools before use. Check cords, handles, blades, and moving parts for damage.
- Keep the work area clean. Clutter causes trips, spills, and lost parts.
- Wear the right protective gear. Match your clothing and safety equipment to the specific hazard.
- Shut off power or water before repairing those systems. Never trust a switch alone when a full shutoff is available.
- Work in good light and ventilation. You need to see clearly and avoid breathing harmful fumes or dust.
- Store tools safely when not in use. Put blades away, unplug tools, and keep sharp or heavy items where they cannot fall.
- Do not rush. Most sloppy cuts, cross-threaded fittings, and crooked installations happen when someone is hurrying.
- Ask for help when the job exceeds your skill level. Good judgment is part of safety.
🎬 Video: 10 Rules for Safety (video) — https://www.youtube.com/shorts/BVCmz9KnwWk
This short video moves quickly, but it reinforces an important truth: safe repair habits are simple and repeatable. Your counselor will be looking for whether you understand the pattern behind them, not whether you memorized a list without context.
What General Precautions Really Mean
General precautions are the broad rules that apply on almost every project, even when the exact repair changes. They include supervision, planning, neat setup, careful cleanup, and stopping when conditions change.
For example, if a repair starts as a simple curtain-rod install but you discover brittle plaster, hidden wiring, or weak anchors, the safe move is not to keep forcing the issue. The safe move is to pause, rethink the method, and get guidance.
Building a Safety Routine You Can Explain
When you talk with your counselor, do more than recite safe practices. Explain how you would use them in real life. You might say:
- “Before weatherstripping a door, I would clear the floor, gather tools, and make sure the door cannot swing into me.”
- “Before replacing a lamp cord, I would unplug the lamp and keep the new cord beside me so I can compare parts.”
- “Before painting, I would protect the floor, open ventilation, and keep the room free of tripping hazards.”
That kind of answer shows that you understand safety as a working habit. It will also help you succeed in every repair option that follows in this guide.
You have the safety mindset in place. Next, you will choose three supervised outdoor repair options and decide which ones best fit your tools, time, and skill level.
Req 2 — Outdoor Fix-It Options
This requirement gives you six outdoor and exterior repair choices, and you must complete exactly three of them. All six teach a similar lesson: weather, dirt, water, and everyday wear slowly damage tools and surfaces, but careful maintenance can stop small problems from spreading.
Your Options
- Req 2a — Yard Tool Tune-Up: Clean, sharpen, and store a yard tool so it works better and lasts longer. You will learn tool care and safe storage.
- Req 2b — Weatherstripping a Door or Window: Seal an air leak around a door or window. You will learn how comfort and energy efficiency depend on small details.
- Req 2c — Exterior Caulking: Fill cracks or joints exposed to weather. You will practice clean surface prep and precise bead control.
- Req 2d — Patching Concrete or Asphalt: Repair a crack or break in a hard surface before water and freeze-thaw cycles make it worse. You will learn why timing matters in outdoor repairs.
- Req 2e — Screen Repair: Repair or replace a damaged window or door screen. You will practice measuring, tensioning, and neat finishing.
- Req 2f — Replacing a Window Pane: Replace broken glass in a window. You will learn careful removal, safe handling, and why sharp materials demand patience.
How to Choose Your Three
Choosing Your Outdoor Repair Options
Compare the time, tools, and lessons in each job- Best beginner project: Req 2a or Req 2e. Both teach careful hand skills without opening up a major house system.
- Best energy-saving project: Req 2b or Req 2c. These options help stop drafts and water intrusion.
- Best heavy-duty surface repair: Req 2d. Choose this if you want to work with patching compounds and outdoor surfaces.
- Most delicate project: Req 2f. Replacing glass requires extra caution, precise cleanup, and close adult supervision.
- Fastest visible improvement: Req 2b, 2c, or 2e. A sealed door, fresh caulk line, or repaired screen makes a difference right away.
- What you will gain: Tool maintenance builds self-reliance, sealing projects teach prevention, and repair jobs teach you how to restore a damaged item instead of throwing it away.
A good mix for many Scouts is one tool-care project, one weatherproofing project, and one repair project. That gives you a wider range of skills and a better feel for the different kinds of work a home repairer handles.
If you enjoyed the safety planning in Req 1 — Safety Basics, use that same habit here. Before you pick an option, ask what could cut, fall, leak, or require cleanup.
You are ready to start the first option page. Even if you do not choose yard tool maintenance as one of your three, it is a great model for how careful cleaning, inspection, and storage prevent future problems.
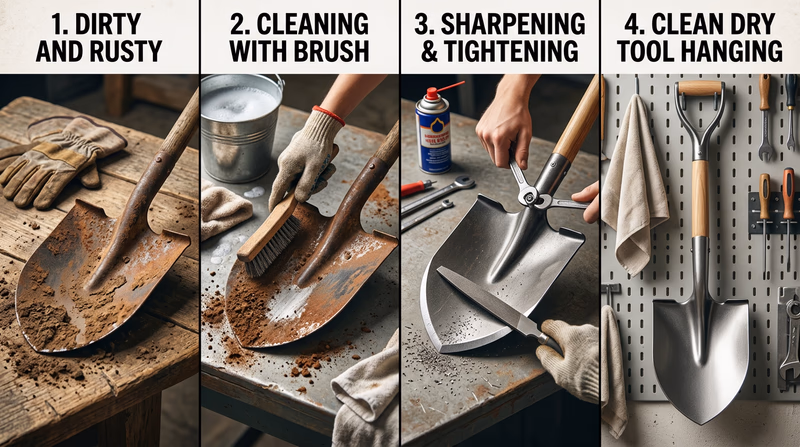
Req 2a — Yard Tool Tune-Up
A rusty shovel, sticky pruners, or a hoe with a loose handle is more than annoying. It is less effective, harder to control, and sometimes unsafe. This requirement teaches one of the most practical repair lessons in the whole badge: tools last longer and work better when you take care of them before they fail.
Choose the Right Tool to Recondition
A good yard tool for this requirement is one that clearly needs attention but is still worth saving. Common choices include shovels, rakes, hoes, trowels, pruning shears, loppers, and post-hole diggers.
Look for these common problems:
- Rust on metal parts
- Dirt or sap stuck on blades
- Dull cutting edges
- Loose screws, nuts, or bolts
- A rough or splintered wooden handle
- Poor storage that leaves the tool exposed to rain or soil
A Simple Reconditioning Process
1. Clean the Tool First
Brush off dirt, grass, and dried mud. A putty knife or stiff brush works well for packed-on debris. If needed, wash the tool and dry it completely so new rust does not form.
2. Remove Rust and Buildup
Light rust can often be removed with steel wool, sandpaper, or a wire brush. For cutting tools like pruners, remove sap and sticky residue carefully so the blades open and close smoothly.
3. Tighten and Inspect
Check all fasteners and moving parts. Tighten what needs tightening. If a handle is loose or cracked, show it to your supervising adult and decide whether that tool is still safe to use.
4. Sharpen if Appropriate
Some yard tools, such as shovels, hoes, and pruning tools, work better with a clean, maintained edge. Sharpen only if the tool is designed for it and you know the correct angle.
5. Protect and Store
Wipe metal surfaces clean and dry. Some adults use a light coat of oil to protect metal from moisture. Store tools off the ground if possible, with blades or sharp edges protected and handles supported.
🎬 Video: How to Clean & Sharpen Your Garden Tools (video) — https://www.youtube.com/watch?v=YzpKDkIOkJM
This video is useful because it shows the full cycle: clean, inspect, sharpen, and protect. As you watch, notice how much easier sharpening and cleanup become when the tool is held steady and the work surface is organized.
Showing That You Know How to Store It
Proper storage is part of the requirement because poor storage causes many of the problems you just fixed.
Good storage means:
- The tool is clean and dry before being put away.
- Sharp or pointed parts are placed where people will not brush against them.
- The tool is stored off wet ground and out of standing water.
- Handles are supported so the tool does not warp, fall, or bend.
- Smaller tools are kept where they are easy to find instead of tossed into a heap.
A shovel leaned carelessly against a wall can slide and fall. Pruners left outdoors can rust shut. A rake left teeth-up in the yard becomes a classic accident. Storage is not an afterthought. It is part of safe tool ownership.
What to Explain to Your Counselor
Show the full story of the repair- What condition the tool was in before you started
- What dirt, rust, looseness, or dullness you found
- What cleaning or sharpening steps you used
- What safety gear you wore and why
- How you now store the tool so it stays ready for the next job
In Req 1 — Safety Basics, you learned to inspect hazards before starting work. Tool maintenance is a perfect place to practice that habit because you notice problems before they become injuries.
Now move to weatherstripping, where the focus shifts from tool care to sealing a home against drafts and wasted energy.
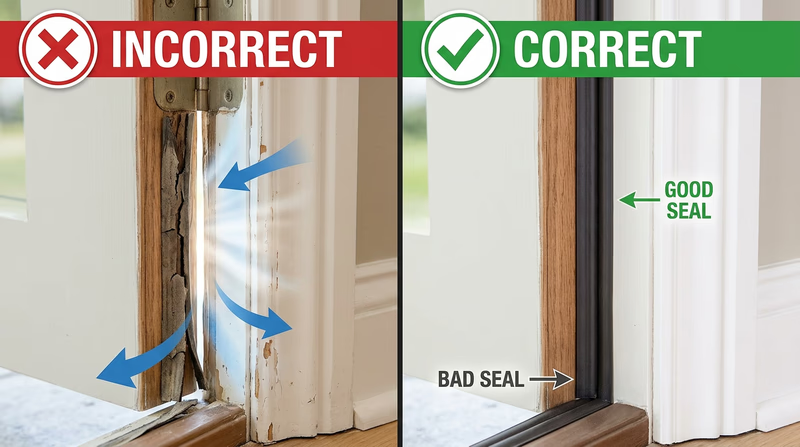
Req 2b — Weatherstripping a Door or Window
If you have ever felt cold air sneaking past a closed door in winter or warm outdoor air leaking in during summer, you have already met the problem weatherstripping solves. It is one of the simplest home repairs in this badge, but it can make a room quieter, more comfortable, and less expensive to heat or cool.
What Weatherstripping Does
Weatherstripping seals the moving joints around doors and operable windows. Unlike caulk, which is usually used on fixed gaps, weatherstripping is designed for places that open and close.
Good weatherstripping should:
- Compress enough to seal a gap
- Spring back after the door or window moves
- Stay attached through repeated use
- Match the size of the gap without making the door or window hard to close
Choosing the Right Spot
A door or window is a good candidate for this requirement if it shows one or more of these signs:
- You can feel a draft near the edges
- Light shows through around a closed door
- Existing weatherstripping is cracked, flattened, or missing
- The frame rattles on windy days
🎬 Video: How to Install Weatherstripping (video) — https://www.youtube.com/watch?v=E3JK2zMR53c
Watch how the installer measures first, cleans the surface, and checks the fit before pressing everything into place. Those steps are what keep the finished job neat and effective.
Steps for a Successful Repair
1. Inspect the Gap
Open and close the door or window. Notice where the gap is widest and where the seal has failed. If the frame itself is damaged or badly out of square, weatherstripping alone may not fully solve the problem.
2. Remove Old Material
Peel away worn weatherstripping and scrape off leftover adhesive if needed. A dirty or uneven surface makes new material fail early.
3. Measure Carefully
Measure each side you need to seal. Cut the new material to length, but do not cut so short that you leave a gap at the corners.
4. Test Before Final Attachment
Set the new strip in place loosely first. Close the door or window and check that it seals without binding.
5. Attach and Recheck
Press or fasten the material as directed, then test the opening again. You want a snug seal, not a forced one.
What You Learn From This Repair
This job teaches a bigger home-repair lesson: prevention saves money. A small air leak can let in moisture, dust, noise, and uncomfortable drafts. Fixing that leak early is much easier than dealing with warped trim, mold, or wasted utility bills later.
This repair also teaches neatness. A crooked or poorly cut strip may still seal for a while, but a clean installation lasts longer and shows that you paid attention to the details.
Next comes exterior caulking, which solves a similar problem on fixed joints that do not move.
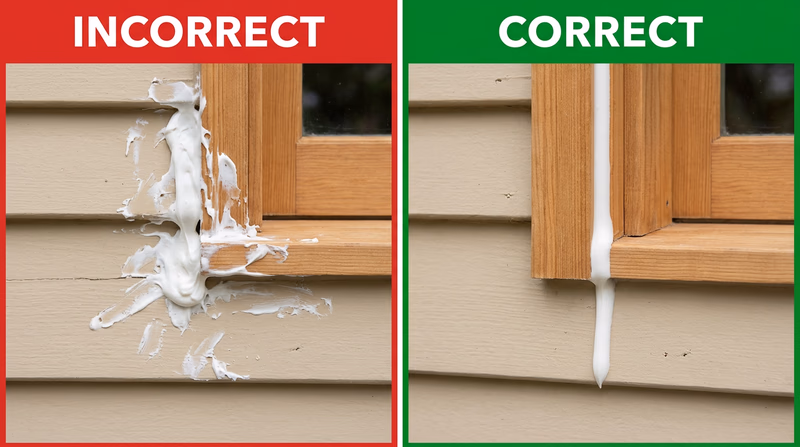
Req 2c — Exterior Caulking
Water is patient. If it finds even a tiny opening around trim, siding, or a window frame, it keeps working on that spot day after day. Exterior caulking is one of the best examples of a small repair that prevents a much bigger one later.
Where Caulk Belongs
Caulk is used on cracks and joints that should stay sealed and mostly still. Good examples include gaps around exterior trim, small joints where siding meets a frame, and narrow openings where water could sneak behind the surface.
Caulk is usually not the right fix for:
- Gaps that are too wide for the product
- Joints designed to drain or vent
- Areas where a missing board, rotten wood, or structural problem needs a true repair first
The Keys to a Good Caulk Job
A neat bead depends on preparation more than speed.
Clean the Surface
Old loose caulk, dirt, and peeling paint make new caulk fail. Remove damaged material and brush the area clean before you begin.
Choose the Right Product
Exterior products are made to handle sun, rain, and temperature changes. Read the label and make sure the caulk is rated for outdoor use and for the materials you are sealing.
Cut a Small Opening First
Many beginners cut the tube opening too wide. Start small. It is much easier to enlarge the opening than to control a bead that is too big.
Move Steadily
Apply the bead with even pressure. The goal is not a giant line of caulk. The goal is enough material to bridge the joint cleanly.
Tool the Bead
Many caulk jobs need to be smoothed right away so the material presses into the joint and sheds water neatly.
🎬 Video: The Secrets to Great Exterior Caulking (Windows, Doors, Trims)! (video) — https://www.youtube.com/watch?v=lS0wiWLFzMw
The resource above is worth watching because it shows how professionals avoid the biggest beginner mistake: adding too much caulk and trying to fix it afterward.
A Good Repair Starts With Judgment
A caulk gun can make it tempting to seal everything you see. That is not smart home repair. Some gaps exist for drainage or movement, and some gaps are warning signs that wood has shifted, failed, or started to rot.
This is where the thinking from Req 1 — Safety Basics matters again. Before you seal a crack, ask what caused it. If the answer is ordinary shrinkage or failed old caulk, this requirement fits well. If the answer is “the wood feels soft” or “the trim is pulling away from the wall,” the real problem may be bigger than caulk.
Signs of a Successful Caulk Repair
What your finished work should show- The old failed material was removed or cleaned up first.
- The new bead follows the joint instead of wandering across the surface.
- The gap is sealed without big globs or missed spots.
- The surrounding area is cleaned up neatly.
- You can explain why this joint needed caulk instead of another repair.
Exterior caulking and weatherstripping both fight drafts and water, but they solve different problems. Weatherstripping handles moving parts. Caulk handles fixed joints. Knowing the difference is part of becoming a smarter repairer.
Next, you will look at a tougher exterior repair: patching a break in concrete or asphalt before weather makes it worse.
Req 2d — Patching Concrete or Asphalt
A crack in a driveway or walkway may not look urgent at first. Then water gets in, winter freezing expands it, weeds push through, and the break gets larger every season. This requirement teaches the repairer’s rule of timing: fix small surface damage early, before nature turns it into a larger and more expensive problem.
Understand the Surface First
Concrete and asphalt are not repaired exactly the same way. They use different patch products and may fail for different reasons.
- Concrete is rigid and can crack from settling, impact, or shrinkage.
- Asphalt is more flexible but can dry out, soften in heat, and break apart under traffic.
The first job is to inspect the damage honestly. Is it a surface crack that can be cleaned and patched, or is the slab or pavement badly shifted, crumbling, or sinking? This requirement works best when the damage is real but manageable.
🎬 Video: How to Fill Asphalt Gaps and Cracks (video) — https://youtu.be/aI3ayjrVJl0?si=UictxFsIutZfuokV
🎬 Video: Repairing a Neglected Driveway Crack (video) — https://youtu.be/xk2lT9D_0wY?si=iclrw2XUIzZ0b5Di
These two videos show an important difference between a quick filler job and a more thoughtful repair. Surface prep, correct product choice, and patient application determine whether the patch lasts.
The Basic Repair Sequence
1. Clear Loose Material
Sweep out dirt, pebbles, weeds, and crumbling fragments. Patch material sticks poorly to a dirty or unstable crack.
2. Dry and Prepare the Area
Many products require a clean, dry surface. Read the instructions before you begin because some compounds have very specific temperature and weather requirements.
3. Use the Correct Patch Material
Match the product to the surface and the size of the break. A narrow crack filler is different from a compound used to rebuild a chunked-out edge or depression.
4. Compact or Smooth as Directed
Some patch materials must be packed tightly. Others are smoothed level with a trowel. Follow the instructions so the repaired area supports weight correctly and sheds water.
5. Protect the Cure Time
A patch is not finished the instant it looks good. It may need time before rain, foot traffic, or vehicle traffic.
What This Repair Teaches
Patching concrete or asphalt teaches you to respect materials and instructions. You cannot force a good result by piling on product. You have to clean first, use the right compound, and let it cure the way the label says.
It also teaches you to look at water differently. Water is often the real enemy behind outdoor surface damage. That makes this requirement connect nicely to Req 2c — Exterior Caulking and later plumbing repairs in Req 5 — Water Shutoffs and Plumbing Fixes.
Next, you will switch from heavy outdoor surfaces to a more delicate repair: restoring a torn or damaged screen.
Req 2e — Screen Repair
A small tear in a screen may seem minor until insects start slipping through and the rip spreads across the frame. Screen repair is a great home repair skill because it rewards patience, neat trimming, and steady pressure more than strength.
What Makes a Good Screen Repair
Whether you patch a small damaged spot or replace the whole mesh, the finished screen should be:
- Secure in the frame
- Smooth and evenly tensioned
- Free of loose edges that can snag or pull out
- Trimmed neatly without cutting too deep
🎬 Video: How to Repair a Window Screen (video) — https://youtu.be/t7emMleueHg
As you watch, notice how the installer keeps the mesh straight and uses the spline to hold even tension. That balance is what prevents wrinkles and loose corners.
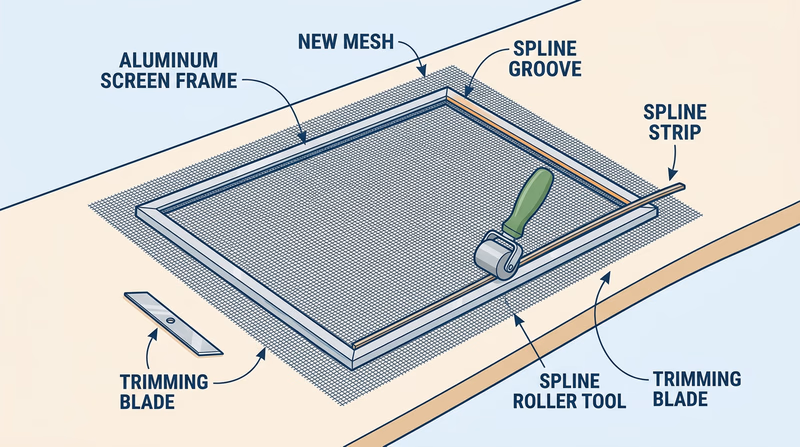
Common Steps in a Full Replacement
1. Remove the Screen Frame Safely
Set it on a flat work surface where it will not twist.
2. Remove the Old Spline and Mesh
The spline is the flexible strip that holds the mesh in the groove. Pull it out carefully so you do not damage the frame.
3. Lay New Mesh Over the Frame
Leave extra material around the edges. That extra gives you room to tension and trim neatly.
4. Press the Spline Back In
Use the proper tool if available and work steadily around the frame. Keep the mesh straight as you go.
5. Trim the Excess Mesh
Use a sharp blade carefully and trim only after the spline is secure.
Repair vs. Replace
A tiny puncture may be patchable, but a screen with multiple tears, brittle mesh, or badly loose edges usually needs full replacement. A repairer’s job is not just doing work. It is deciding which fix makes sense.
That is the same judgment you used in Req 2d — Patching Concrete or Asphalt: first understand the condition, then choose the repair method that fits.
What to Point Out to Your Counselor
Show the difference between a quick patch and a neat repair- Why you chose repair or full replacement
- How you kept the frame flat during the work
- How you avoided wrinkles or slack spots
- How you trimmed the mesh neatly and safely
- How the repaired screen now keeps insects out while still allowing airflow
Next comes the most delicate job in this group: replacing a pane of glass.
Req 2f — Replacing a Window Pane
Broken glass changes the tone of a repair job immediately. What might look like a simple replacement becomes a safety-first project because sharp fragments, old glazing, and exposed window openings can all cause injuries if you rush.
Start With Safety and Supervision
This requirement must be done carefully and with close adult supervision. Before any new glass goes in, the broken pane and surrounding frame need to be made safe.
What the Job Usually Involves
The exact steps vary by window type, but the basic process often includes:
- Removing loose broken glass safely
- Cleaning old glazing material or other holding components from the frame
- Measuring the opening accurately
- Fitting the replacement pane
- Securing it according to the window design
- Cleaning up every piece of debris afterward
🎬 Video: How to Replace a Broken Window Pane (video) — https://youtu.be/Dc67opK57sk?si=xnMQ0ueGHn6NUdtN
This is a good resource because it shows how much of the work happens before the new glass is even touched. Careful cleanup, measurement, and frame preparation matter just as much as the final installation.

Why Measuring Matters So Much
A pane that is too large may not fit safely. A pane that is too small may rattle, leave gaps, or sit poorly in the frame. Window repairs reward accuracy.
That makes this requirement a good reminder that home repair is not only about force or tools. Sometimes the most important skills are patience, observation, and clean technique.
What Your Counselor Should See
Your counselor will not just be looking for “new glass installed.” They will be looking for whether you handled a fragile and hazardous material responsibly.
You should be able to explain:
- How you kept the area safe during removal
- How you measured or checked the replacement size
- How you cleaned and prepared the frame
- How you disposed of broken glass safely
- What supervision was especially important for this task
After this final outdoor option, the guide shifts into workshop and structure repairs. Those next projects will still require care, but they trade broken glass and weather exposure for measuring, fastening, support, and finish work.
Req 3 — Shop and Structure Projects
This requirement moves from outdoor maintenance to workshop and structure projects. You still choose exactly three options, but these jobs focus more on alignment, support, fastening, finish work, and how everyday objects hold together.
Your Options
- Req 3a — Tool Storage Solutions: Install or build a place to store tools. You will learn organization, spacing, and safe access.
- Req 3b — Building a Workbench: Create a stable work surface. You will learn measuring, squaring, and structural support.
- Req 3c — Furniture Repair: Restore a damaged item instead of replacing it. You will learn diagnosis, cleanup, and clamping or fastening.
- Req 3d — Painting and Varnishing: Improve and protect a surface with careful finishing. You will learn prep, coats, and patience.
- Req 3e — Fixing a Sagging Door or Gate: Correct a problem caused by alignment, looseness, or poor support. You will learn how structures move over time.
- Req 3f — Repairing Steps and Railings: Restore stability to something people rely on for safety. You will learn why secure fasteners and solid support matter.
- Req 3g — Fence Repair: Fix a damaged section of fence. You will learn layout, support, and weather exposure.
How to Choose Your Three
Choosing Your Workshop Projects
Think about the kind of skill each project develops- Best for organization: Req 3a. Great if your home or garage truly needs a better storage setup.
- Best for building from scratch: Req 3b. Choose this if you want a true construction project with measuring and assembly.
- Best for restoration: Req 3c or Req 3d. These are good if you enjoy bringing something worn back to life.
- Best for learning alignment: Req 3e. A sagging gate or rubbing door teaches you how small shifts change performance.
- Best for safety-focused structure repair: Req 3f. This option matters because loose steps and rails can injure people.
- Best outdoor structure project: Req 3g. Choose it if you want to work on something exposed to weather and ground movement.
- What you will gain: These projects train you to notice how joints, fasteners, finishes, and supports work together in real objects.
A strong set of three might include one storage or building project, one finish or furniture project, and one structural repair project. That combination gives you a broad picture of how repair work can organize, restore, and strengthen a home.
After choosing your three, begin with tool storage. It is a practical project that improves the workspace for every other repair you might do later.
Req 3a — Tool Storage Solutions
A cluttered tool area slows every job down. It wastes time, hides sharp edges, and makes it easy to lose the exact tool you need. This requirement teaches that organization is not just neatness. It is part of safe, efficient repair work.
What Counts as Tool Storage Equipment
This requirement can include pegboard setups, wall racks, shelves, holders for long-handled yard tools, simple bins, or another organized system approved by your supervising adult. The best project solves a real storage problem.
🎬 Video: 80 Tool Storarge Ideas (video) — https://www.youtube.com/watch?v=txhES7lKfCI
🎬 Video: Easy Scrap Wood Yard Tool Organizer (video) — https://www.youtube.com/shorts/L0CgzmPzOeI
These resources are helpful because they show two different scales of the same idea: big-picture planning and small, practical storage solutions.
What Makes Storage Good
Good tool storage does three things:
- Keeps tools easy to find
- Prevents tools from falling, rusting, or getting damaged
- Keeps sharp, heavy, or awkward items from becoming hazards
A shovel rack that tips over is not a good solution. A pegboard where tools overlap and fall off is not much better than a pile. Think about weight, spacing, and how the tools are actually used.
Storage Design Questions
Plan before you install or build- Which tools need a place right now?
- Which are long, heavy, sharp, or oddly shaped?
- Will the storage be mounted securely to a wall or support?
- Can each tool be removed without knocking another one loose?
- Will the setup keep metal parts dry and off the floor?
In Req 2a — Yard Tool Tune-Up, you learned why tool storage affects tool life. This requirement turns that idea into a permanent solution.
Req 3b — Building a Workbench
A workbench is more than a table. It is a surface designed to stay steady while you measure, clamp, sand, drill, or assemble. Building one teaches some of the most useful ideas in repair work: level surfaces, square corners, strong joints, and support where weight actually lands.
🎬 Video: DIY Simple Workbench (video) — https://www.youtube.com/watch?v=TRp4FaT24BA
What a Good Workbench Needs
Even a simple workbench should be:
- Stable and not wobbly
- Flat enough for accurate work
- Strong enough for the tools and projects you plan to use on it
- Sized to fit the space where it will live
Many benches fail because the builder thinks only about the top. The legs, lower bracing, and connections are what keep the bench from twisting under load.
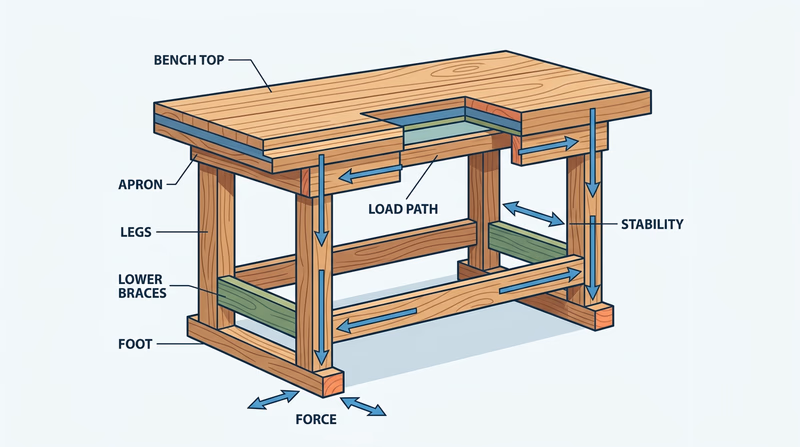
Skills This Project Teaches
A workbench project makes you practice:
- Measuring and marking accurately
- Checking whether parts are square
- Understanding how legs, top, and braces share weight
- Choosing fasteners or joinery that fit the design
- Testing the finished structure for wobble or uneven legs
When you explain this requirement to your counselor, talk about how you kept the bench sturdy. That is the heart of the project.
Req 3c — Furniture Repair
A loose chair rung, broken sofa leg, or separated drawer front can make a good piece of furniture feel ready for the trash. Furniture repair teaches the opposite idea: many everyday items can be restored if you understand where the failure happened and fix the real cause instead of hiding the symptom.
🎬 Video: Sofa Leg Frame Repair (video) — https://www.youtube.com/watch?v=X_3jmub6U0g
🎬 Video: Fix Split Furniture with Wood Glue (video) — https://www.youtube.com/watch?v=66rQe_aB1v0
Diagnose Before You Repair
Furniture can fail in different ways:
- A glue joint may have separated
- A screw or fastener may have loosened
- A leg or brace may have cracked
- A moving part like a drawer may be out of alignment
The smartest repair starts with observation. Wiggle the part gently, look for movement, and identify what is actually loose or broken.
What Makes Furniture Repair Different
Furniture is both structural and visible. A repair has to hold, but it also has to look reasonably neat because people use and see the item every day.
That means cleanup matters. Wipe up excess glue, align parts carefully, and let repairs cure or set fully before testing them. Rushing the final step can undo the whole job.
This project pairs naturally with Req 3d — Painting and Varnishing, where the focus shifts from making the item solid to making the surface look good and stay protected.
Req 3d — Painting and Varnishing
A bad paint job is easy to spot: drips, brush marks, missed edges, dust stuck in the finish, or a surface that starts peeling early. A good finish looks smooth because most of the work happened before the paint or varnish went on.
🎬 Video: Refurbishing a Table (video) — https://youtube.com/shorts/bIis1JZHoKI?si=OxxplR648XUIuUcE
🎬 Video: 3 BIG Door Painting Mistakes DIYers Don't Know They're Making (video) — https://youtu.be/cKOgJmwtigA?si=boGzDnTPu5HUT2KE
Prep Is the Real Project
Before finishing a surface, you often need to:
- Clean away dust, grease, or old residue
- Sand rough spots or failing finish
- Fill small imperfections if needed
- Protect nearby surfaces with drop cloths or tape
- Stir the finish thoroughly and use the right applicator
Paint covers the surface with color and protection. Varnish or a clear finish protects the material while letting the grain show through. In either case, neat prep leads to neat results.
A Better Finish Checklist
Simple habits that improve the final look- Start with a clean, dry surface.
- Use thin, even coats instead of heavy ones.
- Watch edges and corners where drips often form.
- Let each coat dry as directed before adding the next.
- Inspect in good light so you catch misses before cleanup.
Painting and varnishing teach patience. If you rush drying time or slap on thick coats, the result often looks worse than before you started.
Req 3e — Fixing a Sagging Door or Gate
A sagging door tells you something important: parts that used to share weight correctly no longer do. The latch may miss, the bottom edge may rub, or the whole door may lean. This requirement teaches you to look at hinges, screws, framing, and support as a system.
🎬 Video: How to Fix a Sagging Door That's Rubbing or Won't Close!!! (video) — https://www.youtube.com/watch?v=ZcDj6g2UODw
Why Doors and Gates Sag
Common causes include:
- Loose hinge screws
- Worn hinge holes
- A gate brace that is missing or failing
- Wood movement from moisture or age
- Posts or frames that have shifted over time
The best repair depends on the cause. Tightening a hinge may solve one problem, but a sagging gate with weak support may need brace work instead.
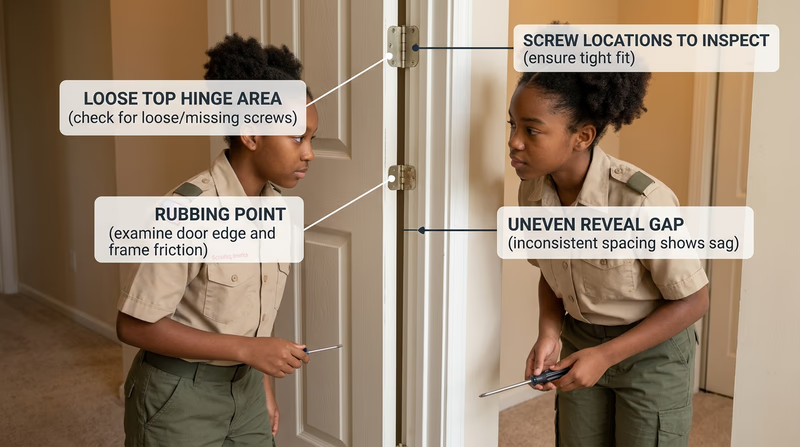
What to Explain to Your Counselor
- What the door or gate was doing before the repair
- What you identified as the likely cause
- What adjustment or repair you made
- How you tested whether the problem was fixed
This is a good project for learning that home repair often starts with diagnosis, not tools.
Req 3f — Repairing Steps and Railings
A loose railing or shifting stair tread is not just annoying. It is a direct safety hazard because people trust those surfaces with their full weight. This requirement teaches how important secure connections are in parts of a home people use every day without thinking.
🎬 Video: How to Repair a Broken Stair Tread (video) — https://www.youtube.com/watch?v=b4ixXEoCMRw
🎬 Video: How to Repair a Loose Newel Post (video) — https://youtu.be/u6_TNkcGL5I?si=IZ3WIUKz3Ldi2VXw
What Makes This Repair Important
Unlike a cosmetic problem, a loose step or railing can cause a fall. That means your repair should focus on solid attachment, not just appearance.
Look for:
- Movement where the part should be rigid
- Missing or backing-out fasteners
- Cracks in the support piece
- Rot, splitting, or worn connection points
This project connects closely to Req 3e — Fixing a Sagging Door or Gate. In both cases, the big lesson is that movement tells you something has loosened, shifted, or weakened.
Req 3g — Fence Repair
A fence has one job: hold its line while facing weather, ground movement, and repeated use. When a section leans, loosens, or breaks, the real question is not just how to reattach a board. It is what part of the fence system failed.
🎬 Video: How to Repair a Fence (video) — https://www.youtube.com/watch?v=y1ZIZhl-Cik
Think in Parts
A fence usually depends on posts, rails, fasteners, and panels or pickets. Damage may come from rot, impact, loose hardware, or shifting soil.
That means your repair may involve:
- Reattaching a loose board or rail
- Replacing damaged hardware
- Correcting alignment on a section
- Cleaning up and stabilizing the area around the damaged part
Fence repair is a strong final option in this group because it combines many ideas from earlier requirements: careful inspection, safe tool handling, alignment, and protection against weather.
Now the guide shifts into electrical basics, where the safety rules become even stricter.
Req 4 — Safe Electrical Repairs
Electricity is the part of home repair where confidence must stay matched to caution. You must choose exactly two of these options, and every one starts with the same first step: make the circuit safe before touching any electrical part.
Your Options
- Req 4a — Breakers and Fuses: Learn where the main electrical panel is and how to reset or replace protection devices. You will gain system awareness and emergency readiness.
- Req 4b — Cords, Plugs, and Sockets: Repair a plug, lamp socket, or cord. You will learn safe disassembly and reconnection of common household parts.
- Req 4c — Installing a Light Switch: Replace a basic single-pole switch. You will learn orderly wiring and careful device installation.
- Req 4d — Replacing an Outlet: Replace a wall outlet. You will learn secure terminal connections and box safety.
How to Choose
Choosing Your Electrical Options
Pick the two that best fit your home and supervision- Best starting point: Req 4a. Everyone should know where the main switch box is and how to respond to a tripped breaker.
- Best small-device repair: Req 4b. Good for learning wiring concepts on something portable and familiar.
- Best wall-switch project: Req 4c. Useful if your home has a simple switch needing replacement.
- Best outlet project: Req 4d. Good if a worn outlet cover or receptacle needs supervised replacement.
- What you will gain: These projects build respect for shutdown procedures, wire organization, and why correct connections matter.
This section connects directly back to Req 1 — Safety Basics. Electrical work is where “stop if you are unsure” becomes especially important.
Req 4a — Breakers and Fuses
When lights go out or a circuit stops working, the fix may be at the panel before it is anywhere else. This requirement teaches you how a home protects itself from overloads and short circuits — and how to respond safely when that protection activates.
🎬 Video: How to Replace Fuses and Reset Breakers (video) — https://www.youtube.com/watch?v=bHQMCovwwAo
🎬 Video: How Fuses and Circuit Breakers Work (video) — https://youtu.be/gDBUqeqx5t4?si=mekwTqgiejSBx6OJ
What You Should Know
You should be able to locate the main electrical panel and explain:
- Which switch or breaker disconnects power
- How to identify a tripped breaker
- The difference between a fuse and a breaker
- Why a breaker trips or a fuse blows in the first place
A breaker is designed to trip and then be reset. A fuse protects a circuit by sacrificing itself and must be replaced with the correct type and rating.
Knowing where the panel is matters during emergencies too. A fast shutoff can make later repairs safer, especially in electrical and water-related problems.
Req 4b — Cords, Plugs, and Sockets
A damaged cord or loose lamp socket is a common household problem, but it is not something to ignore. Frayed insulation, bent prongs, or a broken connection can create heat, sparks, or shock hazards.
🎬 Video: How to Replace a Lamp Cord (video) — https://youtu.be/SsvPe1bo2Qs?si=I7LQZlgGuur8XkG3
What This Repair Teaches
This job helps you understand that electrical parts are organized for a reason. Wires must be connected to the correct terminals, strain relief matters, and damaged parts should not be “good enough for now.”
Good habits include:
- Unplugging the item first and keeping it unplugged
- Taking note of how the old part is connected before removing it
- Matching replacement parts correctly
- Tightening connections securely without damaging terminals
The lesson here is similar to furniture repair: order matters. Take things apart carefully, keep track of parts, and put them back together intentionally.
Req 4c — Installing a Light Switch
A single-pole switch is one of the simplest wall devices in a house, but the repair still demands exact shutdown and careful reconnection. The reward is learning how a very common home control works from the inside.
🎬 Video: How to Replace a Light Switch (video) — https://www.youtube.com/watch?v=HreHB638a2g
What to Focus On
This requirement is about more than swapping old for new. It is about understanding the process:
- Turn off the correct breaker
- Verify power is off
- Remove the switch carefully
- Observe how the wires were connected
- Install the replacement device securely
- Restore the cover and test the result safely
This project is a good test of neatness. Wires should not be forced into a messy tangle, and the finished device should sit straight in the box.
Req 4d — Replacing an Outlet
Outlets seem ordinary because you use them every day, but they are one of the main access points to household electricity. Replacing one safely means working methodically and treating every connection as important.
🎬 Video: How to Replace Outlets, Light Switches and GFCI Plugs (video) — https://youtu.be/drsaKC6_gYw?si=xfZ534IbYV6IsYgI
🎬 Video: How to Change an Outlet (video) — https://www.youtube.com/watch?v=OC-b-00d-R0
What Makes an Outlet Repair Successful
A successful repair means:
- Power was shut off and verified off
- The correct replacement outlet was used
- Connections were secure and organized
- The outlet sat properly in the box
- The cover plate finished flat and tidy
It also means understanding when not to continue. If the box is crowded, the wires are damaged, or the setup does not match what you expected, that is not failure. That is good judgment.
After this electrical section, the guide moves into plumbing — another home system where fast shutoff knowledge can prevent bigger problems.
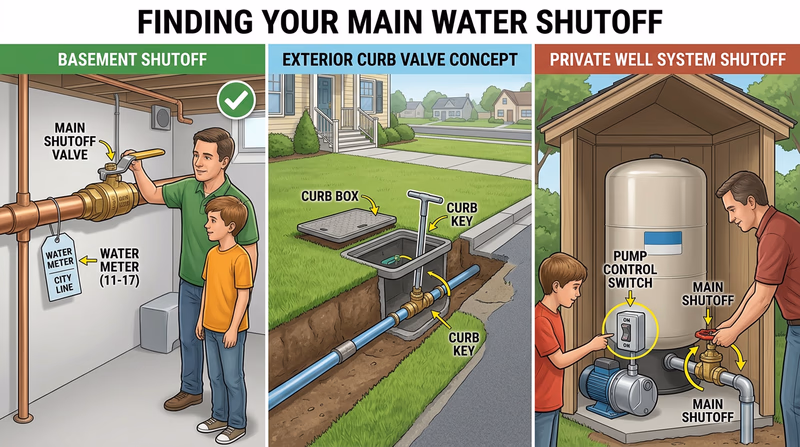
Req 5 — Water Shutoffs and Plumbing Fixes
This requirement begins with the most important plumbing skill of all: knowing how to stop water quickly. After that, you choose exactly two plumbing repairs. Some focus on clogs, some on leaks, and some on fixtures, but they all build the same habit — act early before water damage grows.
This Requirement Covers Two Parts
- Part one: locate and understand the main water shutoff, including well pump shutdown if your home uses one.
- Part two: choose two plumbing repair options from 5a through 5e.
Why the Main Shutoff Matters
A leaking hose can waste water. A failed supply line can flood a room. Knowing how to turn off the main supply can save floors, cabinets, drywall, and a lot of cleanup time.
🎬 Video: Two Methods to Turn Off Your Homes Water Supply (video) — https://youtu.be/aDkaq8RKFAc?si=pLStQ8VDEfPAyLUX
🎬 Video: Main Water Shutoff Valve for Private Pumps and Wells (video) — https://youtu.be/QKUWWgr2kcQ
🎬 Video: How to Shut Off the Water Main to Your Home (video) — https://youtu.be/4RhYOAygA7I?si=FQPSokR-DPv43nQz
These resources are valuable because they show that not every home is set up the same way. Municipal water systems, basement shutoffs, curb-side shutoffs, and private wells all change where the key controls are.
Your Repair Options
- Req 5a — Clearing a Drain or Trap: Remove a clog or clean a trap. You will learn flow paths and why blockages form.
- Req 5b — Fixing a Leaky Faucet: Stop a drip by repairing faucet parts. You will learn how small worn components create constant waste.
- Req 5c — Repairing a Toilet: Fix a common flush or running problem. You will learn how simple tank parts control the whole system.
- Req 5d — Repairing a Hose or Connector: Stop leaks at a hose or fitting. You will learn seals, washers, and connection care.
- Req 5e — Cleaning or Replacing a Sprinkler Head: Restore proper spray and coverage outdoors. You will learn how debris and wear affect irrigation.
How to Choose Your Two
Choosing Your Plumbing Options
Pick the projects that match real needs at home- Best starter repair: Req 5d. Hose repairs are easy to understand and show quick results.
- Best indoor maintenance project: Req 5a or Req 5b. Good for learning how water systems behave inside the home.
- Best system-understanding project: Req 5c. Toilets show how several simple parts work together.
- Best outdoor water-use project: Req 5e. Great if your home has an irrigation system.
- What you will gain: These repairs train you to locate shutoffs, work neatly around water, and solve small problems before they become bigger leaks.
Now begin with drains and traps, where the goal is to understand how water flow gets blocked and how to restore it safely.
Req 5a — Clearing a Drain or Trap
A sink that drains slowly is giving you an early warning. Somewhere in the path below the fixture, hair, grease, soap residue, or debris is narrowing the flow. Clearing a drain or trap teaches you to think about plumbing as a path water has to travel, not just as a hole in the sink.
🎬 Video: How to Unclog Any Drain (video) — https://www.youtube.com/watch?v=LpDLynrXln8
What a Trap Does
The trap is the curved section below many drains. It holds a small amount of water that blocks sewer gases from coming back into the room. Because it is low and curved, it is also a common place for debris to collect.
Start With the Least Invasive Fix
Depending on the situation and your supervising adult’s guidance, you may start with:
- Clearing visible debris at the drain opening
- Using a plunger correctly
- Opening and cleaning a trap
- Reassembling and testing for leaks afterward
This requirement teaches you to prepare before loosening anything. Water always comes out faster than many beginners expect.
Req 5b — Fixing a Leaky Faucet
A dripping faucet may sound small, but the steady drip tells you a seal, cartridge, or other internal part is no longer doing its job. This requirement is a great lesson in how a tiny part can control a very noticeable problem.
🎬 Video: How to Repair a Leaking Faucet (video) — https://www.youtube.com/watch?v=zMH61Yabdj0
The Big Idea Behind Faucet Repair
Faucets stop water by pressing internal parts into place. When those parts wear down, loosen, or collect mineral buildup, the seal is no longer perfect.
A good repair usually includes:
- Shutting off the local water supply first
- Keeping parts in order during disassembly
- Matching replacement parts correctly
- Reassembling carefully and testing slowly
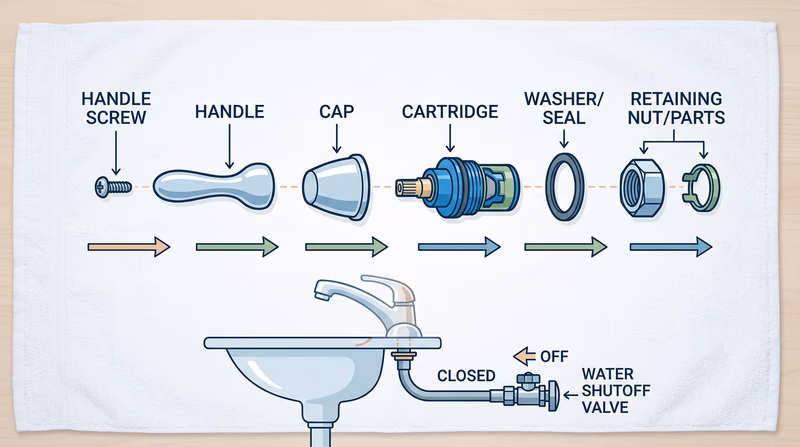
This repair pairs nicely with Req 5d — Repairing a Hose or Connector because both problems often come down to seals, washers, or worn connections.
Req 5c — Repairing a Toilet
Most toilet problems feel mysterious until you lift the tank lid and watch how the parts work together. This requirement teaches a powerful home-repair lesson: many systems become easier once you can see the sequence of what is supposed to happen.
🎬 Video: How to Fix a Running Toilet: The Two Most Common Causes (video) — https://www.youtube.com/watch?v=NQ2AXvqgfPM
🎬 Video: Fix a Running Toilet...Fill Valve Replacement (video) — https://www.youtube.com/watch?v=7K6pcLYrJJs
What to Observe
A toilet repair often starts with asking:
- Is it running constantly?
- Is it failing to refill?
- Is it not flushing completely?
- Is the chain, flapper, or fill mechanism the likely problem?
Watch the tank through one full flush cycle. That will often tell you what is not closing, lifting, or refilling correctly.

Toilet repair is a great example of how observation saves time. If you understand the sequence, you can focus on the part that failed instead of replacing things blindly.
Req 5d — Repairing a Hose or Connector
A hose leak often looks dramatic because the water sprays in all directions, but the underlying cause is usually simple: a split hose end, worn washer, loose fitting, or damaged connector. This requirement is a good reminder that some of the best repairs start with the smallest parts.
🎬 Video: How to Repair a Garden Hose (video) — https://www.youtube.com/watch?v=aOmnHQMBEW4
What to Check First
- Is the leak at the hose body or at the end fitting?
- Is a washer missing or worn out?
- Are the threads damaged or dirty?
- Is the connector tightened correctly but still leaking?
The advantage of this repair is that the system is easy to test. Turn the water on slowly and watch exactly where the leak starts.
This is one of the most accessible plumbing repairs in the badge because the cause-and-effect is easy to see. It is also a great first lesson in why a $1 washer can matter more than a whole new hose.
Req 5e — Cleaning or Replacing a Sprinkler Head
When a sprinkler sprays crookedly, misses part of the lawn, or spits more than it sprays, the cause is often dirt, damage, or wear in the head itself. This requirement shows how outdoor plumbing can be about accuracy, not just flow.
🎬 Video: Replace a Sprinkler Head in 5 Minutes (video) — https://www.youtube.com/watch?v=Fu9rKGWbbMw
🎬 Video: How to Clean a Sprinkler Head (video) — https://www.youtube.com/watch?v=K6qXBbpL8VE
Why This Repair Matters
An irrigation system that sprays the sidewalk or misses dry spots wastes water and does a poor job at the same time. Cleaning or replacing a sprinkler head teaches you to look at performance, not just whether water comes out at all.
Key things to notice include:
- Clogged nozzles or debris
- Heads that do not pop up properly
- Cracked or damaged sprinkler bodies
- Spray patterns that no longer match the area being watered
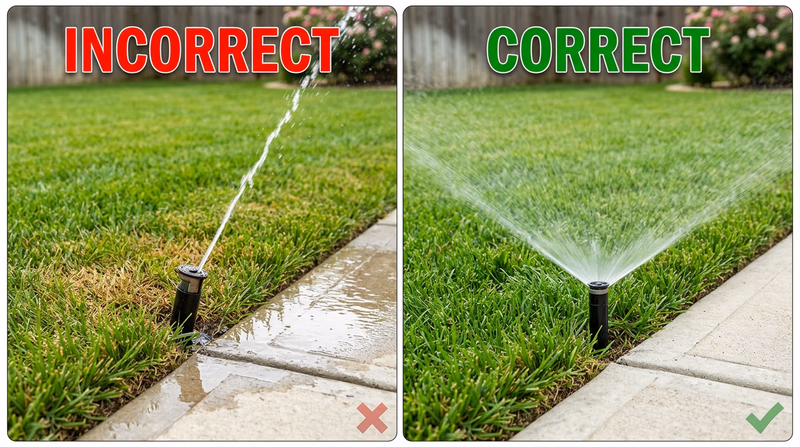
Plumbing repairs often reward observation more than force, and sprinkler work is a great example. A careful adjustment or cleaning can solve what first looked like a bigger problem.
Next, the guide shifts indoors again for finish repairs like painting, flooring, drywall, and hardware.
Req 6 — Interior Repair Options
This requirement focuses on the parts of a home people see and use every day: walls, floors, window coverings, drywall, anchors, frames, pottery, drawers, and cabinet hardware. You must choose exactly three options, and these projects all teach a common lesson: neat, careful interior work depends on prep, alignment, and patience.
Your Options
- Req 6a — Painting a Wall or Ceiling: Improve a room with prep, coverage, and clean edges. You will learn finish discipline.
- Req 6b — Repairing Flooring: Fix damaged tile, linoleum, or vinyl. You will learn careful removal and patching.
- Req 6c — Hanging Curtains or Drapes: Install rods and hang fabric neatly. You will learn measurement and level placement.
- Req 6d — Patching Drywall: Repair a hole cleanly. You will learn backing, patching, and sanding.
- Req 6e — Using Drywall Anchors: Secure a wall-hung item properly. You will learn load support and anchor choice.
- Req 6f — Reinforcing a Picture Frame: Strengthen a frame so it holds together better. You will learn corner support.
- Req 6g — Mending China, Glass, or Pottery: Repair a fragile item carefully. You will learn alignment and adhesive patience.
- Req 6h — Drawer and Cabinet Hardware: Fix drawer slides or replace pulls. You will learn smooth operation and neat hardware installation.
How to Choose Your Three
Choosing Your Interior Repair Options
Pick a set that gives you different kinds of practice- Best wall-and-room project: Req 6a or Req 6d. Both teach prep and finish quality.
- Best measurement-and-alignment project: Req 6c or Req 6e. Good for learning layout and level placement.
- Best small-object repair: Req 6f or Req 6g. Good if you want detail-oriented handwork.
- Best hardware/function project: Req 6h. Great if a drawer or cabinet already needs attention.
- Best surface repair project: Req 6b. Good if your home has worn vinyl, linoleum, or damaged tile.
- What you will gain: These repairs build clean habits, visual accuracy, and the patience to make a finished repair look intentional instead of rushed.
If you want a balanced set of three, try one wall or surface job, one hanging or hardware job, and one small object repair. That mix covers a lot of the fine-detail work common inside a home.
Start with painting, where the clearest lesson is that a smooth result comes from the steps you do before the brush or roller ever touches the wall.
Req 6a — Painting a Wall or Ceiling
Painting looks simple until you notice all the places where a rushed job gives itself away: roller lines, drips, missed edges, paint on the trim, and thin spots that show through after drying. This requirement teaches that neat finish work starts long before the first stroke.
🎬 Video: How to Paint a Wall (video) — https://www.youtube.com/watch?v=ftDSnccAx_Q
The Big Three: Prep, Coverage, Cleanup
Prep means clearing the area, protecting surfaces, fixing small flaws, and making sure the wall is clean and dry.
Coverage means using even strokes, keeping a wet edge, and checking that your roller or brush reaches corners and edges without leaving heavy buildup.
Cleanup means removing tape carefully, storing tools properly, and leaving the room better than you found it.
Painting Habits That Improve Results
Simple steps that matter more than people expect- Protect floors and nearby trim first.
- Stir paint thoroughly before use.
- Start with manageable sections instead of racing the whole wall.
- Watch for drips immediately rather than hoping they disappear.
- Check your work in changing light before putting tools away.
Painting is a strong first option in this group because it teaches patience and visible quality control.
Req 6b — Repairing Flooring
Flooring repairs demand accuracy because the finished surface is used constantly and seen from every angle. A patch that is slightly high, poorly aligned, or badly trimmed will remind people of the repair every time they walk across it.
🎬 Video: How to Patch a Sheet Vinyl Floor (video) — https://www.youtube.com/watch?v=hPh6XEDUHeE
What to Watch For
- Is the damage a tear, crack, chip, or loose edge?
- Is the repair mostly cosmetic, or is the material lifting and becoming a trip hazard?
- Can the damaged piece be matched, trimmed, and seated cleanly?
This project teaches close measuring and neat edge work, much like Req 2e — Screen Repair, but with a surface people walk on instead of a frame they look through.
Req 6c — Hanging Curtains or Drapes
A curtain rod that is even slightly crooked is easy to notice every time you enter the room. That is why this requirement is really about layout and measuring, not just putting brackets on a wall.
🎬 Video: How to Hang Curtain Rods (video) — https://www.youtube.com/watch?v=bJr6jPYs5_I
Skills This Project Builds
- Measuring left and right placement evenly
- Checking level before drilling or mounting
- Choosing a mounting point strong enough for the rod and fabric
- Testing how the curtain hangs and moves once installed
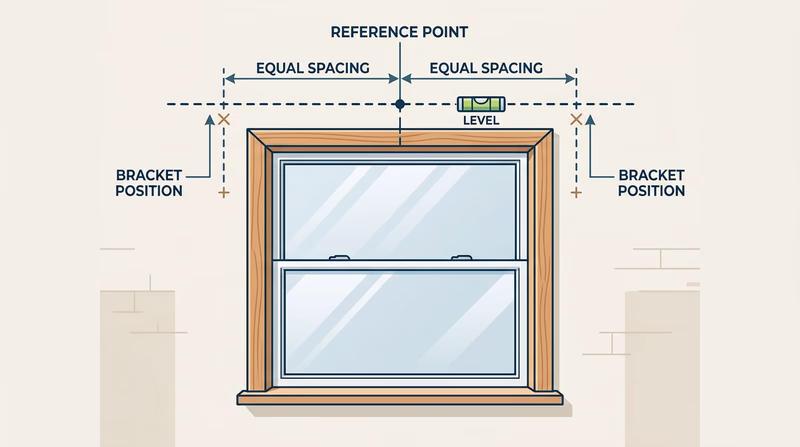
This requirement pairs naturally with Req 6e — Using Drywall Anchors because both involve securing something to a wall in a way that looks neat and stays strong.
Req 6d — Patching Drywall
Drywall holes are common because walls take bumps from doorknobs, furniture, and everyday accidents. What makes this repair satisfying is that it turns obvious damage into a smooth surface again — but only if you build the patch in stages instead of trying to hide the hole all at once.
🎬 Video: How to Patch a Drywall Hole (video) — https://youtu.be/PLGmTzEGSIY
The Main Idea
A good drywall patch usually depends on three things:
- The patch has backing or support if needed
- The repair compound is built up in controlled layers
- The surface is sanded smooth enough to blend before painting
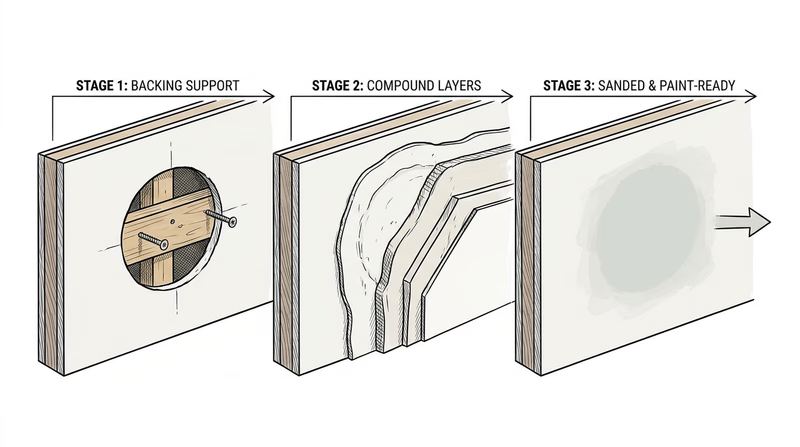
Drywall repair is a strong example of patience in home repair. Rushing the sanding or adding too much compound at once usually makes more work later.
Req 6e — Using Drywall Anchors
Drywall looks solid, but by itself it is not meant to hold much weight from a single screw. This requirement teaches an important idea: the visible surface is not always the thing doing the real work. The anchor is what spreads the load and keeps the object secure.
🎬 Video: How to Use Drywall Anchors for Hanging Pictures and More (video) — https://youtu.be/WL7ha82XrxI
Why Anchors Matter
Different anchors are designed for different loads and wall conditions. A picture frame and a plant hanger may look similar once hung, but they can place very different forces on the wall.
That means the job starts with judgment:
- How heavy is the object?
- Will it stay still or swing and move?
- Does the wall surface need an anchor, or is there a stud available?
Anchor Questions to Answer First
Think before you drill or drive- What is the object’s weight?
- Is the anchor rated for that kind of load?
- Will the object pull straight down or away from the wall?
- Is the height and placement level and centered?
- Will the finished installation be safe if someone bumps it lightly?
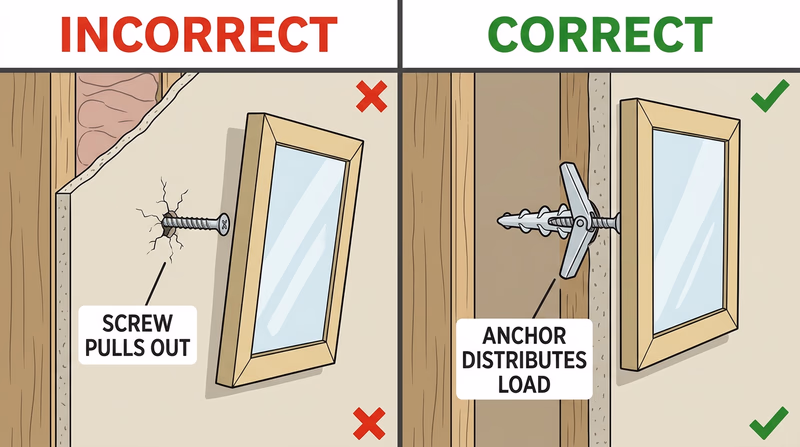
This project connects directly to Req 6c — Hanging Curtains or Drapes: good placement matters, but support matters just as much.
Req 6f — Reinforcing a Picture Frame
Picture frames often fail at the corners because that is where the parts meet and where the whole frame resists twisting. Reinforcing a frame teaches a compact version of a bigger structural lesson: corners matter.
🎬 Video: How to Reinforce Wood Picture Frame Corners (video) — https://www.youtube.com/watch?v=c7s3EVrUx78
🎬 Video: Reinforced Picture Frame (video) — https://www.youtube.com/watch?v=Q3e_kbg-EmM
What to Look For
- Are the corners opening up?
- Is the backing still fitting squarely?
- Does the frame rack or twist when handled?
A good reinforcement keeps the frame aligned without making the repair look clumsy or uneven.

This project pairs well with Req 3c — Furniture Repair because both ask you to find the weak joint and strengthen it cleanly.
Req 6g — Mending China, Glass, or Pottery
Fragile repairs demand a different attitude from construction projects. Force does not help. Speed does not help. You succeed by handling pieces gently, understanding how they fit, and giving adhesives the time they need.
🎬 Video: How To Fix Broken Ceramics (video) — https://www.youtube.com/watch?v=Rg4q0g8zXi8
🎬 Video: The Best Trick for Fixing Broken Ceramics (video) — https://www.youtube.com/watch?v=M2vtfNxHVv0
What This Requirement Teaches
- Align pieces before applying adhesive
- Work on a protected surface where pieces cannot roll or slide
- Keep track of all fragments so the repair stays complete
- Let the repair cure fully before testing it
This project echoes Req 2f — Replacing a Window Pane in one important way: fragile materials punish rushing.
Req 6h — Drawer and Cabinet Hardware
When a drawer sticks or a cabinet pull starts loosening, people often keep using it until the damage gets worse. This requirement teaches a better habit: address hardware problems while they are still small and before screw holes, slides, or drawer faces wear out further.
🎬 Video: How to Repair and Replace Broken Plastic Drawer Guides (video) — https://youtu.be/52B3gGZ_AtE?si=h9gz40ON9llrkClY
🎬 Video: How to Repair a Drawer Slide (video) — https://youtu.be/7Mp60UHj0Yw?si=gsV2wsY2K5NHg-G5
What to Notice
- Is the drawer rubbing because the slide is damaged, loose, or dirty?
- Is the pull loose because screws backed out, or because the mounting holes are worn?
- Does the hardware line up correctly after the repair?
This job is about function and neatness at the same time. A drawer that closes smoothly and a pull that sits straight both show careful work.
Next, the guide turns from hands-on repairs to future paths — either careers in the field or ways to build these skills into a long-term hobby.
Req 7 — Future Paths in Home Repairs
This final requirement asks you to choose one future-facing path. You can either explore a career related to home repairs or think about how these skills could support a hobby or healthy lifestyle. Both options are about seeing this badge as the beginning of something larger, not the end of a checklist.
Your Options
- Req 7a — Exploring a Home Repair Career: Research a job in maintenance, trades, or repair work. You will learn about training, duties, pay, and advancement.
- Req 7b — Building a DIY Hobby or Lifestyle: Think about how repair skills can become a practical hobby and a long-term habit of caring for your surroundings.
How to Choose
Choosing Your Final Option
Pick the path that gives you the most useful discussion with your counselor- Choose Req 7a if you want to learn how skilled repair work turns into a job or trade.
- Choose Req 7b if you are more interested in personal projects, saving money, and becoming more self-reliant at home.
- What you will gain: Req 7a helps you understand professional pathways; Req 7b helps you picture how repair skills can shape your daily life and future goals.
Start with the career path page, then compare it with the hobby-and-lifestyle option before deciding which one you want to discuss most deeply with your counselor.
Req 7a — Exploring a Home Repair Career
When a water heater leaks, a stair rail loosens, or a building needs constant upkeep, someone with real skill gets called in. Home repair careers matter because they keep homes, schools, stores, and public buildings working safely every day.
🎬 Video: Maintenaince and Repair Workers Careers (video) — https://youtu.be/I_mhZjRcH5s
Careers You Might Explore
A few strong examples include:
- Maintenance and repair worker
- Carpenter
- Painter
- Electrician
- Plumber
- Facilities technician
- Property maintenance manager
What to Research
Your counselor will want more than a job title. Build a full picture by looking up:
- Training and education: apprenticeship, trade school, community college, certifications, or on-the-job training
- Costs: tuition, tools, licensing, transportation, and continuing education
- Job prospects: whether employers in your area are hiring and how the field is growing
- Salary: entry-level and experienced pay ranges
- Job duties: what the person actually does during a normal day
- Career advancement: ways to move from helper to specialist, supervisor, inspector, or business owner
A strong discussion with your counselor will include both facts and your reaction. Maybe you like the problem-solving of maintenance work, or maybe you decide you enjoy repair skills at home but not as a career. Either answer is useful if you can explain why.
Req 7b — Building a DIY Hobby or Lifestyle
Not every Scout who enjoys home repairs wants a construction job, but many Scouts do want the confidence that comes from being able to fix real problems. That is what makes this option so practical. Repair skills can become a hobby, a family contribution, and a lifelong habit of taking care of the places where you live.
🎬 Video: Mastering DIY Home Repairs (video) — https://www.youtube.com/shorts/Nj_S3xl2GYg
What a Home-Repair Hobby Might Look Like
A hobby built around these skills might include:
- Learning one new repair skill every month
- Keeping a basic, well-organized home tool kit
- Helping with seasonal maintenance at home
- Restoring used furniture or household items instead of replacing them
- Volunteering repair help with family, neighbors, or community spaces when appropriate and supervised
Think About Training, Cost, and Support
Even as a hobby, repair work benefits from learning and structure.
- Training needed: classes at a hardware store, videos from trusted experts, community workshops, or practice with a knowledgeable adult
- Expenses: starter tools, safety gear, repair materials, and storage space
- Support organizations: local maker spaces, community education programs, and groups that promote practical home maintenance skills
Short-Term and Long-Term Goals
Your short-term goals might be simple:
- Learn how to use a drill, level, stud finder, and caulk gun safely
- Complete three more repair projects at home this year
- Organize a household tool area and keep it maintained
Long-term goals could include:
- Becoming the person in your family who can handle common repairs calmly
- Building skills for future apartment or home ownership
- Expanding into woodworking, maintenance volunteering, or larger DIY projects
You have reached the end of the requirement pages. Next, go beyond the badge and explore deeper skills, real-world experiences, and organizations connected to home repair and maintenance.
Extended Learning
A. Keep Building Your Repair Mindset
You finished the Home Repairs merit badge, but the real prize is not one repaired faucet or one patched wall. It is the habit of noticing problems early, working safely, and understanding that many repairs are really about systems: water, support, alignment, protection, and wear.
The more you practice, the more you will see patterns. A loose hinge and a loose railing both teach you about fasteners and load. A dripping faucet and a leaking hose both teach you about seals. A bad paint job and a bad caulk line both teach you that surface prep matters. That pattern recognition is what turns separate badge tasks into real long-term skill.
B. Deep Dive: Seasonal Home Maintenance
One of the smartest ways to use home repair knowledge is to prevent problems before they start. Seasonal maintenance is how many homeowners stay ahead of expensive repairs.
In spring, people often inspect screens, outdoor faucets, sprinklers, and caulk lines that may have been stressed by winter weather. Summer can be a good time for painting, fence work, and outdoor repairs that need dry conditions. Fall is the season for checking weatherstripping, drainage paths, and tools before cold weather returns. Winter often reveals drafts, sticking doors, and plumbing vulnerabilities that were harder to notice earlier.
A Scout who knows this pattern can build a useful yearly checklist. Instead of waiting for something to fail, you inspect likely trouble spots while they are still small and manageable. That mindset saves money, reduces waste, and makes a home more comfortable.
A Simple Seasonal Maintenance Pattern
Use the year itself as your repair calendar- Spring: screens, outdoor tools, sprinklers, and exterior cracks
- Summer: painting, fence repair, and larger outdoor projects
- Fall: weatherstripping, caulking touch-ups, and tool storage prep
- Winter: indoor leaks, drafts, sticking doors, and electrical awareness
C. Deep Dive: Knowing When a Repair Is Beyond You
One of the most mature repair skills is knowing when not to continue. That may sound less exciting than fixing something yourself, but it is part of responsible home care.
Some problems are outside the scope of a beginner because they involve structural loads, complex electrical work, gas systems, mold, major water damage, or code requirements. Other times the real issue is hidden. A loose railing may point to rot inside the support. A recurring breaker trip may point to a larger electrical problem. A crack in concrete may come from drainage or settling far below the surface.
Skilled repairers do not ignore these warning signs. They document them, shut off what needs shutting off, and ask for the right help. That is not weakness. It is judgment.
This is one reason merit badge work should always be discussed with your counselor and supervised by a knowledgeable adult when required. The badge is teaching you hands-on skills, but it is also teaching you decision-making. Good judgment is part of the tool kit.
D. Deep Dive: Repair as Conservation
Home repair is also a kind of conservation. Every time you fix instead of replace, you extend the life of an object and reduce waste. That matters for tools, furniture, fixtures, and even parts of the home itself.
Repair culture pushes back against the idea that broken automatically means worthless. A tightened hinge, a cleaned sprinkler head, or a repaired drawer slide can keep an item useful for years longer. That saves money, but it also changes how you see material things. You start to ask: what failed, why did it fail, and can the useful part of this item still be saved?
That is a powerful mindset for Scouts because it combines thrift, stewardship, and service. A person who can repair things can help family, help neighbors, and care for shared spaces without always needing to buy something new.
E. Real-World Experiences
Visit a Habitat for Humanity ReStore or Build Site
See how donated building materials, fixtures, and household items are reused instead of thrown away. Notice how repair knowledge, building knowledge, and service connect.
Tour a Local Hardware Store With a Purpose
Go beyond browsing. Compare types of caulk, anchors, weatherstripping, fasteners, and plumbing washers. Ask an employee how they help customers choose the right repair product.
Shadow a Maintenance Worker or Skilled Tradesperson
If possible and approved by your parent or guardian, spend time with someone who handles repairs professionally. Watch how much of the job is diagnosis, prep, and cleanup — not just the final fix.
Help With a Seasonal Maintenance Day at Home
Create a checklist and work with an adult to inspect screens, hoses, weatherstripping, faucet drips, loose hardware, and tool storage. This is one of the best ways to turn badge knowledge into a practical routine.
Restore a Small Household Item
Choose something low-risk like a frame, stool, shelf, or drawer and bring it back into useful shape. The project does not have to be fancy. It just needs to be thoughtful and well finished.