Req 2c — Exterior Caulking
Water is patient. If it finds even a tiny opening around trim, siding, or a window frame, it keeps working on that spot day after day. Exterior caulking is one of the best examples of a small repair that prevents a much bigger one later.
Where Caulk Belongs
Caulk is used on cracks and joints that should stay sealed and mostly still. Good examples include gaps around exterior trim, small joints where siding meets a frame, and narrow openings where water could sneak behind the surface.
Caulk is usually not the right fix for:
- Gaps that are too wide for the product
- Joints designed to drain or vent
- Areas where a missing board, rotten wood, or structural problem needs a true repair first
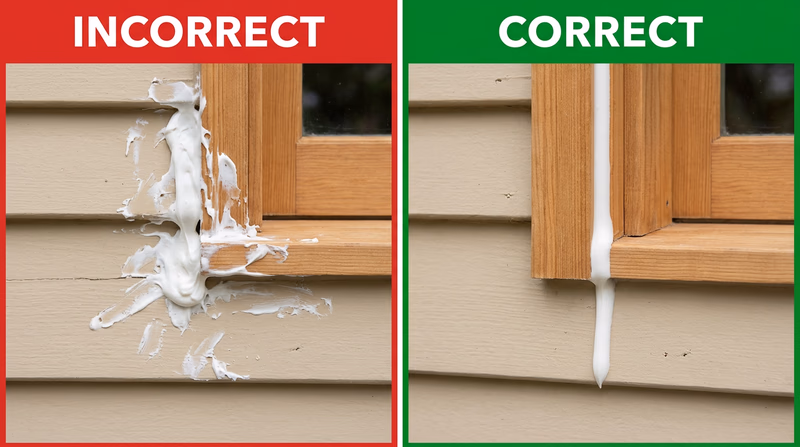
The Keys to a Good Caulk Job
A neat bead depends on preparation more than speed.
Clean the Surface
Old loose caulk, dirt, and peeling paint make new caulk fail. Remove damaged material and brush the area clean before you begin.
Choose the Right Product
Exterior products are made to handle sun, rain, and temperature changes. Read the label and make sure the caulk is rated for outdoor use and for the materials you are sealing.
Cut a Small Opening First
Many beginners cut the tube opening too wide. Start small. It is much easier to enlarge the opening than to control a bead that is too big.
Move Steadily
Apply the bead with even pressure. The goal is not a giant line of caulk. The goal is enough material to bridge the joint cleanly.
Tool the Bead
Many caulk jobs need to be smoothed right away so the material presses into the joint and sheds water neatly.
The resource above is worth watching because it shows how professionals avoid the biggest beginner mistake: adding too much caulk and trying to fix it afterward.
A Good Repair Starts With Judgment
A caulk gun can make it tempting to seal everything you see. That is not smart home repair. Some gaps exist for drainage or movement, and some gaps are warning signs that wood has shifted, failed, or started to rot.
This is where the thinking from Req 1 — Safety Basics matters again. Before you seal a crack, ask what caused it. If the answer is ordinary shrinkage or failed old caulk, this requirement fits well. If the answer is “the wood feels soft” or “the trim is pulling away from the wall,” the real problem may be bigger than caulk.
Signs of a Successful Caulk Repair
What your finished work should show
- The old failed material was removed or cleaned up first.
- The new bead follows the joint instead of wandering across the surface.
- The gap is sealed without big globs or missed spots.
- The surrounding area is cleaned up neatly.
- You can explain why this joint needed caulk instead of another repair.
Exterior caulking and weatherstripping both fight drafts and water, but they solve different problems. Weatherstripping handles moving parts. Caulk handles fixed joints. Knowing the difference is part of becoming a smarter repairer.
Next, you will look at a tougher exterior repair: patching a break in concrete or asphalt before weather makes it worse.