Req 9 — Saddles, Bridles, and Mounting
This requirement brings together three closely related skills: knowing your tack, putting it on correctly, and getting on and off the horse safely. Tack that is dirty, poorly fitted, or used carelessly can make the horse uncomfortable and the rider unsafe.
- Requirement 9a: Name saddle and bridle parts and explain care
- Requirement 9b: Saddle and bridle the horse properly
- Requirement 9c: Mount and dismount safely
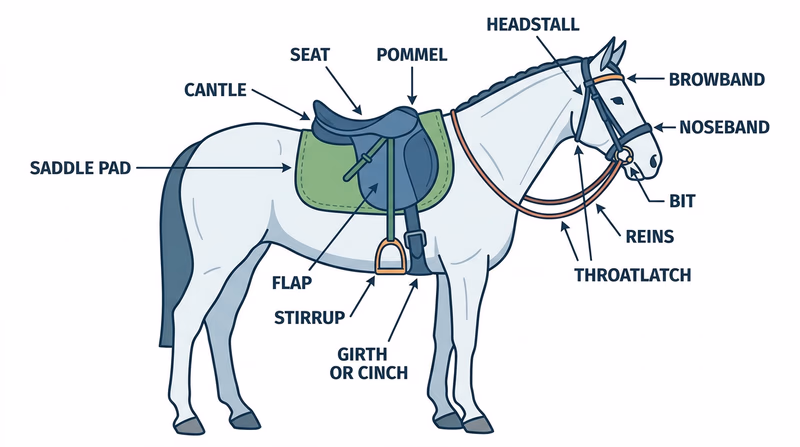
Requirement 9a
Learning tack names helps you follow instructions and notice when something is wrong. Common saddle parts include the seat, pommel, cantle, stirrup, stirrup leather or fender, girth or cinch, billet, saddle flap, and saddle pad. Common bridle parts include the headstall, browband, cheekpieces, throatlatch, reins, bit, and noseband if present.
Tack care matters because leather dries, cracks, and weakens if ignored. Sweat and dirt also wear down stitching and hardware over time.
Basic Tack Care
Clean tack after use according to stable routine. Wipe off sweat, dirt, and dust. Condition leather when needed so it stays supple instead of brittle. Check buckles, billets, stirrup leathers, reins, and stitching for wear. Store tack neatly in a dry place where it keeps its shape.
Ten Useful Tack Parts
A practical starter list for this requirement
- Seat: Where the rider sits.
- Pommel: Front rise of the saddle.
- Cantle: Back rise of the saddle.
- Stirrup: Supports the rider’s foot.
- Girth or cinch: Secures the saddle.
- Saddle pad: Cushions and helps protect the horse’s back.
- Headstall: Main leather that holds the bridle together.
- Bit: The part that fits in the horse’s mouth.
- Reins: The rider’s connection for steering and communication.
- Throatlatch: Helps keep the bridle from slipping off.
Requirement 9b
Correct saddling and bridling should look quiet and organized, not rushed. Brush the horse first so dirt does not get trapped under tack. Place the pad and saddle in the right position, then adjust slightly backward into place instead of scraping hair the wrong way. Tighten the girth or cinch gradually.
When bridling, keep control of the horse calmly, protect the ears, and guide the bit gently into the mouth. Never bang the teeth with the bit or force the head around roughly.
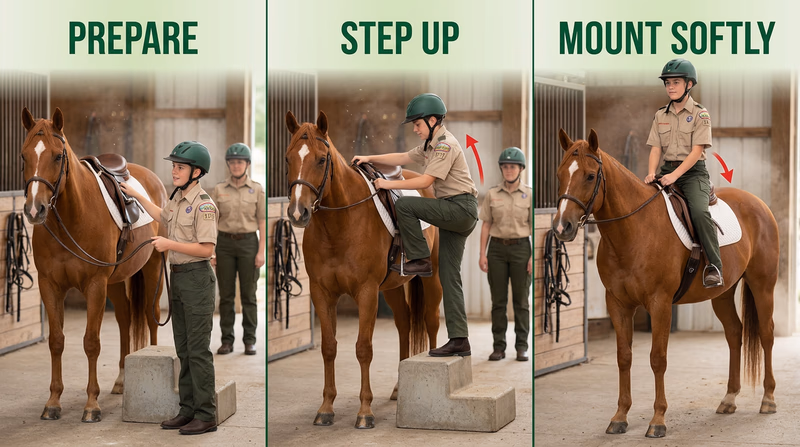
Requirement 9c
Mounting should be smooth and balanced so you do not jab the horse in the side, yank the saddle, or surprise the horse with uneven pressure. Many riders use a mounting block because it is easier on both horse and rider.
For a basic left-side mount, gather the reins, place the left foot in the stirrup, rise with control, swing the right leg over without kicking the horse, and settle quietly into the saddle. For dismounting, halt squarely, remove both feet from the stirrups, swing the right leg back over, and lower yourself down under control.
The Big Idea of This Requirement
Clean tack, careful bridling, and balanced mounting all show the same thing: respect for the horse. A horse learns quickly whether the rider is organized or sloppy. Clear routines make the horse more comfortable and make you safer.
Horse Illustrated — Basic Tack Cleaning A rider-friendly overview of routine tack cleaning and inspection habits.In the next requirement, you will work from the ground again by approaching, leading, and tying a horse safely. Those skills matter every single time you handle a horse, even when you are not riding.