Kayaking Merit Badge — Complete Digital Resource Guide
https://merit-badge.university/merit-badges/kayaking/guide/
Introduction & Overview
A kayak can carry you into quiet coves, narrow marsh channels, and stretches of shoreline that bigger boats can never reach. It is one of the most direct ways to experience moving water, wind, weather, and your own skills at the same time. The Kayaking merit badge teaches you how to enjoy that freedom safely, from choosing equipment to recovering from a capsize and paddling with control.
Then and Now
Then — Indigenous Watercraft and Early Exploration
Long before modern recreation, people around the Arctic built skin-on-frame boats designed for hunting, fishing, and travel in cold, rough water. The word kayak comes from an Inuit word often translated as “hunter’s boat.” These early kayaks were light, efficient, and shaped for the conditions where they were used. In different parts of the world, other cultures also developed small paddle craft for rivers, lakes, and coasts.
By the 1800s and early 1900s, kayaks began spreading into Europe and North America as exploration craft and then as sporting equipment. Builders experimented with canvas, wood, and eventually fiberglass. What began as a practical tool for survival and travel gradually became a way to race, tour, surf, fish, and explore.
- Purpose: Travel, hunting, and survival in places where small, efficient boats were essential
- Design goal: Light enough to move quickly, shaped to handle the local water
Now — Recreation, Skill, and Adventure
Today, kayaking includes calm-lake paddling, sea touring, whitewater, kayak fishing, fitness paddling, and camping trips that last several days. Modern materials such as rotomolded plastic, composites, and inflatable fabrics make kayaks available to almost every kind of paddler. You can paddle for quiet observation, challenge yourself on moving water, or build teamwork through rescue practice and group travel.
Modern kayaking also puts a big focus on preparation. Good paddlers check weather, wear a properly fitted life jacket, carry rescue gear, and build skills step by step. The fun part of kayaking comes from feeling confident in the boat — and confidence comes from practice, judgment, and safety habits.
- Purpose: Recreation, fitness, exploration, skill-building, and outdoor adventure
- Mindset: Plan ahead, paddle within your limits, and always stay ready for the unexpected
Get Ready!
You are about to learn skills that make kayaking feel a lot less mysterious. Each requirement builds on the one before it, so by the time you finish, you will not just know kayaking terms — you will know how to stay calm, move the boat on purpose, and solve problems on the water.
Kinds of Kayaking
Kayaking is not just one activity. The kind of water you paddle changes the kind of boat, gear, and skills you need.
Recreational Kayaking
This is what many Scouts start with: short trips on calm lakes, ponds, and gentle rivers. Recreational kayaks are usually wider and more stable, which helps beginners feel comfortable. They are great for learning strokes, basic rescues, and how to move efficiently without fighting the boat.
Touring or Sea Kayaking
Touring kayaks are longer and built to travel efficiently over distance. They track straighter, carry more gear, and work well for shoreline trips, larger lakes, and coastal paddling. Because they cover water well, they are popular for day trips and overnight adventures.
Whitewater Kayaking
Whitewater kayaks are shorter, more maneuverable, and designed for current, waves, and obstacles. Paddlers use quick strokes, edging, and bracing to stay in control. Whitewater is exciting, but it also raises the safety stakes, which is why strong rescue habits matter so much.
Sit-on-Top and Inflatable Kayaking
Sit-on-top kayaks are common for warm-weather paddling and easy reentry practice because you sit on top of the hull instead of inside a cockpit. Inflatable kayaks are portable and convenient, especially where storage is limited, but they still require the same attention to life jackets, weather, and rescue planning.
Fishing and Nature-Observation Kayaking
Some kayaks are built with extra stability and space for gear so paddlers can fish, photograph wildlife, or explore marshes and shorelines quietly. These boats trade speed for comfort and usefulness, which makes them great for relaxed outings but sometimes slower to handle.
Now you have the big picture: kayaking is part judgment, part skill, and part preparation. Start with the safety habits that every paddler needs before anything else.
Req 1 — Hazards, Injuries & Safety Afloat
Before you worry about speed, strokes, or turning, you need a safety mindset. This requirement covers three parts of safe kayaking:
- Hazards on the water and around the weather
- Common injuries and illnesses that affect paddlers
- How the Scouting America Safety Afloat policy guides every trip
A kayak puts you low on the water, which makes you feel close to the action. That is part of the fun, but it also means weather, cold water, current, sun, and simple mistakes can affect you faster than you expect.
Requirement 1a
A breezy afternoon can feel harmless from shore. Once you are in a kayak, that same wind can push you away from the launch, turn small waves into splashing faces, and make every forward stroke harder. Kayaking hazards are often not dramatic at first. They build one small mistake at a time: the wrong clothing, late launch, poor weather check, no rescue plan, or paddling water beyond your skill level.
Weather Hazards
Weather affects paddlers quickly because you are exposed the whole time. Wind is one of the biggest problems. It can turn a fun outing into a tiring struggle, especially on wide lakes where there is no shelter. Thunderstorms matter even more. Lightning, strong gusts, and fast-moving rain can make it dangerous to remain on open water.
Cold air is not the only concern. Cold water can be dangerous even when the day feels pleasant. A Scout who falls in on a 60-degree day may still be dealing with water cold enough to shock muscles and breathing.
Water Hazards
Current, waves, strainers, low-head dams, boat traffic, rocky landings, and changing water depth all matter. Moving water can pin a boat or sweep a paddler into obstacles. On flatwater, big motorboat wakes and shoreline rebounds can still upset a beginner. Shallow water may hide rocks, logs, and sudden drop-offs.
Hazard Scan Before Launch
Questions to ask before your kayak touches the water- What is the weather doing now? Check wind, air temperature, storm timing, and any weather alerts.
- What is the water doing? Look for current, wave height, water temperature, and hidden obstacles.
- What changes later? A safe launch can become a hard return if wind builds in the afternoon.
- Who is paddling? Match the route to the least experienced person in the group.
- What is the bailout plan? Know where you can land, warm up, or get off the water early.
Prevent, Mitigate, Respond
To anticipate hazards, study the route, forecast, and launch area before you start. To prevent problems, wear your life jacket, dress for the water temperature, stay with your group, and paddle conservative routes. To mitigate hazards, keep a whistle, spare paddle when appropriate, throw bag in the right setting, and a communication plan. To respond, get off the water early if conditions worsen, help a paddler before they become exhausted, and call for trained emergency help when the situation is beyond your skill.
National Weather Service — Water Safety Learn how weather, cold water, flooding, and storms affect people on the water. Link: National Weather Service — Water Safety — https://www.weather.gov/safety/waterRequirement 1b
Kayaking injuries are often simple at first: a hot spot on your hand, a sore shoulder, not enough water, too much sun. The danger comes when a small problem grows into poor judgment or loss of strength on the water. A paddler with numb hands, dizziness, or painful muscle strain does not paddle well and may not be able to help during a rescue.
Blisters
Blisters usually come from friction between your hand and the paddle shaft. Prevention starts with relaxed grip pressure, proper technique, and stopping when you notice a hot spot. First aid means cleaning the area, protecting it with a blister pad or bandage, and avoiding more rubbing.
Cold-Water Shock and Hypothermia
Cold-water shock happens immediately after sudden immersion in cold water. The body gasps, breathing becomes harder to control, and panic can set in fast. Hypothermia develops when the body loses heat faster than it can make it.
Prevent both by dressing for water temperature, not just air temperature, and by keeping capsize recovery skills sharp. For first aid, get the person out of the water, replace wet clothing when possible, insulate them from wind and cold, and seek emergency help for serious symptoms.
Heat Illness, Dehydration, and Sunburn
Heat exhaustion, dehydration, and sunburn often show up together. Sun reflects off the water, and wind can trick you into thinking you are not getting overheated. Prevention means drinking before you feel thirsty, using sun-protective clothing, wearing a hat, and applying sunscreen early and often.
Sprains and Strains
Sprains affect ligaments. Strains affect muscles or tendons. In kayaking they often come from awkward carrying, bad landings, sudden twisting, or overusing shoulders and torso. Prevention means lifting with help, using good posture, warming up, and using torso rotation instead of pulling only with your arms.
Know the Signs
Problems a paddler should catch early- Blisters: Hot spots, rubbing, skin tenderness.
- Cold-water shock: Gasping, fast breathing, panic right after immersion.
- Hypothermia: Shivering, clumsiness, slurred speech, confusion.
- Heat exhaustion: Heavy sweating, headache, weakness, nausea.
- Dehydration: Thirst, dark urine, dry mouth, fatigue, poor focus.
- Sunburn: Red, painful skin that later blisters or peels.
- Sprains and strains: Swelling, pain with movement, weakness, limited range of motion.
Requirement 1c
Safety Afloat is not just a list to memorize. It is a system for making good decisions before and during any boating activity. In kayaking, it matters because paddlers are small, exposed, and affected by conditions quickly. Safety Afloat helps leaders and Scouts reduce preventable risk by thinking ahead.
The policy includes ideas such as qualified supervision, personal health review, swimming ability, life jackets, buddy systems, skill proficiency, planning, proper equipment, and discipline. In kayaking, that means the trip leader chooses water suited to the group, checks that paddlers have the right training and swim skills, and requires correctly worn life jackets the whole time.
It also means the group uses boats and gear that fit the trip. A calm pond, a windy lake, and a moving river are not the same situation. Safety Afloat asks you to match the place, the weather, the equipment, and the people.
How Safety Afloat Shows Up in Kayaking
What the policy looks like on a real trip- Qualified supervision: An experienced adult or trained leader oversees the activity.
- Personal health review: Leaders know about asthma, allergies, recent injuries, and other conditions that affect paddling.
- Swimming ability: Scouts complete the swimmer test before advanced on-water skills.
- Life jackets: Properly fitted life jackets are worn at all times while paddling.
- Buddy system: Paddlers watch each other and respond quickly when something goes wrong.
- Skill proficiency: Rescue practice and stroke skills happen before harder conditions.
- Planning: The route, forecast, float plan, and emergency plan are all considered in advance.
- Equipment: Boats, paddles, signals, and safety gear fit the activity.
By now, you have the safety foundation for the whole badge. Next comes the swim test that proves you are ready to build on-water kayak skills with confidence.
Req 2 — Swimmer Test Readiness
A kayak adds flotation only while you stay with it and stay in control. The swimmer test matters because kayaking includes wet exits, rescues, and the possibility of ending up in the water away from shore. If you cannot swim confidently, it is much harder to stay calm and make good decisions when a capsize happens.
The swimmer test is not just about passing one time. It shows that you can move through the water with control, keep going when you are tired, and recover your breathing under stress. Those are exactly the qualities that help kayakers during rescues and reentry practice.
Why This Comes Before Everything Else
Requirements 3 through 8 ask you to wear a fitted life jacket, capsize on purpose, reenter a kayak, demonstrate strokes, and maneuver the boat alone. All of that assumes you are comfortable in the water. A Scout who fears immersion will struggle to learn wet exits or rescue skills well.
The swimmer test also supports Safety Afloat. In Req 1, you learned that safe boating depends on honest planning. Knowing your real swimming ability is part of that honesty.
Preparing for the Test
Good preparation is simple and steady. Swim regularly, practice relaxed breathing, and focus on smooth form instead of thrashing for speed. If any part of the test feels hard, ask a swimming instructor, lifeguard, or counselor for feedback before test day.
Swimmer Test Prep
Habits that make the test feel more manageable- Practice endurance: Swim multiple lengths without stopping so steady effort feels normal.
- Work on breathing: Exhale into the water and avoid holding your breath too long.
- Use clean form: Efficient strokes save energy.
- Practice resting calmly: Floating and resting are skills, not just breaks.
- Stay relaxed under water: Comfort with submersion helps when you later practice wet exits.
Mindset Matters
Some Scouts are strong athletes but tense up in the water. Others are not fast but stay calm and efficient. For kayaking, calm often matters more than raw power. You want your body and brain to treat the water as a place you can work in, not just survive.
Scouting America — Aquatics Supervision Review Scouting aquatics supervision guidance that connects swimming ability to safe boating activities. Link: Scouting America — Aquatics Supervision — https://www.scouting.org/health-and-safety/gss/gss02/Once you have the swim foundation, you are ready to look at the gear that keeps paddlers afloat and prepared when things go wrong.
Req 3 — Life Jackets & Rescue Equipment
This requirement covers the gear that keeps a kayaking problem from becoming an emergency. You will focus on two big ideas:
- Your life jacket has to fit the way kayakers actually paddle
- Safety equipment only helps if you know what it is for and can reach it fast
Requirement 3a
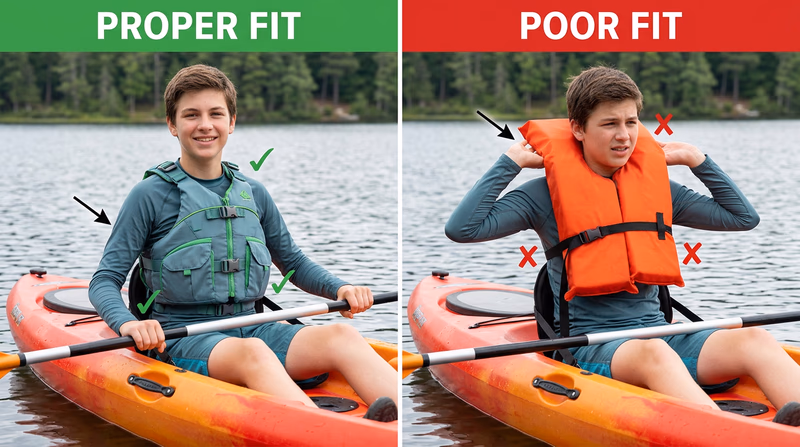
A life jacket for kayaking should let you paddle freely, stay secure in the water, and remain comfortable long enough that you will actually wear it. That usually means a paddling-specific design with large arm openings, a cut that works with a seated position, and enough adjustment points to create a snug fit.
Kayaking life jackets are different from cheap, bulky “just in case” jackets stored under a bench seat. A kayaker needs a jacket that stays on the body during swimming, reentry, and rescue work. If it rides up around your ears or shifts when you lift your arms, it does not fit correctly.
How to Check Fit
Start by choosing the correct size range based on body measurements and manufacturer guidance. Fasten all buckles and tighten the straps. Then move in it. Sit down. Rotate your torso as if paddling. Raise your arms. Have a partner tug upward at the shoulders. A good fit feels snug but not restrictive.
Life Jacket Fit Test
What to check before launching- Snug around the torso: Tight enough that it does not slide up easily.
- Arm movement: You can rotate and stroke without rubbing badly.
- No major gaps: Straps are adjusted, not hanging loose.
- Seated comfort: The jacket does not bunch up badly against the seat.
- Water-ready fit: It stays put when someone lifts gently at the shoulders.
Why It Must Always Be Worn
A life jacket cannot help if it is strapped to the deck or sitting in a hatch. Capsizes are sudden. Cold shock, impact, current, and surprise can take away your chance to put one on later. Wearing it from launch to landing is the only reliable choice.
U.S. Coast Guard Boating Safety — Life Jackets See how to choose, fit, and inspect life jackets for safe boating activities. Link: U.S. Coast Guard Boating Safety — Life Jackets — https://www.uscgboating.org/recreational-boaters/life-jackets.phpRequirement 3b
Good safety gear gives you options. It buys time, improves communication, and helps solve problems before they grow. Each piece of equipment has a specific job.
A signal device, often a whistle, helps you get attention fast without depending on your voice. An extra paddle matters if the main paddle breaks, floats away, or is lost during a rescue. A sponge and bilge pump help remove water from the boat after a capsize or assisted rescue.
Flotation bags help some kayaks keep from filling completely with water, which makes recovery easier. A throw bag is a rescue tool that lets one paddler throw a floating rope to another person in the right setting and with proper training. Not every piece of gear belongs on every calm-water outing, but you should know what each item is for and why it matters.
What Each Piece of Gear Solves
Match the item to the problem- Whistle or signal device: Calling attention in wind, distance, or low visibility.
- Extra paddle: Main paddle lost, damaged, or separated from the paddler.
- Sponge: Removing leftover water after rescue or splashing.
- Bilge pump: Clearing larger amounts of water from inside the boat.
- Flotation bags: Reducing how much water a boat holds after a capsize.
- Throw bag: Reaching a swimmer from a safer position when conditions and training support its use.
Now that you know the gear that keeps you safe, the next step is understanding the kayak itself — what each part does, why boats are shaped differently, and how to take care of them.
Req 4 — Kayak Parts, Design & Care
This requirement is about understanding the kayak as a tool, not just a place to sit. You will learn:
- The major parts of a kayak
- Why different kayak designs feel and behave differently
- How proper care keeps a boat safe and usable
Requirement 4a
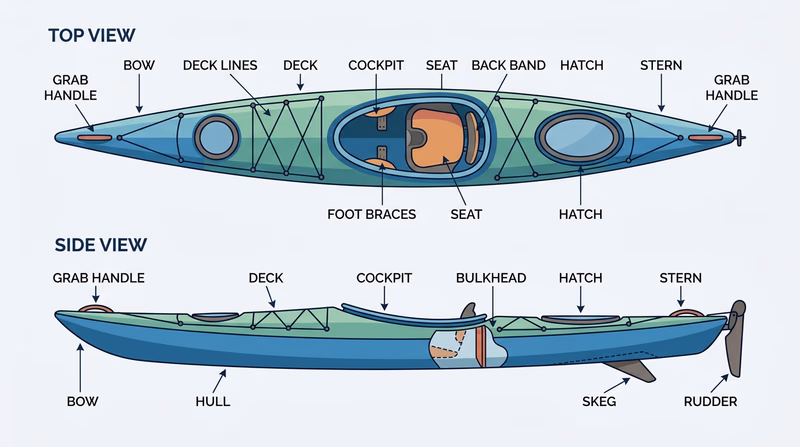
A kayak becomes easier to control once you know what you are looking at. The bow is the front, and the stern is the rear. The hull is the bottom of the boat, while the deck is the top surface. If the kayak has a cockpit, that is the opening where the paddler sits.
Inside the boat, you may see a seat, back band, foot braces, and thigh braces. These are the contact points that help you control the kayak with more than just your paddle. Some boats also have grab handles, deck lines, bungees, bulkheads, hatches, skeg, or rudder systems depending on the type of kayak.
The point is not to memorize fancy words for no reason. The point is to be able to talk clearly during instruction, rescue practice, and gear setup. If an instructor says, “Grab the bow handle,” you should know exactly where to look.
Major Kayak Parts to Know
Common terms a Scout should recognize and point out- Bow / stern: Front and back of the kayak.
- Hull / deck: Bottom and top surfaces of the boat.
- Cockpit or seat area: Where the paddler sits.
- Seat and back support: Where posture and comfort start.
- Foot braces: Help with power transfer and control.
- Grab handles / deck lines: Useful for carrying and rescue handling.
- Hatches / bulkheads: Storage and sealed flotation compartments on some boats.
- Skeg or rudder: Features on some kayaks that help tracking or steering.
Requirement 4b
Kayak design is always a tradeoff. A boat that turns quickly may not track straight as well. A boat that feels very stable at rest may be slower or less responsive. That is why different styles of kayaking use different boats.
A recreational kayak is usually shorter and wider. That makes it feel stable and approachable for beginners on calm water. A whitewater kayak is usually short with significant rocker, meaning the ends curve upward more. That shape helps the boat turn quickly and ride over moving features. A sea or touring kayak is usually longer and narrower so it tracks straighter and travels efficiently over distance.
Four Design Ideas to Compare
- Length: Longer boats tend to go straighter and cover distance better.
- Width: Wider boats tend to feel more stable at first.
- Stability: Some boats feel reassuring right away; others feel lively but handle rougher water well once edged properly.
- Rocker: More rocker helps turning and maneuvering; less rocker often helps straight tracking.
| Kayak Type | Length Tendency | Width Tendency | Rocker | What It Feels Best At |
|---|---|---|---|---|
| Recreational | Short to medium | Wider | Low to moderate | Calm water, easy learning, relaxed outings |
| Whitewater | Short | Medium | High | Quick turns, maneuvering in current, rapid response |
| Sea/Touring | Long | Narrower | Low to moderate | Distance, efficiency, open-water travel |
Requirement 4c
A kayak lasts much longer when it is cleaned, checked, and stored correctly. Dirt, sun, dragging, and poor support can all shorten the life of the boat. Plastic boats are tough, but they can still warp or crack. Composite boats can be lighter and faster, but they can be damaged by impact.
After paddling, rinse off sand, mud, salt, and plant material. Check the hull for deep scratches, cracks, worn hardware, and missing drain plugs or hatch covers. Dry the boat before long storage when possible. If the kayak has straps, lines, seats, or foot braces, inspect those too.
Storage matters because hull shape matters. Support the kayak according to the manufacturer’s guidance or in a way that spreads weight evenly. Keep it out of harsh sun when possible. Long periods of heat and bad support can deform the hull.
Basic Kayak Care Routine
What to do after a trip- Rinse the boat: Especially after saltwater, muddy, or weedy paddling.
- Inspect the hull: Look for cracks, deep gouges, or worn spots.
- Check outfitting: Seat, braces, lines, handles, and hatches should all work.
- Dry it out: Reduce mildew, odor, and trapped moisture.
- Store with support: Avoid leaving the boat sagging on hard points for months.
You now know the boat itself. Next, you will focus on the tool that makes the kayak move: the paddle, your grip, and the techniques that turn effort into control.
Req 5 — Paddle Skills & Paddle Care
This requirement focuses on the paddle itself and the habits that make it work well. You will cover:
- How to use a kayak paddle efficiently
- What each major part of the paddle is called
- How to care for a paddle so it stays reliable
Requirement 5a
Many beginners try to move a kayak with their arms alone. That works for a few minutes, then the shoulders get tired and the strokes get sloppy. Good paddling uses your torso, posture, and rhythm. The paddle is not just something you pull with. It is a tool you plant in the water so your body can move the boat past it.
A correct grip starts with hands spaced comfortably on the shaft and blades oriented the right way. Keep a tall posture, relax your shoulders, and rotate from your torso instead of curling forward. Catch the water near your feet, move through the power phase smoothly, and finish before the stroke drifts too far behind your hip.
Good Technique Habits
- Hold the paddle with a firm but not crushing grip.
- Sit tall so your core can help.
- Rotate your chest toward the stroke instead of pulling with bent arms only.
- Keep strokes smooth and repeatable.
- Match the stroke to the result you want: forward travel, turning, sideways movement, or stopping.
Efficient Paddle Use
What counselors usually want to see- Balanced hand position on the shaft.
- Correct blade orientation before each stroke.
- Torso rotation instead of arm-only paddling.
- Good posture and balance in the seat.
- Controlled finish so the stroke stays useful and does not waste effort.

Requirement 5b
Most kayak paddles have two blades connected by a shaft. The outer ends of the blades are the tips. The area where the blade meets the shaft is often called the shoulder or throat area, depending on design. Some paddles have adjustable ferrules that let you separate the paddle into sections and sometimes change feather angle.
Knowing paddle parts matters for setup, instruction, and care. If someone tells you to inspect the shaft for cracks or says the blade edge is chipped, you should understand what they mean.
Common Paddle Terms
- Blade: The flat part that goes in the water.
- Shaft: The section you hold with your hands.
- Tip: The far end of the blade.
- Shoulder / throat area: Transition between shaft and blade.
- Ferrule: Joint where a two-piece paddle comes apart and reconnects.
- Feather angle: The offset between the two blades on some paddles.
Requirement 5c
A paddle looks simple, but it deserves the same attention as the kayak. Small cracks, loose ferrules, or damaged blade edges can get worse under stress. A paddle also gets dropped on parking lots, trapped under gear, and scraped on rocky launches.
After paddling, rinse off dirt, sand, and saltwater. Check the shaft for cracks or dents, especially on lightweight materials. Inspect the blades for chips and loose edges. If the paddle is adjustable or separates into pieces, make sure the ferrule still locks securely and is free of grit.
Avoid using a paddle as a pry bar, push pole, or drag handle for the boat. That kind of misuse is a fast way to damage it.
Basic Paddle Care
Quick checks that keep a paddle dependable- Rinse after use if exposed to sand, mud, or salt.
- Inspect blades for cracks or severe chips.
- Inspect shaft for wear, bends, or damage.
- Check ferrule and buttons on two-piece paddles.
- Store out of harsh sun and heavy pressure when possible.
These paddle basics lead directly into the next major skill set: what to do when you capsize, exit, rescue, and recover without panic.
Req 6 — Capsize Recovery Skills
This requirement is all about what happens when kayaking stops going perfectly. You will practice five rescue and recovery skills:
- Wet exit after a capsize
- Reentry with assistance
- Kayak-over-kayak rescue
- The HELP position in the water
- Swimming the kayak and paddle to shore and emptying the boat
These skills are not “extra credit.” They are the difference between panic and a plan.
Requirement 6a
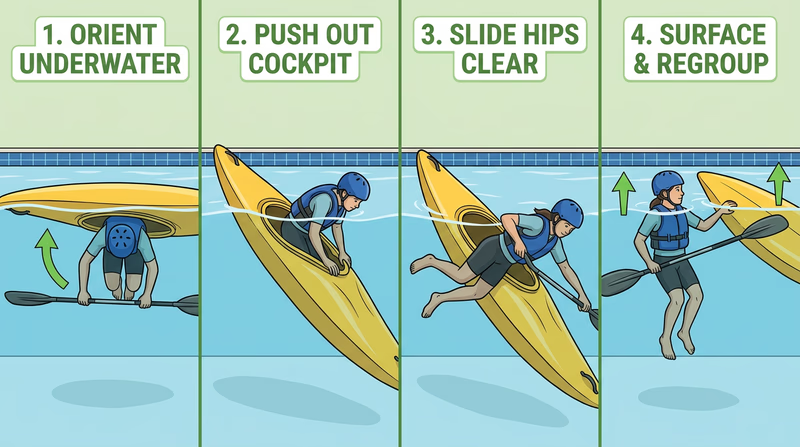
The first time a kayak flips can feel startling, even in controlled practice. That is why the wet exit is so important. It teaches you that being upside down does not mean being trapped forever. With the right setup and calm steps, you can get out cleanly.
A safe wet exit starts before the capsize. You should know where your body contacts the boat, how to stay calm for a moment underwater, and how to push yourself free. Once out, keep hold of yourself first, then stay oriented to the kayak and paddle.
Wet Exit Sequence
Simple actions to practice in order- Take a breath before the capsize practice begins.
- Stay calm for a moment when upside down.
- Release any spray skirt if one is being used and trained with.
- Push yourself out cleanly using your hands and legs.
- Surface, orient, and account for the boat and paddle.
Requirement 6b
An assisted reentry shows why group paddling matters. Your buddy’s kayak adds stability while you climb back in. The key ideas are communication, staying with the boat, and doing the steps smoothly rather than rushing.
The paddler in the rescue position stabilizes the swimmer’s kayak. The swimmer follows directions, gets positioned correctly, and climbs back in as efficiently as possible. Once reentered, the paddler re-centers weight, regains balance, and gets ready to continue or head in.
Requirement 6c
The kayak-over-kayak rescue is a classic assisted rescue. One kayak supports the flooded kayak while the rescuers empty water and stabilize it for reentry. The goal is to make the swamped boat lighter and more usable again.
This rescue works because a kayak full of water is much harder to control. Removing that water changes everything. It is part technique, part teamwork, and part body positioning. Small mistakes matter, so this is a perfect skill to practice slowly and repeatedly.
Requirement 6d
HELP stands for Heat Escape Lessening Posture. It is used in cold water to reduce heat loss while waiting for rescue. The idea is to draw your body into a position that protects the areas where heat escapes fastest.
Even if your life jacket keeps you afloat, cold water can still drain body heat fast. That is why the HELP position matters. It buys time.
HELP Position Basics
What the position is trying to do- Keep your knees up toward your chest if possible.
- Use your arms to stay compact.
- Keep movement limited unless you need to reach safety.
- Rely on the life jacket to support you while you conserve heat.
Requirement 6e
Sometimes the best rescue is not a fancy on-water reentry. Sometimes the best choice is to swim the boat to shore, maintain control of the gear, and solve the problem on land. That is especially true when the paddler is tired, conditions are worsening, or reentry is not working.
This skill teaches good judgment. The objective is not to prove you can do the hardest rescue every time. The objective is to get yourself and the boat to safety.
Priorities During Shore Recovery
- Stay with the kayak if it is safe to do so.
- Keep track of the paddle.
- Move toward the nearest safe landing rather than the original plan.
- Empty water efficiently once the kayak is secure.
- Reassess whether to continue or end the trip.
🎬 Video: Kayaking | How to Self-Rescue || REI — REI — https://www.youtube.com/watch?v=IUHYtQR79Z4
If Req 3 taught you why safety gear matters, this requirement teaches you what that gear and training are for. Next you will shift from rescue skills to the strokes that make solo paddling controlled and efficient.
Req 7 — Essential Kayak Strokes
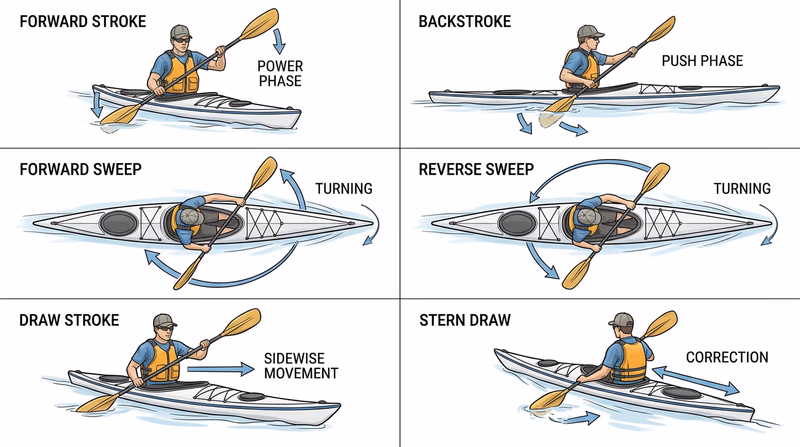
This requirement covers the core strokes that make a kayak respond on purpose instead of by accident. You will demonstrate:
- Forward stroke
- Backstroke
- Forward sweep
- Reverse sweep
- Draw stroke
- Stern draw
Think of these as the paddler’s vocabulary. In Req 5, you learned how the paddle works. Now you are learning what to say with it.
Requirement 7a
The forward stroke is your main engine. A good one moves the kayak ahead efficiently while helping you stay balanced and in rhythm. The stroke begins with a clean catch near your feet, uses torso rotation through the power phase, and finishes around your hip.
Requirement 7b
The backstroke moves the boat backward and helps with stopping or repositioning. It is especially useful in tight spaces, near docks, or when correcting position before another maneuver. Keep it controlled so the blade does not dive too deep or throw off your balance.
Requirement 7c
A forward sweep turns the kayak by making a wide arcing stroke from front to back. It is larger than a standard forward stroke and is meant to pivot the bow away from the paddling side.
Requirement 7d
The reverse sweep works in the opposite direction, helping turn the kayak by using an arc from back toward front. Together, the forward and reverse sweeps give you strong turning tools without having to stop completely.
Requirement 7e
The draw stroke moves the kayak sideways. You place the blade out from the boat and draw water toward the hull. This is useful for moving toward a dock, lining up next to another kayak, or making small positioning changes.
Requirement 7f
The stern draw is a steering stroke used near the rear of the kayak while the boat is moving. It helps the kayak keep tracking where you want or make small heading changes without a full sweep stroke.
How These Strokes Work Together
No stroke lives alone. You often use one to set up another. A forward stroke builds movement. A sweep changes direction. A stern draw fine-tunes the turn. A backstroke slows or resets position. Skilled paddlers blend strokes smoothly instead of treating each one like a separate trick.
What Strong Stroke Demonstrations Show
Things a counselor will notice- Balanced posture in the seat.
- Torso rotation instead of arm-only paddling.
- Clean blade placement in the water.
- Purposeful finish rather than random splashing.
- Control of the boat’s response after each stroke.
These six strokes are your toolkit. Next you will apply them to real boat-handling tasks such as paddling straight, pivoting, moving sideways, stopping, reversing, and completing a figure 8 course.
Req 8 — Maneuvering with Control
This final skills requirement brings everything together. You are no longer just naming strokes. You are using them to make the kayak do exactly what you intend:
- Hold a straight line
- Pivot sharply
- Move sideways
- Stop quickly
- Turn while moving
- Reverse effectively
- Link maneuvers in a figure 8 course
Requirement 8a
Paddling straight sounds easy until the kayak starts drifting off course with every stronger stroke. Holding a line means using balanced forward strokes, steady posture, and awareness of how wind, trim, and body position affect tracking.
Requirement 8b
This maneuver shows that you can turn the kayak efficiently without needing lots of forward space. Strong sweeps, edging when taught appropriately, and clean body position all help the kayak rotate in place.
Requirement 8c
Sideways motion is mostly about draw stroke control. The kayak should slide, not accidentally turn or surge ahead. This is a useful skill for docking, grouping up, or making small corrections in tight spaces.
Requirement 8d
A quick, controlled stop shows good judgment as much as good technique. You need to recognize momentum, use reverse strokes efficiently, and stay balanced as the boat slows.
Requirement 8e
Turning while still moving ahead is a more realistic paddling skill than turning from a dead stop. It shows you can blend strokes instead of treating each maneuver as a separate event.
Requirement 8f
Paddling backward tests awareness and control. The boat may want to wander. Smooth reverse strokes and quick correction help you keep it moving where you want.
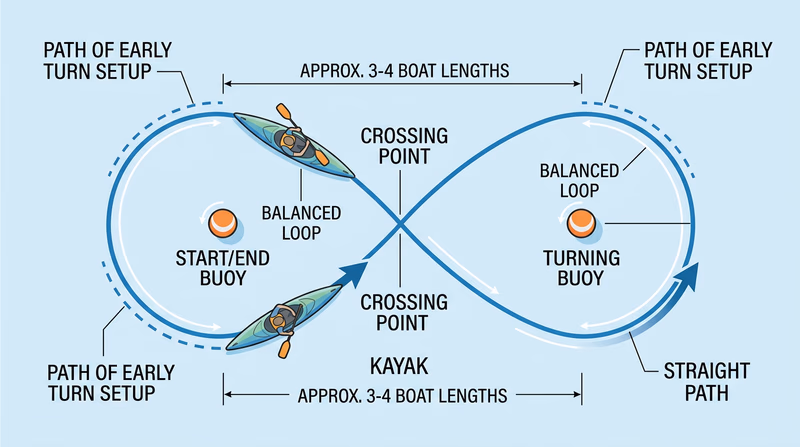
Requirement 8g
The figure 8 is where separate skills become actual boat handling. You need direction changes, rhythm, and foresight. If you wait too long to set up the turn, the course gets messy. If you read the line early, the kayak flows through it.
What Counselors Are Looking For
This requirement is not about looking flashy. It is about looking in control. A counselor usually wants to see that you understand what stroke solves which problem and that you can stay balanced while using it.
Boat Control Habits
What helps every maneuver in this requirement- Look where you want to go. Your body often follows your eyes.
- Sit tall and centered. Trim and balance affect every stroke.
- Set up early. Start turns before you are already past the marker.
- Use smooth corrections. Overcorrecting creates more work.
- Finish the maneuver under control. A sloppy finish usually means the stroke sequence needs work.
You have now covered the full kayaking badge progression: safety, swim readiness, gear, boat design, paddle use, rescues, strokes, and boat control. The next page looks beyond the badge at ways to keep growing as a paddler.
Extended Learning
A. Congratulations
You have built a real paddling foundation. You know how to think about hazards, wear the right gear, recover from a capsize, and move a kayak with intention instead of luck. That is enough to keep learning for years, because kayaking has room for day trips, camping, wildlife observation, fitness, racing, river running, and leadership.
B. Planning a Better Trip
One of the biggest differences between beginners and experienced paddlers is not speed. It is planning. Strong paddlers think about wind direction, launch options, return routes, current, water temperature, group skill level, and what happens if the day changes halfway through. They look at a route and ask, “What will this feel like on the way back?” not just “Can we get there?”
Trip planning also means noticing small details. Is the shoreline easy to land on if someone gets cold? Is there heavy boat traffic at noon? Does the route become harder if the wind shifts? On rivers, are there strainers, dams, or rapids below the launch that a new paddler may not notice at first? These questions are part of good judgment.
If you want to grow quickly, start writing short float plans for your own outings. Include the route, launch time, who is going, what boats and gear are being used, expected weather, and when someone on shore should worry if you are overdue. Even if the trip is simple, the habit matters. It turns paddling from “let’s just go” into “we are prepared.”
A good trip plan also leaves room to change your mind. Experienced paddlers cancel, shorten, or reroute trips all the time. That is not weakness. That is how smart paddlers stay around long enough to keep having adventures.
C. Cold Water Changes Everything
Many paddlers underestimate cold water because they judge conditions by air temperature. A sunny spring day can still hide dangerously cold water. If you capsize, your first problem may be gasping and loss of control, not distance from shore. That is why cold-water judgment is one of the most valuable advanced skills you can develop.
As you keep learning, pay attention to clothing systems, immersion risk, and rescue speed. Ask not only “Could I get back in?” but also “How long would that take, and how cold would I be by then?” A short rescue in warm water and the same rescue in cold water are not the same challenge.
Cold water also changes group decisions. You may choose shorter crossings, stay closer to shore, bring additional dry clothing, or use more conservative turnaround times. The point is not to be afraid of cold conditions. The point is to respect them enough to plan honestly.
Paddlers who understand cold water often become calmer paddlers overall. They stop treating capsizes as abstract and start treating preparation as real. That makes them safer in every season.
D. Building Toward Bigger Adventures
Once basic strokes and rescues feel comfortable, kayaking opens up quickly. A quiet lake day can turn into a shoreline tour. A short evening paddle can grow into a sunrise photography outing, a birding trip, or an overnight camp reached by water. Each new kind of trip adds skills: packing, navigation, weather reading, group management, and energy management.
One of the best next steps is to repeat familiar routes in different conditions while staying within safe limits. Paddle the same lake on a calm morning and a breezy afternoon. Notice how trim, wave direction, and fatigue change the experience. This kind of comparison builds judgment faster than always chasing a brand-new place.
You can also branch into specialized forms of kayaking. Sea kayaking teaches route efficiency and open-water decision-making. River paddling teaches reading current and choosing lines. Fishing from a kayak changes how you think about stability and storage. Each style reinforces the same core truth: the boat works best when the paddler understands why it behaves the way it does.
If you enjoy teaching, kayaking can also become a leadership skill. New paddlers need calm role models who check fit, explain safety clearly, and normalize practice instead of showing off. Being the Scout who helps others launch safely is a strong next step beyond earning the badge.
E. Real-World Experiences
Join a Guided Flatwater Tour
A ranger-led or outfitter-led tour on a lake, estuary, or slow river is a great way to see how professionals manage group spacing, route choice, and on-water communication.
Practice at a Scout Aquatics Event
Many councils, camps, and waterfront programs offer boating sessions where you can repeat strokes and rescues under supervision. Repetition in a structured setting helps skills stick.
Paddle for Nature Observation
Bring binoculars or a waterproof notebook and use a kayak for birding, shoreline sketching, or habitat observation. Quiet paddling is a great way to notice wildlife without disturbing it.
Try an Intro Rescue or Skills Clinic
American Canoe Association instructors and paddling clubs often run beginner clinics. These can sharpen wet exits, assisted rescues, edging, and turning.
Plan a Short Kayak Day Trip
With qualified supervision, help plan a conservative route that includes launch timing, weather check, turnaround time, and safety gear list. That is one of the best ways to turn badge knowledge into real experience.