Req 6 — Capsize Recovery Skills
This requirement is all about what happens when kayaking stops going perfectly. You will practice five rescue and recovery skills:
- Wet exit after a capsize
- Reentry with assistance
- Kayak-over-kayak rescue
- The HELP position in the water
- Swimming the kayak and paddle to shore and emptying the boat
These skills are not “extra credit.” They are the difference between panic and a plan.
Requirement 6a
The first time a kayak flips can feel startling, even in controlled practice. That is why the wet exit is so important. It teaches you that being upside down does not mean being trapped forever. With the right setup and calm steps, you can get out cleanly.
A safe wet exit starts before the capsize. You should know where your body contacts the boat, how to stay calm for a moment underwater, and how to push yourself free. Once out, keep hold of yourself first, then stay oriented to the kayak and paddle.
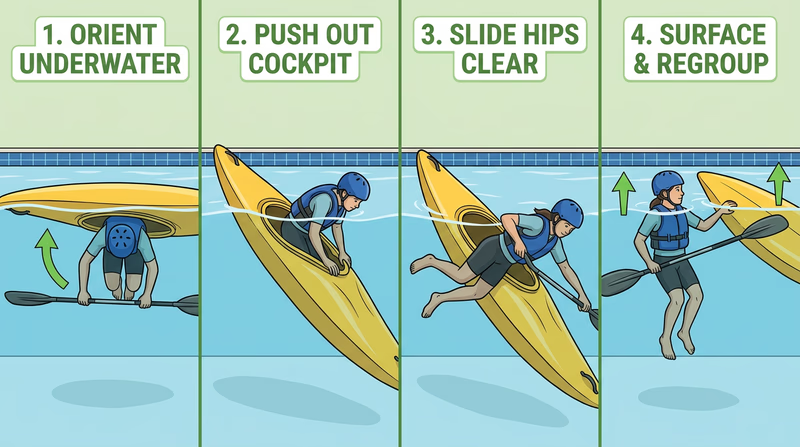
Wet Exit Sequence
Simple actions to practice in order
- Take a breath before the capsize practice begins.
- Stay calm for a moment when upside down.
- Release any spray skirt if one is being used and trained with.
- Push yourself out cleanly using your hands and legs.
- Surface, orient, and account for the boat and paddle.
Requirement 6b
An assisted reentry shows why group paddling matters. Your buddy’s kayak adds stability while you climb back in. The key ideas are communication, staying with the boat, and doing the steps smoothly rather than rushing.
The paddler in the rescue position stabilizes the swimmer’s kayak. The swimmer follows directions, gets positioned correctly, and climbs back in as efficiently as possible. Once reentered, the paddler re-centers weight, regains balance, and gets ready to continue or head in.
Requirement 6c
The kayak-over-kayak rescue is a classic assisted rescue. One kayak supports the flooded kayak while the rescuers empty water and stabilize it for reentry. The goal is to make the swamped boat lighter and more usable again.
This rescue works because a kayak full of water is much harder to control. Removing that water changes everything. It is part technique, part teamwork, and part body positioning. Small mistakes matter, so this is a perfect skill to practice slowly and repeatedly.
Requirement 6d
HELP stands for Heat Escape Lessening Posture. It is used in cold water to reduce heat loss while waiting for rescue. The idea is to draw your body into a position that protects the areas where heat escapes fastest.
Even if your life jacket keeps you afloat, cold water can still drain body heat fast. That is why the HELP position matters. It buys time.
HELP Position Basics
What the position is trying to do
- Keep your knees up toward your chest if possible.
- Use your arms to stay compact.
- Keep movement limited unless you need to reach safety.
- Rely on the life jacket to support you while you conserve heat.
Requirement 6e
Sometimes the best rescue is not a fancy on-water reentry. Sometimes the best choice is to swim the boat to shore, maintain control of the gear, and solve the problem on land. That is especially true when the paddler is tired, conditions are worsening, or reentry is not working.
This skill teaches good judgment. The objective is not to prove you can do the hardest rescue every time. The objective is to get yourself and the boat to safety.
Priorities During Shore Recovery
- Stay with the kayak if it is safe to do so.
- Keep track of the paddle.
- Move toward the nearest safe landing rather than the original plan.
- Empty water efficiently once the kayak is secure.
- Reassess whether to continue or end the trip.
If Req 3 taught you why safety gear matters, this requirement teaches you what that gear and training are for. Next you will shift from rescue skills to the strokes that make solo paddling controlled and efficient.