Leatherwork Merit Badge — Complete Digital Resource Guide
https://merit-badge.university/merit-badges/leatherwork/guide/
Introduction & Overview
A plain piece of leather can become a wallet, key fob, sheath, bookmark, bracelet, or belt that lasts for years. Leatherwork teaches you how to measure carefully, use sharp tools safely, and turn a flat material into something useful and personal. If you like making things with your hands, this badge gives you skills you can use for gifts, gear repairs, and creative projects.
Then and Now
Then
Leather has been part of daily life for thousands of years. People used animal hides for shoes, water containers, belts, saddles, shields, and protective clothing long before factories existed. Early leatherworkers scraped, stretched, smoked, and treated hides with natural oils and plant tannins so the material would not rot.
In many places, leathercraft was a necessary trade. A village needed harness makers, cobblers, and saddle makers because travel, farming, and carrying tools depended on strong leather goods.
Now
Today, leatherwork is both a craft and an industry. Large tanneries process hides for boots, furniture, sports gear, and luxury bags, while individual makers hand-tool custom wallets, notebook covers, guitar straps, and outdoor gear. Modern leatherworkers use better steels, safer finishes, and precise patterns, but the core ideas are still the same: choose the right leather, cut accurately, and finish your work with care.
Some people come to leatherwork because they want to make useful gear. Others love the design side — carving patterns, stamping borders, or blending dyes. Either way, the craft rewards patience more than speed.
Get Ready!
You do not need a huge workshop to begin. A safe work surface, a few basic tools, and the habit of measuring twice before cutting once will take you a long way. By the end of this guide, you will know how leather behaves, how to avoid common mistakes, and how to talk confidently with your counselor about the choices you made.
Kinds of Leatherwork
Utility Leathercraft
This is the practical side of the craft: belts, sheaths, pouches, key fobs, coasters, dog collars, and simple cases. Utility projects teach layout, straight cuts, hole spacing, edge finishing, and strong assembly. They are often the best first projects because you can see quickly whether your measurements and tool control are improving.
Decorative Tooling
Tooling means adding patterns to the surface of vegetable-tanned leather. You might carve lines with a swivel knife, stamp basket-weave textures, or press a maker’s mark into the leather. Decorative work teaches control, rhythm, and planning because once a mark is stamped, it is usually there for good.
Braiding and Lacing
Some leather projects are built less by stitching and more by weaving strands together. Braiding and lacing show up in bracelets, zipper pulls, decorative edges, and handles. This branch of leatherwork is great for Scouts who like patterns and repeated hand motions.
Care and Restoration
Leatherwork is not only about making new things. It also includes cleaning, conditioning, re-dyeing, repairing stitches, and protecting older items from cracking or mildew. Knowing how to care for leather helps boots, gloves, tack, and furniture last much longer.
Now you have the big picture. The first step is learning how to work safely and how to respond if something goes wrong.
Req 1 — Shop Safety and First Aid
Before you make anything out of leather, you need two foundation skills: working safely and knowing basic first aid. This requirement covers both parts.
- Req 1a helps you spot hazards before they become injuries.
- Req 1b helps you respond calmly if someone gets cut, poked, or exposed to chemicals.
Requirement 1a
A leather bench can look calm right up until a blade slips, a punch skids, or a strong finish smell tells you the room is not ventilated well enough. In leatherwork, most injuries come from a small set of predictable problems: sharp tools, striking tools, chemicals, clutter, and rushing. If you learn to notice those hazards early, you prevent most of them before they happen.
The hazards you are most likely to face
Sharp blades are the biggest risk. Utility knives, head knives, swivel knives, and edge tools all cut fast. A dull blade can actually be more dangerous than a sharp one because it makes you push harder, which increases the chance of slipping.
Punches and mauls create another kind of hazard. A drive punch can glance off the leather if it is not held straight. A mallet swing can hit your hand, the table edge, or someone standing too close.
Dyes, cements, finishes, and cleaners may irritate your skin, eyes, or lungs. Some products are flammable, and many give off fumes. If you treat them like ordinary craft supplies instead of chemicals, you can get into trouble quickly.
Cluttered workspaces cause hidden mistakes. Loose tools under scrap leather, cords across a floor, and open bottles near your project all increase the chance of spills, trips, and ruined work.
Dust and tiny scraps matter too. Sanding edges or trimming material can leave fine particles behind. You may not notice them at first, but they build up in your work area and can irritate your eyes or skin.
🎬 Video: Safety in Leatherwork | Dangers and Health and Safety Tips (video) — https://youtu.be/eDDvWMyOPO8?si=svFeILuCoVTRbjng
How to anticipate and prevent those hazards
The best leatherworkers build safety into the setup, not just the cleanup. Start by checking your bench before you start cutting or punching.
Leatherwork Safety Setup
Use this before every session- Protect the surface: Use a cutting mat, poundo board, or scrap board so blades and punches behave predictably.
- Clear the area: Put away tools you are not using right now.
- Improve visibility: Good lighting helps you cut on the line instead of guessing.
- Ventilate the space: Open windows or work where fresh air moves through the room when using dyes, cements, or finishes.
- Secure the leather: Hold or clamp the piece so it does not shift under the tool.
- Cap or close chemicals: Keep lids on whenever possible so spills and fumes stay lower.
- Wear appropriate protection: Safety glasses are smart when punching, setting hardware, or trimming stiff leather.
How to lessen a hazard when something starts going wrong
Mitigating a hazard means reducing the danger even if you cannot remove it completely. If a tool feels hard to control, stop and sharpen it, change your grip, or make several lighter passes instead of one hard one. If fumes become noticeable, close the container and move to better ventilation. If you are getting tired or frustrated, pause. Fatigue leads to rushed motions, and rushed motions lead to injuries.
Requirement 1b
Even careful leatherworkers sometimes get nicked by a blade, poked by an awl, or irritated by a finish. Good first aid starts with staying calm, stopping the activity, and dealing with the real problem instead of panicking.
Minor cuts and scratches
Small cuts happen most often during trimming, skiving, or handling an exposed blade. First, wash your hands if possible. Then clean the wound gently with clean water. Apply direct pressure with a clean cloth or gauze until bleeding stops. Cover the cut with a bandage so dye, dirt, and leather dust do not get into it.
If the cut is deep, will not stop bleeding, or was caused by a dirty tool, tell an adult and get medical help.
First Aid (PDF) Official Scouting guidance for the specific first-aid situations named in this requirement. Link: First Aid (PDF) — https://filestore.scouting.org/filestore/Merit_Badge_ReqandRes/Requirement%20Resources/Leatherwork/Leatherwork_First%20Aid.pdf First Aid for Minor Cuts (website) A quick step-by-step guide for cleaning, protecting, and monitoring minor cuts. Link: First Aid for Minor Cuts (website) — https://www.aad.org/public/everyday-care/injured-skin/burns/treat-minor-cutsPuncture wounds
Punctures are different from slices. An awl, needle, or punch may leave a small opening on the outside but drive dirt deeper into the tissue. Wash the area gently with clean water. Let a small amount of bleeding help flush the wound unless bleeding is heavy. Cover it with a clean bandage and tell an adult. Puncture wounds may need medical evaluation because infection risk is higher.
Do not dig into the wound yourself. If an object is still stuck in the body, leave it in place and get help.
First Aid for Puncture Wounds (website) Explains how puncture wounds differ from surface cuts and when medical care is needed. Link: First Aid for Puncture Wounds (website) — https://www.mayoclinic.org/first-aid/first-aid-puncture-wounds/basics/art-20056665Ingested poisoning
This is less common, but it matters because leatherworking uses products that should never be swallowed. If someone drinks a finish, dye, cleaner, or cement by mistake, do not guess what to do. Tell an adult immediately, check the product label, and call Poison Help or emergency services as directed. Do not force vomiting unless a medical professional tells you to do that.
Chemical exposure reactions
A Scout may get chemicals on the skin, in the eyes, or breathe too much vapor. Skin exposure usually calls for removing the chemical and washing with plenty of water. Eye exposure is more urgent: flush the eye with clean running water right away and keep flushing while an adult gets help. Breathing trouble after fumes or chemical exposure means move to fresh air immediately and get help fast.
🎬 Video: Be Prepared (video) — https://youtu.be/p5wSqJO-bIc?si=_-SM0CzDAFnIRrEm
In the next requirement, you will look closer at the material itself: where leather comes from, the kinds of hides used, and which types fit different projects.
Req 2 — Hides, Leather Types, and Best Uses
This requirement asks you to understand leather as a material before you start building with it. You will explain four connected ideas:
- where leather comes from
- what kinds of hides are used
- five types of leather
- which projects match each type best
Once you understand those differences, your project choices in Req 3 will make much more sense.
Requirement 2a
Leather starts as animal hide. A hide is the skin removed from an animal after slaughter, usually as part of the food industry. Instead of letting that skin go to waste, people preserve and process it into a strong, flexible material. That processing matters because raw hide will stiffen, rot, and break down if it is not treated.
The main preservation process is called tanning. Tanning changes the proteins in the hide so the material becomes more durable, more stable, and more usable. That is the point where hide becomes leather.
Most leathercraft leather comes from cattle, but hides from goats, pigs, deer, sheep, and other animals are also used. The animal, its age, the climate it lived in, and how the hide was handled all affect the final leather.
🎬 Video: How is Leather Made? (video) — https://youtu.be/oNTWz7bwolc?si=MTkSYtqnDxvJIgC8
Requirement 2b
When leatherworkers talk about hides, they are usually comparing both the animal source and the part of the hide being used.
Cowhide is the most common for beginners. It is widely available, comes in many weights, and is strong enough for belts, pouches, wallets, and tooling projects.
Calfskin is finer and smoother than cowhide. It is often used where a softer, dressier look matters.
Goatskin is flexible and durable for its thickness. Many people like it for gloves, linings, and smaller goods.
Sheepskin is soft but less rugged. It is good for soft goods and lining, not for projects that need a stiff body.
Pigskin is recognizable by its pore pattern. It can be durable and is often used in gloves, lining, and some utility items.
Leatherworkers also care about the location on the hide. The backbone area is often firmer and more even, while the belly area stretches more and can behave less predictably.
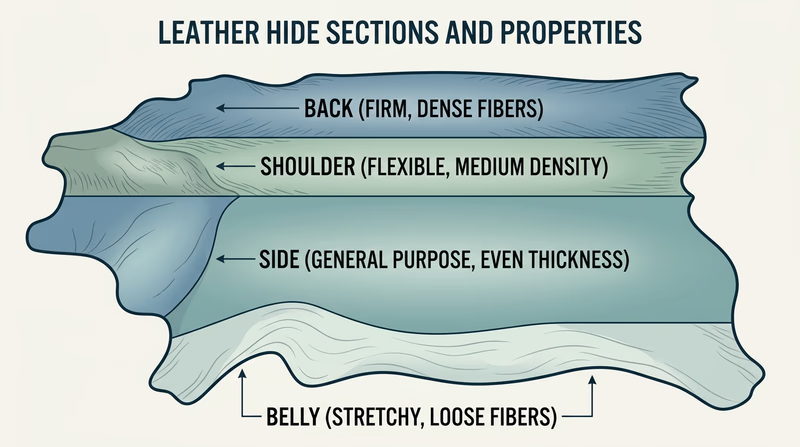
🎬 Video: Picking the Best Part of the Leather Hide (video) — https://youtu.be/UifaYowyj44?si=mz4_Fm3dsS2IdwDf
Requirement 2c
There are many ways to classify leather, but five types show up often in beginner conversations.
Vegetable-tanned leather
This leather is tanned with plant-based tannins. It is usually the best choice for stamping, carving, wet forming, and many Scout projects because it holds impressions well and can be dyed.
Chrome-tanned leather
Chrome tanning uses mineral salts. The result is often softer, more flexible, and more water-resistant than vegetable-tanned leather. It is common in upholstery, garments, and bags.
Full-grain leather
Full-grain means the outer surface of the hide stays mostly intact. It usually shows natural marks and develops character over time. Many people consider it the strongest and most durable grade for quality goods.
Top-grain leather
Top-grain leather has had the surface corrected or sanded slightly for a more uniform appearance. It is still good-quality leather, but it has been altered more than full-grain.
Suede
Suede is made from the underside of the hide or from split leather. It has a fuzzy surface and feels soft, but it usually is not the first choice for tooling or rigid projects.
🎬 Video: Leather Is Made From Which Animal (video) — https://youtu.be/fCrCwKpBXe4?si=ZosX3COH795k644n
Requirement 2d
Matching the leather to the job is one of the most important decisions in the whole badge.
| Leather type | Best uses | Why it fits |
|---|---|---|
| Vegetable-tanned | belts, coasters, sheaths, carved patches, stamped projects | holds shape, takes tooling well, accepts dye |
| Chrome-tanned | bags, soft pouches, garments, linings | flexible, comfortable, often already finished |
| Full-grain | heavy-duty gear, long-lasting everyday goods | strong surface, durable, ages well |
| Top-grain | wallets, handbags, cleaner-looking finished goods | smooth appearance, reliable consistency |
| Suede | lining, trim, soft accessories | soft texture, flexible feel |
A common beginner mistake is trying to tool or stamp soft chrome-tanned leather like it is vegetable-tanned leather. The marks will not hold the same way. Another mistake is choosing very thick leather for a project that needs to fold cleanly.
🎬 Video: What Leather Should I Use for Tooling? (video) — https://youtu.be/NNppGlzskQU?si=a3Kf5tP4MR28dcjf
🎬 Video: Choosing the Correct Leather for your Project (video) — https://youtu.be/i9chSW724QI?si=m5PgNOUbjl-obxra
How to choose the right leather
Ask these questions before you start a project- Does the project need to stay stiff or bend easily?
- Will you carve, stamp, or tool the surface?
- Does the project need a polished surface or a softer texture?
- Will the item face weather, sweat, or frequent handling?
- Is the leather thickness appropriate for the hardware and edge treatment you plan to use?
Now that you understand the material, you are ready for the biggest hands-on decision in the badge: choosing which five leatherworking skills to use in your project.
Req 3 — Choosing Your Five Skills
You must choose exactly 5 options from this requirement. This page is here to help you decide which skills belong in your project before you start cutting leather.
Your Options
- Req 3a — Patterns and Transfer: Learn how to place a design on leather accurately so every later step starts in the right spot.
- Req 3b — Clean Cutting: Shape your project with safe, controlled cuts that follow the pattern instead of wandering off line.
- Req 3c — Punching Accurate Holes: Make holes for stitching, lacing, or hardware without tearing or stretching the leather.
- Req 3d — Carving and Stamping Designs: Add decoration, texture, and personality to a project by tooling the surface.
- Req 3e — Dye, Stain, and Finish: Change the look of the leather and protect it from wear, dirt, and moisture.
- Req 3f — Lacing and Stitching: Join pieces together so the article becomes strong and usable.
- Req 3g — Snaps and Rivets: Add metal hardware for closures, straps, and reinforcement.
- Req 3h — Smooth Finished Edges: Make the outside edges look neat, feel smooth, and resist fraying.
How to Choose
Some combinations happen naturally. A stamped coaster might use 3a, 3b, 3d, 3e, and 3h. A small pouch might use 3a, 3b, 3c, 3f, and 3h. A strap project with a closure might use 3a, 3b, 3c, 3g, and 3h.
Choosing your five steps
Compare time, tools, and what you will learn- Best for a first simple project: 3a, 3b, 3c, 3e, and 3h keep the project manageable while teaching accurate layout and finishing.
- Best if you enjoy decoration: 3d adds the most artistic freedom, especially on vegetable-tanned leather.
- Best if you want a usable pouch or case: 3f matters because assembly turns flat pieces into real gear.
- Best if you want hardware practice: 3g teaches careful alignment and firm setting technique.
- Best for building neat habits: 3h is small but important because edge quality often separates beginner work from polished work.
If you are not sure what to make, start by naming the article first — wallet, bookmark, key fob, coaster set, bracelet, or pouch — then work backward and see which five skills naturally belong in that build.
The pages that follow walk through each skill one by one so you can understand what it adds to your project.
Req 3a — Patterns and Transfer
A project can go wrong before the knife ever touches the leather. If your pattern is crooked, too close to the edge, or transferred in the wrong place, every later step becomes harder. Good layout is the quiet skill that makes the rest of the project look easy.
What pattern layout means
Pattern layout is deciding exactly where each piece belongs on the leather before you cut or tool it. You are trying to use the hide wisely, avoid weak or stretchy spots, and leave enough room around your design for clean cuts and edge finishing.
Transfer is the moment when your paper pattern or design is moved onto the leather surface. That can mean tracing an outline, transferring a border, or marking stitching and hardware locations.
A smart layout routine
Before you transfer a pattern
Set up the project so your marks end up where you want them- Check the leather grain and firmness so the pattern sits on a suitable part of the hide.
- Look for scars, holes, thin spots, or stretchy areas before placing the pattern.
- Leave enough margin around the pattern for cutting and edge work.
- Confirm the direction of straps, folds, or decorative lines so they match the final use of the item.
- Lightly mark centerlines or reference points before tracing.
🎬 Video: Transferring Patterns (video) — https://youtu.be/zkA_TImwL7k?si=uy8jlrqb-_nJdl3v
🎬 Video: "Tap offs" or Mirrored Image Transfers (video) — https://youtu.be/dIZWhRV43WE?si=hEtWo21YxszT8uoa
Tips for accurate transfer
Use a stylus, scratch awl, or other marking tool lightly enough that you mark the leather without cutting it. On vegetable-tanned leather, slightly damp leather often takes a clean transfer better than bone-dry leather, but it should not be soaking wet unless the technique specifically calls for that.
If your design needs symmetry, fold the paper pattern and check both halves before you transfer. If your project includes snaps, rivets, or stitching, mark those locations now so they line up with the actual design instead of being guessed later.
Mistakes to avoid
Do not press so hard that your transfer line becomes a cut line. Do not crowd multiple pieces so tightly that you cannot trim them cleanly. And do not skip a test transfer on scrap if you are using a new tool or method.
In Req 3b, you will see why clean transfer lines matter so much — they are the roadmap for accurate cutting.
Req 3b — Clean Cutting
A rough cut announces itself right away. Wavy lines, overcut corners, and ragged edges are hard to hide later. Cutting leather well is mostly about control: the right blade, the right backing surface, and the patience to let the tool do the work.
Set up for a better cut
Start with a sharp blade and a firm cutting surface. If the blade drags, tears, or forces you to lean your weight into it, stop and change blades or sharpen before continuing. Leather responds much better to several light, accurate passes than one heavy pass.
🎬 Video: Best Practices for Cutting Leather (video) — https://youtu.be/KwamMpHW9Ls?si=8jzWvnYf8rteJcQd
Techniques that help
For straight lines, a metal ruler or straightedge can help guide the blade. For curves, move the leather or your body position so the cut stays comfortable instead of twisting your wrist into an awkward angle.
Cut just outside the line if you know you will trim to final shape later. For inside corners, slow down before the turn. For long straps or borders, check the line from more than one angle before cutting.
Common problems
If the edge looks fuzzy, the blade may be dull. If the cut line wanders, your straightedge may be shifting or you may be cutting too quickly. If the leather bunches or lifts, your surface underneath may be too soft.
Clean cutting leads directly into the next skill. Once the shape is correct, you can place holes exactly where the project needs them.
Req 3c — Punching Accurate Holes
A row of crooked holes can make even a well-cut project look rushed. Hole punching is really a measuring skill disguised as a tool skill. The goal is not just making holes — it is making them the right size, in the right place, and spaced evenly enough that stitching or hardware looks intentional.
🎬 Video: How to Use a Rotary Hole Punch (video) — https://youtu.be/lu14WIqvxHw?si=Sf-GEE-qn9xG9Bea
🎬 Video: How to Punch Holes (video) — https://youtu.be/ei1wqcTX3BQ?si=02881vW0BGWC9EzL
Match the hole to the job
Round holes are often used for snaps, rivets, and some lacing. Stitching holes may be round, diamond-shaped, or slit-like depending on the method. The hole should fit the lace, thread, or hardware without being so large that the joint looks sloppy.
Steps for better results
Mark hole positions before you start punching. Use a ruler, wing divider, or spacing tool when possible. Keep the punch vertical so the front and back stay aligned. Strike on a proper punching surface so the tool cuts through instead of flattening the leather.

Hole-punching habits
Small steps that make a big visual difference- Mark first, punch second.
- Test the punch size on scrap leather.
- Keep equal distance from the edge.
- Hold the tool straight up and down.
- Clear waste from the punch so each hole stays crisp.
Next you can choose whether to keep the surface plain or add decoration through carving and stamping.
Req 3d — Carving and Stamping Designs
This is the step where your project starts looking less like cut material and more like your own design. Carving cuts lines into the leather surface, while stamping presses repeated shapes or textures into it. Both reward planning and steady hands.
🎬 Video: Basic Leather Carving (video) — https://youtu.be/mhYUU3soIac?si=a_KUcxnL_Xz9nSAW
🎬 Video: How to Stamp Leather (video) — https://youtu.be/J-ngZ2h4GPA?si=fW2UlhHrbiek-0ox
Carving vs. stamping
Carving usually uses a swivel knife to create flowing lines. Stamping uses tools pressed or struck into damp vegetable-tanned leather to create borders, basket weaves, textures, letters, or decorative shapes.
A Scout does not need a complicated pattern to meet this step well. A clean name stamp, a simple border, or a repeated geometric texture can look great if the spacing is consistent.
What makes tooling look good
Good tooling depends on moisture control, even pressure, and planning. Leather that is too dry resists the tool. Leather that is too wet can blur details. Practice on scrap first so you can see how the impression looks before committing to your project piece.
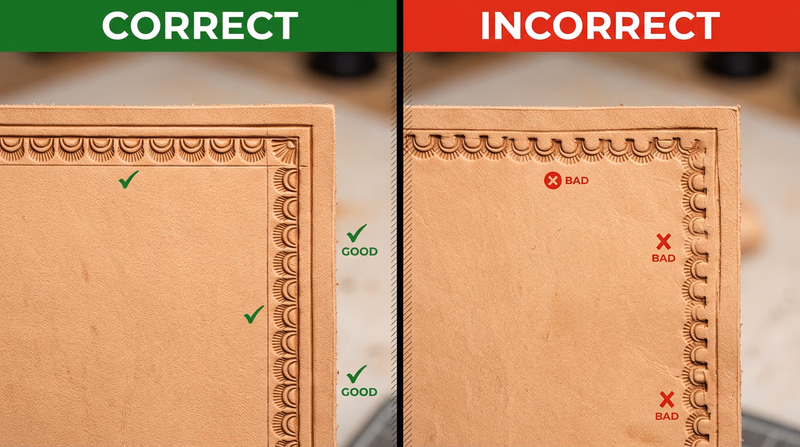
Avoiding common beginner problems
Crowded layouts, crooked borders, and uneven spacing are the most common issues. Light guide lines help. So does pausing often to step back and look at the overall pattern instead of focusing only on the next stamp.
If you plan to dye the leather later in Req 3e, think ahead about how dark or light areas will affect the design. Tooling and color often work together.
Req 3e — Dye, Stain, and Finish
Color can make a project look rich and complete, but it can also highlight every mistake if it is applied carelessly. Dye and stain change appearance. Finish adds protection and can affect the feel, shine, and water resistance of the leather.
🎬 Video: Basics of Hand Dyeing Leather (video) — https://youtu.be/DJ8s7wH-YCg?si=gTx6mtrkUkl3JUej
Think in layers
First the leather may need surface prep. Then the dye or stain goes on. After that, the project often needs time to dry fully before a finish is added. Rushing this sequence can smear color, create blotches, or trap moisture.
Tips for better color
Apply color evenly. Use light coats instead of flooding the surface. Test on scrap from the same leather if possible because different leathers absorb dye differently. If you have carving or stamping, pay attention to how dye settles into the lower areas of the design.
What a finish does
A finish can protect against handling, light moisture, and surface wear. Some finishes leave a more natural look. Others add sheen. The right choice depends on how the article will be used.
After surface treatment comes the question of how pieces are actually joined. That is where stitching and lacing take over.
Req 3f — Lacing and Stitching
This is the step where separate pieces become one finished article. Good assembly is more than just getting the parts attached. It affects strength, appearance, flexibility, and how long the project survives real use.
🎬 Video: How to Punch Holes (for Sewing) in Leather (video) — https://youtu.be/GYnXLSGakYA?si=WJoxl-Dto6gmMres
🎬 Video: How to Choose the Right Thread and Needle Size for Hand-Sewing in Leather (video) — https://youtu.be/CepMYy3yra8?si=bpkV8Y0zoef-tBId
🎬 Video: The Most Common Stitches in Hand-Stitching for Leatherwork (video) — https://youtu.be/Hd103-7adK8?si=UnFoIJJ46SNdtwf7
🎬 Video: How to Start and End Hand-Swing Lines in Leather (video) — https://youtu.be/Eew734WXXzs?si=Jkc2U94RGO1eTfpY
Lacing vs. stitching
Lacing uses leather or synthetic lace threaded through larger holes. It can be decorative as well as structural and often gives projects a bold edge.
Stitching usually uses thread and needles through smaller, more closely spaced holes. It can look cleaner and more refined, especially on wallets, pouches, and notebook covers.
What strong assembly needs
Pieces must line up correctly before you start. Hole spacing should be consistent. Thread or lace should match the scale of the project. Tension should be firm enough to hold the pieces together but not so tight that the leather puckers.
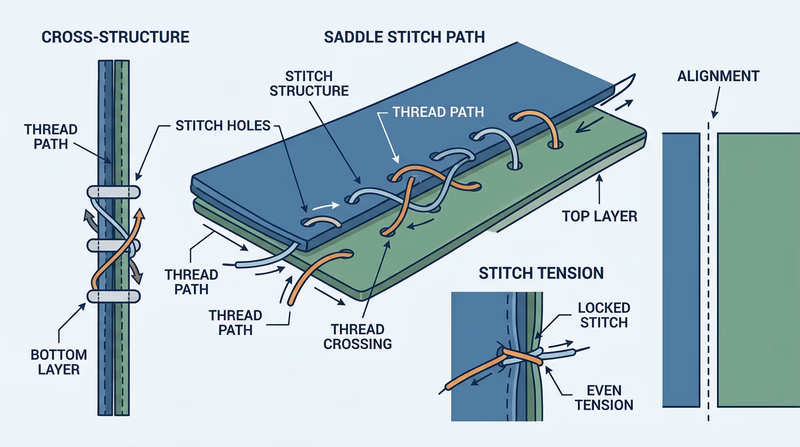
Assembly checkpoints
Check these before calling the seam finished- Edges line up the way you planned.
- Hole spacing looks even.
- Thread or lace fits the hole size.
- Beginning and ending stitches are secure.
- No loose loops, twists, or missed holes remain.
Stitching and lacing solve one type of assembly problem. Hardware solves another. Next comes snaps and rivets.
Req 3g — Snaps and Rivets
Snaps and rivets look small, but they change how a leather article works. A snap can create a closure. A rivet can strengthen a stress point or hold layers together quickly. Both reward accuracy because metal hardware does not forgive crooked placement.
🎬 Video: How to Set Snaps (video) — https://youtu.be/egQHoUw58r4?si=3coK-uKt6ziz5AOM
🎬 Video: How to Remove a Snap (video) — https://youtube.com/shorts/Bb387hzctjA?si=_UNKaVRDZEq2oXed
🎬 Video: How to Set Rivets (video) — https://youtu.be/l0VJgjHJN1c?si=IdbPEWFEAzINzoIm
Snaps
A snap has matching parts that must line up so the closure opens and closes smoothly. If the snap is set at an angle or installed through the wrong hole size, it may wobble or fail.
Rivets
Rivets are often used where straps pull or layers need reinforcement. They are fast and strong, but once set, they are not as easy to adjust as stitches. That means measuring and dry-fitting first matters a lot.
Planning hardware placement
Check the fold, closure direction, and the thickness of all leather layers before you set hardware. If the post is too short, the hardware may not hold. If it is too long, the set may feel loose or uneven.
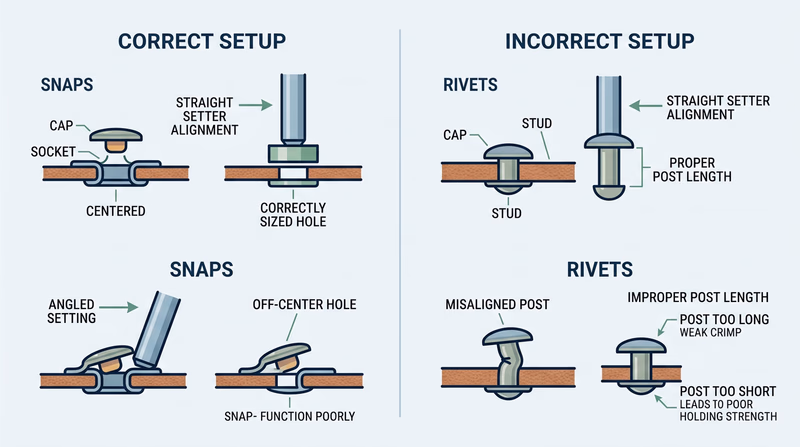
In the next step, you will see how edges complete the project visually. A well-set snap on a rough edge still looks unfinished.
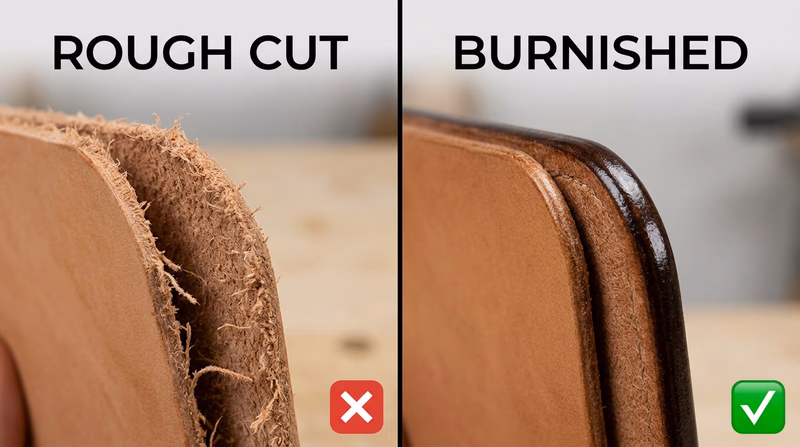
Req 3h — Smooth Finished Edges
Edges are where many projects reveal their true quality. A leather item with smooth, even edges feels finished in your hand. A project with fuzzy, uneven edges can look unfinished even if the rest of the work is solid.
🎬 Video: Edge Finishing Techniques (video) — https://youtu.be/kb8yyG3TO70?si=3neDiHe3jxmRj7UJ
What dressing an edge includes
Depending on the project, dressing an edge may mean trimming it flush, beveling the corners, sanding it smooth, adding water or gum, burnishing it, or applying edge paint or finish. Not every project needs every step, but every project benefits from attention here.
Why this matters
Edges are touched constantly on belts, straps, wallets, and bracelets. A smoother edge feels better, resists fuzzing, and makes the whole project look more professional.
A simple finishing sequence
Trim first if needed. Sand lightly to even the layers. Bevel if the project calls for it. Then burnish or apply your chosen edge treatment until the edge looks smooth and feels comfortable.
Once you can handle project steps from layout through finished edges, you are ready to try another skill that also depends on rhythm and consistency: braiding or plaiting.
Req 4 — Braiding and Plaiting
Braiding feels different from cutting and stitching because the material stays in motion. Instead of shaping flat pieces, you are building a pattern strand by strand. The challenge is keeping tension even so the braid looks organized instead of lumpy.
🎬 Video: Four Strand Round Braid (video) — https://youtu.be/TtncZNCWpQE?si=Ys_SbWAv__wDYzNU
🎬 Video: Plaiting: How to Braid Any Number of Cords (video) — https://youtu.be/qjqXAV9lyns?si=1VmEcBuPoFOW1wFh
Braid vs. plait
People sometimes use these words almost interchangeably, but both involve weaving strands in a repeated pattern. The important skill for this requirement is showing that you can organize multiple strands into a strong, neat article such as a bracelet, key fob, zipper pull, dog leash accent, or decorative strap.
Keys to a good result
Keep strand widths consistent. Anchor one end before you begin. Pull with even tension after each move. Stop occasionally to straighten the pattern instead of hoping it fixes itself later.
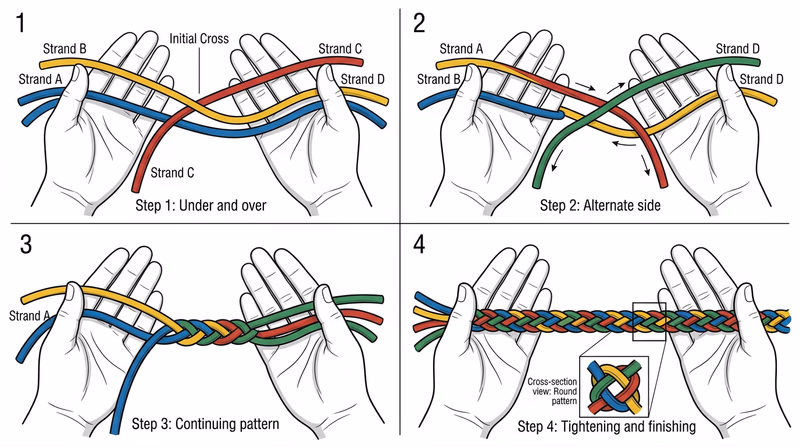
Braiding habits that help
Use these while you work- Start with strands that are cut evenly.
- Keep the work anchored or clipped in place.
- Repeat the same sequence patiently.
- Tighten each move a little, not all at once.
- Check the pattern often so twists do not build up unnoticed.
Req 5 lets you choose one larger direction to explore next: tanning, hide work, care and repair, or learning from a real leather business.
Req 5 — Pick Your Leather Path
You must choose exactly one option from this requirement. Each path teaches something different about leather: how it is made, how to process it yourself, how to care for finished goods, or how the trade works in the real world.
Your Options
- Req 5a — Commercial Tanning: Learn how raw hides move through a tannery and become usable leather for products.
- Req 5b — Tanning a Small Hide: Focus on the hands-on process and safety considerations of tanning on a small scale.
- Req 5c — Care, Repair, and Comparison: Practice maintaining leather items and compare leather with synthetic alternatives.
- Req 5d — Visiting a Leather Business: See how professionals buy, process, design, repair, or sell leather goods in the real world.
How to Choose
Choosing your option
Think about the kind of experience you want- Choose 5a if you like processes, factories, and understanding how raw materials become products.
- Choose 5b if you want a hands-on challenge and can do it safely with adult guidance.
- Choose 5c if you already own leather items and want practical skills you will use again.
- Choose 5d if you learn best by asking questions and seeing a working shop or business in action.
The first option explores the industrial side of leather: what happens between raw hide and finished material.
Req 5a — Commercial Tanning
Commercial tanning is what turns huge numbers of raw hides into material that factories, saddle makers, boot companies, and leathercrafters can actually use. Your goal here is not to memorize every chemical name. It is to understand the sequence and be able to explain what each stage accomplishes.
🎬 Video: How is Leather Made? (video) — https://youtu.be/6Cn7QqdFIxc?si=ocfbQxYR8AA7KPIb
The big stages
Most commercial tanning follows the same broad path: preservation, cleaning, hair removal or preparation, tanning, drying, conditioning, coloring, and finishing. Each stage changes the hide in a specific way.
Raw hides often arrive salted or preserved so they do not decay during transport. Then the tannery cleans and rehydrates them. After that, the hide is prepared for tanning and treated so the fibers become stable and durable.
Once tanned, the leather may be split, shaved to thickness, dyed, softened, finished, embossed, or coated depending on the product being made.
What to notice for your report
Pay attention to three ideas: what problem each step solves, how the leather changes, and why different end uses need different finishes. A saddle leather and an upholstery leather may begin similarly but end with very different properties.
Questions for your counselor report
Use these to organize what you learned- What is the purpose of tanning itself?
- Which stages happen before the actual tanning step?
- How do thickness, softness, and color get adjusted later?
- Why might one tannery finish leather differently for boots than for furniture?
Req 5b looks at tanning from a much smaller, more hands-on angle.
Req 5b — Tanning a Small Hide
This option is hands-on and serious. You are working with an actual hide, biological material, sharp tools, and possibly chemicals depending on the method. That means safety and adult supervision are not side notes here — they are central to the requirement.
🎬 Video: How to Tan Animal Hides (Never Destroy Animals for This Purpose) (video) — https://youtu.be/RJNyABFzWPw?si=TqYic4EWmIBT7Zzx
What your counselor will care about
You should be able to explain where the hide came from, what method you used, what steps you followed, and how you handled sanitation and safety. The exact tanning method may vary, but the important part is understanding the process rather than treating it like a mystery recipe.
Safety precautions to describe
Sanitation matters because raw hides can carry bacteria. Ventilation matters if any chemical treatment is involved. Tool safety matters during scraping, trimming, or fleshing. If you used a particular tanning solution, be ready to explain how you handled storage, disposal, and skin protection.
Req 5c moves away from raw hides and toward a skill many Scouts will use more often in everyday life: leather care.
Req 5c — Care, Repair, and Comparison
Leather lasts longest when people treat it like a material with needs, not like plastic. Dirt dries it out. Water can stain or stiffen it. Too much heat can crack it. Good care means cleaning gently, conditioning when needed, and storing the item so it can keep its shape.
🎬 Video: How to Clean & Shine Leather Shoes! (video) — https://youtu.be/MSaNoMNrZxU?si=NLIb7JASM5tkReY9
🎬 Video: How to Care for Your Baseball Glove (video) — https://youtu.be/sNXcHCHK-wI?si=PN2HDyT5eopuOtnZ
🎬 Video: How to Clean a Western Saddle (video) — https://youtu.be/g_oDJhwVKFI?si=RyU4gxTsFrK672hj
🎬 Video: How to Remove Mold and Mildew on Leather (video) — https://youtu.be/2NUr6y3R7Mg?si=6s2_1YHwovPiZQ_S
A simple care routine
Brush or wipe off dirt first. Use a cleaner that fits the item. Let the leather dry naturally away from strong heat. Then condition if the item needs moisture restored. Not every leather item needs heavy conditioning every time, so part of the skill is noticing when the leather feels dry, stiff, or dull.
Leather vs. synthetic materials
Leather often wins in durability, repairability, and the way it ages. Many leather items develop character instead of just wearing out. Synthetics may win in price, water resistance, uniform appearance, and ease of cleaning.
A smart comparison is not “Which is always better?” It is “Which material is better for this use?” Hiking boots, gloves, furniture, sports gear, and fashion items all make different demands.
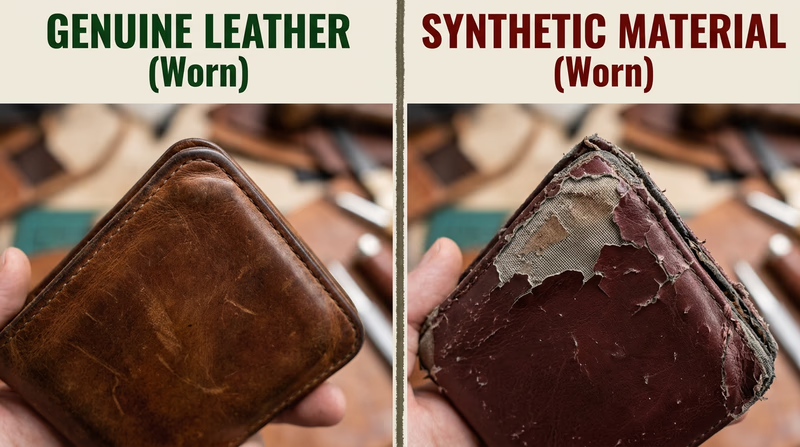
Points to compare with your counselor
Build a balanced discussion- Durability over time
- Repairability
- Feel and comfort
- Water resistance
- Cost
- Appearance as the material ages
From there, the last option shows you the leather trade through the eyes of people who work in it every day.
Req 5d — Visiting a Leather Business
A real shop or business can teach you things a video cannot: how the work smells, sounds, and flows; how tools are organized; what problems workers solve all day; and how design, repair, and customer needs shape the craft.
🎬 Video: A Random Walk Through Horween Leather (video) — https://youtu.be/ljq0x4as32U?si=Tu4LneiFjmNgLEn1
What to watch for on the visit
Notice what kinds of leather the business handles, what tools show up again and again, and which tasks demand the most skill or quality control. Ask how they choose materials for different jobs and what common mistakes beginners make.
Good questions to ask
Questions for a leather business visit
Use these to gather details for your report- What products or services are most common here?
- Which materials are used the most, and why?
- What skills take the longest to learn well?
- How do workers prevent mistakes or wasted material?
- What advice would they give a beginner Scout?
Turning the visit into a strong report
A good report explains what kind of business you visited, what you observed, what surprised you, and what you learned about leather as a trade. The best reports include specific details rather than just saying the visit was interesting.
You have now completed the main guide. The extended learning page will show where leatherwork can take you next.
Extended Learning
A. Congratulations
You have done more than make a project. You have learned how to choose leather, work safely with tools, and think like a craftsperson who plans ahead. That combination of patience, tool control, and attention to detail can carry into woodworking, metalworking, repair projects, and almost any other hands-on skill.
B. Deep Dive — Why Some Leather Ages Beautifully
Leather changes with use. Sunlight, body oils, bending, rain, and friction all affect the surface over time. Many people call the look that develops patina. On a good piece of leather, patina can make the item more interesting instead of just more worn out.
That happens because the fibers compress, the surface polish changes, and the color deepens in places that are handled often. Full-grain leathers usually show this most clearly because the natural surface is still present. A synthetic material may stay the same color until it suddenly cracks. Leather often changes gradually, which is why older leather goods can tell a visual story of how they were used.
Understanding patina helps you make smarter design choices. If you want an item to show use proudly, you may choose a natural or lightly finished leather. If you want it to keep a more uniform appearance, you may choose a more heavily finished surface. Neither choice is automatically better. They simply age differently.
C. Deep Dive — Careers Connected to Leather
Leatherwork connects to more careers than many Scouts expect. Saddlers, cobblers, boot makers, upholsterers, costume makers, luxury-goods craftspeople, repair technicians, and product designers all use leather knowledge in different ways. Some people work mostly by hand on custom pieces. Others work with machines in larger production settings.
There are also careers around the craft instead of directly at the bench. Materials buyers choose hides and finished leather for companies. Quality-control specialists inspect finished goods. Designers decide how a product should look, feel, and function before anyone cuts the first piece. Shop owners teach classes, sell supplies, and help customers choose the right materials.
If you enjoy the badge, pay attention to which part you liked most. Did you love the hand-tooling? The repair work? The problem-solving involved in choosing the right leather? That answer may point toward the part of the leather trade that fits you best.
D. Deep Dive — Repair as a Craft Skill
Making new things gets attention, but repair is one of the most useful leather skills there is. A loose seam, worn edge, dried-out strap, or missing snap can often be fixed long before the whole item fails. Repair work teaches careful observation because you have to study how the original maker built the article.
It also teaches respect for materials. When you repair instead of replace, you learn how construction choices affect longevity. You notice whether holes were spaced well, whether the leather was too thin for the job, or whether the finish protected the surface properly. Those lessons make you a better maker when you return to your own bench.
A Scout who learns basic care and repair can help boots, gloves, belts, sports gear, and horse tack last longer. That is practical skill, not just hobby knowledge.
E. Real-World Experiences
- Visit a local tack shop or saddle shop: Notice how different leathers are chosen for strength, flexibility, and weather exposure.
- Take a beginner class at a leathercraft store or maker space: A class lets you compare your habits with an experienced instructor’s workflow.
- Repair an old leather item at home: With adult permission, clean and condition a belt, glove, or pair of shoes and document the before-and-after changes.
- Compare products in person: Study one leather wallet, one synthetic wallet, and one hybrid product. Notice differences in smell, feel, edge construction, and stitching.
- Attend a craft fair: Talk to leatherworkers about what they make, which tools they use most, and how they price handmade work.
F. Organizations
- Leathercraft Library — Free tutorials, patterns, and project ideas for beginners and advancing makers.
- Leather Working Group — An organization focused on environmental stewardship and standards in the leather supply chain.
- Horween Leather — A long-running tannery whose educational materials and videos help explain how premium leather is produced.
- Saddleback Leather — Useful for studying how makers explain leather grades, construction choices, and long-term durability.