Lifesaving Merit Badge — Complete Digital Resource Guide
https://merit-badge.university/merit-badges/lifesaving/guide/
Introduction & Overview
Every year, thousands of people find themselves in trouble in the water — and someone nearby has the chance to save a life. The Lifesaving merit badge teaches you to be that someone. You will learn how to spot a person in distress, choose the safest rescue method, and act with confidence when every second counts.
Lifesaving is one of the most demanding and rewarding merit badges in all of Scouting. It is also one of the badges that can count toward earning the rank of Eagle Scout. The skills you build here are real — the kind that stay with you for the rest of your life.
Then and Now
Then — The Birth of Organized Rescue
For most of recorded history, drowning was simply accepted as a tragic part of life near water. That began to change in 1774, when a group of London doctors formed the Royal Humane Society — one of the first organizations dedicated to resuscitating drowning victims. Their early methods included rolling victims over barrels and blowing tobacco smoke into their lungs (not recommended today!).
By the late 1800s, surf lifesaving clubs were forming in Australia and the United States. Volunteer rescuers trained with ropes, boats, and cork life rings. The first official lifeguards appeared on American beaches in the early 1900s, and the American Red Cross began teaching water safety courses in 1914.
- Purpose: Save drowning victims using whatever was available
- Mindset: Brave volunteers rushing into the water — heroic, but often dangerous for the rescuer
Now — Trained, Equipped, and Systematic
Modern lifesaving is built on science, training, and a clear order of rescue methods. Today’s lifeguards and rescuers follow standardized protocols developed by the American Red Cross, the YMCA, and the United States Lifesaving Association. Equipment like rescue tubes, rescue boards, and automated external defibrillators (AEDs) are standard at pools and beaches across the country.
The biggest shift? The emphasis on prevention. Programs like the BSA’s Safe Swim Defense and the CDC’s drowning-prevention campaigns have dramatically reduced drowning rates. Modern lifesaving starts before anyone gets in the water.
- Purpose: Prevent drowning through education, supervision, and rapid response
- Mindset: Reach-Throw-Row-Go — always choose the safest rescue method first
Get Ready! You are about to learn skills that could genuinely save someone’s life. This guide will prepare you for every requirement — from understanding water hazards to performing rescues and CPR. Take it seriously, practice with focus, and you will walk away from this badge a more capable and confident Scout.

Kinds of Lifesaving
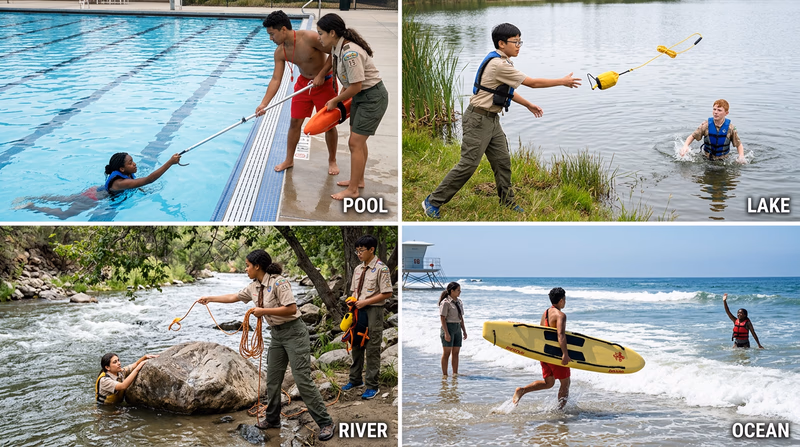
Water rescue happens in many different environments. Each one presents unique challenges. Understanding where rescues take place will help you adapt your skills to the real world.
Pool Lifeguarding
Swimming pools are the most controlled aquatic environment. The water is clear, the depth is marked, and rescue equipment is close at hand. Most pool emergencies involve weak swimmers who drift into deep water, medical events like seizures, or unsupervised children.
Open-Water Lifesaving
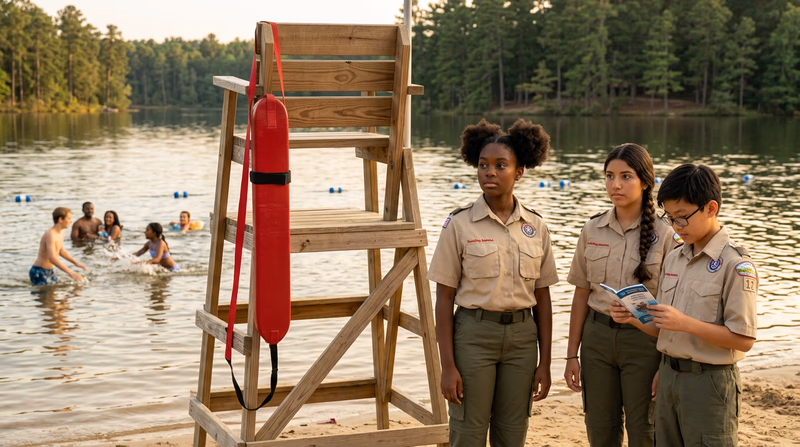
Lakes, ponds, quarries, and reservoirs present challenges that pools do not. Water may be murky, the bottom uneven, and underwater hazards invisible. Temperature layers called thermoclines can cause sudden cold shock. There are no lane lines or walls to grab.
Surf Rescue
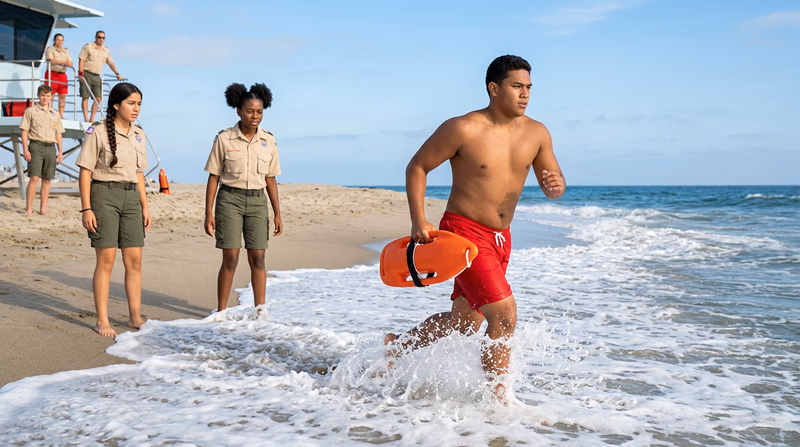
Ocean beaches add waves, rip currents, and tidal changes to the mix. Surf rescuers use specialized equipment like rescue boards, fins, and personal watercraft. Reading the water — understanding where rip currents form and how waves break — is a critical skill.
Swiftwater Rescue
Rivers, streams, and floodwaters move — and moving water is incredibly powerful. Even knee-deep flowing water can knock an adult off their feet. Swiftwater rescue is a specialized discipline that uses throw bags, tethered swimmers, and technical rope systems.
Ice Rescue
Frozen lakes and ponds create a unique and extremely dangerous rescue environment. When ice breaks, victims plunge into water that is at or near freezing. Hypothermia sets in within minutes, and the ice around the break zone is often too weak to support a rescuer’s weight.
Now let’s dive into the requirements for the Lifesaving merit badge — starting with the foundation of every safe aquatic activity.
Req 1 — Safe Swim Defense
Before you learn a single rescue technique, you need to understand the system that keeps everyone safe in the water. The BSA’s Safe Swim Defense is a set of eight principles that apply to every aquatic activity in Scouting — from swimming at summer camp to canoeing on a lake. Think of it as the rulebook that prevents emergencies from happening in the first place.
The Eight Points of Safe Swim Defense
Here is a breakdown of each principle and why it matters for lifesaving:
1. Qualified Supervision — Every swimming activity must be supervised by a mature, conscientious adult who understands the activity and the risks. For swimming, this means someone trained in water rescue and first aid. You would not start a campfire without an experienced adult nearby, and swimming is no different.
2. Personal Health Review — Before anyone enters the water, a health review confirms that each swimmer is physically able to participate. Some medical conditions — such as epilepsy, heart conditions, or recent injuries — can create serious danger in the water. This is not about excluding anyone; it is about making sure every swimmer has the support they need.
3. Safe Area — The swimming area must be checked for hazards before anyone gets in. In a pool, that might mean checking water clarity and depth markers. In open water, it means scouting for drop-offs, underwater obstacles, currents, and cold spots. A safe area has clearly defined boundaries.
4. Lifeguards on Duty — Trained lookouts must be stationed where they can see the entire swimming area. This is different from general supervision. Lifeguards have one job: watch the water. They do not participate in the activity — their eyes stay on the swimmers.
5. Ability Groups — Swimmers are classified by skill level: Swimmer, Beginner, and Learner. Each group swims in an area matched to their ability. This prevents a beginner from accidentally wandering into deep water. During your lifesaving training, you will be working in the Swimmer area.
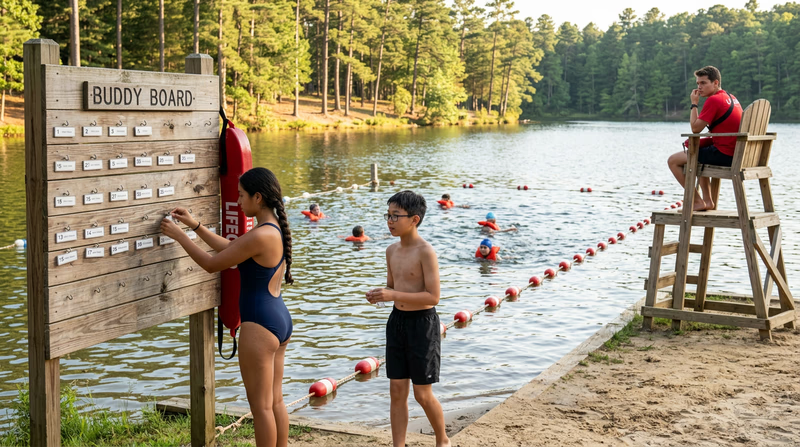
6. Buddy System — Every swimmer has a buddy. Buddies enter and exit the water together, stay within arm’s reach of each other, and check in regularly during buddy checks. If your buddy goes under, you are the first person to notice.
7. Discipline — Everyone follows the rules. No running on the pool deck. No diving in shallow water. No horseplay that could push someone underwater. Discipline is not about being strict for the sake of it — it is about keeping the environment safe so everyone can have fun.
8. Emergency Preparedness — Before any swimming activity begins, there must be a plan in place for what happens if something goes wrong. That includes having rescue equipment ready, a first-aid kit nearby, and knowing how to contact emergency medical services. This is where your lifesaving training fits in — you are becoming part of that emergency preparedness.
Why This Comes First
You might wonder why you need to learn a prevention system before you learn how to rescue someone. The answer is simple: the best rescue is the one that never has to happen. Most drowning incidents are preventable. When Safe Swim Defense is followed correctly, the chance of an emergency drops dramatically.
As you work through the rest of this merit badge, you will see Safe Swim Defense principles woven into every rescue scenario. A qualified supervisor ensures your practice sessions are safe. A buddy system means someone is watching when you perform drills. Ability groups ensure the right people are in the right part of the water.
Safe Swim Defense — BSA The official BSA guide to Safe Swim Defense, including all eight principles and their application. Link: Safe Swim Defense — BSA — https://www.scouting.org/health-and-safety/gss/gss02/Req 2 — Swimming Prerequisites
Lifesaving is built on top of strong swimming. You cannot rescue someone in the water if you are struggling yourself. That is why these two prerequisites must be completed before you begin any of the rescue requirements (3–15).
Why Swimming Comes First
Imagine trying to tow an exhausted swimmer to shore while fighting to keep your own head above water. It would not work — and it would put both of you in danger. A rescuer must be a confident, capable swimmer who can cover distance efficiently and still have energy left when they arrive.
The 400-yard continuous swim is not just a test — it is a benchmark that proves you have the endurance and technique to handle real rescue situations.
The Four Strokes You Need
Each of the four required strokes has a specific role in lifesaving. Understanding why each stroke matters will help you appreciate the 400-yard swim as more than just a fitness test.
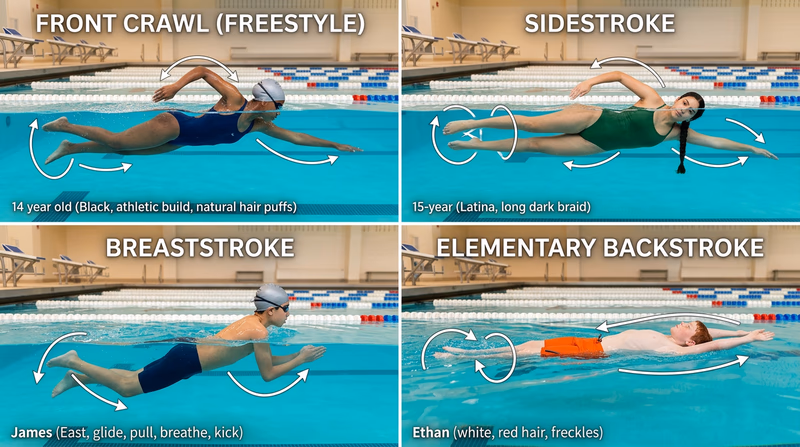
Front Crawl (Freestyle) — This is your fastest stroke and the one you will use for the approach — getting to a victim as quickly as possible. Speed matters when someone is struggling. Your head-up front crawl variation lets you keep eyes on the victim while swimming toward them.
Sidestroke — This is the workhorse of water rescue. The sidestroke lets you swim on your side with one arm free — perfect for towing a victim or carrying a rescue device. You will use this stroke more than any other during actual rescues.
Breaststroke — A slower, energy-efficient stroke that keeps your head above water naturally. This is valuable for approaching a victim when you need to maintain visual contact and assess the situation. It is also useful in choppy water where breathing with a crawl stroke is difficult.
Elementary Backstroke — This is your rest stroke. When you are tired from a rescue, you can roll onto your back and use this stroke to recover while still making progress toward shore. It is also used in some towing techniques where you pull a victim while swimming on your back.
What “Strong Manner” and “Good Form” Mean
Your counselor is looking for more than just getting from one end of the pool to the other. Here is what strong, good-form swimming looks like:
Stroke Quality Checklist
What your counselor will evaluate- Rhythmic breathing: Consistent breathing pattern that does not interrupt your stroke
- Smooth transitions: No stopping or standing between stroke changes
- Efficient kick: Kick generates propulsion without wasted energy
- Proper arm mechanics: Full extension and pull-through on each stroke
- Body position: Streamlined in the water, not dragging legs or lifting head too high
- Endurance: 400 yards without stopping, resting, or touching the bottom
Building Your Endurance
If you are not yet able to swim 400 continuous yards, do not worry — that is exactly what training is for. Here are some ways to build up:
- Start with distance, not speed. Swim at a comfortable pace and add 50 yards to your total each week.
- Practice stroke transitions. Switch between strokes smoothly — you will need to do this during the test and during rescues.
- Train the sidestroke. Many Scouts are less familiar with the sidestroke, but it is the most important stroke for lifesaving. Give it extra practice time.
- Swim with a buddy. Training is safer and more motivating with a partner.
Req 3a — Drowning Situations
Drowning does not look like what you see in the movies. There is usually no screaming, no dramatic splashing, no waving arms. It happens quietly, quickly, and in places that seem perfectly safe. Understanding where and how drowning happens is your first step toward preventing it.
Unfenced Residential Pools
Home swimming pools are the number one location for drowning among children under age five. A backyard pool without a fence is an open invitation for unsupervised children to wander in. Even for older kids and adults, residential pools often lack lifeguards, rescue equipment, and clear safety rules.
How to avoid it:
- Pools should be surrounded by a four-sided fence at least four feet high with a self-closing, self-latching gate.
- Never swim alone in a residential pool — the buddy system applies everywhere.
- Keep rescue equipment (a reaching pole and a ring buoy) beside the pool at all times.
Drop-Offs
A drop-off is a sudden change in water depth. You might be wading in knee-deep water and take one more step into water over your head. Drop-offs are common at lakes, rivers, and ocean beaches where sandbars shift. They catch people off guard — especially non-swimmers who thought they were in safe, shallow water.
How to avoid it:
- Never assume water stays shallow. Test the depth ahead of you before wading further.
- Swim only in areas where the bottom has been checked and boundaries are marked.
- Watch for changes in water color — darker water usually means deeper water.
River Currents
Rivers flow, and that flow creates currents that can overpower even strong swimmers. Foot entrapment — getting a foot stuck between rocks on a river bottom — is one of the most dangerous situations in moving water. The current pushes against your body while your foot holds you in place, forcing you underwater.
How to avoid it:
- Never try to stand or walk in river water above your knees if there is any current.
- If you fall into a river, float on your back with your feet downstream to fend off obstacles. Do not try to stand until the water is very shallow and slow.
- Stay away from strainers (fallen trees, fences, or debris that let water pass through but trap objects — and people).
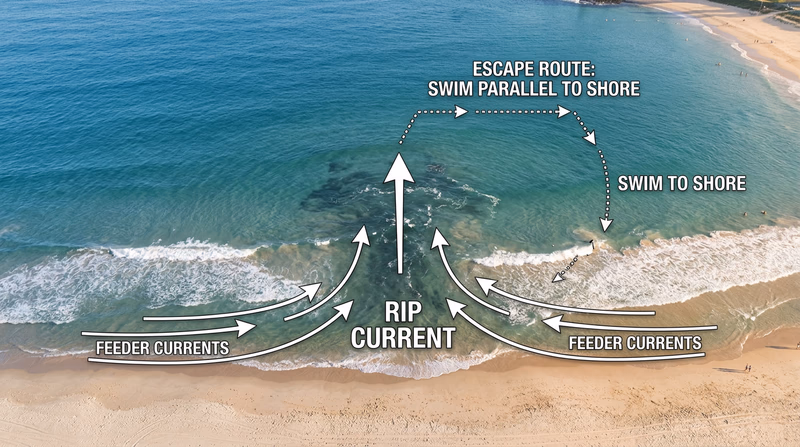
Rip Currents
A rip current is a narrow, powerful channel of water flowing away from shore at a beach. Rip currents form when waves push water onto the beach and it needs a path back out to sea. They can pull swimmers hundreds of yards from shore in less than a minute.
How to avoid it:
- Learn to spot rip currents: look for a channel of choppy, discolored water flowing seaward, a break in the wave pattern, or a line of foam or debris moving out.
- Swim at beaches with lifeguards and ask about conditions before entering the water.
- If caught in a rip current, do NOT swim directly back to shore. Swim parallel to the beach until you are out of the current, then swim in at an angle.
Medical Emergencies
Sometimes drowning is caused by a medical event that happens in or near the water. A seizure, a heart attack, a severe allergic reaction, or a diabetic emergency can all cause a person to lose consciousness and slip underwater. Alcohol and drugs are also major factors — they impair judgment, coordination, and reaction time.
How to avoid it:
- Complete the personal health review before swimming activities.
- Never swim under the influence of alcohol, drugs, or any medication that causes drowsiness.
- People with seizure disorders or heart conditions should always have a buddy who knows their condition and what to do.
- Keep a first-aid kit and an AED (if available) near every swimming area.
Other Common Scenarios
Beyond the situations listed in the requirement, be aware of:
- Unsupervised children: A child near any body of water without a watchful adult is at risk. Supervision means dedicated, undistracted attention — not glancing up from a phone.
- Hyperventilation before diving: Some swimmers deliberately hyperventilate to hold their breath longer. This can cause shallow-water blackout — unconsciousness underwater with no warning.
- Cold-water shock: Jumping into cold water triggers an involuntary gasp reflex that can fill your lungs with water in seconds.
Req 3b — Identifying Distress
One of the most important lifesaving skills is not physical — it is visual. Being able to see that someone is in trouble, even when they cannot call for help, can mean the difference between a rescue and a tragedy. The challenge is that real drowning looks nothing like drowning in movies or on TV.
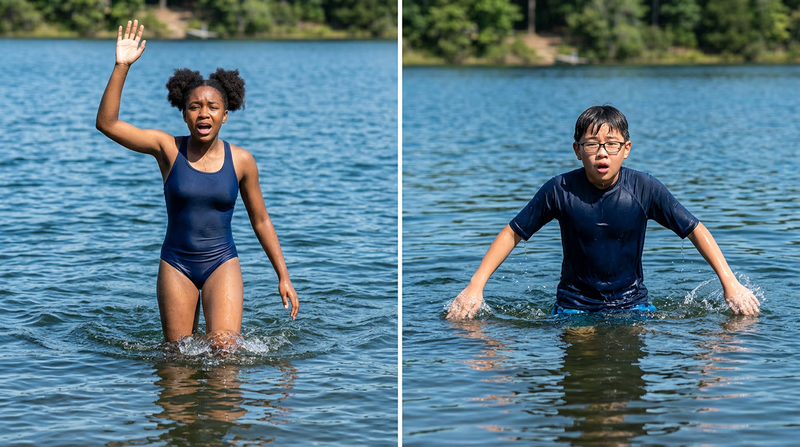
The Instinctive Drowning Response
When a person is actively drowning, their body takes over with an automatic survival response. A researcher named Dr. Frank Pia identified this pattern and called it the Instinctive Drowning Response. Here is what it actually looks like:
- Arms press down and out to the sides, not waving overhead. The body is using the arms to push down on the water to keep the mouth above the surface.
- No call for help. Breathing takes priority over speech. The person’s mouth bobs above and below the surface just long enough to gasp for air — not to shout.
- Body is vertical in the water with no visible kick. The person appears to be climbing an invisible ladder.
- It lasts only 20 to 60 seconds before the person goes under for good.
This means drowning is almost always silent. There is no splashing, no screaming, and no waving. If you are waiting for someone to yell “Help!” you may be waiting too long.
Distressed Swimmer vs. Active Drowning
Not every person in trouble is actively drowning. It is important to tell the difference, because your rescue approach will change.
Distressed Swimmer:
- Can still wave or call for help
- May be floating or treading water poorly
- Can still follow instructions (“Grab this! Kick your feet!”)
- Has some ability to assist in their own rescue
- Has more time before the situation becomes critical
Active Drowning (Instinctive Drowning Response):
- Cannot wave or call for help
- Mouth is at or just below the surface
- Body is vertical, no effective kick
- Cannot follow instructions or grab equipment voluntarily
- Has 20–60 seconds before submersion
Passive Drowning:
- Person is unconscious or unresponsive in the water
- Floating facedown or just below the surface
- No movement at all
- Often the result of a medical emergency, head injury, or shallow-water blackout
What to Watch For
Beyond the drowning response itself, there are other clues that someone may need help:
Warning Signs
Red flags that someone may be in trouble- A swimmer who was active has suddenly gone quiet and still
- Eyes that are glassy, unfocused, or closed
- Head tilted back with mouth open
- Hair over the forehead or eyes with no attempt to clear it
- A swimmer drifting into deeper water without seeming to notice
- Hyperventilating or gasping at the surface
- A swimmer who looks like they are trying to roll onto their back but cannot
- A child who has been underwater for more than 30 seconds
Scanning Technique
Professional lifeguards use a systematic scanning technique to watch their assigned area. You can practice this too:
- Move your eyes in a pattern — left to right across the water, then back. Do not stare at one spot.
- Complete a full scan every 10 seconds. This sounds fast, but it ensures you catch problems early.
- Pay extra attention to transition zones — the boundary between shallow and deep water, areas near pool drains, and spots where currents run.
- Count heads. If you know how many people are in the water, a missing head stands out immediately.
Req 3c — Rescue Order
When you see someone in trouble in the water, your first instinct might be to jump in and swim to them. But that is actually the last option, not the first. Water rescue follows a specific order designed to keep the rescuer as safe as possible while still getting help to the victim quickly.
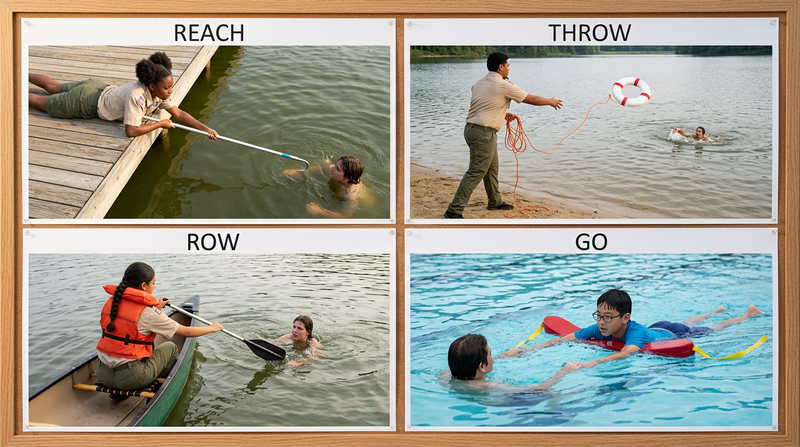
Reach — Throw — Row — Go
This four-step sequence is the backbone of water rescue. You start with the safest method and only move to the next one if the previous method will not work.
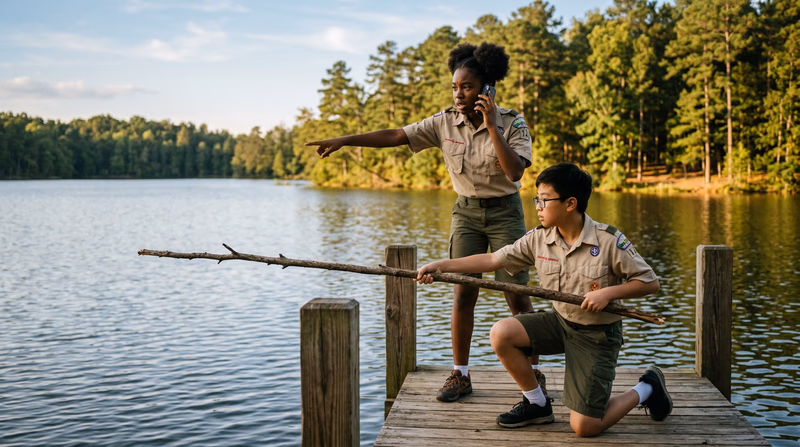
1. Reach
If the victim is close to the edge of a pool, dock, or shoreline, you can rescue them without ever entering the water. Extend something for them to grab:
- Your arm or leg (lie flat to avoid being pulled in)
- A towel, shirt, or belt
- A pole, paddle, branch, or pool noodle
Why it is safest: You stay on solid ground. There is zero chance of the victim grabbing you and pulling you under.
When it works: The victim is within arm’s reach or one object-length of the edge.
2. Throw
If the victim is too far to reach, throw them something that floats. Aim for accuracy — land the device within arm’s reach of the victim, preferably just past them so you can pull it back toward them.
- Ring buoy with attached line
- Throw bag (a bag filled with coiled rope)
- Any buoyant object: cooler, empty jug, kickboard, life jacket
Why it is safe: You still stay on dry ground. The victim gets flotation and you can pull them in with the line.
When it works: The victim is within throwing range (typically up to about 50 feet with practice).
3. Row
If the victim is too far to reach or throw to, use a boat, canoe, kayak, or paddleboard to get to them. You approach from downwind or downcurrent, extend a paddle or oar, and let the victim hold on to the watercraft.
Why it is safer than swimming: You have a large, buoyant platform between you and the victim. You are much harder to capsize than to overpower in the water.
When it works: A watercraft is available and you know how to operate it.
4. Go (Swim)
Swimming to the victim is the last resort. It puts you in the water with a panicking person, which is the most dangerous position for a rescuer. If you must go, bring a buoyant aid with you — never swim to a victim empty-handed.
Why it is the most dangerous: A panicking victim can grab you, push you under, and drown you. Even trained lifeguards prefer to keep a rescue device between themselves and the victim.
When it is necessary: The victim is too far for other methods, no watercraft is available, and they are running out of time.
Always Call for Help
No matter which rescue method you use, one of the first things you should do is activate the emergency action plan. That means:
- Shout for help — alert other people nearby
- Send someone to call 911
- If at a facility, activate the emergency alarm
- Point at a specific person and say: “You — call 911 now!”
Pointing at one person and giving a direct command works much better than yelling “Someone call 911!” to a crowd. People tend to assume someone else will do it.
American Red Cross Water Safety Water safety tips and resources from the American Red Cross, including how to respond to water emergencies. Link: American Red Cross Water Safety — https://www.redcross.org/get-help/how-to-prepare-for-emergencies/types-of-emergencies/water-safety.htmlReq 3d — Adapting Rescue Techniques
You have learned the Reach-Throw-Row-Go sequence, but rescue is not a one-size-fits-all operation. The method you use depends on two key factors: where the emergency is happening and what condition the victim is in. A tired swimmer at the edge of a pool requires a very different response than an unconscious person in the middle of a lake.
How Setting Changes Your Approach
Swimming Pools:
- Clear water, known depth, rescue equipment nearby
- Reaching rescues are almost always possible — the edge is never far
- Ring buoys, reaching poles, and backboards are typically available
- Getting the victim out of the water is relatively easy (ladders, gutters, deck)
Lakes and Ponds:
- Murky water — you may not be able to see the victim if they submerge
- Soft, uneven bottoms with potential drop-offs
- Shoreline may be muddy, rocky, or overgrown — harder to perform reaching rescues
- Greater distances to cover; throwing rescues require more accuracy
- Water temperature may be significantly colder than air temperature
Rivers and Streams:
- Current adds a time-critical element — the victim is moving downstream
- Foot entrapment risk makes wading dangerous
- Position yourself downstream of the victim if possible when throwing a line
- Eddies (calm spots behind rocks) can be used as rescue zones
- Never attempt a swimming rescue in moving water without specialized training
Ocean Beaches:
- Rip currents can carry both victim and rescuer away from shore
- Breaking waves can disorient and exhaust a rescuer
- Sand bars create false bottoms that disappear suddenly
- Rescue boards and fins significantly improve a rescuer’s capability in surf
How the Victim’s Condition Changes Your Approach
The same body of water can require completely different rescue techniques depending on whether the victim is conscious, unconscious, calm, or panicking.
Distressed Swimmer (Conscious, Still Responsive):
- Can hear and follow directions
- May be able to grab a thrown device or swim toward a reaching aid
- Talk to them! Calm, clear instructions make a huge difference: “I see you — grab the ring — kick your feet!”
- A reaching or throwing rescue is usually sufficient
Active Drowning (Conscious, Instinctive Response):
- Cannot follow instructions
- Will instinctively grab anything — including you
- Keep a buoyant object between you and the victim at all times
- If you must swim to them, approach from behind to avoid being grabbed
- Time is extremely limited — act fast but smart
Passive Drowning / Unconscious:
- No response to voice or splash
- May be facedown or just below the surface
- You will likely need to enter the water — reaching and throwing will not work if they cannot grab anything
- Speed is critical — get them out and begin resuscitation
- Support the head and neck in case of spinal injury (especially in shallow-water incidents)
Submerged Victim:
- Victim has already gone under
- Mark the last known location — use a landmark on shore as a reference
- Surface dives may be necessary
- Call 911 immediately — professional rescue teams are needed
- Do not risk your own life searching in deep or murky water
Matching Method to Situation
Here is a quick reference for how setting and condition combine to shape your rescue:
| Situation | Best Method | Key Concern |
|---|---|---|
| Conscious victim near pool edge | Reach | Quick, easy, keep them calm |
| Conscious victim far from shore | Throw | Accuracy of throw, clear instructions |
| Active drowning, 30 ft from shore | Go with buoyant aid | Keep aid between you and victim |
| Unconscious victim in open water | Go with rescue approach | Speed, spinal precaution |
| Victim in river current | Throw from downstream | Current speed, rope management |
| Victim caught in rip current | Direct them to swim parallel | Communicate if possible |
Req 3e — When NOT to Rescue
This may be the most important page in this entire guide. Knowing when not to attempt a swimming rescue is just as critical as knowing how to perform one. An untrained or ill-prepared rescuer who enters the water can quickly become a second victim — doubling the emergency instead of solving it.
The Hard Truth About In-Water Rescues
Swimming out to rescue someone is the most dangerous rescue method for the rescuer. The water itself is hazardous, the victim may be panicking, and the physical demands of towing another person while swimming are enormous. Professional lifeguards train for hundreds of hours before attempting in-water rescues, and even they use flotation equipment whenever possible.
As a Scout, you are learning these skills under supervision with practice subjects who are cooperating. A real emergency is far more chaotic. Knowing your limits is not weakness — it is wisdom.
When NOT to Attempt an In-Water Rescue
Do NOT Enter the Water If...
Situations where a swimming rescue puts you at unacceptable risk- You are not a strong swimmer or are already fatigued
- The water has a strong current, heavy surf, or whitewater
- The water is extremely cold (risk of cold-water shock and rapid exhaustion)
- The victim is much larger or stronger than you
- There is no flotation device available to take with you
- You cannot see the victim or the bottom of the water
- There are dangerous conditions: lightning, flooding, ice, or debris in the water
- You are alone with no one to call for help or back you up
- The distance to the victim is beyond your swimming ability
- You have a medical condition that could be triggered by exertion or cold water
What You SHOULD Do Instead
Not entering the water does not mean doing nothing. There is always something you can do:
1. Call for help immediately. Dial 911. Shout for anyone nearby. Professional rescue teams have boats, ropes, helicopters, and training for the conditions you cannot handle.
2. Use Reach and Throw methods. These work from shore. Extend a branch, throw a rope, toss a cooler — anything that keeps you on solid ground while getting flotation to the victim.
3. Keep eyes on the victim. If the victim submerges, note the exact location using landmarks on shore. This information is critical for rescue teams.
4. Direct others. If bystanders are present, give them specific tasks: “You — call 911. You — get that rope. You — watch the water and point to where you last saw them.”
5. Provide information to responders. When emergency services arrive, tell them: how many victims, where they were last seen, what the water conditions are, and what has already been tried.
The Emotional Challenge
Walking away from someone in the water goes against every instinct in your body. It feels wrong. But consider this: if you jump in and get into trouble, now there are two people drowning and no one on shore to call for help.
The hardest decision a rescuer ever makes is deciding not to go in. But it is often the right decision — the one that keeps you alive and leads to a successful rescue by someone better equipped.
National Drowning Prevention Alliance Education, advocacy, and resources for drowning prevention — including bystander response guidance. Link: National Drowning Prevention Alliance — https://ndpa.org/Req 4 — Reaching Rescues
Reaching rescues are the first method in the Reach-Throw-Row-Go sequence — and for good reason. They are the safest type of rescue because you never leave solid ground. Your feet stay planted on the pool deck, dock, or shoreline while you extend something for the victim to grab.
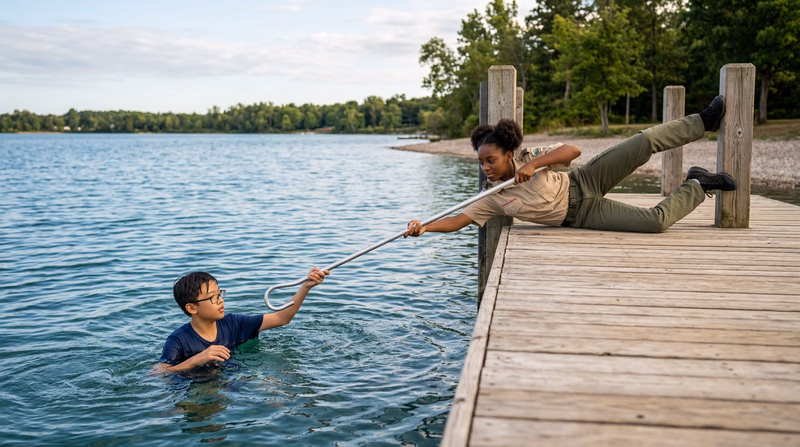
The Golden Rule of Reaching
Get low, stay anchored, and extend. Every reaching rescue follows this pattern:
- Get low. Lie flat on your stomach or drop to one knee. This lowers your center of gravity so you cannot be pulled in.
- Anchor yourself. Grab something solid with your free hand — a dock post, a pool ladder, a tree root. If nothing is available, have a bystander hold your belt or ankles.
- Extend the reach. Stretch your arm, leg, or object toward the victim.
- Pull slowly and steadily. Once the victim has a grip, pull them in smoothly. Do not yank — you could lose your grip or pull the object away from them.
Reaching Tools — From Your Body to Your Environment
The beauty of a reaching rescue is that you can use almost anything. Here are the most common reaching aids, roughly in order from simplest to most effective:
Your Arm or Leg:
- Lie flat on the deck or dock and extend your arm toward the victim.
- If the victim is slightly farther, extend your leg — your reach is longer.
- Only use your body as a reaching tool when the victim is very close (within about 3 feet) and you are firmly anchored.
A Towel or Shirt:
- Roll or twist a towel or shirt into a rope-like shape.
- Hold one end firmly and extend or toss the other end to the victim.
- The victim grabs one end while you pull from the other.
- A wet towel is easier to throw accurately because the added weight keeps it straighter.
A Paddle or Oar:
- Extend the flat blade end toward the victim — it provides a larger surface to grab.
- Hold the handle end with both hands for a strong grip.
- Be careful not to hit the victim — extend slowly and let them grab on.
A Pole or Branch:
- Shepherd’s crooks (the long poles with a hook at the end found at many pools) are ideal.
- A long tree branch works in natural settings.
- The longer the pole, the farther you can reach — but the harder it is to control.
Step-by-Step: Reaching Rescue with a Pole
Here is a detailed walkthrough of the most common reaching rescue:
- Spot the victim and shout reassurance: “I see you — I’m going to help!”
- Get low — lie flat on your stomach near the water’s edge.
- Anchor — grab a solid object with your non-dominant hand, or have someone hold your legs.
- Extend the pole slowly toward the victim, keeping it just above the water surface.
- Guide the victim’s hand to the pole with your voice: “Grab the pole with both hands!”
- Wait for a firm grip before you start pulling.
- Pull steadily toward shore, keeping your body flat and your grip firm.
- Help them out of the water once they reach the edge.
Common Mistakes to Avoid
Reaching Rescue Pitfalls
What NOT to do- Standing upright or kneeling at the very edge without bracing
- Extending your reach so far that you lose your balance
- Letting go of your anchor to get a few extra inches of reach
- Pulling too fast and ripping the aid out of the victim’s hands
- Hitting the victim with the reaching aid — extend gently
- Forgetting to communicate — always talk to the victim
Req 5 — Throwing Rescues
When a victim is beyond your reach, the next safest option is to throw them something that floats. Throwing rescues keep you on solid ground while extending your effective rescue range to 50 feet or more. The key is accuracy — a flotation device that lands 10 feet away from a drowning person might as well be on the moon.
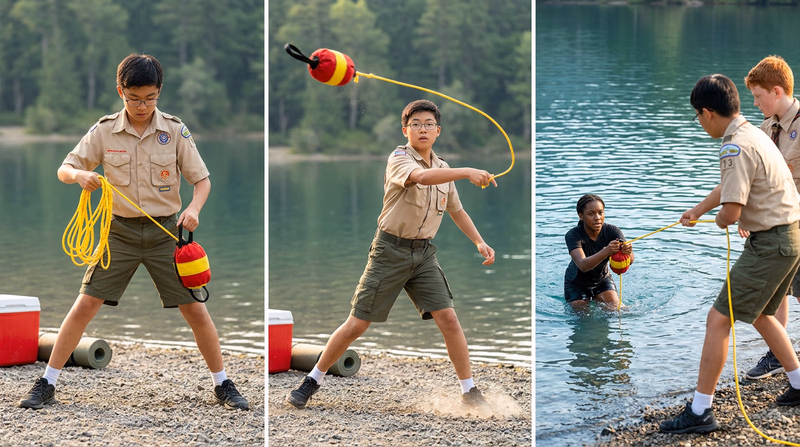
The Throwing Technique
Good throwing technique is surprisingly similar across different devices. Here is the universal approach:
- Plant your feet in a stable stance, one foot slightly ahead of the other.
- Coil the line (if applicable) in your non-throwing hand so it feeds out freely.
- Aim past the victim — throw beyond them so you can pull the device back to them. An overthrow is better than an underthrow.
- Use an underhand swing for ring buoys and throw bags. Overhand throws are less accurate.
- Shout instructions as you throw: “Grab the ring! Hold on!”
- Pull gently once the victim has a grip, drawing them toward shore.
Throwing Devices
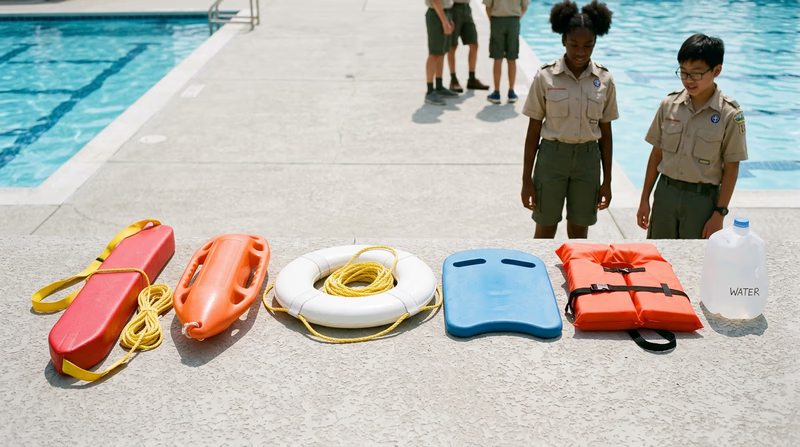
Ring Buoy:
- A hard, buoyant ring (usually white or orange) with a line attached.
- Throw it underhand with a slight arc.
- Aim to land it just past the victim — then drag the line across them so they can grab it.
- Ring buoys provide excellent flotation and are easy for a victim to hold.
Rescue Bag (Throw Bag):
- A small bag filled with coiled rope that feeds out as the bag flies through the air.
- Hold the free end of the rope in your non-throwing hand.
- Throw the bag with an underhand motion — the rope uncoils behind it.
- Very accurate because the bag’s weight gives it a predictable arc.
- After use, you must re-stuff the rope back into the bag before a second throw.
Line (Rope):
- A simple coil of rope — no bag, no ring.
- Coil it neatly in your non-throwing hand and throw the coiled portion with your other hand.
- Less accurate than a throw bag, but available in almost any setting.
- The rope itself does not float (unless it is polypropylene), so the victim must grab it before it sinks.
Free-Floating Support:
- Any buoyant object: a life jacket, a cooler, a sealed empty jug, a pool noodle, a kickboard.
- Throw it as close to the victim as you can.
- No line attached — the victim must swim to it or you must direct them to it.
- Use this when you have no rope or ring buoy available.
What If You Miss?
Missing the first throw is normal, especially under pressure. Here is what to do:
- Re-coil quickly. Pull the line back, coil it, and throw again. Speed matters.
- With a throw bag: For the second throw, pull the rope out of the bag, coil it by hand, and throw the loose coil. Re-stuffing the bag takes too long in an emergency.
- Adjust your aim. If you overthrew, shorten up. If you underthrew, put more into the swing. If the wind pushed it sideways, compensate.
- Switch devices. If one device is not working, try something else.
Improvised Throwing Aids
You will not always have professional rescue equipment nearby. Here are common items you can throw in an emergency:
Improvised Flotation
Everyday items that can save a life- Empty plastic water jug with the cap on — floats well and is easy to throw
- Sealed cooler — significant buoyancy, visible in the water
- Plastic storage bin with the lid on — floats and provides a large surface to grab
- Basketball or soccer ball — good buoyancy, easy to throw accurately
- Empty milk gallon jug — lightweight and very buoyant
- Pool noodle — does not throw far, but excellent flotation if victim is close
Req 6 — Rowing Rescue
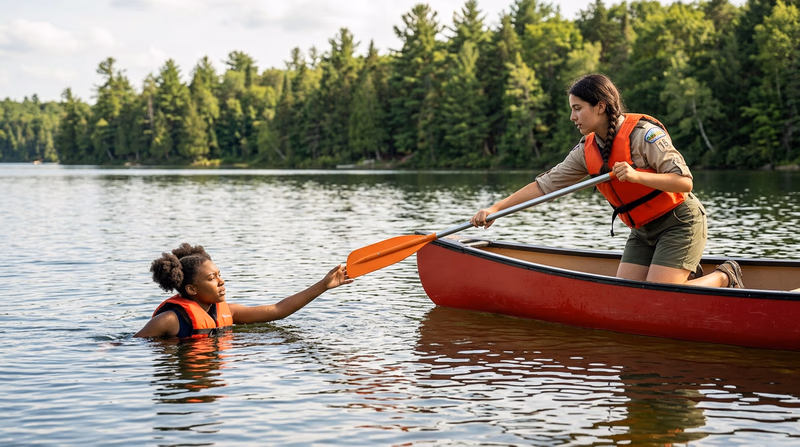
The “Row” step in Reach-Throw-Row-Go uses a watercraft to bring the rescuer close to the victim without entering the water. A boat, canoe, kayak, or stand up paddleboard gives you speed, stability, and a large buoyant platform — advantages that swimming simply cannot match.
Why Rowing Rescues Work
A rowing rescue bridges the gap between shore-based methods (reach and throw) and the most dangerous option (swimming). Here is why watercraft are so effective:
- Speed: A rowboat or kayak can cover 50–100 feet of water in seconds — far faster than swimming.
- Stability: The watercraft provides a platform the victim can hold onto without climbing on top of the rescuer.
- Equipment transport: You can bring rescue devices, first-aid supplies, and even a backboard with you.
- Reduced contact danger: The hull of the boat stays between you and a panicking victim.
How a Rowing Rescue Works
While you are observing (in person or on video), watch for these key elements:
Approach:
- The rescuer approaches from downwind or downcurrent so the boat drifts toward the victim, not away.
- The approach is controlled — coming in too fast risks hitting the victim with the bow.
- The rescuer keeps eyes on the victim at all times.
Contact:
- The rescuer extends an oar, paddle, or rescue device from the boat — never reaches over the side with bare hands toward an active victim.
- The rescuer positions the boat so the victim can grab the stern (back) or gunwale (side) without capsizing the craft.
- Communication is constant: “Grab the end of the paddle. Hold on. I’m going to pull you in.”
Recovery:
- For a canoe or kayak, the victim holds onto the side while the rescuer paddles to shore. Pulling the victim into a small boat risks capsizing.
- For a rowboat, the victim may be pulled over the stern (the flattest, most stable point).
- For a stand up paddleboard, the victim holds the tail while the rescuer paddles prone (lying down) to shore.
What to Look For in the Video or Demonstration
When you observe the rowing rescue, pay attention to these details — your counselor will want to discuss them:
Observation Checklist
Key elements to evaluate- Did the rescuer approach from the correct direction (downwind/downcurrent)?
- Was the approach speed appropriate — controlled, not too fast?
- Did the rescuer maintain visual contact with the victim throughout?
- Did the rescuer use equipment (paddle, oar) to make initial contact, or did they reach with bare hands?
- Was the boat positioned to avoid capsizing when the victim made contact?
- Did the rescuer communicate clearly with the victim?
- Was the victim brought to shore safely without being pulled into the craft (for small boats)?
- How long did the rescue take from start to finish?
- What would you have done differently?
Watercraft Strengths and Limitations
| Watercraft | Strengths | Limitations |
|---|---|---|
| Rowboat | Most stable, can carry equipment and multiple people | Slowest to maneuver, rower faces away from victim |
| Canoe | Good capacity, can be paddled solo or tandem | Less stable, risk of capsizing with an active victim |
| Kayak | Fast, maneuverable, one-person operation | Very limited space, easy to capsize, hard to assist victim aboard |
| Stand Up Paddleboard | Extremely fast when paddled prone, low profile in surf | No sides for victim to grab, unstable in rough water |
Req 7 — Go Rescue Aids
When you must enter the water to rescue someone — the “Go” in Reach-Throw-Row-Go — never go empty-handed. Bringing a rescue aid with you dramatically increases the safety of the rescue for both you and the victim. The type of aid you bring can mean the difference between a controlled rescue and a dangerous struggle.
Buoyant Aids
Buoyant aids float. They provide additional support for both the rescuer and the victim, and they create a physical barrier between you and a panicking person.
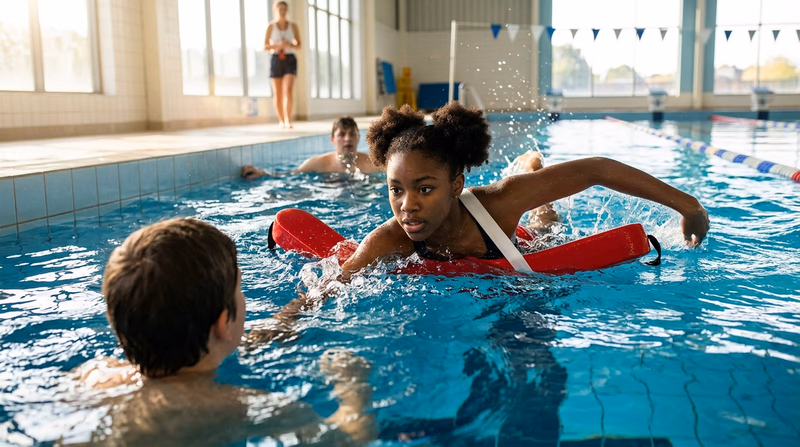
Rescue Tube:
- A long, flexible foam tube (usually red or orange) with a strap and tow line.
- The standard tool for professional lifeguards.
- Can be wrapped around a victim’s chest or held between rescuer and victim.
- Provides enough buoyancy to support two people.
Rescue Buoy (Torpedo Buoy):
- A hard, torpedo-shaped plastic float with handles and a tow line.
- The victim grabs the handles while the rescuer tows with the shoulder strap.
- Extremely buoyant and easy to present to a victim.
Ring Buoy:
- Can be thrown from shore or carried into the water.
- The victim holds onto the ring while the rescuer tows or swims alongside.
Kickboard:
- A pool training tool, but it floats and can be held between you and the victim.
- Not as buoyant as a rescue tube, but widely available at any pool.
Life Jacket / PFD:
- A spare life jacket can be handed to the victim for instant flotation.
- Requires the victim to be calm enough to put it on or at least hold it.
Improvised Buoyant Aids:
- Empty plastic jugs with caps sealed
- Sealed cooler
- Pool noodles (limited buoyancy but better than nothing)
- An inflated beach ball or inner tube
- Any air-filled, sealed container
Nonbuoyant Aids
Nonbuoyant aids do not float, but they still serve an important purpose: they extend your reach in the water and provide something the victim can grab that is not your body.
Towel or Shirt:
- Extend one end to the victim while you hold the other.
- Useful for towing a calm, cooperative victim.
- Sinks eventually, so must be used quickly.
Belt or Strap:
- Similar to a towel — extend one end to the victim.
- Stronger and less likely to rip than a wet shirt.
Rope or Line:
- Can be used to tow a victim while you swim.
- Must be careful not to entangle yourself or the victim.
Why Buoyant Aids Are Preferred
This is the core of the requirement, and there are several clear reasons:
1. Flotation for the victim. A panicking victim’s primary need is to keep their head above water. A buoyant aid meets that need instantly. The moment the victim grabs a rescue tube or buoy, they can breathe — and a victim who can breathe can start to calm down.
2. Separation from the victim. A buoyant aid placed between you and the victim acts as a barrier. The victim grabs the aid instead of grabbing you. This is critical because a panicking person will instinctively climb on top of anything — including their rescuer — pushing them underwater.
3. Energy conservation. Swimming while towing a person is exhausting. A buoyant aid supports the victim’s weight, meaning you are only towing the drag of the aid through the water — not carrying a person.
4. Support for the rescuer. If you become fatigued during the rescue, a buoyant aid keeps both of you afloat while you rest and recover.
5. Works with unconscious victims. An unconscious victim cannot grab a towel or hold a rope. But a rescue tube can be wrapped around their chest to keep them at the surface while you tow them in.
American Red Cross — Lifeguarding Resources Information about lifeguard training, including the equipment used in professional water rescue. Link: American Red Cross — Lifeguarding Resources — https://www.redcross.org/take-a-class/lifeguardingReq 8 — Buoyant Aid Rescues
This is where your training shifts from knowledge to action. You are entering the water, swimming 30 feet to a conscious person, and performing a real rescue using buoyant aids. These two rescues teach two fundamentally different strategies — one where you let the victim save themselves, and one where you actively tow them in.
The Entry
Every swimming rescue starts with a proper water entry. You are not diving into unknown water — you are entering quickly and safely.
Stride Jump (Compact Entry):
- Step forward off the edge with one foot leading.
- Keep your head up and eyes on the victim.
- Squeeze your legs together and press your arms down as you enter to prevent going too deep.
- This entry keeps you at the surface so you can start swimming immediately.
Do not dive headfirst. You need to maintain visual contact with the victim, and a dive takes your eyes off them.
The Approach Stroke
Use the head-up front crawl (also called the lifeguard approach) to swim to the victim. This is a modified freestyle stroke where you keep your head above water and your eyes locked on the victim. It is slightly slower than a regular crawl stroke, but you never lose sight of the person you are rescuing.
Switch to a head-up breaststroke if conditions make it difficult to breathe with the crawl (choppy water, for example).
Communicating with the Victim
Before you present any aid, talk to the victim. Communication serves three purposes:
- Assessment: “Can you hear me? Are you okay? Can you float?” — determine how much help they need.
- Instructions: “I’m going to give you a float. Grab it and hold on.” — tell them what to do.
- Encouragement: “You’re going to be fine. I’m right here.” — calm them down.
A conscious, responsive victim who hears a calm, confident voice will often stop panicking. That makes the entire rescue safer.
Rescue 8a — Present and Release
In this rescue, you give the buoyant aid to the victim and let them make their own way to safety. This is the safest type of swimming rescue because you maintain distance from the victim.
Step by step:
- Enter the water with the stride jump, buoyant aid in hand.
- Swim to the victim using a strong approach stroke, keeping eyes on them.
- Stop about 6 feet away. Do not swim directly to the victim — maintain a safe distance.
- Speak to the victim: “I have a float for you. I’m going to push it to you. Grab it with both hands.”
- Extend or push the aid toward the victim. Let it float to them.
- Release the aid completely. Back away to a safe distance (at least 6 feet).
- Coach them in: “Kick your feet toward shore. You’re doing great.”
- Swim alongside at a safe distance, ready to assist if needed, but not in contact.
Rescue 8b — Present and Tow
In this rescue, you keep hold of the aid and actively tow the victim to shore. This is necessary when the victim cannot swim to safety on their own — they are too tired, too scared, or the distance is too far.
Step by step:
- Enter the water with the stride jump, buoyant aid in hand (with tow line if it has one).
- Swim to the victim using a strong approach stroke.
- Stop about 6 feet away and speak to them: “Grab this and hold on tight. I’m going to pull you to shore.”
- Extend the aid to the victim. Wait for them to grab it securely.
- Begin towing using the sidestroke. If the aid has a tow line, clip the strap over your shoulder and swim. If not, hold one end while the victim holds the other.
- Swim steadily — do not sprint. Pace yourself so you can make it all the way to shore.
- Keep communicating: “Hold on. We’re almost there. Keep your chin up.”
- Assist them out of the water when you reach the edge or shallows.
Key Differences Between 8a and 8b
| Element | 8a — Release | 8b — Tow |
|---|---|---|
| Your contact with the aid | You release it | You keep holding it |
| Distance from victim | Stay 6+ feet away | Connected through the aid |
| Victim’s role | Kicks to shore independently | Holds on while you swim |
| Towing stroke | None — you swim alongside | Sidestroke with tow |
| Best for | Alert victim, close to shore | Exhausted or distant victim |
Req 9 — Nonbuoyant Aid Rescue
Real emergencies do not happen when you are already in your swimsuit at the pool. They happen when you are fully dressed — walking along a riverbank, hanging out at a dock, or standing beside a lake at a picnic. This requirement prepares you for that reality: getting out of heavy clothing fast, entering the water, and performing a rescue with nothing but a piece of cloth.
When to Remove Clothing
Heavy, waterlogged clothing can drown a rescuer. But removing clothes takes time, and time is something a drowning victim does not have much of. Here is the decision framework:
Remove clothing when:
- You are wearing heavy items: jeans, boots, a thick jacket, a hoodie
- The swim distance is significant (more than a few body lengths)
- You have a few seconds to spare — the victim is still at the surface
- The clothing will restrict your movement or weigh you down
Keep clothing on when:
- The victim is about to go under and every second counts
- Your clothing is lightweight (shorts and a T-shirt)
- Removing clothes would take longer than the swim itself
- You are in cold water and the clothing provides insulation
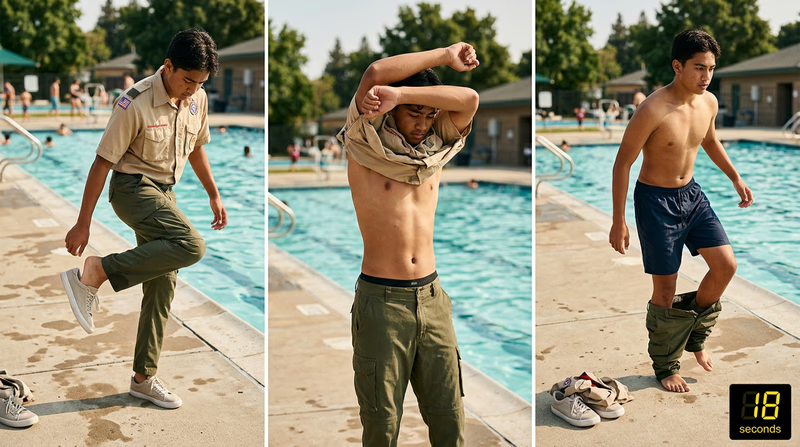
The 20-Second Strip
Here is a reliable sequence for removing street clothes quickly:
- Shoes first. Kick them off or step on the heel and pull your foot out. Do not bother with laces — just force them off. (2–4 seconds)
- Shirt next. Grab the back of the collar and pull over your head in one motion. If it is a button-down, do not unbutton — rip it open or pull it over your head. (3–5 seconds)
- Pants last. Unbutton, unzip, and push down. Step out of them. If wearing a belt, unbuckle it as you unzip. (4–6 seconds)
- Socks optional. If they come off easily, great. If not, leave them — they will not slow you down much.
Save your shirt or towel. You will use it as your rescue aid. Do not throw it aside with the rest of your clothes — hold onto it or drape it over your shoulder.
The Nonbuoyant Aid Tow
Once you are in the water with your shirt or towel, the rescue follows a similar pattern to the buoyant aid tow — but with a critical difference: the aid does not float. The victim must actively hold on, and you must tow without the benefit of buoyancy support.
Step by step:
- Enter the water with a stride jump, holding the shirt or towel.
- Swim to the victim using a strong approach stroke, eyes on the victim.
- Stop about 6 feet away and speak: “I have a shirt for you. Grab this end and hold tight.”
- Extend one end of the shirt or towel toward the victim. Keep a firm grip on your end.
- Wait for the victim to grab with both hands.
- Roll onto your side and begin towing with the sidestroke.
- Kick powerfully — you are pulling the victim’s weight without buoyancy help.
- Communicate throughout: “Keep holding on. Kick your feet if you can. Almost there.”
- Tow to shore and help the victim exit the water.
Why This Is Harder Than a Buoyant Aid Rescue
Challenges of Nonbuoyant Tows
What makes this rescue more demanding- No flotation support — the victim’s weight pulls you down
- The fabric can slip or tear if the victim’s grip is weak
- You must swim harder to maintain forward progress
- The victim may swallow water since they have no float to rest on
- If the victim lets go, you must circle back and present the aid again
- Your own endurance is tested more severely
Making the Most of a Shirt or Towel
- Wet the fabric first if possible — a wet towel is heavier and provides a more secure grip.
- Twist it into a rope rather than leaving it flat. A twisted shirt is easier to grip.
- Hold your end with both hands if you are not actively swimming — switch to one hand only when stroking.
- Keep it short. The closer the victim is to you, the more efficiently you can tow. But maintain enough distance that they cannot grab you.
Req 10 — Lead-and-Wait Techniques
Every lifesaving instructor will tell you the same thing: the most dangerous moment in a water rescue is when you make contact with a panicking victim. The lead-and-wait technique is your strategy for handling an active, panicking victim without putting yourself in a potentially fatal grip.
Why Contact Is Dangerous
A person experiencing the instinctive drowning response is not thinking clearly. Their brain has switched to pure survival mode, and their body is doing one thing: pushing down on anything to keep their mouth above water. If you swim within reach, they will grab you, climb on top of you, and push you under — not because they want to hurt you, but because their survival instinct demands it.
Even a small person in a panic can overpower a larger rescuer in the water. On land, you have leverage. In the water, you have almost none.
What Is Lead-and-Wait?
Lead-and-wait is a positioning strategy. Instead of swimming directly to the victim, you lead them toward safety by positioning yourself between the victim and shore, staying just out of reach. You wait for the right moment — when the victim is calmer, more exhausted, or focused on the aid you are presenting — before making any contact.
How It Works
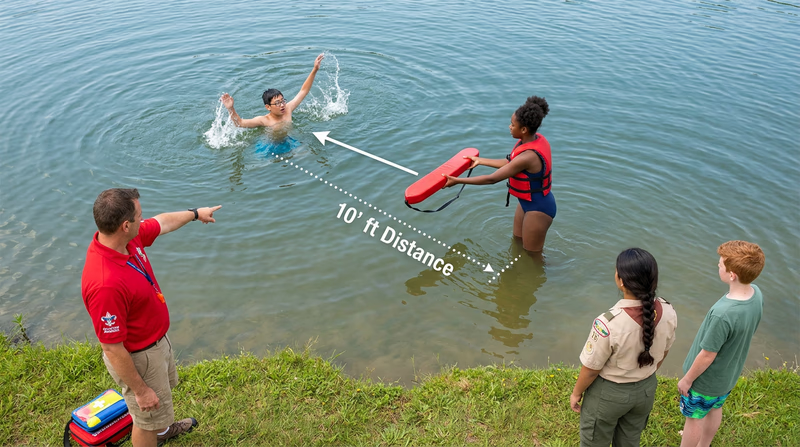
Step by step:
- Approach with a buoyant aid. Swim toward the victim but stop about 10 feet away.
- Assess the victim’s state. Are they actively panicking? Grabbing at the water? Lunging toward you?
- Position yourself between the victim and shore. You want them to have to swim through your position to get to safety.
- Present the aid. Push the buoyant device toward the victim from a safe distance. “Here — grab this!”
- If they lunge at you: Back away. Submerge if necessary. Maintain distance.
- Wait. An active drowning victim will exhaust themselves within 20–60 seconds. As they tire, they become easier to help.
- Re-present the aid when the victim is calmer. Speak constantly: “I’m here to help. Grab the float. I’m not going to leave you.”
- Once they grab the aid, begin towing — but stay at arm’s length through the aid.
The Psychology of Lead-and-Wait
This technique works because of how panic behaves in water:
- Panic is exhausting. The instinctive drowning response burns enormous energy. A person cannot maintain it for more than about a minute.
- A voice calms. Hearing a confident, steady voice — “I’m here, you’re going to be okay” — triggers a shift from panic to cooperation.
- Visible rescue aids attract. A panicking person will instinctively grab at anything buoyant. By presenting the aid from a safe distance, you redirect their grabbing instinct away from you and toward the device.
- Proximity to shore helps. By positioning yourself between the victim and shore, you create a natural path. As the victim tires and the panic subsides, they will move toward you — and toward safety.
When to Use Lead-and-Wait
| Situation | Use Lead-and-Wait? |
|---|---|
| Conscious, calm victim | No — present the aid directly |
| Conscious, distressed but responsive | Maybe — assess their ability to follow instructions |
| Active drowning, lunging and grabbing | Yes — this is exactly what the technique is designed for |
| Unconscious victim | No — they need immediate contact and support |
What If Lead-and-Wait Is Not Working?
Sometimes a victim will not calm down, will not grab the aid, and continues to thrash. In these situations:
- Keep talking. Your voice is your most powerful tool.
- Stay patient. They will tire. It feels like an eternity, but it is usually less than a minute.
- Approach from behind if you must make contact. The rear approach is the safest position because the victim cannot easily grab you.
- Call for backup. If another rescuer is available, a two-person rescue is far safer.
Req 11 — Contact Tows
Contact tows are the rescues where you physically hold the victim and swim them to safety — no equipment, no flotation device, just your body and your training. These are the most physically demanding rescues you will learn, and they require a cooperative (or at least non-combative) victim.
Notice the key distinction in these requirements: you start in the water near the subject, not from shore. This simulates a scenario where you are already swimming nearby when someone gets into trouble.
Before You Make Contact
Even though these rescues involve direct contact, you still follow the same communication protocol:
- Speak first: “Hey, are you okay? Do you need help?”
- Assess: Is the person calm? Tired? Panicking? The requirement specifies cooperative victims — a calm, tired swimmer (11a) and an exhausted but responsive person (11b).
- Give instructions: “I’m going to help you. Roll onto your back and relax.” or “I’m going to hold you and swim you to shore. Try to stay still.”
- Reassure: “You’re going to be fine. I’ve got you.”
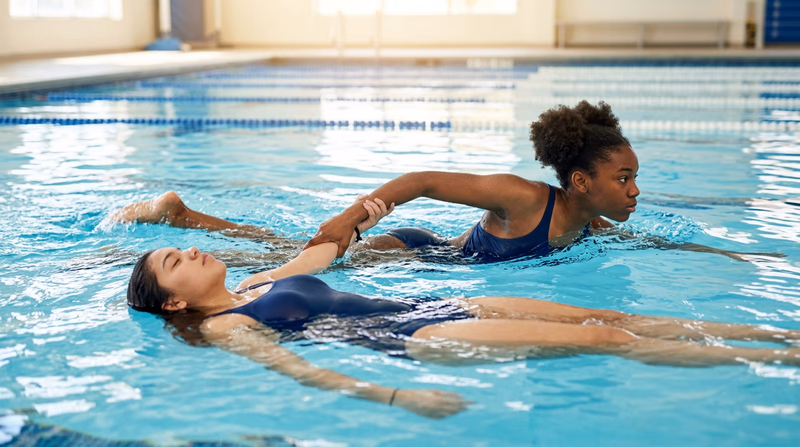
11a — The Armpit Tow
The armpit tow is used for a calm, cooperative victim who is already floating on their back. This is the gentlest of the contact rescues — the victim does most of the floating while you provide propulsion.
Step by step:
- Position yourself behind the victim’s head while they float on their back.
- Reach under one of their arms and grasp the armpit area — your hand cups their armpit from underneath with your palm against their upper back.
- Keep the victim’s face above water. Their back float does most of the work.
- Swim on your back or side using a modified backstroke kick or sidestroke kick. Your free arm can stroke if needed.
- Kick steadily toward shore. Do not rush — this is a controlled, calm tow.
- Talk to the victim throughout: “Just relax. Keep floating. I’m swimming us to the edge.”
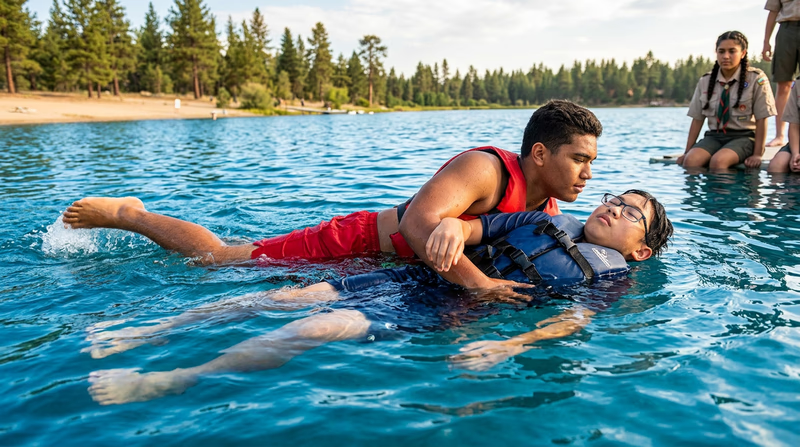
11b — The Cross-Chest Carry
The cross-chest carry is used for an exhausted victim who is still responsive but cannot float unassisted. This is a more controlling hold that supports the victim’s body while you swim.
Step by step:
- Approach from behind. Position yourself at the victim’s back.
- Reach your dominant arm across the victim’s chest — your arm goes diagonally from one of their shoulders to the opposite side of their ribcage, under the arm.
- Lock the victim against your hip. Their back rests against your side.
- Lean back slightly to bring the victim into a back-float position. Your body provides the buoyancy and angle.
- Swim using the sidestroke — your non-dominant arm pulls through the water while your legs do the scissor kick.
- Keep the victim’s mouth and nose above water at all times.
- Communicate: “I’ve got you. Stay still and let me swim.”
Key Differences
| Element | Armpit Tow | Cross-Chest Carry |
|---|---|---|
| Victim condition | Calm, floating on back | Exhausted, treading water |
| Grip | One hand under armpit | Arm across chest, locked at hip |
| Your swimming position | On your back or side | On your side (sidestroke) |
| Control over victim | Minimal — they float independently | High — you control their body position |
| Energy required | Lower | Higher |
| Best for | Tired swimmers who can float | Exhausted swimmers who cannot float |
Building the Physical Skills
Both tows require strong kicking and core endurance. Here are ways to prepare:
Training Exercises
Build the strength and stamina you need- Kick sets with a kickboard — 200 yards of sidestroke kick, 200 yards of backstroke kick
- Partner tows — practice towing a friend across the pool using each technique
- Treading water — build endurance by treading for 2 minutes without stopping
- Core exercises on land — planks, flutter kicks, and bicycle crunches all help with in-water stability
- Distance swimming — the more comfortable you are in the water, the more effective you will be as a rescuer
Req 12 — Escape Techniques
This is the requirement that could save your life as a rescuer. No matter how careful you are — no matter how well you use lead-and-wait and buoyant aids — there may come a moment when a panicking victim grabs you. If that happens, you need to know how to break free immediately, before they push you underwater.
The Principle Behind Every Escape
Every escape technique is built on one simple fact: a panicking victim wants to stay at the surface. If you submerge, they will let go. Their survival instinct forces them to push away from anything that is going down and reach for anything that is going up.
This means your escape strategy always starts the same way:
- Take a deep breath. You are about to go underwater.
- Tuck your chin. Protect your airway.
- Submerge. Push yourself down.
- Break the grip using the specific technique for that hold.
- Swim away underwater and resurface at a safe distance.
- Reassess and try again — this time with a buoyant aid and better positioning.
Wrist Grab Escape
A victim grabs your wrist as you extend your arm toward them.
Technique:
- Take a breath and submerge. Go down.
- Rotate your wrist toward the victim’s thumb. The thumb is the weakest point in any grip.
- Pull sharply in the direction of their thumb gap. Your wrist will slide free.
- Swim away underwater — at least 6 feet — and resurface.
Key detail: Always turn toward the thumb. Even if a person has a crushing grip, the opening between their thumb and fingers is a natural weak point that you can exploit.
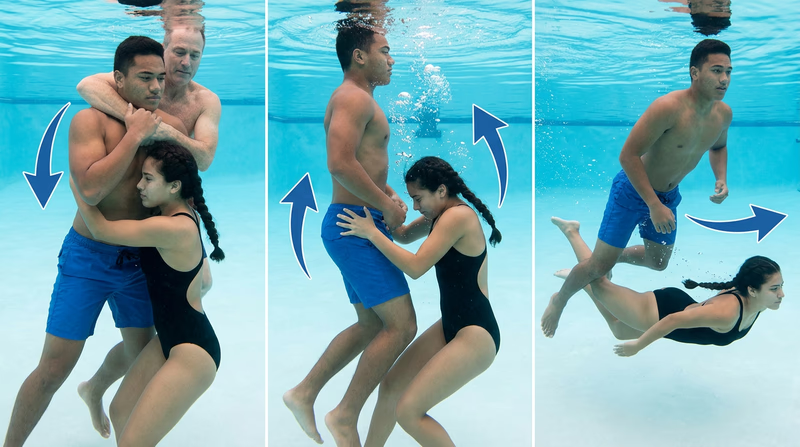
Front Head Hold Escape
A victim facing you wraps both arms around your head and shoulders, pressing you against their chest.
Technique:
- Take a breath and tuck your chin against the victim’s chest. This protects your airway.
- Submerge. Push yourself downward by bending at the waist and driving your hips under the victim.
- Place both hands on the victim’s hips and push them away from you as you go deeper.
- Turn the victim as you push — spin them so their back is toward you.
- Swim away underwater behind them and resurface at a safe distance.
- If possible, transition to a rear approach position for a safer rescue attempt.
Rear Head Hold Escape
A victim behind you wraps both arms around your head and shoulders from the rear.
Technique:
- Take a breath and tuck your chin. The victim’s arms are around your neck from behind — tucking your chin protects your airway and creates space.
- Submerge. Drive yourself downward.
- Grab the victim’s elbow (the arm that is highest or most constraining) with both hands.
- Push the arm up and over your head while you duck under it.
- Spin to face the victim as you come free. Keep hold of their arm.
- Push them away and swim to a safe distance.
- Resurface behind or to the side of the victim.
After the Escape
Breaking free is only half the job. Once you have escaped:
- Catch your breath. You just performed an intense maneuver underwater. Take a moment.
- Reassess the situation. Is the victim still active? Have they tired out? Are they unconscious now?
- Get a buoyant aid if one is available. Do not approach again without one.
- Use lead-and-wait if the victim is still actively panicking.
- Approach from the rear if you must make contact again. The rear approach gives you the most control and the least chance of being grabbed.
Common Mistakes
Escape Pitfalls
Errors that can get you trapped- Trying to break free at the surface — you must submerge first
- Forgetting to take a breath before going under
- Not tucking your chin — leaving your throat exposed to compression
- Surfacing too close to the victim — they will grab you again
- Panicking yourself — stay calm, trust your training, and execute the technique
- Giving up after one failed attempt — try again, go deeper
Req 13 — Unconscious Rescue
Rescuing an unconscious victim is a race against time. An unconscious person in the water cannot breathe, cannot hold onto a device, and cannot assist in their own rescue. The clock is ticking from the moment they go unresponsive — brain damage begins within 4–6 minutes without oxygen. Speed, proper technique, and a plan for what happens after the rescue are all critical.
Confirming Unconsciousness
Before making contact with a victim who appears unconscious, you must verify their condition. The requirement says to speak to the subject and splash water on them. Here is why:
- A victim who appears unconscious may actually be in the final moments of active drowning — barely conscious and about to grab you.
- Splashing water on the face can trigger a response (blinking, flinching, turning) that tells you the victim is still somewhat conscious.
- If there is no response to voice or splash, you can proceed with a contact rescue more safely — an unconscious victim will not grab you.
Approach the victim, stop 6–10 feet away, and shout: “Can you hear me? Are you okay?” Splash water toward their face. Watch for any reaction. If none — proceed with the rescue.
13a — Equipment Assist (Buoyant Aid)
This technique uses a rescue tube or other buoyant aid to support the unconscious victim while you tow them to shore.
Step by step:
- Enter with a stride jump, carrying the buoyant aid.
- Swim to the victim using a strong approach stroke.
- Verify unconsciousness (voice + splash).
- Position the aid under the victim’s shoulders and upper back — this keeps their face above water.
- Secure the aid — if using a rescue tube, wrap it around the victim’s chest and clip it.
- Tow the victim to shore using the sidestroke, pulling by the strap or the aid itself.
- Remove from the water quickly — lift them out with assistance if available.
- Position for CPR — place them flat on their back on a hard surface.
13b — Front Approach and Wrist Tow
This technique is used when no equipment is available and the victim is faceup.
Step by step:
- Enter and swim to the victim with a strong approach stroke.
- Verify unconsciousness (voice + splash).
- Approach from the front — swim to the victim’s head.
- Grasp one of the victim’s wrists with your dominant hand.
- Roll the victim faceup if they are facedown (turn them toward you so you can see their face).
- Extend their arm above their head and tow, keeping their face above water.
- Swim on your side using the sidestroke, pulling the victim by the wrist.
- Remove from the water and position for CPR.
13c — Rear Approach and Armpit Tow
This technique approaches the victim from behind — the safest approach position if there is any doubt about the victim’s consciousness.
Step by step:
- Enter and swim to the victim with a strong approach stroke.
- Verify unconsciousness (voice + splash).
- Swim to the victim’s back — position yourself behind their head.
- Reach under one armpit and cup your hand against their upper back/shoulder area.
- Roll the victim faceup if needed, supporting their head.
- Tow using the sidestroke or backstroke kick, keeping the victim’s face above water.
- Remove from the water and position for CPR.
Getting the Victim Out of the Water
Removing an unconscious person from the water is one of the most physically challenging parts of the rescue. An unconscious body is limp, heavy, and offers no help.
Extrication Steps
Getting the victim onto the deck or shore- At a pool: Position the victim at the wall. Place their hands on the gutter or deck edge. Get out of the water, then reach down and pull them up and over the edge by their wrists or under the arms.
- With a partner: One person supports from the water, the other pulls from the deck.
- On a sloping shore: Drag the victim up the slope by their arms, keeping their body straight.
- Always protect the head and neck — support the head as you move the victim.
- Place them flat on their back on a firm surface immediately.
Positioning for CPR
Once the victim is out of the water and on a firm surface:
- Place them flat on their back.
- Tilt the head back and lift the chin to open the airway (unless spinal injury is suspected).
- Check for breathing — look, listen, feel for 5–10 seconds.
- If not breathing, begin CPR immediately. You will learn the specifics in Req 16.
- Send someone to call 911 and get an AED if not already done.
Req 14 — Submerged Victim Recovery
When a victim goes under before you reach them, the rescue becomes a recovery — and the stakes could not be higher. The window between submersion and irreversible brain damage is only 4–6 minutes. Your ability to pinpoint where they went down, dive to the bottom, and bring them back to the surface can determine whether they survive.
When a Victim Submerges
If you are swimming toward a victim and they go under before you arrive, here is what you should do:
- Mark the spot. Pick a landmark on shore — a tree, a sign, a dock post — and line it up with the spot where the victim was last seen. If possible, pick two landmarks (one on each side) to create a cross-reference.
- Swim to the last-seen location as fast as possible. Use a strong crawl stroke.
- Upon arrival, perform a surface dive to search the bottom.
- Search systematically. Start at the last-known position and expand outward in a circle.
- If you do not find them on the first dive, surface, breathe, and dive again. Repeat.
- Call for help. Make sure 911 has been called. Professional divers and equipment may be needed.
Surface Dives: Two Types
A surface dive is how you transition from swimming at the surface to swimming toward the bottom. Both types get you to the same place — the difference is how you enter the dive.
14a — Feetfirst Surface Dive
The feetfirst surface dive is the safer of the two methods. You enter vertically, feetfirst, which means you can see what is below you on the way down and you will not hit your head on an unseen obstacle.
Step by step:
- Tread water at the surface over the target area.
- Press both arms downward powerfully against the water — this pushes your body upward.
- As your body rises, squeeze your legs together and straighten them below you.
- Let your body sink feetfirst. Keep your arms at your sides to reduce drag.
- Once submerged, use a sweeping arm motion (like a breaststroke pull) to push yourself deeper.
- When you reach the desired depth, tuck your body and roll forward to swim horizontally along the bottom.
- Search with your hands if visibility is low. Feel along the bottom.
- Grab the weight (or victim) and push off the bottom toward the surface.
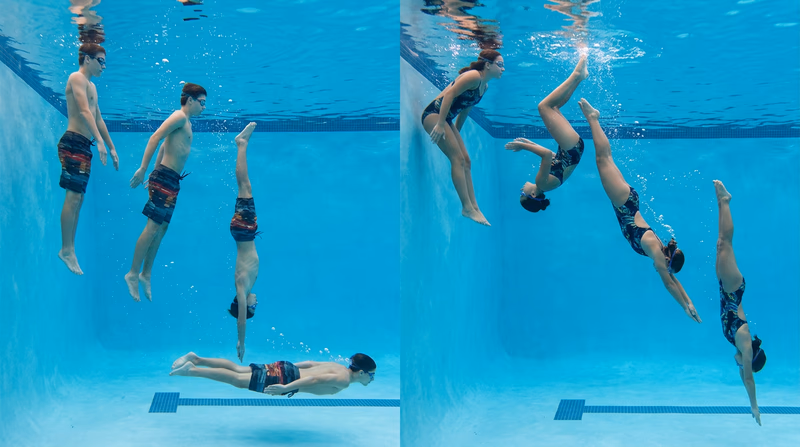
14b — Headfirst Surface Dive (Pike Dive)
The headfirst surface dive (also called a pike dive) gets you to the bottom faster because you are streamlined — head pointed down, body straight. However, it requires clear visibility to avoid hitting your head on the bottom or an obstacle.
Step by step:
- Swim forward with a breaststroke or crawl stroke at the surface.
- At the dive point, bend sharply at the waist — pike your body so your head points straight down.
- Lift your legs out of the water — the weight of your legs above the surface drives you downward.
- Extend your arms in front of you (toward the bottom) in a streamlined position.
- Once fully submerged, use a breaststroke pull to propel yourself deeper.
- Level off at the bottom and search.
- Grab the weight (or victim) and swim toward the surface.
Comparing the Two Dives
| Element | Feetfirst | Headfirst (Pike) |
|---|---|---|
| Entry position | Vertical, feet down | Bent at waist, head down |
| Speed to depth | Slower | Faster |
| Visibility on descent | Good — you can see below | Limited — head is pointed down |
| Risk of head injury | Low | Higher in shallow or unclear water |
| Best for | Unknown depth, murky water | Clear water, known depth |
| Starting position | Treading water | Swimming forward |
Tips for the 10-Pound Weight Recovery
The requirement asks you to recover a 10-pound weight from 8–10 feet of water. Here is how to succeed:
Weight Recovery Tips
Set yourself up for success- Equalize the pressure in your ears on the way down by pinching your nose and gently blowing (Valsalva maneuver). Ear pain will stop your dive short.
- Exhale slowly on the way up — never hold your breath tightly during ascent.
- Grab the weight securely with both hands before pushing off the bottom.
- Push off the bottom with your feet for an extra boost toward the surface.
- Kick hard on the way up — 10 pounds feels much heavier underwater than on land.
- Practice your dives multiple times at shallower depths before attempting the full 8–10 feet.
Req 15 — Spinal Injury Management
A spinal injury in the water is one of the most dangerous situations you can encounter — not because of the water, but because of what happens next. Moving a person with a spinal injury incorrectly can cause permanent paralysis or death. Your job as a rescuer is to stabilize the victim’s head and spine, keep them breathing, and wait for professional medical help.
15a — Causes, Signs, and Symptoms
Common Causes of Spinal Injury in Aquatic Settings:
- Diving into shallow water — the most common cause. A person dives headfirst and strikes the bottom, a sandbar, or a submerged object.
- Diving off elevated surfaces — diving boards, rocks, docks, or cliffs into water of unknown depth.
- Falls — slipping on a wet pool deck, falling off a boat, or falling from a waterside cliff.
- Being struck — hit by a boat, surfboard, watercraft, or another swimmer.
- Being tumbled by waves — large surf can slam a person headfirst into the sand.
Signs and Symptoms to Watch For:
Spinal Injury Indicators
If you see any of these, suspect a spinal injury- Pain in the neck or back
- Numbness, tingling, or loss of sensation in the arms, legs, or fingers
- Inability to move arms or legs (“I can’t feel my legs”)
- Deformity — the neck or back looks misaligned
- Bruising or swelling on the head, neck, or upper back
- Loss of bladder or bowel control
- Altered consciousness or confusion after a head impact
- Victim found unconscious in the water after a diving or falling incident
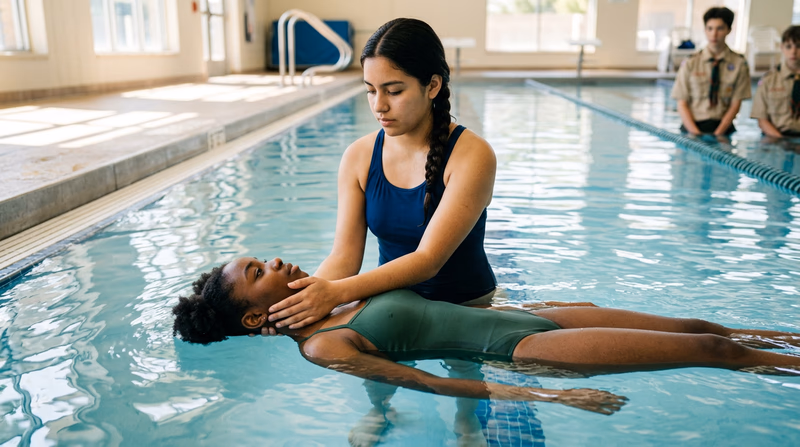
15b — Supporting a Faceup Subject
This technique is called in-line stabilization. You keep the victim’s head, neck, and spine in a straight line while supporting them at the surface in standing-depth water.
Step by step:
- Approach the victim carefully — do not create waves or disturbance that could move them.
- Position yourself at the victim’s head. Stand behind them (at the top of their head).
- Place your hands on either side of the victim’s head — one hand on each side, fingers supporting the back of the skull, palms against the ears.
- Gently squeeze your forearms against the victim’s upper arms/shoulders. This traps the head between your forearms and creates a “splint” effect.
- Keep the head, neck, and body in a straight line. Do not tilt, bend, or rotate.
- Lower yourself so that the victim’s head and body float at the surface. The water provides buoyancy — you provide stability.
- Hold this position and wait for help. Do not move the victim unless they are in immediate danger (e.g., the water is rising).
15c — Turning a Facedown Subject Faceup
A facedown victim with a potential spinal injury cannot breathe. You must turn them faceup — but you must do it without bending or twisting their spine. This technique is called a log roll or vice grip turn.
Step by step:
- Approach the victim at their side, near their head.
- Place one arm along the victim’s spine — your forearm along their back, your hand supporting the base of their skull.
- Place your other arm along the victim’s chest — your forearm across their breastbone, your hand supporting their chin.
- Clamp your arms together, trapping the victim’s head between your forearms. This is the “vice grip.”
- Slowly roll the victim toward you, rotating their entire body as a single unit. Do not let the head move independently of the body.
- Continue the rotation until the victim is faceup.
- Transition to the faceup support position — both hands supporting the head, forearms bracing the shoulders.
- Ensure the victim’s face is clear of the water and check for breathing.
Critical Rules for Spinal Management
Do's and Don'ts
Absolute rules when managing a suspected spinal injury- DO call 911 immediately — this is a medical emergency beyond your training to fully manage
- DO keep the victim still — movement is the enemy
- DO support the head and neck at all times
- DO keep the victim in the water until professional help arrives (the water supports the body and reduces movement)
- DO NOT bend, twist, or rotate the victim’s neck
- DO NOT pull the victim out of the water unless they are in immediate danger or not breathing (and you must perform CPR)
- DO NOT remove a helmet (cycling, skiing) if the victim is wearing one — it provides stabilization
- DO NOT let bystanders move the victim
Req 16 — CPR & Rescue Breathing
CPR — cardiopulmonary resuscitation — is the skill that bridges the gap between a rescue and survival. Getting a victim out of the water is not enough if they are not breathing and their heart is not beating. CPR keeps oxygen flowing to the brain until professional medical help arrives.
16a — Recognizing the Need for Rescue Breathing and CPR
Once you have removed a victim from the water and placed them on a firm, flat surface, you must quickly determine whether they need resuscitation.
The assessment sequence:
1. Check for responsiveness.
- Tap the victim’s shoulders firmly and shout: “Are you okay? Can you hear me?”
- Look for any response — eye movement, groaning, flinching.
- If no response, proceed immediately.
2. Call for help.
- Point at a specific person: “You — call 911 now. Tell them we have a drowning victim who is not responding.”
- Send someone to get an AED (automated external defibrillator) if one is available.
3. Open the airway.
- Place one hand on the victim’s forehead and two fingers under the chin.
- Tilt the head back gently and lift the chin to open the airway.
- If you suspect a spinal injury, use a jaw-thrust maneuver instead (push the jaw forward without tilting the head).
4. Check for breathing.
- Place your ear near the victim’s mouth and nose.
- Look at the chest for rising and falling.
- Listen for breath sounds.
- Feel for air on your cheek.
- Do this for no more than 10 seconds.
5. Determine what is needed:
| Finding | Action |
|---|---|
| Responsive, breathing normally | Recovery position, monitor, wait for EMS |
| Not responsive, breathing normally | Recovery position, monitor closely |
| Not responsive, not breathing but has pulse | Rescue breathing only |
| Not responsive, not breathing, no pulse | Full CPR (compressions + breaths) |
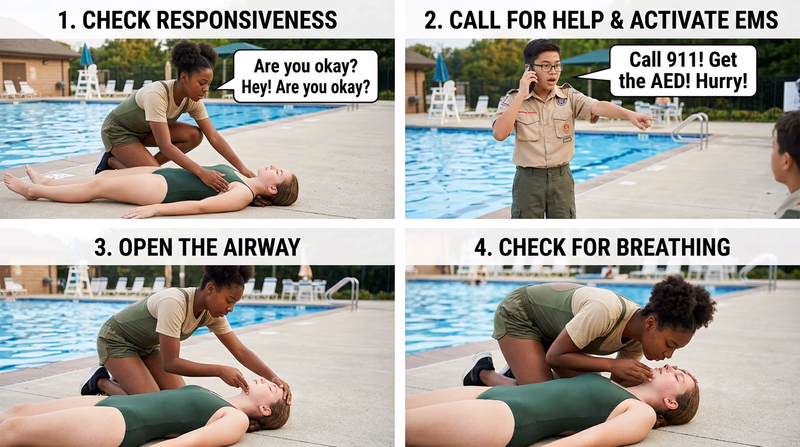
16b — CPR Skills
This requirement must be completed with a certified CPR/AED instructor using a mannequin. This guide will prepare you for that training, but it is not a substitute for hands-on instruction.
CPR for Adults and Older Children:
Compressions:
- Place the heel of one hand on the center of the chest, on the breastbone.
- Place your other hand on top, fingers interlocked.
- Keep your arms straight and shoulders directly over your hands.
- Press down hard — at least 2 inches deep.
- Push at a rate of 100–120 compressions per minute (the tempo of the song “Stayin’ Alive”).
- Let the chest fully recoil between compressions — do not lean on it.
Breaths:
- After 30 compressions, give 2 rescue breaths.
- Tilt the head back, lift the chin, pinch the nose closed.
- Create a seal over the victim’s mouth and blow for about 1 second.
- Watch for the chest to rise. If it does not, re-tilt the head and try again.
- Each breath should be just enough to make the chest rise — do not over-inflate.
The cycle: 30 compressions, 2 breaths. Repeat continuously until:
- The victim starts breathing on their own
- An AED arrives and is ready to use
- Professional medical help takes over
- You are too exhausted to continue (switch with another trained rescuer)
Using an AED
An AED (automated external defibrillator) is a device that can analyze a heart’s rhythm and deliver an electrical shock to restore a normal heartbeat. Modern AEDs are designed to be used by anyone — they give voice prompts that walk you through every step.
Basic AED steps:
- Turn it on — most have a single power button.
- Attach the pads — place one on the upper right chest, one on the lower left side. The pads have diagrams showing placement.
- Stand clear — the AED will analyze the heart rhythm. Make sure no one is touching the victim.
- If a shock is advised, the AED will tell you. Press the shock button when prompted.
- Resume CPR immediately after the shock. The AED will tell you when to stop for re-analysis.
CPR for Drowning Victims — Special Considerations
Drowning victims have unique needs compared to other cardiac arrest patients:
- Start with rescue breaths. In drowning, the heart stopped because of lack of oxygen (unlike a heart attack, where the heart’s electrical system fails). Getting air into the lungs is especially important.
- Expect water. The victim may have water in their airway. You may hear gurgling during rescue breaths. Do not try to drain the water — chest compressions will help clear it.
- Hypothermia. A cold-water drowning victim may appear dead but can sometimes be revived even after prolonged submersion. The cold water slows the body’s metabolism and protects the brain. Keep doing CPR until professional help arrives.
Getting Certified
The requirement specifies that you must demonstrate CPR skills under the guidance of a current CPR/AED instructor from a nationally certified provider. These organizations offer certification:
American Red Cross CPR/AED Training Find CPR and AED training classes near you through the American Red Cross. Link: American Red Cross CPR/AED Training — https://www.redcross.org/take-a-class/cpr/cpr-training American Heart Association CPR Courses CPR training courses and certification from the American Heart Association. Link: American Heart Association CPR Courses — https://cpr.heart.org/en/cpr-courses-and-kitsReq 17 — Other Injuries & Illnesses
Water emergencies are not limited to drowning. Swimmers and boaters face a range of hazards — from the sun beating down overhead to the cold water below, from invisible jellyfish to the body’s own reaction to overexertion. Understanding these conditions will make you a more complete rescuer and a safer Scout.
Hypothermia
What it is: A dangerously low body temperature (below 95°F / 35°C) caused by prolonged exposure to cold. Water conducts heat away from the body 25 times faster than air, so hypothermia can set in even in water that does not feel particularly cold.
Causes:
- Extended time in cold water (below 70°F)
- Falling into cold water unexpectedly (cold-water immersion)
- Wet clothing combined with wind or cold air
- Exhaustion reducing the body’s ability to generate heat
Signs and symptoms:
- Uncontrollable shivering (early stage)
- Confusion, slurred speech, poor coordination
- Shivering stops (this is a dangerous sign — the body has lost the ability to warm itself)
- Drowsiness, loss of consciousness
Prevention:
- Wear a wetsuit or appropriate insulation in cold water
- Limit time in water below 70°F
- Get out of the water and dry off if you begin shivering
- Keep a dry set of clothes available for after swimming
Treatment:
- Remove the victim from the water immediately
- Remove wet clothing and replace with dry layers or blankets
- Warm the core first — warm drinks (not alcohol), warm compresses on the chest, neck, and groin
- Handle gently — rough movement can trigger a dangerous heart rhythm in severely hypothermic patients
- Call 911 for moderate or severe hypothermia

Dehydration
What it is: A deficit of water in the body. It sounds contradictory — getting dehydrated while surrounded by water — but it happens regularly to swimmers and boaters who forget to drink.
Causes:
- Physical exertion while swimming generates sweat (you just do not feel it in the water)
- Sun exposure increases fluid loss
- Not bringing drinking water on boat trips
- Assuming you are not sweating because you are wet
Signs and symptoms:
- Thirst, dry mouth
- Dark-colored urine
- Dizziness or lightheadedness
- Headache, fatigue
- Muscle cramps
Prevention and treatment:
- Drink water before, during, and after swimming
- Bring water bottles on all boating trips
- Take regular water breaks during swim practice
Heat-Related Illnesses
Heat exhaustion and heat stroke affect people who are active in hot, sunny conditions — exactly the kind of weather that brings people to the pool or beach.
Heat exhaustion:
- Heavy sweating, cool and clammy skin
- Nausea, dizziness, weakness, headache
- Treatment: Move to shade, cool down with water, drink fluids, rest
Heat stroke (medical emergency):
- Body temperature above 104°F
- Hot, red, dry skin (sweating has stopped)
- Confusion, seizures, loss of consciousness
- Treatment: Call 911 immediately. Cool the person aggressively — ice packs on neck, armpits, and groin. Immerse in cold water if possible.
Muscle Cramps
What they are: Sudden, involuntary contractions of a muscle that cause sharp pain. In the water, a cramp in the calf, foot, or thigh can be frightening and dangerous.
Causes:
- Overexertion or fatigue
- Dehydration and electrolyte imbalance
- Cold water
- Swimming with unfamiliar or intense techniques
Prevention:
- Stay hydrated
- Warm up before swimming
- Stretch regularly
- Build swimming endurance gradually
Treatment:
- Float on your back and gently stretch the affected muscle
- For a calf cramp: flex the foot upward (pull toes toward shin)
- For a thigh cramp: straighten the leg and gently pull the ankle
- Move to shallow water or exit the water as soon as possible
Sunburn
What it is: Skin damage from ultraviolet (UV) radiation. A serious sunburn is painful, blistering, and increases the risk of skin cancer over a lifetime.
Causes:
- Extended sun exposure without protection
- Reflected UV rays off the water surface (intensifies exposure)
- Cloudy days — UV rays penetrate clouds
Prevention:
- Apply broad-spectrum SPF 30+ sunscreen 15 minutes before going outside
- Reapply every 2 hours and after swimming
- Wear a rash guard or UV-protective shirt while swimming
- Wear a hat and sunglasses when out of the water
- Seek shade during peak sun hours (10 a.m. to 4 p.m.)
Stings
What they are: Painful injuries from jellyfish, sea urchins, stingrays, bees, wasps, or other stinging creatures encountered in or near the water.
Jellyfish stings:
- Rinse with vinegar (for most species) or saltwater — never freshwater, which can trigger more stinging cells
- Remove visible tentacles with tweezers (not bare hands)
- Apply heat (hot water, 110–115°F) for 20 minutes to neutralize the toxin
Stingray stings:
- Immerse the wound in hot water (as hot as tolerable) for 30–90 minutes
- Clean the wound and seek medical attention
Insect stings (bees, wasps):
- Remove the stinger by scraping sideways with a flat edge (credit card)
- Apply cold compress
- Watch for signs of allergic reaction (swelling of face/throat, difficulty breathing) — this is anaphylaxis and requires 911 and an epinephrine auto-injector
Hyperventilation
What it is: Rapid, deep breathing that blows off too much carbon dioxide from the blood. In swimming, this is especially dangerous when done deliberately before an underwater swim.
Why it is dangerous: Some swimmers intentionally hyperventilate before a breath-hold dive, believing it will let them hold their breath longer. It does delay the urge to breathe — but it does NOT increase oxygen levels. Instead, it suppresses the body’s warning signal (the urge to breathe). The swimmer may lose consciousness underwater with no warning. This is called shallow-water blackout and it is frequently fatal.
Prevention:
- Never hyperventilate before an underwater swim
- Never hold your breath for extended periods in the water
- Always swim with a buddy who is watching you
- Lifeguards should be alert for swimmers who are hyperventilating before going under
Extended Learning
A. Introduction
Congratulations — you have completed the Lifesaving merit badge, one of the most challenging and meaningful badges in all of Scouting. The skills you have learned are not theoretical. They are real, practical abilities that can save someone’s life. But your journey as a lifesaver is far from over. Ahead are advanced certifications, career paths, and opportunities to serve your community in ways that truly matter.
B. Deep Dive: Becoming a Certified Lifeguard
Earning the Lifesaving merit badge gives you a strong foundation, but professional lifeguarding takes your skills to the next level. Lifeguard certification courses — offered by the American Red Cross, YMCA, and other organizations — typically require candidates to be at least 15 years old and able to pass a swimming skills test similar to what you completed for this badge.
A lifeguard certification course covers everything you learned here and goes much deeper. You will practice rescue scenarios with instructors creating realistic emergencies in the water. You will learn to use professional equipment like rescue tubes, backboards, and bag-valve masks. You will study facility management — how to handle chemical spills in a pool, manage crowds, and enforce rules without creating conflict.
Most certification courses take 25–30 hours to complete and include a written test, a skills test, and a CPR/AED certification. Once certified, you can work at community pools, water parks, summer camps, hotels, and beaches. Many Scouts earn their lifeguard certification at 15 or 16 and work as lifeguards through high school and college — it is one of the best summer jobs available.
Lifeguard certification must be renewed every two years, which includes updated training on the latest rescue techniques and CPR guidelines. This keeps your skills sharp and your knowledge current.
C. Deep Dive: Water Rescue as a Career
The skills you have learned in this badge open doors to careers that combine physical ability, technical knowledge, and a deep commitment to helping others. Here are some of the paths lifesavers follow:
Ocean Lifeguard: Ocean lifeguards are elite water rescuers who patrol beaches, monitor surf conditions, and perform rescues in open water. Agencies like the United States Lifesaving Association (USLA) set national standards. Ocean lifeguards must be exceptional swimmers and comfortable in surf, currents, and variable weather. Some agencies, especially in California, Florida, and Hawaii, offer full-time career positions with benefits.
Swiftwater Rescue Technician: Fire departments and emergency management agencies train specialized teams to perform rescues in moving water — rivers, floods, and storm drains. This is some of the most technically demanding rescue work, involving ropes, throw bags, inflatable boats, and helicopter operations. Many swiftwater technicians start as firefighters or EMTs and add swiftwater certification later.
Coast Guard Rescue Swimmer: The U.S. Coast Guard trains rescue swimmers to deploy from helicopters into open ocean to save people from sinking vessels, capsized boats, and natural disasters. The training pipeline is considered one of the toughest in the military — but the skills you built in this merit badge are the same foundational abilities that Coast Guard recruiters look for.
Aquatic Director / Facility Manager: Behind every safe pool or waterfront is someone who manages the staff, maintains the facility, and ensures compliance with health and safety codes. This career combines lifesaving expertise with leadership and management skills. Many aquatic directors started as teenage lifeguards.
D. Deep Dive: Drowning Prevention in Your Community
One of the most powerful ways to use your new skills is to help prevent drowning before it happens. Drowning is the leading cause of unintentional death for children ages 1–4 and the second leading cause for children ages 5–14. Many of these deaths are preventable.
You can make a difference in your community right now. Consider organizing a water safety awareness event at your local pool or community center. Partner with the American Red Cross or your local fire department to teach basic water safety to younger children. You do not need to be a certified instructor — you can share the Reach-Throw-Row-Go sequence, explain the buddy system, and demonstrate how to recognize someone in distress.
Another impactful project: advocate for pool fencing and water safety signage in your neighborhood. If you know of residential pools without proper fencing, or local swimming areas without safety equipment, talk to your local government or homeowners association. Drowning prevention is largely an engineering and education problem — the right barriers and the right knowledge save lives.
If you are looking for an Eagle Scout project, drowning prevention offers many options. Past Eagle projects have included installing life ring stations at local lakes, creating bilingual water safety signage for community pools, and organizing swim lesson fundraisers for underserved neighborhoods. These projects save lives and leave a lasting impact.
E. Real-World Experiences
Junior Lifeguard Programs
BSA Aquatics Camp Programs
USLA Junior Lifeguard Program
American Red Cross Volunteer
Community Pool Volunteering
F. Organizations
The national organization for open-water lifeguards. Sets training standards, certifies lifeguards, and promotes beach safety education across the country.
Organization: United States Lifesaving Association (USLA) — https://www.usla.org/
Offers lifeguard certification, water safety instructor training, swim lessons, and community water safety programs.
Organization: American Red Cross — Aquatics — https://www.redcross.org/take-a-class/swimming
A nonprofit coalition focused on reducing drowning through education, research, and community partnerships.
Organization: National Drowning Prevention Alliance (NDPA) — https://ndpa.org/
Provides swim lessons, lifeguard training, and water safety education at YMCA facilities nationwide. Emphasizes community access to aquatic safety programs.
Organization: YMCA Water Safety — https://www.ymca.org/what-we-do/youth-development/swim
The global authority on drowning prevention, water rescue, and lifesaving sport. Connects lifesaving organizations from over 100 countries.
Organization: International Life Saving Federation (ILS) — https://www.ilsf.org/
A nonprofit focused on innovative aquatics safety education, including the StarGuard lifeguard training program used at water parks and facilities worldwide.
Organization: Starfish Aquatics Institute — https://www.starfishaquatics.org/