Req 11 — Contact Tows
Contact tows are the rescues where you physically hold the victim and swim them to safety — no equipment, no flotation device, just your body and your training. These are the most physically demanding rescues you will learn, and they require a cooperative (or at least non-combative) victim.
Notice the key distinction in these requirements: you start in the water near the subject, not from shore. This simulates a scenario where you are already swimming nearby when someone gets into trouble.
Before You Make Contact
Even though these rescues involve direct contact, you still follow the same communication protocol:
- Speak first: “Hey, are you okay? Do you need help?”
- Assess: Is the person calm? Tired? Panicking? The requirement specifies cooperative victims — a calm, tired swimmer (11a) and an exhausted but responsive person (11b).
- Give instructions: “I’m going to help you. Roll onto your back and relax.” or “I’m going to hold you and swim you to shore. Try to stay still.”
- Reassure: “You’re going to be fine. I’ve got you.”
11a — The Armpit Tow
The armpit tow is used for a calm, cooperative victim who is already floating on their back. This is the gentlest of the contact rescues — the victim does most of the floating while you provide propulsion.
Step by step:
- Position yourself behind the victim’s head while they float on their back.
- Reach under one of their arms and grasp the armpit area — your hand cups their armpit from underneath with your palm against their upper back.
- Keep the victim’s face above water. Their back float does most of the work.
- Swim on your back or side using a modified backstroke kick or sidestroke kick. Your free arm can stroke if needed.
- Kick steadily toward shore. Do not rush — this is a controlled, calm tow.
- Talk to the victim throughout: “Just relax. Keep floating. I’m swimming us to the edge.”
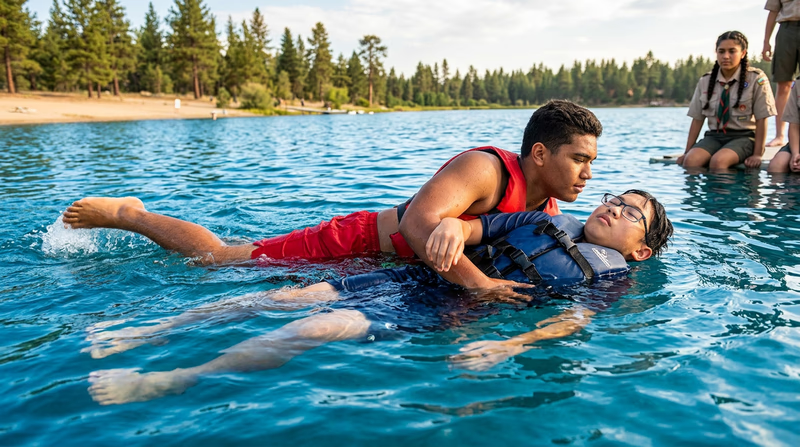
11b — The Cross-Chest Carry
The cross-chest carry is used for an exhausted victim who is still responsive but cannot float unassisted. This is a more controlling hold that supports the victim’s body while you swim.
Step by step:
- Approach from behind. Position yourself at the victim’s back.
- Reach your dominant arm across the victim’s chest — your arm goes diagonally from one of their shoulders to the opposite side of their ribcage, under the arm.
- Lock the victim against your hip. Their back rests against your side.
- Lean back slightly to bring the victim into a back-float position. Your body provides the buoyancy and angle.
- Swim using the sidestroke — your non-dominant arm pulls through the water while your legs do the scissor kick.
- Keep the victim’s mouth and nose above water at all times.
- Communicate: “I’ve got you. Stay still and let me swim.”
Key Differences
| Element | Armpit Tow | Cross-Chest Carry |
|---|---|---|
| Victim condition | Calm, floating on back | Exhausted, treading water |
| Grip | One hand under armpit | Arm across chest, locked at hip |
| Your swimming position | On your back or side | On your side (sidestroke) |
| Control over victim | Minimal — they float independently | High — you control their body position |
| Energy required | Lower | Higher |
| Best for | Tired swimmers who can float | Exhausted swimmers who cannot float |
Building the Physical Skills
Both tows require strong kicking and core endurance. Here are ways to prepare:
Training Exercises
Build the strength and stamina you need
- Kick sets with a kickboard — 200 yards of sidestroke kick, 200 yards of backstroke kick
- Partner tows — practice towing a friend across the pool using each technique
- Treading water — build endurance by treading for 2 minutes without stopping
- Core exercises on land — planks, flutter kicks, and bicycle crunches all help with in-water stability
- Distance swimming — the more comfortable you are in the water, the more effective you will be as a rescuer