Req 16 — CPR & Rescue Breathing
CPR — cardiopulmonary resuscitation — is the skill that bridges the gap between a rescue and survival. Getting a victim out of the water is not enough if they are not breathing and their heart is not beating. CPR keeps oxygen flowing to the brain until professional medical help arrives.
16a — Recognizing the Need for Rescue Breathing and CPR
Once you have removed a victim from the water and placed them on a firm, flat surface, you must quickly determine whether they need resuscitation.
The assessment sequence:
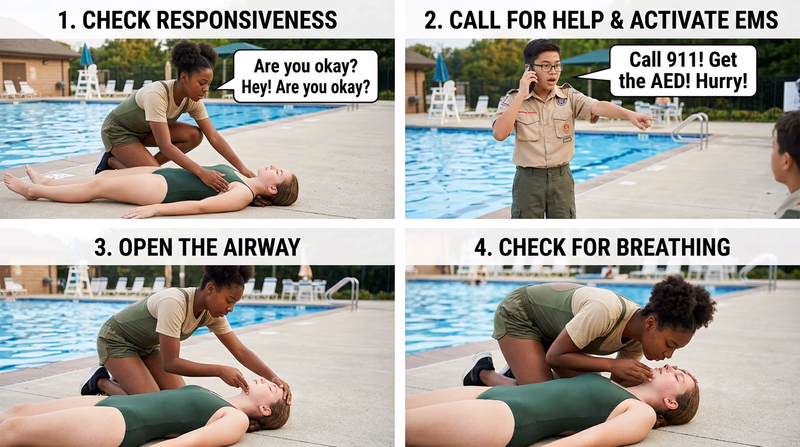
1. Check for responsiveness.
- Tap the victim’s shoulders firmly and shout: “Are you okay? Can you hear me?”
- Look for any response — eye movement, groaning, flinching.
- If no response, proceed immediately.
2. Call for help.
- Point at a specific person: “You — call 911 now. Tell them we have a drowning victim who is not responding.”
- Send someone to get an AED (automated external defibrillator) if one is available.
3. Open the airway.
- Place one hand on the victim’s forehead and two fingers under the chin.
- Tilt the head back gently and lift the chin to open the airway.
- If you suspect a spinal injury, use a jaw-thrust maneuver instead (push the jaw forward without tilting the head).
4. Check for breathing.
- Place your ear near the victim’s mouth and nose.
- Look at the chest for rising and falling.
- Listen for breath sounds.
- Feel for air on your cheek.
- Do this for no more than 10 seconds.
5. Determine what is needed:
| Finding | Action |
|---|---|
| Responsive, breathing normally | Recovery position, monitor, wait for EMS |
| Not responsive, breathing normally | Recovery position, monitor closely |
| Not responsive, not breathing but has pulse | Rescue breathing only |
| Not responsive, not breathing, no pulse | Full CPR (compressions + breaths) |
16b — CPR Skills
This requirement must be completed with a certified CPR/AED instructor using a mannequin. This guide will prepare you for that training, but it is not a substitute for hands-on instruction.
CPR for Adults and Older Children:
Compressions:
- Place the heel of one hand on the center of the chest, on the breastbone.
- Place your other hand on top, fingers interlocked.
- Keep your arms straight and shoulders directly over your hands.
- Press down hard — at least 2 inches deep.
- Push at a rate of 100–120 compressions per minute (the tempo of the song “Stayin’ Alive”).
- Let the chest fully recoil between compressions — do not lean on it.
Breaths:
- After 30 compressions, give 2 rescue breaths.
- Tilt the head back, lift the chin, pinch the nose closed.
- Create a seal over the victim’s mouth and blow for about 1 second.
- Watch for the chest to rise. If it does not, re-tilt the head and try again.
- Each breath should be just enough to make the chest rise — do not over-inflate.
The cycle: 30 compressions, 2 breaths. Repeat continuously until:
- The victim starts breathing on their own
- An AED arrives and is ready to use
- Professional medical help takes over
- You are too exhausted to continue (switch with another trained rescuer)
Using an AED
An AED (automated external defibrillator) is a device that can analyze a heart’s rhythm and deliver an electrical shock to restore a normal heartbeat. Modern AEDs are designed to be used by anyone — they give voice prompts that walk you through every step.
Basic AED steps:
- Turn it on — most have a single power button.
- Attach the pads — place one on the upper right chest, one on the lower left side. The pads have diagrams showing placement.
- Stand clear — the AED will analyze the heart rhythm. Make sure no one is touching the victim.
- If a shock is advised, the AED will tell you. Press the shock button when prompted.
- Resume CPR immediately after the shock. The AED will tell you when to stop for re-analysis.
CPR for Drowning Victims — Special Considerations
Drowning victims have unique needs compared to other cardiac arrest patients:
- Start with rescue breaths. In drowning, the heart stopped because of lack of oxygen (unlike a heart attack, where the heart’s electrical system fails). Getting air into the lungs is especially important.
- Expect water. The victim may have water in their airway. You may hear gurgling during rescue breaths. Do not try to drain the water — chest compressions will help clear it.
- Hypothermia. A cold-water drowning victim may appear dead but can sometimes be revived even after prolonged submersion. The cold water slows the body’s metabolism and protects the brain. Keep doing CPR until professional help arrives.
Getting Certified
The requirement specifies that you must demonstrate CPR skills under the guidance of a current CPR/AED instructor from a nationally certified provider. These organizations offer certification:
American Red Cross CPR/AED Training Find CPR and AED training classes near you through the American Red Cross. American Heart Association CPR Courses CPR training courses and certification from the American Heart Association.