Metalwork Merit Badge — Complete Digital Resource Guide
https://merit-badge.university/merit-badges/metalwork/guide/
Introduction & Overview
Overview
Metalwork is the art of turning hard, stubborn material into something useful, strong, or beautiful. A flat sheet can become a box, a soft alloy can become a casting, and a glowing bar can become a hook, hinge, or tool. This badge teaches you how metal behaves, how to work with it safely, and how different craftspeople shape it for real-world jobs and hobbies.
You will study the language of metals, practice changing hardness with heat and hammering, and then choose one specialty path to explore in depth. Along the way, you will start thinking like a maker: planning before cutting, paying attention to safety, and learning that small changes in heat, angle, and pressure make a big difference.
Then and Now
Then
Long before factories, people were already discovering that some metals could be shaped with stone hammers, charcoal fires, and patience. Early metalworkers began with native metals such as copper and gold because they could be found in nature and worked without giant furnaces. Over time, people learned how to combine metals into stronger alloys, cast shapes in molds, and forge tools that changed farming, building, trade, and warfare.
Bronze Age craftspeople made knives, jewelry, bowls, and fittings that were both practical and decorative. Blacksmiths later became essential members of nearly every town, repairing tools, shoeing horses, making nails, and building hardware for wagons and doors. For centuries, if something metal broke, a skilled craftsperson fixed it by hand.
Now
Modern metalwork still uses the same basic ideas: cut, bend, heat, join, cast, and finish. What has changed is the range of tools and materials. Sheet metal shops build ductwork, flashing, and custom enclosures. Jewelers and silversmiths create precise small objects with saws and solder. Foundries cast everything from art pieces to machine parts. Blacksmiths still forge useful hardware, but they also create architectural details, sculpture, and custom tools.
Even highly automated industries still depend on people who understand how metal moves, when it cracks, how heat changes structure, and how to finish a project so it lasts. That mix of science and hands-on skill is what makes metalwork so satisfying.
Get Ready!
This is a badge for Scouts who like making real things. You will measure carefully, sketch before you build, and pay close attention to heat, edges, and surfaces. Go slowly, ask questions often, and treat every tool as if it can hurt you if you get careless—because it can.
Kinds of Metalwork
Sheet Metal and Tinsmithing
This branch of metalwork starts with flat sheet stock. You cut patterns, bend edges, form seams, and join pieces into objects such as boxes, trays, scoops, and covers. Accuracy matters because even a small measuring error can throw off an entire project.
Silversmithing and Small Precision Work
Silversmithing focuses on thin metal, fine tools, careful layout, and clean joints. The work is smaller than blacksmithing, but not easier. A crooked saw cut or overheated solder joint shows up immediately, so patience and control matter.
Founding and Casting
Founders shape metal by pouring it into molds. This path teaches you to think in reverse: instead of hammering metal into shape, you create the empty space the metal will fill. Gates, vents, shrinkage, and mold quality all affect the final casting.
Blacksmithing
Blacksmithing uses heat and force to move metal while it is hot. At the forge, you learn how hammer blows stretch, bend, and twist steel. It is physical work, but it also rewards rhythm, timing, and careful observation of color and temperature.
Next Steps
Your first requirement is about the habit that makes every other metalworking skill possible: safe behavior. Before you cut, heat, file, or forge anything, you need to know how to protect your eyes, hands, lungs, and workspace.
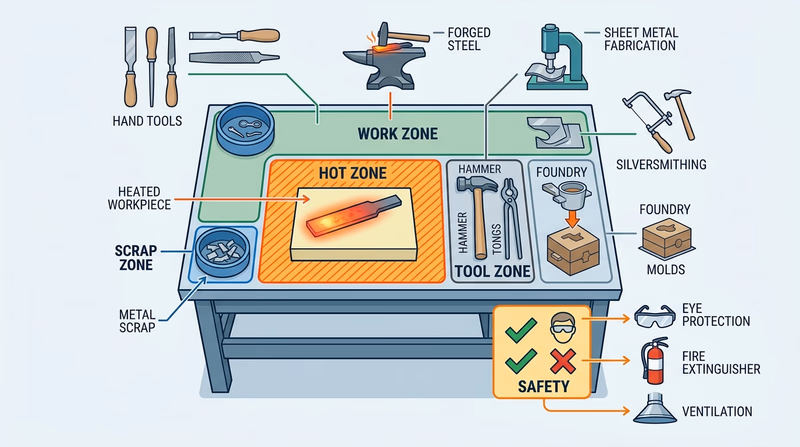
Req 1 — Safety First
Metalworking can be exciting because it gives you the power to change strong materials with heat, force, and sharp tools. That same power is why safety has to come first. In a metal shop, mistakes happen fast: a file can slip, a chip can fly, solder fumes can build up, or a piece that looks cool can still be hot enough to cause a serious burn.
The Biggest Hazards in Metalwork
The safest Scouts learn to name the hazard before they start the job. In metalwork, the main hazards are:
- Sharp edges from sheet metal, cutoffs, and unfinished projects
- Flying chips and scale from cutting, filing, drilling, and forging
- Heat and burns from torches, forges, soldering tools, hot metal, and recently heated tools
- Fumes and dust from heating, polishing, grinding, flux, and coatings
- Noise from hammering, striking steel, and power equipment
- Fire from sparks, open flames, oily rags, paper patterns, or clutter near hot work
- Pinch and impact injuries from hammers, vises, stakes, and heavy material
Metal Shop Safety Habits
Build these habits before every session- Protect your eyes: Wear safety glasses any time chips, sparks, or wire ends might fly.
- Dress for the job: Closed-toe shoes, tied-back hair, and no loose sleeves or dangling jewelry.
- Know what is hot: Ask before touching any tool, workpiece, or surface near heat.
- Keep your area clear: Clean up scrap, sharp offcuts, and clutter before they become hazards.
- Ventilate the space: Use the shop’s ventilation system and avoid breathing fumes directly.
- Work only with approval: Get your counselor’s okay before changing tools, heat levels, or materials.
Personal Protective Equipment
The right protective gear depends on the process. Safety glasses are the baseline. When forging or chipping scale, a face shield may be added. Hearing protection can matter during repeated hammering or power-tool use. Heat-resistant gloves may help when moving hot material, but gloves are not universal—some rotating tools and some fine-detail work are safer without loose hand coverings. That is why you should follow your counselor’s shop rules instead of making assumptions.
Heat Safety
Heat changes everything in metalworking. A torch flame, forge, soldering iron, or recently heated project can cause burns long after the bright color is gone. Dark steel may still be dangerously hot. Flux and coatings may smoke. Nearby tools can also heat up enough to burn you.
Air Quality and Clean Materials
Not every danger is easy to see. Heating metal, solder, flux, or surface coatings can release fumes. Grinding and polishing can create fine dust. Good ventilation matters, and so does using the right material. For example, some coatings and plated metals should not be heated in the same way as clean base metal. Ask before heating anything with an unknown coating.
Process-Specific Rules for Requirement 5
Requirement 5 asks you to choose one option, and each option adds its own safety concerns:
- Sheet Metal / Tinsmith: razor-sharp edges, snips, punches, rivets, soldering heat, and handling flat stock safely
- Silversmith: fine saw blades, small hot parts, flux and solder fumes, polishing compounds, and close-up hand work
- Founder: molds, molten lead-free pewter, spills, moisture hazards near molten metal, and careful pouring technique
- Blacksmith: forge heat, hot scale, striking tools, moving long stock, and safe hammering around an anvil
One of the most important discussions with your counselor is not just “what could go wrong?” but “how do we prevent it before the tool ever touches the metal?”
A counselor will notice good safety habits before they notice good craftsmanship. If you work safely, you give yourself the chance to learn every other skill in this badge with confidence.
Req 2 — The Language of Metal
This requirement gives you the vocabulary that makes the rest of the badge easier to understand. You are learning what metals are, how they are grouped, and how people change their properties. Once those ideas make sense, the hands-on work in the next requirements feels much less mysterious.
- Native metal — a metal found in nature in metallic form rather than locked inside ore. Gold, silver, and copper are classic examples.
- Malleable — able to be hammered or pressed into shape without breaking.
- Metallurgy — the science and practice of extracting, studying, alloying, heating, and shaping metals.
- Alloy — a mixture of two or more elements in which at least one is a metal, made to improve properties such as strength, hardness, or corrosion resistance.
- Nonferrous — a metal or alloy with little or no iron.
- Ferrous — a metal or alloy that contains iron.
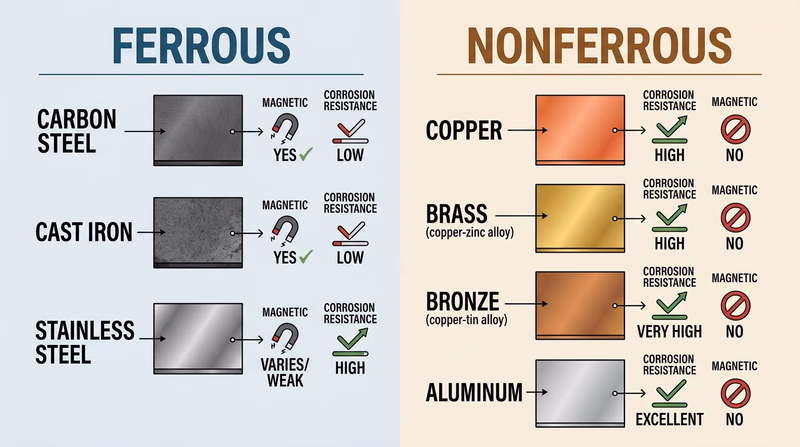
Requirement 2a: Early Nonferrous Alloys
Two strong examples are:
- Bronze — mostly copper combined with tin
- Brass — copper combined with zinc
Bronze is the more famous pre-Iron Age alloy because it was widely used for tools, weapons, vessels, and artwork before iron technology spread. Brass also has a long history, though its use became more common in later ancient periods and afterward. Both are nonferrous because neither is based on iron.
What matters most is understanding why people used alloys. Pure copper is useful, but adding other metals can make it harder, stronger, easier to cast, or better-looking.
Requirement 2b: Modern Ferrous Alloys
Three common ferrous alloys are:
- Carbon steel
- Cast iron
- Stainless steel
These all contain iron, but they behave very differently. Carbon steel is widely used because it can be strong, affordable, and workable. Cast iron pours well into molds but is brittle compared with many steels. Stainless steel includes chromium, which helps it resist corrosion.
When your counselor asks about ferrous alloys, do not stop at the name. Be ready to say what makes each one useful.
Requirement 2c: Work-Hardening
Work-hardening happens when you deform certain metals without heating them enough to reset their structure. Hammering, bending, peening, or rolling can make the metal harder and less willing to move. In simple terms, the metal becomes tougher to shape because you have already strained it.
That is why a piece of copper or brass often feels different after repeated bending. At first it moves easily. After more hammering or bending, it resists more strongly and may crack if you keep forcing it.
Requirement 2d: Annealing
Annealing means heating a metal in a controlled way so it becomes softer and easier to work.
For a nonferrous metal such as copper or brass, annealing usually means heating the piece to the proper temperature and then allowing the structure to reset so the metal becomes workable again. In many shop situations, copper is heated and then cooled according to the method your instructor teaches.
For a ferrous metal such as steel, annealing also involves heating to the right temperature, but cooling practice matters a great deal. Many steels are softened by slow cooling so the internal structure changes in a way that reduces hardness.
The exact temperature and cooling method depend on the metal, which is why metalworkers do not treat every alloy the same.
What Req 2 Teaches You
Carry these ideas into the next requirement- Names matter: Ferrous and nonferrous tell you a lot about behavior.
- Alloys are designed: People mix metals to improve properties.
- Hardness can change: Hammering and bending can harden metal.
- Heat can reset the structure: Annealing can make metal workable again.
The next requirement turns this vocabulary into something you can feel with your own hands. You will compare worked metal with annealed metal and notice the difference in effort.
Req 3 — Hardening, Softening & Tempering
This requirement is where metal stops being an idea and starts becoming a physical lesson. You are not just hearing that metal can harden or soften—you are being asked to feel the difference in your hands. Pay attention to how much force is needed, what the bend line looks like, and how the metal responds after heating.
Requirement 3a: Work-Harden a Bend Line
Brass and copper are excellent teaching metals because they respond clearly to hammering and bending. When you peen along the bend line, you compress and deform the metal repeatedly. That extra work makes the bend area stiffer and less willing to move.
The key observation is the yield point—the moment where the metal stops springing back and actually begins to change shape. Before work-hardening, the metal reaches that point more easily. As you peen the bend line, it should take more effort to push it further.
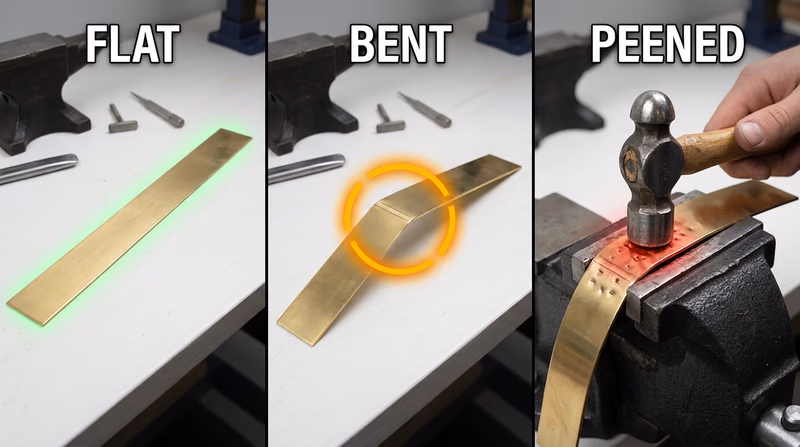
Requirement 3b: Anneal and Compare
This step gives you the comparison that makes the lesson stick. After annealing, the same metal should become easier to move again. If 3a taught you that working metal can increase resistance, 3b shows that controlled heating can reduce that resistance.
The most important part is your observation. Did the bend move more easily? Did it feel smoother? Did the metal resist less before yielding? Those are the details your counselor wants to hear.
Requirement 3c: Temper Colors and a Center Punch
This part of the requirement moves from nonferrous sheet metal into steel heat treatment. When steel is heated carefully, thin oxide colors can appear on the surface. These temper colors help metalworkers judge temperature ranges during heat treatment.
A center punch is a practical shop tool used to make a small dent in metal before drilling. That tiny mark helps keep a drill bit from skating across the surface. Making one yourself teaches a powerful lesson: the tool’s usefulness depends on how its hardness and toughness are balanced.
Why Tempering Matters
If steel is only hardened and not tempered, it may be too brittle. If it is too soft, it may mash over instead of making a clean mark. Tempering helps move the steel toward a better balance for the job.
What to Notice in Req 3
These details make your discussion stronger- Resistance: Did the metal take more or less force after each step?
- Location: Which area changed most—the bend line, the whole piece, or the tip of the tool?
- Purpose: Why do metalworkers sometimes want hardness and other times want softness?
- Result: How did heat treatment affect how the final tool behaved?
Metalwork is full of choices about hardness, toughness, and formability. This requirement teaches you that those properties are not fixed. A metalworker can change them on purpose.
Req 4 — Where Metal Takes You
You must choose exactly one option from this requirement. Both paths ask you to think beyond a single project and imagine what metalworking could become in your life. One option focuses on careers. The other focuses on hobbies, clubs, and long-term personal goals.
Your Options
- Req 4a — Metalworking Careers: Research three jobs that use metalworking skills, then go deeper on one. This path helps you understand training, certifications, cost, pay, and advancement.
- Req 4b — Metalworking as a Hobby: Explore how metalworking could become a personal interest you keep doing for fun, art, repair, or making. This path helps you plan equipment, learning, community, and goals.
How to Choose
| Factor | Req 4a — Careers | Req 4b — Hobby |
|---|---|---|
| Main question | Could I see myself doing this for work? | Could I see myself doing this for enjoyment? |
| Research focus | Training, certification, salary, job outlook | Tools, shop access, clubs, cost, practice plan |
| Best for Scouts who… | Want to compare real professions | Want to keep making things on their own time |
| What you gain | A clearer picture of real-world opportunities | A realistic plan for growing a lasting hobby |
Choosing Your Path
Use these questions to decide- Do I want to learn about a profession?: Choose 4a if you are curious about jobs, schools, and career ladders.
- Do I want to imagine my own shop time?: Choose 4b if you are excited by projects, clubs, and personal practice.
- What conversation will be stronger with my counselor?: Pick the path that gives you real details to discuss.
- What fits my age right now?: A hobby plan may feel more immediate, while career research may help you think further ahead.
Metalworking can fit many lives. Some people use it to earn a living. Others use it to make gifts, repair equipment, build art, or relax after work. Either path is worth exploring because both teach you how metalworking connects to the real world.
Req 4a — Metalworking Careers
Metalworking careers are much broader than “person with hammer.” Some jobs focus on fabrication, some on repair, some on design, and some on precision finishing. This requirement is really about learning how to compare a career path in a practical way—not just whether it sounds interesting.
Three Strong Career Categories to Consider
Here are three common directions you could research:
- Welder or fabricator — builds and repairs metal structures, frames, pipe systems, and custom assemblies
- Sheet metal worker — makes and installs ductwork, flashing, roofing components, and custom sheet-metal parts
- Machinist or tool-and-die maker — uses precise equipment to shape metal into parts that fit exact measurements
You could also look at blacksmithing for architectural ironwork, foundry work, jewelry and metalsmithing, metal sculpture, industrial maintenance, or manufacturing engineering support.
What to Research
Your counselor will be most interested in whether you compared real factors instead of collecting random facts.
Career Research Checklist
Bring these answers to your counselor discussion- Training path: Apprenticeship, trade school, community college, or four-year degree?
- Certifications: Are there industry credentials employers value?
- Experience: What entry-level work helps someone get started?
- Cost: Tuition, tools, safety gear, transportation, or testing fees?
- Job outlook: Is demand steady, growing, or highly competitive?
- Starting pay: What might a beginner realistically earn?
- Advancement: Can someone become a supervisor, specialist, shop owner, or instructor?
How to Compare Careers Fairly
A career can sound exciting and still be a poor fit for you. Maybe it requires long hours in noisy industrial settings. Maybe it needs advanced math, travel, or expensive training. On the other hand, a path you had not considered might fit you well because you enjoy physical work, precision, art, repair, or problem-solving.
Questions to Ask Yourself
As you prepare to talk with your counselor, think beyond money. Would you enjoy working indoors, outdoors, or both? Do you like repetition and precision, or custom one-off projects? Do you want to make functional parts, artistic objects, or building systems? Those answers matter just as much as pay.
A strong discussion includes your own opinion. You do not have to say, “Yes, I want this career.” You can just as honestly say, “I respect the work, but I learned it is probably not for me because I prefer another environment or type of project.”
Req 4b — Metalworking as a Hobby
A hobby does not have to become a job to matter. Metalworking can be a satisfying personal practice because it gives you visible progress: flat stock becomes a finished box, plain steel becomes decorative hardware, or scrap becomes sculpture. This requirement asks you to imagine what it would take to keep learning after the badge.
Ways Metalworking Can Become a Hobby
A hobby path could include:
- Blacksmithing for hooks, fire tools, hinges, bottle openers, and decorative ironwork
- Silversmithing or metalsmithing for jewelry, bowls, pendants, and small art objects
- Sheet metal projects for tool trays, lanterns, signs, duct mockups, and camp gadgets
- Casting for tokens, medallions, hardware, and artistic small objects
Each path uses different tools, workspace needs, and costs. Your job is to think realistically about which one you could actually keep doing.
What to Research
Hobby Planning Questions
Use these to build a practical plan- Training: Would I learn from a class, club, mentor, online videos, or workshops?
- Workspace: Could I work at home, in a makerspace, or only with a counselor or club?
- Startup cost: What tools, safety gear, and materials would I need first?
- Ongoing cost: What would I keep spending on fuel, metal, blades, solder, or consumables?
- Community: Are there local clubs, guilds, fairs, or online groups that could help me improve?
- Goals: What could I build in the next month, the next year, and the next few years?
Keep the First Step Small
A lot of hobbies die because people try to buy everything at once. A better plan is to start with a safe, realistic entry point. Maybe that means taking a beginner blacksmith class before buying tongs and a forge. Maybe it means learning hand-saw and solder skills in a supervised jewelry studio before collecting tools of your own.
Short-Term and Long-Term Goals
Your counselor will want to hear goals that sound real. A short-term goal might be “take one beginner class and make a simple hook” or “learn to solder clean seams on copper.” A long-term goal might be “sell handmade pieces at a craft fair,” “build camp hardware for troop use,” or “join a local guild and improve my forging skills over time.”
A good answer is honest. You might conclude that you love the idea of metalworking but need more access to tools and instruction before it becomes a regular hobby. That is still a strong result because it shows you understand the path clearly.
Req 5 — Choose Your Craft
The first four requirements gave you the foundation — safety, metallurgy vocabulary, hands-on work-hardening and annealing experiments, and a look at where metalworking can take you professionally or personally. Now you get to choose a craft and put those skills to real use.
You must complete exactly one of the four options below. Each option leads you through naming the tools of the trade, sketching your projects, and making two finished objects.
Your Options
- Req 5a — Sheet Metal Mechanic/Tinsmith: Work with thin sheet metal using snips, stakes, and forming tools to cut, bend, edge, solder or braze two objects — one of which must include a riveted component. You will gain practical fabrication skills used in HVAC, automotive, and architectural metalwork.
- Req 5b — Silversmith: Work with copper sheet (or silver if you have prior experience) to saw, sink, solder, and polish two objects. You will gain the careful hand-tool skills and finishing eye that define jewelry and decorative metalwork.
- Req 5c — Founder: Design and build two sand molds, then cast two objects in lead-free pewter. You will gain experience with pattern-making, mold assembly, and pouring molten metal — the oldest metalworking tradition.
- Req 5d — Blacksmith: Use an anvil and forge to hot-forge two objects from low-carbon steel, using draws, bends, twists, and a hammer-riveted joint. You will gain a feel for how heat changes steel and how forged shapes develop under the hammer.
How to Choose
Choosing Your Option
Match the option to your interests and available resources- If you like precise layout, folded seams, and practical shop-made objects: Option 5a (Sheet Metal) is a natural fit — its tools and processes connect directly to HVAC, auto body, and fabrication trades.
- If you enjoy fine detail work, jewelry, and patient hand-tool craft: Option 5b (Silversmith) rewards steady hands and careful filing and finishing.
- If molten metal and mold-building fascinate you: Option 5c (Founder) is a direct look at casting — one of the oldest manufacturing methods in human history.
- If you like physical, heat-dependent work and seeing a bar of steel transformed under the hammer: Option 5d (Blacksmith) gives the most visceral metalworking experience.
- Consider access: Sheet metal and silversmithing tools are more likely to be available at a troop shop or community maker space. Founding and blacksmithing require a forge or foundry setup — talk to your counselor early about what facilities are available.
| Option | Craft | Core Processes |
|---|---|---|
| 5a | Sheet Metal Mechanic/Tinsmith | Cutting, bending, edging, riveting, soldering/brazing |
| 5b | Silversmith | Sawing, sinking, soldering, cleaning, polishing |
| 5c | Founder | Mold-making, pattern layout, pouring, casting |
| 5d | Blacksmith | Hot-forging draws, bends, twists, hammer riveting |
No matter which option you choose, the pattern is the same: learn the tools first, plan your objects on paper, then make them. Take your time with the sketching step — a clear sketch with dimensions will save you rework at the bench.
Req 5a — Sheet Metal Mechanic/Tinsmith
This path starts with flat sheet metal and ends with finished objects that hold their shape because you measured, cut, bent, and joined them accurately. Tinsmithing teaches planning and precision. A good result depends less on brute force and more on layout, clean edges, and the right sequence of operations.
What You’ll Complete
- Req 5a1 — Tinsmith Tools: Learn the basic tools and what each one does.
- Req 5a2 — Sketching Your Sheet Metal Objects: Plan two objects with dimensions before cutting anything.
- Req 5a3 — Cutting, Bending & Joining: Make two objects using core sheet-metal techniques, including a riveted component and surface protection when needed.
How This Path Builds
Tinsmithing rewards order. First you learn the tools so you know what each one is for. Then you sketch and measure so your patterns make sense. Only then do you cut and form the metal. If you skip ahead, you usually waste material.
You are ready to start with the toolset that makes flat metal manageable.
Req 5a1 — Tinsmith Tools
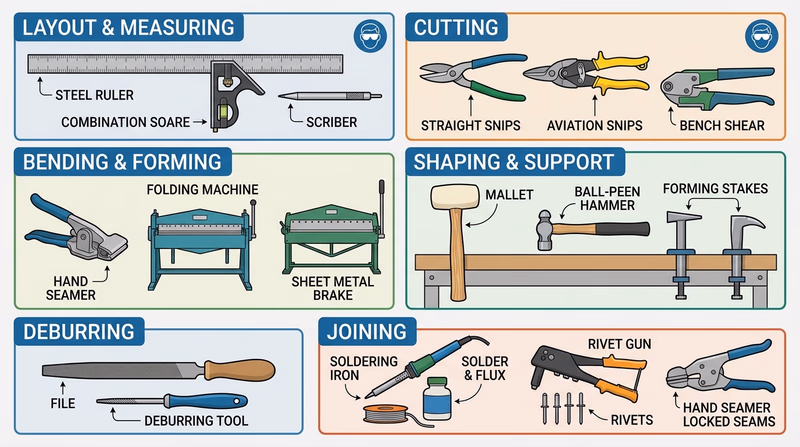
Sheet metalworking tools fall into a few main jobs: measuring and marking, cutting, bending, shaping, supporting, and joining. A Scout does not need to memorize every specialty tool in a professional shop, but you should understand the basic ones your counselor uses and what each one is meant to do.
Common Sheet Metal Tools
- Rule or tape measure — measures stock and finished dimensions
- Scratch awl or scribe — marks lines on metal more precisely than a pencil
- Combination square — checks 90-degree lines and layout accuracy
- Tin snips — cut sheet metal; left-cut, right-cut, and straight-cut snips handle curves differently
- Hand seamer — bends tabs, hems, and straight edges cleanly
- Wooden or rawhide mallet — shapes metal with less surface marring than a steel hammer
- Ball-peen hammer — used for riveting and shaping
- Stake, anvil, or metal form — supports the work while bending or forming
- Files — smooth sharp edges and remove burrs
- Rivet set and drill or punch — prepare and secure riveted joints
- Soldering or brazing equipment — joins parts permanently with heat and filler metal
Match the Tool to the Job
A good metalworker does not just ask, “Can this tool do it?” They ask, “Is this the right tool for a safe, clean result?” Tin snips may cut a line, but a hand seamer gives better control on a bend. A mallet may shape a surface without marking it, while a harder hammer may leave dents you did not want.
What Your Counselor Wants to Hear
When you describe a tool, explain both its name and its purpose. “These are tin snips” is only half an answer. A stronger answer is: “These are straight-cut snips. They are used to cut sheet metal along marked lines, especially for straight cuts and gentle curves.”
Knowing the tool language now will help you sketch smarter in the next requirement, because you will start thinking about how each part will actually be made.
Req 5a2 — Sketching Your Sheet Metal Objects
Good sheet metal projects begin on paper. A sketch does not need to look like professional drafting, but it does need to communicate shape, size, and parts clearly enough that you and your counselor can understand how the object will be made.
What a Useful Sketch Shows
Your sketch should answer three questions:
- What is the object?
- What parts does it include?
- How big is each part?
That means your drawing should label each component and include measurements such as length, width, height, diameter, flange width, or tab size wherever they matter.
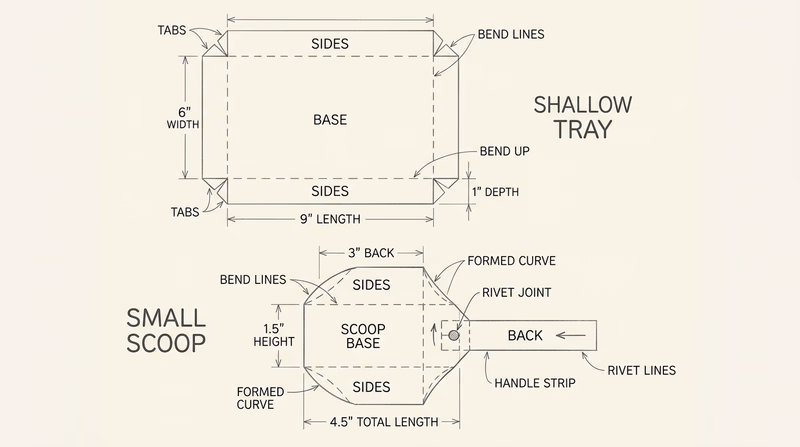
Good Beginner Project Ideas
For this requirement, choose objects that are realistic for your tool access and skill level. Strong beginner examples include:
- a tray or dustpan
- a scoop
- a candle shield or simple lantern body
- a small box or lidded container
- a business-card holder or tool caddy
The goal is not to impress anyone with complexity. The goal is to make two objects that let you practice real sheet-metal methods successfully.
Think Like a Fabricator
When you sketch, imagine the build order. Which part is cut first? Where do the bends happen? Which edge needs a hem or seam? Where might a rivet go? If the object will hold weight or be handled often, think about whether the shape needs stiffness at the edges.
You do not need a full flat-pattern layout unless your counselor asks for one, but you should at least think about how a three-dimensional object starts as a flat piece of metal.
Sketch Quality Check
Review your sketch before showing your counselor- Dimensions included: Major lengths, widths, and heights are written clearly.
- Parts labeled: Separate components are identified.
- Bends considered: You can point to where the metal will fold or curve.
- Construction realistic: The object fits the tools and techniques you are allowed to use.
A clear sketch saves time, material, and frustration. Once your counselor approves the plan, you are ready to cut and form the real thing.
Req 5a3 — Cutting, Bending & Joining
This is where tinsmithing becomes real fabrication. You are taking your approved plan and turning it into finished objects with accurate cuts, square bends, and secure joints. The exact objects may differ, but the core lesson is the same: every step affects the next one.
Build in a Smart Order
A strong sequence usually looks like this:
- transfer the pattern and dimensions
- cut the parts cleanly
- remove burrs and sharp edges
- form bends and hems in the right order
- fit parts together before joining
- solder, braze, or rivet as required
- clean and protect the finished piece
If you jump ahead, you can trap yourself. For example, a seam made too early may block a later bend. A bend made first may make a cut line harder to reach.
Requirement 5a3a: Add a Riveted Component
A rivet is more than a fastener. It teaches alignment, hole placement, and tight mechanical joining. For a riveted part to work well, the pieces must fit before you set the rivet. Sloppy holes or shifting parts usually lead to weak or ugly results.
Requirement 5a3b: Protect Against Oxidation
Some sheet metals need extra protection after fabrication. If your metal is not already protected by plating, your counselor may have you clean it, coat it, wax it, paint it, or otherwise finish it so moisture and air do not attack the surface quickly.
This is an important real-world lesson: a project is not truly finished just because it holds together. A good finish helps it survive handling, weather, and time.
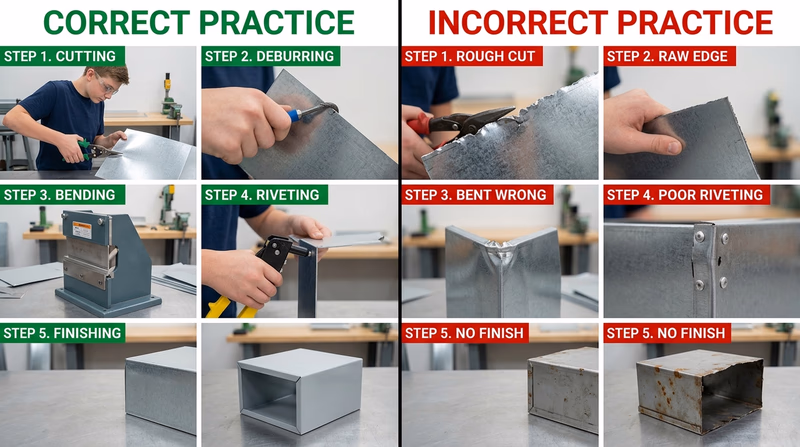
The best sheet-metal objects look simple when they are done. That usually means the maker planned carefully, worked in order, and corrected small errors before they became big ones.
Req 5b — Silversmith
Silversmithing is the precision branch of this badge. Instead of shaping heavier stock with big hammer blows, you work with thinner material, smaller tools, tighter cuts, and cleaner joints. This path rewards patience, accuracy, and a good eye for finish.
What You’ll Complete
- Req 5b1 — Silversmith Tools: Learn the small, precise tools used in silversmithing.
- Req 5b2 — Sketching Your Silver Objects: Plan two objects with enough clarity to build them cleanly.
- Req 5b3 — Sawing, Sinking & Soldering: Build two objects with soldered joints and include required hand-made features.
How This Path Builds
This option teaches control. First you identify the toolset. Then you plan carefully. Then you make two objects that prove you can cut, shape, join, and finish metal without rushing.
Req 5b1 — Silversmith Tools
Silversmithing tools are smaller than many blacksmithing or sheet-metal tools, but they are just as specialized. Each one supports a controlled action: marking, sawing, filing, shaping, soldering, or finishing.
Common Silversmith Tools
- Jeweler’s saw and blades — cut fine shapes and interior openings
- Bench pin — supports small work while sawing or filing
- Files — refine edges, remove burrs, and adjust fit
- Ball-peen or chasing hammer — shape or texture metal with control
- Mallet — moves metal while reducing marring
- Stake, dapping block, or forming tools — support curved or sunken shaping
- Soldering torch — provides controlled heat for soldering
- Tweezers or solder pick — position small hot parts safely
- Flux brush — applies flux to support clean solder flow
- Polishing materials — smooth and brighten the final surface
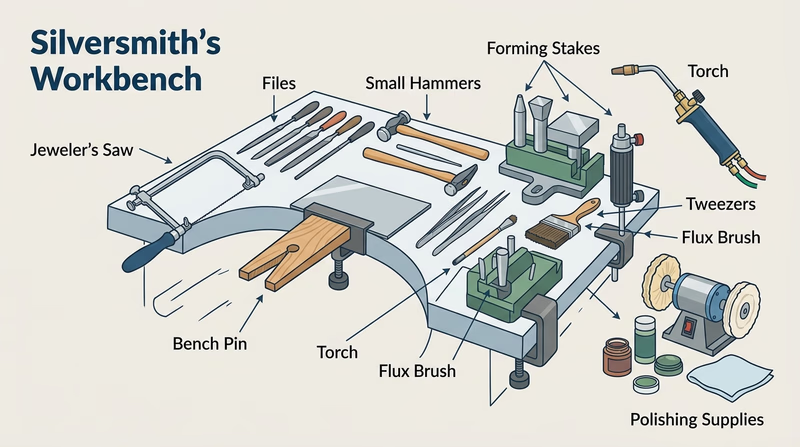
Precision Matters More Than Force
A jeweler’s saw is not just a smaller saw. It is meant for accuracy and control. A bench pin is not just a block of wood. It gives your saw blade support where you need it. These tools work together to help you make clean shapes without tearing or twisting the metal.
When you describe a silversmithing tool to your counselor, explain the purpose in plain language. That shows you understand the process, not just the vocabulary.
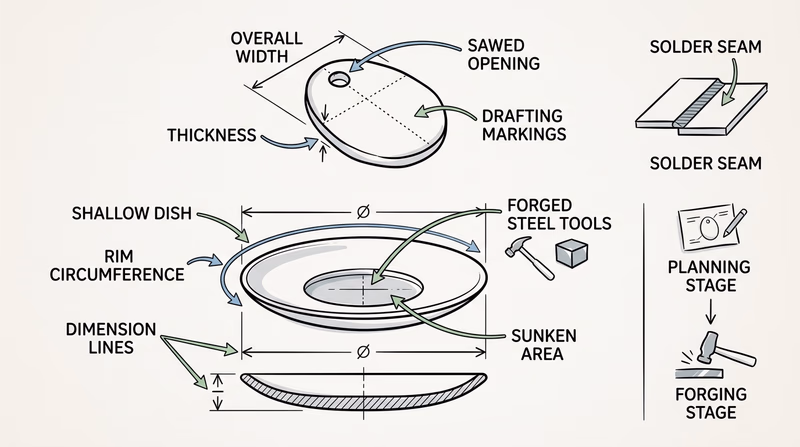
Req 5b2 — Sketching Your Silver Objects
Silversmithing projects usually look simple when finished, which means planning matters even more. A good sketch helps you think through shape, scale, and where each joint or formed area will go before you commit to cutting metal.
What to Include
Your sketch should show:
- the overall outline of each object
- major dimensions
- separate parts or layers
- any sawed openings or decorative cutouts
- any area that will be sunk, domed, folded, or joined
You do not need a perfect technical drawing. You do need enough detail that your counselor can approve the design and you can follow your own plan later.
Choose Manageable Designs
Good beginner silversmith projects often include pendants, simple trays, small dishes, decorative plates, bookmarks, or small boxes. Pick objects that let you demonstrate the required skills without creating so many parts that accuracy becomes hard to maintain.
The best sketch is the one that leads to a successful build. Once your counselor approves your design, the next step is careful execution.
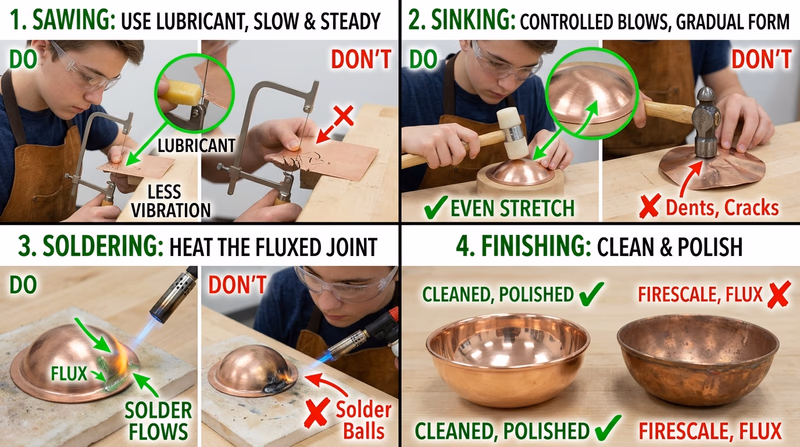
Req 5b3 — Sawing, Sinking & Soldering
This requirement brings the whole silversmith path together. You will shape, join, and finish two objects, and both must prove that you can make a clean soldered joint. That means careful fit-up, controlled heat, and good surface preparation.
Requirement 5b3a: Add a Sawed Component
Sawing is one of the skills that separates fine hand work from simple cutting. A sawed component might be a decorative shape, an interior cutout, or a precise outline. The important part is that it shows control.
Requirement 5b3b: Add a Sunken Part
A sunken part means you deliberately form the metal inward to create a shallow recessed shape. This teaches you how support tools and controlled hammering can move metal without tearing it.
Requirement 5b3c: Clean and Polish
Finishing is not an afterthought. Cleaning removes flux residue, oxidation, fingerprints, and scratches. Polishing helps the final shape and workmanship show clearly. A strong project may begin with accurate cutting and joining, but it looks complete only after proper cleanup.
If your solder joints are clean, your saw cuts controlled, and your finished surfaces thoughtful, you will have done more than complete a requirement. You will have practiced the mindset of careful bench work.
Req 5c — Founder
Founding is one of the oldest ways humans learned to shape metal. Instead of hammering a bar or bending a sheet, you create a mold cavity, then let molten metal flow into that space and harden. This option teaches you to think ahead: every gate, vent, and parting line affects the finished result.
What You’ll Complete
- Req 5c1 — Molds & Their Parts: Learn the language of mold parts and common mold types.
- Req 5c2 — Sketching Your Cast Objects: Plan two objects that make sense for casting.
- Req 5c3 — Making & Pouring Your Molds: Build molds, position gates and vents, and cast lead-free pewter objects.
How This Path Builds
Founding rewards careful planning. A bad mold can ruin a careful pour, and a bad gate or vent can trap air or keep the cavity from filling. By the time you pour metal, many of the important choices have already been made.
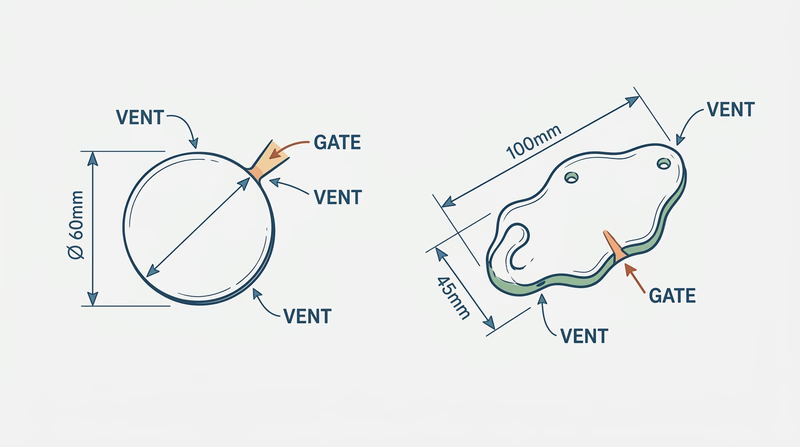
Req 5c1 — Molds & Their Parts
A two-piece mold works like a carefully fitted sandwich. Each half holds part of the cavity, and together they create the shape the molten metal will fill. If the halves do not align well, the casting will not come out correctly.
Basic Parts of a Two-Piece Mold
- Cope — the top half of the mold
- Drag — the bottom half of the mold
- Parting line — the place where the two halves meet
- Pattern cavity — the empty shape left by the pattern
- Pouring gate or sprue — the channel where metal enters the mold
- Runner — a passage that carries metal from the sprue toward the cavity
- Vent — small passage that lets trapped air and gases escape
Common Mold Types
Three common mold types you might name are:
- Sand mold — made by packing sand around a pattern; common for many foundry projects
- Permanent mold — a reusable mold, often metal, used for repeated castings
- Investment mold — made from a wax pattern and refractory material; often used for fine detail
You may also hear about green-sand molds, shell molds, or die-casting molds depending on the process.

Understanding mold structure now will help you design smarter objects in the next requirement.
Req 5c2 — Sketching Your Cast Objects
Casting starts long before the metal melts. A good sketch helps you choose an object that can actually be molded, vented, and poured successfully.
Think About Castability
Some shapes look great on paper but are hard to cast well. Very thin sections may cool too quickly. Deep undercuts may not release cleanly from a simple mold. Tiny decorative details may disappear if the mold material cannot hold them sharply.
That is why beginner castings are often simple objects such as:
- medallions or tokens
- small plaques
- simple hardware pieces
- decorative pendants
- flat-backed symbols or emblems
Casting Sketch Checklist
Review these before asking for approval- Overall dimensions shown: Length, width, and thickness are clear.
- Shape is realistic for a mold: No hidden spaces that a simple mold cannot support.
- Pattern source considered: One casting uses a counselor-provided pattern; one uses your own approved pattern.
- Pouring thought ahead: You can imagine where the metal might enter and where air might escape.
A strong sketch proves you are thinking like a founder instead of just drawing an object. The next step is building the molds and bringing molten pewter into that planned space.
Req 5c3 — Making & Pouring Your Molds
This requirement asks you to prove two things: that you can make a working mold, and that you understand why gate and vent placement matter. The casting process starts with the mold, not the metal.
Requirement 5c3a
A counselor-provided mold gives you a controlled first test. It lets you focus on the pouring process, observing metal flow, and learning what a successful fill looks like.
Requirement 5c3b
Your self-made mold is the real proof of understanding. If the cavity, gate, and vent work together, the metal should fill cleanly and release a recognizable casting. If the result is imperfect, that also teaches you something valuable about the design.
Why Gates and Vents Matter
The gate gives the molten metal a path into the cavity. The vent gives trapped air a path out. Without both, the metal may hesitate, cool too soon, or leave gaps and voids.
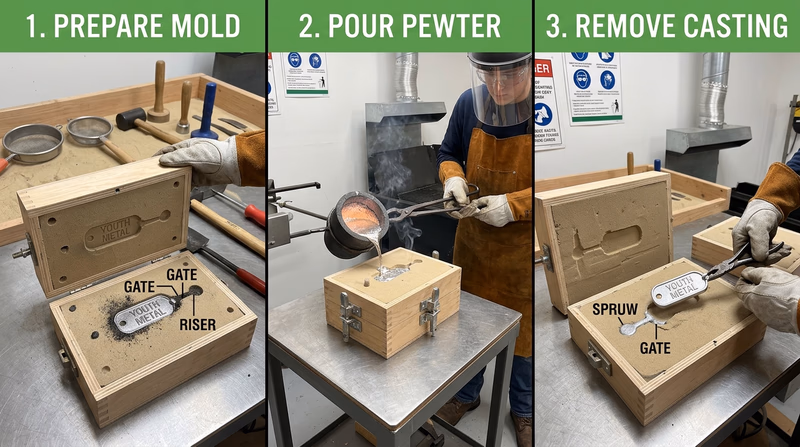
Founding teaches a different kind of craftsmanship from forging or tinsmithing. Instead of forcing metal into shape directly, you create the conditions that allow the shape to happen.
Req 5d — Blacksmith
Blacksmithing is the most heat-and-force driven option in this badge. You will watch steel change color, move under the hammer, and respond differently depending on where and how you strike it. It is physical work, but it is also thoughtful work. Good blacksmithing depends on timing, aim, and attention.
What You’ll Complete
- Req 5d1 — Blacksmith Tools: Learn the forge, anvil, hammers, tongs, and supporting tools.
- Req 5d2 — Sketching Your Forged Objects: Plan two forge projects with clear dimensions.
- Req 5d3 — Hot-Forging Exercises: Practice the fundamental shapes and movements of forging.
- Req 5d4 — Forging Your Two Objects: Use those skills to make two finished projects.
How This Path Builds
You do not start blacksmithing by making fancy finished work. First you learn the toolset. Then you plan. Then you practice core movements such as drawing, bending, and twisting. Only after that do you make the finished objects.
Req 5d1 — Blacksmith Tools
Blacksmithing tools are designed to heat, hold, support, strike, and shape steel. Each tool has a specific job, and using the right one safely matters as much as using it skillfully.
Core Blacksmith Tools
- Forge — heats steel to workable temperatures
- Anvil — the main working surface for shaping metal
- Face of the anvil — the flat top used for most forging blows
- Horn — the rounded projection used for curves and bends
- Edge of the anvil — used for sharper bends and controlled shaping
- Hammers — move metal with repeated blows; different weights and faces suit different jobs
- Tongs — hold hot stock securely
- Vise — grips work for twisting, bending, or cutting operations
- Hardy tools or bottom tools — fit into the anvil and provide special shaping functions
- Wire brush — removes scale from hot metal surfaces
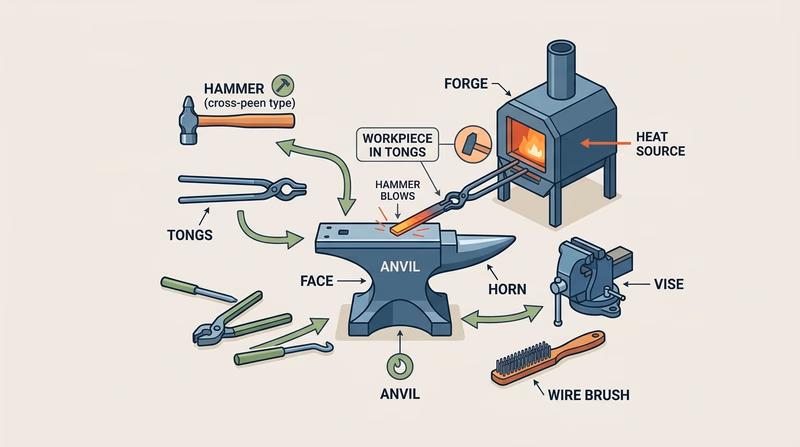
What Makes Blacksmith Tools Different
A blacksmith tool is made for hot work. Tongs must grip stock securely at high temperature. Hammers must strike repeatedly without loosening. The anvil is not just a heavy block—it gives you different shaping surfaces depending on whether you need a flat face, rounded horn, or sharper edge.
When you describe tools to your counselor, connect each one to the action it supports. That will make the forging exercises in the next requirements easier to explain.
Req 5d2 — Sketching Your Forged Objects
A blacksmith sketch should help you think through proportion, stock size, and the order of operations. Unlike a sheet-metal pattern, a forged object sketch often represents what the project will become after the metal has been stretched, bent, or twisted.
Strong Beginner Forge Projects
Reasonable projects often include:
- a wall hook
- a roasting fork
- a decorative S-hook
- a simple bracket
- a fire poker or small utility tool
These let you practice tapers, bends, twists, and joints without creating more complexity than a beginner can control.
Questions to Ask While Sketching
- Where will the bends happen?
- Does one piece need a decorative twist?
- Could one object include the hammer-riveted joint requirement?
- Is the starting stock heavy enough for the shape you want?
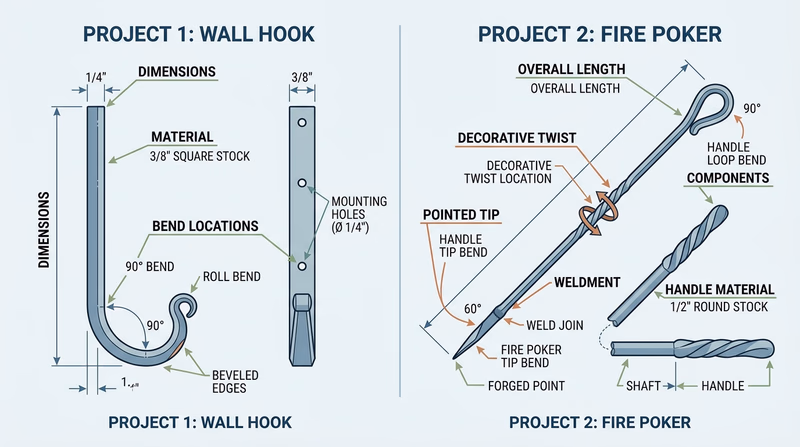
Your counselor’s approval matters because a good forge project needs to fit both your skill level and the available tools.
Req 5d3 — Hot-Forging Exercises
These exercises are the forge equivalent of scales in music. They teach the basic moves that show up later in your finished projects. Do not treat them as throwaway practice. Each one teaches control over where the metal moves.
Requirement 5d3a
Drawing out means making the metal longer and narrower by concentrating blows where you want the material to spread. A taper teaches you how repeated hammering can move thickness into length.
Requirement 5d3b
The horn supports curved shaping. A U-bend teaches you how to wrap hot metal around a rounded surface without collapsing the shape or kinking the stock.
Requirement 5d3c
A twist teaches heat control and alignment. If the heated section is not even, the twist may distort or wander. If the bar is not held squarely, the pattern may look uneven.
Requirement 5d3d
The edge of the anvil gives you a more defined corner than the horn. That makes it useful when you want a sharper bend instead of a smooth curve.
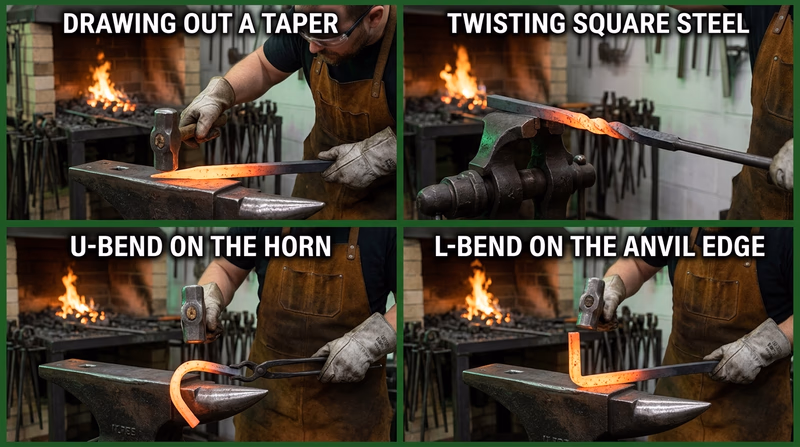
When you can explain what each exercise teaches, you are ready to apply those moves in finished work.
Req 5d4 — Forging Your Two Objects
This final forge requirement is where practice becomes craftsmanship. Your two objects should show that you can move hot steel intentionally, not just strike it until it changes shape. Each heat should have a purpose.
Requirement 5d4a
A decorative twist proves you can isolate a heated section, control alignment, and stop at the right amount of rotation. It is decorative, but it also shows discipline.
Requirement 5d4b
A hammer-riveted joint adds mechanical joining to your forging work. It shows that your project is not only shaped well, but assembled thoughtfully.
Requirement 5d4c
Forged steel can rust quickly if it is left unfinished. Depending on your counselor’s method, preserving the work may involve cleaning, brushing, oiling, waxing, or another protective finish. The point is to make the forged object last.
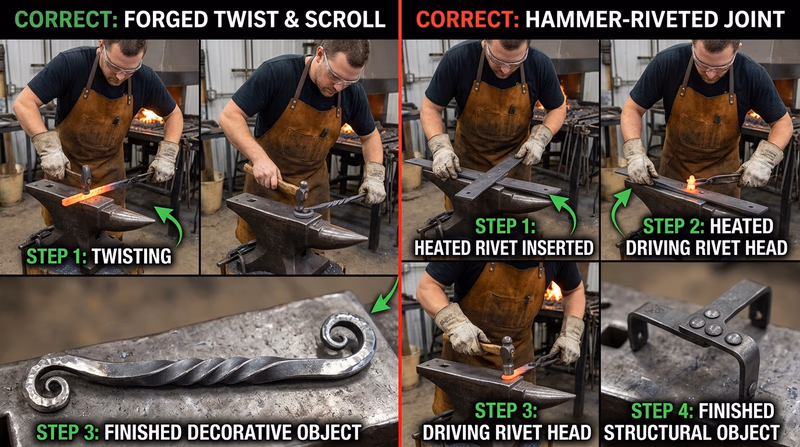
When you finish this requirement, you will have worked through one full branch of traditional metalworking from tools to planning to final craftsmanship. That is a real accomplishment.
Extended Learning
A. Congratulations
You have done more than memorize tool names. You have learned how metal behaves, how heat and force change it, and how different branches of metalworking solve different problems. That is the beginning of real craft knowledge.
Metalworking is one of those skills that can grow with you for decades. Some people start with a Scout project and later build camp hardware, make jewelry, repair equipment, or take classes in forging or casting. Others use what they learned simply to understand how things are made. Either way, you now have a stronger eye for tools, materials, and workmanship than you did when you started.
B. Deeper History: Why Iron Changed the World
The transition from copper and bronze to iron was not just a change in material. It changed agriculture, building, transportation, and warfare because iron could be used to make tougher tools in larger quantities. That made farming more productive, building more ambitious, and everyday repair work more practical.
But bronze did not disappear. Different metals remained useful because each had strengths. Bronze resisted corrosion better in some settings. Gold and silver remained important for decoration and wealth. Cast iron made certain shapes possible at larger scales. Steel eventually became dominant because it balanced strength, toughness, and workability so well.
That is one of the most interesting lessons in metalwork: there is rarely a single “best” metal. There is usually a best choice for a specific job. A metalworker learns to match material to purpose.
C. Deeper Craft: Joinery and Finishing
Many beginners think shaping is the whole craft. Experienced metalworkers know that joining and finishing often decide whether a piece looks professional. A slightly crooked bend may be hidden or corrected, but a sloppy solder seam, weak rivet, or poor finish is hard to ignore.
Joinery asks you to think about strength and service. Does the piece need to flex? Hold weight? Resist weather? Come apart for repair? Different answers lead to different joints. Finishing asks a different question: how will this object live in the world? Indoors, outdoors, handled daily, or mostly displayed?
The more projects you make, the more you realize that good craft is rarely about a single dramatic move. It is usually the result of many careful small choices.
D. Deeper Observation: Learn by Looking Closely
One of the best ways to improve is to study metal objects around you. Look at hinges, tools, duct fittings, jewelry, railings, camp hardware, cookware, and old shop tools. Ask yourself how they were made. Was the part forged, cast, stamped, welded, riveted, or machined? Where do you see evidence of bending, heat, or finishing?
This habit turns the whole world into a classroom. A rain gutter can teach sheet-metal seams. A cast-iron pan can teach mold-making. A forged hook can teach tapers and twists. A silver pendant can teach layout and polishing.
If you train yourself to notice process, you will keep learning long after the badge is complete.
E. Real-World Experiences
- Visit a blacksmith demonstration: Historical villages, fairs, and museums often host working forge demonstrations that make the heat-and-hammer process easier to understand.
- Tour a makerspace or community studio: Many maker spaces offer beginner classes in jewelry, welding, blacksmithing, or fabrication.
- Watch a sheet metal shop at work: If your counselor knows a local HVAC or fabrication shop, seeing layout, cutting, and forming in a real workplace is valuable.
- Explore a foundry or metal arts program: College art departments and community foundries sometimes host public events or demonstrations.
- Study architectural metalwork in your town: Railings, gates, brackets, and old hardware can become a field trip if you look carefully.