Req 5a2 — Sketching Your Sheet Metal Objects
Good sheet metal projects begin on paper. A sketch does not need to look like professional drafting, but it does need to communicate shape, size, and parts clearly enough that you and your counselor can understand how the object will be made.
What a Useful Sketch Shows
Your sketch should answer three questions:
- What is the object?
- What parts does it include?
- How big is each part?
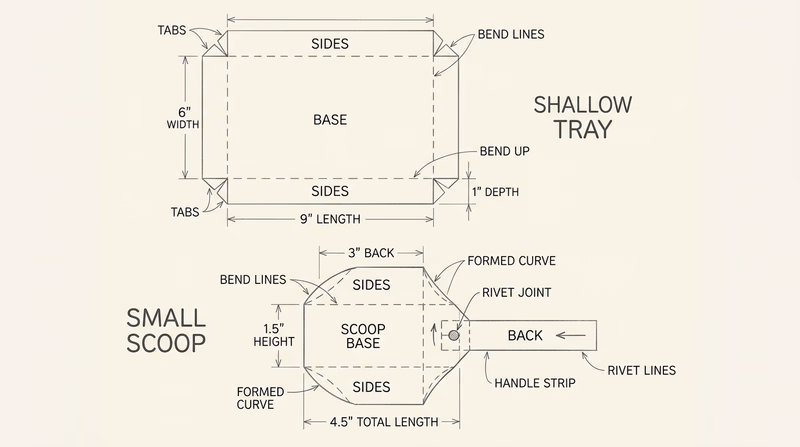
That means your drawing should label each component and include measurements such as length, width, height, diameter, flange width, or tab size wherever they matter.
Good Beginner Project Ideas
For this requirement, choose objects that are realistic for your tool access and skill level. Strong beginner examples include:
- a tray or dustpan
- a scoop
- a candle shield or simple lantern body
- a small box or lidded container
- a business-card holder or tool caddy
The goal is not to impress anyone with complexity. The goal is to make two objects that let you practice real sheet-metal methods successfully.
Think Like a Fabricator
When you sketch, imagine the build order. Which part is cut first? Where do the bends happen? Which edge needs a hem or seam? Where might a rivet go? If the object will hold weight or be handled often, think about whether the shape needs stiffness at the edges.
You do not need a full flat-pattern layout unless your counselor asks for one, but you should at least think about how a three-dimensional object starts as a flat piece of metal.
Sketch Quality Check
Review your sketch before showing your counselor
- Dimensions included: Major lengths, widths, and heights are written clearly.
- Parts labeled: Separate components are identified.
- Bends considered: You can point to where the metal will fold or curve.
- Construction realistic: The object fits the tools and techniques you are allowed to use.
A clear sketch saves time, material, and frustration. Once your counselor approves the plan, you are ready to cut and form the real thing.