Req 5a3 — Cutting, Bending & Joining
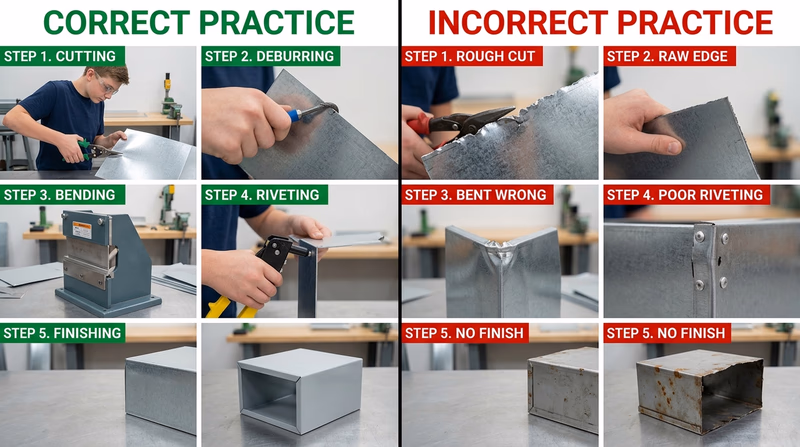
This is where tinsmithing becomes real fabrication. You are taking your approved plan and turning it into finished objects with accurate cuts, square bends, and secure joints. The exact objects may differ, but the core lesson is the same: every step affects the next one.
Build in a Smart Order
A strong sequence usually looks like this:
- transfer the pattern and dimensions
- cut the parts cleanly
- remove burrs and sharp edges
- form bends and hems in the right order
- fit parts together before joining
- solder, braze, or rivet as required
- clean and protect the finished piece
If you jump ahead, you can trap yourself. For example, a seam made too early may block a later bend. A bend made first may make a cut line harder to reach.
Requirement 5a3a: Add a Riveted Component
A rivet is more than a fastener. It teaches alignment, hole placement, and tight mechanical joining. For a riveted part to work well, the pieces must fit before you set the rivet. Sloppy holes or shifting parts usually lead to weak or ugly results.
Requirement 5a3b: Protect Against Oxidation
Some sheet metals need extra protection after fabrication. If your metal is not already protected by plating, your counselor may have you clean it, coat it, wax it, paint it, or otherwise finish it so moisture and air do not attack the surface quickly.
This is an important real-world lesson: a project is not truly finished just because it holds together. A good finish helps it survive handling, weather, and time.
The best sheet-metal objects look simple when they are done. That usually means the maker planned carefully, worked in order, and corrected small errors before they became big ones.