Req 3 — Planning Your Original Project
This parent requirement matters because it turns your build from a cool idea into a workable plan. Before you start cutting material or opening software, decide what you are making, why it interests you, what scale it will use, and which tools you actually have access to. A strong plan saves material, prevents frustration, and makes your counselor conversation much more productive.
Your project must be your own original design. That does not mean every part has to come from nowhere. You can study real houses, real plumbing layouts, real vehicles, or real machines for inspiration. What matters is that you are making design choices yourself instead of assembling a premade kit someone else already solved.
Project Planning Worksheet Resource: Project Planning Worksheet — /merit-badges/model-design-and-building/guide/project-planning-worksheet/Requirement 3a
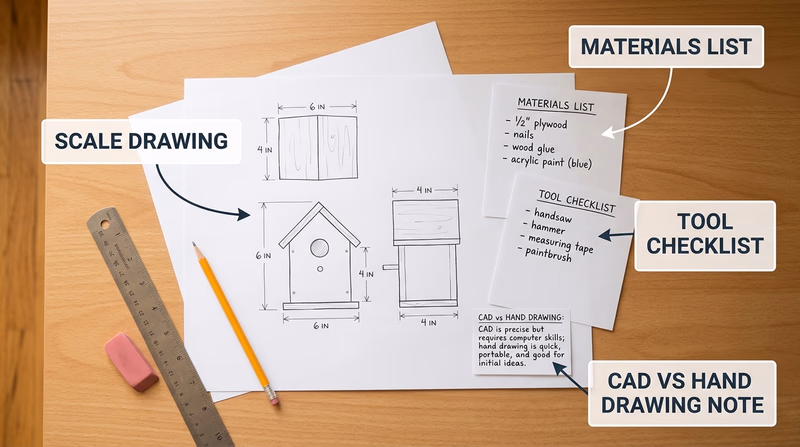
A scale drawing is the bridge between your idea and your build. It tells you how big each part should be and how those parts relate to each other. Without a scale plan, modelmaking turns into guessing.
Start by choosing the required scale from the option you plan to build in Req 4. Write that scale at the top of every sketch or digital drawing. Then draw the main views your project needs. A house may need floor plans and elevations. A vehicle may need top, front, rear, and side views. A mechanical device may need an overall view plus close-ups of moving parts.
Use clear dimensions even if your drawing is not perfect art. Straight lines, labels, and measurements matter more than fancy shading. If you are working digitally, double-check your units before printing or exporting. If you are drawing by hand, use a ruler and keep a conversion note nearby so you can translate full-size dimensions into model size.
What a Good Plan Shows
Include enough information that you could build from it later
- Overall size: Length, width, height, or footprint.
- Key views: Top, side, front, section, or elevation as needed.
- Important parts: Doors, windows, framing members, pipes, wheels, gears, or other major features.
- Scale note: The ratio or drawing scale written clearly on the page.
- Labels: Part names so your counselor can follow your thinking.
Requirement 3b
A materials list should do more than name what you hope to use. It should explain what each material is for and how much you need. That keeps you from buying too much, forgetting a critical piece, or choosing a material that does not match the job.
For each item, list the material, size or thickness, estimated quantity, and purpose. For example, foam board might form wall panels, clear plastic might become windows, and basswood strips might become framing members. If you are using a digital method, include filament type, print color, resin, acrylic sheet, or laser-cut stock.
Think about finish materials too. Paint, primer, glue, sandpaper, and labels are all part of the project. A model often stalls because the builder planned the big pieces but forgot the adhesives and finishing supplies.
A smart materials list answers four questions
- What is this item? Cardboard, styrene, PLA filament, basswood, acrylic, and so on.
- How much do I need? Sheets, sticks, feet, pieces, or grams.
- Why this material? Strength, appearance, flexibility, clean cuts, low cost, or easy printing.
- What is the backup plan? If that material is unavailable, what could replace it?
Requirement 3c
Your tool list should match your design honestly. If your project needs a drill, clamps, hobby knife, square, cutting mat, sanding block, and paintbrushes, list them. If it needs a computer, CAD software, 3D printer, calipers, or a laser cutter supervised by an adult, list those too.
This requirement is really about planning the build process. A tool list helps you notice early if your design depends on equipment you do not actually have. It is much better to revise the design now than to discover halfway through that one missing tool makes the project impossible.
Requirement 3d
Your counselor wants to hear your reason, not the “right” answer. Maybe you chose a house model because you like architecture. Maybe you chose a structural corner because you want to understand how buildings really stand up. Maybe a fantasy spacecraft gives you room to be inventive.
A strong explanation connects your choice to one or more of these ideas:
- Personal interest: You genuinely enjoy the subject.
- Learning goal: You want to understand a real system or design method.
- Challenge level: The project stretches you without overwhelming you.
- Resources available: You can actually build it with the tools and materials you have.
When you explain why you chose the subject, show that you made the decision on purpose. That proves this is your project, not just the first option you saw.
Requirement 3e
You do not have to use computer tools for every project, but you should think seriously about where they help. Digital tools are great for repeated parts, precise dimensions, and trying out changes without wasting material. Hand methods are great for quick sketching, direct problem solving, and working with simple materials on a bench.
The smartest answer is often a blended one. You might sketch early ideas by hand, create final dimensions on a computer, print a template, and then build the model physically. Or you might do the reverse: start with a rough cardboard mock-up to test proportions, then redraw the best version digitally.
Talk with your counselor about your actual plan. Which steps will be traditional? Which steps might benefit from CAD, 3D modeling, digital rendering, or machine-assisted fabrication? How will using those tools make your build clearer, more accurate, or easier to revise?
🎬 Video: How To Think Like An Architect: The Design Process — Barry Berkus — https://www.youtube.com/watch?v=vmHoGicPQQQ
By now, you should have a project idea that is scaled, supplied, and realistic. Next, compare the five build paths and decide which one you will make.