Req 4b — Showing How a Building Stands
This option is less about decoration and more about understanding the hidden skeleton of a building. A structural corner model lets you show how floor framing, wall framing, and roof framing connect to make a building strong. At 1:8 scale, the parts are large enough to label clearly and build with care.
The big question behind this project is simple: where does the load go? Roof weight travels into rafters, down through studs, and into the framing below. A good structural model helps your counselor see that path clearly.
Know the Main Parts
You do not need to memorize terms without understanding them. Instead, picture what each one does.
- Intermediate girder: A major horizontal support that carries floor loads.
- Joist: A repeating horizontal member that supports the floor.
- Bridging: Bracing between joists that helps keep them aligned and stable.
- Subfloor: The layer attached over the joists that creates the floor surface base.
- Sill: The member that rests on the foundation and connects framing to the base.
- Sole plate: The bottom horizontal piece of a wall frame where studs are attached.
- Stud: Vertical wall framing member.
- Rafter: Sloped roof framing member that carries roof loads downward.
If you can point to each part on your model and explain its job, you are doing the real learning this requirement is after.
Use a Clean Structural Layout
Before building, make a drawing that shows where each framing member belongs. Because this is a corner model, you are not building a whole house. You are building enough of one corner to explain how the pieces meet. That means clarity matters more than size.
A helpful layout usually shows floor framing below, wall framing above, and a roof section on top. Think about spacing. If members are too crowded, your model becomes hard to read. If they are too sparse, it stops looking believable.
🎬 Video: How To Build a Deck | Design & Layout (1 of 5) — Lowe's Home Improvement — https://www.youtube.com/watch?v=v79flY1pIKk
Structural Model Goals
Aim for these qualities in your build
- Accurate part relationships: Floor, wall, and roof members connect where they should.
- Readable spacing: The viewer can easily distinguish one component from another.
- Stable assembly: The model stands and holds shape without twisting.
- Clear explanation: You can name each part and explain its purpose.
Material Choices
Wood is a natural choice because it behaves like the real material the model represents, but cardboard and foam board can work well if cut carefully. Whatever you choose, straight cuts and square joints are important. Crooked members make the structure harder to understand.
A good trick is to prepare repeated pieces in batches. Cut all similar studs together, all joists together, and all rafters together. That keeps sizes consistent and saves time during assembly.
Common Challenges
One common challenge is keeping everything square. If the corner is out of square early, every part added later becomes harder to fit. Another is choosing enough detail without overcrowding the model. You want the model to teach, not confuse.
Support can also be tricky. Real buildings rely on many connected parts. Your model may need temporary braces during assembly or a sturdy base to keep the framing aligned while glue dries.
American Wood Council — Wood Frame Construction Resources A professional reference that helps explain wood framing members and how structural parts work together in real buildings. Link: American Wood Council — Wood Frame Construction Resources — https://www.awc.org/codes-standards/publications/wcd1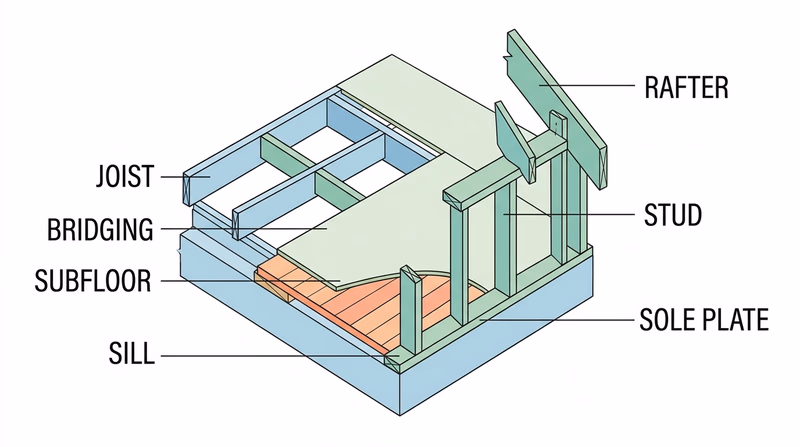
If you like the idea of showing a hidden system instead of a visible structure, the process model moves from framing to flow.