Req 4c — Mapping Water In and Waste Out
A process model helps people understand a system that is usually hidden behind walls. In a plumbing model, the goal is not to make a pretty miniature bathroom. The goal is to show where water enters, where it travels, how waste leaves, and how venting keeps the system working.
That makes this option great for Scouts who like diagrams, systems thinking, and explaining how several connected parts do one job together.
Separate the Three Main Paths
A good plumbing model clearly distinguishes three different things.
Cold-water supply brings fresh water into fixtures such as sinks, toilets, showers, and appliances. Hot-water supply starts at the water heater and serves the fixtures that need heated water. Waste returns carry used water away. Vents connect the drainage system to air so water can flow properly without creating suction problems.
If those lines all look the same, the model becomes hard to read. Use color, labels, spacing, or different material sizes so each kind of line is easy to follow.
What Your Plumbing Model Must Show
Make each system easy to trace with your eyes
- Cold-water supply: A clear route from source to fixtures.
- Hot-water supply: A separate path from heater to fixtures that need it.
- Waste returns: Drain lines carrying used water out.
- Venting: Pipes that support drainage by letting air into the system.
Plan Before You Build
Start with a simple house layout. Mark fixture locations first, then connect them with supply and drain paths. You do not need to copy every pipe in a real house. You do need to show the logic of the system clearly.
At 1:16 scale, readability matters more than tiny detail. If pipes overlap too much, viewers will lose the system. It is often better to space parts slightly for clarity while still keeping the model believable.
Good Materials for System Models
This option works well with straws, tubing, wire, dowels, or printed parts because those materials naturally suggest pipe runs. Foam board or cardboard can become floors and walls if you want some building context around the system. You can also mount the whole model on a board so the pipes remain visible and stable.
If you use computer tools, they can help you lay out clean pipe routes, test spacing, or print connectors and fixtures. Just remember that the finished result still needs to communicate the system clearly to another person.
Problems You May Run Into
The most common challenge is crowding. Real plumbing lines pass through framing and change direction often. In a model, that can turn into a tangle. Another challenge is keeping the vent system visible. Because vents are less obvious than supply or waste lines, they are easy to forget even though the requirement specifically asks for them.
Think about the order of assembly. If you glue the outer walls too early, you may block access to the system you are trying to show. Many process models work best when the system stays partly exposed.
EPA WaterSense Homes Helpful background on how plumbing systems are planned in real homes, especially around fixtures, water use, and system layout. Link: EPA WaterSense Homes — https://www.epa.gov/watersense/homes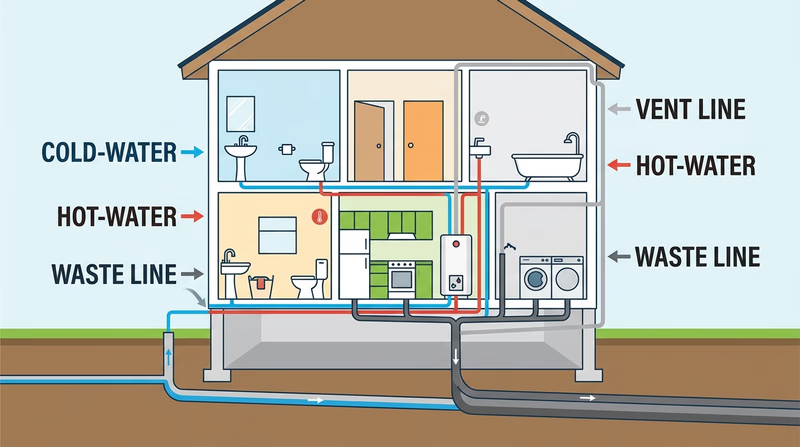
If you would rather build something that moves instead of something that flows, the mechanical model gives you a chance to turn force into action.