Req 4e — Designing a Scaled Passenger Vehicle
This option trains your eye. Vehicles are full of curves, proportions, and repeated shapes that look simple until you try to draw them accurately. The challenge is not just building a miniature car, van, or bus. It is learning to observe the real vehicle closely enough that your scaled version still feels like the same machine.
Measure the Real Vehicle Carefully
The requirement specifically tells you to begin by measuring a real passenger-carrying vehicle. That step matters because real measurements keep the project grounded in reality. Record overall length, width, height, wheelbase if possible, wheel size, and the positions of major features such as doors, windows, lights, and bumpers.
Then turn those measurements into scaled dimensions. Once you choose 1:12 or 1:24, stay consistent. A model where the body is at one scale and the wheels are at another will look wrong even if each part is neat on its own.
Use Multiple Views
Vehicle design depends on seeing the object from several directions at once. A side view shows overall length, roofline, and wheel spacing. A front view shows width and stance. A top view reveals the footprint and windshield angle. Rear views help with symmetry and tail details.
When those views agree with each other, your final model becomes much easier to build. When they do not, the body shape starts to drift.
Vehicle Drawing Set
These views make a strong starting point
- Side view: Overall profile, wheels, doors, and roofline.
- Front view: Width, headlights, grille, and windshield shape.
- Rear view: Symmetry, trunk or hatch, and light placement.
- Top view: Body footprint, hood, roof, and window arrangement.
Choose What Level of Detail You Can Finish
It is easy to get excited and plan every mirror, door handle, and trim line. But a strong model often comes from choosing the most important features and doing them well. Start with overall body proportions, wheel placement, and window shapes. Those three things usually determine whether a viewer recognizes the vehicle immediately.
Once the big shapes are right, add selected details that support the identity of the vehicle. Maybe it is the grille, the body crease, the wheel arches, or the shape of the rear lights. Prioritize the details that say, “This is definitely that vehicle.”
Physical Build or Digital Final
This option gives you flexibility. You can build a physical model by hand, produce a digital rendering, 3D print the body, or combine methods. A smart mixed approach might be to sketch and measure by hand, refine the shape digitally, print small test sections, and then complete the final version physically.
Your counselor will also want to hear which parts were hardest. That reflection is valuable because vehicle design involves compromise. Curved surfaces, wheel openings, windshield angles, and symmetry are all common trouble spots.
NASA Glenn — Beginners Guide to Aeronautics Even though it focuses on aircraft, it is a strong example of how real designers study shape, drag, and multiple-view geometry when creating vehicles. Link: NASA Glenn — Beginners Guide to Aeronautics — https://www1.grc.nasa.gov/beginners-guide-to-aeronautics/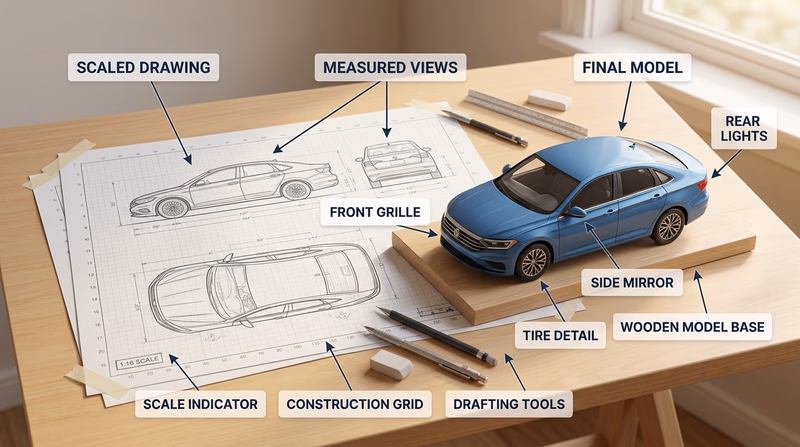
You have now reviewed all five build choices. The next requirement shifts from real-world models to something more imaginative: a fantasy spacecraft built with believable design logic.