Moviemaking Merit Badge — Complete Digital Resource Guide
https://merit-badge.university/merit-badges/moviemaking/guide/
Introduction & Overview
A movie can make you laugh, hold your breath, or suddenly understand someone else’s world. Moviemaking is the craft of telling that story on purpose. In this badge, you will learn how filmmakers plan shots, guide an audience’s attention, and turn an idea into something other people can watch.
Moviemaking is not only about fancy cameras or huge budgets. It is about choices: where to put the camera, when to cut, what to show, and what to leave out. Those same choices matter whether you are filming a troop event, a short training video, or a creative story of your own.
Moviemaking Merit Badge Pamphlet The official merit badge pamphlet gives background, vocabulary, and examples you can use alongside this guide. Link: Moviemaking Merit Badge Pamphlet — https://filestore.scouting.org/filestore/Merit_Badge_ReqandRes/Pamphlets/Moviemaking.pdfThen and Now
Then
The first motion pictures were little more than moving photographs. In the late 1800s and early 1900s, cameras were bulky, film reels were short, and many scenes were captured from one fixed spot as if the audience were sitting in a theater seat. Early filmmakers quickly discovered that where they placed the camera changed how viewers felt. A close-up could show fear. A wide shot could make a character seem alone. Editing two shots together could create a whole new meaning.
As moviemaking grew, directors, camera operators, editors, and sound crews each developed specialized jobs. Silent films gave way to sound, black-and-white to color, and fragile film stock to more reliable cameras. The language of cinema grew one tool at a time.
Now
Today, professional movies may still use giant crews and expensive gear, but the core skills have not changed. A phone, tablet, or simple digital camera can now capture footage that would have amazed early filmmakers. What still separates a random clip from a real movie is visual storytelling: composition, rhythm, light, sound, and clear planning before you hit record.
Modern moviemaking also reaches far beyond theaters. Scouts make short documentaries, teachers create how-to videos, sports teams review game footage, and families record milestone events. If you can tell a clear story with moving images, you can use that skill in school, work, hobbies, and service.
Get Ready!
This badge rewards planning. You will think like a writer, sketch like a director, and observe like a camera operator. You do not need to be a great artist to storyboard or own expensive gear to film something strong — but you do need to notice details and practice on purpose.
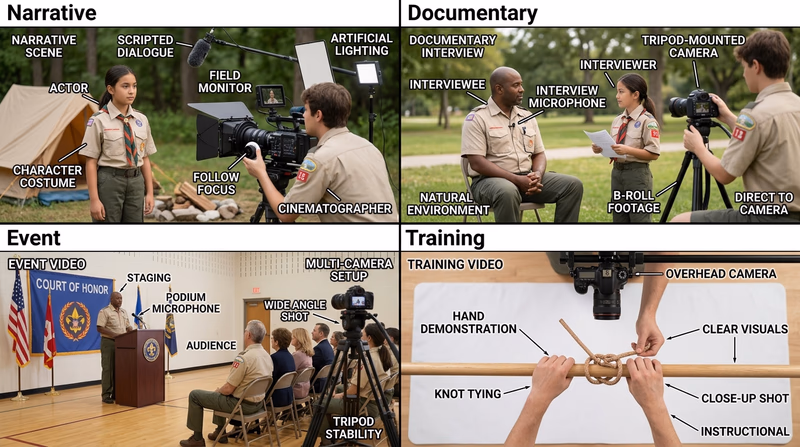
Kinds of Moviemaking
Narrative Films
Narrative moviemaking tells a story with characters, conflict, and change. That could mean a mystery, a comedy, or a short drama about a Scout trying to solve a problem. Narrative films depend on clear scene order and shot choices that help the audience follow emotions and action.
Documentary Films
Documentaries show real people, events, or ideas. A documentary might cover conservation work, a community project, or the story behind a troop tradition. Documentary filmmakers still shape a story, but they do it by choosing interviews, facts, and footage from real life.
Live Event Coverage
Some films are not scripted at all. Recording a court of honor, campfire, or ceremony means you must be ready before the important moment happens. This kind of moviemaking depends on preparation, smart camera placement, and an understanding of what must not be missed.
Instructional and Training Videos
A training video has one job: help the audience learn to do something correctly. That means clear steps, strong close-ups, and no confusing extra footage. In this badge, that style appears when you plan a video to teach a Scouting skill.
Experimental and Personal Films
Some moviemakers use film to explore mood, memory, or a creative idea. These projects may rely less on dialogue and more on image, sound, or editing. Even unusual projects still benefit from the same basics you will learn in Req 1 and Req 2.
Next Steps
You are about to learn the basic language every filmmaker uses. Once you understand how shots, movement, rhythm, and lens choice shape a scene, the rest of the badge makes much more sense.
Req 1 — Film Language Basics
A good movie does not happen by accident. Every shot answers a question for the audience: Where should I look? What should I feel? What matters most right now? When you talk with your counselor about this requirement, think less about memorizing definitions and more about showing how each choice changes the story.
Visual Storytelling
Visual storytelling means the audience learns by what it sees, not only by what someone says. A Scout nervously tightening a backpack strap before a long hike tells you something even before any dialogue starts. A close-up of a shaking hand, a muddy boot print, or a torn note can move the story forward without anyone explaining it.
When you plan your own movie in Req 2a, ask yourself: what can the camera show instead of what a character can say? Movies become stronger when actions, objects, and faces carry part of the meaning.
Rhythm
Rhythm is the pace created by shot length, movement, and editing. Fast cuts can make a scene feel urgent. Longer shots can feel calm, awkward, or thoughtful. Rhythm is not just about speed — it is about matching the pace to the moment.
Imagine two versions of the same scene. In one, the camera cuts every two seconds as Scouts race to set up camp before a storm. In the other, the camera stays still while one Scout quietly studies a script before a presentation. Both can be good rhythm if the pace fits the story.
The 180-Axis Rule
The 180-axis rule helps viewers keep track of where people and objects are in relation to each other. Picture an invisible line running between two actors. If you keep the camera on one side of that line, one actor stays screen-left and the other stays screen-right. If you suddenly jump to the other side without a clear reason, the audience may feel like the characters swapped places.
This rule matters most during conversations, sports action, or any scene where direction matters. You can break the rule on purpose, but you should understand it first.
How to protect screen direction
Use these habits while filming conversations or action- Choose the line early: Before filming, decide where the camera can safely move without crossing the action axis.
- Mark your positions: Use cones, sticks, or notes on the ground if needed.
- Add a neutral shot if you must cross: A centered shot looking straight at the action can help the audience reset.
- Review your footage: If screen direction feels confusing, the line may have been crossed.
Camera Movement
A moving camera changes energy immediately. A slow push in can make a moment feel more serious. A pan can reveal new information. A shaky handheld shot can feel urgent, but too much shake can distract the viewer.
Movement should have a reason. Ask what the motion adds. Does it reveal something? Follow an action? Make the audience feel closer? If the answer is “nothing,” a locked shot may be better.
Framing and Composition
Framing is what you include inside the picture. Composition is how you arrange it. Good framing guides the viewer’s eye. You can use headroom, leading lines, foreground objects, and the rule of thirds to make the subject clear.
A common beginner mistake is centering everything at all times. Sometimes centered framing works, but often a subject feels stronger when placed slightly off-center with room to look or move into. If someone is walking to the right, give them space on the right side of the frame. If you cut off the top of someone’s head by accident, the shot feels careless.

Lens Selection
Different lenses change how a scene feels. A wider lens shows more of the environment and can make movement feel bigger. A longer lens narrows the field of view, brings distant subjects closer, and can make the background feel compressed. On phones, this often shows up as switching between wide, normal, and telephoto options.
Choose the lens based on the story:
- Wide for locations, groups, or action in tight spaces
- Normal for natural-looking interviews and everyday scenes
- Longer / telephoto for isolating a subject or filming from farther away
The best lens is not the most dramatic one. It is the one that helps the audience understand the scene.
🎬 Video: Film Making Basics (video) — https://youtu.be/BFwMRVwrKcA?si=uW4whxq0-SZjyFHJ
A Simple Way to Demonstrate This Requirement
When you meet with your counselor, choose one short scene and talk through it in plain language:
- What is the story moment?
- How is the subject framed?
- Does the camera move? Why?
- What rhythm does the scene use?
- Where is the camera in relation to the 180-axis line?
- Why was that lens or field of view a smart choice?
If you can explain those choices while also showing them with your own camera, you are doing exactly what this requirement asks.
Req 2a — Write the Treatment
A treatment is the movie before the movie. It is not a full script with every line of dialogue. It is a short, readable description of what happens, who it happens to, and what the audience will actually see on screen. If your treatment is clear, storyboarding and filming become much easier.
What a Treatment Does
A treatment answers four big questions:
- Who is this about?
- What happens?
- Why does it matter?
- What will the audience see as the story unfolds?
For this badge, your counselor does not need a Hollywood-style pitch document. They need to see that your story has a beginning, middle, and end, and that you are thinking visually. That means describing actions, settings, and turning points instead of writing a summary that could belong to a book report.
What to include in your 3–4 paragraphs
Each paragraph should move the movie forward- Paragraph 1: Introduce the subject, setting, and situation.
- Paragraph 2: Show the main problem, goal, or challenge.
- Paragraph 3: Describe the important actions, choices, or turning point.
- Paragraph 4: End with the result, lesson, or final image if your story needs it.
Write Visually, Not Vaguely
Compare these two versions:
- Weak: “A Scout learns about teamwork at camp.”
- Stronger: “At a rainy campsite, a Scout struggles to raise a dining fly alone. After two failed tries, other patrol members step in, and the camera follows muddy boots, pulled ropes, and a final wide shot of the shelter standing in the storm.”
The second version gives you images to film. It suggests actions, details, and possible shots. That is what “conveys a visual picture” means.
Keep the Scope Small Enough to Film
A common beginner mistake is writing a story too big to produce. Car chases, giant crowds, or scenes in six locations sound exciting until you try to shoot them. Choose a story you can actually finish with the people, places, and equipment you have.
Think about:
- one or two main locations
- a small cast
- a simple conflict
- actions you can film safely
- a running time of only a few minutes
This is especially important before you build your storyboard in Req 2b and choose your filming option in Req 2d.
A Reliable Treatment Formula
If you feel stuck, use this pattern:
- Set-up — Who is the main subject, and what is happening at the start?
- Complication — What problem or goal drives the action?
- Development — What attempts, discoveries, or moments build tension?
- Payoff — How does it end, and what image should the audience remember?
That pattern works for a court of honor video, a short feature, or a Scout skill vignette.
Production Planning Worksheet Print this worksheet to shape your treatment, define your main story beats, and sketch early storyboard ideas. Resource: Production Planning Worksheet — /merit-badges/moviemaking/guide/production-planning-worksheet/🎬 Video: Film Production Explained, Each Step of the Production Process (video) — https://youtu.be/puF9CkvmJt0?si=jiFW5a-I3X0vZDV4
Questions to Ask Before You Finish
Before showing your treatment to your counselor, read it out loud and check:
- Can someone picture the movie without extra explanation?
- Does each paragraph show action, not just background?
- Is the story short enough to film well?
- Does the ending feel earned?
- Did you leave room for camera choices from Req 1?
If the answer to those questions is yes, your treatment is doing its job.
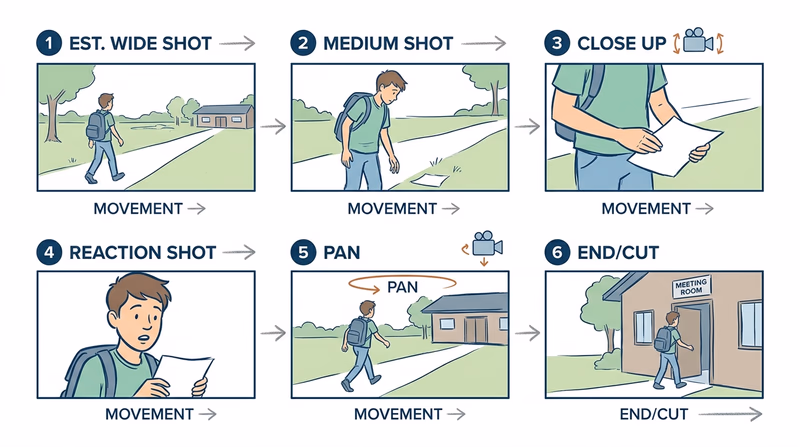
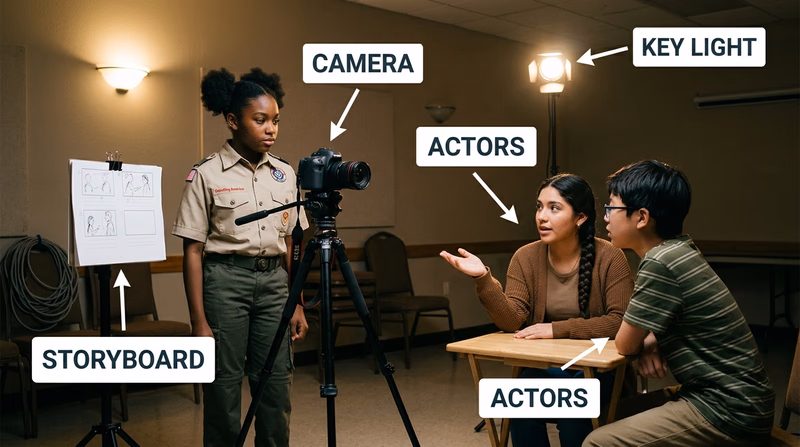
Req 2b — Build the Storyboard
A storyboard is your movie broken into pictures before you film it. It lets you test the order of shots, camera angles, and important actions while changes are still easy. Your drawings do not have to look impressive. They only need to communicate what the camera sees.
Why Storyboards Matter
A storyboard saves time because it answers problems before production starts. You may realize that a key close-up is missing, that a transition will feel abrupt, or that two shots are showing the same thing. It also helps anyone working with you understand the plan.
In other words, your treatment from Req 2a tells the story in paragraphs. The storyboard tells it in frames.
What to Put in Each Panel
A simple storyboard panel can include:
- a rough sketch of the shot
- the shot size, such as wide, medium, or close-up
- a note about camera movement
- a short description of the action
- optional dialogue or sound notes if they matter
Stick figures are fine because the important part is the decision, not the drawing style.
Storyboard essentials
These details make a panel useful on shoot day- Who or what is in the frame
- Where the camera is placed
- What the subject is doing
- How the shot connects to the one before and after it
- Any special note about movement, angle, or timing
Think Like an Editor While You Draw
A storyboard should flow. If you draw six panels in a row that all show the same medium shot, ask whether the audience will get bored. If you jump from a very wide shot to another wide shot with no reason, the sequence may feel flat.
Try mixing:
- an establishing shot to show location
- a medium shot for action
- a close-up for a reaction or important detail
- a cutaway to support rhythm or cover edits
That does not mean every sequence needs every type. It means your board should show intent.
Storyboard for Real-Life Events
If you are planning to film a court of honor or a training vignette, some shots may be predictable and some may not. Your storyboard can still help. Plan the shots you know you need: opening wide shot, close-up of awards, audience reaction, speaker at podium, Scout demonstrating a skill, and closing shot.
For events, think in terms of coverage rather than perfect control. Your storyboard becomes a checklist of must-have footage.
Production Planning Worksheet Print this worksheet to draft your treatment, list shot details, and rough out storyboard panels before filming. Resource: Production Planning Worksheet — /merit-badges/moviemaking/guide/production-planning-worksheet/🎬 Video: What Is a Storyboard and Why Is It Important? Pre-Production Filmmaking (video) — https://youtu.be/yPtqHdQcOOw?si=24Rdiz36nJTayneu
What Your Counselor Wants to See
Your counselor is looking for a plan you can actually film. They do not need polished artwork. They need evidence that you know where the camera will go, what the audience will see, and how the sequence supports the story.
If a Scout who has never heard your idea can look at your storyboard and roughly follow the action, you are on the right track.
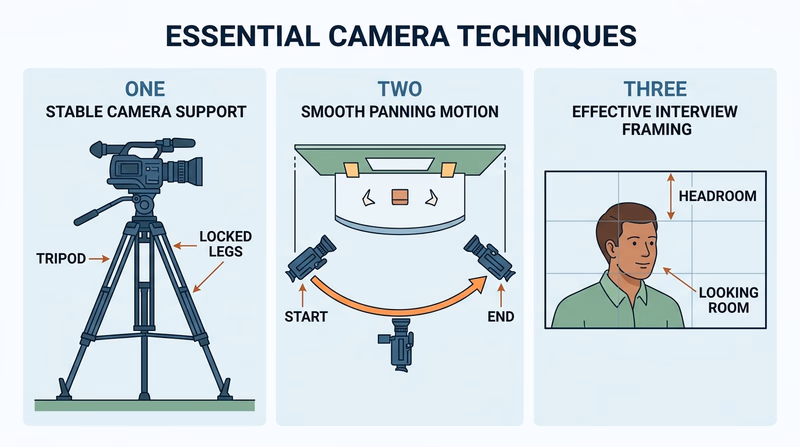
Req 2c — Master Camera Moves
This requirement is about control. Each technique below affects what the audience notices and how professional your footage feels. Practice them in short bursts before your real shoot so you can focus on storytelling instead of wrestling with the camera.
A smart practice routine
Run through all six skills with one simple scene- Pick one subject: A person walking, a backpack on a table, or a Scout demonstrating a skill.
- Record each technique separately: Do not try to combine everything at once.
- Watch the footage right away: Small problems are easier to see than to feel while filming.
- Repeat with one correction: Better is more useful than longer.
Requirement 2c1
A tripod gives you stability. Stable shots feel intentional, especially for interviews, ceremonies, and demonstrations. Start by leveling the tripod, tightening each leg, and checking that the camera is locked in place before you walk away.
What to show your counselor
- how you set the tripod on solid ground
- how you adjust height for the shot
- how you lock the camera securely
- how a locked-off shot looks smoother than a handheld version
🎬 Video: 7 Tripod Tricks for Filmaking (video) — https://youtu.be/pAvn034VcCg
🎬 Video: Camera Panning (video) — https://youtu.be/Km7Rfpda_Lw
Requirement 2c2
Purpose of a pan
A pan turns the camera left or right from one fixed point. It can follow movement, reveal information, or connect two parts of a space. A good pan feels smooth and motivated. A random pan feels like the camera operator got distracted.
How to perform it well
Start with your body balanced and your tripod or stance ready. Pick a clear beginning frame and ending frame before you move. Then pan slowly enough that the viewer can understand what is being revealed.
Common mistakes
Beginners often start moving before the shot begins or stop abruptly at the end. Hold still for a moment before and after the move so editing is easier.
Requirement 2c3
Purpose of framing
Framing tells the audience where to look. It decides how much of the scene appears, where the subject sits in the image, and what distractions are left out.
How to frame with intent
Check headroom, background clutter, and looking room. For a person speaking, leave a little space above the head and space in the direction they face. For an object demonstration, make sure the hands and key details stay visible.
Common mistakes
Busy backgrounds, cut-off body parts, and too much empty space can weaken the shot. If something in the frame does not help the story, move it, crop it out, or change your angle.
🎬 Video: Reverse Shot (video) — https://youtu.be/5UE3jz_O_EM
🎬 Video: Frame it Right Essential Framing (short video) — https://www.youtube.com/shorts/DAwz2Wnrr90?feature=share
🎬 Video: Filmmaking 101: 5 Camera Angles (video) — https://youtu.be/nfHvSnILXl0?si=9ObCi1MwUvu3CHyW
🎬 Video: 12 CAMERA ANGLES to Enhance Your Films (video) — https://youtu.be/SlNviMsi0K0
🎬 Video: Ultimate Guide to Cinematic Lighting (video) — https://youtu.be/r2nD_knsNrc
🎬 Video: Zack Snyder Justice League Martian Man Hunter Meets Lois (video) — https://youtu.be/zdZ2zza5WbY?si=m3eF-8tZrS-NaOC5
🎬 Video: 5 Tips for Shooting Handheld Videos (video) — https://youtu.be/LuJdvwm8-0k
🎬 Video: Birdman: Anatomy of a Scene (video) — https://youtu.be/PVmaJAmQ3yQ
Requirement 2c4
Purpose of angle choice
Camera angle changes meaning. Shooting at eye level feels natural. Shooting from low can make a subject feel larger or more confident. Shooting from high can make a subject seem smaller, younger, or under pressure.
How to choose the angle
Ask what the audience should feel in that moment. For a ceremony, a respectful eye-level angle may be best. For a training close-up, an overhead angle may show hand positions clearly. For a dramatic reveal, a lower angle may add energy.
Common mistakes
Do not pick unusual angles just because they look fancy. If the angle hides important action or confuses the viewer, it is not helping.
Requirement 2c5
Purpose of lighting
Lighting helps the audience see faces, objects, and mood. Good lighting can make even simple footage look polished. Bad lighting can make a strong scene unusable.
How to improve the light
Use soft, even light when possible. Face subjects toward a window or open shade outdoors. If the light is behind the subject, their face may become too dark unless you adjust position or exposure.
Common mistakes
Avoid harsh backlight, mixed light colors, and strong overhead shadows across the eyes. If you cannot improve the light, move the subject instead of hoping editing will fix it later.
Requirement 2c6
Purpose of handheld shooting
Handheld footage can feel immediate and alive. It works well when you must move fast, follow action, or fit into a tight space where a tripod is not practical.
How to keep it usable
Hold the camera with both hands, keep your elbows close, and move from your legs instead of your wrists. Take smaller steps than usual. If available, use image stabilization, but do not depend on it to solve everything.
Common mistakes
Too much shake makes viewers work harder than they should. Handheld is a style choice, not an excuse for unstable footage.
The American Society of Cinematographers Cinematography resources and interviews that can help you understand why professionals choose specific camera techniques. Link: The American Society of Cinematographers — https://theasc.comPulling It All Together
These six skills support the projects you will choose in Req 2d. A stable tripod shot may work best for a court of honor. Careful framing and lighting may matter most in a short feature. Handheld movement might help a Scout-skill training scene feel more active.
Your goal is not to show off every technique in every shot. Your goal is to prove that you can choose and control the right one.
Req 2d — Choose Your Production
You must choose exactly one option from this requirement. Each path asks you to plan with a treatment, use real camera techniques, and present the finished program to an audience. The difference is the kind of story you will tell.
Your Options
- Req 2d1 — Cover a Court of Honor: Record a real Scouting event and build an audience-ready piece from moments you cannot easily repeat. This option teaches planning, anticipation, and event coverage.
- Req 2d2 — Create a Short Feature: Invent your own short story and film it on purpose. This option teaches creative control, shot planning, and storytelling choices.
- Req 2d3 — Teach a Scout Skill: Produce a training vignette that helps a new Scout learn something clearly. This option teaches instructional structure, clarity, and useful close-up coverage.
How to Choose
Choosing the right production
Pick the one that matches your time, resources, and interests- Control over the scene: Req 2d2 gives you the most control because you design the story. Req 2d1 gives you the least because real events happen when they happen.
- Planning pressure: Req 2d1 rewards preparation and coverage. Req 2d3 rewards organization and clear teaching. Req 2d2 rewards story design.
- People needed: Req 2d1 may need only event access. Req 2d2 may need actors. Req 2d3 usually needs one person demonstrating a skill.
- What you will gain: Req 2d1 builds documentary-style awareness, Req 2d2 strengthens creative storytelling, and Req 2d3 develops communication and instructional filming.
When you have chosen your path, move to the first option page and compare its demands with your own project idea.
Req 2d1 — Cover a Court of Honor
A court of honor is one of the best event-filming challenges in Scouting because the important moments are real and usually cannot be repeated. You must be ready before the action starts. That means knowing where people will stand, when awards are presented, and what moments matter most to the audience.
What the audience will care about
Think like a viewer, not only like a camera operator. People watching later will want to see:
- the setting and audience
- who is being recognized
- key award moments
- applause and reactions
- enough context to understand what happened
That is why event coverage needs a mix of wide shots, medium shots, close-ups, and cutaways.
Must-have coverage for a court of honor
Protect these shots first- Opening wide shot of the room or ceremony space
- Speaker coverage from a stable angle
- Award presentation shots showing the recognition clearly
- Audience reactions such as applause, smiles, and family responses
- Closing shot that gives the event a finished feeling
Plan before the event begins
Arrive early. Walk the space. Notice where the flags, podium, and award area will be. Decide whether one camera position can cover everything or whether you need to move carefully at specific moments.
Your treatment for this project should explain the story of the event: who is being honored, what the ceremony includes, and what emotional beats you want the audience to feel. Your storyboard can focus on predictable moments like opening remarks, the first award presentation, reaction shots, and the closing.
Sound matters as much as the picture
A beautiful shot is not helpful if the audience cannot hear the speaker. Try to film from a spot with a clear line to the podium and less room noise. If you cannot get close, test the sound beforehand and keep handling noise to a minimum.
Edit for memory and meaning
Your job is not to show every second exactly as it happened. Your job is to build a clear record of the event. That may mean trimming pauses, using applause as a bridge, or adding cutaways so the final video feels smooth.
Event videos often work best when they begin with a strong establishing shot and end with a final image that feels complete, such as the honored Scout with family or a closing flag shot.
🎬 Video: 4 Videography Tips for Beginners (video) — https://youtu.be/oPfet0ypjmY?si=flKBth5nUkcFZelI
A good finished result
A strong court-of-honor video feels respectful, easy to follow, and complete. The audience should know where they are, what was celebrated, and why the moment mattered.
If you want more creative control than event coverage allows, compare this option with Req 2d2. If you would rather teach clearly than capture an event, Req 2d3 may fit better.
Req 2d2 — Create a Short Feature
This option gives you the most creative freedom. You decide what kind of story to tell, what tone it should have, and how the audience should feel at the end. That freedom is exciting, but it also means you must make more decisions before filming starts.
Keep the idea filmable
A short feature works best when the concept is simple and specific. One clear problem is usually enough. Maybe a Scout races to recover a forgotten item before departure. Maybe a patrol misunderstands a plan and has to fix it before a campfire. Maybe a small mystery unfolds through visual clues.
The strongest short features for this badge usually have:
- one main goal
- one or two locations
- a small number of performers
- a running time that stays focused
If your idea needs costumes, stunts, large crowds, or hard-to-control locations, simplify it.
Design shots around the story beat
This is where Req 1 really pays off. Your lens choice, framing, movement, and rhythm should support the emotional beat of each moment. A wide establishing shot helps the audience understand where they are. A close-up can capture reaction. A slower rhythm may fit a thoughtful scene, while faster cutting may fit a problem-solving sequence.
Short feature planning questions
Answer these before you shoot- What changes from beginning to end?
- What is the most important visual moment?
- Which shots are absolutely required to tell the story clearly?
- How will the ending feel different from the opening?
Directing people on camera
Even if your cast is made up of friends or family, people perform better when they know what the scene needs. Give simple direction. Instead of saying, “Be more cinematic,” say, “Look toward the door, pause, then pick up the note.” Specific actions are easier to film well.
You also do not need lots of dialogue. Short features often become stronger when they rely on action, expression, and objects.
Edit for shape, not just order
During editing, ask whether every shot earns its place. If a scene takes too long to communicate one idea, tighten it. If the audience needs a reaction shot or cutaway to understand the moment, add it. Rhythm is part of the storytelling, not a finishing touch.
🎬 Video: 10 Tips for Beginner Videographers (video) — https://youtu.be/kZWH6OBDdR0?si=e1VBvG2lGwQHKqEY
When this is the right choice
Choose this option if you enjoy making up stories and want the most control over your final product. It is a great fit for Scouts who liked writing the treatment and storyboard because it lets them see that planning turn into a finished piece.
If you prefer a real event, see Req 2d1. If you want your movie to teach a skill clearly, Req 2d3 may be a better fit.
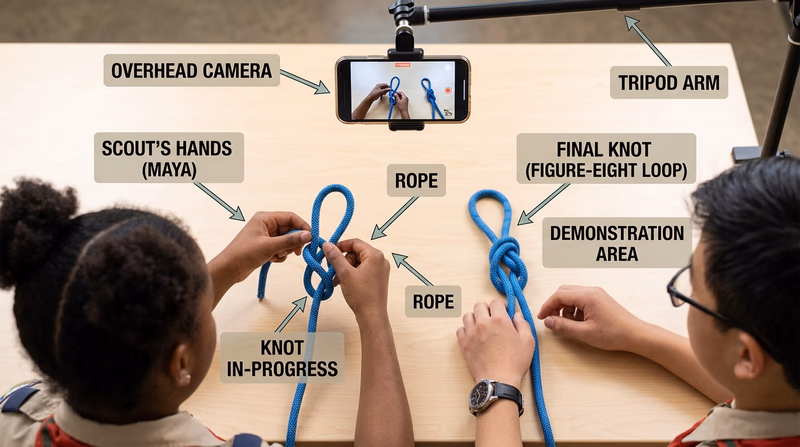
Req 2d3 — Teach a Scout Skill
A training vignette has one main purpose: help someone understand a skill clearly enough to try it correctly. That makes this option different from a short feature. Style still matters, but clarity matters more.
Choose one skill and one learning goal
Pick a skill that can be shown in a short, focused video. Good examples include tying a knot, setting up a piece of camp gear, folding a flag, packing a day hike bag, or explaining a simple outdoor safety step. Avoid trying to teach too much at once.
Ask yourself: by the end of this video, what should a new Scout know or be able to do?
Organize the video like instruction
A useful training vignette often follows this pattern:
- Introduce the skill and why it matters.
- Show the materials or setup.
- Demonstrate the steps in order.
- Highlight common mistakes or safety points.
- Finish with a quick review or final result.
That structure can become your treatment and storyboard. It also makes editing easier because each section has a job.
What instructional videos need
These choices help a beginner follow along- Clear close-ups of hands, tools, or gear
- Simple background with few distractions
- Logical step order
- Lighting that makes details easy to see
- A final shot showing the correct completed result
Film like a teacher
When teaching on camera, do not hide the important action. If a hand blocks the view, change angle. If a step happens too quickly, shoot another take more slowly. Overhead or side angles often work well for demonstrations because they let viewers see exactly what is happening.
This is one place where your practice from Req 2c becomes especially useful. Stable tripod shots, careful framing, and good lighting make instruction easier to follow.
Keep safety and accuracy first
If the skill has a safety element, state it clearly and demonstrate it correctly. Never sacrifice accuracy just to make the shot look dramatic.
🎬 Video: How to Make a Great Instructional Video (video) — https://youtu.be/cLLuuV_57JY?si=vcdpLOuyRcHeC1jf
Why this option is strong
For many Scouts, this is the most practical option in Req 2d because the goal is so clear. You are not trying to invent a whole world or cover an unpredictable ceremony. You are teaching one useful thing well.
That same mindset will help as you move into the next requirement, where you choose either to observe a working production or study a zoom lens more closely.
Req 3 — Pick a Production View
You must choose exactly one option from this requirement. One path lets you observe moviemaking in the real world. The other helps you understand a major camera tool that changes how shots look and feel.
Your Options
- Req 3a — Visit a Working Set: Watch a real production environment, notice the crew roles, and learn how many decisions happen before a scene is captured. This option builds observation skills and shows how teamwork shapes film and television.
- Req 3b — Understand the Zoom Lens: Study the parts and function of a zoom lens so you can explain how focal length changes the image. This option builds camera knowledge and helps you make smarter shot choices.
How to Choose
Comparing the two paths
Pick the option that best matches your access and interests- Access needed: Req 3a depends on permission, scheduling, and an actual production visit. Req 3b can often be completed with a camera, lens, or solid demonstration from your counselor.
- What you will gain: Req 3a teaches how productions really operate as teams. Req 3b teaches how optics affect framing, perspective, and storytelling.
- Best fit for you: Choose Req 3a if you love seeing the full process. Choose Req 3b if you want a deeper camera-skills foundation.
Whichever path you choose, you are moving from making your own project to understanding the wider world of moviemaking.
Req 3a — Visit a Working Set
A working set can look calm one second and extremely busy the next. That is because many people are doing specialized jobs at the same time. Watching a production in person helps you understand that moviemaking is not one talent — it is teamwork organized around time, safety, and communication.
What to watch for on a visit
When you visit, pay attention to how the crew prepares before cameras roll. You may see lights being adjusted, sound checked, marks placed on the floor, or equipment moved quietly into position. Those steps are part of production, even though the audience never sees them.
Try to notice roles such as:
- director
- camera operator or cinematographer
- sound crew
- lighting crew
- production assistants
- on-camera talent
Questions to keep in mind during the visit
These observations will help you talk with your counselor afterward- Who gives the main directions?
- How do crew members communicate without creating chaos?
- What equipment is used most often?
- How much time goes into setup compared with the actual filming?
- What surprised you about the workflow?
Notice how controlled the environment is
Even on a simple set, very little is random. Lights are placed for a reason. Camera positions are chosen for a reason. People wait for cues so sound is clean and movement is safe. Watching that process can make your own projects better because you begin to see how much preparation supports even short scenes.
Be a respectful guest
A set visit is not the time to wander, touch gear, or interrupt a take with questions. Observe first. Ask questions at the right time if invited. If the production has rules about phones, photography, or restricted areas, follow them immediately.
🎬 Video: Film Set Order of Operations (video) — https://youtu.be/zqUAiM-FLrs?si=xK2hkF_sD9zCzGcM
What this option teaches
This option gives you a wide-angle view of moviemaking as a profession. Instead of learning one technique at a time, you see the full machine in action. That can help you understand where your own interests fit — camera, directing, editing, sound, design, or something else.
If a set visit is not available, the zoom-lens option in Req 3b still gives you a strong technical skill to discuss with your counselor.
Req 3b — Understand the Zoom Lens
A zoom lens lets a filmmaker change focal length without swapping lenses. That means one lens can move from a wider view to a tighter view, which is useful when you need flexibility during events, documentaries, or fast-moving shoots. Understanding a zoom lens also helps you explain why a shot looks the way it does.
What a zoom lens does
When you zoom wider, the lens shows more of the scene. When you zoom longer, the lens narrows the field of view and brings distant subjects closer in the frame. That change affects composition, background appearance, and how the audience experiences the shot.
A zoom lens does not replace moving the camera. Zooming changes the optics. Physically moving the camera changes perspective. Good filmmakers know the difference.
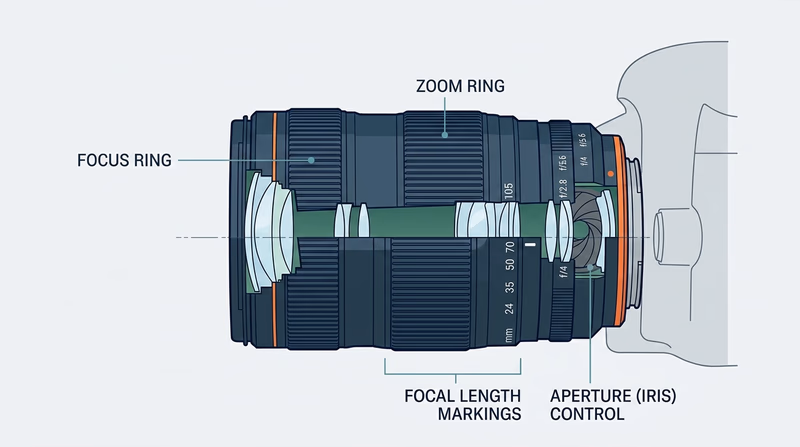
Three important parts to understand
1. Zoom ring
The zoom ring changes focal length. Turning it makes the frame go wider or tighter. On some cameras this may be controlled electronically, but the idea is the same. A smooth zoom ring helps the operator make precise framing choices.
2. Focus ring
The focus ring controls what looks sharp. If focus is wrong, even a well-composed shot can become unusable. As focal length changes, focus may need attention too, especially on more advanced lenses.
3. Aperture or iris control
The aperture affects how much light enters the lens. It also affects depth of field, which is how much of the image appears in focus from front to back. A wider aperture can blur the background more, while a narrower one can keep more of the scene sharp.
Other zoom-lens ideas worth mentioning
These can strengthen your counselor discussion- Focal length numbers such as 24mm–70mm or 70mm–200mm
- Field of view and how wide or tight the image appears
- Image stabilization on some lenses or cameras
- Lens speed and how well a lens performs in low light
When zoom lenses are especially useful
Zoom lenses shine when the subject changes distance quickly or when you cannot easily move your camera position. That is one reason they are popular for event coverage like the court-of-honor option in Req 2d1. They are also practical on documentaries and school productions.
Prime lenses, by contrast, stay at one focal length and often offer different creative advantages. You do not need to master that whole comparison for this requirement, but it helps to know why zoom lenses are valued: flexibility.
A strong explanation for your counselor
If you are discussing this requirement out loud, try this structure:
- Explain what changing focal length does to the frame.
- Name three important parts and what each one controls.
- Give an example of when a zoom lens is helpful in real filming.
- Compare zooming with physically moving the camera.
🎬 Video: How Lens Work in Camera (video) — https://youtu.be/fRKsKR9wvqE
🎬 Video: The Parts of a Camera Lens - Anatomy of a DSLR Lens (video) — https://youtu.be/15h9iG-Rdwk?si=TUp4-HL00H50ZX79
Why this matters beyond one requirement
Lens choice is part of visual storytelling. Once you understand how a zoom lens changes your image, you stop treating the camera as a simple recording device and start using it as a storytelling tool.
That shift matters as you look beyond the badge into careers or hobbies in the final requirement.
Req 4 — Choose Your Next Step
You must choose exactly one option from this requirement. Both options ask you to look beyond the badge and think about where moviemaking skills could take you next.
Your Options
- Req 4a — Research a Film Career: Investigate a real job in film or television and learn what training, duties, cost, and advancement look like. This option helps you explore moviemaking as a profession.
- Req 4b — Build a Film Hobby: Research how moviemaking could become a long-term hobby or healthy creative outlet. This option helps you think about realistic goals, expenses, and communities that support the activity.
How to Choose
Career path or hobby path?
Both are useful — they just answer different questions- Choose Req 4a if you want to know what adults actually do in the industry and what preparation those jobs require.
- Choose Req 4b if you want a practical way to keep making videos now, even if you are not sure about a future career.
- What you will gain: Req 4a gives professional context and research skills. Req 4b gives a realistic action plan for continued personal growth.
Whether you choose the career path or the hobby path, this requirement is about turning curiosity into a plan.
Req 4a — Research a Film Career
Moviemaking careers cover far more than directing. A finished production depends on people who plan, shoot, edit, design, schedule, record sound, and solve technical problems. This requirement asks you to pick one of those jobs and research it like a real opportunity, not just a dream title.
Good careers to research
You might choose:
- cinematographer or camera operator
- editor
- sound mixer or boom operator
- producer or production manager
- screenwriter
- animator or motion graphics artist
- director
Pick a role that genuinely interests you. If you liked Req 3a, you may already have noticed a job you want to understand better.
What strong research includes
Your counselor wants more than a short description. Try to gather information in these categories:
- Training or education: film school, college, apprenticeships, certificates, or on-the-job learning
- Costs: tuition, gear, software, travel, or unpaid entry-level work
- Job duties: what the person actually does day to day
- Job prospects: where work is available and how competitive it is
- Salary: a realistic pay range, knowing that freelance film work can vary a lot
- Advancement: what experience or connections help someone move up
Questions to answer in your research
Use these as your discussion outline- What does this person do during pre-production, production, or post-production?
- What training is most common?
- What expenses or barriers make this field harder to enter?
- What is appealing about the work?
- What sounds difficult or demanding about it?
Use more than one source
One website rarely tells the whole story. A smart research mix might include an official labor resource, a film-industry organization, and a conversation with someone who has done the work. Comparing sources helps you notice where the job is stable, where it is competitive, and what skills matter most.
U.S. Bureau of Labor Statistics Occupational Outlook Handbook A strong starting point for job outlook, pay, duties, and education information across many careers. Link: U.S. Bureau of Labor Statistics Occupational Outlook Handbook — https://www.bls.gov/ooh/ Careers in Film: Which Film Careers Pay the Most? A career-focused resource that can help you compare different jobs and think about how film work varies by role. Link: Careers in Film: Which Film Careers Pay the Most? — https://www.careersinfilm.com🎬 Video: Top 10 Careers in Film & Video Production (video) — https://youtu.be/CNMBMhNh2S0
What to discuss with your counselor
Do not stop at facts. Explain what makes the profession interesting to you. Maybe you like the problem-solving of editing, the visual style of cinematography, or the teamwork of production management. It is just as useful to say what concerns you, such as long hours, freelance uncertainty, or training cost.
That kind of honest reflection shows you really explored the profession.
Req 4b — Build a Film Hobby
Moviemaking does not have to become a job to matter. It can be a hobby that gets you outdoors, helps you serve your troop, records family stories, or gives you a creative way to solve problems. This option is about building a realistic plan for continuing after the badge.
Ways moviemaking can become a healthy hobby
Moviemaking can support a healthy lifestyle because it combines creativity, observation, planning, and collaboration. You might use it to:
- document campouts and service projects
- make short travel or nature videos
- create troop training clips
- experiment with editing and storytelling at home
- work with friends on short films or documentaries
It can also encourage you to spend time learning outdoors, interviewing community members, or participating in group projects instead of only consuming media.
Think realistically about training and expenses
You do not need a huge budget to continue. A realistic hobby plan might begin with a phone camera, simple editing software, and one basic support tool such as a tripod or microphone. Training might come from school clubs, free online lessons, library programs, or local youth media workshops.
Build a hobby plan you can sustain
Use these categories when talking with your counselor- Skills to build next: editing, sound, lighting, interviewing, or story structure
- Basic gear: what you already own and what you might add later
- Practice opportunities: troop events, family milestones, nature walks, school projects
- Communities and organizations: clubs, youth programs, film institutes, or contests
- Goals: one short-term project and one long-term dream
Set short-term and long-term goals
Short-term goals should be specific and easy to start. Long-term goals can be bigger. For example:
- Short-term: Make a two-minute troop recap video this month.
- Short-term: Learn how to record cleaner sound on interviews.
- Long-term: Build a small portfolio of short films.
- Long-term: Join a youth media program or submit work to a student film festival.
The best goals push you forward without depending on expensive gear or perfect conditions.
The Academy — Education Education programs and film-learning opportunities that can help young filmmakers keep building their skills. Link: The Academy — Education — https://www.oscars.org/education BFI homepage Film-learning resources and youth opportunities that can inspire realistic next steps for a continuing hobby. Link: BFI homepage — https://www.bfi.org.uk🎬 Video: Filmmaking as a Hobby - Getting Started (video) — https://youtu.be/d30kfqueNKI
Why this path matters
A hobby does not need to be small to be meaningful. Many filmmakers started by recording school projects, community events, or personal stories. What mattered was that they kept practicing, noticing, revising, and sharing their work.
That is a strong way to finish the badge — not as the end of moviemaking, but as the start of your own style and interests.
Extended Learning
Congratulations
You have done more than watch movies differently — you have started thinking like a filmmaker. You have worked with story structure, shot planning, camera technique, and audience awareness. Those skills carry into school presentations, troop communication, family storytelling, and creative projects far beyond this badge.
Editing Is Where the Story Changes Shape
Many beginners think the movie is finished when filming ends. In reality, editing is where the story often becomes clear. The order of shots, the length of pauses, and the choice to stay on a face for one second longer can change what the audience feels.
If you want to grow after this badge, practice editing the same footage two different ways. Make one version feel calm and reflective. Make another feel urgent. You will quickly see how rhythm shapes meaning.
Sound Design Is the Secret Strength
Viewers forgive pictures more easily than they forgive bad sound. Clean speech, thoughtful background sound, and careful music choices can make a small project feel much stronger. Listen closely to movies you already enjoy. Notice footsteps, room tone, wind, doors, crowd noise, and silence. Those details are part of the storytelling.
A useful next step is recording the same short interview in two places — one quiet and one noisy — and comparing the result. That simple test teaches a lot about production quality.
Documentary Ethics Matter
When you film real people, you are making choices about fairness as well as style. What you include, what you leave out, and how you edit someone’s words can change the audience’s understanding. Good documentary work aims for honesty, context, and respect.
This matters in Scouting too. A troop event video should represent people well and avoid turning a real moment into something misleading.
Small Projects Build Big Skills
You do not need a feature-length movie to improve. Short, repeatable challenges often teach more.
Try projects like:
- film a one-minute silent story
- record a three-shot sequence that clearly shows a task
- make a short interview with strong sound and lighting
- edit a recap of a service project using only natural sound and titles
Each small project strengthens a different part of the craft.
Real-World Experiences
Visit a local film festival or student showcase
Watching short films made by students or independent creators can teach you what is possible with limited budgets and strong ideas.
Volunteer to document a troop or community event
Real events teach timing, coverage, and how to work respectfully around people who are not performing for the camera.
Join a school media club or broadcast team
These groups often give you repeated chances to practice planning, shooting, editing, and teamwork.
Create a family-history interview project
Interviewing relatives about a memory or experience can teach documentary skills while preserving something meaningful.