Req 2c — Master Camera Moves
This requirement is about control. Each technique below affects what the audience notices and how professional your footage feels. Practice them in short bursts before your real shoot so you can focus on storytelling instead of wrestling with the camera.
A smart practice routine
Run through all six skills with one simple scene
- Pick one subject: A person walking, a backpack on a table, or a Scout demonstrating a skill.
- Record each technique separately: Do not try to combine everything at once.
- Watch the footage right away: Small problems are easier to see than to feel while filming.
- Repeat with one correction: Better is more useful than longer.
Requirement 2c1
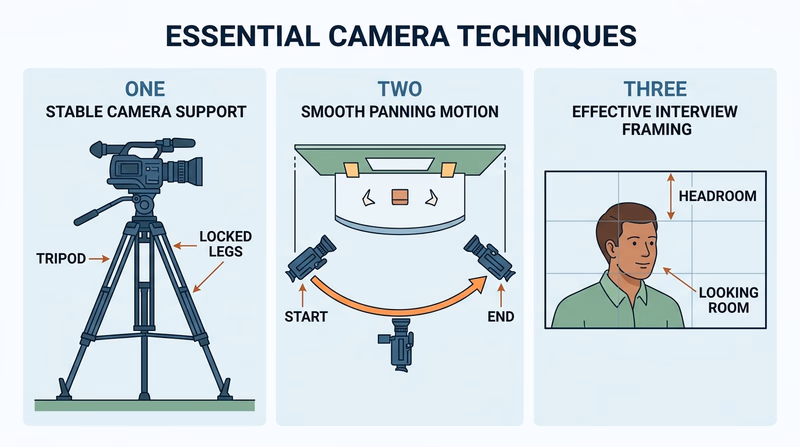
A tripod gives you stability. Stable shots feel intentional, especially for interviews, ceremonies, and demonstrations. Start by leveling the tripod, tightening each leg, and checking that the camera is locked in place before you walk away.
What to show your counselor
- how you set the tripod on solid ground
- how you adjust height for the shot
- how you lock the camera securely
- how a locked-off shot looks smoother than a handheld version
🎬 Video: 7 Tripod Tricks for Filmaking (video) — https://youtu.be/pAvn034VcCg
🎬 Video: Camera Panning (video) — https://youtu.be/Km7Rfpda_Lw
Requirement 2c2
Purpose of a pan
A pan turns the camera left or right from one fixed point. It can follow movement, reveal information, or connect two parts of a space. A good pan feels smooth and motivated. A random pan feels like the camera operator got distracted.
How to perform it well
Start with your body balanced and your tripod or stance ready. Pick a clear beginning frame and ending frame before you move. Then pan slowly enough that the viewer can understand what is being revealed.
Common mistakes
Beginners often start moving before the shot begins or stop abruptly at the end. Hold still for a moment before and after the move so editing is easier.
Requirement 2c3
Purpose of framing
Framing tells the audience where to look. It decides how much of the scene appears, where the subject sits in the image, and what distractions are left out.
How to frame with intent
Check headroom, background clutter, and looking room. For a person speaking, leave a little space above the head and space in the direction they face. For an object demonstration, make sure the hands and key details stay visible.
Common mistakes
Busy backgrounds, cut-off body parts, and too much empty space can weaken the shot. If something in the frame does not help the story, move it, crop it out, or change your angle.
🎬 Video: Reverse Shot (video) — https://youtu.be/5UE3jz_O_EM
🎬 Video: Frame it Right Essential Framing (short video) — https://www.youtube.com/shorts/DAwz2Wnrr90?feature=share
🎬 Video: Filmmaking 101: 5 Camera Angles (video) — https://youtu.be/nfHvSnILXl0?si=9ObCi1MwUvu3CHyW
🎬 Video: 12 CAMERA ANGLES to Enhance Your Films (video) — https://youtu.be/SlNviMsi0K0
🎬 Video: Ultimate Guide to Cinematic Lighting (video) — https://youtu.be/r2nD_knsNrc
🎬 Video: Zack Snyder Justice League Martian Man Hunter Meets Lois (video) — https://youtu.be/zdZ2zza5WbY?si=m3eF-8tZrS-NaOC5
🎬 Video: 5 Tips for Shooting Handheld Videos (video) — https://youtu.be/LuJdvwm8-0k
🎬 Video: Birdman: Anatomy of a Scene (video) — https://youtu.be/PVmaJAmQ3yQ
Requirement 2c4
Purpose of angle choice
Camera angle changes meaning. Shooting at eye level feels natural. Shooting from low can make a subject feel larger or more confident. Shooting from high can make a subject seem smaller, younger, or under pressure.
How to choose the angle
Ask what the audience should feel in that moment. For a ceremony, a respectful eye-level angle may be best. For a training close-up, an overhead angle may show hand positions clearly. For a dramatic reveal, a lower angle may add energy.
Common mistakes
Do not pick unusual angles just because they look fancy. If the angle hides important action or confuses the viewer, it is not helping.
Requirement 2c5
Purpose of lighting
Lighting helps the audience see faces, objects, and mood. Good lighting can make even simple footage look polished. Bad lighting can make a strong scene unusable.
How to improve the light
Use soft, even light when possible. Face subjects toward a window or open shade outdoors. If the light is behind the subject, their face may become too dark unless you adjust position or exposure.
Common mistakes
Avoid harsh backlight, mixed light colors, and strong overhead shadows across the eyes. If you cannot improve the light, move the subject instead of hoping editing will fix it later.
Requirement 2c6
Purpose of handheld shooting
Handheld footage can feel immediate and alive. It works well when you must move fast, follow action, or fit into a tight space where a tripod is not practical.
How to keep it usable
Hold the camera with both hands, keep your elbows close, and move from your legs instead of your wrists. Take smaller steps than usual. If available, use image stabilization, but do not depend on it to solve everything.
Common mistakes
Too much shake makes viewers work harder than they should. Handheld is a style choice, not an excuse for unstable footage.
The American Society of Cinematographers Cinematography resources and interviews that can help you understand why professionals choose specific camera techniques. Link: The American Society of Cinematographers — https://theasc.comPulling It All Together
These six skills support the projects you will choose in Req 2d. A stable tripod shot may work best for a court of honor. Careful framing and lighting may matter most in a short feature. Handheld movement might help a Scout-skill training scene feel more active.
Your goal is not to show off every technique in every shot. Your goal is to prove that you can choose and control the right one.