Nature Merit Badge — Complete Digital Resource Guide
https://merit-badge.university/merit-badges/nature/guide/
Introduction & Overview
Nature is the study of living things, the places they live, and the connections that hold an ecosystem together. This merit badge trains you to slow down, notice details, ask better questions, and understand why a patch of woods, a pond edge, or even an empty field is full of clues.
You will look at nature the way a field scientist does: by observing, comparing, recording, and explaining. The more carefully you look, the more you start to see how plants, animals, soil, water, weather, and human choices all affect one another.
Then and Now
Then
Long before nature study became a school subject, people learned from the land because they depended on it. Hunters watched animal tracks, farmers read the soil, herbal healers identified useful plants, and Indigenous communities built deep knowledge of seasons, migration, and habitat over generations.
Later, naturalists began keeping notebooks, pressing plants, drawing birds, and organizing collections so they could compare species. Early nature study often focused on naming what was seen. That was useful, but it was only the start.
Now
Today, nature study still begins with careful observation, but it goes farther. Scientists use trail cameras, sound recorders, GPS maps, and community science apps to track changes in species, habitat, and climate. A Scout with a notebook, a phone camera, and good field habits can contribute real observations too.
Modern nature study is also more careful about ethics. Instead of collecting everything we find, we try to leave habitats healthy, reduce disturbance, and record what we see in ways that protect wild places.
Get Ready!
Bring your curiosity, not just your gear. A Scout who notices patterns, writes down good notes, and treats habitats with respect will learn far more than someone who rushes from one checklist item to the next.
Kinds of Nature Study
Plants and Habitats
Plants shape nearly every natural community. They provide food, oxygen, shelter, shade, and nesting material. Learning to notice plant forms, seeds, leaves, and growth patterns helps you understand why certain animals are found in certain places.
Animal Study
Nature study includes birds, mammals, reptiles, amphibians, fish, insects, spiders, mollusks, and crustaceans. Some are easiest to identify by sight. Others are better found by tracks, calls, eggs, shells, or feeding signs.
Ecology and Relationships
Ecology is the study of how living things interact with one another and with their environment. Food chains, succession, and habitat change all belong here. These big-picture ideas help explain why an ecosystem looks the way it does.
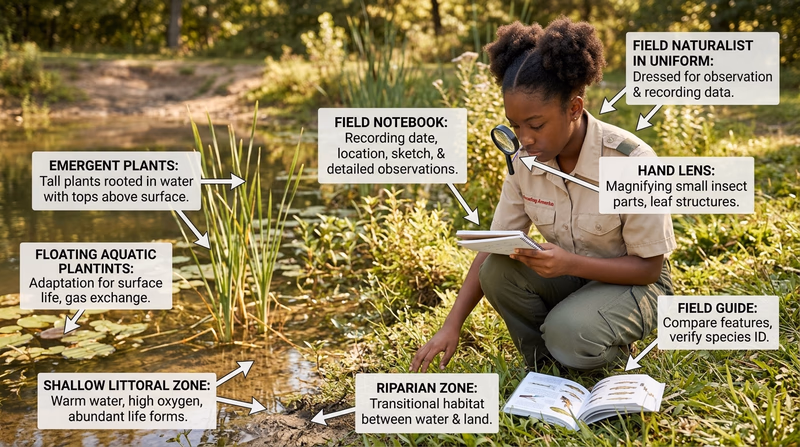
Field Observation
A big part of this badge happens outdoors. You will observe, identify, compare, and record. That means moving slowly, using all your senses, and keeping accurate notes.
Conservation and Stewardship
This badge is not only about what nature is. It is also about how people treat it. Outdoor ethics, habitat protection, and careful observation all help you become a better steward of the natural world.
Next Steps
You are ready to begin with one of the most important ideas in nature study: plants and animals depend on each other in ways that are easy to miss until you start looking closely.
Req 1 — Plants Support Animal Life
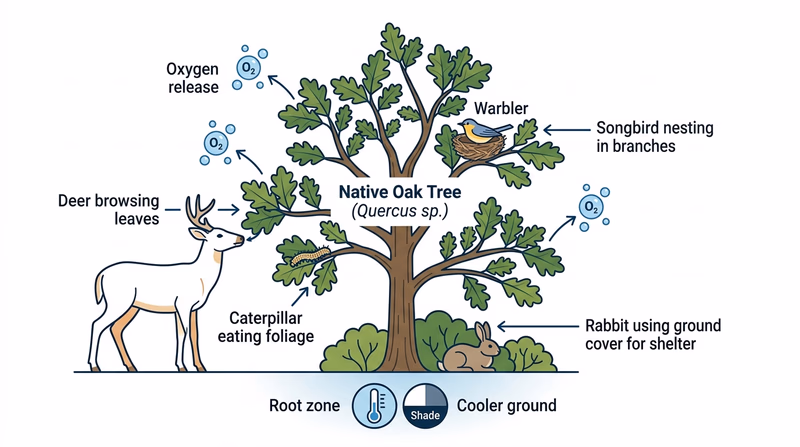
Take plants out of an ecosystem and animals begin to disappear fast. A squirrel, deer, butterfly, duck, or fox may seem very different, but all of them depend on plants either directly or indirectly.
Three Big Ways Plants Help Animals
Food is the most obvious answer. Deer browse leaves and twigs. Caterpillars chew plant tissue. Hummingbirds drink nectar. Even predators depend on plants because the animals they eat depended on plants first.
Shelter is just as important. Trees hold nests. Grass hides young rabbits. Shrubs protect songbirds from predators and weather. Wetland plants give fish fry and frogs places to hide.
Oxygen and habitat quality matter too. Through photosynthesis, plants release oxygen and help regulate temperature, moisture, and soil stability. That creates living conditions animals can survive in.
When you explain plants to your counselor
Use examples from a place you know- Food: Name one animal that eats seeds, leaves, fruit, nectar, or another plant part.
- Shelter: Point out where an animal nests, hides, or rests in or near plants.
- Habitat support: Explain how plants cool an area, protect soil, or help water stay clean.
Looking for a Protected Plant
The second half of this requirement asks you to name a plant that is protected in your state or region and explain why it is at risk. This is where local research matters. A plant can be common in one state and rare in another.
Here are good questions to guide your research:
- Is the plant threatened, endangered, rare, or specially protected where you live?
- What habitat does it need?
- What is harming that habitat?
- Are people collecting it, mowing it, developing the land, or introducing invasive species?
- Is climate change changing temperature, water, or fire patterns where it grows?
What “At Risk” Usually Means
Plants are often at risk because their habitat is shrinking or changing. A wildflower that needs open prairie may disappear when land is paved or overgrown. A wetland plant may decline if water levels change. Some rare orchids and carnivorous plants are threatened because people dig them up.
If you choose a plant for this requirement, be ready to explain the chain of cause and effect. For example: “This plant needs seasonal wetlands. Draining those wetlands removes the habitat, so the plant cannot reproduce well.” That kind of answer shows understanding, not just memorization.
Why Animals Need Plants (video) A short overview showing how plants provide food, oxygen, and habitat for animals. Link: Why Animals Need Plants (video) — https://www.pbs.org/video/why-animals-need-plants-y469zr 11 Plants That Use Animals to Do Their Dirty Work (website) Examples of plant-animal partnerships that can help you think beyond simple food relationships. Link: 11 Plants That Use Animals to Do Their Dirty Work (website) — https://completegardening.com/11-plants-that-use-animals-to-do-their-dirty-work/A Strong Way to Discuss This Requirement
Try organizing your answer like this:
- Name the plant-to-animal connection.
- Give a specific example from nature.
- Explain why the connection matters.
- Then describe your protected plant and what threatens it.
You do not need the “perfect” rare plant. You need a real local example and a clear explanation.
Plants help animals survive. Next, turn the relationship around and look at the surprising ways animals help plants.
Req 2 — Animals Support Plant Life
Plants may stay rooted in one place, but they are not on their own. Many depend on animals to move pollen, spread seeds, protect soil, or even recycle nutrients back into the ground.
Three Big Ways Animals Help Plants
Pollination is one of the best-known examples. Bees, butterflies, moths, beetles, bats, and birds move pollen from flower to flower. Without that help, many plants could not make seeds or fruit.
Seed dispersal is another major relationship. Some seeds stick to fur. Others survive a trip through an animal’s digestive system and get dropped far from the parent plant. Squirrels bury nuts and forget some of them, which helps new trees grow.
Nutrient cycling and soil improvement also matter. Earthworms, insects, and scavengers break down dead material. Burrowing animals move soil. Fish and birds can even transport nutrients from one place to another. Healthy plant growth depends on those recycled nutrients.
Good examples to share
Choose examples that fit your region- Pollination: bees visiting wildflowers, hummingbirds feeding at trumpet-shaped flowers, or bats pollinating desert plants.
- Seed dispersal: birds eating berries, squirrels caching acorns, or mammals carrying burrs in their fur.
- Nutrient help: worms mixing soil, dung beetles recycling waste, or burrowing animals loosening compacted ground.
Protected Animals Need Local Research Too
Just like protected plants in Req 1, the animal you choose here should be local to your state or region. Focus on one real species and be ready to explain both why it matters and why it is in trouble.
Many protected animals are at risk because of habitat loss, pollution, road mortality, invasive species, overcollection, or climate change. A freshwater mussel, turtle, pollinator, or grassland bird can all be strong examples if they are protected where you live.
Think in Two Directions
Req 1 and Req 2 work best together. In Req 1, you explain how plants help animals. In Req 2, you explain how animals help plants. When both directions are working, the ecosystem is healthier and more resilient.
That idea leads straight into food chains in Req 3. If pollinators disappear, seed production changes. If seed-eating animals disappear, predators lose food. Nature is full of links like that.
How Do Animals Help Plants? (4 Symbiotic Interactions) (website) Examples of pollination, seed dispersal, and other plant-animal partnerships you can use in your explanation. Link: How Do Animals Help Plants? (4 Symbiotic Interactions) (website) — https://nature-mentor.com/how-do-animals-help-plants/ Why Animals Need Plants (video) A quick review of the back-and-forth relationship between plants and animals in ecosystems. Link: Why Animals Need Plants (video) — https://www.pbs.org/video/why-animals-need-plants-y469zr 11 Plants That Use Animals to Do Their Dirty Work (website) Shows how some plants rely on animals in surprising ways, especially for reproduction and seed movement. Link: 11 Plants That Use Animals to Do Their Dirty Work (website) — https://completegardening.com/11-plants-that-use-animals-to-do-their-dirty-work/Animals do more than eat plants. They help build the next generation of plants too. Now put those relationships into sequence by learning how energy moves through a food chain.
Req 3 — Food Chains in Action
A food chain shows how energy moves through living things. It usually starts with a producer, such as a plant or algae, which makes its own food using sunlight. Then it moves to animals that eat plants, animals that eat those animals, and finally to top predators or decomposers that recycle what is left.
What Makes a Food Chain Work
A simple chain answers one question: who gets energy from whom? It is not only about “who eats who.” It is really about the movement of sunlight energy through an ecosystem.
A four-step chain often looks like this:
- Producer — a plant, grass, tree leaf, pond algae, or aquatic plant
- Primary consumer — an animal that eats the producer
- Secondary consumer — an animal that eats the plant-eater
- Tertiary consumer — a larger predator that eats the secondary consumer
Building a strong example
Use real organisms from one habitat- Start with a plant or algae species that really lives there.
- Make sure each step could realistically eat the one before it.
- Keep all four steps in the same habitat.
- Be ready to explain what happens if one step disappears.
Land Food Chain Example
A land chain might begin with grass, which is eaten by a grasshopper. The grasshopper may be eaten by a frog or songbird, which could then be eaten by a hawk. Your own example does not have to match this one exactly, but it should make ecological sense.
Water Food Chain Example
A water chain could begin with algae or tiny aquatic plants. Those may be eaten by insect larvae or zooplankton. Small fish eat them, and then a larger fish, heron, or otter may be the top consumer in your four-step example.
Food Chains vs. Food Webs
In real life, most ecosystems are not neat single chains. They are food webs, with many overlapping feeding relationships. A raccoon might eat crayfish, berries, frogs, eggs, or corn. A hawk may eat several different prey species. For this requirement, though, a clear four-step chain helps you show that you understand the basic pattern.
That idea connects directly to Req 1 and Req 2. Plants support animals. Animals support plants. Food chains help you see those connections in order.
🎬 Video: Food Chains and Food Webs (video) — https://youtu.be/JCl_yDf0Qok?si=E9r3jI_7n8iYE1Rb
🎬 Video: Food Chains in the Everglades (video) — https://youtu.be/5Z8rKhXUYAg?si=CG1gOoYQ6n9s86LY
Now you are ready for the biggest part of the badge: choosing five field-study areas and getting outside to observe nature directly.
Req 4 — Choose Your Five Field Studies
This requirement covers eight different field-study paths, but you complete exactly five of them. Your goal is not to rush through the easiest choices. Pick five that fit your location, season, and access to habitats so you can make careful observations.
Your Options
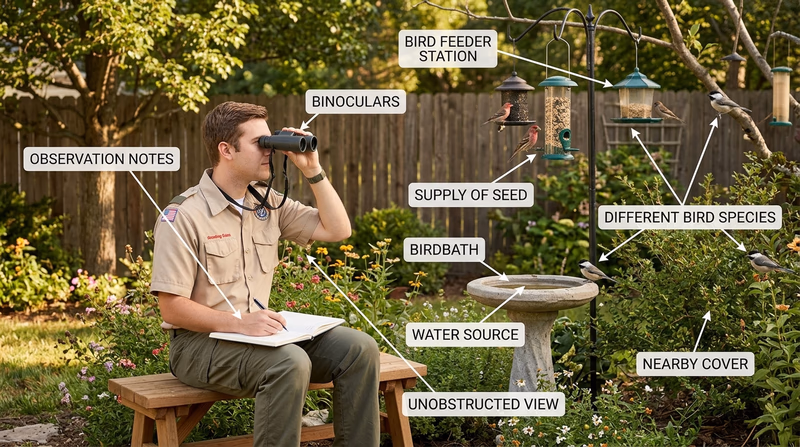
- Req 4a — Birds in the Field: Identify birds outdoors and create a bird-friendly feature such as a birdhouse, feeder, or birdbath while tracking what visits it.
- Req 4b — Mammal Signs and Tracks: Learn to spot wild mammals in the field and preserve evidence of their tracks with plaster casts.
- Req 4c — Reptiles and Amphibians: Study snakes, frogs, salamanders, turtles, and other herps by sight, sound, and field signs.
- Req 4d — Insects and Spiders Up Close: Observe small creatures closely through identification, photography, rearing, or colony care.
- Req 4e — Fish and Food Sources: Connect fish identification to habitat and diet by finding native species and the foods they eat.
- Req 4f — Shells, Mollusks, and Crustaceans: Build your ability to identify aquatic invertebrates and organize a labeled shell collection.
- Req 4g1 — Wild Plant Identification and Req 4g2 — Seeds, Leaves, and Plant Records: Identify wild plants, then choose whether to collect and label specimens or build a photo catalog.
- Req 4h — Soils and Rocks: Compare soil types and identify rocks from your local area.
How to Choose
Choosing your five fields
Match your choices to your real opportunities- Season: Birds, frogs, insects, and wildflowers are often easiest in spring and summer. Tracks, soils, and rocks can be easier year-round.
- Location: Ponds, creeks, coasts, fields, forests, and backyards all support different options. Pick fields your local habitats can actually support.
- Gear: Birding may need binoculars. Plant work may need a field guide or phone camera. Track casting needs plaster. Choose options you can prepare for well.
- Time: Bird and feeder observations can take weeks. Rock or soil collecting may be done in a shorter outing. Balance long and short projects.
- What you will gain: Bird, mammal, reptile, and insect options sharpen field observation. Plant and soil options train careful comparison. Fish and shell studies strengthen habitat thinking.
Start With Good Field Habits
No matter which five you choose, bring a notebook, label what you observe right away, and record the date, place, weather, and habitat. Those notes make later discussion with your counselor much easier.
🎬 Video: Food Chains and Food Webs (video) — https://youtu.be/JCl_yDf0Qok?si=E9r3jI_7n8iYE1Rb
🎬 Video: Food Chains in the Everglades (video) — https://youtu.be/5Z8rKhXUYAg?si=CG1gOoYQ6n9s86LY
Those videos are a good reminder that every field option in Req 4 connects back to the ecosystem relationships you already studied. Start with birds and build your observation skills from there.
Req 4a — Birds in the Field
This field starts with looking up and listening carefully. Then it asks you to make a small improvement to habitat and watch what happens over time.
Requirement 4a1
How to identify birds in the field
Start with shape and size before color. A robin-sized bird hopping on the ground tells you more than a tiny flash of yellow disappearing into leaves. Notice the bill shape, tail length, wing pattern, posture, and behavior.
Where to look
Different birds use different layers of habitat. Waterfowl stay near ponds and marshes. Woodpeckers cling to trunks. Sparrows feed low in brush or grass. Hawks circle overhead or perch on poles.
What to record
Write down the date, location, habitat, what the bird was doing, and the clues you used. Even a quick note like “small gray bird, white eye ring, flicking tail in shrubs” helps later.
🎬 Video: How to Identify Birds [TOP 10 BACKYARD BIRDS] (video) — https://www.youtube.com/watch?v=HtBcOk8ICpA
Requirement 4a2
Choosing what to build or place
A birdhouse helps cavity nesters like bluebirds or wrens if the size and location fit the species. A feeding station attracts seed-eating birds and lets you compare preferences. A birdbath can attract species that may ignore feeders but still need clean water.
Keeping a good one-month record
Make a chart with dates, times, weather, and species seen. You do not need birds every day, but regular observation matters. Try checking at the same time of day several times each week.
What makes the setup work
Place it where birds feel safe, with cover nearby but not so close that predators can hide easily. Keep baths and feeders clean. If you use a feeder, use the right food and refill it consistently.
🎬 Video: DIY Birdhouse (video) — https://www.youtube.com/watch?v=u4iAhnbWpz8
🎬 Video: How to Pick (or Build) the Right Bird Bath for Your Garden (video) — https://www.youtube.com/watch?v=yZl2N2XlHDA
🎬 Video: Build a Bird House for Under $5 in Under 5 Minutes (video) — https://www.youtube.com/watch?v=j0werPvrrPI
Bird station success checklist
Simple habits that improve your results- Keep water fresh and clean.
- Record visits regularly for a full month.
- Place stations where you can observe without disturbing birds.
- Note which species use which setup most often.
Birds train your eyes to spot movement and pattern fast. Next, shift from feathers to fur and learn how mammals leave clues even when you never see them directly.
Req 4b — Mammal Signs and Tracks
Mammals are often harder to spot than birds, so this section teaches a different skill: reading evidence. Fur, droppings, tracks, feeding marks, and travel paths all tell a story.
Requirement 4b1
Signs and clues of wild mammals
You may identify mammals by direct sight, but you can also use tracks, scat, chewed nuts, gnawed bark, trails through grass, burrows, or dens. A squirrel, raccoon, deer, rabbit, or fox often leaves better evidence than a long, clear view.
Best places to look
Check muddy edges, sandy paths, stream banks, snow, and soft soil. Dawn and dusk are especially active times for many mammals.
Matching clues to species
Ask yourself: how big was the animal, how did it move, and what habitat was it using? Hoofprints suggest deer. Paired bounding tracks may suggest rabbit or squirrel. Small hand-like prints near water may point to raccoon.
🎬 Video: How to Find Mammal Signs (video) — https://www.youtube.com/watch?v=x8DfP0Nh7kA
Requirement 4b2
Finding a good track to cast
Pick a clear print in damp mud or soft soil. Avoid tracks that are crumbly, full of standing water, or distorted by many overlapping prints.
Preparing the cast
Build a small collar around the track with cardboard or a strip of plastic if needed. Mix plaster so it pours like pancake batter. Pour gently from one side so you do not wash out the details.
Finishing the cast
Let it set fully before lifting it. Later, clean it gently and label it with the date, place, and likely species. Your label matters because it turns the cast into usable field evidence.
🎬 Video: How to Make Plaster Casts of an Animal Track (video) — https://www.youtube.com/watch?v=Y4WTmgo4zeA
🎬 Video: How to Make Your Own Animal Track Cast (video) — https://www.youtube.com/watch?v=A_ksi4Ih_wU
Mammal study teaches patience and clue-reading. Next, move to reptiles and amphibians, where sound, habitat, and safety become even more important.
Req 4c — Reptiles and Amphibians
Reptiles and amphibians are easy to overlook because many stay hidden, blend into their surroundings, or appear only in the right weather. This option teaches you to identify them safely by sight, sound, and field signs.
Requirement 4c1
Start with your own state or region. Do not try to memorize every venomous snake in North America. Learn the species that actually live near you, where they are found, and what markings, head shape, body pattern, and habitat clues can help you recognize them.
A strong answer includes more than “this one is dangerous.” Be ready to explain how you would avoid disturbing it, back away slowly, and leave it alone.
How to Tell if a Snake Is Venomous (website) A starter overview of features people use when learning to recognize venomous snakes, along with caution about not relying on myths. Link: How to Tell if a Snake Is Venomous (website) — https://urbanjunglewildliferemoval.com/blog/how-to-tell-venomous-snake/🎬 Video: Zoologist Explains Snake Venom - Poisonous vs Venomous (video) — https://youtu.be/KxXfWrI6bB4?si=6TMzt9gUfQdxCvWc
Requirement 4c2
Where to look for reptiles and amphibians
Turtles may bask on logs. Frogs gather near shallow water. Salamanders often stay under logs or rocks in damp places. Lizards may sun themselves on warm surfaces. Habitat is often your first clue.
What details help with identification
Look at body shape, skin texture, color pattern, tail shape, toes, and where the animal was found. Reptiles usually have dry scales. Amphibians usually have moist skin and stay closer to water or damp cover.
Reptiles of the United States (website) A searchable community-science reference that helps you compare reptiles by range and appearance. Link: Reptiles of the United States (website) — https://www.inaturalist.org/places/united-states#taxon=26036 Amphibians of the United States (website) A field-friendly way to compare amphibians reported in different regions and habitats. Link: Amphibians of the United States (website) — https://www.inaturalist.org/places/united-states#taxon=20978Requirement 4c3
Recognizing frogs and toads by voice
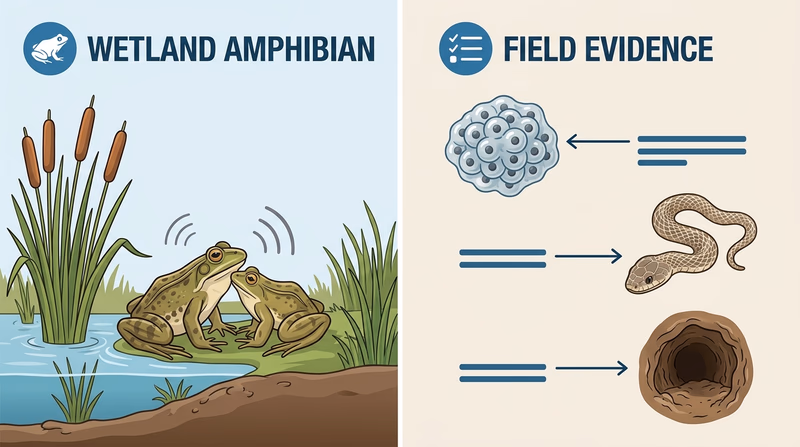
Spring evenings can sound like a giant orchestra of frogs. Focus on one common species first. Learn whether its call is a peep, trill, croak, or clucking sound, and connect that sound to wetland type and season.
Identifying reptiles or amphibians by signs
If you choose the sign option, look for egg masses in shallow water, turtle nests in sandy soil, snake sheds, basking spots, or burrows associated with known species. A good field note explains why you think the sign belongs to that animal.
🎬 Video: Reptiles vs. Amphibians (video) — https://www.youtube.com/watch?v=6MsTbQi19SA
🎬 Video: Frog Sounds: Why They Make Them (Examples) (video) — https://youtu.be/74-vaZv54s8?si=7ClcX_Akwhjh0A_T
This option sharpens your field senses. Next, move even smaller and study the busy world of insects and spiders.
Req 4d — Insects and Spiders Up Close
This option asks you to notice tiny details. It is one of the best parts of the Nature badge because it shows how much life is active all around you, even in a small yard or patch of weeds.
Requirement 4d1
Finding species to identify
Look in more than one habitat. Flowers attract pollinators. Porch lights attract moths. Logs and leaf litter shelter beetles, millipedes, and spiders. A pond edge may show dragonflies, damselflies, and water striders.
Photographing or collecting evidence
Photos are often the easiest and most ethical choice. Try to capture the top view, side view, and a size reference if possible. If you use outside photos, make sure you can explain why you chose them and how you identified the species.
Identifying what you found
Pay attention to wing shape, number of legs, antennae, body segments, and behavior. Remember that spiders are arachnids, not insects, so they have eight legs instead of six.
🎬 Video: How to Start a Bug Collection (video) — https://youtu.be/_Ep2ronR_io?si=VWUcH8SZodx_njzz
Requirement 4d2
Choosing a life-cycle project
A caterpillar-to-butterfly project is often the easiest for beginners because the stages are visible and dramatic. Ant colonies and bee projects can be fascinating too, but they require more setup and responsibility.
What to observe
Record dates, changes in size, feeding behavior, molting, pupation, hatching, or colony activity. The point is not just to keep the organism alive. It is to notice the life cycle closely and explain what changed.
Good care matters
Research the species before you begin. Some insects need fresh host plants. Some need airflow and dry conditions. Some species should never be collected from the wild in ways that harm local populations.
🎬 Video: Hatch and Raise Monarch Butterflies (video) — https://www.youtube.com/watch?v=XC_O2MN4iOk
🎬 Video: How to Raise an Ant Colony 101 | The Ultimate Guide to Keeping Pet Ants (video) — https://www.youtube.com/watch?v=o1421IyFKuU
🎬 Video: How to Raise a Caterpillar Into a Butterfly (video) — https://www.youtube.com/watch?v=G-nriWdyR5w
Good bug-study notes
Keep your records useful- Date and location
- Habitat or host plant
- Size, color, and behavior
- Life stage observed
- How you confirmed the identification
The tiny world of insects and spiders teaches close attention. Next, head to the water and study fish and the foods they depend on.
Req 4e — Fish and Food Sources
Fish are harder to study than many land animals because much of their world is hidden under the surface. This option asks you to connect identification with feeding ecology.
Requirement 4e1
Look for native species in the lakes, ponds, streams, rivers, or coastal waters near you. Pay attention to body shape, fin placement, mouth shape, color pattern, and habitat. A fish that stays near the bottom may look very different from one built for open-water swimming.
Try to learn not only the names, but also where each species fits in the ecosystem. Is it a predator, bottom feeder, plankton eater, or insect eater?
Game Fish Identification Reference Guides (website) A species reference that helps you compare fish shape, markings, and range while learning local identification. Link: Game Fish Identification Reference Guides (website) — https://igfa.org/game-fish-database/Requirement 4e2
Common animal foods for fish
Fish eat many kinds of animals depending on species and size. Good examples include aquatic insect larvae, worms, crayfish, snails, minnows, and zooplankton. You are looking for animal food items, not plant matter.
Collecting responsibly
You might find examples by turning over rocks in shallow water, using a dip net where allowed, or observing shoreline life. Follow local rules and return living things carefully when possible.
Connecting diet to fish behavior
A bass that hunts minnows uses a different feeding strategy than a sunfish picking insects from vegetation. When you collect food examples, think about which fish would eat them and where that feeding would happen.
🎬 Video: What Do Fish Eat? (video) — https://www.youtube.com/watch?v=LVTGIn4gnTw
Studying fish teaches you to think below the surface. Next, look at mollusks, crustaceans, and shells from aquatic habitats.
Req 4f — Shells, Mollusks, and Crustaceans
This option brings you into the world of invertebrates with shells, jointed legs, antennae, and soft bodies. You will identify species and organize physical evidence carefully.
Requirement 4f1
Mollusks include animals such as snails, clams, mussels, slugs, and squid. Crustaceans include crayfish, crabs, shrimp, pill bugs, and lobsters. One quick difference is that crustaceans have segmented bodies and jointed legs, while many mollusks have soft bodies protected by shells.
Look at habitat too. A freshwater mussel tells a different story than a beach snail or a crayfish under a stream rock. Where you found it can help confirm what it is.
🎬 Video: All About Mollusks (video) — https://www.youtube.com/watch?v=G_GJH1t7VVM
🎬 Video: Crustaceans Facts (video) — https://youtu.be/nfTQUX-GMjc?si=uWRRlR9ez4Tc5ymm
Requirement 4f2
Collecting shells ethically
Collect only empty shells where it is legal to do so. Some beaches, parks, and protected waters do not allow collecting. Never remove a shell that is still occupied.
Mounting and labeling well
A shell collection becomes useful when each shell is labeled with where it was found, when it was found, and what species it likely belongs to. Mounting can be as simple as organized display trays or cards, as long as the labels stay with the shells.
What makes a strong label
Include habitat if possible: ocean beach, freshwater stream, muddy estuary, rocky shore, or pond edge. That helps show that you understand the environment, not only the object.
🎬 Video: Organizing My Massive Seashell Collection. Identifying Similar Shells & Comparing Shells to Critters (video) — https://youtu.be/MMkynhuI_1w?si=ZC4ur2DlM9Sl2IFw
From shell shapes and shoreline clues, move back onto land and begin the plant-study section of Req 4.
Req 4g1 — Wild Plant Identification
This requirement rewards slow looking. Plants do not run away, but they can still be tricky because many change with the season, look different when young, or resemble close relatives.
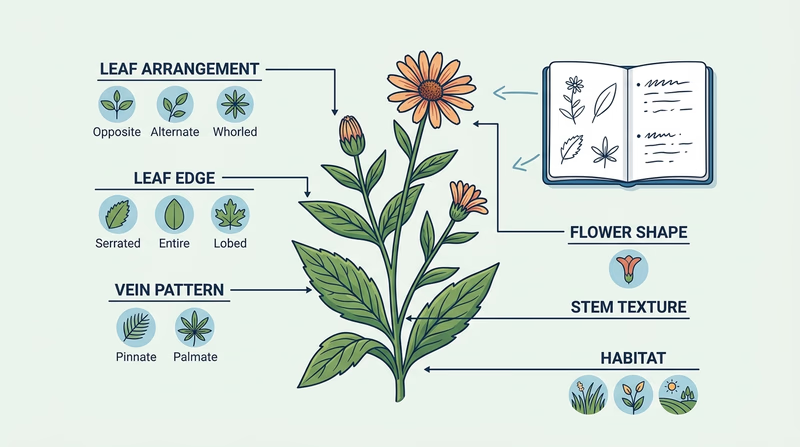
Start with the whole plant
Before zooming in on tiny details, ask broad questions. Is it a tree, shrub, vine, grass, fern, or flowering plant? Is it growing in sun or shade? Dry soil or wet soil? Field edge or forest interior?
Look for reliable clues
Leaves are useful, but not enough by themselves. Notice whether leaves are opposite or alternate on the stem, whether their edges are smooth or toothed, and whether the plant has flowers, fruit, cones, thorns, or a distinctive smell.
Use habitat as a clue
Some plants strongly prefer certain places. Cattails suggest shallow water. Pines often dominate dry, sunny ground. Mosses point to moisture and shade. Habitat does not prove identification by itself, but it helps you narrow the possibilities.
🎬 Video: How to Identify Wild Plants - A Guide To Botanical Terms (video) — https://www.youtube.com/watch?v=5Aj82u2he6s
What to record for each plant
Useful details for your notes- Date and location
- Habitat type
- Growth form: tree, shrub, vine, forb, grass, fern, or other
- Leaf shape and arrangement
- Flowers, fruit, seeds, or bark if present
Once you can identify plants in the field, the next step is to organize plant evidence by either collecting labeled specimens or creating a photo catalog.
Req 4g2 — Seeds, Leaves, and Plant Records
You choose exactly one of these two plant-record paths. Both options build the same skill: careful comparison and accurate labeling. The difference is whether you create a physical collection or a visual catalog.
Your Options
- Req 4g2a — Collect and Label Specimens: Gather and organize seeds or leaves so you can compare real plant parts side by side and label them clearly.
- Req 4g2b — Build a Photo Catalog: Photograph seeds or leaves and build a record that preserves plant details without removing as much material from the habitat.
How to Choose
Choosing your plant-record option
Think about ethics, access, and how you like to work- Collection rules: If you are in parks, preserves, or protected habitats, photography may be the better choice because collecting may be limited or prohibited.
- Gear: Specimen collecting needs storage, labels, and careful drying or pressing. Photo catalogs need a camera or phone and a way to organize images.
- Time: A physical collection takes time to preserve and label. A photo catalog may be faster in the field but still needs careful sorting later.
- What you will gain: A physical set helps you compare texture and shape directly. A photo catalog builds observation and documentation skills without as much handling.
Good record-keeping matters in both options
Whichever option you choose, label your work right away. “Leaf from tree near parking lot” is weak. “White oak leaf, east side of Riverside Park, sunny slope, 2026-04-01” is strong.
Move to the first option page for the collecting path, even if you think you may choose the photo path. Seeing both will help you decide clearly.
Req 4g2a — Collect and Label Specimens
This option turns field observation into a physical reference set. The challenge is not only gathering material. It is keeping each specimen organized, legal to collect, and labeled clearly enough that another person could understand what it is.
Decide what to collect
Leaves are often easier to find in larger numbers. Seeds may be more interesting if you want to compare dispersal methods like burrs, wings, pods, or fluffy parachutes.
Collect responsibly
Take only what is allowed and only what the plant can spare. Avoid rare plants, protected areas, and private property without permission. Do not strip a plant bare just to finish faster.
Label as you go
A specimen without a label loses much of its value. Write down the species name if you know it, the date, place, habitat, and any extra clue that helped you identify it.
🎬 Video: Science at Play: Preserving Fall Leaves (video) — https://www.youtube.com/watch?v=06nhKenT410
🎬 Video: Harvesting & Saving Seeds! (video) — https://www.youtube.com/watch?v=QqIoGe-m2OM
Specimen label basics
Every leaf or seed should stay tied to its data- Common or scientific name if known
- Date collected
- Exact place or habitat
- Whether it is a seed or leaf
- Any identifying note such as shape, vein pattern, or seed structure
A physical collection helps you compare real plant parts. The other option builds many of the same skills through careful photography and cataloging.
Req 4g2b — Build a Photo Catalog
This option is great if you want strong records without removing as much material from the environment. The hard part is making photos useful enough to identify and compare later.
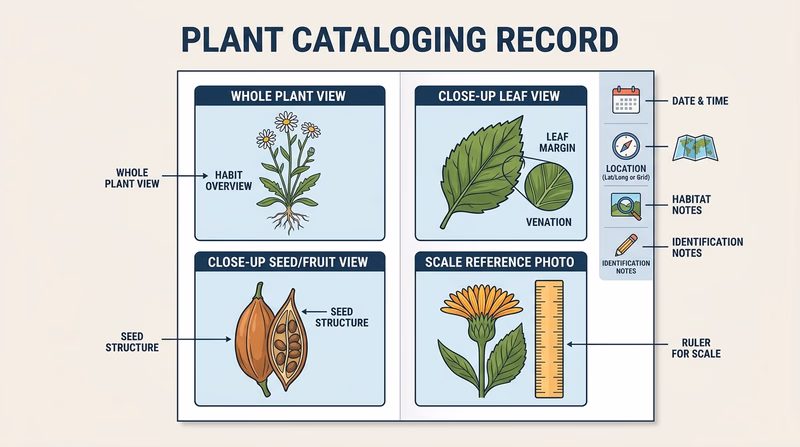
What makes a useful plant photo
Take more than one angle. Include the whole plant when possible, then move closer to show the leaf shape, leaf arrangement, seed form, veins, edges, or attachment point. Lighting matters too. A blurry dark photo is much harder to use than a simple clear one.
Build a real catalog, not a random gallery
A catalog should be organized so someone can flip through it and understand what each image shows. Group your photos by species, habitat, or plant type. Add captions with the date, location, and what feature matters most.
Why this option is valuable
Photo catalogs are especially useful in protected areas, parks, and school nature trails where collecting is discouraged. They also let you document more of the habitat around the plant.
🎬 Video: Plant Photography for Beginners (video) — https://youtu.be/ChxvvKV2Gx8?si=PXSE1d46dKsQqDmv
🎬 Video: How I Shot My First Plant Time-Lapse (video) — https://youtu.be/gqoAL4-XTNg?si=p-r1McCO7JyXONJH
With plants finished, close out the field-study options by comparing soil and rock types from your area.
Req 4h — Soils and Rocks
Nature study is not only about living things. Soil and rock shape which plants can grow, how water moves, and what habitats develop. This option helps you read the ground beneath your feet.
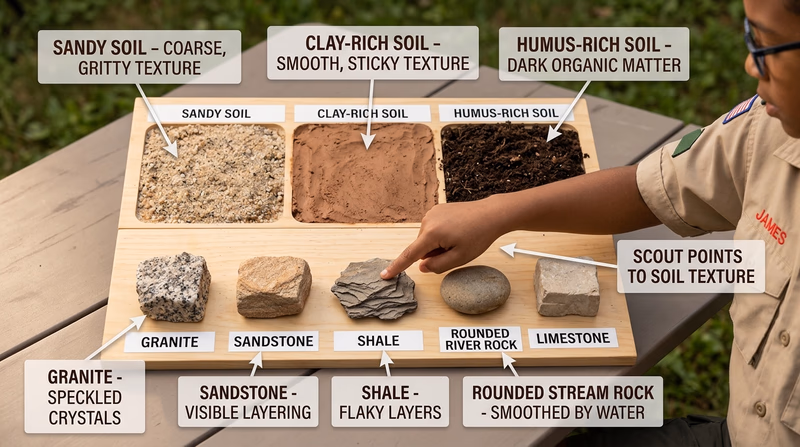
Requirement 4h1
Recognizing sandy soil
Sandy soil feels gritty. Water drains through it quickly, and it does not hold together well in your hand.
Recognizing clay-rich soil
Clay feels smooth and sticky when wet. It holds water longer and can be shaped or rolled more easily than sandy soil.
Recognizing humus-rich soil
Humus-rich soil is dark, crumbly, and full of decomposed organic matter. It often has an earthy smell and supports lots of life.
🎬 Video: Layers of Soil | Soil Profile Formation (video) — https://www.youtube.com/watch?v=VTuL5Pa0gC0
Simple soil comparison clues
What to note when you collect samples- Color
- Texture
- How well it holds together
- How quickly water drains
- Organic matter such as roots or decomposed leaves
Requirement 4h2
Look at texture and grain
Some rocks have visible grains. Others are smooth and dense. Some break into layers, and some have crystals or holes. These details help you sort rocks into groups like igneous, sedimentary, and metamorphic.
Keep location with the rock
Where you found the rock matters. Stream rocks are often rounded by water. Road cuts may reveal local layers. Gravel piles may contain stones brought from somewhere else, so local natural sites usually make better evidence.
Use plain language if needed
If you cannot identify a rock to a very specific name, begin with what you can observe: color, grain size, hardness, layering, sparkle, or rounded edges. Careful observation is still part of good nature study.
🎬 Video: Rockhounding 101: What to Look for on Your Next Adventure! (video) — https://youtu.be/yORP1Ba-K4Q?si=iR3Lo66iW-dmFjno
🎬 Video: Rock & Mineral Identification | It Can Be Easier Than You Think (video) — https://www.youtube.com/watch?v=mgld5jeYR04
You have now finished the menu of field-study options. The next requirement turns from observation to outdoor ethics and how Scouts should behave in natural areas.
Req 5 — Outdoor Ethics in Nature Study
Nature study can be harmful if it is done carelessly. A Scout who tramples a wetland edge, flips logs without putting them back, or disturbs nesting animals may learn something in the moment but leave the habitat worse than it was. That is why this requirement matters.
Why Leave No Trace matters in nature study
The Leave No Trace Seven Principles remind you to plan ahead, travel and camp on durable surfaces, dispose of waste properly, leave what you find when appropriate, minimize impacts, respect wildlife, and be considerate of others. For a Nature Scout, these are not extra rules. They are field skills.
How the Outdoor Code connects
The Outdoor Code asks Scouts to be clean, careful, considerate, and conservation-minded. That fits nature study perfectly. You are not just visiting wild places. You are practicing stewardship while you observe them.
Outdoor ethics during nature study
What your counselor wants to hear in a real example- How you stayed on durable surfaces or established trails
- How you avoided disturbing nests, dens, or resting animals
- How you limited collecting to what was allowed and necessary
- How you packed out trash and left the place better than you found it
- How you respected other visitors who were using the same area
Good examples you can discuss
Maybe you photographed plants instead of picking them in a protected area. Maybe you replaced a log carefully after checking underneath for salamanders. Maybe you cleaned mud from your boots before moving to another trail so you would not spread invasive seeds.
These are the kinds of specific examples that show you understand the principles in action.
🎬 Video: The Outdoor Code Explained (video) — https://www.youtube.com/watch?v=XoOSgw6sOPA
🎬 Video: What is Leave No Trace? (video) — https://www.youtube.com/watch?v=Rpq01rO9ZR0
A useful way to explain your own behavior
Pick one or two real field experiences from Req 4 and describe what you did. Explain the principle, the choice you made, and why it protected the habitat. That turns the requirement from a list of slogans into proof that you can act like a responsible naturalist.
Outdoor ethics guide every part of nature study. Next, you will use those same observation skills to explain how habitats change over time through ecological succession.
Req 6 — Reading Ecological Succession
This requirement covers two linked ideas:
- What succession means in ecology
- How to read a real landscape and explain how it changed in the past and may change in the future
Requirement 6a
Succession is the natural process by which a habitat changes over time. Bare ground may become grassland. Grassland may become shrubland. Shrubland may become young forest, and young forest may later become mature forest. Not every place follows the exact same pattern, but the big idea is that communities of plants and animals shift as conditions change.
A disturbance often starts or restarts succession. Fire, flooding, storms, farming, logging, erosion, or abandoned fields can all change what grows next.
🎬 Video: Ecological Succession (video) — https://www.youtube.com/watch?v=IrIvMt6HWlA
🎬 Video: Ecological Succession: Change Is Good (video) — https://www.youtube.com/watch?v=jZKIHe2LDP8
Requirement 6b
This is where the idea becomes real. You are acting like a field ecologist, using clues to reconstruct the past and predict possible futures.
What clues to look for
Notice whether the site has bare soil, annual weeds, grasses, shrubs, young trees, or a mature canopy. Then ask what animals fit that stage. Meadow birds, pollinators, rabbits, and deer may use open ground differently than owls, salamanders, and shade-loving plants in older forest.
Thinking backward
If you are standing in a meadow with a few young trees, maybe the place used to be a farm field or a recently disturbed opening. If you are in a dense young forest, perhaps it was logged or cleared decades ago. Stumps, fencing, drainage ditches, invasive plants, or old road beds can all be clues.
Thinking forward
If disturbance stops, shrubs may thicken, trees may spread, shade may increase, and the animal community may change too. But future disturbance could send the area in another direction. Floods, fire, mowing, invasive species, or development might change the path.
🎬 Video: Ecological Succession-Primary and Secondary (video) — https://youtu.be/8ceDE01iWLE?si=kzFlf4WEsd2ArppS
Succession field notes
Questions to answer while you are on-site- What plants dominate here now?
- What animals or signs of animals fit this stage?
- What evidence suggests an earlier stage?
- What disturbance may have shaped this place?
- What might the site become if current trends continue?
🎬 Video: The Outdoor Code Explained (video) — https://www.youtube.com/watch?v=XoOSgw6sOPA
🎬 Video: What is Leave No Trace? (video) — https://www.youtube.com/watch?v=Rpq01rO9ZR0
Succession helps you see nature as a moving story, not a frozen picture. The final badge requirement asks how this knowledge could shape your future through a career or hobby.
Req 7 — Choose a Future Path
You choose exactly one final path for this badge. One option looks at careers that use nature knowledge professionally. The other looks at hobbies you might pursue for personal growth and enjoyment.
Your Options
- Req 7a — Nature Careers: Compare possible jobs, research training and costs, and decide whether one career path fits your interests.
- Req 7b — Nature as a Lifelong Hobby: Choose a hobby connected to nature, learn what it takes to pursue it well, and set goals for how you might grow in it.
How to Choose
Career or hobby?
Pick the option that gives you the most honest answer- If you like imagining future work: Option 7a helps you compare education, salaries, and job prospects.
- If you are curious but not career-focused yet: Option 7b lets you explore nature as something you may enjoy for years without turning it into a job.
- What you will gain: Option 7a builds research and career-planning skills. Option 7b helps you connect badge skills to real life in a personal way.
- Best fit for your age: Younger Scouts sometimes find 7b more natural, while older Scouts may enjoy the detail in 7a. Either is valid.
A lot of Scouts discover that nature study can shape both work and free time. Start with careers, then compare that with the hobby path.
Req 7a — Nature Careers
This requirement asks you to think like both a naturalist and a planner. Nature knowledge can lead to work in science, education, conservation, outdoor leadership, parks, land management, agriculture, environmental policy, and more.
Start with three different career types
Choose three careers that are genuinely different from one another. For example:
- Wildlife biologist or ecologist
- Park ranger or interpreter
- Environmental educator, forester, fisheries technician, botanist, restoration specialist, or natural resources officer
That variety helps you compare what each path requires.
What to research for your chosen career
Look for the training level, degrees or certificates, early experience, licenses if any, and costs. Some jobs require college degrees. Others begin with seasonal work, technical training, internships, or certifications.
Also look at the day-to-day work. Does the person spend time outdoors? In labs? Writing reports? Teaching the public? The more concrete your research is, the stronger your discussion will be.
Career research checklist
Topics to cover for your counselor- What the job actually does
- Training or education needed
- Certifications or licenses if any
- Typical starting pay and employment outlook
- Advancement possibilities over time
- Why this path does or does not fit your interests
🎬 Video: 10+ Wildlife biology careers (video) — https://youtu.be/AK2Onqx-ctM?si=OS1LiXEGCczteH1X
🎬 Video: 12 Environmental Career Paths for Non-Scientists (video) — https://youtu.be/GfpULQZL3tk?si=byWfIgDnVLy-xAPY
🎬 Video: 10+ Outdoor & Nature Job Ideas With NO Degree! (video) — https://youtu.be/Q-3KseGxoOw?si=qn8G2GE_wnzwTI6B
🎬 Video: Ecological Succession (video) — https://www.youtube.com/watch?v=IrIvMt6HWlA
🎬 Video: Ecological Succession: Change Is Good (video) — https://www.youtube.com/watch?v=jZKIHe2LDP8
Turn information into a judgment
The requirement does not stop at research. You also need to discuss whether you might be interested in the field. That means comparing the real demands of the job with your own strengths.
Maybe you love field work but not long report writing. Maybe you like teaching others outdoors. Maybe you want a job that mixes science with public service. Those are the kinds of thoughts worth sharing.
A career is one way nature can shape your life. The other path is keeping nature as a hobby you return to for enjoyment, challenge, and growth.
Req 7b — Nature as a Lifelong Hobby
Not every passion needs to become a career. Nature skills can grow into hobbies that keep you outdoors, sharpen your observation, and connect you to a community for years.
Good hobbies connected to this badge
Birding, wildlife photography, nature journaling, native plant gardening, fishing, shell collecting where allowed, rockhounding, herping with safety and ethics, and community-science observation are all possible paths.
Research the real cost of participation
Every hobby has a startup cost and a growth path. Birding may begin with a notebook and borrowed binoculars. Photography may start cheaply but become more expensive as gear improves. Rockhounding might require travel, tools, and permits depending on location.
Look for organizations and community
A hobby becomes easier to stick with when you find other people doing it well. Nature centers, Audubon chapters, native plant societies, hiking clubs, local photography groups, museums, and online community-science platforms can all help.
🎬 Video: Other Hobbies in Your Journal: The Nature Journal Show (video) — https://www.youtube.com/watch?v=Pt1UqDNcaFg
🎬 Video: Ecological Succession-Primary and Secondary (video) — https://youtu.be/8ceDE01iWLE?si=kzFlf4WEsd2ArppS
Set goals you can really reach
Your short-term goal might be simple: keep a weekly nature journal for one month, join one guided bird walk, or photograph ten local wildflowers. A long-term goal might be bigger: become skilled enough to help with a Christmas Bird Count, grow a pollinator garden, or build a serious regional plant catalog.
Questions for choosing a hobby
Use these to shape your discussion- What part of nature study do you enjoy most?
- What equipment or training would help you improve?
- What organizations could teach or support you?
- What can you start this month?
- What could you build toward over the next few years?
You have reached the end of the requirement pages. The extended learning section will help you keep exploring nature beyond the badge itself.
Extended Learning
Congratulations
You finished a badge that asks you to observe, compare, explain, and care for the natural world. Those are the same habits used by hikers, educators, land managers, and scientists every day.
Follow One Habitat Through the Year
One of the best next steps is to return to the same place in every season. Pick a pond edge, meadow, neighborhood woods, or creek bank and visit it once a month. Notice what blooms, what dries out, what migrates in, and what signs of animals appear or disappear.
If you keep the same route and the same notebook style each time, your notes will become a real record of seasonal change. This is a great way to understand succession, migration, flowering times, and weather patterns in one place.
Build a Personal Field Notebook System
Many experienced naturalists use a notebook that mixes sketches, maps, species lists, weather notes, and questions. It does not have to be artistic. It has to be useful.
Try creating repeating sections such as:
- site name and habitat type
- date, time, and weather
- species observed
- signs of animal activity
- questions to research later
A notebook like that turns every walk into a small field study.
Join Community Science
You do not need to work for a research lab to contribute useful observations. Community-science projects let everyday observers submit bird counts, frog calls, pollinator sightings, invasive species reports, and seasonal changes in plants.
That matters because long-term datasets are built from many people making careful observations over time. Your notes and photos can become part of a bigger conservation picture.
Learn to Read Disturbance
A powerful next-level skill is recognizing what changed a habitat. Was the field recently mowed? Did fire open the area? Did flooding move soil? Did invasive plants take over after disturbance? The more you ask those questions, the more landscapes begin to make sense.
Real-World Experiences
Visit a nature center or wildlife refuge
Look for guided walks, interpretive signs, and staff who can help you identify local species and habitats.
Join a bird walk, frog call night, or native plant hike
These events let you learn from people who notice field marks and sounds you might miss on your own.
Volunteer for habitat restoration
Pulling invasives, planting natives, or helping with trail stewardship teaches how conservation work happens in real places.
Explore a museum or natural history collection
Museums can help you compare bones, shells, rocks, insects, and preserved specimens with what you see in the field.
Organizations
National Park Service
Mission: Protect natural and cultural resources while helping the public learn from them.
Link: https://www.nps.gov/
U.S. Fish & Wildlife Service
Mission: Conserve fish, wildlife, plants, and the habitats they depend on.
Link: https://www.fws.gov/
Cornell Lab of Ornithology
Mission: Advance the understanding and protection of birds and the natural world.
Link: https://www.birds.cornell.edu/home/
Leave No Trace
Mission: Teach outdoor ethics that reduce human impact on nature.
Link: https://lnt.org/
iNaturalist
Mission: Help people record biodiversity observations and share them with a global community.
Link: https://www.inaturalist.org/
Nature study does not end with one badge. The more often you look closely, the more the outdoors turns from scenery into a living story.