Orienteering Merit Badge — Complete Digital Resource Guide
https://merit-badge.university/merit-badges/orienteering/guide/
Introduction & Overview
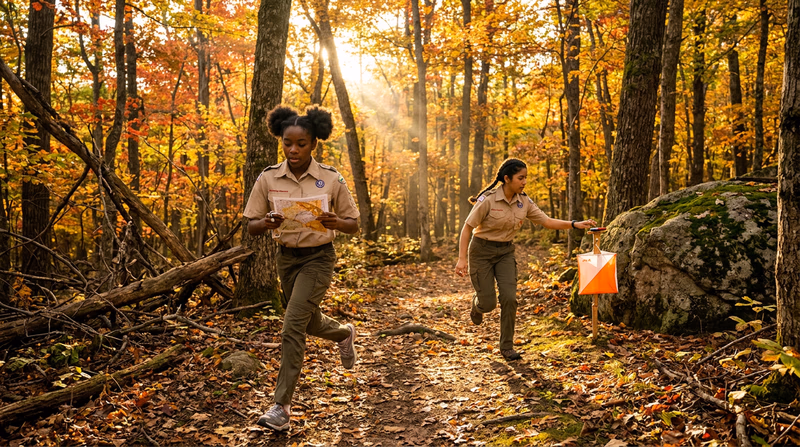
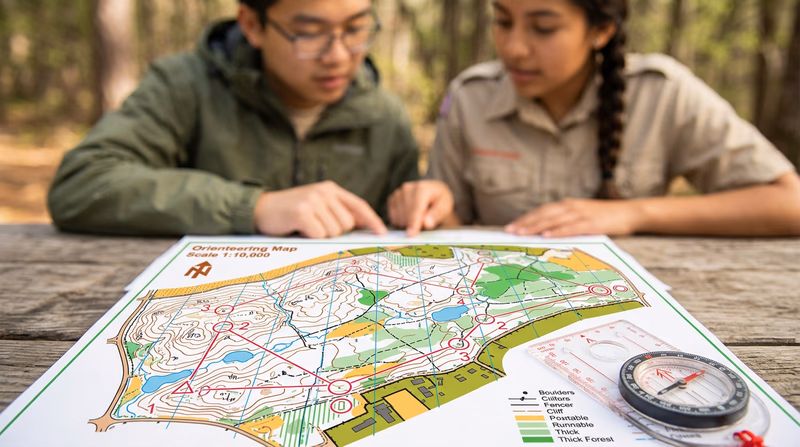
Somewhere in a forest, an orange-and-white flag hangs from a wooden stake. Dozens of competitors are racing to find it — but there is no trail to follow. The only tools they carry are a map, a compass, and their own wits. This is orienteering: the sport where your brain is the engine and the wilderness is the course.
Orienteering teaches you to read the land itself — ridgelines, stream crossings, vegetation boundaries — and translate those features between the real world and a detailed map. It is one of the few merit badges where every skill you learn is immediately testable: take a bearing, follow it through the woods, and either you find the control marker or you don’t. No faking it.
Then and Now
Then
In 1897, a Swedish military officer named Ernst Killander organized what is considered the first orienteering competition near Stockholm. The Swedish military had used cross-country navigation exercises for decades, but Killander saw something more — a way to make land navigation exciting enough that civilians would want to practice it too. The idea worked. By the 1920s, orienteering clubs had spread across Scandinavia, and the invention of affordable compasses by the Silva company in 1933 made the sport accessible to everyone, not just soldiers with military-grade equipment.
The sport jumped to the rest of Europe in the 1950s and reached North America in the 1960s, when Björn Kjellström (one of the Silva compass inventors) began promoting it in the United States. The first U.S. orienteering championships were held in 1970.
Now
Today, orienteering is practiced in over 80 countries, with the International Orienteering Federation (IOF) overseeing world championships in foot, mountain bike, ski, and trail orienteering. Modern orienteering maps are extraordinarily detailed — printed at 1:10,000 or 1:15,000 scale, they show individual boulders, fence corners, and even distinct tree types. Electronic punching systems have replaced the old paper punch cards, letting competitors record their visits to control points with a quick tap of a finger stick.
In an age where GPS can guide you anywhere, orienteering is more relevant than ever. Search-and-rescue teams, wildland firefighters, and backcountry guides all rely on map-and-compass skills when batteries die, signals drop, or satellites fail. The ability to navigate without technology is not a relic — it is a lifeline.
Get Ready!
Kinds of Orienteering
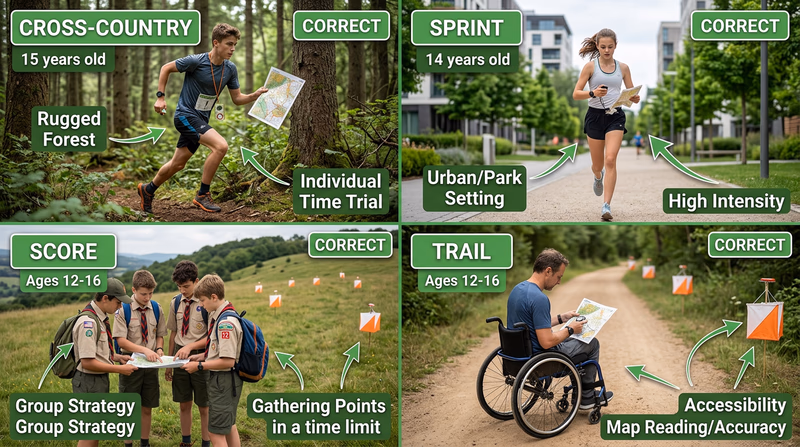
Cross-Country (Foot) Orienteering
The classic format. Competitors visit a set of control points in a specific order, choosing their own route between each one. Courses range from 2 to 12 kilometers through forests, fields, and varied terrain. This is the format you will encounter most often at local events and the one required in Requirement 7.
Score Orienteering
Instead of visiting controls in order, you get a time limit (usually 60–90 minutes) and a map full of control points, each worth different point values. Harder-to-reach controls are worth more. You decide which ones to pursue based on how fast you can navigate. Go over the time limit and you lose points — so clock management matters as much as compass work.
Sprint Orienteering
Held in parks, college campuses, or urban areas, sprint courses are short (2–4 km) but demand fast decision-making. Controls may be tucked behind buildings, along stairways, or inside park features. Races typically last 12–20 minutes. If you like intensity and quick thinking, sprint orienteering is worth trying.
Trail Orienteering
Designed for accessibility, trail orienteering tests map-reading precision rather than speed. Competitors follow a marked trail and must identify which of several flags at each control site is the correct one based on the map. This format welcomes participants of all physical abilities.
Night Orienteering
Same concept, but after dark. Competitors carry headlamps and navigate by compass bearing and pace count, since visibility is limited. Reflective markers on controls help, but finding them requires precise navigation. Night orienteering sharpens your skills dramatically because you cannot rely on distant landmarks.
Ski Orienteering
Popular in Scandinavia and anywhere with reliable snow, ski orienteering combines cross-country skiing with navigation. Competitors navigate a network of ski tracks and must choose the fastest route — which is not always the shortest one on the map.
Req 1 — Safety and First Aid
You are a quarter-mile into the woods, racing to your next control point, when your foot catches a root and you skid across a rocky slope. Your knee is bleeding, your palms are scraped, and the nearest road is 20 minutes away. What you do in the next 60 seconds determines whether this is a minor setback or a trip to the emergency room.
Orienteering takes you off-trail and into terrain where help is not immediate. That is exactly what makes it exciting — and exactly why first aid knowledge is Requirement 1.
Cuts, Scratches, and Scrapes
Branches, thorns, and rocky ground are part of every orienteering course. For minor cuts and scratches:
- Stop the bleeding by applying direct pressure with a clean cloth or gauze.
- Clean the wound with clean water. Remove any visible dirt or debris.
- Apply antibiotic ointment and cover with an adhesive bandage or sterile dressing.
- Monitor for infection — redness, swelling, warmth, or pus in the following days means you need medical attention.
For deeper cuts that will not stop bleeding after 10 minutes of direct pressure, or wounds with embedded objects, seek medical help.
Blisters
A blister the size of a dime can turn a 3-kilometer course into agony. Prevention is everything:
- Wear broken-in shoes — never race in new footwear.
- Use moisture-wicking socks and consider liner socks to reduce friction.
- Address hot spots immediately. If you feel rubbing, stop and apply moleskin or athletic tape before a blister forms.
If a blister does form, do not pop it — the skin acts as a natural bandage. Cover it with a donut-shaped piece of moleskin to relieve pressure, and cushion it for the rest of your course.
Snakebite
Most snakes want nothing to do with you. But when you are crashing through underbrush and stepping over logs, surprise encounters happen. If bitten by a snake:
- Move away from the snake to avoid a second bite.
- Stay calm and still. Elevated heart rate speeds venom circulation.
- Remove rings, watches, and tight clothing near the bite — swelling will come.
- Keep the bitten limb at or below heart level.
- Get to medical help as quickly as possible. Call 911 or have your buddy go for help.
Insect Stings and Tick Bites
Insect stings (bees, wasps, hornets): Remove the stinger by scraping it sideways with a flat edge — do not squeeze with tweezers, which can inject more venom. Clean the area, apply a cold pack to reduce swelling, and take an antihistamine if available. Watch for signs of a severe allergic reaction (anaphylaxis): difficulty breathing, swelling of the face or throat, dizziness, or rapid pulse. Anyone with a known allergy should carry an epinephrine auto-injector.
Tick bites: Ticks are a serious concern for orienteers because you spend time in exactly the habitat ticks love — tall grass, leaf litter, and brushy areas. After every event, do a full tick check. To remove an attached tick:
- Use fine-tipped tweezers to grasp the tick as close to your skin as possible.
- Pull straight up with steady, even pressure — no twisting.
- Clean the bite area with rubbing alcohol or soap and water.
- Save the tick in a sealed bag with the date, in case symptoms develop later.
🎬 Video: How To Do A Tick Check — https://www.youtube.com/watch?v=mwAHhOwqeX4
Heat and Cold Reactions
Orienteering happens in all weather, which means you need to recognize both heat and cold emergencies.
Heat Reactions
| Condition | Signs | Response |
|---|---|---|
| Sunburn | Red, painful, warm skin | Cool compresses, aloe vera, stay hydrated. Prevent with sunscreen (SPF 30+) and a hat. |
| Heat exhaustion | Heavy sweating, weakness, cold/clammy skin, nausea, fast pulse | Move to shade, loosen clothing, cool with wet cloths, sip water. Seek medical help if symptoms worsen. |
| Heatstroke | Hot/red/dry skin, temperature above 103°F, confusion, loss of consciousness | Call 911 immediately. Cool the person rapidly — ice packs on neck, armpits, and groin. This is life-threatening. |
Cold Reactions
Hypothermia occurs when your body loses heat faster than it can produce it. This can happen even in mild temperatures (50–60°F) if you are wet and exposed to wind. Signs progress from shivering and confusion to slurred speech and loss of coordination. Treatment: get the person out of wind and wet clothing, insulate them from the ground, wrap them in warm layers or a sleeping bag, and give warm (not hot) drinks if they are alert. Severe hypothermia requires professional medical care.
Dehydration
You lose water through sweat, breathing, and exertion — all of which are amplified during orienteering. Signs of dehydration include dark urine, dry mouth, headache, dizziness, and fatigue. Drink water before, during, and after your event. A good rule: if you are thirsty, you are already behind on hydration.
Poisonous Plants and Animals
Your counselor will ask you to explain why identifying local hazards matters. The answer is practical: on an orienteering course, you are choosing your own route through unmarked terrain. You might push through a thicket of poison ivy, step near a copperhead’s hiding spot under a log, or brush against stinging nettle. Knowing what is dangerous in your area — and what it looks like — lets you make smart route choices and avoid problems before they start.
Before your first event, learn to identify:
- Poisonous plants in your region (poison ivy, poison oak, poison sumac, stinging nettle)
- Venomous snakes (copperhead, rattlesnake, cottonmouth, coral snake — distribution varies by state)
- Dangerous insects and arachnids (black widow, brown recluse, fire ants, scorpions)
🎬 Video: 4 Tips to Outsmarting Poisonous Plants — https://www.youtube.com/watch?v=P6aBc4OAD0g
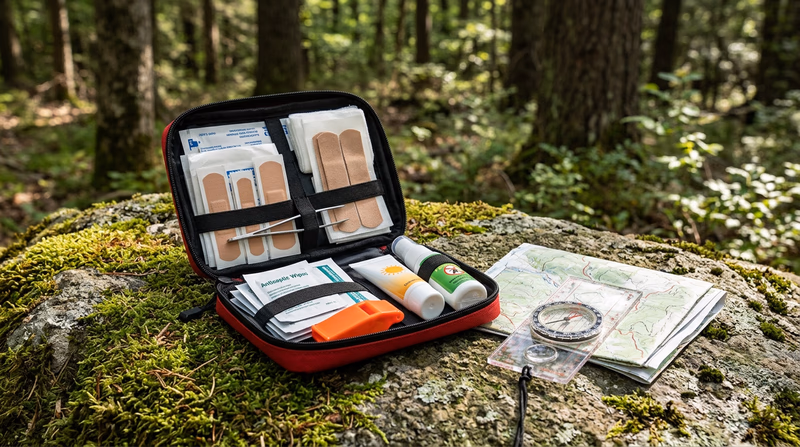
Orienteering First Aid Kit
Essentials to carry on every course- Adhesive bandages (assorted sizes): For cuts, scrapes, and small wounds.
- Moleskin and athletic tape: Blister prevention and treatment.
- Gauze pads and roller bandage: For larger wounds requiring pressure.
- Antiseptic wipes: Wound cleaning in the field.
- Tweezers (fine-tipped): Tick and splinter removal.
- Antihistamine tablets: For insect sting reactions.
- Sunscreen (SPF 30+): Apply before the event and reapply.
- Insect repellent: Especially in tick-prone areas.
- Emergency whistle: Three blasts is the universal distress signal.
Req 2 — What Is Orienteering?
Hand someone a map, a compass, and a list of checkpoints hidden in the woods. Tell them the clock is running. That, in its simplest form, is orienteering — the sport of navigating through unfamiliar terrain using only a detailed map and a compass to find a series of control points as quickly as possible.
But reducing orienteering to “running with a map” misses what makes it unique. Every other racing sport rewards pure speed. In orienteering, the fastest legs lose to the sharpest mind. A competitor who sprints the wrong direction finishes behind the one who walks the clever route. It is a sport where a 14-year-old who reads terrain well can beat a collegiate cross-country runner who cannot.
The Core Elements
Every orienteering event has the same basic components:
- A detailed map — Usually at 1:10,000 or 1:15,000 scale, printed in standardized colors. Unlike a hiking trail map, an orienteering map shows individual boulders, thickets, clearings, and even distinct ground surfaces. It is the most detailed map most people will ever use.
- A compass — For taking bearings and orienting the map to match the real world.
- Control points — Marked on the map as numbered circles, these correspond to physical markers (orange-and-white flags) hidden at specific features in the terrain.
- A control description sheet — A list using international symbols that tells you exactly what feature each control is placed on (e.g., “the northwest side of a large boulder”).
- A timing system — Your time starts at the start triangle and ends when you reach the finish. Some events use electronic punching (you carry a small chip that records each control visit); others use manual punch cards.
How an Event Works
- Start. You receive your map (sometimes only at the moment the clock starts) and a control description sheet.
- Navigate. You visit each control point in the order listed on your map (or, in score events, in any order you choose). At each control, you punch or tap to prove you were there.
- Route choice. Between any two controls, there are multiple possible routes. You might follow a trail that curves around a hill, or you might take a straight bearing through dense forest. The “right” route depends on your speed, the terrain, and your confidence in your navigation.
- Finish. Cross the finish line. Your time is your score.
Why Orienteering Matters Beyond the Sport
The skills you learn for this badge are the same ones used by:
- Search and rescue teams — When a lost hiker needs finding, SAR volunteers navigate with map and compass through trackless wilderness.
- Wildland firefighters — GPS signals often fail in steep canyons and heavy smoke. Map-and-compass is the reliable backup.
- Military land navigation — Every branch of the military teaches map and compass skills as a fundamental competency.
- Backcountry hikers and paddlers — Off-trail travel, route planning, and understanding terrain all build on orienteering fundamentals.
Even in everyday life, orienteering builds spatial reasoning, decision-making under pressure, and the ability to stay calm when you are temporarily “lost” — a skill that translates far beyond the woods.
🎬 Video: Start Orienteering — A Newcomer's Guide — https://www.youtube.com/watch?v=26Zc5AVkFis
Req 3a — How a Compass Works
Pick up a compass and the needle swings, wobbles, and settles — pointing roughly north every single time. It does this without batteries, without satellites, without any signal at all. Understanding why is the first step to trusting this tool with your navigation.
How a Compass Works
The Earth has a magnetic field generated by molten iron circulating in its outer core. This field extends from the South Magnetic Pole to the North Magnetic Pole, creating invisible lines of force that wrap around the planet. A compass needle is a small, lightweight magnet balanced on a nearly frictionless pivot. It aligns itself with the Earth’s magnetic field, so one end (usually painted red) points toward magnetic north.
That is the entire principle: a free-spinning magnet aligns with the Earth’s magnetism. No moving parts except the needle itself, no power source, no signal required. This is why a compass works in canyons where GPS fails, in storms where satellites are blocked, and in remote wilderness where there is no cell service.
Parts of an Orienteering Compass
An orienteering compass (also called a baseplate compass) is specifically designed for use with a map. It has features you will not find on a simple pocket compass.
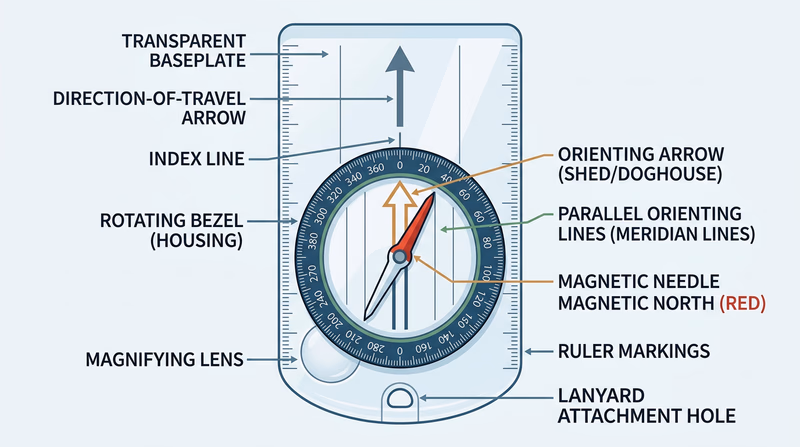
Baseplate
The flat, transparent plastic base that the compass housing sits on. Transparency matters — you need to see the map through it. The baseplate has a direction-of-travel arrow printed on it, a straight edge for drawing lines on maps, and ruler markings (usually in millimeters and map scales) along the edges.
Rotating Bezel (Housing)
The circular dial marked with degrees from 0° to 360°. You twist it to set your bearing. The index line (or read bearing mark) is where the bezel meets the direction-of-travel arrow — this is where you read your bearing number.
Magnetic Needle
Floating inside the bezel on a jeweled pivot, the needle spins freely and points to magnetic north. The north end is usually red. Some needles have luminous markings for use in low light.
Orienting Arrow and Lines
Inside the bezel (printed on the bottom of the housing), you will find the orienting arrow — sometimes called the “shed” or “doghouse” because of its shape. Surrounding it are orienting lines (also called meridian lines) that run parallel to the arrow. When you rotate the bezel, these move with it. Their job is to align with the north-south lines on your map.
Ruler and Scale Markings
The baseplate edges have rulers — typically in millimeters, plus one or two common map scales (1:25,000, 1:10,000). These let you measure distances directly on the map without a separate ruler.
Types of Compasses
While the baseplate orienteering compass is what you will use for this badge, it helps to know the other types exist:
- Thumb compass — Straps to your thumb. Preferred by competitive orienteers because it keeps the map and compass in one hand. Faster but takes practice.
- Lensatic (military) compass — Heavy, precise, and built for durability. Used by the military for detailed land navigation but slower to use with a map.
- Button (pocket) compass — Small and cheap. Fine for general direction but lacks the features needed for orienteering.
🎬 Video: Basic Orienteering Skills — https://www.youtube.com/watch?v=bzNA6-lx5n8
Req 3b — Taking a Compass Bearing
Knowing what a compass is means nothing if you cannot use it to get from Point A to Point B through unmarked terrain. Taking a bearing — and then walking that bearing accurately — is the single most fundamental orienteering skill. Master this, and every other technique in this badge builds on top of it.
What Is a Bearing?
A bearing is a direction expressed as a number of degrees from north, measured clockwise. North is 0° (or 360°). East is 90°. South is 180°. West is 270°. If someone tells you to “walk a bearing of 135°,” they mean head southeast — exactly halfway between south and east.
Taking a Bearing from a Map
This is the process you will use constantly during orienteering events. You know where you are on the map and where you want to go, and you need the compass to tell you which direction to walk.
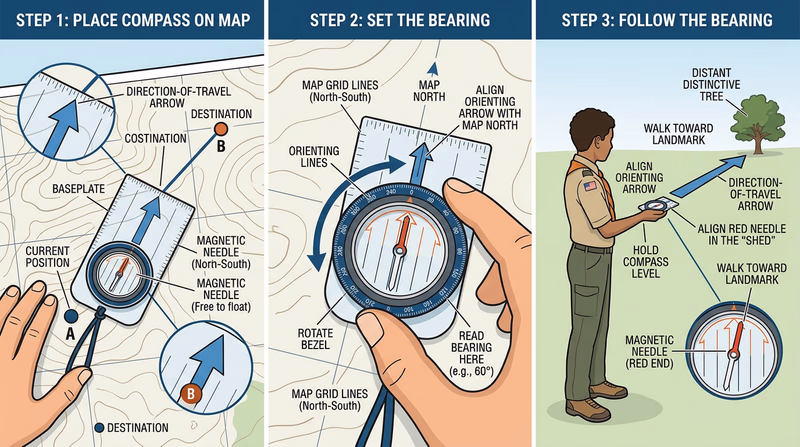
- Place the compass on the map so the baseplate edge connects your current position to your destination. The direction-of-travel arrow should point toward where you want to go.
- Rotate the bezel until the orienting lines inside the housing are parallel to the north-south grid lines on the map, with the orienting arrow pointing toward the top of the map (north).
- Read the bearing at the index line where the bezel meets the direction-of-travel arrow.
- Pick up the compass. Hold it flat in front of you and turn your whole body until the red end of the magnetic needle sits inside the orienting arrow (this is called “putting red in the shed”).
- Look up along the direction-of-travel arrow and pick a visible landmark — a distinctive tree, a rock, a fence post.
- Walk to that landmark, then repeat: hold the compass, align the needle, pick the next landmark.
Taking a Field Bearing
Sometimes you see something in the landscape — a hilltop, a building, a distinctive tree — and want to know what bearing it is from your position.
- Hold the compass flat at waist level with the direction-of-travel arrow pointing at the feature.
- Rotate the bezel until the red end of the needle sits inside the orienting arrow.
- Read the bearing at the index line. That is the bearing from you to that feature.
This is useful for identifying features on a map (“that hill is at 230° from me”) and for triangulating your position when you are unsure where you are.
Following a Bearing Accurately
Taking the bearing is the easy part. Walking it through dense forest without drifting is where most beginners struggle. Here are techniques that keep you on course:
Leapfrogging with a Buddy
If you are orienteering with a partner (as required by Scouting America Youth Protection policies), send your buddy ahead along your bearing line. When they reach a landmark, walk to them and repeat. Two people leapfrogging stay on a straight line much better than one person walking alone.
Aiming Off
If your destination is on a linear feature (a trail, a stream, a fence), deliberately aim a few degrees to one side. When you hit the feature, you know which direction to turn. If you aimed straight and missed, you would not know whether to go left or right. This technique is covered more deeply in Req 6c — Navigation Techniques.
Counting Paces
Combine your bearing with a pace count (covered in Req 5) to know not just which direction but how far you have traveled. Together, bearing and pace count give you a position fix in featureless terrain.
🎬 Video: How to Use a Compass — https://www.youtube.com/watch?v=0cF0ovA3FtY
Req 4a — Terrain Features
A trail map tells you where the paths are. A topographic map tells you what the land looks like — every hill, valley, cliff, and saddle, all represented by brown contour lines on a flat sheet of paper. Learning to read those lines is like learning a new language, and once you are fluent, you can “see” the terrain from the map before you ever set foot on it.
How Contour Lines Work
A contour line connects all points at the same elevation. If you walked along a contour line, you would neither climb nor descend — you would stay perfectly level. The contour interval (stated in the map legend) tells you the elevation difference between adjacent lines. On a typical USGS topographic map, the interval might be 10, 20, or 40 feet.
The key rules:
- Lines close together = steep terrain. When contour lines are packed tightly, the elevation changes rapidly over a short distance.
- Lines far apart = gentle slope. Wide spacing means gradual terrain.
- Lines never cross. Each line represents one elevation. The only exception is an overhanging cliff, which is extremely rare on standard maps.
- Every fifth line is bold. These index contour lines are labeled with their elevation, making it easy to count up or down.
Five Essential Terrain Features
Your counselor will ask you to identify five. Here are the features every orienteer needs to recognize, both on the map and on the ground:
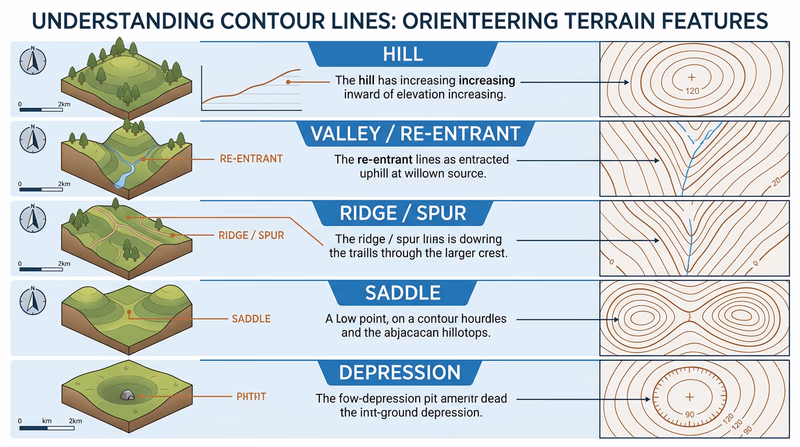
Hill (or Summit)
On the map: concentric contour circles, with elevation increasing toward the center. The innermost ring is the highest point. On the ground: you see a rise of land with slopes falling away in all directions.
Valley (or Re-entrant)
On the map: contour lines form U-shapes or V-shapes pointing uphill (toward higher elevation). On the ground: a low area between ridges where water would naturally flow. In orienteering, small valleys (called re-entrants) are common control point locations.
Ridge (or Spur)
On the map: contour lines form U-shapes or V-shapes pointing downhill (toward lower elevation) — the mirror image of a valley. On the ground: a narrow, elevated spine of land extending outward from a hill.
Saddle (or Col)
On the map: an hourglass shape where contour lines from two adjacent hills nearly touch, with lower ground in between. On the ground: the low point on a ridge between two summits — like the seat of a saddle.
Depression
On the map: closed contour loops with small tick marks (hachures) pointing inward, toward lower ground. On the ground: a low spot or pit — the opposite of a hill.
More Features Worth Knowing
Beyond the five you need for this requirement, experienced orienteers learn to spot these features quickly:
- Cliff — Represented by a black line or thick brown contour bundle, cliffs are steep vertical faces. On orienteering maps, they are marked with a specific black symbol.
- Knoll — A small hill, often just one or two contour lines. Knolls are frequent control locations.
- Terrace (or bench) — A flat area partway up a slope, shown by wider contour spacing interrupting a steep section.
🎬 Video: How to Read a Topo Map — https://www.youtube.com/watch?v=CoVcRxza8nI
Req 4b — Map Symbols
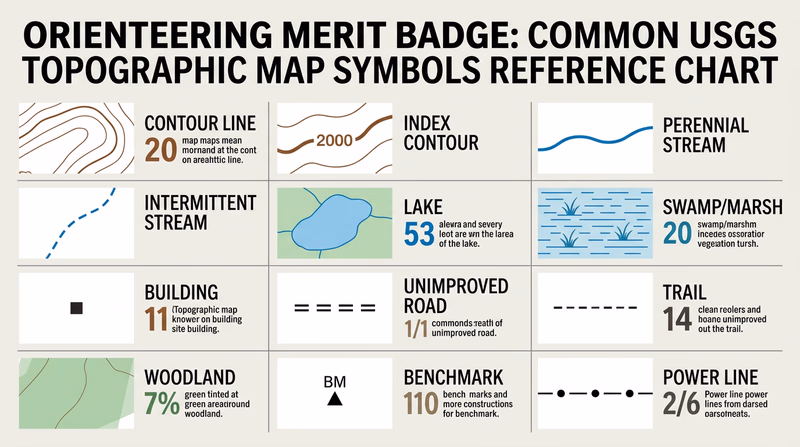
Contour lines tell you the shape of the land. Map symbols tell you everything on the land — roads, rivers, buildings, vegetation, and boundaries. A topographic map uses a standardized symbol system so that anyone, anywhere, can read any map without a tutorial. Your job for this requirement is to recognize at least 10 of these symbols and know what they represent.
The Five Color Groups
USGS topographic maps organize symbols by color, and each color represents a category:
| Color | Represents | Examples |
|---|---|---|
| Brown | Terrain / elevation | Contour lines, spot elevations, sand, cuts, fills |
| Blue | Water | Rivers, lakes, streams, springs, swamps, canals |
| Green | Vegetation | Forest cover, orchards, scrub, vineyards |
| Black | Human-made features | Buildings, roads, trails, railroads, boundaries, labels |
| Red | Important roads & survey | Major highways, land survey lines, built-up areas |
Some modern maps add purple for features updated from aerial photography since the last full survey revision.
Symbols You Should Know
You need 10 for your counselor. Study these and be able to point them out on a real map:
- Contour line (brown) — A line connecting points of equal elevation. You learned these in Req 4a.
- Index contour (brown, bold) — Every fifth contour line, drawn heavier and labeled with elevation.
- Perennial stream (blue, solid line) — A waterway that flows year-round.
- Intermittent stream (blue, dashed line) — A waterway that flows only seasonally.
- Lake or pond (blue, solid fill) — Standing water body.
- Swamp or marsh (blue, horizontal line pattern with vegetation tufts) — Wetland areas.
- Building (black, small square or rectangle) — Individual structures.
- Unimproved road (black, parallel dashed lines) — Unpaved road or track.
- Trail (black, single dashed line) — Foot or horse trail.
- Woodland (green tint area) — Forested or densely vegetated area.
- Cleared land (white area within green) — Open fields surrounded by forest.
- Benchmark (black triangle with “BM” and elevation) — A surveyed point with precisely known elevation.
- Church (black square with cross) — A church with a prominent steeple visible as a landmark.
- Power line (black, dashed line with dots) — Overhead electrical transmission line.
- Railroad (black, line with cross-ties) — Active or abandoned rail line.
USGS vs. Orienteering Map Symbols
If you are coming from USGS topo maps and then encounter an orienteering map for the first time, the symbols will look different. Orienteering maps follow the International Specification for Orienteering Maps (ISOM) standard, which uses a different color scheme and symbol set optimized for navigation at a run:
| Feature | USGS Map | Orienteering Map |
|---|---|---|
| Dense forest | Green tint | Dark green (slow running) |
| Open forest | White | White (fast running) |
| Open ground | White or no tint | Yellow |
| Marsh | Blue pattern | Blue horizontal stripes |
| Boulder | No standard symbol | Black dot or circle |
| Fence | Varies | Black line with cross marks |
Understanding both systems will help you as you progress from studying USGS topo maps in the classroom to using orienteering maps in competition.
USGS Topographic Map Symbols — Official Reference The complete USGS reference sheet showing all standard topographic map symbols. Print this out and use it while studying. Link: USGS Topographic Map Symbols — Official Reference — https://pubs.usgs.gov/gip/TopographicMapSymbols/topomapsymbols.pdfReq 4c — Magnetic Declination
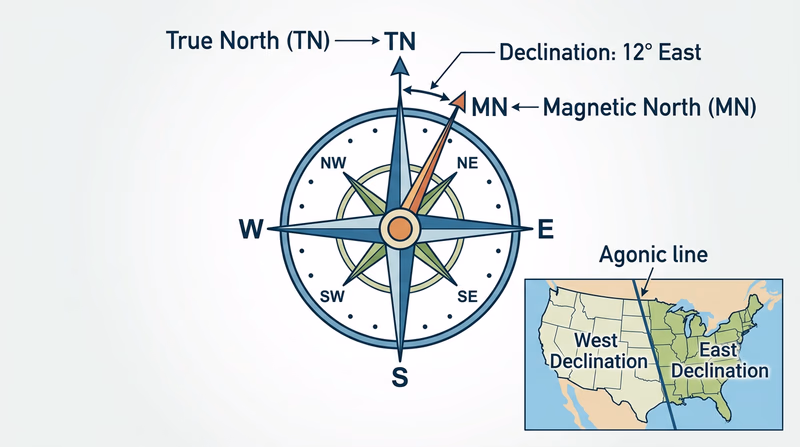
Here is a fact that surprises most beginners: your compass does not point to the North Pole. It points to the Earth’s magnetic north pole, which is located in a different place — currently in the Canadian Arctic, roughly 500 miles from the geographic (true) North Pole. The angular difference between true north and magnetic north is called declination, and ignoring it is the fastest way to get lost.
True North vs. Magnetic North
- True north (also called geographic north) is the direction toward the geographic North Pole — the top of the Earth’s axis of rotation. Maps are drawn with true north at the top.
- Magnetic north is the direction your compass needle points. It shifts over time because the Earth’s magnetic field is generated by moving molten metal in the outer core.
The angle between these two directions, measured from your location, is magnetic declination. It varies depending on where you are on Earth.
East and West Declination
- East declination means magnetic north is east of true north. Your compass needle points slightly right of where the map says north is. This occurs along the East Coast and across the eastern United States.
- West declination means magnetic north is west of true north. Your compass needle points slightly left of true north. This is common on the West Coast.
- Zero declination (agonic line) runs roughly through the Mississippi Valley, where true north and magnetic north happen to align. On this line, no correction is needed.
Why Declination Matters
A bearing taken from a map uses true north. A bearing read from your compass uses magnetic north. If the declination in your area is 10° east and you ignore it, every bearing you follow will be off by 10°. That sounds small, but over distance the error compounds rapidly.
How to Correct for Declination
There are two approaches:
Method 1: Adjust the Bearing Mathematically
After taking a bearing from the map (a “true” bearing), convert it to a magnetic bearing before following it with your compass:
- East declination: Subtract the declination from your map bearing.
- West declination: Add the declination to your map bearing.
A common mnemonic: “East is least (subtract), West is best (add).” This refers to converting from true to magnetic. When going the other direction (field bearing to map bearing), you reverse the operation.
Method 2: Set the Declination on Your Compass
Many orienteering compasses have an adjustable declination correction — a small screw or mechanism that offsets the orienting arrow by the declination value. Once set, all your readings are automatically corrected and you never need to do the math in the field. This is the preferred method for most orienteers.
Method 3: Draw Magnetic North Lines on Your Map
Instead of correcting every bearing, you can draw magnetic north-south lines on the map itself (you will learn this in Req 4d). When you align the orienting lines with these lines instead of the map’s grid lines, the correction is built in.
NOAA Magnetic Declination Calculator Enter your location and get the current magnetic declination value. Updated regularly as the magnetic field shifts. Link: NOAA Magnetic Declination Calculator — https://www.ngdc.noaa.gov/geomag/calculators/magcalc.shtml🎬 Video: Magnetic Declination Explained — https://www.youtube.com/watch?v=SStmBzQC7eI
Req 4d — Magnetic North-South Lines
In Req 4c, you learned that the gap between true north and magnetic north — declination — can throw your bearings off significantly. Drawing magnetic north-south lines directly on your map is the most practical way to eliminate that problem. Once these lines are in place, you align your compass with them instead of the map’s printed grid lines, and declination is automatically corrected every time you take a bearing.
Why Orienteers Draw These Lines
Standard orienteering maps are printed with magnetic north lines already on them. But USGS topographic maps — the kind you will encounter most often outside of formal events — are oriented to true north. If you use a USGS map without correction, every bearing will be off by the declination angle. Drawing magnetic north lines converts the map into a tool that works directly with your compass.
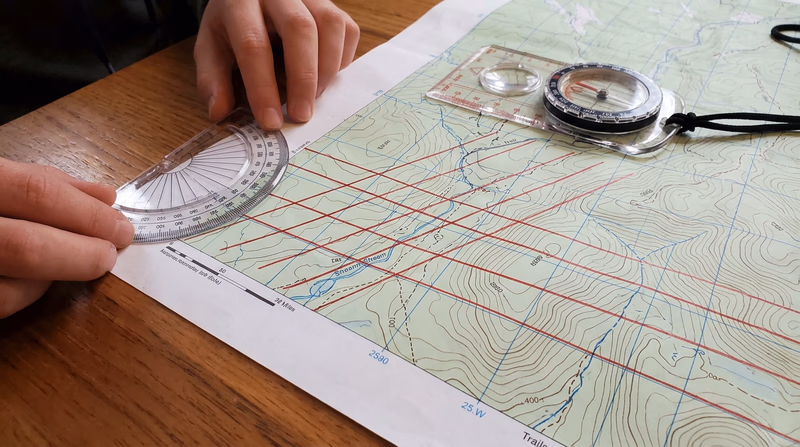
How to Draw Magnetic North-South Lines
You will need your topographic map, a long straightedge (a yardstick works well), a pencil, and a protractor.
Find the declination for your map area. Check the map’s declination diagram (usually in the bottom margin) or use the NOAA calculator you learned about in Req 4c.
Choose a starting point. Pick a point along the left or right edge of the map where a printed north-south grid line (or the map border) intersects.
Measure the declination angle. Place your protractor at the starting point. If the declination is east, measure that many degrees clockwise from the grid line. If west, measure counterclockwise.
Draw the first line. Using your straightedge, draw a line through the starting point at the measured angle, extending across the full map. This is your first magnetic north-south line.
Draw parallel lines. Move your straightedge and draw parallel lines across the map, spaced about 1–2 inches (2.5–5 cm) apart. These do not need to be perfectly even — close enough to provide reference lines wherever you place your compass on the map.
Label the lines. Write “MN” (magnetic north) with an arrow at the top of one line so you remember what these lines represent.
Using Your Magnetic North Lines
Once the lines are drawn, the process from Req 3b changes in one small but critical way:
Before (without MN lines): Rotate the bezel until the orienting lines align with the map’s north-south grid lines, then apply a declination correction.
After (with MN lines): Rotate the bezel until the orienting lines align with your magnetic north-south lines. No further correction needed — the declination is baked into the line angle.
This saves time and eliminates a common source of error. In competition, where you are taking bearings quickly and under pressure, one fewer step means one fewer place to make a mistake.
Req 4e–4f — Distances and Orienting a Map
These two skills are the final pieces of the map-reading puzzle. Measuring distance tells you how far you need to go. Orienting the map tells you which way the world lines up around you. Together with bearings and declination, you now have a complete navigation toolkit.
Measuring Distances on a Map
Your orienteering compass baseplate has ruler markings along its edges — usually in millimeters, plus scales for common map ratios. Here is how to use them:
Straight-Line Distance
- Place the edge of the baseplate so it connects your starting point and your destination on the map.
- Read the distance using the ruler markings. If your map scale is 1:25,000, use the 1:25,000 scale on the compass (if present). Otherwise, measure in millimeters and convert.
Converting Millimeters to Real Distance
Every map has a scale. Common scales:
| Map Scale | 1 mm on map = | 1 cm on map = |
|---|---|---|
| 1:10,000 | 10 meters | 100 meters |
| 1:15,000 | 15 meters | 150 meters |
| 1:24,000 (USGS) | 24 meters | 240 meters |
| 1:25,000 | 25 meters | 250 meters |
So on a 1:25,000 map, if the distance between two points is 40 mm (4 cm), the real-world distance is 4 × 250 = 1,000 meters (1 kilometer).
Curved or Irregular Routes
Real routes rarely follow straight lines. To measure a winding trail or stream:
- Use a piece of string or thread. Lay it along the curved route on the map, then straighten it against the compass ruler.
- Alternatively, “walk” the compass edge along the route in short straight segments, adding up each segment.
Orienting a Map
An oriented map is one that has been rotated so that north on the map matches north in the real world. When your map is oriented, everything on it lines up with what you see around you — the trail to your left on the map is also to your left in real life, the hill ahead on the map is ahead in the terrain.
Step-by-Step: Orienting with a Compass
- Set the bezel to 0° (north). Rotate the bezel so the N mark aligns with the index line.
- Place the compass on the map. Align the baseplate edge along a north-south line — either the map’s grid line or your magnetic north lines from Req 4d.
- Rotate the map and compass together (do not move the compass on the map) until the magnetic needle aligns inside the orienting arrow — red in the shed.
- The map is now oriented. Every feature on the map should correspond to the real terrain around you.
Orienting Without a Compass
In a pinch, you can orient a map without a compass:
- Use visible landmarks. If you can see a distinctive feature (a hilltop, a lake, a building) and identify it on the map, rotate the map until that feature lines up in the correct direction.
- Use the sun. Before noon, the sun is roughly east; at noon, roughly south; after noon, roughly west. This gives you a general orientation.
Map Skills Self-Check
Before you head to the field, verify you can do all of these- Read contour lines: Identify hills, valleys, ridges, saddles, and depressions (Req 4a).
- Name 10 map symbols: Point them out on a real topo map (Req 4b).
- Explain declination: Know your local value and why it matters (Req 4c).
- Draw magnetic north lines: Mark them on any USGS topo map (Req 4d).
- Measure distances: Use your compass baseplate to calculate real-world distances (Req 4e).
- Orient a map: Rotate it so north-on-map equals north-in-the-field (Req 4f).
Req 5 — Pace Counting
You have a bearing. You know the distance from the map. But after 300 meters of walking through featureless forest, how do you know when you have gone far enough? You cannot see your destination yet. There are no trail markers to count. The only measuring device you have is your own stride — and that is exactly what pace counting uses.
What Is a Pace Count?
A pace count is the number of steps (specifically, double-steps) you take to cover a known distance. In orienteering, the standard reference distance is 100 meters. Once you know your pace count for 100 meters, you can measure any distance in the field simply by counting your steps.
One “pace” = two steps. You count every time the same foot (left or right) hits the ground. If you take 62 steps with your left foot to cover 100 meters, your pace count is 62.
Setting Up a 100-Meter Pace Course
This is a hands-on requirement — you need to physically lay out a course and walk it.
- Find a flat, open area — a playing field, a parking lot, or a straight section of trail.
- Measure 100 meters. Use a measuring tape, a pre-measured distance (many running tracks have 100-meter marks), or measure it with a long tape measure or surveyor’s wheel.
- Mark the start and end. Use cones, flags, or simply mark a line on the ground.
- Walk the course at your normal walking pace. Count every time your left foot (or right foot — pick one and be consistent) hits the ground.
- Repeat three times. Your count will vary slightly each time. Average the three counts — that is your walking pace count for 100 meters.
- Run the course and repeat the process. Your running pace count will be lower (fewer, longer strides). Average three runs.
Why Pace Counting Matters
Pace counting answers the question: “How far have I gone?” When you combine it with a compass bearing, you get a complete navigation fix — direction and distance — without any technology at all.
Here is where pace counting saves you:
- Featureless terrain. In a flat pine forest with no landmarks, pace counting is the only way to know when you have reached the vicinity of your control point.
- Confirming your position. If the map shows a trail crossing 400 meters ahead and your pace count says you have walked 400 meters, the next trail you cross confirms you are where you think you are.
- Approaching a control point. In competition, you will often take a bearing from an “attack point” (a nearby obvious feature) to a control that is 100–200 meters away. Pace counting tells you when to start looking.
Adjusting for Terrain
Your pace count on flat ground will not match your pace count on a hillside. Terrain changes your stride length:
| Terrain | Effect on Pace Count |
|---|---|
| Uphill | More paces (shorter strides) — add ~10% |
| Downhill | Slightly more paces (cautious steps) — add ~5% |
| Thick brush | More paces (restricted movement) — add ~15% |
| Soft sand or mud | More paces (less traction) — add ~10% |
| Snow | More paces — add 10–25% depending on depth |
Experienced orienteers calibrate their pace count on different terrains over time. Start with flat-ground numbers and adjust as you gain experience.

🎬 Video: Establishing a Pace Count — https://www.youtube.com/watch?v=YAS9Cc8fhO8
Pace Count Record
Fill in after your calibration- Walking pace count (average of 3 runs): Record your number for flat terrain.
- Running pace count (average of 3 runs): Record your number for flat terrain.
- Uphill adjustment: Note your estimated percentage increase.
- Thick brush adjustment: Note your estimated percentage increase.
Req 6a — Control Description Symbols
When you arrive at a control circle on your orienteering map, you know the general area — but the control flag could be on a boulder, behind a tree, next to a stream junction, or in a depression. The control description symbols are an international pictorial language that tells you the exact feature and its precise location, without using any written words. This system, maintained by the International Orienteering Federation (IOF), works the same whether you are competing in Sweden, Japan, or Ohio.
Why Symbols Instead of Words?
Orienteering is an international sport. A description sheet written in Finnish would not help a Brazilian competitor. The IOF symbol system eliminates the language barrier — every orienteer in the world reads the same pictographs the same way.
The Eight Columns
Control description symbols are organized into a table with up to eight columns. Each column has a specific purpose:
| Column | Purpose | Example |
|---|---|---|
| A | Control number (sequence) | 1, 2, 3… |
| B | Control code (marker ID) | 101, 205, 47 |
| C | Which of similar features | Northern, middle, eastern |
| D | Feature (what the control is on) | Boulder, re-entrant, path crossing |
| E | Appearance / size | Large, small, shallow, deep |
| F | Dimensions | 2m × 3m, height 5m |
| G | Position relative to feature | North side, foot, bend |
| H | Other information | First aid, refreshment, manned |
For this requirement, you need to identify 20 symbols and explain what they mean. Focus on the most common ones — these are the symbols you will encounter at nearly every event.
Common Control Description Symbols to Learn
Landform Features (Column D)
These symbols describe the terrain feature where the control is placed:
- Terrace — A flat area on a slope, like a natural shelf.
- Spur — A small ridge projecting from a larger slope.
- Re-entrant — A small valley or indentation in a hillside.
- Earth bank — A steep, distinct change in ground level.
- Quarry — An excavated area, typically with steep sides.
- Depression — A hollow or pit in the ground.
- Small depression — A smaller version, often just 1–2 meters across.
- Hill / Knoll — A distinct rise in the ground.
- Cliff — A steep rock face.
- Boulder — A distinct large rock.
- Boulder field — An area covered with boulders.
Water Features (Column D)
- Lake — A body of standing water.
- Pond — A small body of standing water.
- Stream — Flowing water.
- Marsh — Wetland area.
- Spring — A point where water emerges from the ground.
Vegetation Features (Column D)
- Open land — Field, meadow, or clearing.
- Distinct tree — A single tree that stands out from its surroundings.
- Vegetation boundary — The line where one type of vegetation meets another (e.g., forest edge).
Human-Made Features (Column D)
- Path or trail crossing — Where two paths intersect.
- Road — A wider, more developed path.
- Fence — A fence, wall, or similar linear barrier.
- Building — A structure.
- Ruin — Remains of a structure.
Position Symbols (Column G)
- North side — Control is on the north side of the feature.
- Southeast corner — Control is at the SE corner.
- Upper part — Control is on the upper portion.
- Lower part / Foot — Control is at the base.
- Between — Control is between two features.
- Bend / Corner — Control is at a bend in a linear feature.
- Junction / Crossing — Control is where features meet.

Req 6b — Control Description Sheets
Every orienteering event gives you two essential documents: a map and a control description sheet (also called “clue sheet” or “control card”). The map shows where each control circle is located. The control description sheet tells you exactly what feature the flag is on and where on that feature to find it. Without it, you would arrive at the general area of a control and have to search blindly — a massive waste of time in competition.
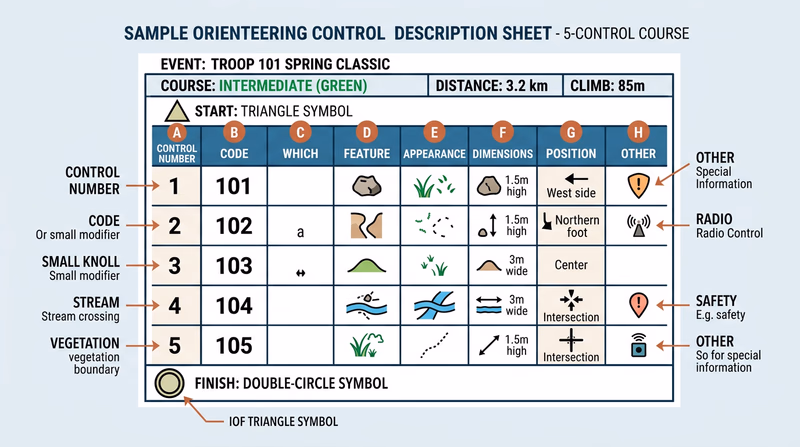
Anatomy of a Control Description Sheet
A control description sheet is a grid with one row per control point and up to eight columns. Here is what a typical entry looks like:
| A | B | C | D | E | F | G | H |
|---|---|---|---|---|---|---|---|
| 1 | 101 | Boulder | Large | 3m | North side | ||
| 2 | 205 | Eastern | Re-entrant | Shallow | Upper part | ||
| 3 | 47 | Path | Crossing | Water |
What Each Column Means
Column A — Control number: The sequence you must visit the controls in (for cross-country events). In score orienteering, there is no required order.
Column B — Control code: A unique number on the physical flag marker. When you reach a control, check this code against your sheet to confirm you found the right one — not someone else’s control from a different course.
Column C — Which feature: When multiple similar features exist near the control circle, this column tells you which one. “Northern” means the northernmost of several. “Middle” means the one in between.
Column D — Feature: The type of terrain or man-made feature the control is placed on. This is the column that uses the IOF symbols you learned in Req 6a.
Column E — Appearance or size: Describes the feature further — large, small, shallow, deep, overgrown, ruined.
Column F — Dimensions: The feature’s size in meters (height, length, or both).
Column G — Position: Where on the feature the flag is placed — north side, foot, bend, junction, between.
Column H — Other information: Special notes like “manned control” (a volunteer is stationed there), first aid station, water/refreshment available, or “follow taped route from here.”
The Header and Footer
Above the grid, the sheet shows:
- Event name and date
- Course name or class (e.g., “Orange Course” or “M16” for Males age 16)
- Course length and climb (e.g., 4.2 km, 150m climb)
- Number of controls
Below the grid, special symbols may indicate:
- Start: A triangle symbol with the start location description
- Finish: A double circle with the finish location description
- Route markings: Sections where you must follow a marked (taped) route rather than navigate freely
Reading a Real Example
Imagine you are running a cross-country course and your control description sheet shows this for Control 3:
| 3 | 117 | Southern | Knoll | Small | 2m | NW side | |
This tells you: “Control 3 (code 117) is on the northwest side of the southern small knoll, which is about 2 meters high.” When you arrive at the control circle on your map, you might see two small knolls. You are looking for the southern one. Walk to its northwest side, and you should see flag #117.
Req 6c — Navigation Techniques
If compass bearings and pace counting are the engine of orienteering, these nine techniques are the steering wheel. They are what separate a beginner stumbling through the woods from a confident navigator who moves decisively from control to control. Learn them here, then practice each one on a real course.
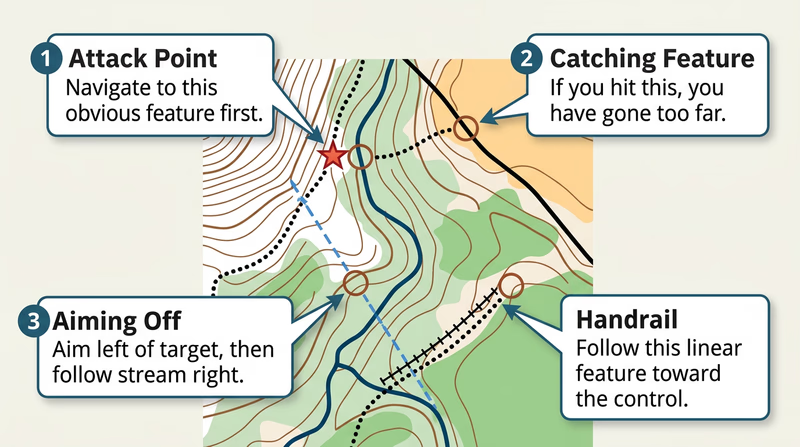
Attack Point
An attack point is a large, easily found feature near a control point that you navigate to first, then use as a launching pad for precise navigation to the control itself. The idea is simple: it is much easier to find a big feature (a trail junction, a building, a hilltop) than a small one (a boulder, a depression). Get to the big feature, then take a careful bearing and pace count for the last 100–200 meters.
When to use it: Always. Every leg of a course should have an attack point. Identify it during your pre-race study of the control descriptions.
Collecting Feature
A collecting feature is a large, unmistakable feature along your route that confirms you are on track. As you travel from one control to the next, you “collect” these features as checkpoints. If you cross the stream that the map shows at 300 meters, you know your navigation is correct.
When to use it: On every leg. Plan which features you should pass and when. If you do not encounter them, you know to reassess.
Catching Feature
A catching feature is a large feature beyond your destination that tells you if you have gone too far. Think of it as a safety net. If your control is in a re-entrant 400 meters before a road, the road is your catching feature. If you hit the road, you have overshot and need to backtrack.
When to use it: Every time you navigate toward a control in dense terrain. Without a catching feature, overshooting means you might wander indefinitely.
Aiming Off
Aiming off means deliberately setting your compass bearing a few degrees to one side of your actual destination — especially when it sits on a linear feature like a trail, stream, or fence. When you reach the linear feature, you know which direction to turn because you aimed to miss on a specific side.
When to use it: Whenever your control is on or near a linear feature. It eliminates the agonizing question: “Did I land left or right of the control?”
This technique was briefly introduced in Req 3b. Now you understand the tactical reasoning behind it.
Contouring
Contouring means traveling along a slope at a constant elevation rather than going straight over a hill. You follow the contour lines, essentially walking a level path around the obstacle. It takes longer in horizontal distance but avoids exhausting climbs.
When to use it: When climbing over a hill would cost more time and energy than going around it. The steeper and higher the hill, the more valuable contouring becomes.
Reading Ahead
Reading ahead means studying the next section of your route on the map while you are still navigating the current section. Before you reach a control, you have already planned your route to the next one — which attack point to use, which features to collect, which direction to leave the control.
When to use it: Constantly. Elite orienteers read ahead while running. As a beginner, take a few seconds at each control to study the next leg before you start moving.
Handrail
A handrail is a linear feature (trail, stream, fence, power line, vegetation edge) that runs roughly parallel to your intended direction. Instead of navigating purely by bearing, you follow the handrail — it keeps you on course without constant compass checks.
When to use it: Whenever a linear feature runs near your route. Following a trail for 500 meters and then cutting into the woods for the final 100 meters is often faster and more reliable than a 600-meter compass bearing through dense forest.
Relocation
Relocation is the process of figuring out where you are when you have become lost or disoriented. It is not a failure — it is a skill. Every orienteer, no matter how experienced, occasionally needs to relocate.
Steps for relocation:
- Stop moving. Continuing to travel when lost makes things worse.
- Orient your map. Align it with the compass so north matches.
- Look for identifiable features. A hilltop, a stream, a clearing — anything you can match to the map.
- Take bearings to visible features. If you can identify two or more features, take compass bearings to them and plot the lines on your map. Where they intersect is your approximate position.
- Move to a catching feature. If you still cannot pinpoint your location, head for the nearest large, unmistakable feature — a road, a lake, a major trail.
Rough vs. Fine Orienteering
These are not two separate techniques but rather two modes of navigation that you switch between constantly during a course.
Rough orienteering means navigating quickly using general direction, major features, and handrails. You are moving fast and not worrying about precise bearings. You use rough orienteering for the middle portion of a leg — the “travel” phase where you are covering distance between controls.
Fine orienteering means slowing down and navigating precisely — careful bearings, exact pace counting, reading every feature on the map. You use fine orienteering for the final approach to a control, especially when the terrain is complex and the control is on a small feature.
The transition from rough to fine usually happens at your attack point. You “rough it” to get there quickly, then “fine it” to hit the control accurately.
Intermediate Orienteering Techniques Detailed explanations and diagrams of advanced navigation techniques with real course examples. Link: Intermediate Orienteering Techniques — https://betterorienteering.org/intermediate-techniquesReq 7a — Orienteering Events
All the map reading, compass work, and technique study you have done so far leads to this: getting out into the woods and putting your skills to the test on a real course. Three events. At least one cross-country. It is time to compete.
Finding Events Near You
Orienteering events happen more often than most people realize. Here is where to find them:
- Orienteering USA (OUSA) maintains an event calendar listing events nationwide. This is the best starting point.
- Local orienteering clubs run monthly events in parks, forests, and recreation areas. Most clubs welcome beginners with open arms and often provide instruction at the start.
- Scouting district or council events — some councils organize orienteering meets specifically for Scouts working on this badge.
- State and regional parks sometimes host orienteering events, especially in the fall and spring.
If there is no local club near you, talk to your merit badge counselor. You may be able to set up your own course (which also helps with Req 8) and have your troop run it as an event.
What to Expect at Your First Event
Before the Event
- Register in advance if required. Most events have online registration.
- Choose your course difficulty. Events typically offer courses at different levels: white (very easy), yellow (easy), orange (intermediate), and green/red/blue (advanced). Start with white or yellow for your first event.
- Gear up. Bring your compass, a watch, a whistle, water, appropriate clothing, and your first aid kit. Wear shoes with good traction — trail runners or light hiking boots work well. Long pants protect against thorns and brush.
At the Event
- Check in at the registration table. You will receive your map (face-down until your start time), a control description sheet, and a punch card or electronic timing device (e-punch or SI card).
- Study the map during your allocated start time.
- Go. At your signal, flip your map and begin navigating.
- At each control, verify the code number matches your description sheet, then punch your card or tap your e-punch.
- Finish by crossing the finish line and turning in your card.
After the Event
- Check results. Your time and any missed controls will be posted.
- Walk the course with experienced orienteers. Many events offer a “walk-through” or informal discussion afterward where you can compare routes and learn from others.
Event Day Checklist
Pack and verify before each event- Orienteering compass: Charged or calibrated, with a working needle.
- Watch: For time management, especially in score events.
- Whistle: Three blasts = distress signal.
- Water bottle: At least 500 mL for short courses, more for longer ones.
- First aid kit: The pocket-sized version from Req 1.
- Long pants and long sleeves: Protection from brush, thorns, and ticks.
- Trail-appropriate shoes: Good traction, ankle support optional.
- Snack: An energy bar or trail mix for longer events.
- Red pen or pencil: For marking your route on the map afterward.
The Three Events
Your three events should give you a range of experience:
Cross-country event (required) — The classic format. You visit controls in a set order, navigating freely between them. This tests every skill: compass bearings, map reading, pace counting, route choice, and the navigation techniques from Req 6c.
Score event — Consider making one of your three events a score orienteering format. The time-limited, choose-your-own-order format develops different skills: time management, risk assessment, and rapid route planning.
Any format — Sprint, night, or another cross-country. Each format teaches something different.
Req 7b — Event Reports
This requirement is where learning actually happens. Finishing an orienteering course feels great, but the real improvement comes from analyzing what you did afterward — control by control, leg by leg. The best orienteers in the world review every race. You should too.
The Four Parts of Your Report
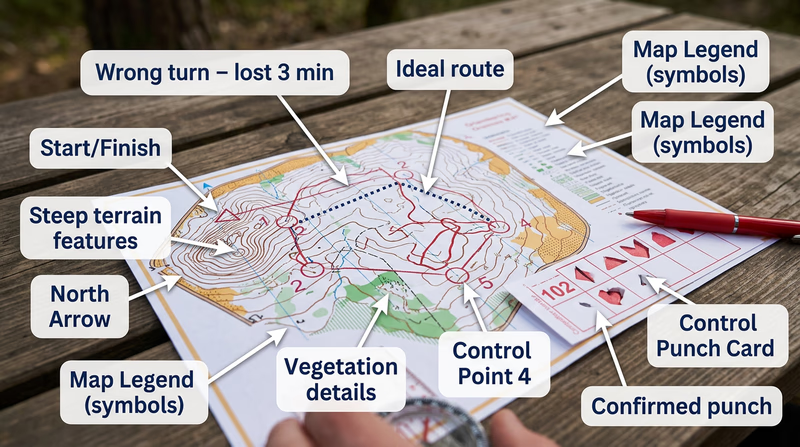
1. Master Map and Control Description Sheet
After most events, you can keep your competition map or request a copy of the master map showing all control locations. Attach or include:
- A copy (or photo) of the master map with the course printed on it — start triangle, numbered control circles, and finish double circle
- The control description sheet you used during the event
If you took a photo of the map at the event or the organizer posts maps online afterward, use those.
2. Your Route
Using a red pen (standard in orienteering), draw the actual route you took on the map. Be honest — include the detours, the wrong turns, and the places where you wandered. Mark key decision points:
- Where did you leave each control?
- Where did you change direction?
- Where did you realize you were off course?
- What was your attack point for each control?
Comparing your route to the “ideal” route (which you can discuss with other competitors or your counselor) reveals where you lost the most time.
3. Improving Your Time
For each leg (the section between two consecutive controls), ask yourself:
- Route choice: Did you take the best route, or was there a faster option you did not see? Sometimes the straight-line bearing through thick brush is slower than a longer route following a trail.
- Attack point selection: Did you use a clear attack point, or did you try to navigate directly to the control? Would a different attack point have been faster?
- Navigation speed: Did you hesitate or stop to re-check your map too many times? Where were you confident and fast?
- Technique usage: Did you use handrails, collecting features, catching features, and aiming off effectively? Which techniques did you forget to apply?
4. Your Major Weaknesses
Be specific and honest. Generic statements like “I need to be faster” do not help. Focus on what actually went wrong:
| Weakness Example | What to Practice |
|---|---|
| “I overshot control 3 because I didn’t use a catching feature” | Pre-identify catching features during map study |
| “I lost 4 minutes relocating after control 5 because I misread the contour lines” | Practice contour reading on local topo maps |
| “My pace count was inaccurate on the uphill section” | Recalibrate pace count on hilly terrain |
| “I panicked when I couldn’t find control 2 and ran in circles” | Practice relocation drills |
| “I chose the trail route every time even when a bearing would have been faster” | Practice off-trail compass navigation |
Writing the Report
Keep it organized. A good format:
- Event header: Name, date, location, course level, total time, number of controls found.
- Attached documents: Map with route drawn, control description sheet.
- Leg-by-leg analysis: For each leg, note your time (if available), route choice, what went well, and what went wrong.
- Summary: Top 2–3 weaknesses, specific actions to improve for next time.
One to two pages per event is plenty. Quality analysis beats quantity.
Req 8 — Setting Up a Course
This requirement asks you to shift from competitor to course designer. You choose one of two options:
- Option A: Set up a cross-country course at least 2,000 meters long with at least five control markers
- Option B: Set up a score orienteering course with at least 12 control points and a 60-minute time limit
Both options require a master map and a control description sheet. Read through both options below and choose the one that best fits your situation, your available terrain, and the resources you have.
Option A — Cross-Country Course
A cross-country course visits controls in a fixed sequence. Competitors must find them in order. Designing one teaches you to think about leg difficulty, route choice, and how terrain creates navigation challenges.
Planning the Course
Choose your venue. A park, camp property, or Scout reservation with varied terrain works best. You need features — hills, streams, trails, clearings, boulders — to place controls on. A flat, featureless field will not create an interesting course.
Obtain a map. Use a USGS topographic map, an existing orienteering map if one exists for the area, or create a simplified map. Draw magnetic north lines on it (your work from Req 4d applies here).
Select control locations. For each control, pick a distinct, identifiable terrain feature — something you can describe unambiguously on the control description sheet. Place controls at features like:
- Trail junctions or bends
- Stream crossings or junctions
- Hilltops, saddles, or re-entrants
- Boulders, clearings, or vegetation boundaries
- Buildings or ruins
Plan the legs. Arrange controls so that the total course distance is at least 2,000 meters (2 km). Vary the leg difficulty — some should be along obvious handrails, others should require compass bearings through trickier terrain. The course should flow logically and avoid dangerous areas.
Assign control codes. Give each control a unique number (e.g., 101–105) that does not match its sequence number.
Setting Up in the Field
- Hang control markers (orange-and-white flags or homemade equivalents) at the exact location described on the sheet. Hang them at eye level and visible from at least a few meters away.
- Mark the control code clearly on each marker.
- Verify with a buddy. Have someone else use your map and descriptions to find each control. If they struggle, adjust.
Option B — Score Course
A score course has no required order. Competitors choose which controls to visit within a time limit. Harder-to-find or more distant controls are worth more points. Designing one teaches you about risk-reward tradeoffs and terrain difficulty assessment.
Designing the Point Values
Assign point values based on difficulty:
| Difficulty | Points | Typical Location |
|---|---|---|
| Easy | 10–20 | Near trails, obvious features, close to start |
| Moderate | 30–40 | Requires compass bearing, farther from trails |
| Hard | 50–60 | Off-trail, requires precise navigation, distant |
Make sure the total points available exceed what anyone could reasonably collect in 60 minutes. This forces strategic choices.
Penalty for Overtime
Standard score orienteering deducts points for exceeding the time limit — typically 10 points per minute over. State this rule clearly in the event briefing.
Preparing the Master Map and Control Description Sheet
Both options require these two documents:
Master Map
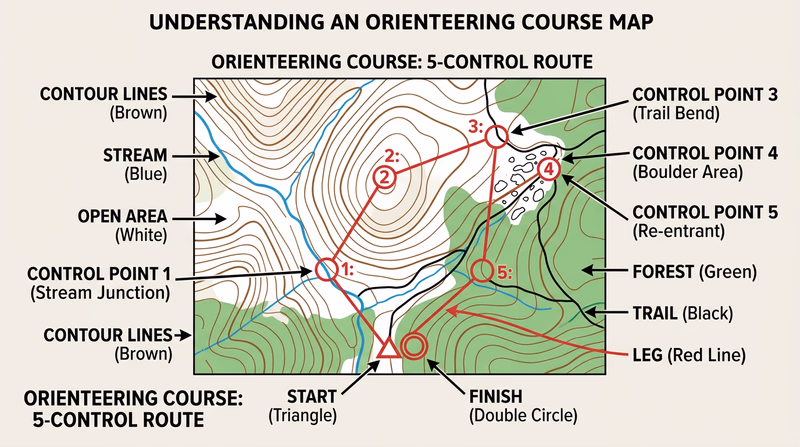
The master map shows:
- Start location (marked with a triangle)
- All control locations (circles with numbers)
- Connecting lines between controls (for cross-country) or all controls scattered (for score)
- Finish location (double circle)
Draw this on a clean copy of your base map. Make copies for competitors.
Control Description Sheet
Create a sheet following the IOF format you studied in Req 6b. Each row describes one control using the eight-column format. Every control needs at minimum:
- Column A: Sequence number (cross-country) or point value (score)
- Column B: Control code
- Column D: Feature symbol
- Column G: Position on feature
Course Design Quality Check
Verify before opening the course to competitors- Total distance is at least 2,000m (Option A) or at least 12 controls exist (Option B): Meets the minimum requirement.
- Every control is on a distinct, identifiable feature: No ambiguous placements.
- Control descriptions match actual field placement: Walk and verify each one.
- Control codes do not match sequence numbers: Prevents guessing.
- Course avoids hazards: No cliff edges, deep water, private property, or road crossings.
- Map has magnetic north lines drawn: Competitors can navigate accurately.
- Master map is clean and legible: All symbols, circles, and lines are clear.
Req 9 — Acting as an Official
Running a course tests your navigation skills. Officiating an event tests something different — organization, fairness, attention to detail, and the ability to keep an event running smoothly while handling the unexpected. This requirement puts you on the other side of the start line.
Official Roles at an Orienteering Event
Orienteering events need volunteers in several positions. You may serve in one or more of these roles:
Starter
The starter manages the start area and sends competitors off at their assigned times:
- Pre-start briefing: Explain the rules, the course format, safety procedures, and the time limit (for score events). Make sure every competitor knows the distress signal (three whistle blasts) and what to do if they cannot find a control.
- Timed starts: In formal events, competitors start at intervals (usually 2–3 minutes apart) to avoid following each other. The starter calls each competitor, hands out the map (face-down until the start signal), and records the start time.
- Equipment check: Verify that every competitor has a compass, a whistle, and water.
Finish Timer
The finish timer records each competitor’s finish time and calculates results:
- Record the exact time each competitor crosses the finish line.
- Collect punch cards or download e-punch data.
- Verify that all controls were visited in the correct order (cross-country) or calculate point totals minus overtime penalties (score).
- Post preliminary results.
Control Monitor
At some events, an official is stationed at one or more controls to verify that competitors visit the correct location:
- Confirm the control flag is visible and correctly placed.
- Assist with any emergency situations.
- Report any problems (damaged flag, missing punch) to the event director.
Safety Officer
The safety officer ensures all competitors are accounted for:
- Maintain a list of all competitors and their start times.
- Track check-ins at the finish. If a competitor has not returned within a reasonable time after the course closes, initiate a search.
- Know the location of the nearest medical help and have a communication plan.
Tips for Being a Good Official
- Be fair and consistent. Apply the rules the same way for every competitor.
- Stay organized. Use a checklist for your role. Write down everything — start times, finish times, notes about problems.
- Anticipate problems. What if it starts raining? What if a control flag blows away? What if a competitor gets injured? Think through scenarios and have a plan.
- Be approachable. Competitors, especially beginners, will have questions. Answer patiently and clearly.
🎬 Video: How to Setup a Compass Course — https://www.youtube.com/watch?v=IfSaBKaau4k
Official's Event Checklist
Complete before, during, and after the event- All control flags placed and verified: Walk the course before competitors start.
- Competitor list complete: Name, start time, emergency contact for each participant.
- Rules briefed: Safety, format, time limits, distress signal explained.
- Timing system ready: Stopwatch charged, punch cards distributed, or e-punch working.
- Safety plan in place: Know the closest road, phone signal, and medical facility.
- All competitors accounted for at finish: No one left on the course.
- Course taken down: Retrieve all flags and markers after the event.
Req 10 — Teaching Orienteering
Teaching is the ultimate test of understanding. If you can explain magnetic declination to a Scout who has never held a compass, you truly know it. This final requirement asks you to pass your orienteering knowledge forward — and in the process, solidify your own mastery.
Planning Your Teaching Session
A good orienteering lesson has both classroom and field components. One without the other falls flat: pure lecture bores everyone, and jumping straight into the field without foundations leads to confusion.
Suggested Lesson Plan (60–90 minutes)
Part 1: Indoor or Shelter (20–30 minutes)
- What is orienteering? Give a quick overview using what you learned in Req 2. Show a sample orienteering map and a control description sheet.
- Compass basics. Pass out compasses and teach the parts (baseplate, bezel, needle, direction-of-travel arrow). Let everyone hold one and watch the needle settle. Reference your knowledge from Req 3a.
- Taking a bearing. Demonstrate how to set a bearing and follow it. Keep it simple — “set the number, red in the shed, walk.” This builds on Req 3b.
- Map reading. Show a topo map and explain contour lines using the five terrain features from Req 4a. Point out the common symbols from Req 4b.
Part 2: Outdoor Practice (40–60 minutes)
- Bearing exercise. Set up 3–4 stations in a field. Give each group a bearing and a distance (e.g., “Walk bearing 270° for 80 meters”). If they arrive at the correct station, they get the next bearing. This creates a simple course they can complete using only compass and pace count.
- Map orientation. Give everyone a map of the area and have them orient it using their compass. Then ask: “Point to the [building/parking lot/stream].” If they oriented correctly, they will point the right direction.
- Mini-course. If you have time and space, set up a short 3–5 control course using ribbons or cones as markers. Let them navigate it in pairs.
Teaching Techniques That Work
Show, then do
Demonstrate each technique yourself first, then have everyone try it. Walk through taking a bearing step-by-step, then pair up Scouts and let them practice on each other.
Use their language
When explaining declination, you might say: “Imagine the map says ’north is this way,’ but your compass needle says ’no, north is a little bit that way.’ Declination is the gap between those two directions.” Analogies beat technical definitions every time.
Celebrate mistakes
When someone follows a bearing and ends up 50 meters off target, celebrate it — that is exactly how they learn why pace counting and technique matter. Say: “You did the compass part right, but without pace counting, you did not know when to stop. Let’s add that.”
Adapt to your audience
For younger Scouts (11–12), keep it to compass basics and a short course. For older Scouts (15–17), you can cover declination, attack points, and the techniques from Req 6c.
What to Prepare
Teaching Session Prep
Gather these before your session- Enough compasses for at least one per pair: Borrow from the troop if needed.
- A topographic map of the practice area: Or print one from USGS topoView.
- A sample orienteering map and control description sheet: Show what a real event looks like.
- Bearing exercise cards: Pre-written bearings and distances for the outdoor stations.
- Station markers: Cones, flags, or ribbons for marking controls.
- A whiteboard or poster: For drawing compass diagrams (optional but helpful).

Extended Learning
A. Congratulations
You have earned the Orienteering merit badge — one of the most hands-on, field-tested badges in all of Scouting. You can read a topographic map, navigate by compass bearing, count paces through trackless terrain, and find a hidden flag in the middle of the woods. Those are skills that work when every battery is dead and every satellite is out of reach. What follows are ways to take your navigation even further.
B. Deep Dive: Route Choice Strategy
In competition, the difference between a good time and a great time often comes down to route choice — the path you take between two controls. On every leg, you face a fundamental tradeoff: do you take the shortest straight-line route (which may go through thick brush, over hills, or across unmapped terrain), or do you take a longer route that follows trails, avoids climbs, and keeps you on fast-running ground?
The answer depends on three variables: distance, terrain difficulty, and your confidence in the navigation. A 400-meter straight-line bearing through dense green vegetation (slow running) might take longer than a 700-meter route that follows a trail to an attack point, then cuts in with a short bearing.
To improve your route choice, try this exercise: after an event, look at the master map and identify three to five legs where multiple routes were possible. For each leg, estimate the time for each route option using your pace count and terrain knowledge. Then compare with what you actually did. Over time, you develop an intuition for when the trail route beats the straight-line route — and when it does not.
Experienced orienteers talk about three classes of route:
- Straight (bearing) route: Direct compass navigation. Best when the terrain is open and the distance is short.
- Path route: Follows trails and handrails. Best when the trail network goes roughly where you need and the off-trail terrain is slow or complex.
- Contouring route: Goes around hills rather than over them. Best when the climb is steep and the alternative adds minimal distance.
The best competitors switch between these classes within a single leg — following a trail for the first half, cutting off-trail for the approach. Practice reading the map for route options even when you are not competing. It is a skill that rewards constant attention.
C. Deep Dive: Electronic Timing and Modern Competition Technology
The old-fashioned way to prove you visited a control was to use a pin punch to poke a pattern into a paper card. It worked, but it was slow, error-prone, and impossible to verify after the fact. Modern orienteering uses electronic timing systems that have transformed the sport.
SPORTident (SI) is the most widely used system worldwide. Each competitor carries a small electronic “finger stick” (called an SI card) worn on a finger. At each control, a small station unit is mounted next to the flag. You tap your stick to the station — it records the control code and timestamp in both the stick and the station. At the finish, your stick is read by a computer that instantly produces your split times for every leg, compares them to other competitors, and checks that you visited every control in the correct order.
EMIT is the dominant system in Scandinavia. Instead of a finger stick, you carry a small card with a built-in battery. The punching process is similar — tap the card to the station — but the technology behind it is different.
Timing data has revolutionized how orienteers analyze performance. With split times for every leg, you can see exactly where you lost or gained time compared to competitors. Services like Winsplits and Livelox display your GPS track overlaid on the orienteering map, showing your actual path compared to the fastest routes. This level of analysis was impossible in the pin-punch era.
If you attend a larger event, you will likely encounter electronic timing. The registration desk will assign you an SI card or EMIT device if you do not own one. Rental fees are usually a few dollars.
D. Deep Dive: Contour Interpretation for Advanced Navigation
You learned the basics of contour reading in Req 4a — hills, valleys, ridges, saddles, and depressions. Advanced contour reading goes much deeper and is the skill that separates intermediate orienteers from expert ones.
Contour shapes as navigation features. A subtle bend in a contour line might represent a small re-entrant that is just 3 meters deep. On the ground, it looks like a shallow dip in the hillside. An expert orienteer uses that dip as a collecting feature or even an attack point. A beginner walks right past it without noticing.
Reading slope steepness in real time. As you run, you should constantly match the steepness of the ground under your feet with the contour spacing on the map. If the map shows wide-spaced contours (gentle slope) but you are climbing steeply, you have drifted off course. This continuous slope-matching is one of the most powerful relocation techniques.
Visualizing terrain in three dimensions. Practice looking at a section of contour lines and building a mental 3D model of the landscape before you see it. Can you predict, from the map alone, whether you will see a distinct hilltop to your left when you cross the stream? Will the ground flatten out at the top of the next climb, or does it continue to steepen? The faster you build these mental models, the faster you navigate.
Try this drill: find a USGS topo map of an area you have never visited. Study a 1-kilometer square for five minutes. Write down what you expect to see if you were walking north through that square. Then visit the area (or view it on satellite imagery) and compare your predictions. This builds the visual translation skill that makes contour reading instinctive.
E. Real-World Experiences
Local Orienteering Club Events
Rogaine Events
Adventure Racing
National Orienteering Championships
F. Organizations
The national governing body for orienteering in the United States. Maintains the event calendar, supports local clubs, organizes national championships, and provides resources for beginners and instructors. Your first stop for finding events and getting connected.
Organization: Orienteering USA (OUSA) — https://orienteeringusa.org/
The worldwide governing body for orienteering, overseeing world championships in foot, mountain bike, ski, and trail orienteering. Their website offers rules, maps, and results from international competitions.
Organization: International Orienteering Federation (IOF) — https://orienteering.sport/
A nonprofit organization dedicated to supporting orienteering development in the United States through grants, mapping projects, and youth programs. They fund new orienteering maps and support clubs that need resources to grow.
Organization: Orienteering Foundation — https://orienteeringfoundation.org/
The federal agency responsible for producing topographic maps of the United States. Their free topoView tool lets you download and print topo maps for any area in the country — essential for orienteering practice and course design.
Organization: U.S. Geological Survey (USGS) — https://www.usgs.gov/programs/national-geospatial-program/topographic-maps