Req 3b — Taking a Compass Bearing
Knowing what a compass is means nothing if you cannot use it to get from Point A to Point B through unmarked terrain. Taking a bearing — and then walking that bearing accurately — is the single most fundamental orienteering skill. Master this, and every other technique in this badge builds on top of it.
What Is a Bearing?
A bearing is a direction expressed as a number of degrees from north, measured clockwise. North is 0° (or 360°). East is 90°. South is 180°. West is 270°. If someone tells you to “walk a bearing of 135°,” they mean head southeast — exactly halfway between south and east.
Taking a Bearing from a Map
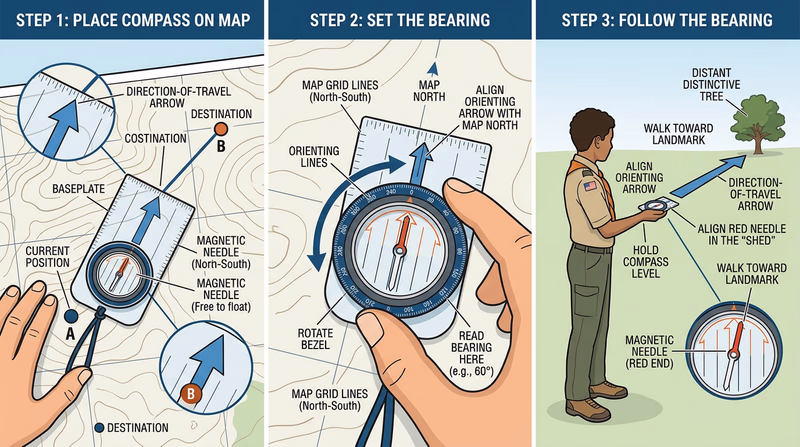
This is the process you will use constantly during orienteering events. You know where you are on the map and where you want to go, and you need the compass to tell you which direction to walk.
- Place the compass on the map so the baseplate edge connects your current position to your destination. The direction-of-travel arrow should point toward where you want to go.
- Rotate the bezel until the orienting lines inside the housing are parallel to the north-south grid lines on the map, with the orienting arrow pointing toward the top of the map (north).
- Read the bearing at the index line where the bezel meets the direction-of-travel arrow.
- Pick up the compass. Hold it flat in front of you and turn your whole body until the red end of the magnetic needle sits inside the orienting arrow (this is called “putting red in the shed”).
- Look up along the direction-of-travel arrow and pick a visible landmark — a distinctive tree, a rock, a fence post.
- Walk to that landmark, then repeat: hold the compass, align the needle, pick the next landmark.
Taking a Field Bearing
Sometimes you see something in the landscape — a hilltop, a building, a distinctive tree — and want to know what bearing it is from your position.
- Hold the compass flat at waist level with the direction-of-travel arrow pointing at the feature.
- Rotate the bezel until the red end of the needle sits inside the orienting arrow.
- Read the bearing at the index line. That is the bearing from you to that feature.
This is useful for identifying features on a map (“that hill is at 230° from me”) and for triangulating your position when you are unsure where you are.
Following a Bearing Accurately
Taking the bearing is the easy part. Walking it through dense forest without drifting is where most beginners struggle. Here are techniques that keep you on course:
Leapfrogging with a Buddy
If you are orienteering with a partner (as required by Scouting America Youth Protection policies), send your buddy ahead along your bearing line. When they reach a landmark, walk to them and repeat. Two people leapfrogging stay on a straight line much better than one person walking alone.
Aiming Off
If your destination is on a linear feature (a trail, a stream, a fence), deliberately aim a few degrees to one side. When you hit the feature, you know which direction to turn. If you aimed straight and missed, you would not know whether to go left or right. This technique is covered more deeply in Req 6c — Navigation Techniques.
Counting Paces
Combine your bearing with a pace count (covered in Req 5) to know not just which direction but how far you have traveled. Together, bearing and pace count give you a position fix in featureless terrain.