Req 6b — Control Description Sheets
Every orienteering event gives you two essential documents: a map and a control description sheet (also called “clue sheet” or “control card”). The map shows where each control circle is located. The control description sheet tells you exactly what feature the flag is on and where on that feature to find it. Without it, you would arrive at the general area of a control and have to search blindly — a massive waste of time in competition.
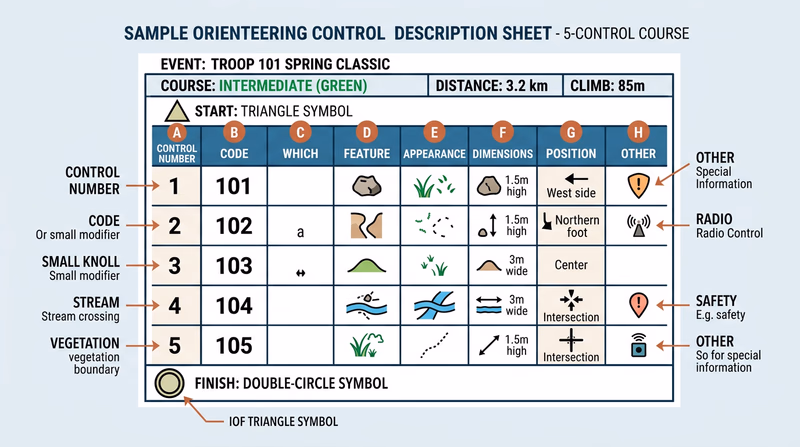
Anatomy of a Control Description Sheet
A control description sheet is a grid with one row per control point and up to eight columns. Here is what a typical entry looks like:
| A | B | C | D | E | F | G | H |
|---|---|---|---|---|---|---|---|
| 1 | 101 | Boulder | Large | 3m | North side | ||
| 2 | 205 | Eastern | Re-entrant | Shallow | Upper part | ||
| 3 | 47 | Path | Crossing | Water |
What Each Column Means
Column A — Control number: The sequence you must visit the controls in (for cross-country events). In score orienteering, there is no required order.
Column B — Control code: A unique number on the physical flag marker. When you reach a control, check this code against your sheet to confirm you found the right one — not someone else’s control from a different course.
Column C — Which feature: When multiple similar features exist near the control circle, this column tells you which one. “Northern” means the northernmost of several. “Middle” means the one in between.
Column D — Feature: The type of terrain or man-made feature the control is placed on. This is the column that uses the IOF symbols you learned in Req 6a.
Column E — Appearance or size: Describes the feature further — large, small, shallow, deep, overgrown, ruined.
Column F — Dimensions: The feature’s size in meters (height, length, or both).
Column G — Position: Where on the feature the flag is placed — north side, foot, bend, junction, between.
Column H — Other information: Special notes like “manned control” (a volunteer is stationed there), first aid station, water/refreshment available, or “follow taped route from here.”
The Header and Footer
Above the grid, the sheet shows:
- Event name and date
- Course name or class (e.g., “Orange Course” or “M16” for Males age 16)
- Course length and climb (e.g., 4.2 km, 150m climb)
- Number of controls
Below the grid, special symbols may indicate:
- Start: A triangle symbol with the start location description
- Finish: A double circle with the finish location description
- Route markings: Sections where you must follow a marked (taped) route rather than navigate freely
Reading a Real Example
Imagine you are running a cross-country course and your control description sheet shows this for Control 3:
| 3 | 117 | Southern | Knoll | Small | 2m | NW side | |
This tells you: “Control 3 (code 117) is on the northwest side of the southern small knoll, which is about 2 meters high.” When you arrive at the control circle on your map, you might see two small knolls. You are looking for the southern one. Walk to its northwest side, and you should see flag #117.