Req 6c — Navigation Techniques
If compass bearings and pace counting are the engine of orienteering, these nine techniques are the steering wheel. They are what separate a beginner stumbling through the woods from a confident navigator who moves decisively from control to control. Learn them here, then practice each one on a real course.
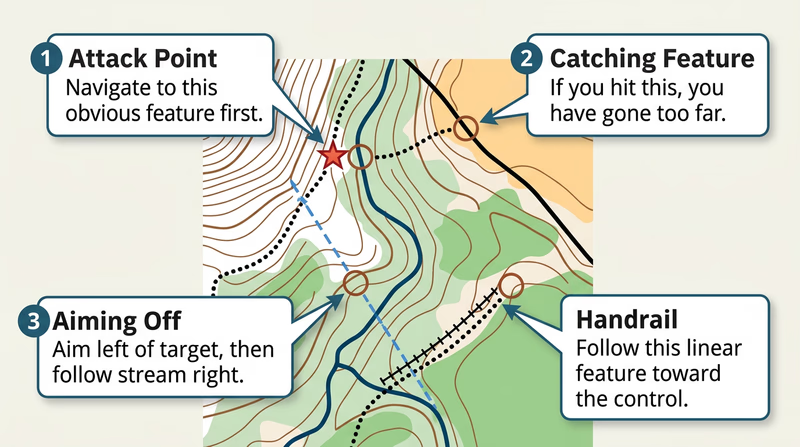
Attack Point
An attack point is a large, easily found feature near a control point that you navigate to first, then use as a launching pad for precise navigation to the control itself. The idea is simple: it is much easier to find a big feature (a trail junction, a building, a hilltop) than a small one (a boulder, a depression). Get to the big feature, then take a careful bearing and pace count for the last 100–200 meters.
When to use it: Always. Every leg of a course should have an attack point. Identify it during your pre-race study of the control descriptions.
Collecting Feature
A collecting feature is a large, unmistakable feature along your route that confirms you are on track. As you travel from one control to the next, you “collect” these features as checkpoints. If you cross the stream that the map shows at 300 meters, you know your navigation is correct.
When to use it: On every leg. Plan which features you should pass and when. If you do not encounter them, you know to reassess.
Catching Feature
A catching feature is a large feature beyond your destination that tells you if you have gone too far. Think of it as a safety net. If your control is in a re-entrant 400 meters before a road, the road is your catching feature. If you hit the road, you have overshot and need to backtrack.
When to use it: Every time you navigate toward a control in dense terrain. Without a catching feature, overshooting means you might wander indefinitely.
Aiming Off
Aiming off means deliberately setting your compass bearing a few degrees to one side of your actual destination — especially when it sits on a linear feature like a trail, stream, or fence. When you reach the linear feature, you know which direction to turn because you aimed to miss on a specific side.
When to use it: Whenever your control is on or near a linear feature. It eliminates the agonizing question: “Did I land left or right of the control?”
This technique was briefly introduced in Req 3b. Now you understand the tactical reasoning behind it.
Contouring
Contouring means traveling along a slope at a constant elevation rather than going straight over a hill. You follow the contour lines, essentially walking a level path around the obstacle. It takes longer in horizontal distance but avoids exhausting climbs.
When to use it: When climbing over a hill would cost more time and energy than going around it. The steeper and higher the hill, the more valuable contouring becomes.
Reading Ahead
Reading ahead means studying the next section of your route on the map while you are still navigating the current section. Before you reach a control, you have already planned your route to the next one — which attack point to use, which features to collect, which direction to leave the control.
When to use it: Constantly. Elite orienteers read ahead while running. As a beginner, take a few seconds at each control to study the next leg before you start moving.
Handrail
A handrail is a linear feature (trail, stream, fence, power line, vegetation edge) that runs roughly parallel to your intended direction. Instead of navigating purely by bearing, you follow the handrail — it keeps you on course without constant compass checks.
When to use it: Whenever a linear feature runs near your route. Following a trail for 500 meters and then cutting into the woods for the final 100 meters is often faster and more reliable than a 600-meter compass bearing through dense forest.
Relocation
Relocation is the process of figuring out where you are when you have become lost or disoriented. It is not a failure — it is a skill. Every orienteer, no matter how experienced, occasionally needs to relocate.
Steps for relocation:
- Stop moving. Continuing to travel when lost makes things worse.
- Orient your map. Align it with the compass so north matches.
- Look for identifiable features. A hilltop, a stream, a clearing — anything you can match to the map.
- Take bearings to visible features. If you can identify two or more features, take compass bearings to them and plot the lines on your map. Where they intersect is your approximate position.
- Move to a catching feature. If you still cannot pinpoint your location, head for the nearest large, unmistakable feature — a road, a lake, a major trail.
Rough vs. Fine Orienteering
These are not two separate techniques but rather two modes of navigation that you switch between constantly during a course.
Rough orienteering means navigating quickly using general direction, major features, and handrails. You are moving fast and not worrying about precise bearings. You use rough orienteering for the middle portion of a leg — the “travel” phase where you are covering distance between controls.
Fine orienteering means slowing down and navigating precisely — careful bearings, exact pace counting, reading every feature on the map. You use fine orienteering for the final approach to a control, especially when the terrain is complex and the control is on a small feature.
The transition from rough to fine usually happens at your attack point. You “rough it” to get there quickly, then “fine it” to hit the control accurately.
Intermediate Orienteering Techniques Detailed explanations and diagrams of advanced navigation techniques with real course examples.