Painting Merit Badge — Complete Digital Resource Guide
https://merit-badge.university/merit-badges/painting/guide/
Introduction & Overview
Painting is everywhere. It protects houses from rain, keeps metal from rusting, helps rooms feel calm or energetic, and turns plain surfaces into something worth noticing. When you earn this merit badge, you are learning both a practical trade skill and a creative design skill.
This badge matters because good painting is not just “put color on a wall.” It means choosing the right coating, preparing the surface carefully, working safely, and leaving the job looking sharp and lasting longer than it would have otherwise.
Then and Now
Then
People have been painting surfaces for thousands of years. Ancient builders used pigments made from minerals, charcoal, and plant materials to decorate caves, temples, and homes. Later, painters mixed oils, limewash, and varnishes by hand because there were no ready-made cans waiting on a store shelf.
For much of history, painting was slow, messy, and highly skilled work. Paint often protected wood from weather, brightened dark rooms, and signaled status. Decorative painters also used paint to imitate expensive materials like marble or fine wood on surfaces that were much cheaper.
Now
Modern painting combines chemistry, design, and craftsmanship. Today’s painters can choose from primers, acrylics, enamels, stains, and specialty coatings designed for exact jobs. Some paints resist mildew. Some stand up to scrubbing. Some are made to cover concrete, metal, or outdoor trim.
Painting has also become safer and more precise. Better ventilation, personal protective equipment, and improved formulas help reduce hazards. At the same time, color tools and digital planning make it easier to choose a look before opening the first can.
Get Ready!
You do not have to be an artist to be a good painter. What matters most is patience, attention to detail, and a willingness to prepare the surface before you ever dip a brush into paint. If you like making things look better and last longer, this badge is a great fit.
Kinds of Painting
House and Building Painting
This is the type most people picture first: walls, ceilings, doors, trim, porches, rails, and fences. The goal is part protection and part appearance. A good house painter knows how to patch, sand, prime, cut in edges, roll large areas, and choose finishes that match the room or surface.
Decorative and Mural Painting
Some painting jobs add personality more than protection. Murals, accent walls, stenciling, and faux finishes all fall into this category. Decorative painting still requires careful prep, but color choice and design become a bigger part of the job.
Staining and Clear Finishes
Not every surface should be covered with opaque paint. Wood stain and varnish let the grain show while still adding color or protection. These finishes are common on furniture, decks, and interior woodwork where people want the material itself to stay visible.
Protective Coatings
Some coatings are mainly about durability. Think of concrete floor coatings, rust-resistant paints for metal, or enamel finishes on surfaces that get touched a lot. These products are chosen for toughness, washability, and resistance to moisture or wear.
Next Steps
You have the big picture now: painting is equal parts planning, chemistry, craftsmanship, and design. The first requirement starts where every good project starts too — with safety.
Req 1 — Work Safe Before You Paint
The most dangerous part of a paint job is often not the painting. It is the sanding dust in the air, the cleaner on your hands, the ladder you climbed without thinking, or the fumes building up in a closed room. A smart painter treats prep and application as a safety job from start to finish.
Start with the Label and the Workspace
Before you open any product, read the label. That sounds simple, but it tells you almost everything you need to know: whether the product is flammable, whether you need gloves or eye protection, how much ventilation is required, and how to clean it up safely.
Then look at the space where you will work.
Safe Setup Before Painting
Do these things before you stir, sand, or roll- Clear the area: Move furniture, cords, and clutter so you do not trip while carrying tools or paint.
- Protect surfaces: Use drop cloths instead of loose plastic under your feet. Plastic can be slippery.
- Improve airflow: Open windows and doors when possible. Use fans to move fumes out, not deeper into the room.
- Check ignition sources: Keep products away from pilot lights, sparks, cigarettes, and anything else that could ignite flammable vapors.
- Plan your exit path: Do not paint yourself into a corner or block a doorway with tools and buckets.
Protect Your Body
Painting can expose you to dust, solvents, and splashes. The right gear depends on the product and the job, but the idea stays the same: keep hazardous material out of your lungs, eyes, and skin.
- Safety glasses protect against drips, sanding dust, and flying debris when scraping.
- Gloves keep cleaners, caulk, stain, and paint off your skin.
- Long sleeves and work clothes protect your arms and make cleanup easier.
- A respirator or mask rated for the task may be needed when sanding old coatings, spraying finishes, or working with strong fumes.
Prep Work Has Its Own Hazards
Surface preparation is where many injuries happen. Scrapers are sharp. Sanding creates dust. Patch compounds and caulks may irritate skin. Cleaners can splash. Work slowly and keep the area under control.
Sanding and Scraping
When you sand, tiny particles become airborne. Those particles may be plain dust, paint residue, or something more hazardous if the surface is old.
Good sanding safety includes:
- keeping the work area ventilated
- wearing eye protection
- using the right dust mask or respirator when needed
- vacuuming or wiping dust instead of sweeping it into the air
Cleaning and Deglossing
Paint sticks better to clean surfaces. That may mean washing away grease, dirt, soap film, or chalky residue. Some cleaners are mild. Others are stronger and need careful handling.
Use only the amount you need. Keep products in labeled containers. Never mix cleaning chemicals unless the label clearly says it is safe.
Safe Application Habits
Once the surface is ready, application brings a different set of risks. Wet paint creates slip hazards. Solvent-based products can release stronger vapors. Rollers and brushes may drip on skin or into eyes if used carelessly.
Good habits during application include:
- keeping lids on containers when you are not using them
- pouring only a workable amount into a tray or smaller container
- wiping spills right away
- using the right brush, roller, or applicator for the product
- taking breaks if you feel dizzy, lightheaded, or irritated by fumes
Why Ventilation Matters
Ventilation helps remove airborne fumes and speeds drying. In a room with poor airflow, even a product that seems mild can start to build up an unpleasant or unsafe level of vapor. Outdoors, ventilation is usually easier, but wind can blow dust or overspray where you do not want it.
Think Ahead About Cleanup
Safe painters plan cleanup before they begin. Know where used rags, empty containers, and dirty tools will go. Know whether your cleanup water or solvent can be poured out safely or whether it must be handled differently.
That matters because a rushed cleanup leads to accidents. The brush gets left where someone steps on it. The paint can stays open. The used rag sits in a bad spot. A clean finish starts with a clean finish to the job too.
🎬 Video: Interior Painting Safety (video) — https://www.youtube.com/watch?v=4vpr3e_erug
As you move into the next requirement, keep this in mind: every coating has a job to do, and each one works best only when used on the right surface in the right way.
Req 2 — Coatings, Paint Types & Sheen
This requirement covers four connected ideas every painter needs to understand:
- why coatings matter beyond color
- how paint types differ in cleanup, durability, and use
- where specific finishes belong on real projects
- why the “best” product depends on the surface and the job
A good painter does not start by asking, “What color should I use?” A good painter starts by asking, “What does this surface need?”
Requirement 2a: Why coatings improve a surface
Coatings improve surfaces in at least three big ways.
1. Protection
Paint and other coatings shield surfaces from damage. On wood, they slow down moisture movement that can lead to swelling, cracking, rot, or peeling. On metal, the right coating helps block rust. On walls and trim, coatings make the surface easier to wash after fingerprints, dirt, or splashes.
2. Appearance
Coatings change how a surface looks. They can make an old wall look clean again, brighten a dark room, or help trim stand out from surrounding surfaces. Stains and clear finishes can highlight wood grain instead of covering it.
3. Performance
Some coatings make a surface work better. A porch rail may need a finish that handles weather and frequent touching. A bathroom wall may need something that stands up to humidity. A concrete floor may need a coating that resists scuffing and is easier to clean.
🎬 Video: Epoxy Resin Coatings (video) — https://www.youtube.com/watch?v=A-ERekKoohI
Requirement 2b: Oil-based, acrylic-based, and water-based paints
These names describe how the paint is made and how it behaves. They affect drying time, cleanup, smell, flexibility, and durability.
| Paint type | Main strengths | Watch-outs | Typical uses |
|---|---|---|---|
| Oil-based | Hard, durable finish; smooth leveling | Stronger odor, slower drying, solvent cleanup | Some trim, specialty surfaces, older restoration work |
| Acrylic-based | Good adhesion, flexibility, durability | Must still be matched to the right surface | High-quality interior and exterior jobs |
| Water-based | Easier cleanup, lower odor, faster drying | Some formulas may be less durable than premium products | Walls, ceilings, many common home projects |
Oil-based paint
Oil-based paint usually dries to a hard finish and can level out smoothly, which is why it was popular for trim, doors, and surfaces that take wear. The tradeoff is stronger fumes, longer drying time, and cleanup with mineral spirits or another solvent.
Acrylic-based paint
Acrylic paint is a common modern choice because it sticks well, stays flexible, and often handles temperature changes better than older formulas. That flexibility matters outdoors, where surfaces expand and contract.
Water-based paint
Many modern interior wall paints are water-based. They usually have easier soap-and-water cleanup, dry faster, and produce less odor than oil-based products. For many Scout-sized projects, they are simpler to use and easier to clean up safely.
🎬 Video: Paints - Oil, Water, Enamel, Acrylic (video) — https://www.youtube.com/watch?v=jEyTpUfbrYA
🎬 Video: Water vs Oil Based Paints (video) — https://www.youtube.com/watch?v=T99OFHCLF4s
Requirement 2c: Enamel, flat paint, stain, varnish, and sheen
Enamel paint
Enamel paint is chosen when you want a tougher, more washable finish. It is often used on trim, doors, cabinets, railings, or other surfaces that get touched a lot.
Flat paint
Flat paint has very little shine. It hides surface flaws better than shinier finishes, which makes it useful on ceilings and some walls where you want a softer look and do not need heavy scrubbing.
Wood stain
Wood stain adds color while letting the grain show through. It is a good choice when the wood itself is attractive and you want to highlight it rather than hide it.
Varnish
Varnish is a clear protective finish often used over wood. It adds a protective layer and can come in different sheen levels, from low luster to glossy.
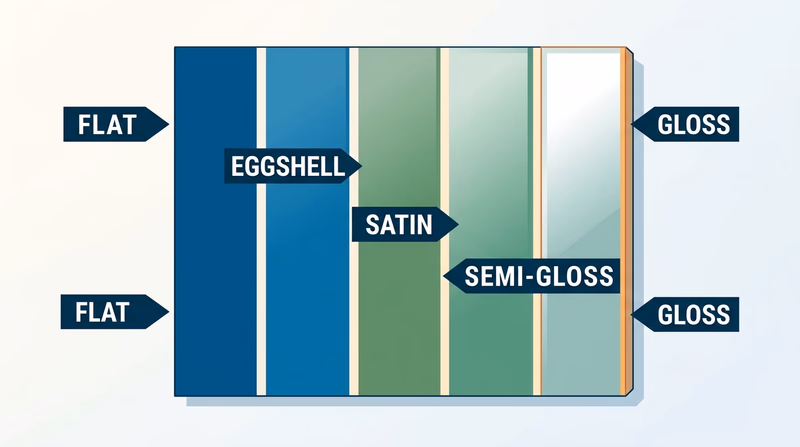
Why sheen matters
Sheen is how shiny a finish looks when light hits it. It matters because it affects both appearance and performance.
- Lower sheen often hides flaws better.
- Higher sheen is usually easier to wipe clean.
- Too much sheen can make wall defects stand out.
- Too little sheen may not hold up as well on high-touch surfaces.
🎬 Video: Paint Sheen Differences Explained (video) — https://www.youtube.com/watch?v=DyKh80Yt9k0
Requirement 2d: Why each finish is best for its use
This part is about reasoning, not memorizing brand names. Your counselor wants to hear why one product fits one job better than another.
How to explain your choice
Use this logic for each finish- Surface material: Is it drywall, wood, metal, masonry, or something else?
- Wear and cleaning: Will people touch it often, bump it, or wash it regularly?
- Moisture and weather: Will it face humidity, rain, or temperature swings?
- Look you want: Should the finish hide flaws, show grain, or reflect light?
- Maintenance: Will the surface need touch-ups or easy cleaning later?
For example, flat paint is often best where hiding imperfections matters more than scrub resistance. Enamel is often best where durability and cleaning matter. Stain is best when you want to show the wood. Varnish is best when you want a protective clear coat over wood.
That same decision process will help you in Req 3 when you choose two real painting projects and match them to the right prep, primer, and topcoat.
OSHA — Safety and Health Topics: Lead Background on lead hazards that matter when older painted surfaces are sanded, scraped, or repaired. Link: OSHA — Safety and Health Topics: Lead — https://www.osha.gov/leadAs you head to the next page, shift from paint theory to real planning. You are about to choose projects, prepare surfaces, and make the same kinds of decisions real painters make.
Req 3 — Plan Two Real Projects
This requirement is where the badge stops being mostly talk and becomes real craft. One surface may forgive a small mistake. Two different surfaces force you to think like a painter: what material am I working on, what problems does it have, and what coating system fits it best?
Before you do anything else, get your counselor’s approval.
Painting Project Planner Resource: Painting Project Planner — /merit-badges/painting/guide/project-planner/Choose two genuinely different surfaces
Try to avoid picking two projects that are almost the same. The requirement is stronger if the surfaces teach you different lessons.
Good pairings might include:
- an interior wall and a piece of furniture
- a door and a fence
- a concrete floor and a wood porch rail
That way, you will have to think about differences in porosity, wear, moisture exposure, and finish choice.
Step 1: Inspect before you prep
A painter’s eyes are one of the most important tools on the job. Before you buy supplies, inspect each surface.
Look for:
- cracks, holes, and dents
- peeling or flaking old paint
- glossy areas that may need scuffing
- mildew, dirt, grease, or chalky residue
- gaps that need caulking
- signs the old coating may be failing underneath
Step 2: Match the repair to the surface
Different repairs solve different problems.
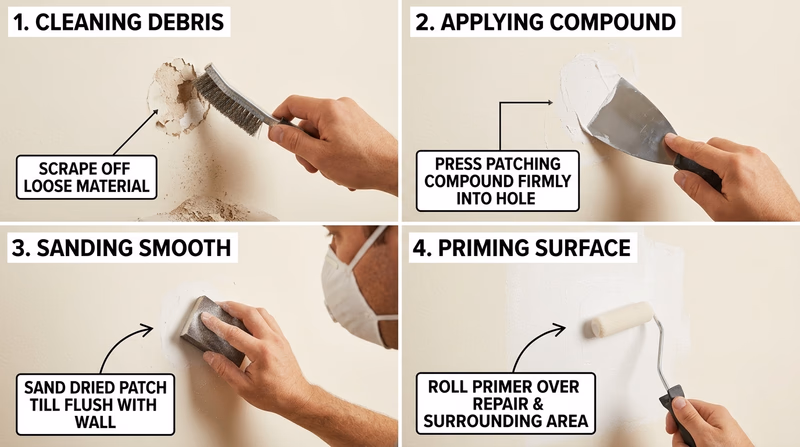
Patching materials
Patching compounds fill dents, holes, and damaged spots so the final surface can look smooth. Use the kind of filler made for the material you are repairing. A wall patching compound is not the same as a wood filler or a concrete patch product.
Caulking
Caulk seals narrow gaps where two surfaces meet, such as trim against a wall or a window frame against siding. Caulk is not for filling big holes. Its job is sealing joints and preventing air or moisture from getting in.
Before you patch or caulk
Set yourself up for a cleaner result- Remove loose material so your repair bonds to something solid.
- Clean the area so dust and grease do not weaken the repair.
- Apply only what you need because oversized repairs take longer to dry and more sanding to smooth.
- Let it cure fully before sanding or coating over it.
Step 3: Use the right primer
Primer is the bridge between the surface and the finish coat. It can seal porous material, help paint stick, block stains, and create a more even final appearance.
You may need primer when:
- the surface is bare wood, masonry, or repaired drywall
- you are covering a stain or water mark
- the old finish is slick or uneven
- you are changing color dramatically
In Req 2, you learned that not all coatings behave the same way. This is where that knowledge becomes useful. The wrong primer can lead to peeling, flashing, or uneven coverage later.
Step 4: Apply the topcoat with patience
Topcoat is the finish people actually see and touch. Choose it based on the surface, the location, and the wear the item will get.
An interior wall may need a washable finish. A fence may need weather resistance. Furniture may need a tougher finish than a low-traffic wall. Work in thin, even coats instead of trying to cover everything at once.
What your counselor will want to see
Your counselor is not expecting perfection like a pro who paints every day. They are looking for evidence that you understand the process.
Be ready to explain:
- why you chose each project
- what repairs were needed
- why you used patching material or caulk
- which primer you used and why
- which topcoat you used and why
- what you would do differently next time
🎬 Video: How to Paint a Room (video) — https://www.youtube.com/watch?v=CRXCB_3gLok
Your next painting decision is less about repair and more about design. In the next requirement, you will use the color wheel to choose combinations that feel balanced instead of accidental.
Req 4 — Choose Harmonizing Colors
Two colors can be perfectly nice on their own and still look awkward together. This requirement teaches an important part of painting that beginners often miss: good color choices are planned, not guessed.
What “harmonizing” means
Harmonizing colors feel like they belong together. They do not fight for attention, and they help the item or space look intentional. On a project like a stool, shelf, sign, or small piece of furniture, harmony can come from contrast, closeness, or balance.
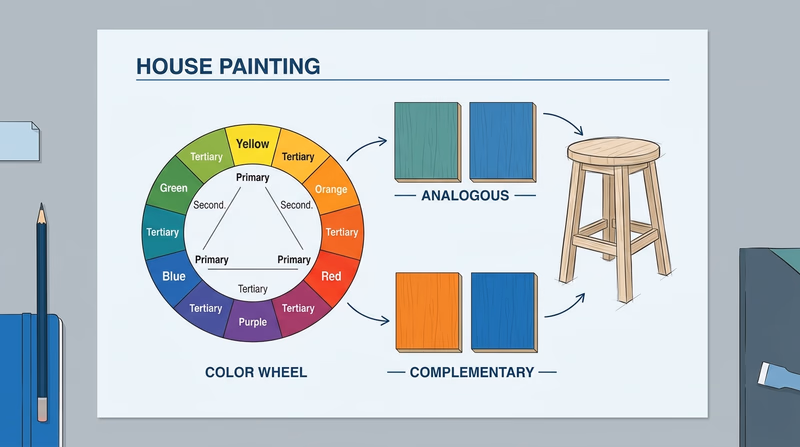
Common color-wheel relationships include:
- Analogous colors: next to each other on the wheel, such as blue and blue-green
- Complementary colors: opposite each other, such as blue and orange
- Warm and cool balance: one color may lead while the other supports
You do not need to memorize fancy design vocabulary. You do need to show that you chose your colors on purpose.
Start with the mood and the object
Before picking colors, ask two questions:
- What is this item for?
- What feeling should it give?
A toy chest might use brighter, more playful colors. A small shelf for a bedroom may look better with calmer tones. A garden sign might need stronger contrast so it is easy to read from a distance.
Simple ways to build a good palette
Use one main color and one supporting color
This is often the easiest plan for a Scout project. Pick a dominant color for most of the surface, then use a second color on trim, edges, legs, lettering, or a smaller accent area.
Pay attention to value, not just hue
Value means how light or dark a color is. Two colors can both be blue but still look very different if one is pale and one is deep. Contrast in value helps important details stand out.
Keep the finish in mind
In Req 2, you learned about sheen. The same color can feel different in a flat finish than in a glossy one. A shiny finish often makes color feel stronger and draws more attention.
Questions to ask before you paint
Use these to explain your color choices to your counselor- Why did I choose this main color?
- Why does the second color work with it?
- Will the item be used indoors or outdoors?
- Will the colors still look good under the light where the item will live?
- Do the colors help important details stand out instead of disappear?
Use the official color wheel
Color Wheel from Painting Merit Badge Pamphlet (PDF) Use this official color wheel to test which colors sit near, across from, or balance each other before you paint your item. Link: Color Wheel from Painting Merit Badge Pamphlet (PDF) — https://filestore.scouting.org/filestore/Merit_Badge_ReqandRes/Requirement%20Resources/Painting/Painting_Color%20Wheet%20from%202025%20MBP.pdfThe color wheel gives you a visual way to defend your choices. If your counselor asks, “Why do these colors work together?” you can point to the relationship you used instead of saying, “I just liked them.”
🎬 Video: Choosing a Color Palette for Your Home (video) — https://www.youtube.com/watch?v=K75ynD7aAeg
A strong project process
- Pick the item you will paint.
- Decide where the item will be used.
- Choose your main color.
- Use the color wheel to find a harmonizing second color.
- Test both colors on scrap.
- Prep, prime, and paint with the finish that fits the item.
Once you can choose a finish and a color plan, the next skill is keeping your tools in good shape. Good tool care saves money and makes every future job easier.
Req 5 — Use and Care for Your Tools
A cheap brush can still do decent work if it is clean and cared for. A great brush can be ruined in one afternoon if paint dries deep in the bristles or the roller gets left in a tray overnight. Tool care is part of painting skill, not a chore added at the end.
Use tools the way they are meant to work
Different tools solve different problems.
- Brushes are best for edges, trim, corners, and detailed control.
- Rollers cover broad flat areas faster and more evenly.
- Putty knives and patch tools spread filler or scrape loose material.
- Caulk guns help seal narrow gaps with control.
- Trays, liners, and buckets make paint handling cleaner and safer.
Using a tool correctly usually means using less force than beginners expect. Let the brush carry paint. Let the roller roll instead of pressing hard. Let the scraper work at the correct angle instead of gouging the surface.
Clean tools as soon as you finish
Dried paint is the enemy. The longer you wait, the harder cleanup becomes and the more likely the tool is to lose its shape.
Brushes
Remove extra paint first. Then clean according to the product you used.
- Water-based products usually clean with warm water and mild soap.
- Oil-based products may require the cleaner named on the label.
Work the cleaner through the bristles until it reaches the base, then rinse until the brush is truly clean, not just cleaner-looking.
Rollers
Scrape off excess paint before washing. Work water or the proper cleaner through the roller cover until the runoff is mostly clear. Rollers take longer to clean than brushes, which is one reason people sometimes replace low-cost covers instead of saving them.
Trays, knives, and other tools
These are easiest to clean before paint skins over. A few quick minutes now can save a lot of scraping later.
🎬 Video: Good Paint Hygiene (video) — https://www.youtube.com/watch?v=C_bY5_mOTcY
🎬 Video: How to Clean and Store Paint Brushes (video) — https://www.youtube.com/watch?v=u6_e5YXgviY
Maintain shape and condition
Cleaning is only half the job. Maintenance keeps tools ready for next time.
For brushes
- reshape the bristles after washing
- hang the brush or lay it flat to dry as directed for the tool
- keep the protective sleeve if it came with one
For rollers
- let them dry completely before storing
- avoid crushing the cover so it stays round
For metal tools
Putty knives and scrapers should be dried after cleaning so they do not rust. Remove hardened buildup before it affects the edge.
Signs a tool needs attention
Do not wait until the next project- Brush bristles are stiff or splayed: old paint may still be trapped near the ferrule.
- Roller leaves lint or uneven texture: the cover may be worn out or damaged.
- Caulk gun sticks or jerks: clean buildup and check the plunger.
- Metal blade has dried ridges: scrape and clean before it hardens further.
Store tools so they stay ready
Tool storage should protect shape, cleanliness, and safety.
- Store brushes where the bristles will not be bent.
- Keep tools dry so metal parts do not rust.
- Close paint containers tightly and label them if needed.
- Keep products and tools away from heat, flames, and small children.
The next requirement zooms back out from tools to the whole job site. Good painters protect not just their tools, but their bodies too.
Req 6 — Ladder Safety and PPE
A paint job can go wrong fast when a painter gets careless above the ground, ignores what is getting on their skin, or skips protective gear because “it will only take a minute.” This requirement is really about preventing simple mistakes from becoming injuries.
Ladder safety
Ladders are useful because they put you where the work is. They are dangerous because they do the same thing.
Before climbing
Check that the ladder is in good condition. Look for cracked rails, bent parts, loose feet, or anything slippery on the steps. Set it on firm, level ground. If the floor or soil is uneven, stop and fix that problem first instead of trying to balance the ladder with scrap wood or guesswork.
While working
Keep three points of contact when climbing: two hands and one foot, or two feet and one hand. Carry tools in a way that leaves your hands free, or use a tool belt or helper. Never lean so far to one side that your belt buckle goes past the ladder rail. Climb down and move the ladder instead.
🎬 Video: Ladder Safety (video) — https://www.youtube.com/watch?v=b7ArZilnnTE
Personal hygiene matters on a paint job
Painting is messy in ways that are easy to ignore. Dust gets on your hands. Wet coatings splash on your skin. Old paint chips may land on your clothes. Good hygiene keeps those materials from staying on your body longer than they should.
Important habits include:
- washing hands before eating or drinking
- keeping paint-covered gloves away from your face
- changing out of contaminated clothes after the job
- cleaning small splashes promptly instead of leaving them on your skin
This matters even more if you are scraping, sanding, or working around older coatings. You do not want dust or residue ending up in your mouth, eyes, or car seat after the job is done.
Personal protective equipment
PPE means personal protective equipment. It is the gear that creates a barrier between you and the hazard.
Common PPE for painting
- Safety glasses for splashes and dust
- Gloves for cleaners, coatings, stains, and caulks
- Respiratory protection when labels or conditions require it
- Long sleeves or coveralls when the job is especially messy
🎬 Video: Personal Protective Equipment for Painting (PPE) (video) — https://www.youtube.com/watch?v=67G06bhuxPA
Match the PPE to the task
The right PPE depends on what you are doing.
- Rolling low-odor interior wall paint in a ventilated room may need basic eye and skin protection.
- Sanding an old painted surface may require much more serious dust protection.
- Using strong cleaners or solvent-based coatings may require gloves and ventilation that go beyond a simple open window.
Ask these questions before you start
They will tell you what protection you need- Am I creating dust?
- Am I working overhead where drips could hit my face?
- Does the label warn about fumes, skin contact, or flammability?
- Will I be on a ladder or in a tight space?
- Do I have a safe way to wash up when I finish?
In the next requirement, you will take this safety mindset one step further by looking at the long-term health and environmental effects of painting materials.
Req 7 — Paint, Health, and the Environment
Paint seems harmless when you only notice the color. This requirement asks you to notice the hidden side: what gets into the air, what ends up on the ground, and what happens to leftover product after the job is done. Responsible painters do more than finish the surface. They control the whole mess.
Removing old paint
Removing paint can create the biggest health risks of the whole project. Scraping, sanding, heat, or chemical removers can all release material you do not want in your lungs, on your skin, or spread around the site.
Dust and old coatings
Dust from paint removal can irritate the eyes and lungs even when the paint is modern. On older buildings, the risk may be much higher if the coating contains lead. That is why older painted surfaces should never be treated casually.
Chemical strippers
Some paint removers work by softening old coatings so they can be scraped away. These products can be strong, messy, and irritating. Good ventilation, gloves, and careful label reading matter.
🎬 Video: Paint Removers (video) — https://www.youtube.com/watch?v=8lG6dAZE52k
Applying paint
Application can affect indoor air quality, skin, and nearby soil or water.
Fumes and ventilation
Some coatings release vapors while they dry. In enclosed spaces, those fumes can build up and cause headaches, irritation, or dizziness. Good airflow helps protect people and also helps the finish cure the way it should.
Overspray, drips, and spills
Outside, paint can end up on plants, soil, sidewalks, or storm drains if the work area is not controlled. Inside, splashes and spills can spread material far beyond the surface you meant to coat.
Discarding old paint
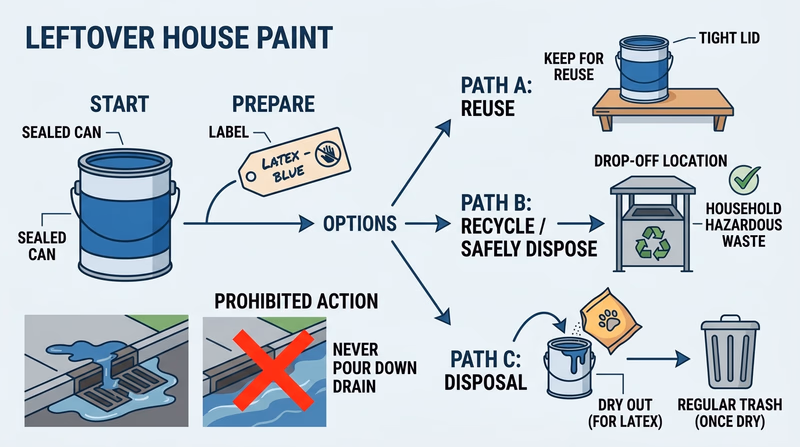
Leftover paint is not regular trash in every situation. Rules vary by product and by location, but the key idea is simple: dispose of it the way your community requires, not the way that seems quickest.
Why careless disposal is a problem
Paint or solvent poured on the ground, into a storm drain, or down a sink can contaminate water or create a hazard in plumbing and waste systems. Containers that still hold usable product may also create fire or exposure risks if stored badly.
🎬 Video: How to Dispose of Old Paint (video) — https://www.youtube.com/watch?v=7YKuwlGgWpc
Responsible paint disposal habits
Use local rules, but keep these principles in mind- Keep products in labeled containers so no one has to guess what they are.
- Store leftovers safely until you know the correct disposal or recycling option.
- Never pour paint into storm drains or onto soil.
- Ask about local recycling or take-back programs for paint and related materials.
The final badge requirement asks you to look beyond the project itself and think about where painting knowledge can lead next — as a career, a hobby, or part of a healthy lifestyle.
Req 8 — Choose a Painting Path
For this requirement, you choose exactly one option. One option focuses on painting as a career. The other focuses on painting as a hobby, creative outlet, or healthy long-term interest.
Your Options
- Req 8a — Research a Painting Career: Explore a real job connected to painting, such as residential painter, industrial coating specialist, scenic painter, mural artist, or finishing technician. You will research training, costs, duties, pay, and advancement.
- Req 8b — Make Painting Part of Your Life: Explore how painting skills can support a hobby or healthy lifestyle, such as mural work, home improvement, creative painting, set painting, or volunteer beautification projects. You will think about training, expenses, support organizations, and your own goals.
How to Choose
Choosing Your Option
Think about what kind of future you want to explore- Time and research style: Option 8a works well if you enjoy researching jobs, interviewing professionals, or visiting a work site. Option 8b works well if you want to imagine yourself doing painting more personally and creatively.
- What you will gain: Option 8a builds career research skills and helps you understand how trades and creative jobs really work. Option 8b helps you picture painting as part of your everyday life, wellness, service, or self-expression.
- Equipment and access: Option 8a may require access to a professional, trade program, or job-site information. Option 8b may be easier if you already enjoy art, DIY projects, or community improvement work.
- Best fit for your interests: If you like trades, craftsmanship, and job pathways, lean toward 8a. If you like creativity, room makeovers, murals, or painting for relaxation and service, lean toward 8b.
Whichever option you choose, bring specific notes to your counselor. They will want to hear what you learned, not just which link you clicked or which video you watched.
Req 8a — Research a Painting Career
A good painting career is about much more than putting color on a wall. It can involve repair work, coating technology, design decisions, safety planning, customer communication, estimating jobs, and leading a crew. This requirement asks you to zoom in on one real path and learn what the job actually looks like.
Start by choosing one career
Possible careers related to painting include:
- residential or commercial painter
- industrial coating or corrosion-control painter
- scenic painter for theater or film
- mural artist
- decorative finisher or faux-finish painter
- paint sales specialist or coating representative
- restoration painter for historic buildings
Choose one that honestly interests you. It is easier to discuss the career well if you are curious about it.
What to research
Your counselor will expect more than a job title. Build a short profile of the career.
Career research notes
Make sure you can speak to each of these- Training and education: Does the job need apprenticeship, trade school, college, on-the-job training, or certifications?
- Costs: Are there tuition costs, tools to buy, licensing fees, or travel expenses for training?
- Job prospects: Is there steady demand in your area or in certain industries?
- Salary: What is a typical pay range for entry-level and experienced workers?
- Job duties: What does a normal day include besides painting itself?
- Advancement: Can the person become a crew leader, estimator, business owner, designer, or specialist?
Strong ways to gather information
Interview a professional
This is often the best method because it gives you real answers instead of generic ones. Ask what they wish they had known when they started, what tools they use most, and what part of the job surprises people.
Visit a work site or shop
If your parent or guardian approves and the visit is allowed, seeing the environment can teach you a lot. Notice whether the work is indoors or outdoors, how much prep is involved, what safety gear people use, and how organized the crew is.
Use reliable career sources
Trade associations, government labor data, and reputable employers can help you fill in salary and training information.
Questions worth asking
- What skills matter most besides painting technique?
- How much of the job is prep, repair, cleanup, and planning?
- What training helped you most?
- What safety risks are part of the job?
- What kind of person enjoys this career long-term?
Think about what makes the job interesting to you
The requirement ends with your own judgment. Maybe you like that painting gives visible results quickly. Maybe you like the mix of hands-on work and design. Maybe you like the idea of restoring old buildings or creating scenery for theater productions.
If the job does not sound appealing, that is useful too. A good career exploration project helps you understand yourself, not just the career.
🎬 Video: Painters Career Overview (video) — https://youtu.be/5glRwgnb5gk
🎬 Video: Scenic Painter (video) — https://youtu.be/mWjbRoAId_4
If you want a more personal future path instead of a job-focused one, the next option explores how painting can become part of your hobbies, creativity, and everyday life.
Req 8b — Make Painting Part of Your Life
Painting does not have to become your job to become an important part of your life. For some people, it becomes a creative hobby. For others, it becomes a way to improve their home, serve their community, reduce stress, or make ordinary spaces feel more personal.
Ways painting can become part of your life
Here are a few directions you might explore:
- Home improvement: painting rooms, furniture, fences, and small repair projects
- Creative expression: murals, decorative painting, signs, props, and custom room designs
- Community service: helping repaint shared spaces, benches, sheds, or neighborhood features
- Wellness and routine: using painting and making as a focused, screen-free activity that helps you slow down and concentrate
Research the practical side
Even hobbies have costs and learning curves. Your counselor will want to hear how realistic the hobby is for you.
Questions to answer about your hobby path
Use specific examples, not vague guesses- Training needed: Can you learn from a class, club, online tutorial, mentor, or lots of practice?
- Expenses: What would brushes, rollers, drop cloths, paint, surface prep materials, and workspace cost?
- Support organizations: Are there clubs, art centers, makerspaces, or painting groups that could help you grow?
- Short-term goals: What could you reasonably do in the next few months?
- Long-term goals: If you keep going, what would you want to improve or create later?
Build goals that sound like real life
A short-term goal might be repainting a small stool, helping refresh a room at home, or learning how to tape and cut in clean edges. A long-term goal might be painting a mural, restoring furniture regularly, volunteering on beautification projects, or creating a portfolio of decorative work.
Organizations and communities can help
If you keep painting, you do not have to learn alone. Local art centers, community workshops, trade education programs, and national organizations can all help you find ideas and instruction.
🎬 Video: How to Paint Murals Like a Pro (video) — https://youtu.be/L4ADLL2gAtU
🎬 Video: Easy Wall Painting DIY I Balcony Makeover I Yoga Wall Art (video) — https://youtu.be/UpImD3qedKw?si=CotiHOXpynF-JptZ
Whether you chose the career path or the hobby path, you have reached the end of the badge requirements. The next page looks beyond the requirements and shows where painting can take you next.
Extended Learning
Congratulations
You just finished a badge that mixes trade knowledge, design sense, safety habits, and practical problem-solving. That combination is what makes painting such a useful lifelong skill: it helps you improve spaces, protect materials, and create work people can see immediately.
Why Surface Preparation Separates Beginners from Pros
Most people notice the final color. Professional painters notice the prep underneath it. Surface preparation is where smooth finishes, sharp edges, and long-lasting results are won or lost. If you want to go deeper in painting, spend time learning surface repair, sanding strategy, caulking technique, and primer selection. Those skills transfer to almost every project you will ever do.
How Color Changes the Way a Space Feels
Color is not just decoration. It changes how people experience a room or object. Lighter colors can make a small space feel more open. Strong contrast can highlight trim or make signs easier to read. Soft, related colors can make a room feel calm. If Req 4 interested you, a great next step is to study color psychology, lighting, and how finish sheen changes the look of the same hue.
Where Craft Meets Chemistry
Painting is really applied chemistry in work clothes. Primers seal, topcoats protect, stains soak in, varnishes cure, and different formulas react differently to heat, moisture, and wear. If you liked the “why” behind products in Req 2, keep learning about coating systems, corrosion protection, mildew resistance, and finishes made for concrete, metal, or exterior wood.
Service Projects That Make a Visible Difference
Painting is also one of the easiest practical skills to turn into service. Repainting benches, fences, storage sheds, community rooms, or theater sets can improve a shared space quickly and visibly. Few service projects show the before-and-after difference as clearly as painting does.
Real-World Experiences
Tour a Paint Store or Contractor Shop
Help With a Community Beautification Day
Visit a Historic Property Under Restoration
Take a Decorative Painting or Mural Class
Organizations
PaintCare
PaintCare A paint stewardship program that helps people find paint recycling and drop-off options in participating states. Link: PaintCare — https://www.paintcare.org/Painting Contractors Association
Painting Contractors Association An industry association offering education, standards, and professional development for painting contractors. Link: Painting Contractors Association — https://www.pcapainted.org/Society of Decorative Painters
Society of Decorative Painters A global community for painters and aspiring artists with chapters, education, and events focused on decorative painting. Link: Society of Decorative Painters — http://decorativepainters.org/OSHA
Occupational Safety and Health Administration Federal workplace safety guidance, including information that helps painters understand hazards, protective equipment, and safe work practices. Link: Occupational Safety and Health Administration — https://www.osha.gov/Now that you have completed the guide, the printable companion is ready if you want one page you can review offline or bring to a meeting with your counselor.