Req 3 — Plan Two Real Projects
This requirement is where the badge stops being mostly talk and becomes real craft. One surface may forgive a small mistake. Two different surfaces force you to think like a painter: what material am I working on, what problems does it have, and what coating system fits it best?
Before you do anything else, get your counselor’s approval.
Painting Project Planner Resource: Painting Project Planner — /merit-badges/painting/guide/project-planner/Choose two genuinely different surfaces
Try to avoid picking two projects that are almost the same. The requirement is stronger if the surfaces teach you different lessons.
Good pairings might include:
- an interior wall and a piece of furniture
- a door and a fence
- a concrete floor and a wood porch rail
That way, you will have to think about differences in porosity, wear, moisture exposure, and finish choice.
Step 1: Inspect before you prep
A painter’s eyes are one of the most important tools on the job. Before you buy supplies, inspect each surface.
Look for:
- cracks, holes, and dents
- peeling or flaking old paint
- glossy areas that may need scuffing
- mildew, dirt, grease, or chalky residue
- gaps that need caulking
- signs the old coating may be failing underneath
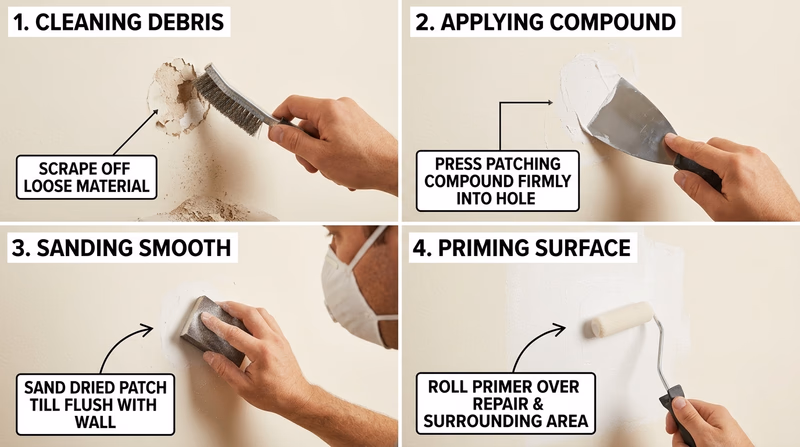
Step 2: Match the repair to the surface
Different repairs solve different problems.
Patching materials
Patching compounds fill dents, holes, and damaged spots so the final surface can look smooth. Use the kind of filler made for the material you are repairing. A wall patching compound is not the same as a wood filler or a concrete patch product.
Caulking
Caulk seals narrow gaps where two surfaces meet, such as trim against a wall or a window frame against siding. Caulk is not for filling big holes. Its job is sealing joints and preventing air or moisture from getting in.
Before you patch or caulk
Set yourself up for a cleaner result
- Remove loose material so your repair bonds to something solid.
- Clean the area so dust and grease do not weaken the repair.
- Apply only what you need because oversized repairs take longer to dry and more sanding to smooth.
- Let it cure fully before sanding or coating over it.
Step 3: Use the right primer
Primer is the bridge between the surface and the finish coat. It can seal porous material, help paint stick, block stains, and create a more even final appearance.
You may need primer when:
- the surface is bare wood, masonry, or repaired drywall
- you are covering a stain or water mark
- the old finish is slick or uneven
- you are changing color dramatically
In Req 2, you learned that not all coatings behave the same way. This is where that knowledge becomes useful. The wrong primer can lead to peeling, flashing, or uneven coverage later.
Step 4: Apply the topcoat with patience
Topcoat is the finish people actually see and touch. Choose it based on the surface, the location, and the wear the item will get.
An interior wall may need a washable finish. A fence may need weather resistance. Furniture may need a tougher finish than a low-traffic wall. Work in thin, even coats instead of trying to cover everything at once.
What your counselor will want to see
Your counselor is not expecting perfection like a pro who paints every day. They are looking for evidence that you understand the process.
Be ready to explain:
- why you chose each project
- what repairs were needed
- why you used patching material or caulk
- which primer you used and why
- which topcoat you used and why
- what you would do differently next time
🎬 Video: How to Paint a Room (video) — https://www.youtube.com/watch?v=CRXCB_3gLok
Your next painting decision is less about repair and more about design. In the next requirement, you will use the color wheel to choose combinations that feel balanced instead of accidental.