Photography Merit Badge — Complete Digital Resource Guide
https://merit-badge.university/merit-badges/photography/guide/
Introduction & Overview
Overview
A photograph can freeze one blink, one touchdown, one sunrise, or one expression that disappears a second later. Photography teaches you how to notice those moments on purpose instead of by accident. As you work on this badge, you will learn to use light, timing, composition, and editing to make pictures that communicate something real.
Photography is also one of the most practical creative skills a Scout can carry. You can use it to document adventures, tell stories for your troop, record service projects, explore nature, or simply pay closer attention to the world around you. A camera does not do the seeing for you. You do.
Then and Now
Then
Photography began as chemistry and patience. In the 1800s, early photographers used metal plates, glass negatives, and long exposure times. Portrait subjects sometimes had to sit still for many seconds just to avoid a blurry image. Cameras were bulky, expensive, and far from everyday tools.
As film photography improved, cameras became smaller and faster. Roll film, 35mm cameras, flash bulbs, and color film made photography more practical for families, newspapers, travelers, and scientists. For much of the 20th century, developing pictures still meant darkrooms, chemicals, enlargers, and waiting to see whether the shot worked.
Now
Today, many Scouts start with a phone camera in their pocket, but the core ideas are the same: light enters a camera, the camera records it, and the photographer decides what matters. Digital cameras made it easier to review, delete, and edit images right away. That means modern photographers can experiment faster, but they still need judgment.
Now photography is everywhere: sports, journalism, science, art, advertising, wildlife research, law enforcement, family history, and social media. The tools changed, but the challenge did not. A strong photo still depends on observation, planning, and good decisions.
Get Ready!
You do not need fancy gear to do well in this badge. You need curiosity, patience, and a willingness to try the same subject more than one way. Bring your camera often, look carefully before pressing the shutter, and be ready to learn from both your best shots and your mistakes.
Kinds of Photography
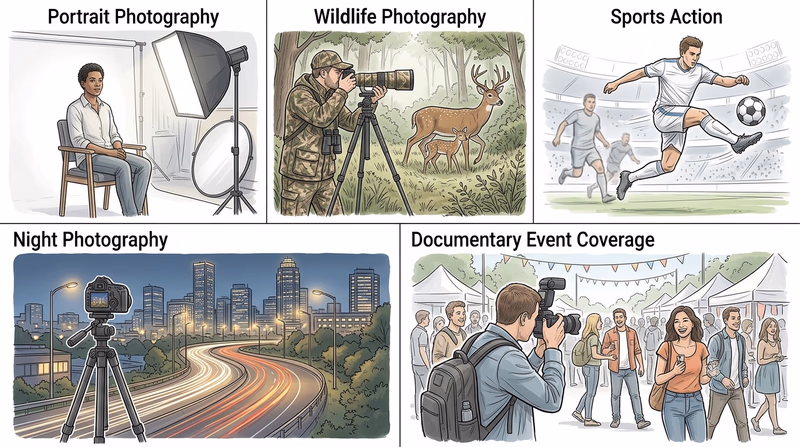
Portrait Photography
Portrait photography focuses on people. That might mean a close-up of one face or a wider image that shows personality through clothing, location, and body language. Good portrait photographers pay close attention to expression, eye contact, and how light falls across a face.
Documentary and Story Photography
Documentary photography shows real events, places, and people. Instead of staging everything, the photographer looks for moments that reveal what is happening. This kind of photography is especially useful in Scouting because campouts, service projects, and ceremonies all tell stories.
Nature and Wildlife Photography
Nature photography can include landscapes, weather, plants, insects, and animals. It rewards patience and observation. Often the goal is not just to show what was there, but to show scale, mood, color, or behavior in a way someone else can feel.
Sports and Action Photography
Action photography is about timing. The key question is often, “When should I press the shutter?” Fast shutter speeds can freeze movement, while slower settings can blur motion to show speed. Either way, the photographer has to anticipate what will happen next.
Macro and Close-Up Photography
Macro and close-up photography reveal small details that people often miss, such as insect wings, bark texture, or the stitching on a baseball glove. This kind of work teaches you to slow down and think about focus, distance, and background clutter.
Night and Low-Light Photography
Low-light photography includes campfires, city lights, stars, evening events, and indoor scenes. It can create dramatic images, but it also makes camera shake, noise, and poor focus more likely. Understanding exposure becomes especially important here.
Next Steps
The first requirement starts with something every good photographer needs: safe habits. Before you worry about lighting tricks or editing tools, make sure you know how to protect yourself, your subjects, and your equipment.
Req 1 — Shoot Safely
Photography looks harmless until you are backing toward traffic, standing in the sun for an hour, or posting an image that reveals more than you meant to share. This requirement covers two safety areas every photographer needs to think about before pressing the shutter:
- Physical safety while shooting indoors, outdoors, and around equipment
- Digital safety when you store, share, and post images online
Requirement 1a
A photographer often gets so focused on the shot that they stop noticing the space around them. That is when accidents happen. Good photographers build the habit of doing a quick safety scan before they start.
Common hazards photographers face
Trips and falls happen when you back up without checking behind you, leave bags in walkways, or stretch for a better angle on unstable ground. Prevent this by stopping before you move, wearing secure shoes, and keeping your gear packed neatly when you are not using it.
Traffic and crowds are serious risks at parades, games, busy sidewalks, and parking lots. Never step into a road while looking through a screen or viewfinder. If cars or bicycles are nearby, choose a safe position first and let the action come to you.
Water hazards matter at pools, lakes, beaches, rivers, and even on wet rocks after rain. Cameras and phones are replaceable. You are not. Stay back from slippery edges, use a strap, and keep both feet planted before leaning for a photo.
Weather exposure can sneak up on you. Long shoots can mean sunburn, dehydration, cold hands, heat illness, or lightning danger. Pack for the conditions, not just the picture you hope to get.
Equipment hazards include light stands tipping over, cords across the floor, and heavy tripods that can strike someone if they swing loose. In a studio or meeting room, tape down cords, spread tripod legs fully, and keep lights away from fabric or flammable materials.
Photo Safety Scan
Ask these questions before every shoot- Where am I standing? Make sure your footing is solid and your path is clear.
- What could change quickly? Weather, waves, crowds, traffic, and moving players can all create sudden hazards.
- What is above and below me? Look for branches, slippery surfaces, drop-offs, and uneven ground.
- What is my exit plan? Know how you would move quickly if conditions get worse.
- What gear needs protection? Use straps, weather covers, and packed cases so loose gear does not become a hazard.
Prepare for weather, sun, and water
For sun, wear sunscreen, a hat, and light clothing when appropriate. Drink water before you feel thirsty. A long sports game or camp event can mean hours of exposure.
For rain or spray, keep a dry bag, zipper bag, or rain cover ready. Wipe wet hands before handling electronics. If lightning is nearby, stop shooting and get to proper shelter.
For cold, keep spare batteries warm in a pocket because cold drains them faster. For heat, give both yourself and your gear shade breaks. For water, avoid turning your back on waves and never wade deeper just to improve your composition.
Official Resources
Is Photography a Dangerous Career? (website) A practical look at common photography risks, from lifting gear to working on location. Link: Is Photography a Dangerous Career? (website) — https://www.coverhound.com/insurance-learning-center/is-photography-a-dangerous-career Health and Safety in a Photography Studio (website) Useful reminders about cords, light stands, electrical safety, and keeping a shooting space organized. Link: Health and Safety in a Photography Studio (website) — https://thephotocove.com/health-and-safety-in-a-photography-studio/ 9 Safety Tips for Landscape and Nature Photographers (website) Outdoor-specific advice for weather, terrain, wildlife awareness, and remote shooting conditions. Link: 9 Safety Tips for Landscape and Nature Photographers (website) — https://loadedlandscapes.com/safety-tips-nature-photography/Requirement 1b
Digital safety matters because photographs can reveal more than the subject. A posted image might show your school name on a shirt, your home address on a package, your location in real time, or the faces of people who did not agree to be shared online.
As you watch the video, pay attention to three big ideas:
Protect private information
Check the background before you post. House numbers, license plates, computer screens, and papers on a table can all give away personal details. Some devices also attach location data to images, which can reveal where the photo was taken.
Respect other people
Ask before posting photos of friends, younger Scouts, or family members. A funny picture to you might feel embarrassing to someone else. That is part of being trustworthy and kind with a camera.
Think long-term
Pictures can spread quickly and stay online for a long time. Before uploading, ask yourself: would I be okay with my parents, Scout leaders, teachers, or future employers seeing this later?
Before You Share a Photo
Use this quick digital-safety test- Who is in the image? Make sure sharing it is respectful and appropriate.
- What details are visible? Check for addresses, schedules, usernames, badges, or location clues.
- Where am I posting it? Know whether the account is public, private, or easy to repost from.
- Why am I sharing it? Post with purpose, not just because the button is there.
Official Resources
Personal Safety Awareness "Digital Safety" video Scouting America's youth-protection page that hosts the Digital Safety training context for Scouts and families. Link: Personal Safety Awareness "Digital Safety" video — https://www.scouting.org/training/youth-protection/scouts-bsa/ Digital Safety (video) The official Scouting America Digital Safety video required for this badge. Link: Digital Safety (video) — https://filestore.scouting.org/filestore/YPSAT/YT%20Mod1%20Final%20Master%20Small.mp4Knowing how to photograph safely will help with every picture you take for the rest of the badge.
Req 2 — Control Light and Motion
This requirement is the heart of photography. If you understand how light, exposure, focus, composition, and timing work together, you can stop hoping for a good picture and start building one on purpose.
Requirement 2a
How natural light affects a photo
Natural light can be soft, harsh, warm, cool, direct, or filtered. Early and late in the day often give softer shadows and warmer color. Midday sun can create bright highlights and dark shadows. Cloud cover acts like a giant diffuser and can make portraits easier because the light becomes more even.
How low light affects a photo
Low light makes it harder to keep a photo sharp. The camera may need a slower shutter speed, higher ISO, or wider aperture, and each of those choices changes the look of the image. Night scenes can feel dramatic, but they also reveal camera shake and digital noise much faster.
How artificial light affects a photo
Artificial light gives you control, but it can also create odd color casts or flat-looking images if used carelessly. Flash can freeze action and brighten a dark subject, yet direct flash can also make faces look harsh. Lamps, LEDs, and studio lights all have different color temperatures and directions.
Official Resources
🎬 Video: Golden Hour Magic: Perfect Light for Stunning Photos (video) — https://youtu.be/FWcOshGthBI?si=Ft8P8g7G36BnSSle
🎬 Video: Artificial Lighting for Photography (So Much Easier Than You Think!) (video) — https://youtu.be/Z9znfhFQPbE?si=iynxep4eY2ZuuzNY
🎬 Video: Why Most Natural Light Photography is Flat (and How to Fix It) (video) — https://youtu.be/VgT4O6CclfA?si=Gw4HDf3VeGxeE6z7
Requirement 2b
Aperture affects brightness and background blur
Aperture is the opening inside the lens. A wider aperture lets in more light and often creates a blurrier background. A narrower aperture lets in less light and usually keeps more of the scene in focus. The f-stop number works backward from what many people expect: f/2.8 is wider than f/11.
Shutter speed affects motion
Shutter speed is how long the camera records light. A fast shutter speed can freeze a runner, bird, or splash. A slow shutter speed can blur motion, which can look exciting when used intentionally.
ISO affects sensitivity and image quality
ISO controls how sensitive the camera is to light. A higher ISO helps in darker situations, but it usually adds more grainy-looking digital noise. A lower ISO often produces cleaner images when enough light is available.
Together, aperture, shutter speed, and ISO form the exposure triangle. Changing one often means adjusting another.
Official Resources
🎬 Video: Iso, Shutter Speed and Aperture Explained | Exposure Basics for Beginners (video) — https://youtu.be/Edvpu_939l4?si=lFqGf0-AJuUJR-v-
🎬 Video: Photography Basics in 10 Minutes (video) — https://youtu.be/V7z7BAZdt2M?si=0XATnG-lMciqFgr0
Requirement 2c
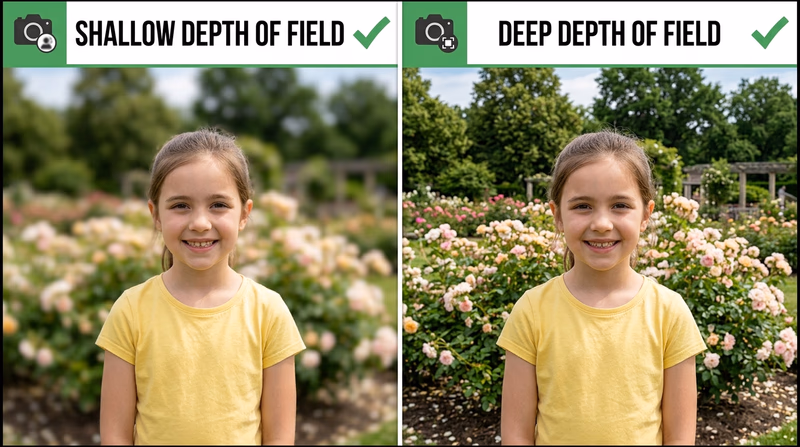
What depth of field means
Depth of field is how much of the picture looks acceptably sharp from front to back. A shallow depth of field keeps only a small area sharp, which helps a subject stand out. A deep depth of field keeps more of the scene in focus, which is useful for landscapes and group scenes.
Aperture, distance, and lens choice all affect depth of field. If you move closer to your subject or use a wider aperture, the background usually blurs more.
Official Resources
🎬 Video: Depth of Field in 30 Seconds (video) — https://youtube.com/shorts/98B3dvdAX6c?si=a6zX8YPAisVYAszi
Requirement 2d
Rule of thirds
Imagine your picture divided into a tic-tac-toe grid. Placing the main subject near one of those intersection points often makes the image feel more balanced and interesting than putting everything dead center.
Leading lines
Roads, fences, shadows, and tree lines can guide the viewer’s eye toward the subject. Good leading lines create direction and make the photo easier to read.
Framing
Framing means using something in the scene, such as a doorway, branches, or a window, to surround the subject. This can add depth and make the viewer focus on what matters.
Depth in composition
A photo feels stronger when it has layers. A foreground object, a main subject in the middle, and background context can make a flat scene feel more three-dimensional.
Official Resources
🎬 Video: Basic Photography | Composition: The Only Rules You Need to Know (video) — https://youtu.be/eImryR3yKz8?si=ITbUmVHQYD9gR72Y
🎬 Video: Photography Composition: Master Leading Lines for Stunning Shots! (video) — https://youtu.be/2uAYj6WScJQ?si=SrzE5OUdOVWWH65y
🎬 Video: Master the Rule of Thirds for Better Photos (video) — https://youtube.com/shorts/Z1Wb8ZH0uvc?si=e6TjeQIgyqaYBcUr
Requirement 2e
Angle of view describes how much of a scene the lens includes. A wide angle of view fits more into the frame, which is useful for landscapes, buildings, and cramped spaces. A narrow angle of view shows less of the scene and makes distant subjects appear larger.
Your physical shooting angle matters too. Kneeling down, climbing safely to a higher position, or stepping to one side can completely change the feeling of a photo. Kids photographed at eye level often look more natural than when shot from standing height. A flower photographed from ground level can feel much more dramatic than the same flower photographed from above.
Official Resources
🎬 Video: Angle of View and Framing (video) — https://youtu.be/9SZy4ptc5ws?si=SfIb8MuYpZziiVaW
Requirement 2f
To stop action, use a fast shutter speed so the moving subject looks crisp. This works well for sports, pets, bikes, and splashing water. If the shutter is too slow, the subject will smear across the frame.
To blur motion, slow the shutter on purpose. A blurred waterfall can look smooth and soft. A runner with slightly blurred legs can feel faster than a perfectly frozen runner. Motion blur works best when the blur looks intentional instead of accidental.
Official Resources
🎬 Video: How to Shoot Motion Blur Photography Like a Pro (video) — https://youtu.be/5h4J8nZn1Sw?si=n6r01F0XG_ncDOxH
🎬 Video: Photography Tips: How to Do Stop Action Photography (video) — https://youtu.be/YtkIsA4VdRw?si=T0IV9u60N-evsqrl
Requirement 2g
The decisive moment is the split second when everything comes together: the peak of a jump, the instant a flag unfurls, the laugh before someone looks away, or the exact moment a hand reaches a finish line. This idea reminds photographers that timing is part of composition.
A scene can look ordinary one second and unforgettable the next. That is why photographers watch carefully, anticipate action, and keep shooting when something is about to happen instead of after it already did.
Official Resources
🎬 Video: Decisive Moment (video) — https://youtu.be/meeqJ58eSzk?si=lxhdmU83SSLCDxvw
Camera Setting Guides
Easy to Understand Guide to Camera Settings for Beginners (website) A plain-language overview of common settings and how they affect brightness, focus, and motion. Link: Easy to Understand Guide to Camera Settings for Beginners (website) — https://shotkit.com/camera-settings/ Common Camera Settings for Beginners (website) A detailed beginner guide to camera settings, with examples of when to adjust each one. Link: Common Camera Settings for Beginners (website) — https://photographylife.com/common-camera-settings#camera-setupBy now you know the words photographers use when they talk about why a picture worked.
Req 3 — Know Your Camera
A camera is a light-tight box with a very organized job: let in the right amount of light, focus it, record it, and save the result. Once you know the main parts, the camera becomes much less mysterious.
Main camera parts
Lens — The lens gathers and focuses light. Different lenses can show a wide view, a close-up view, or a distant subject. Some lenses zoom. Others stay at one focal length but may be brighter or sharper.
Aperture — Inside the lens is an opening that gets wider or narrower to control how much light enters.
Shutter — The shutter opens for a specific amount of time and then closes. That timing affects both exposure and motion.
Image sensor — In a digital camera, the sensor records the light and turns it into electronic data. You can think of it as the digital replacement for film.
Viewfinder or screen — This is how you compose the shot and review your settings.
Focus system — Manual or automatic focus helps the camera decide what should look sharp.
Memory card — The memory card stores the image files after the camera processes them.
Battery — Powers the camera, screen, autofocus, and often the flash.
Flash — Adds artificial light when the scene is too dark or when you want to brighten shadows.
Know These Controls
You should be able to point to these on your own camera- Power button: Turns the camera on and off.
- Shutter button: Usually half-press to focus, full press to take the photo.
- Mode dial or camera modes: Chooses auto, portrait, sports, manual, and other shooting modes.
- Menu and playback controls: Lets you change settings and review images.
- Zoom control or lens ring: Changes framing if your camera supports zoom.
How a picture is made
When you press the shutter button, several things happen in order:
- The camera meters the light in the scene.
- It focuses on the chosen subject area.
- The aperture sets how wide the lens opening should be.
- The shutter opens for the selected time.
- Light hits the sensor.
- The camera processes that light into an image file.
- The file is saved to the memory card.
That whole process may happen in a fraction of a second, but each step matters. If the focus is wrong, the subject may be soft. If the shutter stays open too long, motion may blur. If not enough light reaches the sensor, the image may be too dark.
Why an exposure can fail
A bad exposure does not always mean “too dark.” It can also mean highlights are blown out, shadows are muddy, or the camera chose settings that do not match the photographer’s goal.
For example:
- A basketball shot might be bright enough but blurry because the shutter was too slow.
- A portrait might be sharp but distracting because the background stayed too detailed.
- A sunset might lose color if the camera brightens the scene too much.
This connects directly to Req 2, where you learned how light, aperture, shutter speed, ISO, and composition affect the result.
Official Resources
🎬 Video: Photography Basics in 10 Minutes (video) — https://youtu.be/V7z7BAZdt2M?si=0XATnG-lMciqFgr0
🎬 Video: Parts of a Camera (video) — https://youtu.be/BsSjEhktkzU
🎬 Video: How Digital Cameras Work (video) — https://youtu.be/Ey6S3rKH_o4
Understanding the camera makes the next set of photo exercises much easier.
Req 4 — Pick Two Creative Experiments
You must choose exactly two options from this requirement. Each one asks you to keep the subject mostly the same while changing one photography variable on purpose. That is what makes this requirement such good practice: you get to see how a single decision changes the final image.
Your Options
- Req 4a — Change Your Angle: Photograph the same subject from two different viewpoints and learn how camera position changes mood, emphasis, and storytelling.
- Req 4b — Change the Light: Compare natural light and artificial light to see how each changes color, shadow, and texture.
- Req 4c — Change the Focus: Shoot one subject with two different depth-of-field choices so you can compare background blur and subject isolation.
- Req 4d — Change the Composition: Use two compositional techniques to prove that framing decisions affect how the viewer reads a picture.
How to Choose
Choosing Your Two
Think about what you can set up easily- Time available: Req 4a and Req 4d can often be done quickly with almost any subject. Req 4b may take more setup if you need both indoor and outdoor light.
- Equipment: Req 4c is easier if your camera lets you control aperture or portrait mode. Req 4b may work better if you have access to a lamp, flash, or bright window light.
- What you will gain: Req 4a builds awareness of perspective. Req 4b teaches light quality. Req 4c teaches focus control. Req 4d teaches visual design.
- Best subject types: A person, backpack, plant, bicycle, or troop item works well because it can stay still while you experiment.
When you show your pictures to your counselor, be ready to explain not just what changed, but why the new version feels different.
Req 4a — Change Your Angle
A subject does not change just because it is interesting. It changes because you move. One photo taken from standing height and one photo taken from ground level can feel like two different stories.
What to compare
Choose one subject that can stay in place long enough for you to experiment. Good choices include a person, pet, backpack, bike, camp chair, flower, or statue.
Then change your point of view in a clear way:
- high angle vs. eye level
- eye level vs. low angle
- front view vs. side view
- close viewpoint vs. farther viewpoint
What angle does to the picture
A high angle can make the subject seem smaller or more vulnerable. A low angle can make the subject seem taller, stronger, or more dramatic. A side angle can show shape and depth better than a straight-on shot.
Try to notice what each version emphasizes. Does one show more background clutter? Does one make the subject stand out better? Does one feel more personal?
Angle Experiment Plan
Keep everything the same except your viewpoint- Use the same subject.
- Keep the lighting as similar as possible.
- Move your body, not just the zoom.
- Take several versions of each angle.
- Pick the two photos that show the contrast most clearly.

Official Resources
🎬 Video: Pro Photo Secrets: Avoid Shadows & Master Poses (video) — https://youtube.com/shorts/o5yjHn56VtE?si=XC3OvPIABX276ZtY
When you show your counselor the two images, explain which angle works better and what visual effect caused that difference.
Req 4b — Change the Light
This exercise proves that light is not just brightness. It also changes color, shadow edges, texture, and mood. The same subject can look warm and friendly in window light, then sharp and dramatic under a lamp or flash.
Set up a fair comparison
Pick one subject that can stay still. A mug, shoe, hat, small trophy, or person sitting in one place works well. Photograph it once in natural light and once in artificial light.
Natural light ideas:
- near a window
- outside in shade
- outside during golden hour
Artificial light ideas:
- desk lamp
- room light
- LED panel
- flash
What to look for
Compare these questions when you review the photos:
- Which light creates softer shadows?
- Which one changes the color of the subject?
- Does one reveal texture better?
- Which photo feels more natural? Which feels more dramatic?
Your explanation to the counselor matters as much as the photos. Be ready to say what changed and which light helped the subject most.
Req 4c — Change the Focus
Depth of field changes what the viewer notices first. A blurry background can make one face or object stand out immediately. A deep focus image can show a subject in context.
How to create the two versions
Take one photo with a shallow depth of field and one with a deep depth of field.
Ways to get a shallower depth of field:
- use portrait mode or a wider aperture
- move closer to the subject
- increase the distance between subject and background
Ways to get a deeper depth of field:
- use a narrower aperture if your camera allows it
- step back a little
- use a wider lens or wider field of view
What the viewer experiences
In the shallow-focus version, the eye goes straight to the main subject. In the deep-focus version, the viewer sees more surroundings and may understand the setting better.
This is a good requirement for flowers, signs, people, backpacks, or any object that can be separated from its background.
When you share your work, explain which version is better for isolation and which is better for context.
Req 4d — Change the Composition
Composition is the photographer’s way of saying, “Look here first.” Two photos of the same subject can feel completely different depending on how you arrange the frame.
Good technique pairings
Choose two clearly different approaches, such as:
- rule of thirds and centered composition
- leading lines and framing
- close foreground depth and clean minimal background
- symmetry and off-center placement
Make the difference obvious
For this requirement, subtle changes are less useful than obvious ones. If both images feel almost the same, your counselor may not be able to see what you were testing.
Try asking yourself:
- Where does my eye go first?
- What lines guide me there?
- What did I leave out of the frame on purpose?
- Does one version feel calmer, stronger, or more dynamic?
Composition Comparison
What to say when you present your two images- Name the two techniques you used.
- Point out where the viewer’s eye goes first.
- Explain how the background helps or hurts the subject.
- Say which version tells the stronger story and why.
After these exercises, you will be ready to start choosing different kinds of subjects on purpose.
Req 5 — Pick Three Subject Types
You must choose exactly three options from this requirement. This section helps you practice with different kinds of subjects, not just different camera settings. Each choice pushes you to notice a different challenge: expression, relationship, motion, patience, environment, or timing.
Your Options
- Req 5a — Make a Strong Close-Up: Fill the frame with one person and pay attention to expression, focus, and what the background does.
- Req 5b — Capture Interaction: Photograph two or three people together so the image shows connection, activity, or emotion.
- Req 5c — Freeze or Follow Action: Capture motion at the right instant and make the subject feel active instead of random.
- Req 5d — Photograph Animals Patiently: Work with unpredictable subjects and learn patience, timing, and respect for distance.
- Req 5e — Notice the Outdoors: Turn nature into a subject by noticing light, pattern, scale, season, or weather.
- Req 5f — Photograph a Person Intentionally: Compare candid, posed, and camera-aware choices and decide what best fits the story.
How to Choose
Choosing Your Three
Pick options that give you variety- Fastest to set up: Req 5a, Req 5e, and Req 5f often work with only one available subject.
- Best for events: Req 5b and Req 5c are easier at troop meetings, games, camp activities, or family gatherings.
- Best for outdoor trips: Req 5d and Req 5e fit hikes, parks, campouts, and backyard observation.
- What you will gain: Req 5a sharpens portrait focus. Req 5b teaches relationship and storytelling. Req 5c teaches timing. Req 5d teaches patience. Req 5e teaches observation. Req 5f teaches intention and communication.
Bring your best three examples to your counselor and be ready to explain what made each one successful.
Req 5a — Make a Strong Close-Up
A close-up works because it removes distractions. Instead of showing everything around a person, it lets the viewer focus on expression, eyes, and detail.
What makes a close-up effective
The eyes are usually the most important part of the frame. If the eyes are soft, the whole image often feels weak. Try to focus there first.
Also watch the background. Even in a close-up, a bright sign, messy room, or branch sticking out behind the person’s head can pull attention away.
Helpful choices
- move physically closer instead of relying only on zoom
- use softer light when possible, especially window light or open shade
- ask the person to turn slightly rather than facing straight on every time
- take several expressions instead of only one
If you share this image with your counselor, explain what you wanted the viewer to notice first.
Req 5b — Capture Interaction
A strong interaction photo shows a relationship, not just multiple bodies in the same frame. The goal is to capture people doing something with each other: talking, laughing, working, teaching, cheering, or reacting.
What to watch for
Look for hands, faces, and lines of sight. If one person is looking at another, that creates a connection. Shared activity helps too. Two Scouts tying a knot together tells a clearer story than two Scouts standing shoulder to shoulder with no action.
Composition tips
- keep everyone separated enough that faces are visible
- avoid cutting off hands if hands help tell the story
- wait for expressions that match the moment
- choose a background that supports the activity instead of cluttering it
This kind of photo works especially well at service projects, campfire prep, games, or conversations.
Req 5c — Freeze or Follow Action
An action shot captures movement at the moment it matters. That could mean freezing the peak of a jump, catching the instant a ball leaves a hand, or following motion with just enough blur to show speed.
Pick the right kind of action
The best subjects are easy to predict and repeat:
- running or biking
- sports drills
- a dog catching a toy
- a Scout chopping kindling safely with supervision
- someone jumping over a puddle or log
Timing matters more than luck
Start watching before the action reaches its best point. If you wait until after you see the big moment, you are often already too late.
If your camera supports burst mode, use it. Taking several shots quickly increases the chance that one frame will capture the peak moment.
When you present this photo, explain whether you tried to stop motion cleanly or show speed through blur.
Req 5d — Photograph Animals Patiently
Animal photography teaches patience faster than almost any other kind of subject. Animals do not care about your timing, and they rarely hold still exactly where you want them.
Start where success is likely
A pet, farm animal, zoo animal, or backyard bird can all work. The requirement does not say the animal must be wild. What matters is that you create a strong image while respecting the subject.
What improves an animal photo
- focus on the eyes when possible
- get down closer to the animal’s eye level
- leave space in front of the direction the animal is looking or moving
- wait for alert ears, open eyes, or interesting behavior
Patience beats chasing
Instead of chasing the animal, choose a good spot and wait. Animals often return to a comfortable behavior if you stay calm and predictable. That usually produces a better photograph and a safer experience.
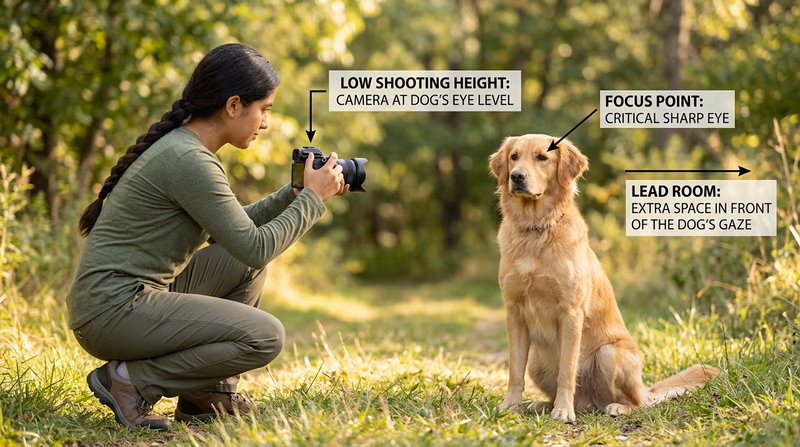
When you show this photo, talk about how you balanced patience, distance, and timing.
Req 5e — Notice the Outdoors
A nature shot is more than “I saw a tree.” It works when you notice something specific the viewer might otherwise miss: light through leaves, frost on a fence, a trail disappearing into fog, bark texture, storm clouds, or the shape of a single feather.
Ways to make a nature photo stronger
Choose one visual idea to emphasize:
- color — bright fall leaves, wildflowers, sunset tones
- texture — bark, stone, feathers, ripples, snow
- scale — one small flower in a big field, or one hiker against a huge landscape
- pattern — repeating waves, branches, or rows of reeds
- mood — calm morning light, windy weather, rain, or mist
Slow down and observe
Nature photography rewards patience. Walk a little, stop, and look again. Often the better picture appears after you notice where the light is coming from or which background is cleanest.
When you share this image, explain what you were trying to show about the natural scene.
Req 5f — Photograph a Person Intentionally
This requirement gives you choices, but each choice says something different about the person in the frame.
Candid
A candid photo catches a real moment without the subject performing for the camera. It often feels natural and honest. Good candid photos usually come from patience and observation.
Posed
A posed photo is planned. The photographer and subject work together on expression, posture, background, and light. A posed photo can still feel warm and real if it does not look stiff.
Camera aware
A camera-aware photo means the subject knows the camera is there, even if the pose is casual. This can create a direct connection with the viewer when the expression feels genuine.
Choose the Right Approach
Match the style to the moment- Use candid when you want real activity or emotion.
- Use posed when you want control over expression and background.
- Use camera aware when you want the subject to connect directly with the viewer.
- In all cases pay attention to light, background, and whether the person’s expression fits the story.
The next requirement moves from capturing the image to improving it after the shot.
Req 6 — Edit for Impact
Editing is where you refine the photo you already captured. Good editing does not rescue every weak image, but it can make a strong image clearer, cleaner, and more intentional.
You must choose exactly one option from this requirement.
Your Options
- Req 6a — Crop for Stronger Framing: Remove distractions and improve composition by deciding what belongs inside the frame.
- Req 6b — Fix Exposure or Color: Correct brightness or color so the image looks closer to what you intended when you took it.
- Req 6c — Improve Impact Another Way: Use another editing choice, such as contrast, black-and-white conversion, straightening, or selective cleanup, to strengthen the message of the photo.
How to Choose
Choosing Your Edit
Pick the improvement your image actually needs- Choose 6a if the subject is good but the edges of the frame feel messy or distracting.
- Choose 6b if the image is too dark, too bright, too warm, too cool, or otherwise off in tone.
- Choose 6c if another change would better serve the story, such as straightening a horizon, increasing contrast, or converting to black and white.
- What you will gain: 6a teaches composition after the fact, 6b teaches correction, and 6c teaches judgment.
Official Resources
🎬 Video: PHOTO EDITING FOR BEGINNERS - 9 Simple Steps to Improve Your Photos (video) — https://youtu.be/KR7L2oSRlwY
Whether you use a phone app, tablet, or computer software, the key is to make purposeful changes you can explain.
Req 6a — Crop for Stronger Framing
Cropping changes the frame after the picture is taken. It can remove distractions, improve balance, and move the viewer’s attention toward the main subject.
What cropping can fix
- extra empty space that adds nothing
- distracting objects near the edge of the frame
- a subject placed awkwardly in the original image
- a horizon or main feature that feels off-balance
What cropping cannot fix
Cropping cannot restore focus that was never sharp. It also cannot replace details that were not captured. If you crop too aggressively, the file may lose quality.
Smart Cropping Questions
Ask these before you save the edited version- What is the main subject?
- What can I remove without hurting the story?
- Does the new frame feel tighter and clearer?
- Did I accidentally crop off something important like hands, feet, or context?
When you show your counselor the edited image, explain exactly what the crop removed and why that improved the photo.
Req 6b — Fix Exposure or Color
Sometimes the camera gets close, but not quite right. Maybe the picture is darker than the scene felt in real life, or maybe indoor lights made everything look yellow or green. This option is about correcting that kind of problem.
Exposure adjustments
Adjusting exposure changes overall brightness. You might also change highlights, shadows, contrast, whites, or blacks depending on the software. Small changes are usually better than huge ones.
Color correction
Color correction often involves white balance. That means telling the software what should look neutral so the whole image shifts warmer or cooler in a believable way.
Examples:
- a snowy scene that looks too blue can be warmed slightly
- a room lit by tungsten bulbs may need a cooler correction
- a backlit portrait may need shadows opened so the face is visible
When you present your work, describe the problem in the original image and the exact fix you made.
Req 6c — Improve Impact Another Way
This option is about judgment. Maybe your image does not need a crop or color correction. Maybe it needs a straighter horizon, stronger contrast, black-and-white conversion, noise reduction, or a small cleanup that removes a distracting spot.
Good improvement choices
- Straighten a crooked horizon or building line.
- Increase contrast so the subject stands out more clearly.
- Convert to black and white if color distracts from shape, light, or emotion.
- Reduce noise if a low-light image looks grainy.
- Clean up distractions such as a tiny bright object near the edge.
Match the edit to the goal
Do not choose an edit just because it looks dramatic. Choose it because it supports what the photo is trying to say. A black-and-white version can make a portrait feel more timeless. A straightened horizon can make a seascape feel calm and deliberate instead of sloppy.
Explain Your Editing Choice
What your counselor will want to hear- What problem or weakness did the original image have?
- What exact edit did you apply?
- How did that change the viewer’s attention or emotional response?
- Why was this the best improvement for this image?
The next requirement asks you to think bigger than one photo by planning a complete visual story.
Req 7 — Tell a Visual Story
A visual story is more than a collection of good photos. It is a sequence that helps someone understand what happened, why it mattered, and what details made the event or topic feel real.
This requirement covers three connected steps:
- planning the pictures you will need
- getting counselor input before shooting
- choosing and arranging eight to 12 images that tell the story clearly
Why planning matters
If you only start shooting without a plan, you may end up with twelve versions of the same kind of image and none of the pictures that explain the whole story. Visual storytellers think in variety: wide shots, close details, action, reaction, and ending shots.
Requirement 7a
Start by deciding what your story is about. An event could be a campfire program, service project, troop meeting, hike, or family celebration. A topic could be something like “how a bike gets repaired” or “one day at camp.”
Make a shot list before you begin. Try to include:
- an opening image that sets the scene
- medium shots showing the main activity
- close-up details
- people reacting or interacting
- an ending image that gives the story closure
Official Resources
🎬 Video: Storytelling in Photography (video) — https://youtu.be/UtMXpomDWlk?si=Zo4DOxTQMgshkjFA
Requirement 7b
Your counselor may notice gaps in the plan that you do not see yet. Maybe you forgot to include an establishing shot, or maybe you chose a topic that is too broad for eight to 12 images. This step helps you improve the plan before you invest time in shooting.
Bring your shot list, explain the event or topic, and ask where your counselor thinks the story may need more variety or clearer focus.
Requirement 7c
When you review your images, do not just pick the twelve prettiest ones. Pick the ones that work together. A strong sequence usually has:
- a beginning that introduces the setting or subject
- a middle that shows the process, event, or key moments
- an ending that gives the viewer a sense of completion
Arrange the photos so one leads naturally to the next. If two images do the same job, keep the stronger one and cut the weaker one.
Build a Strong Photo Story
What your final sequence should include- Variety: wide, medium, and close images
- Clarity: the viewer can tell what the story is about
- Order: the sequence makes sense from image to image
- Purpose: every image adds something new
- Ending: the final image feels like a conclusion, not an accident
Official Resources
🎬 Video: How to Make a PowerPoint Photo Slideshow (video) — https://youtu.be/G-qyX_Ri17M?si=mFi7rrxZa1KDlNrT
A photo story uses everything you practiced earlier in the badge: safety, light, camera control, composition, timing, and editing.
Req 8 — Explore Photography Careers
Photography careers are broader than many Scouts realize. Some photographers create art, but many others solve practical problems: documenting events, explaining products, reporting news, recording scientific evidence, or helping businesses communicate visually.
Three example career paths
Photojournalist — Tells real-world stories through images for newspapers, magazines, or websites. This role requires strong ethics, fast decision-making, and the ability to work under pressure.
Portrait or event photographer — Photographs people for families, schools, weddings, teams, and organizations. This path requires people skills as much as camera skill.
Commercial photographer — Creates images for advertising, products, food, real estate, or brands. This kind of work often involves planning, lighting, editing, and teamwork with clients.
Other paths include wildlife photography, sports photography, forensic photography, scientific imaging, drone imaging, filmmaking, and photo editing.
How to prepare
No matter which career you choose to discuss, good preparation often includes:
- practicing regularly with real subjects
- building a small portfolio of your best work
- learning editing software
- studying light, storytelling, and composition
- taking classes, workshops, or school media opportunities
- learning how to work well with people and deadlines
Some jobs may require a college degree, while others care more about portfolio quality, internships, apprenticeships, certifications, or hands-on experience. That is part of what you should discuss with your counselor.
Official Resources
🎬 Video: Top 10 Careers For Photographers (video) — https://youtu.be/fEp_EDQE0IM?si=4IIC3sAbXyD1_6tK
You have now covered the full badge. The next page goes beyond the requirements and suggests ways to keep growing as a photographer.
Extended Learning
Congratulations
You finished the Photography merit badge, but you are still at the beginning of what photography can teach you. The more you practice, the more you start noticing light, timing, expression, weather, pattern, and story before anyone else around you does.
Train Your Photographer’s Eye
One of the best ways to improve is to give yourself small assignments. Spend one week looking only for reflections. Another week, photograph only shadows, doorways, hands, or weather. These focused projects teach you to see patterns instead of waiting for random luck.
You can also revisit the same place at different times of day. A playground at sunrise, noon, and dusk feels like three different locations. That kind of comparison builds skill much faster than taking hundreds of unrelated pictures.
Build a Small Portfolio
A portfolio is a short collection of your best work, not all your work. Even five to ten strong images can begin to show your style. Try to choose photos that show variety: people, nature, action, storytelling, and one or two images that feel especially personal to you.
As you build a portfolio, ask these questions:
- Which picture has the strongest light?
- Which one tells a clear story?
- Which one shows patience or timing?
- Which one still holds up when I look at it a month later?
Learning to edit your own selections is a big step from “I took a lot of pictures” to “I know which pictures matter.”
Explore Specialty Paths
Photography can branch in many directions. If one part of the badge grabbed your attention, follow it further.
Night and Astro Photography
Try photographing stars, moon phases, or campfire scenes. You will learn patience, tripod use, long exposure techniques, and how darkness changes composition.
Sports and Action Coverage
If you enjoy timing and movement, try photographing games, races, or troop competitions. This path teaches anticipation, positioning, and how to work quickly.
Nature and Conservation Photography
If you liked Req 5d or Req 5e, spend more time photographing birds, insects, weather, or local habitats. Photography can become a way to observe change in the natural world over time.
Documentary Storytelling
If you liked Req 7, keep telling stories with image sequences. Document a service project from setup to finish, or tell the story of how something gets built, cooked, repaired, or performed.
Real-World Experiences
Visit a Local Gallery or Museum
See how professional photographers use light, subject choice, and print size to guide attention. Looking closely at finished work improves your own decision-making.
Photograph a Troop Event
Offer to document a campout, court of honor, or service project. You will practice storytelling, candid moments, and fast-changing conditions.
Join a School Yearbook or Media Team
School media groups are one of the best places to practice deadlines, portraits, event coverage, and caption writing with a real audience.
Print and Display Your Work
Choose three to five favorite images, print them, and mount them neatly. Seeing your work off a screen teaches you a lot about detail, cropping, and color.