Pioneering Merit Badge — Complete Digital Resource Guide
https://merit-badge.university/merit-badges/pioneering/guide/
Introduction & Overview
Pioneering is the art of turning rope, poles, planning, and teamwork into something useful. A wash station, a table, a bridge, or a tower may look like camp magic, but every successful pioneering project is really a lesson in safety, physics, and leadership.
This badge matters because it teaches you to build with purpose. You are not just tying knots for inspection. You are learning how to choose the right rope, control loads, anchor a structure, and work with a team so the finished project is both useful and safe.
Then and Now
Then
Long before steel trusses and portable power tools, people built what they needed from what they could carry or cut nearby. Explorers, soldiers, settlers, and engineers crossed streams with rope bridges, raised signal towers, and built camp gadgets from spars and lashings. A good pioneering crew could turn a pile of poles into a gate, a cooking area, or a bridge in a matter of hours.
In early Scouting, pioneering became one of the classic outdoor skills because it blended so many parts of the program at once: knots, patrol teamwork, problem-solving, and service. A troop that could lash together a wash stand or a flagpole did not just look sharp. It lived more comfortably in camp.
Now
Today, pioneering is still one of the best ways to learn how structures work. Every lashing teaches force and friction. Every anchor teaches load control. Every layout teaches planning before action. Even if you never build a monkey bridge outside of Scouting, the habits behind pioneering carry over to engineering, construction, trades, event setup, and team leadership.
Pioneering also makes camp better right away. A stable hand-washing station improves hygiene. A smart table keeps gear organized. A well-built gateway or bridge can become the centerpiece of a camporee site. Good pioneering combines usefulness with craftsmanship.
Get Ready!
You are about to build things that other people will actually use. That is what makes pioneering exciting — and what makes safety matter so much. Slow down, measure twice, talk with your team, and make every lashing clean and deliberate.
Kinds of Pioneering
Camp Gadgets
Camp gadgets are the entry point for most Scouts. Tripod wash stations, dish racks, and simple tables teach you how to make something practical with just a few spars and a handful of lashings. These projects are small enough to fix when something goes wrong, which makes them great training builds.
Bridges and Towers
Bridges and towers bring bigger loads, bigger forces, and bigger consequences. They teach you how weight travels through a structure, why anchors matter, and why a good bracing system can keep a build from racking sideways. They also demand stronger teamwork because one person cannot safely do every step alone.
Service Structures
Some of the best pioneering projects solve a real camp problem. A wash station improves sanitation. A gateway marks a troop site. A Chippewa kitchen creates a better cooking area. Service structures remind you that pioneering is not about showing off knots. It is about helping a group function better outdoors.
Teaching and Leadership Builds
Pioneering is also a leadership skill. Someone has to read the plan, organize materials, assign jobs, and keep the team working safely. If you enjoy explaining lashings, checking alignment, and helping younger Scouts succeed, pioneering can become one of the most satisfying ways to lead in camp.
Ready to start with the most important part of any build? Begin with hazard awareness, injury prevention, and the safety mindset that every pioneering project needs.
Req 1 — Safe Pioneering Basics
Before you pick up a spar or tension a line, you need a safety plan. This requirement covers two connected ideas: spotting the hazards around a pioneering project, and knowing how to prevent or treat the injuries that can happen if something goes wrong.
- Req 1a helps you recognize hazards before the build starts.
- Req 1b helps you respond to common injuries and environmental problems during the project.
Requirement 1a
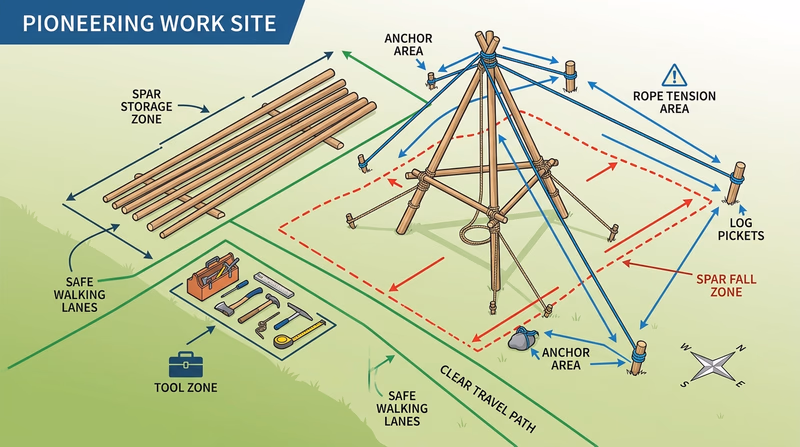
A pioneering project can look calm right up until the moment something shifts, slips, or falls. That is why the best builders are always scanning the site. They think about the ground, the weather, the weight of the spars, the path of ropes under tension, and where people are standing.
Hazards to expect
The most common pioneering hazards are not mysterious. They are the predictable result of heavy poles, stretched rope, uneven ground, and distracted teamwork.
Hazards to Look For
Use this list before and during every build- Falling or rolling spars: Poles can slip off supports or roll if they are laid on a slope.
- Tensioned rope: A rope under load can snap, whip, or pinch fingers.
- Unstable footing: Mud, loose gravel, roots, and gear on the ground can cause trips and falls.
- Poor lifting technique: Heavy or awkward lifts can strain backs, shoulders, and hands.
- Weak lashings or anchors: A structure that seems fine at first can loosen as weight shifts.
- Weather exposure: Heat, sun, cold, wind, and rain can make the job less safe fast.
- Tool misuse: Saws, mallets, and knives used around spars and rope need clear spacing and attention.
Four safety habits that prevent most problems
- Survey the site first. Pick level ground when possible. Clear branches, loose gear, and other trip hazards.
- Create a work zone. Keep people out of the swing radius of long spars and away from lines being tightened.
- Assign jobs clearly. One person gives lifting commands. One person checks alignment. Everyone else knows where to stand.
- Inspect as you go. Tight lashings can loosen. Anchors can creep. Poles can settle. Stop and re-check often.
The official Safe Pioneering video is worth watching before your first large build because it shows the mindset your counselor wants to hear: slow, organized, and alert.
🎬 Video: Safe Pioneering (video) — https://youtu.be/hWDLLkUPFCI?si=8JSQve7lVV65fKp9
Requirement 1b
Most pioneering injuries start small. A dry rope can leave splinters. A quick grab on a moving line can burn your palm. A hot workday can turn into dehydration before anyone notices. Your counselor wants you to know both halves of first aid: how to prevent the problem, and what to do right away if it happens.
Rope splinters and rope burns
Natural-fiber rope can leave tiny splinters. Fast-moving rope can scrape or burn skin.
- Prevent it: Wear work gloves when appropriate, keep ropes clean and dry, and never let rope slide through bare hands under load.
- Treat it: Remove small splinters carefully with clean tweezers. For rope burns, cool the area with clean water, cover it loosely, and watch for deeper damage.
Cuts, scratches, and falls
Spars, tools, and rough ground can all cause minor wounds. Falls are more serious because they can involve head, neck, or back injuries.
- Prevent it: Keep the site tidy, carry spars with enough helpers, and avoid horseplay around builds.
- Treat it: Clean minor cuts and scratches, apply pressure if bleeding, and cover with a clean bandage. After a fall, do not rush to move the person if you suspect a head, neck, or back injury. Get adult help immediately.
Insect bites, stings, and weather injuries
Outdoor builds often last long enough for heat, cold, and sun exposure to matter.
- Prevent it: Use insect repellent, drink water before you feel thirsty, take shade breaks, wear layers in cold weather, and use sunscreen.
- Treat it: Remove a stinger if present, wash bites or stings, cool sunburned skin, warm a chilled person gradually, and move anyone with heat illness out of the sun right away.
Red Flags That Need Adult Help Fast
Do not try to handle these alone- Heatstroke signs: Confusion, hot skin, fainting, seizure, or loss of consciousness.
- Severe dehydration: Dizziness, very dark urine, or inability to keep fluids down.
- Allergic reaction: Trouble breathing, swelling of the face or throat, widespread hives.
- Possible broken bone or spine injury: Severe pain, deformity, numbness, or inability to move normally.
- Heavy bleeding: Bleeding that does not stop with firm direct pressure.
The official safety checklist is useful because it turns general safety ideas into a pre-build review you can use with your patrol.
Pioneering Safety Checklist (PDF) Use this checklist to review site setup, lifting, tools, and structural safety before you start building. Link: Pioneering Safety Checklist (PDF) — https://filestore.scouting.org/filestore/Merit_Badge_ReqandRes/Requirement%20Resources/Pioneering/Pioneering_Safety_Checklist.pdfUse this short sunburn video as a reminder that even a cloudy day on an open field can do damage while you are focused on the project.
🎬 Video: Sunburn (video) — https://www.youtube.com/watch?v=DCNUwuNTtGg
If rope burns come up during counselor discussion, this first-aid reference gives a clear review of cleaning and protecting the injury.
First Aid for Rope Burns (website) Review the basic first-aid steps for treating rope burns and knowing when the injury needs more care. Link: First Aid for Rope Burns (website) — https://www.firstaidforfree.com/first-aid-for-rope-burn/In Req 2, you will learn the rope skills that make builds stronger and safer from the start.
Req 2 — Core Rope Skills
This requirement is your rope-and-spar toolkit. You will learn how to keep a rope end from unraveling, how to tie working knots that control load and movement, and how to use lashings to turn separate poles into a stable structure.
- Req 2a is about protecting rope ends with a whipping.
- Req 2b is about knots and rope tackle for tension and attachment.
- Req 2c is about lashings, which are the real joints of pioneering.
Requirement 2a
A rope with a frayed end becomes harder to handle, weaker to use, and more annoying every time you touch it. Whipping fixes that by binding the end tightly so the strands stay together. The West Country method is popular in Scouting because it is simple, quick, and easy to inspect.
What the whipping is doing
The whipping is not just decoration. It squeezes the strands together and keeps them from untwisting. A good whipping is snug, even, and placed close enough to the end to protect it without slipping off.
What to show your counselor
Make the demonstration clean, not rushed- Start with a neat rope end so the strands are even.
- Wrap with consistent tension so the whipping does not gap.
- Finish with secure knots that do not loosen when handled.
- Trim the tail neatly without cutting the rope itself.
These two official videos give you both the specific West Country method and a useful comparison to another common whipping style.
🎬 Video: How to Tie a Half Knot (West Country) Whipping (video) — https://youtu.be/gU3LJ-QD_-s?si=0smdbUSo_20udYq3
🎬 Video: How to Tie a Sailmaker's Whipping (video) — https://youtu.be/bzTduzweDdE?si=UByC4CSpmRy9G3FI
🎬 Video: Safe Pioneering (video) — https://youtu.be/hWDLLkUPFCI?si=8JSQve7lVV65fKp9
Requirement 2b
These knots each solve a different problem. That is the key to remembering them. Do not memorize them as a random list. Learn what job each one does.
Rope tackle
A rope tackle helps you tighten a line. In pioneering, that matters because loose lines create sloppy structures. Rope tackle gives you mechanical advantage so you can pull harder and hold tension better.
Clove hitch formed as two half hitches
This is one of the first knots many Scouts learn because it starts and finishes many lashings. It grips a spar quickly and is easy to adjust before you tighten it fully.
Clove hitch on a bight
This version lets you place the hitch over the end of a spar without needing access to the free end of the rope. That makes setup faster in some builds.
Butterfly knot
The butterfly knot creates a fixed loop in the middle of a rope. It is handy when you need a middle attachment point without cutting the line.
Roundturn with two half hitches
This knot is strong for attaching a rope to a spar, ring, or post when the line will stay under tension. The roundturn helps absorb load before the half hitches lock it in place.
Rolling hitch
The rolling hitch is useful when you want to grip another rope or a spar and resist lengthwise pulling. That is why it appears so often in guy lines and adjustments.
Pioneering Safety Checklist (PDF) Review the checklist before practicing knots under tension so your work area stays organized and safe. Link: Pioneering Safety Checklist (PDF) — https://filestore.scouting.org/filestore/Merit_Badge_ReqandRes/Requirement%20Resources/Pioneering/Pioneering_Safety_Checklist.pdf🎬 Video: How to Tie a Rope Tackle (video) — https://youtu.be/fZC2iXF0V3g?si=Nl9Z-88jPw1wTzlq
🎬 Video: How to Tie and Apply a Clove Hitch and Half Hitches (video) — https://youtu.be/LFH1L3lfciA?si=RhEQn4lo1Oc7fpwU
🎬 Video: How to Tie a Clove Hitch on a Bight (video) — https://youtu.be/IXsXjB0gWqw?si=IVQv_b3mkhjb8lWo
🎬 Video: How to Tie a Butterfly Knot (video) — https://youtu.be/q0KPxnj3Rck?si=LYZ3LFkgbb86EINV
🎬 Video: How to Tie a Roundturn with Two Half Hitches (video) — https://youtu.be/90MJxoRu9Fg?si=H_r3J8zOUTSwyVZ8
🎬 Video: How to Tie a Rolling Hitch (video) — https://youtu.be/O0vGxZ5KQ-s?si=Jim_m6GbDLg30g1l
The sunburn and rope-burn resources from Req 1 still matter here because this is the stage where Scouts often handle rope repeatedly and work in the open.
🎬 Video: Sunburn (video) — https://www.youtube.com/watch?v=DCNUwuNTtGg
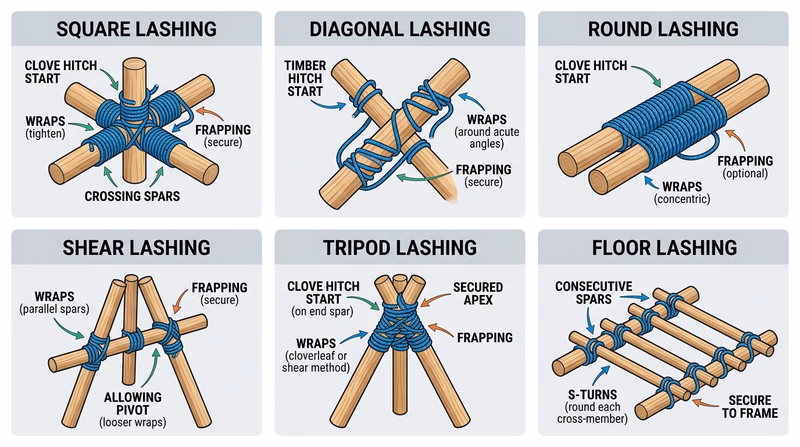
Requirement 2c
If knots are the fasteners of pioneering, lashings are the joints. Each one is built for a different relationship between poles.
Square lashing
Use square lashing when two spars cross at roughly a right angle and need to stay fixed. This is one of the most common lashings in tables, wash stations, and frames.
Diagonal lashing
Use diagonal lashing when two spars cross but tend to pull apart or rack under strain. It starts by pulling the poles together, which is why it is helpful in bracing.
Round lashing
Use round lashing when poles lie side by side. It is often used to join spars end-to-end or to attach parallel pieces.
Shear lashing
Use shear lashing to join two poles that will spread apart like legs. This is common in A-frames and other spread-leg supports.
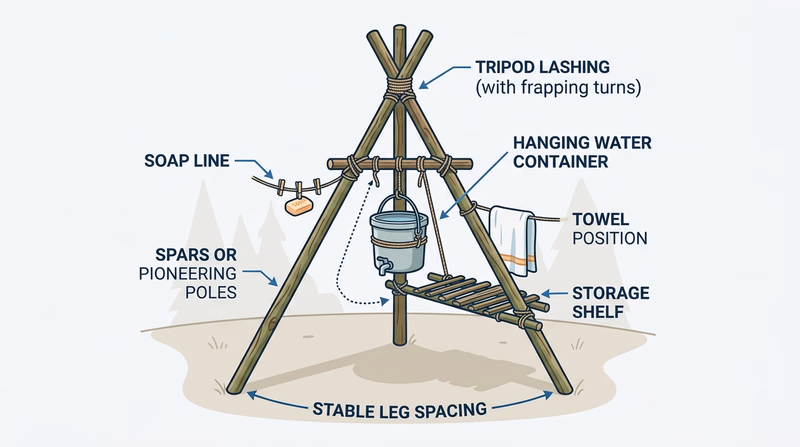
Tripod lashing
Use tripod lashing to join three spars that will spread into a tripod. It is ideal for wash stations, suspended gear, and light camp gadgets.
Floor lashing
Use floor lashing when you need to attach a horizontal spar across a frame so it forms part of a platform or tabletop.
How to choose the right lashing
Ask these questions before you start tying- Are the poles crossing or running side by side?
- Will the structure try to spread, twist, or rack sideways?
- Is this a frame joint, a brace, or a platform support?
- Will people or gear put weight on it later?
🎬 Video: How to Tie the Mark II Square Lashing (video) — https://youtu.be/ll5BC7SohnE?si=dmcZo8pVawLfULQx
🎬 Video: How to Tie a Diagonal Lashing (video) — https://youtu.be/F-RRn9ccf34?si=18PZENVSjSti0Css
🎬 Video: How to Tie a Round Lashing (video) — https://youtu.be/tDGSiQhmwBs?si=j_7GZgMV4xdTinXY
🎬 Video: How to Tie a Shear Lashing (video) — https://youtu.be/ZleaU84exEw?si=u1In--D192D2eIFE
🎬 Video: How to Tie a Tripod Lashing (with Plain Turns) (video) — https://youtu.be/DB1g69AaMy8?si=qOpo7B_b-CjAFuQO
🎬 Video: How to Tie a Floor Lashing (video) — https://youtu.be/aS8mPYPGJGI?si=Ud7walIeV2dsRYwa
In Req 3, you will put these rope skills to work on real camp gadgets where clean lashings make the difference between wobbly and solid.
Req 3 — Practical Camp Builds
This is where pioneering starts to feel real. You are taking the knots and lashings from Req 2 and turning them into camp gadgets people can actually use.
- Req 3a focuses on a tripod wash station or a similar light gadget.
- Req 3b moves into a taller flagpole build with line tension and stability.
- Req 3c adds a wider frame and working surface for a simple camp table.
Requirement 3a
A tripod wash station is a great first build because it does real work in camp and clearly shows whether your lashings are doing their job. If the tripod spreads evenly and the hanging water or soap setup stays balanced, your build works. If it leans, twists, or slides, you get instant feedback.
What makes a good wash station
- Even tripod legs so the load shares across all three spars
- A tight tripod lashing that lets the legs spread smoothly without slipping loose
- Level placement on the ground so the structure does not rack
- Practical attachments for soap, water, and a drying towel
🎬 Video: Tripod Hand Wash Station: The Ideal First Class Camp Gadget! (video) — https://youtu.be/bImsiFVwhpQ?si=DU03rbOjtb5vL3nJ
The whipping videos below are also relevant here because wash stations get handled, moved, and re-used. Clean rope ends help the whole build last longer.
🎬 Video: How to Tie a Half Knot (West Country) Whipping (video) — https://youtu.be/gU3LJ-QD_-s?si=0smdbUSo_20udYq3
🎬 Video: How to Tie a Sailmaker's Whipping (video) — https://youtu.be/bzTduzweDdE?si=UByC4CSpmRy9G3FI
Requirement 3b
A flagpole build teaches one of the most important ideas in pioneering: tall structures magnify small mistakes. A loose joint that barely matters on a wash station can become a major wobble on a 15-foot pole.
What to focus on
- Straight alignment so the finished pole does not bend or wander sideways
- Strong side-by-side joins because the staves must act like one longer spar
- Clean tensioning with rolling hitches or roundturns where the design calls for them
- Safe raising procedure with clear commands and enough helpers
Before you raise the flagpole
Stop and inspect these points- All lashings are tight and cinched
- The base area is clear of feet and gear
- Helpers know the raise command
- Guy lines or stabilizing lines are ready if needed
- No one is standing in the fall path
🎬 Video: Patrol Challenge - 15 Foot Scout Stave Flagpole (video) — https://youtu.be/M2sEwJr_NX0?si=D_CDFf4ROU_-4-AS
These knot videos are especially useful here because the flagpole option depends on secure attachments and controlled tension.
🎬 Video: How to Tie a Rope Tackle (video) — https://youtu.be/fZC2iXF0V3g?si=Nl9Z-88jPw1wTzlq
🎬 Video: How to Tie and Apply a Clove Hitch and Half Hitches (video) — https://youtu.be/LFH1L3lfciA?si=RhEQn4lo1Oc7fpwU
🎬 Video: How to Tie a Clove Hitch on a Bight (video) — https://youtu.be/IXsXjB0gWqw?si=IVQv_b3mkhjb8lWo
🎬 Video: How to Tie a Butterfly Knot (video) — https://youtu.be/q0KPxnj3Rck?si=LYZ3LFkgbb86EINV
🎬 Video: How to Tie a Roundturn with Two Half Hitches (video) — https://youtu.be/90MJxoRu9Fg?si=H_r3J8zOUTSwyVZ8
🎬 Video: How to Tie a Rolling Hitch (video) — https://youtu.be/O0vGxZ5KQ-s?si=Jim_m6GbDLg30g1l
Requirement 3c
A camp table forces you to think in rectangles instead of triangles. That means alignment matters more. If one leg spreads too wide or one crosspiece sits too high, the whole tabletop can wobble.
Why this project is valuable
A table uses several kinds of joints in one structure. You may need shear lashings for leg sets, square lashings for right-angle connections, and floor lashings for the top support. That makes it a great review build because each joint has a different job.
🎬 Video: Simple Camp Table (video) — https://youtu.be/MjlZez7vGDQ?si=bfk_4HLElA_WuApo
🎬 Video: How to Tie the Mark II Square Lashing (video) — https://youtu.be/ll5BC7SohnE?si=dmcZo8pVawLfULQx
🎬 Video: How to Tie a Diagonal Lashing (video) — https://youtu.be/F-RRn9ccf34?si=18PZENVSjSti0Css
🎬 Video: How to Tie a Round Lashing (video) — https://youtu.be/tDGSiQhmwBs?si=j_7GZgMV4xdTinXY
🎬 Video: How to Tie a Shear Lashing (video) — https://youtu.be/ZleaU84exEw?si=u1In--D192D2eIFE
🎬 Video: How to Tie a Tripod Lashing (with Plain Turns) (video) — https://youtu.be/DB1g69AaMy8?si=qOpo7B_b-CjAFuQO
🎬 Video: How to Tie a Floor Lashing (video) — https://youtu.be/aS8mPYPGJGI?si=Ud7walIeV2dsRYwa
By now you should notice a pattern: each successful build starts with the right rope and ends with good maintenance. That is exactly what Req 4 covers next.
Req 4 — Rope for Real Loads
The wrong rope can make a good design fail. Pioneering is not just about how you tie the rope. It is also about what the rope is made from, how strong it is, and how well it has been cared for.
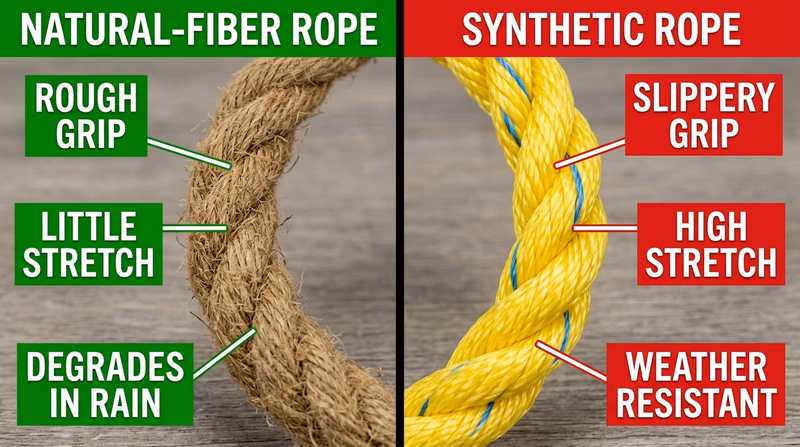
Natural-fiber rope vs. synthetic rope
Natural-fiber rope
Natural-fiber rope is made from plant materials such as manila, sisal, hemp, or cotton. It often grips well, feels traditional in the hand, and can hold lashings securely because the surface has more texture.
Advantages:
- Good grip for many lashings
- Traditional look and feel for pioneering instruction
- Often easier to keep from slipping at the start of a lashing
Disadvantages:
- Can rot if stored damp
- Loses strength over time from mildew and weather
- Usually heavier for its strength than synthetic rope
Synthetic rope
Synthetic rope is made from manufactured fibers such as nylon, polyester, or polypropylene. It is usually stronger for its size, resists rot better, and handles wet conditions more easily.
Advantages:
- Strong for its diameter
- Resists mildew and moisture damage better
- Often lasts longer if maintained well
Disadvantages:
- Some types can be slippery for lashings
- Some stretch more than you want in a structure
- Heat and sunlight can still weaken them over time
Breaking strength vs. safe working load
These two ideas are related, but they are not the same.
- Breaking strength is the amount of force that can make the rope fail under test conditions.
- Safe working load is the much lower amount you should actually allow in real use.
You never plan a project right up to the rope’s breaking point. Real builds have movement, shock loads, knots, wear, moisture, and human error. Safe working load gives you a safety margin.
Which rope suits pioneering best?
For many Scout pioneering builds, the best rope is the rope that balances three qualities:
- Enough strength for the intended load
- Enough grip to hold lashings securely
- Good condition, with no major wear or damage
That is why the answer is not always “synthetic is better because it is stronger.” A rope that is too slick for your lashings, or too stretchy for your design, may be less suitable even if the raw strength number is high.
Care and storage
A strong rope can become an unsafe rope if you treat it poorly.
How to care for pioneering rope
Simple habits that make rope last longer- Coil it neatly so it does not kink or tangle.
- Keep it dry before storing, especially natural-fiber rope.
- Store it off the ground and away from standing water.
- Inspect it often for fraying, cuts, mildew, hard spots, or melted fibers.
- Retire damaged rope instead of hoping it will be fine one more time.
This official video is especially useful because it connects rope care with spar care, which is exactly how real projects are stored and reused.
🎬 Video: How to Prepare and Preserve Lashing Ropes and Pioneering Spars (video) — https://youtu.be/2GfbsP7G5YE?si=VuSeeyD_YzDOVzEO
In Req 5, you will go a step farther and learn splices, which let you finish or repair rope in ways knots cannot.
Req 5 — Splices That Solve Problems
Splices matter because sometimes a knot is not the best solution. A splice can make a rope end neater, create a permanent loop, or join rope sections with less bulk than many knots.
Back splice
A back splice folds the rope strands back into themselves at the end. Its main job is to keep the end from fraying while creating a thicker stop at the rope tip.
Common use: Finishing a rope end when you want durability more than flexibility.
Eye splice
An eye splice creates a fixed loop at the end of a rope. That loop can clip to hardware, fit over a spar, or serve as a strong attachment point.
Common use: Making a permanent loop that is neater and often stronger than tying a loop knot every time.
Short splice
A short splice joins two rope ends into one continuous line. It makes the rope thicker at the splice point, so it is not ideal where the rope needs to run smoothly through small pulleys or tight spaces.
Common use: Repairing or joining rope when added bulk is acceptable.
How to compare the three splices
Think about the job each one solves- Back splice: Finishes an end.
- Eye splice: Makes a permanent loop.
- Short splice: Joins two rope ends together.
These official videos show each splice directly, which is the best way to see how the strands are tucked and why the finished shapes are different.
🎬 Video: How to Create a Back Splice (video) — https://youtu.be/s65PbgZZSgE?si=OkKgfp8pSZRqQ3ts
🎬 Video: How to Create an Eye Splice (video) — https://youtu.be/ZHffzAX3-tk?si=mIKK34hC692CWIrc
🎬 Video: How to Create a Short Splice (video) — https://youtu.be/8HZbsRtxgw0?si=gQq1qdxcJrRcY2lQ
🎬 Video: How to Prepare and Preserve Lashing Ropes and Pioneering Spars (video) — https://youtu.be/2GfbsP7G5YE?si=VuSeeyD_YzDOVzEO
In Req 6, you will take the next logical step and make rope yourself, which helps all the twisting and laying in these splices make more sense.
Req 6 — Twist, Lay, and Whip
Making rope teaches you what rope really is: not one thing, but a system of smaller pieces working together. Once you understand yarns, strands, lay, and tension, you start to see why some rope feels balanced and some wants to kink or untwist.
How a simple rope is built
Your finished rope has three levels:
- Yarns are the smallest pieces.
- Strands are groups of yarns twisted together.
- The rope is made by laying the strands together in the opposite direction.
That opposite twist is what makes rope stable. If everything twists the same way, the rope wants to snarl or separate.
Keys to a good rope-making session
What to watch while the machine is turning- Keep the yarns even so one strand is not fatter than the others.
- Maintain steady tension so the rope forms tightly instead of loosely bunching.
- Let the strands lay together naturally instead of forcing them.
- Measure the finished length after the rope is fully formed.
- Whip both ends so your work stays neat.
Why this requirement matters in pioneering
You may not make every rope you use in camp, but this project teaches you how twisting affects strength, flexibility, and handling. That helps you understand every other rope skill in the badge, from whipping to splicing to choosing the right rope for a structure.
This official video is the best starting point because it shows the overall process from yarns to finished rope.
🎬 Video: Making a Rope from Twine (video) — https://youtu.be/1yb5fqq4dxU?si=Zkl9MOFSFyIRwdwD
These splice videos also help because they show how rope structure matters after the rope is made.
🎬 Video: How to Create a Back Splice (video) — https://youtu.be/s65PbgZZSgE?si=OkKgfp8pSZRqQ3ts
🎬 Video: How to Create an Eye Splice (video) — https://youtu.be/ZHffzAX3-tk?si=mIKK34hC692CWIrc
🎬 Video: How to Create a Short Splice (video) — https://youtu.be/8HZbsRtxgw0?si=gQq1qdxcJrRcY2lQ

In Req 7, you will apply the same mechanical thinking to anchors, where small setup choices make a huge difference in safety.
Req 7 — Keep the Structure Put
A strong structure can still fail if it is not anchored. Anchoring matters because every pioneering build creates forces that try to pull, lift, twist, or slide the structure out of place. The anchor system resists those forces and sends them safely into the ground.
Why anchoring matters
Think about what happens when someone walks across a bridge, leans on a tower, or tightens a guy line. The load does not stay in one place. It moves through the spars, through the lashings, and finally into the ground. If the anchoring is weak, the whole project can creep, rack, or collapse even if the visible frame looks solid.
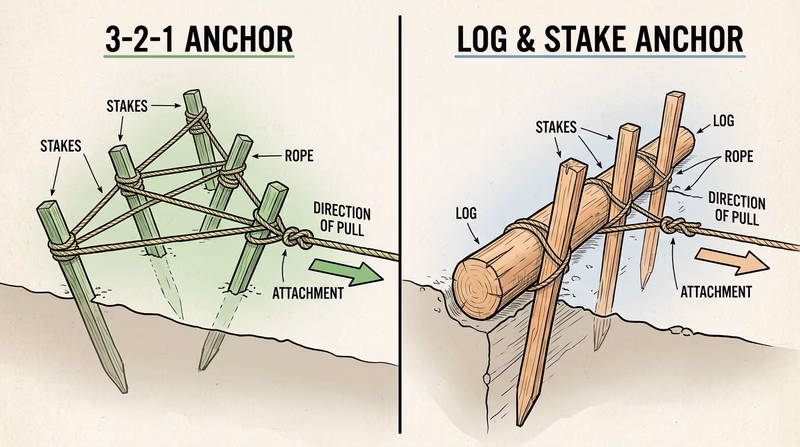
The 3-2-1 anchoring system
The 3-2-1 system uses multiple stakes driven into the ground and tied together so the load is shared.
- Three stakes are set in line with the pull.
- Two stakes help distribute the force and support the main line of pull.
- One anchor point is created where the load line attaches.
The exact arrangement can vary by instruction style, but the main idea stays the same: spread the force across several stakes instead of trusting a single point.
The log-and-stake anchoring system
This system uses a buried or ground-level log backed up by stakes. The rope pulls against the log, and the stakes help keep that log from shifting.
It is useful when you need a broad, solid anchor and ground conditions allow the system to seat firmly. It also helps Scouts see that anchoring is not only about the rope. The soil, the wood, and the direction of pull all matter.
Questions to ask about any anchor
Use these before trusting the system- What direction is the force pulling?
- Is the ground firm enough to resist that force?
- Will the load be steady, or could it jerk and shock-load the anchor?
- Is the anchor backed up or inspected by an adult before use?
This official video is the core resource for the requirement because it shows how anchor systems are laid out and why direction of pull matters.
🎬 Video: Anchoring Pioneering Projects (video) — https://youtu.be/_z-GzDAjVZM?si=qyEvV1jFW0nCHHT8
The rope-making video is also useful here because anchors depend on understanding rope tension, twist, and load path.
🎬 Video: Making a Rope from Twine (video) — https://youtu.be/1yb5fqq4dxU?si=Zkl9MOFSFyIRwdwD
In Req 8, you will look at trestles, pole placement, and X braces—the structural pieces that make a project resist movement before the anchors even engage.
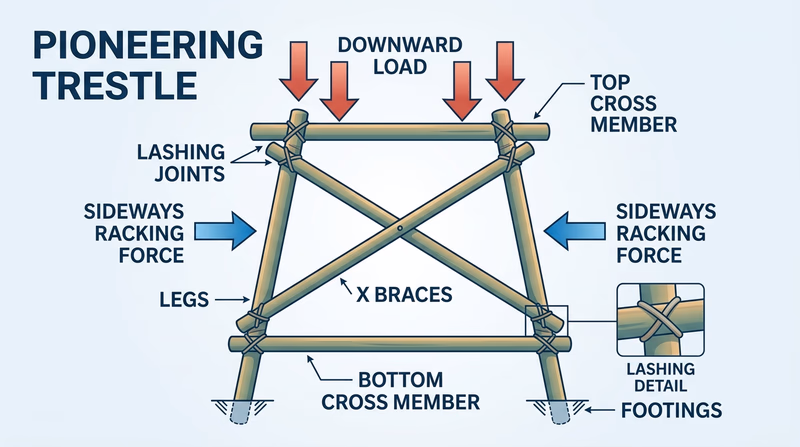
Req 8 — Build a Strong Frame
A trestle is one of the most important building blocks in large pioneering projects. Bridges, towers, and platforms often depend on trestles because they create a stable support frame that can carry load downward while resisting sideways movement.
Lashings used in a trestle
A trestle often uses more than one kind of lashing because different joints do different jobs.
- Shear lashings can join legs that spread into a support shape.
- Square lashings secure crosspieces where poles meet at right angles.
- Diagonal lashings may appear where braces need to stop racking or shifting.
The exact combination depends on the design, but your explanation should connect each lashing to the force it resists.
How the poles are positioned
Pole position is not random. A good trestle spreads load clearly.
- Leg poles carry weight toward the ground.
- Cross members hold spacing and shape.
- Braces keep the frame from folding sideways.
If the poles are uneven, misaligned, or set on weak ground, even good lashings will struggle to keep the structure true.
Why X braces matter
X braces are a big deal because they fight racking. Racking is the sideways distortion that turns a rectangle into a leaning parallelogram. Without bracing, a frame may feel solid when empty but shift dangerously once someone climbs or crosses it.
This official trestle video helps you visualize how the support frame is assembled.
🎬 Video: Making a Trestle (video) — https://youtu.be/YATmim1eIrQ?si=XFpV4wfQRaEE5l_6
The anchoring video connects directly to this requirement because a strong trestle and a strong anchor system must work together.
🎬 Video: Anchoring Pioneering Projects (video) — https://youtu.be/_z-GzDAjVZM?si=qyEvV1jFW0nCHHT8
Next comes the biggest decision in the badge: choosing and planning your full-size project for Req 9.
Req 9 — Choose Your Big Build
You must choose exactly one option for this final requirement. This is the capstone build of the badge, so your job is not just to pick the most impressive-looking structure. Pick the one your team can plan, anchor, and build safely with the time, space, materials, and skill level you actually have.
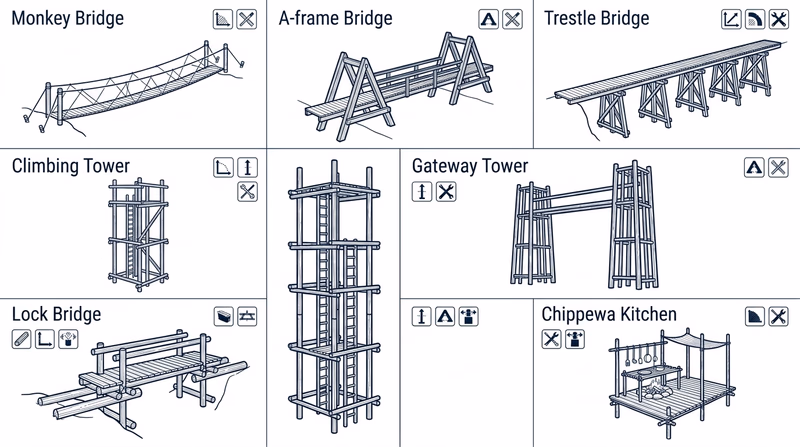
Your Options
- Req 9 — Double A-Frame Monkey Bridge: Build a bridge with elevated supports and a walkable crossing. You will gain experience with trestles, anchoring, and how user weight changes the load on a structure.
- Req 9 — Single A-Frame Bridge: Build a simpler bridge design that still teaches support geometry and careful load management. You will gain bridge-building experience with less complexity than the monkey bridge.
- Req 9 — Single Trestle Bridge: Focus on a strong support frame and a practical crossing. You will gain a clear understanding of how trestles, braces, and decking work together.
- Req 9 — Single Lock Bridge: Build a bridge that depends on secure joins and controlled alignment. You will gain practice in precision and in keeping a narrow design stable.
- Req 9 — 4x4 Square Climbing Tower: Build vertically and think hard about bracing, anchoring, and height limits. You will gain the strongest lessons in tower stability and inspection discipline.
- Req 9 — Four Flag Gateway Tower: Build a camp entrance structure that combines height, appearance, and teamwork. You will gain experience creating a useful landmark while keeping the frame square and safe.
- Req 9 — Double Tripod Chippewa Kitchen: Build a service structure that improves camp cooking and organization. You will gain practical experience with a project people will actually use during camp.
- Req 9 — Counselor-Approved Custom Structure: Design or select another structure with your counselor’s approval. You will gain the most freedom, but also the most responsibility for planning, materials, and safety review.
How to Choose
Choosing the right project
Match the build to your team and site- Time available: A service gadget or simpler bridge may fit a short camp window better than a more ambitious tower.
- Materials on hand: Count the number and length of usable spars before choosing a design.
- Ground conditions: Soft, rocky, or uneven ground can change which anchors and structures are realistic.
- Skill level of your crew: If your team is still learning clean lashings, pick a design you can build well instead of one you can barely finish.
- What you want to learn: Bridges teach load paths, towers teach bracing and height discipline, and kitchens teach useful camp design.
| Option | Best For | What You Gain |
|---|---|---|
| Double A-Frame Monkey Bridge | Teams with room, strong anchors, and good bridge supervision | Bridge design, moving loads, and crossing safety |
| Single A-Frame Bridge | Scouts who want a simpler bridge geometry | A-frame support layout and controlled bracing |
| Single Trestle Bridge | Scouts who want to apply Req 8 directly | Trestle strength, decking, and practical support design |
| Single Lock Bridge | Teams that enjoy detail and careful alignment | Precision building and stability in a narrow span |
| 4x4 Square Climbing Tower | Advanced teams with close adult oversight | Vertical load control, bracing, and inspection discipline |
| Four Flag Gateway Tower | Campsites that need a visible entrance feature | Height management, symmetry, and site presentation |
| Double Tripod Chippewa Kitchen | Patrols that want a useful service project | Function-first design and camp utility |
| Custom Structure | Teams with a strong idea and counselor support | Planning, adaptation, and design ownership |
These official videos give you a useful preview of the major project styles in this requirement.
🎬 Video: Making a Trestle (video) — https://youtu.be/YATmim1eIrQ?si=XFpV4wfQRaEE5l_6
🎬 Video: Building Pioneering Projects (video) — https://youtu.be/DxuDrvGpoHA?si=4qRcFFdEflt6bqeG
🎬 Video: Double A-Frame Monkey Bridge (video) — https://youtu.be/qlafze5YVXI?si=P1CTghvisAMAU1bA
🎬 Video: Single Trestle Bridge (video) — https://youtu.be/YrmG69HSDyA?si=_fOp1Ejio8I1qAWD
🎬 Video: Double Tripod Chippewa Kitchen (video) — https://youtu.be/ttOG0msK4EQ?si=o3gujOvObReMDEfL
Pick a project, talk it through with your counselor, and start with the first option page to see how one full-size build should be planned from the ground up.
Req 9 — Double A-Frame Monkey Bridge
A monkey bridge is one of the classic pioneering projects because it looks exciting and teaches a lot at once. It combines elevated supports, strong anchoring, hand lines, foot lines, and real moving loads as people cross.
What makes this option challenging
This bridge teaches how a structure behaves when the load is not static. The force changes with each person’s movement, so alignment, anchors, and inspection matter more than looks.
Plan before you build
Questions to answer with your team- Do we have enough room for the span and approach areas?
- Do we have enough qualified adult supervision for a bridge project?
- Are our anchors and A-frames appropriate for the expected load?
- Who is checking the bridge before anyone crosses?
This official monkey bridge video is the most direct example for this option.
🎬 Video: Double A-Frame Monkey Bridge (video) — https://youtu.be/qlafze5YVXI?si=P1CTghvisAMAU1bA
Req 9 — Single A-Frame Bridge
The Single A-Frame Bridge keeps the bridge idea but simplifies the support system compared with the double A-frame monkey bridge. That makes it a solid choice for a team that wants a major structure without the extra complexity of a larger bridge setup.
What you learn here
- How A-frame supports spread force into the ground
- How straight alignment affects the feel of the crossing
- How careful anchoring turns a narrow design into a stable one
Req 9 — Single Trestle Bridge
This option is a natural extension of Req 8 because the trestle is the star of the project. If you liked tracing load paths and talking about braces, this is one of the best capstone builds in the badge.
🎬 Video: Single Trestle Bridge (video) — https://youtu.be/YrmG69HSDyA?si=_fOp1Ejio8I1qAWD
🎬 Video: Making a Trestle (video) — https://youtu.be/YATmim1eIrQ?si=XFpV4wfQRaEE5l_6
What to focus on
- Build matching trestle geometry on both sides.
- Keep the deck level enough for safe use.
- Use braces and anchors so the supports resist sideways movement.
Why choose this option
Best fit for these teams- You want a strong connection to Req 8.
- Your team likes frame-building more than tower-building.
- You want a project with obvious structural logic and inspection points.
Req 9 — Single Lock Bridge
The Single Lock Bridge rewards precision. It is a good choice for a team that likes neat alignment and careful construction because small errors in spacing or tension can make a narrow bridge feel much less solid.
Skills this option builds
- Careful measurement before tying
- Consistent lashing quality across a repeating structure
- Attention to user balance and approach safety
Req 9 — 4x4 Square Climbing Tower
This option teaches the most about vertical structure behavior. A climbing tower looks impressive, but it also demands the most discipline about bracing, anchoring, supervision, and height restrictions.
Why teams choose this option
- They want a dramatic project with obvious engineering challenges.
- They want to study how a square frame resists twist and sway.
- They have strong adult supervision and a site appropriate for height.
Req 9 — Four Flag Gateway Tower
A gateway tower is part structure and part camp statement. It has to look good, but it also has to stand straight, carry flag lines safely, and survive wind and repeated camp traffic around the site.
Why this option is useful
A gateway project teaches symmetry, presentation, and function at the same time. If your troop wants a build that improves the campsite and gives your crew a shared goal, this is a strong option.
Req 9 — Double Tripod Chippewa Kitchen
The Chippewa kitchen may be the most practical option in the whole list. Instead of building something mainly to prove you can, you build something that helps your patrol cook, organize gear, and work more efficiently in camp.
Why Scouts like this option
- People actually use it during camp.
- It combines tripod ideas with service-minded design.
- It rewards thoughtful layout, not just height or drama.
This official video is the strongest direct preview for the option.
🎬 Video: Double Tripod Chippewa Kitchen (video) — https://youtu.be/ttOG0msK4EQ?si=o3gujOvObReMDEfL
Features to think about
A useful kitchen is planned around tasks- Where will cooking gear hang?
- Where will pots, utensils, and wash items go?
- Can people move around it safely while cooking?
- Is the structure stable enough for repeated use all weekend?
Req 9 — Counselor-Approved Custom Structure
This option gives you the most freedom, but it also removes the safety of a pre-selected design. That means your planning has to be even better. You and your counselor need to agree on the purpose, materials, expected loads, anchor plan, and supervision before the first spar moves.
When this option makes sense
- Your site or camp needs a structure not listed in the standard options.
- Your counselor wants to adapt the project to available materials.
- Your team has a strong design idea and can explain how it will stay safe.
Questions your custom plan must answer
Get these approved before building- What problem does the structure solve?
- What forces will act on it?
- What lashings and anchors will resist those forces?
- What are the limits on height, use, and supervision?
However your project turns out, the real win is learning to build safely, work as a team, and leave camp better than you found it.
Extended Learning
Congratulations
You have worked through one of Scouting’s most hands-on badges. Pioneering teaches more than knots and poles. It teaches you how to plan before acting, build with a team, and respect the difference between something that merely stands up and something that is truly safe to use.
Designing for Real Camp Problems
The best pioneering projects solve a real need. Try looking at your next campsite like a designer. Where do wet towels pile up? Where does dish gear become a mess? Where do people trip over lines or stack packs in the wrong place? A good pioneering Scout sees those problems and starts sketching simple solutions.
That mindset turns pioneering into service. A gateway welcomes people into camp. A wash stand improves sanitation. A gear rack reduces clutter. The most useful projects are often not the flashiest ones.
How Builders Think About Force
If you keep going with pioneering, start paying attention to force instead of just form. Ask where the weight goes. Ask which direction a line is pulling. Ask what would happen if one brace loosened or one anchor shifted.
This is the beginning of structural thinking. Engineers, carpenters, riggers, stage crews, and rescue teams all think this way. They study load paths, points of failure, and how materials behave under stress. Pioneering gives you a safe, visible way to practice those habits outdoors.
Events That Build Advanced Skills
Camporees and district pioneering competitions are some of the best next steps after the badge. Timed builds force you to organize tools, assign roles, and communicate clearly. Even when you do not win, you learn which steps slow your team down and which habits make your structures cleaner.
Another strong next step is teaching younger Scouts. When you explain why a diagonal lashing belongs in one place and a square lashing belongs in another, your own understanding gets stronger. Teaching is one of the fastest ways to turn a skill into real mastery.
Real-World Experiences
Visit a bridge, tower, or ropes-course site
Look for a place where you can safely observe how supports, anchors, braces, and load-bearing members work in a real structure.
Help design a troop camp gadget plan
Before the next campout, sketch a wash station, dining fly support, or patrol kitchen layout that solves a real problem your troop faces.
Join a camporee pioneering event
Even if you are not leading the team, watching other patrols build can show you new lashing patterns, better workflows, and different design choices.
Talk with a tradesperson or engineer
A carpenter, rigger, stage technician, or civil engineer can explain how the same ideas from pioneering show up in everyday work.
Organizations
Scouting America
The national Scouting organization provides advancement resources, safety policies, and the outdoor program culture that keeps pioneering alive.
Leave No Trace
Leave No Trace helps you think about how to build and camp responsibly so your structures and work areas do not damage the site.
American Society of Civil Engineers
ASCE introduces the world of structural design, bridges, and infrastructure — useful if pioneering makes you curious about engineering.
SkillsUSA
SkillsUSA highlights trade and technical careers where planning, teamwork, and safe hands-on building matter every day.
Habitat for Humanity
Habitat for Humanity connects practical building skills with service, which is one of the best long-term directions for a Scout who enjoys pioneering.