Req 2 — Core Rope Skills
This requirement is your rope-and-spar toolkit. You will learn how to keep a rope end from unraveling, how to tie working knots that control load and movement, and how to use lashings to turn separate poles into a stable structure.
- Req 2a is about protecting rope ends with a whipping.
- Req 2b is about knots and rope tackle for tension and attachment.
- Req 2c is about lashings, which are the real joints of pioneering.
Requirement 2a
A rope with a frayed end becomes harder to handle, weaker to use, and more annoying every time you touch it. Whipping fixes that by binding the end tightly so the strands stay together. The West Country method is popular in Scouting because it is simple, quick, and easy to inspect.
What the whipping is doing
The whipping is not just decoration. It squeezes the strands together and keeps them from untwisting. A good whipping is snug, even, and placed close enough to the end to protect it without slipping off.
What to show your counselor
Make the demonstration clean, not rushed
- Start with a neat rope end so the strands are even.
- Wrap with consistent tension so the whipping does not gap.
- Finish with secure knots that do not loosen when handled.
- Trim the tail neatly without cutting the rope itself.
These two official videos give you both the specific West Country method and a useful comparison to another common whipping style.
🎬 Video: How to Tie a Half Knot (West Country) Whipping (video) — https://youtu.be/gU3LJ-QD_-s?si=0smdbUSo_20udYq3
🎬 Video: How to Tie a Sailmaker's Whipping (video) — https://youtu.be/bzTduzweDdE?si=UByC4CSpmRy9G3FI
🎬 Video: Safe Pioneering (video) — https://youtu.be/hWDLLkUPFCI?si=8JSQve7lVV65fKp9
Requirement 2b
These knots each solve a different problem. That is the key to remembering them. Do not memorize them as a random list. Learn what job each one does.
Rope tackle
A rope tackle helps you tighten a line. In pioneering, that matters because loose lines create sloppy structures. Rope tackle gives you mechanical advantage so you can pull harder and hold tension better.
Clove hitch formed as two half hitches
This is one of the first knots many Scouts learn because it starts and finishes many lashings. It grips a spar quickly and is easy to adjust before you tighten it fully.
Clove hitch on a bight
This version lets you place the hitch over the end of a spar without needing access to the free end of the rope. That makes setup faster in some builds.
Butterfly knot
The butterfly knot creates a fixed loop in the middle of a rope. It is handy when you need a middle attachment point without cutting the line.
Roundturn with two half hitches
This knot is strong for attaching a rope to a spar, ring, or post when the line will stay under tension. The roundturn helps absorb load before the half hitches lock it in place.
Rolling hitch
The rolling hitch is useful when you want to grip another rope or a spar and resist lengthwise pulling. That is why it appears so often in guy lines and adjustments.
Pioneering Safety Checklist (PDF) Review the checklist before practicing knots under tension so your work area stays organized and safe. Link: Pioneering Safety Checklist (PDF) — https://filestore.scouting.org/filestore/Merit_Badge_ReqandRes/Requirement%20Resources/Pioneering/Pioneering_Safety_Checklist.pdf🎬 Video: How to Tie a Rope Tackle (video) — https://youtu.be/fZC2iXF0V3g?si=Nl9Z-88jPw1wTzlq
🎬 Video: How to Tie and Apply a Clove Hitch and Half Hitches (video) — https://youtu.be/LFH1L3lfciA?si=RhEQn4lo1Oc7fpwU
🎬 Video: How to Tie a Clove Hitch on a Bight (video) — https://youtu.be/IXsXjB0gWqw?si=IVQv_b3mkhjb8lWo
🎬 Video: How to Tie a Butterfly Knot (video) — https://youtu.be/q0KPxnj3Rck?si=LYZ3LFkgbb86EINV
🎬 Video: How to Tie a Roundturn with Two Half Hitches (video) — https://youtu.be/90MJxoRu9Fg?si=H_r3J8zOUTSwyVZ8
🎬 Video: How to Tie a Rolling Hitch (video) — https://youtu.be/O0vGxZ5KQ-s?si=Jim_m6GbDLg30g1l
The sunburn and rope-burn resources from Req 1 still matter here because this is the stage where Scouts often handle rope repeatedly and work in the open.
🎬 Video: Sunburn (video) — https://www.youtube.com/watch?v=DCNUwuNTtGg
Requirement 2c
If knots are the fasteners of pioneering, lashings are the joints. Each one is built for a different relationship between poles.
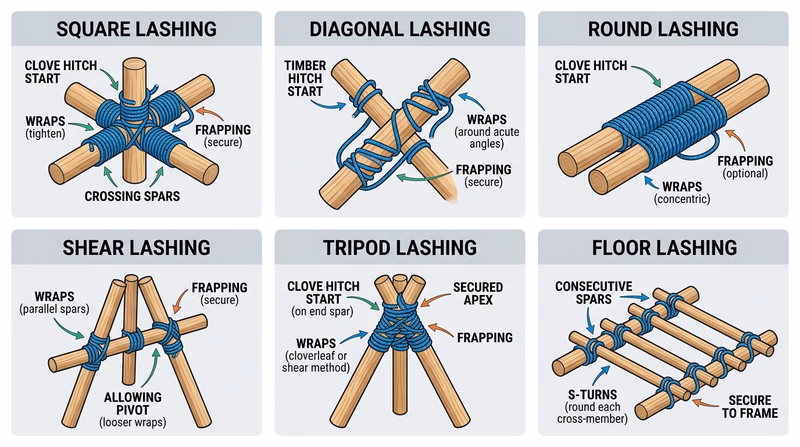
Square lashing
Use square lashing when two spars cross at roughly a right angle and need to stay fixed. This is one of the most common lashings in tables, wash stations, and frames.
Diagonal lashing
Use diagonal lashing when two spars cross but tend to pull apart or rack under strain. It starts by pulling the poles together, which is why it is helpful in bracing.
Round lashing
Use round lashing when poles lie side by side. It is often used to join spars end-to-end or to attach parallel pieces.
Shear lashing
Use shear lashing to join two poles that will spread apart like legs. This is common in A-frames and other spread-leg supports.
Tripod lashing
Use tripod lashing to join three spars that will spread into a tripod. It is ideal for wash stations, suspended gear, and light camp gadgets.
Floor lashing
Use floor lashing when you need to attach a horizontal spar across a frame so it forms part of a platform or tabletop.
How to choose the right lashing
Ask these questions before you start tying
- Are the poles crossing or running side by side?
- Will the structure try to spread, twist, or rack sideways?
- Is this a frame joint, a brace, or a platform support?
- Will people or gear put weight on it later?
🎬 Video: How to Tie the Mark II Square Lashing (video) — https://youtu.be/ll5BC7SohnE?si=dmcZo8pVawLfULQx
🎬 Video: How to Tie a Diagonal Lashing (video) — https://youtu.be/F-RRn9ccf34?si=18PZENVSjSti0Css
🎬 Video: How to Tie a Round Lashing (video) — https://youtu.be/tDGSiQhmwBs?si=j_7GZgMV4xdTinXY
🎬 Video: How to Tie a Shear Lashing (video) — https://youtu.be/ZleaU84exEw?si=u1In--D192D2eIFE
🎬 Video: How to Tie a Tripod Lashing (with Plain Turns) (video) — https://youtu.be/DB1g69AaMy8?si=qOpo7B_b-CjAFuQO
🎬 Video: How to Tie a Floor Lashing (video) — https://youtu.be/aS8mPYPGJGI?si=Ud7walIeV2dsRYwa
In Req 3, you will put these rope skills to work on real camp gadgets where clean lashings make the difference between wobbly and solid.