Req 3 — Practical Camp Builds
This is where pioneering starts to feel real. You are taking the knots and lashings from Req 2 and turning them into camp gadgets people can actually use.
- Req 3a focuses on a tripod wash station or a similar light gadget.
- Req 3b moves into a taller flagpole build with line tension and stability.
- Req 3c adds a wider frame and working surface for a simple camp table.
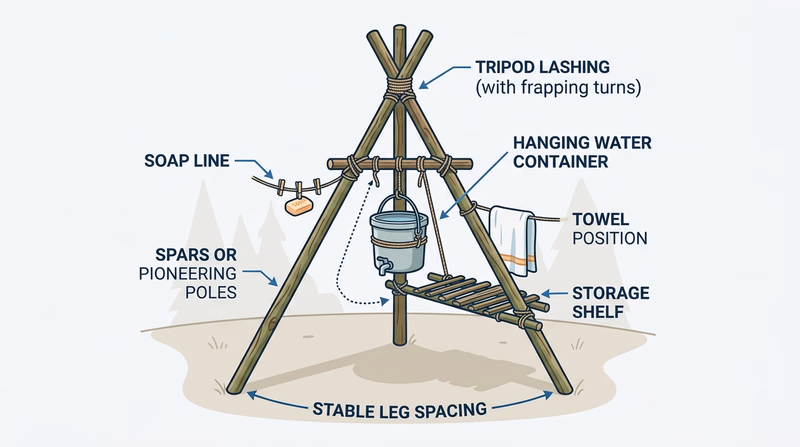
Requirement 3a
A tripod wash station is a great first build because it does real work in camp and clearly shows whether your lashings are doing their job. If the tripod spreads evenly and the hanging water or soap setup stays balanced, your build works. If it leans, twists, or slides, you get instant feedback.
What makes a good wash station
- Even tripod legs so the load shares across all three spars
- A tight tripod lashing that lets the legs spread smoothly without slipping loose
- Level placement on the ground so the structure does not rack
- Practical attachments for soap, water, and a drying towel
🎬 Video: Tripod Hand Wash Station: The Ideal First Class Camp Gadget! (video) — https://youtu.be/bImsiFVwhpQ?si=DU03rbOjtb5vL3nJ
The whipping videos below are also relevant here because wash stations get handled, moved, and re-used. Clean rope ends help the whole build last longer.
🎬 Video: How to Tie a Half Knot (West Country) Whipping (video) — https://youtu.be/gU3LJ-QD_-s?si=0smdbUSo_20udYq3
🎬 Video: How to Tie a Sailmaker's Whipping (video) — https://youtu.be/bzTduzweDdE?si=UByC4CSpmRy9G3FI
Requirement 3b
A flagpole build teaches one of the most important ideas in pioneering: tall structures magnify small mistakes. A loose joint that barely matters on a wash station can become a major wobble on a 15-foot pole.
What to focus on
- Straight alignment so the finished pole does not bend or wander sideways
- Strong side-by-side joins because the staves must act like one longer spar
- Clean tensioning with rolling hitches or roundturns where the design calls for them
- Safe raising procedure with clear commands and enough helpers
Before you raise the flagpole
Stop and inspect these points
- All lashings are tight and cinched
- The base area is clear of feet and gear
- Helpers know the raise command
- Guy lines or stabilizing lines are ready if needed
- No one is standing in the fall path
🎬 Video: Patrol Challenge - 15 Foot Scout Stave Flagpole (video) — https://youtu.be/M2sEwJr_NX0?si=D_CDFf4ROU_-4-AS
These knot videos are especially useful here because the flagpole option depends on secure attachments and controlled tension.
🎬 Video: How to Tie a Rope Tackle (video) — https://youtu.be/fZC2iXF0V3g?si=Nl9Z-88jPw1wTzlq
🎬 Video: How to Tie and Apply a Clove Hitch and Half Hitches (video) — https://youtu.be/LFH1L3lfciA?si=RhEQn4lo1Oc7fpwU
🎬 Video: How to Tie a Clove Hitch on a Bight (video) — https://youtu.be/IXsXjB0gWqw?si=IVQv_b3mkhjb8lWo
🎬 Video: How to Tie a Butterfly Knot (video) — https://youtu.be/q0KPxnj3Rck?si=LYZ3LFkgbb86EINV
🎬 Video: How to Tie a Roundturn with Two Half Hitches (video) — https://youtu.be/90MJxoRu9Fg?si=H_r3J8zOUTSwyVZ8
🎬 Video: How to Tie a Rolling Hitch (video) — https://youtu.be/O0vGxZ5KQ-s?si=Jim_m6GbDLg30g1l
Requirement 3c
A camp table forces you to think in rectangles instead of triangles. That means alignment matters more. If one leg spreads too wide or one crosspiece sits too high, the whole tabletop can wobble.
Why this project is valuable
A table uses several kinds of joints in one structure. You may need shear lashings for leg sets, square lashings for right-angle connections, and floor lashings for the top support. That makes it a great review build because each joint has a different job.
🎬 Video: Simple Camp Table (video) — https://youtu.be/MjlZez7vGDQ?si=bfk_4HLElA_WuApo
🎬 Video: How to Tie the Mark II Square Lashing (video) — https://youtu.be/ll5BC7SohnE?si=dmcZo8pVawLfULQx
🎬 Video: How to Tie a Diagonal Lashing (video) — https://youtu.be/F-RRn9ccf34?si=18PZENVSjSti0Css
🎬 Video: How to Tie a Round Lashing (video) — https://youtu.be/tDGSiQhmwBs?si=j_7GZgMV4xdTinXY
🎬 Video: How to Tie a Shear Lashing (video) — https://youtu.be/ZleaU84exEw?si=u1In--D192D2eIFE
🎬 Video: How to Tie a Tripod Lashing (with Plain Turns) (video) — https://youtu.be/DB1g69AaMy8?si=qOpo7B_b-CjAFuQO
🎬 Video: How to Tie a Floor Lashing (video) — https://youtu.be/aS8mPYPGJGI?si=Ud7walIeV2dsRYwa
By now you should notice a pattern: each successful build starts with the right rope and ends with good maintenance. That is exactly what Req 4 covers next.