Plant Science Merit Badge — Complete Digital Resource Guide
https://merit-badge.university/merit-badges/plant-science/guide/
Introduction & Overview
Overview
Plants are the foundation of almost every ecosystem on Earth. They produce the oxygen you breathe, the food on your table, the lumber in your house, and the cotton in your shirt. The Plant Science merit badge takes you from the basic anatomy of a flower all the way to hands-on fieldwork — growing crops, designing landscapes, or conducting botanical surveys in your own community.
Whether you live in a city apartment or on a thousand-acre farm, this badge will change the way you look at the green world around you.
Then and Now
Then
For most of human history, understanding plants was a matter of survival. Early peoples learned through trial and error which plants were safe to eat, which could heal wounds, and which would kill. When agriculture emerged roughly 10,000 years ago in the Fertile Crescent, it transformed human civilization — permanent settlements, stored food, and growing populations all depended on people who understood seeds, soil, and seasons.
By the 1700s, Carl Linnaeus developed the binomial naming system that botanists still use today. In the 1800s, Gregor Mendel’s experiments with pea plants unlocked the science of genetics. Luther Burbank bred hundreds of new plant varieties, proving that careful selection could feed more people with less land.
Now
Modern plant science blends ancient knowledge with cutting-edge technology. Agronomists use satellite imagery and GPS-guided equipment to manage fields with precision. Horticulturists develop disease-resistant cultivars that thrive in changing climates. Field botanists use DNA barcoding alongside traditional identification keys to catalog biodiversity. And backyard gardeners can track soil moisture with smartphone sensors.
The challenges have evolved too. Invasive species threaten native ecosystems across North America. Pollinators face habitat loss and pesticide exposure. Climate change is shifting hardiness zones northward. The skills you build in this badge — observation, identification, propagation, and stewardship — are exactly what the world needs right now.
Get Ready!
Plant Science is one of the most hands-on merit badges you can earn. You will draw plant anatomy, grow living plants, identify species in your neighborhood, and complete a major project in agronomy, horticulture, or field botany. Some requirements take weeks of growing time, so start early and plan ahead. A notebook, a pencil, and a willingness to get dirt under your fingernails are all you need to begin.
Before your first meeting with your counselor, look around your yard or neighborhood and ask yourself: Can I name five plants I see? Do I know if any are native? Could I grow one of them from seed? By the end of this badge, those questions will be easy.
Kinds of Plant Science
Agronomy
Agronomy focuses on field crops — the corn, wheat, soybeans, and cotton that feed and clothe the world. If you choose Option A in Requirement 8, you will learn about seedbed preparation, germination testing, crop pests, and the geography of American agriculture.
Horticulture
Horticulture is the science and art of growing ornamental plants, fruits, vegetables, and landscape trees. Option B takes you into nurseries and gardens, teaching you about hardiness zones, propagation, pruning, and landscape design.
Field Botany
Field botany is the study of plants in their natural habitats. Option C sends you into parks, forests, and wild areas to identify species, press specimens, learn about rare plants, and conduct real scientific surveys.
Ready to discover what makes a plant tick? Your first stop is the anatomy of a flowering plant — the parts that make growth, reproduction, and survival possible.
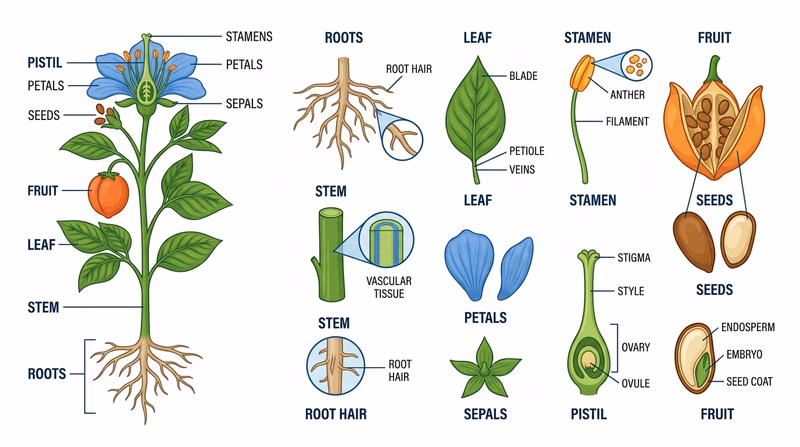
Req 1 — Flower Parts and Jobs
This requirement asks you to draw a flowering plant and label at least five parts. Your drawing does not need to be artistic — it needs to be accurate and clearly labeled. Use a real flower if possible; dissecting one will help you see structures that are hard to spot from the outside.
Key Parts of a Flowering Plant
Here are the major parts you should know. You need at least five, but learning all of them will strengthen your understanding for later requirements.
Roots
Roots anchor the plant in the soil and absorb water and dissolved minerals. They also store food for the plant. Some plants have a single thick taproot (like a carrot), while others have a network of thin fibrous roots (like grass).
Stem
The stem supports the plant and carries water, minerals, and sugars between the roots and leaves. Inside the stem, xylem tissue moves water upward from the roots, while phloem tissue carries sugars made in the leaves to the rest of the plant.
Leaves
Leaves are the primary site of photosynthesis — the process that converts sunlight, water, and carbon dioxide into sugar and oxygen. Leaves have tiny pores called stomata on their surfaces that allow gas exchange with the air.
Flower
The flower is the reproductive structure. It contains:
- Petals — Often colorful, petals attract pollinators like bees and butterflies.
- Sepals — The small, usually green leaf-like structures at the base of the flower that protect the bud before it opens.
- Stamen (male part) — Made up of the anther (which produces pollen) and the filament (which holds the anther up).
- Pistil (female part) — Made up of the stigma (sticky tip that catches pollen), the style (tube connecting stigma to ovary), and the ovary (which contains ovules that develop into seeds after fertilization).
Fruit and Seeds
After pollination, the ovary develops into a fruit that contains seeds. The fruit protects the seeds and helps with dispersal — by wind, water, or animals.
Drawing Tips
Drawing Checklist
Make sure your drawing includes- The whole plant from roots to flower.
- At least five labeled parts with lines pointing to each structure.
- A brief note next to each label explaining the function (e.g., “Roots — absorb water and minerals”).
- Your name and date.
🎬 Video: Flower Dissection - Reproduction in Flowering Plants — https://youtu.be/493WeySyf-8?si=u7d6_2RKO2h03wNo
🎬 Video: Flower Structures and Functions — https://youtu.be/GkzFimUJdD8
With a solid understanding of plant anatomy, you are ready to learn the chemical process that makes all plant life possible.
Req 2 — Photosynthesis and Why Plants Matter
Photosynthesis is the process that powers nearly all life on Earth. Understanding it is essential to every topic you will encounter in this badge — from growing crops to protecting wild ecosystems.
What Is Photosynthesis?
Photosynthesis is the process by which green plants use sunlight, water, and carbon dioxide to produce glucose (a sugar) and oxygen. It takes place mainly in the leaves, inside tiny structures called chloroplasts that contain the green pigment chlorophyll.
The simplified equation:
6CO₂ + 6H₂O + sunlight → C₆H₁₂O₆ + 6O₂
In plain language: plants take in carbon dioxide from the air and water from the soil, capture energy from sunlight, and produce sugar for food and oxygen as a byproduct.
Why Photosynthesis Matters
- Oxygen production — Photosynthesis generates the oxygen that humans and animals breathe.
- Food chain foundation — Plants are producers — the base of nearly every food chain. Remove photosynthesis, and the entire food web collapses.
- Carbon dioxide removal — Plants absorb CO₂ from the atmosphere, helping regulate Earth’s climate.
- Energy storage — The sugar plants produce fuels their own growth and is the original energy source for fossil fuels formed from ancient plant material.
Five Ways Humans Depend on Plants
You need at least five. Here are several to choose from — pick the ones most meaningful to you and be ready to explain each:
- Food — Nearly everything we eat comes from plants or from animals that ate plants. Grains, fruits, vegetables, nuts, and spices are all plant products.
- Oxygen — Photosynthesis produces the oxygen in every breath you take.
- Medicine — Many medicines come from plants. Aspirin was originally derived from willow bark. The cancer drug taxol comes from Pacific yew trees.
- Building materials — Lumber for homes, paper for books, and bamboo for countless products all come from plants.
- Clothing — Cotton, linen (from flax), and hemp are plant-based fibers used in textiles worldwide.
- Fuel — Wood was humanity’s first fuel. Today, corn and sugarcane are converted into ethanol. Fossil fuels themselves are ancient plant matter.
- Clean air and water — Plants filter air pollutants and their root systems prevent erosion, keeping waterways clean.
- Mental health — Studies show that spending time around green spaces reduces stress and improves mood.
🎬 Video: Photosynthesis and Cellular Respiration — https://youtu.be/WzOrF5W4l3Q
🎬 Video: Photosynthesis Light Reactions and the Calvin Cycle — https://youtu.be/dAF5FngVa7A?si=cJyFp2gNf1uMiLqD
Now that you understand how plants make their own food, it is time to learn about the creatures that help plants reproduce.
Req 3 — Pollinators at Work
Pollination is the transfer of pollen from the male part of a flower (anther) to the female part (stigma). Without pollination, most flowering plants cannot produce seeds or fruit. While some plants rely on wind or water, the vast majority depend on animals — especially insects — to move pollen from flower to flower.
Why Honeybees Matter
Honeybees are the world’s most important managed pollinator. A single honeybee colony can visit millions of flowers per day, and beekeepers transport hives to farms specifically to pollinate crops. In the United States, honeybees pollinate an estimated $15 billion worth of crops annually, including almonds, apples, blueberries, cherries, and melons.
How Bee Pollination Works
- A bee visits a flower to collect nectar (its food source).
- As the bee moves around the flower, pollen grains stick to its fuzzy body.
- When the bee visits the next flower, some of that pollen rubs off onto the stigma.
- The pollen grain grows a tube down to the ovary, fertilizing the ovule.
- The fertilized ovule develops into a seed, and the ovary becomes a fruit.
Other Pollinating Insects
Honeybees get the most attention, but many other insects are critical pollinators:
- Bumblebees — Larger and fuzzier than honeybees, bumblebees are especially effective at pollinating tomatoes and peppers through “buzz pollination,” where they vibrate their bodies to shake pollen loose.
- Butterflies — Attracted to brightly colored flowers, butterflies carry pollen on their long legs as they drink nectar.
- Moths — Night-flying moths pollinate pale, fragrant flowers that open in the evening, like moonflowers and evening primrose.
- Beetles — Some of the oldest pollinators on Earth, beetles pollinate magnolias, water lilies, and other ancient flower types.
- Flies — Hover flies and other species pollinate many wildflowers and some crops.
- Wasps — While less efficient than bees, wasps pollinate figs and several other plants.
Non-Insect Pollinators
Some plants rely on animals other than insects:
- Hummingbirds — Pollinate tubular red and orange flowers.
- Bats — Pollinate hundreds of tropical plants, including agave and some cacti.
- Wind — Grasses, corn, wheat, and many trees are wind-pollinated, producing huge amounts of lightweight pollen.
Threats to Pollinators
Pollinator populations face serious challenges, including:
- Habitat loss — Development and farming eliminate the wildflower meadows and nesting sites pollinators need.
- Pesticides — Certain insecticides, especially neonicotinoids, can kill bees or impair their ability to navigate.
- Disease and parasites — The Varroa mite has devastated honeybee colonies worldwide.
- Climate change — Shifts in bloom timing can create mismatches between when flowers open and when pollinators emerge.
🎬 Video: Animal Pollinators Other Than Bees — https://youtu.be/gR3E2tGx2vc
🎬 Video: How do Bees Make Our Food? — https://youtu.be/pRDcNhQGaeo
🎬 Video: Honeybees and Agriculture — https://youtu.be/cwneYtj_Zk4
Now that you understand how plants reproduce with the help of pollinators, it is time to learn what else plants need to grow — and how soil makes it all possible.
Req 4 — What Plants Need to Thrive
This requirement covers the environmental factors every plant needs — and the soil that ties them all together. Understanding these factors is the foundation for everything in Requirements 5 through 8.
How Environmental Factors Affect Plants
Water
Water is essential for photosynthesis, nutrient transport, and maintaining cell structure (turgor pressure). Too little water causes wilting and eventually death. Too much water drowns roots by cutting off their oxygen supply, leading to root rot.
Light
Light provides the energy for photosynthesis. Different plants need different amounts — full-sun plants (like tomatoes) need 6+ hours of direct sunlight daily, while shade-tolerant plants (like ferns) thrive with much less. Light also triggers flowering, seed germination, and growth direction (phototropism).
Air
Plants need carbon dioxide (CO₂) from the air for photosynthesis and oxygen (O₂) for cellular respiration. Air circulation also helps prevent fungal diseases by keeping foliage dry. In enclosed environments like greenhouses, CO₂ levels and ventilation must be managed.
Temperature
Each plant species has an optimal temperature range for growth. Warm-season crops like corn and tomatoes thrive in summer heat, while cool-season crops like lettuce and peas prefer milder temperatures. Extreme cold can freeze and rupture plant cells, while extreme heat can denature enzymes and halt photosynthesis.
Pests
Pests include insects, diseases, and competing plants (weeds):
- Insects — Aphids, caterpillars, and beetles can eat leaves, bore into stems, or suck plant sap.
- Diseases — Fungi, bacteria, and viruses cause blight, rust, mildew, and rot.
- Weeds — Compete with desired plants for water, light, and nutrients.
🎬 Video: Learn the Various Factors That Affect Roots — https://www.youtube.com/shorts/UxZCSsA2piU
🎬 Video: How Plants Grow — https://www.youtube.com/shorts/KqNmyeIk688
The Nature and Function of Soil
Soil is far more than “dirt.” It is a living system made up of four main components:
- Minerals (about 45%) — Broken-down rock particles of varying sizes.
- Organic matter (about 5%) — Decayed plant and animal material (humus) that provides nutrients.
- Water (about 25%) — Held in pore spaces between soil particles, carrying dissolved nutrients to roots.
- Air (about 25%) — Fills pore spaces not occupied by water, supplying oxygen to roots and soil organisms.
Healthy soil also teems with life — earthworms, fungi, bacteria, and other organisms that break down organic matter and cycle nutrients.
Soil Texture
Soil texture refers to the size of the mineral particles:
| Particle Type | Size | Feel |
|---|---|---|
| Sand | Largest | Gritty |
| Silt | Medium | Smooth, like flour |
| Clay | Smallest | Sticky when wet |
Loam — a roughly even mix of sand, silt, and clay — is considered the ideal garden soil because it drains well, holds moisture, and provides good nutrient retention.
Soil Structure
Structure describes how soil particles clump together into aggregates. Good structure creates a mix of large and small pore spaces, allowing water to drain while retaining enough moisture for roots. Compacted soil (walked on, driven over) loses its structure and becomes difficult for roots to penetrate.
Soil Composition and Fertility
Fertile soil contains adequate levels of essential nutrients — especially nitrogen (N), phosphorus (P), and potassium (K) — along with a pH in the range most plants prefer (roughly 6.0–7.0). A soil test from your local extension office will tell you exactly what your soil has and what it needs.
How to Improve Soil
- Add organic matter — Compost, aged manure, and leaf mold improve texture, structure, and nutrient content in any soil type.
- Adjust pH — Add lime to raise pH (reduce acidity) or sulfur to lower pH (increase acidity).
- Reduce compaction — Aerate lawns, avoid walking on garden beds, and use raised beds in heavy clay areas.
- Mulch — A layer of organic mulch (wood chips, straw, shredded leaves) protects the soil surface, retains moisture, moderates temperature, and adds organic matter as it decomposes.
- Cover crops — Planting clover, rye, or other cover crops in the off-season prevents erosion and adds nutrients when tilled under.
🎬 Video: Soil and Soil Dynamics — https://youtu.be/mg7XSjcnZQM
🎬 Video: Types of Soil — https://youtu.be/UNqCBicHe6s
With a solid understanding of what plants need to grow, you are ready to learn how new plants are created.
Req 5 — Propagation in Practice
Plant propagation is the process of creating new plants. There are two broad categories: sexual propagation (using seeds) and vegetative (asexual) propagation (using plant parts other than seeds). This requirement asks you to understand five specific methods and actually grow a plant using one of them.
Five Propagation Methods
1. Seeds
Seeds are the product of sexual reproduction. A seed contains an embryo, stored food, and a protective coat. To propagate by seed:
- Choose fresh, viable seeds appropriate for your climate and season.
- Plant seeds at the depth recommended on the packet (usually 2–3 times the seed’s diameter).
- Keep the soil consistently moist but not waterlogged.
- Provide adequate light and warmth for germination.
Advantages: Produces genetic diversity, seeds are easy to store and transport, and many species grow readily from seed.
2. Roots
Some plants can be propagated by dividing or separating their root systems. Plants like daylilies, hostas, and ornamental grasses form clumps that can be dug up, divided into sections (each with roots and shoots), and replanted.
How to do it: Dig up the plant, use a sharp spade or knife to separate the root mass into sections, and replant each division at the same depth.
3. Cuttings
A cutting is a piece of stem, leaf, or root removed from a parent plant and encouraged to grow its own roots. Stem cuttings are the most common method:
- Cut a 4–6 inch section of healthy stem, ideally just below a leaf node.
- Remove the lower leaves.
- Dip the cut end in rooting hormone (optional but helpful).
- Insert the cutting into moist potting mix or perlite.
- Keep it warm, humid, and in indirect light until roots develop (usually 2–6 weeks).
Advantages: Produces an exact genetic copy (clone) of the parent plant.
4. Tubers
Tubers are swollen underground stems that store food and have “eyes” (buds) that can sprout new plants. The potato is the classic example.
How to do it: Cut a tuber into pieces, each with at least one eye, let the cut surfaces dry for a day, then plant each piece 3–4 inches deep in soil. Each eye will sprout a new plant.
5. Grafting
Grafting joins a piece of one plant (the scion) onto the root system of another (the rootstock). The two grow together as one plant. Grafting is widely used for fruit trees and roses.
How to do it: Make a matching cut on both the scion and rootstock, align the cambium layers (the thin green layer just under the bark), bind them tightly together, and seal with grafting wax. The connection heals over several weeks.
Advantages: Combines desirable fruit quality (from the scion) with a strong, disease-resistant root system (from the rootstock).
Growing Your Plant
You must grow a plant by one of these five methods. Here are practical options:
| Method | Easy Options | Time to See Results |
|---|---|---|
| Seeds | Beans, sunflowers, marigolds, lettuce | 1–2 weeks to germinate |
| Roots (division) | Hostas, daylilies, mint | Immediate replanting |
| Cuttings | Pothos, coleus, basil, rosemary | 2–6 weeks to root |
| Tubers | Potatoes, sweet potatoes | 2–3 weeks to sprout |
| Grafting | Tomatoes onto rootstock, fruit tree scion | 3–6 weeks to heal |
🎬 Video: How to Propagate Plants — https://youtu.be/szcExpxPyXc
🎬 Video: How to Propagate Any Plant | Multiply Your Plants for Free! — https://youtu.be/_taBmwyRSyc?si=j4U-9tDMrbONry6u
You know how plants grow and how to create new ones. Next, you will survey the plants that grow near your home — native, cultivated, and invasive.
Req 6 — Native, Cultivated, and Invasive Plants
This requirement sends you into your own neighborhood to observe and categorize the plants around you. You will need three lists: native plants, cultivated plants, and invasive species.
Understanding the Categories
Native plants are species that have grown in your region for thousands of years without human introduction. They evolved alongside local wildlife and are well-adapted to your climate and soil. Examples vary by region — oaks, maples, goldenrod, and bluestem grass are native to much of eastern North America.
Cultivated plants are species that humans grow intentionally — in gardens, farms, parks, and landscaping. Many cultivated plants are not native to your area. Roses, tulips, tomatoes, and ornamental grasses are common cultivated plants.
Invasive non-native plants are species introduced from other regions that spread aggressively and harm native ecosystems. They outcompete native plants for resources, reduce biodiversity, and can alter habitats.
Building Your Lists
Finding 10 Native Plants
- Walk through a local park, nature preserve, or undeveloped area.
- Look for trees, shrubs, wildflowers, and grasses that appear to grow naturally rather than in planned beds.
- Use a regional field guide or a plant identification app to confirm species and native status.
- Your state’s native plant society website is an excellent resource.
Finding 10 Cultivated Plants
- Survey your own yard, a neighbor’s garden, a community park, or a local farm.
- Include ornamental flowers, vegetable garden plants, lawn grasses, and landscaping trees or shrubs.
- Grocery store herbs grown in your area count too.
Finding 5 Invasive Plants
Common invasive species found across much of the United States include:
| Invasive Species | Region | Harm Caused |
|---|---|---|
| Japanese honeysuckle | Eastern U.S. | Smothers native trees and shrubs |
| Kudzu | Southeast | Blankets forests, blocks sunlight |
| Purple loosestrife | Northeast/Midwest | Chokes wetlands, displaces native marsh plants |
| English ivy | Widespread | Climbs and kills trees, carpets forest floors |
| Garlic mustard | Eastern/Midwest | Releases chemicals that inhibit native plant growth |
| Tree of Heaven | Widespread | Produces toxic compounds, spreads rapidly |
| Multiflora rose | Eastern U.S. | Forms impenetrable thickets |
| Phragmites (common reed) | Widespread | Takes over wetlands |
Check your state’s invasive species list for the five most relevant to your area.
How Invasive Plants Cause Harm
- Competition — Invasives often grow faster and more aggressively than native species, stealing water, light, and nutrients.
- Habitat loss — Dense invasive stands replace diverse native plant communities, reducing food and shelter for wildlife.
- Altered soil chemistry — Some invasives change soil nutrients or pH, making the area inhospitable to native species even after the invasive is removed.
- Economic damage — Invasive plants cost the U.S. billions of dollars annually in agricultural losses and control efforts.
Controlling Invasive Plants Responsibly
The requirement specifically asks about control methods that do not harm humans, wildlife, or the environment:
- Manual removal — Pulling, digging, or cutting invasive plants by hand. Most effective for small infestations. Remove the entire root system when possible.
- Mowing and cutting — Repeated mowing or cutting weakens invasives over time by depleting their energy reserves.
- Mulching and smothering — Covering infested areas with thick mulch, cardboard, or landscape fabric blocks light and prevents regrowth.
- Biological control — Introducing natural predators or diseases specific to the invasive species. This must be done carefully and is usually managed by government agencies.
- Targeted herbicide use — When necessary, spot-applying herbicide directly to invasive plants (rather than broadcasting it) minimizes impact on surrounding life.
- Prescribed fire — Controlled burns can suppress invasives and promote native fire-adapted species. This is used by land managers in prairies and some forests.
- Planting natives — After removing invasives, replanting with native species fills the gap and prevents reinvasion.
🎬 Video: Getting Rid of Invasive Plants From Your Yard — https://youtu.be/QyxLJ1WZwxs
🎬 Video: How To Identify and Remove Invasive Plants — https://youtu.be/zWty9EVuw4k
🎬 Video: How To Select Native Plants For Your Landscape — https://youtu.be/CFwMWLAM5CE
You have surveyed the plant life around your home. Next, you will explore how plant science connects to careers and hobbies.
Req 7 — Careers or Hobbies
Requirement 7 asks you to connect what you have learned to life beyond this badge — either by exploring a plant science career or by developing a plant-based hobby. You only complete one option. Read both descriptions below, pick the one that genuinely interests you, and tell your counselor your choice before you start researching.
Option 7a — Exploring Plant Science Careers
Research one career related to plant science. You will need to find out:
- What the job involves day to day
- Required education and training (and what it costs)
- Typical salary and job outlook
- Opportunities for advancement
- What makes the career personally interesting to you
Then discuss your findings with your counselor.
Best choice if you: are curious about working with plants professionally, are drawn to agriculture, environmental science, forestry, or landscape architecture, or want to explore what a degree in plant science could lead to.
→ Go to Req 7a — Exploring Plant Science Careers
Option 7b — Plant Science as a Hobby
Explore how the knowledge and skills from this badge could become a hobby or healthy lifestyle practice — think home gardening, beekeeping, bonsai, foraging, or native plant restoration. You will research:
- Any training or skills you would need
- Costs to get started
- Organizations that support the hobby
- Your short-term and long-term goals in this pursuit
Then discuss your ideas with your counselor.
Best choice if you: enjoy growing things for the pleasure of it, want to grow your own food, are interested in beekeeping or bonsai, or see plant science as something you want to do on weekends for the rest of your life.
→ Go to Req 7b — Plant Science as a Hobby
Still not sure?
| Question | If yes → |
|---|---|
| Do you picture yourself working outdoors with plants for a living? | 7a — Careers |
| Are you more excited about growing a garden at home than about a job? | 7b — Hobbies |
| Do you want to learn what degree you would need to become a botanist? | 7a — Careers |
| Do you want to start beekeeping, grow bonsai, or build a native plant garden? | 7b — Hobbies |
Both options require real research and a genuine conversation with your counselor — not just a quick web search. Choose the one that excites you most.
Req 7a — Exploring Plant Science Careers
Plant science offers a wide range of career paths. Your job is to pick one, research it thoroughly, and discuss your findings with your counselor.
Careers to Consider
Agronomist — Works with farmers to improve crop production through soil management, plant breeding, and pest control. Typically requires a bachelor’s degree in agronomy or crop science.
Horticulturist — Grows and manages ornamental plants, fruits, vegetables, and landscapes. Many positions require a bachelor’s degree, though hands-on nursery and greenhouse roles may accept associate degrees or certifications.
Botanist / Plant Biologist — Studies plant life in laboratories, universities, or the field. Research positions typically require a master’s degree or PhD.
Landscape Architect — Designs outdoor spaces including parks, gardens, and campuses. Requires a bachelor’s or master’s degree and state licensure.
Forester — Manages forests for timber production, wildlife habitat, recreation, and conservation. Requires a bachelor’s degree in forestry or a related field.
Extension Agent — Works for a university extension service, helping farmers, gardeners, and communities apply the latest agricultural research. Requires at least a bachelor’s degree.
Arborist — Specializes in the care and maintenance of trees. Certification through the International Society of Arboriculture (ISA) is common.
Plant Pathologist — Studies plant diseases and develops control strategies. Typically requires a graduate degree.
Research Checklist
Cover these topics for your counselor discussion- What does a person in this career do day to day?
- What education or training is required? How long does it take?
- What does the education cost, and are scholarships available?
- What is the typical starting salary? What about experienced professionals?
- Are jobs in this field growing, shrinking, or stable?
- What career advancement opportunities exist?
- What about this career appeals to you personally?
🎬 Video: A Day in the Life of an Agronomist — https://youtu.be/sbyuwd1nDVo
🎬 Video: What's the Difference Between Horticulture and Agronomy — https://youtu.be/d1HGz04SA9U?si=zGMuF_gt8Tm5s368
Req 7b — Plant Science as a Hobby
Plant science is not just a career path — for millions of people it is a deeply satisfying way to spend free time, grow food, create beauty, and connect with the natural world. This option asks you to pick a plant-based hobby that genuinely interests you and research it well enough to talk about it with your counselor.
Hobby Ideas to Consider
You are not limited to this list, but these are common starting points for plant-science hobbyists:
Home vegetable gardening — Growing your own food is one of the most practical applications of everything in this badge: soil prep, propagation, pest management, and plant selection all apply. A 4×8-foot raised bed costs roughly $50–150 to build and fill.
Native plant gardening — Designing a landscape with native wildflowers, grasses, and shrubs supports local pollinators and requires less water and maintenance than traditional lawns. Organizations like the Native Plant Society of your state provide free plant lists, workshops, and seed swaps.
Bonsai — The art of growing miniature trees in containers. Bonsai blends horticulture, artistic design, and patient observation. Starter trees and basic tools run $30–80; advanced trees and pots can cost hundreds of dollars. The National Bonsai and Penjing Museum in Washington, D.C. and local bonsai clubs are excellent resources.
Beekeeping — Beekeepers work directly with one of the most important pollinators on earth. A starter hive, protective equipment, and first-year supplies typically cost $300–600. Most states require registration with the state department of agriculture. The American Beekeeping Federation and local beekeeping associations offer beginner courses and mentorship.
Fairy gardening / miniature gardens — Creating small-scale planted landscapes in containers or garden beds. Low startup cost ($20–50), highly creative, and a good introduction to container horticulture and plant selection.
Foraging — Learning to identify and harvest wild edible and medicinal plants. Requires strong plant identification skills (directly from this badge) and knowledge of local regulations. Local foraging guides, herbalist organizations, and nature centers often offer guided walks.
What to Research
The requirement is specific. Your counselor discussion should cover:
Research Checklist
Cover these points before your counselor discussion- What is the hobby and why does it appeal to you?
- What skills or knowledge would you need to get started? Is any formal training available?
- What would it cost to begin? What are ongoing annual expenses?
- What organizations, clubs, or online communities support this hobby?
- What is your short-term goal — something you could accomplish in the next 3–6 months?
- What is a realistic long-term goal — something you would like to achieve over several years?
- How does the hobby connect to what you learned in this merit badge?
Short-Term vs. Long-Term Goals
Your counselor will ask about both. Here are some examples to get you thinking:
| Hobby | Short-Term Goal (3–6 months) | Long-Term Goal (2–5 years) |
|---|---|---|
| Vegetable garden | Grow tomatoes, peppers, and basil from seed | Produce at least 25% of family’s summer vegetables |
| Native plant garden | Plant a 4×4-foot pollinator patch with 3 species | Replace the front lawn with a certified wildlife habitat |
| Bonsai | Style one juniper into a basic upright form | Develop a 10-year-old tree with established nebari |
| Beekeeping | Complete a beginner course and join a local club | Manage two thriving hives and harvest honey |
| Foraging | Confidently identify 10 local edible plants | Lead a guided foraging walk for friends or family |
🎬 Video: Fairy Gardens — https://youtu.be/ZuQ6SvmYjtw?si=WVlIAlraQrSiwYHj
🎬 Video: Bonsai Tree Hobby — https://youtu.be/ztx0fMF2rAA?si=08-Ef4YnEJsPHhvF
🎬 Video: Common Reasons for Keeping Honey Bees — https://youtu.be/DUM3o2b7NUA?si=1aXCsEnClarmfKpK
With Requirement 7 complete, you are ready for the major hands-on portion of this badge.
Req 8 — Choose a Plant Science Track
This is the capstone of the badge. You will pick one branch and follow it all the way through. Each branch gives you a different kind of plant-science experience, so choose the one that best fits your interests, your location, and the time you have available.
Your Options
- Req 8a — Agronomy Roadmap: Study field crops such as corn, cotton, forage crops, small grains, and soybeans. You will learn about seedbeds, germination, pests, crop regions, and one crop-specific project.
- Req 8b — Horticulture Roadmap: Focus on plants grown for food, beauty, and landscaping. You will visit growing spaces, learn horticulture terms, practice hands-on plant care, and complete a seasonal project.
- Req 8c — Option C: Field Botany: Work outdoors in natural areas. You will study plant communities, use identification keys, press specimens, research rare plants, and complete a structured field study.
How to Choose
| Track | Best for Scouts who like… | You will spend most of your time… | Good fit if you have… |
|---|---|---|---|
| Agronomy | farming, food systems, maps, crop production | studying how major crops are planted, grown, protected, and harvested | access to a garden plot, farm, or crop field |
| Horticulture | gardening, landscaping, nurseries, plant care | growing and maintaining plants in designed spaces | a yard, containers, or a public garden or nursery nearby |
| Field Botany | hiking, ecology, native plants, nature study | observing wild plants in natural habitats and documenting what you find | parks, preserves, Scout camps, or natural areas nearby |
Questions to Ask Before You Decide
Pick the branch you can actually complete well- Season: Which branch matches the time of year? Crop and garden work depend on planting season.
- Location: Do you have access to a field, a garden, a greenhouse, or natural areas?
- Equipment: Will you need plant tags, notebooks, maps, seed trays, or a plant press?
- Time: Some options stretch across weeks or a full growing season.
- What you’ll gain: Agronomy teaches crop systems, Horticulture builds practical growing skills, and Field Botany strengthens observation and identification skills.
Req 8a — Agronomy Roadmap
Agronomy is the science of growing field crops and managing the land they depend on. This branch takes you from the basics of getting seeds started to the larger questions of pests, climate, harvest, and where major crops are grown.
What You’ll Complete
- Req 8a1 — Preparing a Seedbed: Learn how to turn soil into a place where seeds can sprout evenly and grow well.
- Req 8a2 — Seed Germination Testing: Build a simple germination tester, test four kinds of seeds, and calculate the percentage that are alive.
- Req 8a3 — Crop Pests and Weeds: Study major insect pests, crop diseases, and weed control that protects people and useful species.
- Req 8a4 — Major Crop Regions: Map where important U.S. crops are grown and explain why those regions lead production.
- Req 8a5 — Choose a Crop Study: Pick one crop area—corn, cotton, forage crops, small grains, or oil crops—and complete the full set of project requirements.
How to Approach the Branch
Do the first four requirements in order. They build a strong base for your crop study. Then choose the 8a5 track that best matches what you can actually observe or grow where you live.
Req 8a1 — Preparing a Seedbed
A seedbed is the part of the soil where seeds will be planted and expected to sprout. A good seedbed gives seeds three things at the same time: close contact with moist soil, enough air for roots, and a surface that is even enough for consistent planting depth.
What a Good Seedbed Looks Like
A good seedbed is:
- Loose enough for young roots to push through
- Firm enough that seeds do not sink too deep
- Moist but not soggy
- Free of large clods, rocks, and heavy weed growth
- Level enough that water does not pool in one spot and run off another
Basic Seedbed Steps
Seedbed Preparation Steps
Work from site cleanup to final planting surface- Clear the area: Remove weeds, crop residue, and large stones.
- Check the soil: Notice texture, drainage, and compaction. A soil test is even better.
- Loosen the soil: Use a shovel, fork, hoe, or tiller to break up compacted soil.
- Add amendments if needed: Compost improves many soils. Lime or sulfur may be used only if a soil test shows the pH needs adjustment.
- Break clods and smooth the surface: Seeds germinate more evenly in fine, crumbly soil.
- Firm lightly: Press or rake so the seedbed is not fluffy and uneven.
- Water if needed: The soil should be ready to hold steady moisture after planting.
Match the Seedbed to the Crop
Tiny seeds need a finer, smoother surface than large seeds do. A lettuce or clover seed can struggle in rough soil full of air gaps. Larger seeds such as corn or soybeans can handle a coarser seedbed, but they still need good soil contact and even depth.
Drainage matters too. In heavy clay, a raised bed or carefully loosened row may help prevent soggy conditions. In sandy soil, added organic matter can help hold moisture long enough for germination.
Official Resources
🎬 Video: How To Prepare Your Seedbed For Spring Planting (video) — https://youtu.be/YYbzM7halC0?si=UYbTPYp_l47celkS
Req 8a2 — Seed Germination Testing
A germination test answers a simple question: if you plant these seeds, how many are likely to sprout? Farmers and gardeners do not assume a bag of seed is perfect. They test it so they know how much seed to plant and whether the lot is still worth using.
A Simple Germination Tester
You can make a basic tester with paper towels, water, and a tray or plastic bag.
What You'll Need
A simple home or classroom germination setup- Paper towels or coffee filters
- Water
- Four labeled containers, trays, or plastic bags
- 50 seeds each of four different crops from the approved list
- Pencil and notebook
How to Run the Test
- Moisten the paper towel so it is damp, not dripping.
- Count out 50 seeds of one crop and spread them so they do not overlap.
- Fold or cover the towel and place it in a labeled bag or tray.
- Keep the seeds warm and check daily.
- Count how many seeds germinate normally.
- Repeat for the other three crops.
A seed counts as live when it produces a healthy sprout, not just a cracked seed coat. Weak, moldy, or misshapen seedlings usually do not count as good germination.
Calculating Percent Live Seed
Use this formula:
number of healthy sprouts ÷ 50 × 100 = percent live seed
If 43 of 50 soybean seeds sprout well, then:
43 ÷ 50 × 100 = 86% live seed
Why the Result Matters
A high germination percentage means seed is vigorous and likely to establish an even stand. A lower percentage means you may need more seed to get the same plant population—or the seed may not be worth planting at all.
Official Resources
🎬 Video: How to Do Seed Germination Test (video) — https://youtu.be/MOphmTH-WIA
Req 8a3 — Crop Pests and Weeds
Healthy crops compete against insects, diseases, and weeds all season long. Agronomists study these threats so they can protect yield without creating bigger problems for soil, wildlife, or people.
One Pest and One Disease for Each Crop Group
You only need one example for each crop group, but choose examples that are actually important where you live.
Corn
- Insect pest example: corn rootworm or corn earworm
- Disease example: gray leaf spot or corn smut
Small grains
- Insect pest example: Hessian fly or aphids
- Disease example: rusts, powdery mildew, or Fusarium head blight
Cotton
- Insect pest example: bollworm, boll weevil, or cotton fleahopper
- Disease example: bacterial blight or wilt diseases
For each one, be ready to explain what part of the plant is damaged, how that lowers yield or quality, and how growers try to control it.
Weed Control Without Unnecessary Harm
Weeds compete for sunlight, water, space, and nutrients. The safest control plan usually uses integrated pest management instead of jumping straight to broad chemical control.
Lower-Harm Weed Control
Use the least damaging effective methods first- Prevent introduction: Clean boots, tools, and equipment before moving between sites.
- Mulch or cover the soil: Block light so weed seeds do not sprout.
- Hand-pull or hoe early: Small weeds are easier to control before they flower and set seed.
- Use crop rotation and spacing: Healthy crops can outcompete some weeds.
- Spot-treat only when needed: If herbicide is required, use the smallest targeted treatment and follow the label exactly.
Official Resources
🎬 Video: Different Types of Diseases in Corn (video) — https://youtu.be/lpIsRU63qIE
🎬 Video: Major Pest of Cotton (video) — https://youtu.be/Yt_Z3SJmw3c
Req 8a4 — Major Crop Regions
Crops are not grown evenly across the United States. They cluster in regions where temperature, rainfall, soil, length of growing season, and transportation all line up in the crop’s favor.
Major Crop Patterns
Corn
The Corn Belt—especially Iowa, Illinois, Indiana, eastern Nebraska, and surrounding states—leads corn production. Deep prairie soils, warm summers, and enough rainfall or irrigation make this region ideal.
Cotton
Cotton is concentrated in the South and Southwest, including Texas, Georgia, Mississippi, Arkansas, and parts of the Carolinas and Arizona. It needs a long, warm growing season and does not tolerate frost well.
Forage crops
Forage is grown widely, but especially where livestock production is important: the Great Plains, upper Midwest, and irrigated western valleys. Hay, alfalfa, and pasture plants are tied closely to cattle and dairy systems.
Small grains
Wheat, oats, rye, and barley dominate parts of the Great Plains, the northern tier, and the Pacific Northwest. Dryland farming, cooler seasons, and broad open acreage favor many small grains.
Oil crops
Soybeans lead oil-crop production in the Midwest and eastern Corn Belt, often in rotation with corn. Canola is important farther north, where cooler conditions fit that crop better.
Why Regions Matter
Location is not just about weather. Successful crop regions also usually have:
- soil suited to machinery and root growth
- storage and processing facilities nearby
- rail, river, or road systems for moving harvests
- generations of local knowledge about the crop
Official Resources
🎬 Video: Major Crops of United States (video) — https://youtu.be/AHx27-1Qjxw
🎬 Video: Major Agricultural Crops in United States (video) — https://youtu.be/ulHKu0l0xds
Req 8a5 — Choose a Crop Study
This is your hands-on crop study. You will choose one path and follow every part of it. Pick the crop that best matches what you can grow, visit, or observe in your region.
Your Options
- Req 8a5a — Corn in the Field: Grow a corn plot, study commercial corn farming, and explain one insect problem that affects corn production.
- Req 8a5b — Cotton from Field to Fiber: Grow cotton if your climate allows, learn how fiber and seed are used, and study one important cotton insect pest.
- Req 8a5c — Forage Crops and Soil Health: Collect forage and weed samples, learn how legumes and livestock affect soil, and study poisonous plants for grazing animals.
- Req 8a5d — Small Grains from Harvest to Mill: Use production data, help with harvest, and visit a grain-related business to trace the crop after it leaves the field.
- Req 8a5e — Soybeans and Oil Crops: Grow soybeans, study modern soybean production, and explain why a hard frost is dangerous after emergence.
How to Choose
| Track | Best if you can… | What you will gain |
|---|---|---|
| Corn | plant or observe corn locally | understanding of one of the country’s biggest feed, food, and fuel crops |
| Cotton | access warm conditions or a strong cotton-growing region | insight into fiber production and crop economics |
| Forage crops | visit pastures, hay fields, or livestock operations | stronger links between plants, soil, and animals |
| Small grains | visit farms, elevators, or mills | a clear picture of harvesting, storage, and grain processing |
| Oil crops | grow or observe soybeans | understanding of oilseed production and soybean uses |
Req 8a5a — Corn in the Field
Corn is one of the most important crops in the United States. This track combines hands-on growing, large-scale farming, and crop-protection questions. Start by planning your corn plot, because the later discussion makes more sense once you have watched real plants grow.
Requirement 8a5a1
Corn needs full sun, warm soil, and enough room for multiple plants. Even a small plot works better when planted in short rows or blocks instead of one long single row, because corn is wind pollinated and nearby plants help one another set kernels.
Record the exact seed variety or code number from the packet. That detail matters because different varieties mature at different speeds, grow to different heights, and may resist different diseases.
Corn Plot Basics
Set yourself up for a better stand- Choose a sunny site with well-drained soil.
- Plant after frost danger has passed and soil has warmed.
- Space seeds evenly so plants do not crowd one another.
- Keep weeds down early, when young corn is least competitive.
- Bring your notes when your counselor inspects the plot.
Official Resources
🎬 Video: The Incredible Logistics Behind Corn Farming (video) — https://youtu.be/R9pxFgJwxFE
Requirement 8a5a2
Modern corn farming relies on GPS-guided planting, improved seed genetics, soil testing, fertilizer timing, pest scouting, and large harvesting equipment. Farmers aim for even spacing, healthy root development, and efficient use of water and nutrients.
Corn contributes to today’s food supply in several ways. People eat sweet corn directly, but field corn is also processed into cornmeal, corn syrup, starches, oils, and many packaged-food ingredients. It also feeds livestock, which means corn indirectly supports milk, meat, and egg production. In the fuel supply, corn is used to produce ethanol that is blended into gasoline.
Requirement 8a5a3
One important corn insect is the corn earworm. The caterpillars feed on kernels and ears, reducing yield and making the crop less marketable. Feeding damage also opens the way for molds and rot.
Control depends on the situation. Farmers may rotate crops, choose resistant varieties, scout fields regularly, encourage beneficial insects, and use targeted treatment only when populations justify it.
Official Resources
🎬 Video: Different Types of Diseases in Corn (video) — https://youtu.be/lpIsRU63qIE
Req 8a5b — Cotton from Field to Fiber
Cotton is both a field crop and an industrial crop. This track helps you connect the biology of the plant with the economics of fiber, seed, and pest control. If you live outside a warm cotton-growing region, talk with your counselor early about how you will observe or document the growing portion of the requirement.
Requirement 8a5b1
Cotton needs a long, warm growing season and plenty of sun. Seeds should go into warm soil, not cold spring ground. Keep your plot weeded and watch closely for insect damage on leaves, squares, and bolls.
If you are able to grow cotton, document the plot with dates and photos. Your counselor will want to see that you cared for the crop and observed its growth, not just planted it once.
Requirement 8a5b2
Modern cotton farming uses precision planting, irrigation where needed, pest scouting, mechanical harvesters, and ginning equipment that separates fiber from seed. Cotton fiber is turned into clothing, medical textiles, thread, and other fabric products. Cottonseed is also valuable: it can be crushed for oil, and the remaining meal can be used in animal feed.
Cotton matters economically because one harvest produces both fiber and seed products. In strong cotton regions, it supports farms, gins, trucking, mills, and export markets.
Official Resources
🎬 Video: How American Farmers Produce 14.68 Million Bales Of Cotton - American Farming (video) — https://youtu.be/ODLRz9H_FLU
Requirement 8a5b3
One important cotton pest is the cotton fleahopper. It feeds on small buds and developing fruiting structures, which can reduce the number of bolls the plant produces. Other important pests include bollworms and aphids, but you only need to explain one clearly.
Control starts with careful scouting. Farmers watch fields for threshold levels, protect beneficial insects when possible, and use targeted treatment only when needed. Timing matters—late or unnecessary spraying can waste money and upset natural pest control.
Official Resources
🎬 Video: Major Pest of Cotton (video) — https://youtu.be/Yt_Z3SJmw3c
🎬 Video: Insect Lockdown Pest Profiles: The Cotton Fleahopper (video) — https://youtu.be/B0ApDCtkdQk?si=mmYbeVgPAk-9o9DL
Req 8a5c — Forage Crops and Soil Health
Forage crops connect plant science directly to animal agriculture. This track asks you to observe useful plants, problem plants, and the way soil, legumes, and livestock all affect one another.
Requirement 8a5c1
Make a display that shows you understand the difference between the four groups, not just their names. A perennial grass comes back year after year. An annual grass completes its life cycle in one season. Legumes are especially important because many work with nitrogen-fixing bacteria. Broadleaf weeds are not grasses and often compete with desired forage plants.
For each useful grass or legume, note how it is used: hay, pasture, silage, erosion control, or soil improvement.
Requirement 8a5c2
Legumes such as clover and alfalfa can enrich soil because bacteria in their root nodules help fix nitrogen. That added nitrogen can benefit later crops or mixed pasture systems.
But legumes can also deplete soil if the crop is removed and nutrients are not replaced. Heavy harvests remove minerals and organic matter. The same is true of livestock. Animals can enrich soil when manure is spread evenly and grazing is well managed. They can deplete or damage soil when they overgraze plants, compact wet ground, or concentrate waste in one spot.
Official Resources
🎬 Video: Importance of Legumes (video) — https://youtu.be/fUJXV-lHDKk
🎬 Video: The Science of Soil Health: Understanding the Value of Legumes and Nitrogen-Fixing Microbes (video) — https://youtu.be/0yRYdvEzXag?si=vcj8GD4Awd1EoLJZ
Requirement 8a5c3
The exact poisonous plants depend on your region, so use local extension or veterinary sources. Common examples in some parts of the country include poison hemlock, water hemlock, lupine, jimsonweed, and oleander. Do not guess—get local names right.
Forage crops may be used as:
- pasture, where animals graze directly
- hay, which is cut and dried
- silage, which is chopped and fermented
- green chop, where fresh forage is cut and fed soon after harvest
Official Resources
🎬 Video: Local Veterinarian Explains What Plants Are Toxic to Large Animals (video) — https://youtu.be/vwrNGUx0TJ4
Req 8a5d — Small Grains from Harvest to Mill
Small grains such as wheat, oats, barley, and rye are major food and feed crops. This track helps you connect official production data, field work, and the businesses that move grain from farms to food systems.
Requirement 8a5d1
Use the latest available USDA data, not outdated numbers from random websites. Write down the crop name, the year, and the figure exactly as reported. Your counselor may also ask whether the number refers to acres, bushels, or tons, so pay attention to units.
Official Resources
USDA - National Agricultural Statistics Service - Charts and Maps - Field Crops (website) Official USDA production charts and maps that help you find current figures for wheat and other grain crops by year and region. Link: USDA - National Agricultural Statistics Service - Charts and Maps - Field Crops (website) — https://www.nass.usda.gov/Charts_and_Maps/Field_Crops/index.phpRequirement 8a5d2
Harvesting losses happen when grain shatters before collection, falls from the combine, or is left in the field because equipment settings are wrong. Growers reduce losses by harvesting at the right moisture level, keeping equipment adjusted, and moving efficiently so storms or lodging do not ruin the stand.
If you discuss one small grain crop, wheat is a strong example. Modern wheat production can include improved varieties, seed treatment, fertilizer timing, disease scouting, and large combines that cut, thresh, and separate grain in one pass.
Official Resources
🎬 Video: Growing and Harvesting Wheat on a Small Scale (video) — https://youtu.be/RYn_yUUpwSQ
🎬 Video: Reducing Soybean Harvest Losses | Michigan Soybean | Harvest Demonstration Video (video) — https://youtu.be/PEgONTJko6s
Requirement 8a5d3
This requirement is about following the crop after harvest. A grain elevator stores and moves grain. A mill grinds it. A cereal plant processes it into food. A seed company cleans, sorts, and packages seed for planting.
When you visit, ask about:
- how grain is received and tested
- how moisture is managed
- how grain is cleaned, stored, or processed
- what quality problems they watch for
- how safety is handled around bins, dust, and equipment
Official Resources
🎬 Video: The Journey: Wheat into Flour (video) — https://youtu.be/PYP6AnNQjNo?si=mL4eQyG6nOPebuk5
🎬 Video: Everything About Grain Bins (Farmers are Geniuses) (video) — https://youtu.be/ywBV6M7VOFU?si=ngV-w_iXGlnwjTox
🎬 Video: How Does a Seed Company Work? (video) — https://youtu.be/zFzQE7kKAck?si=TaPtU3MhtTWMCv_Q
Req 8a5e — Soybeans and Oil Crops
Soybeans are the main oil crop in this requirement, and they matter because they provide both edible oil and protein-rich meal. This track combines field observation with the larger role soybeans play in agriculture and food systems.
Requirement 8a5e1
Soybeans need warm soil, full sun, and good weed control early in life. Keep notes on planting date, seed variety if known, stand establishment, weed pressure, and any signs of stress.
Young soybean plants are especially important to watch because early damage can thin the stand and reduce final yield.
Official Resources
🎬 Video: How to Produce Millions Of Tons Of Soybeans | Modern Agricultural Technology | Soy milk Processing (video) — https://youtu.be/1olmtb3MpME
Requirement 8a5e2
Modern soybean production often includes row planting, inoculated seed, GPS-guided equipment, herbicide and weed-management planning, and timely harvest. Soybeans are commonly rotated with corn because the rotation can help manage pests and spread out nutrient demands.
Soybeans contribute to the food supply through soybean oil, tofu, soy milk, edamame, processed-food ingredients, and especially livestock feed. Soybean meal is one of the most important protein sources in animal agriculture.
Official Resources
Soybeans and Oil Crops - Oil Crops Sector at a Glance | Economic Research Service (website) USDA's overview of soybean and oil-crop production, uses, and market importance in the United States. Link: Soybeans and Oil Crops - Oil Crops Sector at a Glance | Economic Research Service (website) — https://www.ers.usda.gov/topics/crops/soybeans-and-oil-crops/oil-crops-sector-at-a-glanceRequirement 8a5e3
Right after emergence, soybean seedlings are small, tender, and exposed. A hard frost can kill or damage the growing point, blacken tissues, and reduce the plant stand before the crop has really begun. If enough seedlings are lost, the field may need to be replanted.
This is why planting date matters. Growers try to balance the benefit of an early start with the risk that cold weather may still return.
Official Resources
🎬 Video: Soybean School: Assessing the Impact of Frost (video) — https://youtu.be/x86tt8PPwiA
Req 8b — Horticulture Roadmap
Horticulture is the science and art of growing plants for food, beauty, and the environment. This branch takes you from a real-world field visit through vocabulary, a hands-on skill, landscape thinking, and a multi-week project—all five requirements must be completed.
Work through each child requirement in order. Use this page as your roadmap before opening the first detailed page.
What You’ll Complete
- Req 8b1 — Learning by Visiting Growing Spaces: Visit a public garden, nursery, greenhouse, arboretum, or conservatory and report what you learned about horticulture there.
- Req 8b2 — Speaking the Language of Horticulture: Define 14 key horticultural terms, find your USDA hardiness zone, and list 10 climate-appropriate landscape plants with common and scientific names.
- Req 8b3 — Choose a Hands-On Skill: Pick ONE of four practical skills—propagation, transplanting, pruning, or planting a tree or shrub.
- Req 8b4 — Smart Landscape Choices: Explain why good design and right-plant-right-place principles matter, including mature size and growth rate.
- Req 8b5 — Choose a Horticulture Project: Complete ALL sub-requirements within ONE of four multi-step project tracks—bedding plants, fruit/berry/nut crops, woody ornamentals, or home gardening.
Timing Note
Requirements 8b1 and 8b2 can be done at any time. Req 8b3 (skill) and Req 8b5 (project) both involve living plants and may span several weeks or a full growing season—start them early so you have time to observe and record results before your counselor conference.
Req 8b1 — Learning by Visiting Growing Spaces
Any one of the six venues qualifies. Choose whichever is most accessible to you—a local nursery counts just as well as a botanical garden. The goal is to observe plants being grown or displayed professionally and connect what you see to what horticulturists actually do.
What to Look for During Your Visit
Before you go, write down two or three questions. Good ones to start with:
- What plants are being grown here, and why are they grown this way?
- How are pests, diseases, or environmental stress managed?
- What specialized equipment or techniques do workers use that you wouldn’t see in a backyard?
Take brief notes or photos (if allowed) so you can give specific examples when you tell your counselor what you learned.
What to Report to Your Counselor
Your counselor wants to hear that you observed and connected, not just that you visited. Try to describe:
- Where you went and what kind of facility it is.
- At least two specific things you saw that relate to horticulture (e.g., grafting benches, irrigation zones, labeled cultivar tags, pest monitoring stations).
- One thing that surprised you or that you didn’t expect to find.
Venue Quick Guide
| Venue | What you’ll typically find |
|---|---|
| Public garden / arboretum | Collections of labeled specimens, design demonstrations, seasonal displays |
| Retail nursery | Wide variety of ornamentals, vegetables, and tools; knowledgeable staff |
| Wholesale nursery | Large-scale production, propagation houses, B2B sales |
| Production greenhouse | Controlled-environment growing, often for bedding plants or vegetables |
| Conservatory greenhouse | Tropical or specialty collections maintained year-round |
Official Resources
🎬 Video: Horticulture Center Tour (video) — https://youtu.be/8M5Pb6XWMcE
Req 8b2 — Speaking the Language of Horticulture
These 14 terms are the foundation of every plant-selection conversation a horticulturist has. Learn them well enough to use them naturally—your counselor may ask you to apply them to a specific plant rather than just recite a definition.
The 14 Terms
Hardiness zone — A geographic area defined by average annual minimum winter temperature (USDA system in the U.S.). Knowing your zone tells you which plants can survive your winters outdoors.
Shade tolerance — How well a plant grows with reduced light. Full-sun plants need 6+ hours of direct sun; full-shade plants can thrive with fewer than 2 hours.
pH — A measure of soil acidity or alkalinity on a scale of 1–14 (7 is neutral). Most landscape plants prefer slightly acidic to neutral soil (pH 6–7). Blueberries want pH 4.5–5.5; lilacs prefer 6.5–7.
Moisture requirement — How much water a plant needs to thrive. Ranges from drought-tolerant (cacti, lavender) to consistently moist (cardinal flower, marsh marigold).
Native habitat — The natural environment where a plant evolved—forest floor, prairie, wetland, etc. Matching a plant to conditions similar to its native habitat reduces maintenance.
Texture — The visual or tactile coarseness of a plant’s leaves and stems. Fine-textured plants (ferns, ornamental grasses) contrast with coarse-textured ones (hosta, oakleaf hydrangea) in design.
Cultivar — A cultivated variety selected for a specific trait (size, color, disease resistance) and propagated to keep that trait consistent. Written in single quotes: Hydrangea macrophylla ‘Endless Summer’.
Ultimate size — The maximum height and spread a plant reaches at full maturity under good conditions. Underestimating this leads to plants crowding buildings or each other.
Disease resistance — A plant’s genetic ability to resist common pathogens. Choosing resistant cultivars reduces the need for fungicides (e.g., disease-resistant roses, powdery-mildew-resistant phlox).
Habit — The natural shape or form of a plant: upright, spreading, weeping, columnar, mounding, vase-shaped, etc.
Evergreen — A plant that retains its leaves year-round (needled or broadleaf). Examples: pine, boxwood, rhododendron.
Deciduous — A plant that drops all its leaves seasonally, typically in fall. Examples: oak, forsythia, hostas.
Annual — A plant that completes its entire life cycle (germinate, grow, flower, seed, die) in one growing season. Must be replanted each year.
Perennial — A plant that lives for more than two years, dying back to the roots in cold climates and re-sprouting each spring.
Finding Your Hardiness Zone
Use the USDA Plant Hardiness Zone Map—enter your ZIP code and it returns your zone instantly. Write it down; you’ll use it when building your list of 10 plants.
Building Your Plant List
Your list needs 10 landscape plants that:
- Are suitable for your hardiness zone
- You genuinely find attractive or interesting
- Include the common name and scientific name (genus + species, in italics)
A good format:
| Common Name | Scientific Name | Zone Range |
|---|---|---|
| Eastern redbud | Cercis canadensis | 4–9 |
| Coneflower | Echinacea purpurea | 3–9 |
Use plant tags at the nursery you visited, the Grow Native! glossary, or the USDA map site to verify hardiness.
Official Resources
🎬 Video: US Plant Zones: Explained // Garden Answer (video) — https://youtu.be/O6AM0pNiUOs
Req 8b3 — Choose a Hands-On Skill
You must complete exactly one of the four options below. Each develops a different core horticultural skill; pick the one that fits your situation and interest.
Your Options
- Req 8b3a — Propagation Methods: Explain the difference between vegetative and sexual propagation, describe advantages of each, and grow a plant from a cutting or graft. Best if you have a few weeks for roots to develop.
- Req 8b3b — Transplanting Seedlings: Transplant 12 seedlings or rooted cuttings to larger containers and grow them for at least one month. Best if you already have young plants or can buy seedling packs.
- Req 8b3c — Pruning with Purpose: Demonstrate good pruning techniques and explain why pruning matters. Best if you have access to an established shrub or tree that needs attention.
- Req 8b3d — Planting a Tree or Shrub: With permission, plant a tree or shrub properly in an appropriate site. Best if you have a site that needs a plant and can source one affordably.
How to Choose
| If you… | Consider… |
|---|---|
| Want to understand plant biology deeply | 8b3a — propagation teaches how plants reproduce |
| Have limited outdoor space | 8b3b — containers work on a patio or porch |
| Have an overgrown hedge or shrub available | 8b3c — pruning can be done in an afternoon |
| Have yard space and parental permission | 8b3d — planting something permanent is satisfying |
Only one option is required. Once you’ve chosen, follow that page fully—there’s nothing to do on the others.
Req 8b3a — Propagation Methods
Plant propagation is how horticulturists multiply plants. There are two fundamentally different strategies, and understanding both is essential to this requirement.
Sexual vs. Vegetative Propagation
Sexual propagation uses seeds—the result of fertilization between a male (pollen) and female (ovule). Each seed is genetically unique, which introduces variation. This is how breeders create new cultivars, and it’s why a seed from your favorite apple tree won’t produce an identical tree.
Horticultural advantages of sexual propagation:
- Low cost; seeds are inexpensive to produce at scale
- Introduces genetic diversity, which can improve disease resistance
- Long seed shelf life when stored correctly
- Used to breed new varieties with desirable traits
Vegetative (asexual) propagation creates new plants from non-reproductive plant tissue—stems, leaves, roots, or buds. Because no fertilization occurs, the offspring is genetically identical to the parent (a clone).
Horticultural advantages of vegetative propagation:
- Preserves desirable traits exactly (color, size, flavor, disease resistance)
- Faster to reach maturity than seed-grown plants for many species
- Essential for propagating cultivars that don’t breed true from seed
- Methods include: cuttings, division, layering, grafting, budding, tissue culture
Growing a Plant from a Cutting or Graft
You need to actually do this and be ready to show your counselor the resulting plant (or document it with photos if timing doesn’t align with your conference).
Stem Cutting (most common for beginners)
- Select a healthy stem 4–6 inches long with at least two nodes (the bumps where leaves attach). Remove lower leaves.
- Dip the cut end in rooting hormone powder or gel (optional but helpful).
- Insert into a moistened rooting medium—coarse perlite, vermiculite, or a commercial propagation mix work well. Avoid regular potting soil, which can stay too wet.
- Place in bright indirect light and cover loosely with a plastic bag or dome to maintain humidity.
- Check for roots in 2–6 weeks by gently tugging—resistance means roots have formed.
Good beginner plants for cuttings: pothos, coleus, chrysanthemum, geranium, mint, basil, forsythia.
Graft (intermediate)
A graft joins the scion (the shoot from the desired plant) to a rootstock (the rooted base, often chosen for vigor or disease resistance). The cambium layers of both must align perfectly for the graft to “take.”
Common beginner graft: cleft graft or whip-and-tongue graft on small-diameter material (pencil-thick stems).
Secure with grafting tape or rubber budding strips and keep the union humid until new growth appears from the scion.
Official Resources
🎬 Video: How to Propagate Plants: 4 Methods to Master (video) — https://youtu.be/WHiv1OvXGcI
🎬 Video: Vegetative Propagation-Asexual Reproduction in Plants-Leaving Cert Biology (video) — https://youtu.be/7sr1Sd8T2YU?si=lJ1gbe9HuKIyzFim
🎬 Video: Propagation Techniques for Prolific Plants - Growing Spaces Greenhouses (video) — https://youtu.be/qH1tJcoTxJM?si=eCtTyCOJHOmnAr4M
Req 8b3b — Transplanting Seedlings
Transplanting is one of the most common operations in horticulture. Done correctly it accelerates growth; done carelessly it causes transplant shock—wilting, stunted growth, or death. This requirement gives you hands-on practice with the full process and a month to observe results.
What Counts
- 12 individual plants moved into larger containers (not 12 of the same pot—12 separate plants).
- They can be seedlings you started yourself, seedlings purchased in a flat, or rooted cuttings from a previous propagation attempt.
- “Larger container” means meaningfully bigger—not just the same pot. Moving from a 4-cell tray to a 4-inch pot, or from a 4-inch pot to a 1-gallon container, both count.
- Grow them for at least one month and observe their progress.
Step-by-Step Process
Prepare containers. Fill new pots with appropriate potting mix—not garden soil, which compacts. Leave about ½ inch of headspace at the top for watering.
Water seedlings first. Watering 30–60 minutes before transplanting makes the root ball easier to handle and reduces root damage.
Remove carefully. Squeeze flexible containers gently from the sides to loosen the root ball, or use a dibber to ease seedlings out of trays. Hold the plant by a leaf, not the stem—a broken leaf is recoverable; a crushed stem is not.
Set the depth right. Most seedlings should be planted at the same depth they were growing. Tomatoes are an exception—bury them deeper to promote extra root formation along the stem.
Firm and water in. Gently firm the mix around the root ball to eliminate air pockets, then water thoroughly until water drains from the bottom.
Reduce stress. Keep newly transplanted seedlings out of direct midday sun for 2–3 days. This “hardening off” period lets roots re-establish before the plant is asked to support full transpiration.
What to Observe Over the Month
Keep a simple log noting:
- Date of transplant
- Any wilting in the first week (normal if brief; concerning if it persists)
- Signs of new growth (new leaves, elongating stems)—this signals the plant has re-established
- Any problems: yellowing, pests, root-bound signs after a few weeks
Your counselor will want to see or hear about the plants’ progress, not just that you moved them.
Official Resources
🎬 Video: How to Transplant Seedlings to Bigger Pots (video) — https://youtu.be/60jGd-9RP3E?si=sNCzM86umQrpvytg
Req 8b3c — Pruning with Purpose
Pruning is the deliberate removal of plant parts to improve the plant’s health, structure, appearance, or productivity. It looks simple but requires knowing where to cut, when to cut, and why each cut is being made.
Why Pruning Is Important
Your counselor will ask you to explain this, so be ready with specific reasons:
- Health: Removing dead, damaged, or diseased wood prevents decay organisms from spreading into healthy tissue.
- Structure: Eliminating crossing, rubbing, or weak-angled branches reduces future breakage and creates a strong framework.
- Air circulation: Opening up the canopy reduces humidity inside the plant, which lowers the risk of fungal diseases like powdery mildew.
- Vigor and rejuvenation: Cutting back overgrown or leggy shrubs stimulates fresh, vigorous growth.
- Productivity: On fruit trees and berry bushes, pruning directs energy toward fruit production rather than excess vegetative growth.
- Aesthetics: Shaping plants to fit their site maintains the design intent of a landscape.
Good Pruning Techniques to Demonstrate
Tools: Use sharp, clean tools. Dull blades crush tissue; dirty tools spread disease. Wipe blades with rubbing alcohol between plants if disease is a concern.
The three-cut method for large branches:
- Undercut 6–12 inches from the trunk (prevents bark tearing when the branch falls).
- Cut from the top a few inches farther out to drop the bulk of the branch.
- Make the final cut just outside the branch collar—the slightly raised ring of tissue at the base of the branch. Never flush-cut; never leave a stub.
Heading cuts (shortening a stem) vs. thinning cuts (removing a stem entirely at its origin): understand the difference and when each is appropriate.
Timing matters: Most deciduous shrubs and trees are best pruned in late winter/early dormancy before bud break. Spring-blooming shrubs (lilac, forsythia) should be pruned right after they bloom, not in winter or you’ll remove the flower buds.
What Your Demonstration Should Show
- At least one correct thinning cut to an appropriate lateral or the main stem
- Correct tool handling (blade oriented correctly, clean cut)
- Explanation of why each cut is being made (not just where)
- Proper cut placement relative to the branch collar or node
Official Resources
🎬 Video: Everything You Need to Know to Start Pruning | Gardening 101 (video) — https://youtu.be/nuF411tf1x0?si=yc53pSsJi6z2aQF7
Req 8b3d — Planting a Tree or Shrub
Planting a tree or shrub is one of the most impactful horticultural acts a Scout can take—a well-placed plant can serve a site for decades. The requirement emphasizes doing it properly and in an appropriate site, both of which require preparation.
Getting Permission
Permission is explicit in the requirement. Before you plant:
- If planting on family property, get verbal permission from the property owner (a parent or guardian).
- If planting in a park, school yard, or Scout camp, obtain written permission from whoever manages the land.
- Check for underground utilities before digging any hole deeper than 12 inches—call 811 (USA) or your local dig-safe service.
Selecting an Appropriate Site
Match the plant to the site using the terms you learned in Req 8b2:
- Hardiness zone: The plant must survive your winters.
- Sun/shade: Check how many hours of direct sun the site receives.
- Moisture: Is the spot well-drained, wet, or dry?
- Ultimate size: Is there enough space for the plant to reach full height and spread without conflicting with buildings, power lines, or other plants?
- Soil pH: Does the plant’s preference match your soil?
How to Plant Correctly
1. Dig the right hole. Make it 2–3× wider than the root ball but no deeper than the root ball’s height. The hole’s width matters more than its depth—roots need loose, aerated soil to spread laterally.
2. Check the root flare. The root flare (where the trunk widens at the base) must sit at or slightly above the final soil grade. Planting too deep is the most common cause of long-term tree failure.
3. Remove all wrapping. Take off burlap, wire baskets, and any container material. Even “biodegradable” burlap can restrict root growth if left on.
4. Place and backfill. Set the plant upright in the center of the hole. Backfill with the native soil you removed—no amendments needed for most trees and shrubs. Amendments create an interface that roots may not cross.
5. Water thoroughly. Slowly apply 5–10 gallons of water to settle the soil and eliminate air pockets around the roots.
6. Mulch. Apply 2–4 inches of wood chip mulch in a ring extending to the drip line—but keep mulch 4–6 inches away from the trunk. “Mulch volcanoes” piled against bark cause rot.
7. Stake only if necessary. Most container-grown shrubs and small trees don’t need staking. If the plant is top-heavy or in a windy site, stake loosely with flexible ties and remove the stakes after one growing season.
What Your Counselor Will Expect
Be ready to explain each decision: why you chose that plant, why that site, and why each step in the planting process matters. The counselor wants to see that you understand the reasoning, not just the motions.
Official Resources
🎬 Video: How to Properly Plant a Tree (video) — https://youtu.be/z30jQa8-Lvg?si=FJ4sW01BFP8g6kBH
Req 8b4 — Smart Landscape Choices
This requirement has three discussion-based sub-requirements. All three are completed on this page—there are no additional child pages. Prepare to explain each concept to your counselor in your own words, using specific examples.
Requirement 8b4a
Good landscape design does more than look attractive—it reduces maintenance, conserves water, and ensures plants survive long-term. The core principle is right plant, right place: matching a plant’s requirements to the conditions a site actually provides.
Poor plant selection is the most common reason landscape plants fail. A plant that needs full sun placed in partial shade becomes leggy and weak. A moisture-loving plant in a dry, rocky slope will struggle regardless of how often it’s watered. Conversely, a drought-tolerant plant in a poorly drained area may suffocate.
Good design also considers function—privacy screens, stormwater management, wildlife habitat, seasonal color—not just ornamental value. A well-designed landscape works with the natural environment rather than fighting it.
Example to share with your counselor: Describe a plant you know that was installed in the wrong spot, or describe what you looked for when selecting the plant for Req 8b3d. Connect those decisions to design principles.
Official Resources
🎬 Video: How to Pick the Right Plants for Stunning Landscaping - A Botanical Bliss Guide (video) — https://youtu.be/fpI_A_F7U50?si=r0VZS0UHwFOQ8ZiY
Requirement 8b4b
Ultimate size is one of the most underestimated factors in landscape planting. A shrub labeled “compact” at the nursery may still reach 6 feet tall and wide at maturity. Problems caused by underestimating mature size include:
- Structural conflict: Roots lifting pavement; branches pressing against buildings or power lines
- Overcrowding: Plants competing for light, water, and nutrients as they reach their natural size
- Excessive maintenance: Repeated heavy shearing to keep an oversized plant small—which weakens it over time and destroys its natural form
- Safety hazards: Large trees planted too close to structures can cause damage in storms
The solution is to research the ultimate size (from the plant tag, a reputable nursery database, or the USDA Plants database) before planting, and to give each plant sufficient space at installation—even if it looks sparse at first.
Official Resources
How to Know the Height, Width & Size a Plant or Tree Will Grow to at Maturity (website) Practical guidance on researching mature plant dimensions before you plant, with examples of common landscape plants. Link: How to Know the Height, Width & Size a Plant or Tree Will Grow to at Maturity (website) — https://www.wilsonbrosgardens.com/how-to-know-how-tall-a-plant-will-grow-when-mature.htmlRequirement 8b4c
Faster isn’t always better in the landscape. Fast-growing trees and shrubs often sacrifice other qualities to achieve rapid growth:
- Wood density and strength: Fast-growing trees (silver maple, Bradford pear, Leyland cypress) tend to have brittle wood that breaks in ice storms or high winds.
- Longevity: Many fast-growing species are short-lived. A silver maple may grow 3–4 feet per year but decline at 30–50 years; an oak grows slowly but can live for centuries.
- Maintenance: Fast growth often means more frequent pruning to maintain size and shape, increasing long-term maintenance costs.
- Root behavior: Some fast-growing trees have aggressive roots that damage infrastructure.
Slower-growing plants often offer superior structural integrity, longer lifespans, lower maintenance, and better habitat value once established. When a landscape feature is meant to be permanent—a street tree, a privacy hedge, a specimen focal point—a slower-growing, durable species may be the smarter investment even if it takes longer to reach mature size.
Official Resources
Choosing Slow-Growing Plants for Greater Longevity (website) Explains the trade-offs between fast- and slow-growing landscape plants and makes the case for prioritizing longevity over quick establishment. Link: Choosing Slow-Growing Plants for Greater Longevity (website) — https://livetoplant.com/choosing-slow-growing-plants-for-improved-longevity/Req 8b5 — Choose a Horticulture Project
This is the most substantial requirement in Option B. You must complete every sub-requirement within one of the four project tracks—not just selected steps. Each track spans at least one growing season, so choose early and start planting or planning as soon as possible.
Your Options
- Req 8b5a — Bedding Plants Through the Season: Grow bedding plants from seed or cuttings, transplant them to a landscape bed, perform maintenance (mulching, watering, fertilizing, weeding, deadheading) through the end of the season, and explain the differences between annuals and perennials.
- Req 8b5b — Fruit, Berry, and Nut Crops: Plant five fruit, nut, or berry plants; care for them through one season; prune one properly; demonstrate a graft; and describe how a crop is processed.
- Req 8b5c — Woody Ornamentals in the Landscape: Plant five or more trees or shrubs; care for them through one season; prune one; identify and describe 10 landscape trees with common and scientific names; and explain five ways trees improve the environment.
- Req 8b5d — Home Gardening for People and Wildlife: Design and plant a 10×10-foot garden with 10+ plant types; demonstrate 9 garden management techniques; and identify 10 native plants beneficial to birds and wildlife.
How to Choose
| If you… | Best track |
|---|---|
| Want to work with flowers and see fast results | 8b5a Bedding Plants |
| Are interested in food crops and fruit production | 8b5b Fruit, Berry, and Nut Crops |
| Want to work with trees and permanent plantings | 8b5c Woody Ornamentals |
| Want a mixed garden with ecological value | 8b5d Home Gardening |
Space and timing considerations:
- 8b5a and 8b5d work well in a backyard, raised bed, or community garden plot.
- 8b5b and 8b5c require enough space to establish woody plants—at least a portion of a yard or a Scout camp site.
- All tracks require ongoing attention for a full growing season. Start as early in the season as your climate allows.
Only one track is required. Browse the child page for your preferred option, then commit and get started—these projects take time to complete well.
Req 8b5a — Bedding Plants Through the Season
This track follows bedding plants from propagation through end-of-season care. All four sub-requirements must be completed. They build on each other in sequence—start with 8b5a1, then proceed through the season.
Requirement 8b5a1
Choose plants that will perform well in your hardiness zone and the site where you’ll transplant them. Common choices: marigolds, zinnias, petunias, impatiens, or snapdragons from seed; geraniums or coleus from cuttings.
Manufactured soil mix: Use a commercial seed-starting mix or potting mix—not garden soil. Be ready to explain what’s in it. Most mixes contain:
- Peat moss or coco coir — lightweight, retains moisture
- Perlite or vermiculite — improves aeration and drainage
- Wetting agents — help hydrophobic peat absorb water initially
- Some mixes include slow-release fertilizer; seed-starting mixes generally don’t, to avoid burning seedlings
When your counselor asks why you chose the mix, connect it to the needs of your specific plants—seed mixes are finer for good seed-to-media contact; cutting mixes are coarser for root development.
Requirement 8b5a2
Transplant after the last frost date for your area and after hardening off seedlings (gradually acclimating them to outdoor conditions over 7–10 days before permanent planting).
Record-keeping is required. Keep a log that includes:
- Transplant date and plant spacing
- Watering and fertilizing schedule
- Pest or disease observations
- Costs (plants, soil amendments, mulch, fertilizer)
- Notable observations (first bloom, weather events, etc.)
Bring this record to your counselor conference—it demonstrates you maintained the bed through the season, not just at the start.
Official Resources
🎬 Video: Transplanting Ferns & Other Plants: A Guide to Success (video) — https://youtu.be/vd3w_hmtm9A?si=ryWERSwz8LEQQssw
Requirement 8b5a3
You must be able to demonstrate all five practices—not just discuss them. Be ready to show your counselor (or document with photos) that you performed each one. Here’s what to know about each:
Mulching: Apply 2–3 inches of organic mulch around plants. Reduces moisture loss, moderates soil temperature, and suppresses weeds. Keep mulch away from stems to prevent rot.
Fertilizing: Bedding plants benefit from regular feeding (every 2–4 weeks with a balanced fertilizer, or use slow-release at planting). Nitrogen promotes leafy growth; phosphorus supports roots and blooms; potassium improves overall vigor.
Watering: Water deeply and less frequently rather than lightly every day—this encourages deep root development. Water at the base of plants (not overhead) to reduce disease risk.
Weeding: Remove weeds before they flower and set seed. Weeds compete for water, nutrients, and light. Hand-pull while roots are young; use a hoe for larger areas.
Deadheading: Removing spent flowers (seed heads forming) redirects the plant’s energy from seed production back to flowering, extending bloom time for annuals significantly.
Official Resources
🎬 Video: The Big Five - Weeding, Pruning, Fertilizing, Mulching, Watering (video) — https://youtu.be/mgviGaoWO1w
Requirement 8b5a4
This is a discussion requirement—prepare to speak to at least four or five clear differences.
| Annuals | Perennials | |
|---|---|---|
| Lifespan | Complete life cycle in one season | Return for 3+ years |
| Cost | Replant every year | Larger upfront cost; pays off over time |
| Bloom period | Often continuous from planting to frost | Typically a defined bloom window each year |
| Flexibility | Easy to change design year to year | More permanent; harder to move once established |
| Establishment | Perform immediately | First year often slow (“sleep, creep, leap”) |
| Maintenance | Deadheading prolongs bloom; remove in fall | Cut back in fall or spring; divide every few years |
| Seed viability | Many self-sow or can be saved | Self-sow less reliably; may need division to renew vigor |
Practical examples help: marigolds (annual) vs. coneflowers (perennial); petunias (annual) vs. daylilies (perennial).
Official Resources
🎬 Video: The Difference Between Annuals and Perennials (video) — https://youtu.be/-jQsd1fNFA8
🎬 Video: Annuals or Perennials? Which Is Best, and How Do I Choose? (video) — https://youtu.be/nbJJMwsp0TM?si=eweSHAYVtUPc8cs4
Req 8b5b — Fruit, Berry, and Nut Crops
This track focuses on woody and semi-woody food plants—fruit trees, berry bushes, grapevines, and nut trees. All four sub-requirements must be completed. Begin planting as early in the season as possible; fruit and nut plants need a full growing season to observe properly.
Requirement 8b5b1
“Suited to your area” means appropriate for your hardiness zone and adapted to your soil and climate. Check with a local nursery or your state extension service for recommended cultivars in your region.
What counts: Five separate individual plants—five apple trees, or a mix such as two apple trees, two blueberry bushes, and one grape vine.
Full care through one season includes:
- Watering (especially critical in the first season while plants establish)
- Fertilizing (follow label rates; young trees often need less than you’d think)
- Mulching around the base (keep away from trunks)
- Monitoring for pests and diseases
- Staking if needed for newly planted trees
Keep a simple log of care activities and observations—your counselor will ask about them.
Requirement 8b5b2
Pruning fruit plants serves distinct purposes from ornamental pruning:
- Fruit trees: Prune to create an open canopy structure that allows light to reach all fruiting wood. Removes crossing branches, water sprouts (upright vigorous shoots), and suckers.
- Berry bushes: Blueberries benefit from removing oldest canes; raspberries and blackberries have specific first- and second-year cane management.
- Grapes: Prune dramatically each dormant season—up to 90% of the previous year’s growth is removed to control the fruiting zone and prevent overcrowding.
Explain to your counselor why each cut you make is necessary—not just where to cut.
Official Resources
🎬 Video: Why You Should Prune Your Shrubs and Trees (video) — https://youtu.be/nZ4Fn1_rVRo
Requirement 8b5b3
Grafting joins the scion (desired fruiting variety) to a rootstock (chosen for vigor, size control, or disease resistance). Nearly all commercial fruit trees are grafted—it’s how nurseries propagate cultivars that won’t come true from seed and how they control tree size.
Why grafting is useful in fruit production:
- Preserves exact genetic characteristics of a named cultivar (e.g., ‘Honeycrisp’ apple)
- Dwarfing rootstocks control tree size, making harvest and management easier
- Some rootstocks confer resistance to soil-borne diseases
- Allows rapid multiplication of a desirable variety
Common beginner grafts to demonstrate:
- Cleft graft: Insert a wedge-cut scion into a split rootstock; good for larger-diameter material
- Whip-and-tongue graft: Interlocking cuts on same-diameter stock and scion; good for pencil-thick material
- Budding (T-bud): Insert a single bud under a flap of bark; used commercially for roses and fruit trees
Secure with grafting tape or strips and protect the union until the scion begins to grow. Document with photos if your graft is attempted before your counselor conference.
Official Resources
🎬 Video: How Plant Grafting Actually Works and Why It's So Cool (video) — https://youtu.be/NN1Y_giTMeE?si=NHHCKRuR32-NH0pa
Requirement 8b5b4
Choose any one crop and describe the steps from harvest to a finished product. You don’t have to process the crop yourself—describe the process accurately.
Examples:
- Pecans: Harvested when husks split open; hulled, dried, and sorted; cracked mechanically or by hand; shelled halves graded and packaged.
- Grapes to raisins: Harvested clusters laid on paper trays; sun-dried 2–4 weeks; mechanically harvested from trays; sorted, washed, dried further to target moisture content; packaged.
- Apples to cider: Washed and sorted; ground into a mash (pomace); pressed to extract juice; juice filtered and pasteurized (or left raw for hard cider fermentation).
Be specific—name the crop and walk through the major processing steps in order.
Official Resources
🎬 Video: How Pecans Are Manufactured | How It's Made (video) — https://youtu.be/EhqW-eZ9Vtg?si=HBV3u_RDnqeAiGbI
🎬 Video: How Are Raisins Made - Sun-Dried or Machine-Made? (video) — https://youtu.be/QfyUcGuc8ww?si=1hEFDzcQt-kf2uBA
Req 8b5c — Woody Ornamentals in the Landscape
This track focuses on trees and shrubs grown for their landscape value—form, foliage, flowers, and ecological contributions. All five sub-requirements must be completed. Start planting as early in the season as possible; woody plants need time to establish and for you to observe them adequately.
Requirement 8b5c1
“Landscape setting” means in-ground in a yard, park, Scout camp, or other outdoor site—not containers. The five plants can be the same species or a mix.
Full care for one season includes:
- Watering regularly, especially in the first season (roots haven’t extended beyond the planting hole yet)
- Mulching to conserve moisture and moderate soil temperature—2–4 inches, pulled back from the trunk
- Monitoring for pests, disease, deer browse, or mechanical damage
- Staking if needed (remove stakes after one season)
- Fertilizing lightly in mid-spring if growth seems slow
Keep notes on each plant: what you planted, where, when, and how they progressed. Your counselor will want to know.
Requirement 8b5c2
For woody ornamentals, pruning serves structural, health, and aesthetic goals:
- Remove the three Ds: dead, damaged, and diseased wood first.
- Then address crossing and rubbing branches that create wounds.
- Finally, shape for structure and form—preferably by thinning (removing entire branches) rather than heading (shortening), which produces unnatural regrowth.
Always cut just outside the branch collar (the swollen ring at the base of a branch). The collar produces chemicals that close the wound; cutting into it removes that protective tissue.
Be prepared to explain each cut you make to your counselor and why it was necessary.
Official Resources
🎬 Video: Ask an Arborist: Why Do I Need to Prune? (video) — https://youtu.be/-RjCGdgF7Jo?si=TFYAJs23hB21ewOn
🎬 Video: Ask an Arborist: What Are the Rules of Pruning? (video) — https://youtu.be/O1UBV35JAxI?si=v9bsuqKs9l5Tdjj8
🎬 Video: Ask an Arborist: The ABC's of Pruning (video) — https://youtu.be/IQhmIK-0HOc?si=owIKfbXa8G-lcX1q
Requirement 8b5c3
Your list must be trees you haven’t already discussed in req 6. For each entry, note its primary landscape use—shade, screening, specimen focal point, street tree, wildlife value, seasonal color, etc.
Format your list like this:
| Common Name | Scientific Name | Primary Landscape Use |
|---|---|---|
| Serviceberry | Amelanchier canadensis | Small ornamental; spring flowers, bird-attracting fruit |
| Japanese maple | Acer palmatum | Specimen focal point; fall color, fine texture |
| Eastern redbud | Cercis canadensis | Spring-flowering understory; native |
Spend time at a nursery or arboretum to observe real specimens—you’ll give a much richer description than if you rely only on reference books.
Official Resources
🎬 Video: 10 Most Popular Ornamental Trees for Your Garden (video) — https://youtu.be/pTcQTifb6lI?si=JzJ9j6xsPbckdtjW
Requirement 8b5c4
For each of the 10 trees from 8b5c3, you should be able to describe:
- Size: Mature height × spread (e.g., 20–25 ft tall, 15–20 ft wide)
- Texture: Fine (small leaves, delicate branching), medium, or coarse
- Color: Bark color, summer foliage color, fall color
- Flowers: Color, time of bloom, fragrance if notable
- Leaves: Shape, margin, arrangement (opposite vs. alternate); deciduous or evergreen
- Fruit: Type (berry, capsule, samara, acorn), ornamental or wildlife value
- Hardiness: USDA zone range
- Cultural requirements: Sun, moisture, soil pH preference, drainage needs
- Special characteristics: Anything that makes it stand out—fragrance, multi-season interest, drought tolerance, native status, invasive concerns
You can use a plant database, nursery catalog, or the USDA Plants Database to gather this information—but practice describing it out loud before your conference.
Requirement 8b5c5
Be specific and ready to explain each:
- Carbon sequestration: Trees absorb CO₂ during photosynthesis and store carbon in their wood, helping offset greenhouse gas emissions.
- Air quality improvement: Leaves filter particulate matter and absorb pollutants including ozone, sulfur dioxide, and nitrogen dioxide.
- Urban heat island reduction: Tree canopy shades surfaces and releases water vapor through transpiration, cooling air temperatures by several degrees.
- Stormwater management: Root systems and leaf litter increase soil permeability and slow runoff, reducing flooding and erosion.
- Wildlife habitat: Trees provide nesting sites, food (fruit, seeds, insects), and cover for birds, mammals, and pollinators.
Bonus talking point: trees also reduce energy costs by shading buildings in summer and blocking wind in winter.
Official Resources
🎬 Video: The Importance of Trees for Our Environment and Health (video) — https://youtu.be/E6VvooVLgq4?si=wpybhPMXwOSnZ8y5
Req 8b5d — Home Gardening for People and Wildlife
This track creates a designed mixed garden that serves both human enjoyment and wildlife habitat. All four sub-requirements must be completed—they build on each other from design through ongoing care and ecological awareness. Begin planning before the season starts so you’re ready to plant as soon as conditions allow.
Requirement 8b5d1
The design phase is as important as the planting. Before putting a single plant in the ground:
- Observe the site: How many hours of sun does it receive? What is the drainage like? What is the soil texture?
- Sketch a plan: Draw the 10×10-foot area to scale. Mark where each plant will go, considering mature size, height layering (tall plants at back/center, shorter at front/edges), and color combinations.
- Select plants: Choose a mix of types suited to your site and zone. Mix annuals for immediate color with perennials for long-term structure.
- Prepare the soil: Test pH if possible; amend with compost; remove existing grass or weeds.
Keep your design sketch—your counselor will want to see that you planned before planting.
Official Resources
🎬 Video: How to Design the Perfect Landscape | Landscape Design 101 (video) — https://youtu.be/e-wO-LqEQb4?si=_RjhdI1Bh7eIlgd-
Requirement 8b5d2
Ten different types—not just 10 individual plants. Aim for variety in function, form, and season of interest.
When your counselor asks why you selected particular varieties, connect your choices to observable criteria: this tomato variety resists blight; this zinnia tolerates heat and drought; this native coneflower attracts pollinators and provides winter seed for birds.
Taking care for one season means active, ongoing attention—not just planting and walking away. Document your activities in a simple log: what you did, when, and what you observed.
Official Resources
Caring for a Vegetable Garden | HowStuffWorks (website) Practical overview of the full range of garden maintenance tasks from watering and fertilizing to pest management and end-of-season cleanup. Link: Caring for a Vegetable Garden | HowStuffWorks (website) — https://home.howstuffworks.com/caring-for-a-vegetable-garden.htmRequirement 8b5d3
Nine techniques must be demonstrated. Here is what to know about each and why it matters:
Soil preparation: Loosen compacted soil; add compost to improve structure and fertility. Prepared soil allows roots to penetrate easily and water to drain properly.
Staking: Support tall, top-heavy, or climbing plants (tomatoes, dahlias, tall perennials) to prevent wind damage and keep fruit off the ground.
Watering: Deep, infrequent watering encourages deep root growth. Watering at the base reduces fungal disease. Drought stress causes wilting, reduced yield, and increased pest susceptibility.
Weeding: Weeds compete for water, light, and nutrients—remove before they set seed. Hand-pull when soil is moist; use a hoe on dry, loose soil.
Mulching: 2–3 inches of organic mulch conserves moisture, moderates soil temperature, suppresses weeds, and adds organic matter as it breaks down.
Composting: Recycling plant material into compost reduces waste and creates a free soil amendment rich in nutrients and beneficial microorganisms.
Fertilizing: Replenishes nutrients that plants consume and rain leaches away. Match fertilizer type to plant needs (nitrogen for leafy growth, phosphorus for roots and flowers, potassium for overall vigor).
Pest management: Identify the pest before treating. Integrated pest management (IPM) uses the least-harmful effective control first—physical removal, barriers, beneficial insects, then targeted pesticides as a last resort.
Pruning: Removing dead or diseased tissue, shaping plants, or pinching back growth to direct energy where it’s needed (e.g., pinching basil tips to prevent bolting and promote leafy growth).
Official Resources
🎬 Video: Remove Weeds Using These Effective Methods | Gardening 101 (video) — https://youtu.be/3zNij-aGpVw?si=_alv-L6QxChk5Ukk
🎬 Video: How to Mulch Your Garden: A Step-by-Step Guide (video) — https://youtu.be/gy6q5f75O7k?si=HJltpHrtGxdpt2i_
🎬 Video: Composting For Beginners (video) — https://youtu.be/1LZzgi1k9aA?si=8UAYVwjNPRBB90g5
Requirement 8b5d4
Four types of habitat improvements (be specific, not just general categories):
- Food sources: Native plants with berries, seeds, or nectar (coneflower, serviceberry, native grasses); supplemental feeders stocked with appropriate seeds.
- Water: A birdbath, small pond, or shallow dish kept clean and fresh—especially important in dry seasons.
- Shelter and nesting sites: Dense shrubs, brush piles, snag trees (standing dead wood), or nest boxes sized for target species.
- Reduced pesticide use: Avoiding broad-spectrum insecticides protects insect food sources for birds and preserves pollinators critical to the entire food web.
For your native plant list: Use resources specific to your region—state extension service, native plant societies, or the Audubon Native Plants database. For each plant provide:
| Common Name | Scientific Name |
|---|---|
| Purple coneflower | Echinacea purpurea |
| Black-eyed Susan | Rudbeckia hirta |
The plants should be genuinely native to your area—not just plants that happen to be sold at a nursery.
Official Resources
Get to Know These 20 Common Types of Native Plants (website) Audubon's illustrated guide to widely available native plants, including their wildlife value—a good starting point for building your list of 10 regionally appropriate species. Link: Get to Know These 20 Common Types of Native Plants (website) — https://www.audubon.org/news/get-know-these-20-common-types-native-plants Native Plant Recommendations | United States Botanic Garden (website) The U.S. Botanic Garden's regionally organized recommendations for native plants that support pollinators, birds, and other wildlife. Link: Native Plant Recommendations | United States Botanic Garden (website) — https://www.usbg.gov/native-plant-recommendationsReq 8c — Option C: Field Botany
Field Botany takes you out of the garden and into the natural world. You will visit natural areas, identify native and exotic plants, use dichotomous keys, press voucher specimens, research rare plants, and conduct a structured field study. Every sub-requirement must be completed—this is not a pick-one option like Req 8 itself.
What You’ll Complete
- Req 8c1 — Observing a Natural Area: Visit a park, forest, or Scout camp and observe how dominant plants, shade, and environmental factors shape what grows where.
- Req 8c2 — Native vs. Exotic Plants: Select a 100×100-foot study site, list 10 woody and 10 non-woody plants, and determine which are native versus exotic.
- Req 8c3 — Identification Keys and Scientific Names: Use a dichotomous key to identify 10 plants and explain why scientific names matter more than common names.
- Req 8c4 — Pressing and Mounting Specimens: Collect, press, mount, and label 10 plants and explain the value of herbarium voucher specimens.
- Req 8c5 — Rare Plants: Research your state’s rare plant list, learn what protections are in place, and write a paragraph about one species.
- Req 8c6 — Field Study Method (Choose One): Complete all requirements in exactly one of five structured field methods: Tree Inventory, Transect Study, Nested Plot, Herbarium Visit, or Plant Conservation Organization Visit.
Preparing for the Option
Start early: requirements 8c1–8c5 require visits to natural areas, and 8c4 (pressing specimens) needs lead time—pressed plants take 1–2 weeks to dry completely. Coordinate with your counselor before collecting any plants to confirm which species may be collected on the property you intend to use.
A field notebook is your most important tool throughout this option. Record dates, locations (GPS coordinates or clear descriptions), weather conditions, and everything you observe—your counselor will expect to discuss your field notes.
Req 8c1 — Observing a Natural Area
All three sub-requirements (a, b, c) are completed on the same visit—or a series of visits to the same site. Go prepared: bring a field notebook, pencil, and a regional plant field guide or plant ID app. Take photos to jog your memory later, but write observations down on the spot too. You cannot reconstruct what you didn’t record.
Requirement 8c1a
Largest means greatest physical size—height, canopy spread, or trunk diameter for trees; overall mass for shrubs and ground cover. The largest plant on your site is usually a single dominant individual. The most abundant is the species whose individuals you see most often—it may be far smaller than the biggest tree.
Walk the site in a systematic pattern (e.g., a grid or concentric circles) so you don’t just notice the most obvious plants at the entrance. In a forest, the tallest trees almost certainly form the canopy layer and cast the most shade. The question is whether that shade changes what grows underneath. Note:
- Which canopy trees let in dappled light vs. deep shade
- Whether shade-tolerant species (ferns, wild ginger, trillium) cluster under the dense canopy
- Whether sun-loving species (grasses, wildflowers) appear in gaps, edges, or openings
Record species names (even if provisional), relative abundance (dominant, common, occasional, rare), and whether each species appears to be a light demander or shade tolerant.
Requirement 8c1b
This requirement is research-based—you gather information from outside sources and then connect it to what you saw on the ground. Work through each factor:
Latitude and climate: Your latitude determines day length and average temperature range across the year—these set the basic plant hardiness zone. Check the USDA Plant Hardiness Zone Map for your county.
Air and soil temperature: Minimum winter temperatures limit which species can survive. Soil temperature in spring controls when seeds germinate and when roots become active.
Soil type and pH: Sandy soils drain fast and stay dry; clay soils compact and hold water. Acidic soils (pH < 6) favor heaths, oaks, and pines; neutral to alkaline soils favor many garden vegetables and grasses. Soil survey data for your county is available free from the NRCS Web Soil Survey (websoilsurvey.sc.egov.usda.gov).
Geology: Limestone bedrock produces alkaline soils; granite produces acidic soils. Serpentine (ultramafic) rock produces soils toxic to most plants but supportive of specialized endemic flora.
Hydrology: Where water flows, pools, or drains affects which plants survive. Wetland species tolerate flooded soils; upland species cannot.
Topography: South-facing slopes receive more sun and are warmer/drier; north-facing slopes are cooler and moister. Hilltops are windier and drier; valleys accumulate cold air and frost.
Write your description as a paragraph (or organized list) that links each factor to your specific site and explains how it contributes to the plant community you observed.
Official Resources
Environmental Factors Affecting Plant Growth (website) Oregon State Extension's overview of the key abiotic factors—light, temperature, water, soil, and more—that determine which plants succeed in a given location. Link: Environmental Factors Affecting Plant Growth (website) — https://extension.oregonstate.edu/gardening/techniques/environmental-factors-affecting-plant-growthRequirement 8c1c
These are all edge or disturbance habitats—places where conditions differ from the undisturbed interior. They typically host different species than the core habitat because:
- Forest edges receive more sunlight, wind, and temperature fluctuation than the interior. Look for brambles (blackberry, raspberry), young trees of edge-tolerant species (box elder, eastern red cedar), and invasive shrubs like Japanese barberry or multiflora rose.
- Near water (stream banks, pond margins): expect moisture-loving species—willows, alders, sedges, rushes, touch-me-nots, and native ferns. Soil is often saturated seasonally.
- Burned areas: fire-adapted and early-successional species colonize quickly—fireweed (Epilobium angustifolium), native grasses, and nitrogen-fixing plants like clover. Look for patterns based on fire intensity (hotter areas may still be bare; cooler margins show vigorous regrowth).
- Roadsides and railroads: These corridors spread exotic invasive species—garlic mustard, Queen Anne’s lace, chicory, purple loosestrife. Salt, compaction, and mowing also shape what survives here.
For your field notebook, record the specific location (edge of the trail near the creek, burned patch in the southwest corner), the plants you observed, and what you think explains their presence there.
Req 8c2 — Surveying a Study Site
Choosing and Surveying Your Site
The site must be at least 100×100 feet (10,000 sq ft)—roughly the footprint of a small city block. It can overlap with the area you used in Req 8c1, or it can be a different location. Walk the site thoroughly before settling on your list; the first 10 plants you spot may not represent the full diversity present.
Woody plants have stems that persist and harden year to year: trees and shrubs. You only need 10 species, but try to include a range of sizes and forms—a canopy tree, a mid-story tree, a large shrub, and a low shrub if all are present on your site.
Non-woody plants (also called herbaceous plants) include wildflowers, grasses, sedges, ferns, mosses, vines without woody stems, and aquatic plants. These die back above ground at the end of the growing season (in temperate regions). Aim for diversity: don’t list 10 species of the same genus.
Documenting your list: For each plant, record:
- Provisional common name and scientific name (look it up if you don’t know it)
- Where on the site you found it
- Native or exotic status (see below)
Determining Native vs. Exotic Status
A plant is native to your region if it was present before European colonization and arrived through natural processes—not human introduction. A plant is exotic (non-native, alien, or introduced) if it was brought to the region by humans, intentionally or accidentally.
To determine status for each plant on your list:
- iNaturalist: Search the species and look at the “About” tab, which notes native range.
- USDA Plants Database (plants.usda.gov): Search by scientific name and check the “Native Status” field for your state.
- State native plant society: Most states publish native plant checklists.
- Go Botany (gobotany.nativeplanttrust.org): Excellent for New England, with clear native/introduced flags.
Note: “Native to North America” is not the same as native to your state. Use regional sources.
Common Patterns to Watch For
In many suburban and disturbed natural areas, you’ll find a mix: native oaks, maples, or pines dominating the canopy, with exotic invasive shrubs (Japanese barberry, autumn olive, multiflora rose, burning bush) filling the understory. Ground cover may be dominated by exotic grasses or garlic mustard. Recognizing this pattern—and knowing why it happens—is the point of this requirement.
Official Resources
🎬 Video: Native Plants vs Exotic Plants | Which Are More Beneficial to the Ecosystem (video) — https://youtu.be/Af80dnhp2QY
Req 8c3 — Using Plant Identification Keys
An identification key is a step-by-step tool that helps you narrow down a plant by choosing between paired statements. Instead of guessing from one picture, you work through observable features such as leaf arrangement, flower shape, stem type, or fruit structure until only one answer fits.
How a Key Works
Most plant keys are dichotomous, which means each step gives you two choices. For example:
- leaves opposite each other on the stem
- leaves alternate along the stem
Your choice sends you to the next pair of statements until you reach a name.
The key only works when you observe carefully. If you rush the first few steps, the rest of the result is usually wrong.
Using a Simple Plant Key
Slow, accurate observation beats quick guessing- Start with a fresh, complete specimen when possible.
- Read both choices before picking one.
- Look at more than one leaf, flower, or stem part.
- Use a hand lens if tiny structures matter.
- Write down the path you followed so you can explain your identification.
Common Names vs. Scientific Names
A common name is the everyday name people use, such as black-eyed Susan or red maple. Common names are easy to remember, but they can be confusing because different places may use different names for the same plant.
A scientific name is the standardized two-part name used worldwide, such as Rudbeckia hirta or Acer rubrum. Scientific names matter because they point to one specific species, no matter what language or region you are in.
Why Scientific Names Matter
Botanists, land managers, and conservation workers need to know exactly which plant they are discussing. If one person says “cedar” and another person thinks of a different tree, communication breaks down. Scientific names reduce that confusion.
Official Resources
🎬 Video: Scientific vs Common Names (video) — https://youtu.be/WVaxMwcPVEY
🎬 Video: How to Key Out a Plant (video) — https://youtu.be/AAx3ZsNfoIM?si=3DATJ-glDsjVHJjM
Req 8c4 — Pressing and Mounting Specimens
A pressed plant specimen is more than a souvenir. It is a record of what was found, where it was found, and when it was collected. That is why botanists call well-documented specimens voucher specimens—they support later study and prove that an identification was made from a real plant.
Basic Specimen Workflow
From Field to Mounted Specimen
Build a set your counselor can review clearly- Collect a representative piece that shows important features.
- Write down location, date, habitat, and collector name immediately.
- Arrange the plant flat in newspaper or blotting paper.
- Put it in a press or under steady weight so it dries evenly.
- Mount the dried specimen on sturdy paper.
- Add a label with the common name, scientific name, location, date, and notes.
What Makes a Good Voucher Specimen
A good specimen shows the traits someone would need to identify it again later. Flowers, fruits, leaf arrangement, and stem details are especially helpful. A crushed leaf without a label is not a useful voucher.
Voucher specimens matter because they let other people verify what was found. They also become part of long-term records used in conservation, ecology, and range mapping. A specimen collected decades ago can still help scientists understand what used to grow in a place.
Official Resources
🎬 Video: Pressing Plants for Herbarium Study (video) — https://youtu.be/zEevM61u4Ew
Req 8c5 — Rare Plants and Conservation
Rare plants are often rare for a reason: they may need unusual soil, a narrow climate range, a special pollinator, or a habitat that has mostly disappeared. This requirement asks you to move from field observation into conservation work.
What to Look For
Start by finding your state’s official rare-plant list or a trusted conservation source. Then learn:
- which species are listed as threatened, endangered, or of special concern
- what habitats those plants need
- what threats they face
- what agencies or groups are working to protect them
Common threats include habitat loss, invasive plants, drainage changes, off-trail damage, and illegal collecting.
What Protection Can Look Like
Protection is not just “make a rule.” It may include nature preserves, conservation easements, seed banking, controlled burns, invasive-species removal, restoration planting, careful monitoring, and education for visitors.
Official Resources
Rare Plant Profiles (website) U.S. Forest Service profiles that show what some rare plants look like, where they grow, and why they need protection. Link: Rare Plant Profiles (website) — https://www.fs.usda.gov/wildflowers/Rare_Plants/profiles/index.php Find Rare Plants Near You (website) Conservation resource that helps you locate regional rare-plant information and connect with plant-protection efforts near you. Link: Find Rare Plants Near You (website) — https://saveplants.org/rare-plants-near-me/Req 8c6 — Choose a Field Botany Project
You must choose exactly one project. Each option teaches field botany in a different way, so pick the project that best matches your access, skill level, and time.
Your Options
- Req 8c6a — Tree Inventory: Identify trees, document them with specimens, measure size, and teach others how to use a key.
- Req 8c6b — Transect Study: Compare two plant communities along long straight study lines and graph the results.
- Req 8c6c — Nested Plot Study: Use large, medium, and small plots to compare plant layers at two sites.
- Req 8c6d — Visiting an Herbarium: Study how plant collections are stored, organized, and used by researchers.
- Req 8c6e — Visiting a Plant Conservation Organization: Learn directly from people protecting rare plants and natural areas.
How to Choose
| Option | Best if you want to… | Best if you have access to… |
|---|---|---|
| Tree Inventory | focus on trees and teaching identification | neighborhoods, parks, or camps with many trees |
| Transect Study | collect field data and make graphs | two long study areas with different plant communities |
| Nested Plot Study | compare vegetation layers in detail | sites where you can mark and measure plots |
| Herbarium Visit | learn indoor research methods | a university, botanical garden, or online herbarium |
| Conservation Visit | see real protection work in action | a nature agency or conservation group nearby |
Req 8c6a — Tree Inventory
A tree inventory is part field survey, part identification exercise, and part record keeping. You will build a list of the trees in one defined area and document enough detail that someone else could understand what grows there.
Requirement 8c6a1
Choose one area and stay consistent. Walk it carefully and make provisional identifications as you go. Look at leaves, bark, buds, branching pattern, fruit, and overall shape. In winter, twigs and buds matter more than leaves.
Official Resources
🎬 Video: How to Use Twigs to Identify Trees (video) — https://youtu.be/X2TDSiaqfbQ?si=h0rb2-D_5zUSTcgN
Requirement 8c6a2
Collect only what you are allowed to take, and only enough to document the tree. A labeled sample helps support your inventory later when you explain how you made your identifications.
Requirement 8c6a3
Diameter at 4½ feet above ground is called diameter at breast height, or DBH. This standard measurement lets foresters and botanists compare trees consistently. Record the number of individuals for each species and note the largest example you found.
Requirement 8c6a4
Teaching is part of this project. When you show other people how to use a key, slow down and explain each choice. The goal is not just to get an answer but to show how the process works.
Req 8c6b — Transect Study
A transect study helps you compare two plant communities in a structured way. Instead of wandering and taking random notes, you study what happens along a defined line and record the plants close to it.
What You’ll Complete
- Req 8c6b1 — Choosing Two Transect Sites: Pick two places to compare, making sure at least one differs from your earlier site.
- Req 8c6b2 — Running a Transect: Lay out transects at least 500 feet long in two different plant communities.
- Req 8c6b3 — Recording and Graphing Transect Data: Record soil and site factors, identify nearby trees, measure them, and turn your observations into a graph or chart.
Why This Method Matters
Transects help botanists notice patterns that casual walks can miss. They are especially useful when you want to compare edges, slopes, wet and dry areas, or disturbed and undisturbed ground.
Req 8c6b1 — Choosing Two Transect Sites
The best transect study compares sites that are clearly different. Good examples include forest edge versus forest interior, dry slope versus streamside ground, or mowed field versus native meadow.
Choose sites that are safe to access and long enough for a 500-foot transect. Before you commit, walk both areas and ask yourself whether the vegetation really changes from one place to the other.
Req 8c6b2 — Running a Transect
A transect is a measured line laid across a habitat so you can sample what occurs along it in a repeatable way. The point is not to study everything everywhere. The point is to study one line carefully enough that you can compare two places fairly.
How to Set Up a Transect
Transect Basics
Keep your method simple and repeatable- Mark a straight line at least 500 feet long.
- Keep the line placement consistent with your study goal.
- Record the start and end points clearly.
- Use the same method at both sites.
- Decide in advance how you will record trees near the line.
You might use a tape measure, marked rope, or mapping app. What matters most is that you can explain the setup and repeat it if needed.
Official Resources
🎬 Video: Weekly Science Challenge #5: Create a Transect (video) — https://youtu.be/hbhR8hgFqG0?si=nlHaeSRLkK4NzRFs
Req 8c6b3 — Recording and Graphing Transect Data
This is the data page for your transect study. Begin by recording the conditions that may explain plant-community differences: soil moisture, texture, slope, shade, recent disturbance, nearby water, and anything else that changes how plants grow at the two sites.
Requirement 8c6b3a
Work steadily down the full transect and look 10 feet to each side. Use the same width the whole way so your study stays fair. List each tree by common and scientific name if you can. If you are unsure in the field, make a careful note and verify the name later.
Requirement 8c6b3b
Measure diameter at breast height the same way for every tree. Then map each tree along the transect so you can compare spacing, species mix, and size patterns between the two sites. Your map does not need to be artistic. It needs to be clear and consistent.
Turning the Results Into a Graph or Chart
A bar graph can compare the number of trees by species. A table can compare species, counts, and average diameter. A simple map can show where trees cluster. Choose the format that makes the comparison easiest to explain to your counselor.
Req 8c6c — Nested Plot Study
A nested plot study compares vegetation at more than one scale. Instead of looking only at big trees or only at tiny ground plants, you study large, medium, and small plots inside one another.
What You’ll Complete
- Req 8c6c1 — Choosing Two Nested Plot Sites: Select two sites, with at least one different from your earlier field-botany location.
- Req 8c6c2 — Marking Off Nested Plots: Lay out nested study plots in two different plant communities.
- Req 8c6c3 — Recording a Nested Plot Inventory: Measure trees in a large plot, count trees and shrubs in a smaller plot, and examine ground-layer plants in the smallest plot.
This method is useful when you want to compare canopy, shrub, and ground layers in a structured way.
Req 8c6c1 — Choosing Two Nested Plot Sites
Choose two sites where the plant communities are different enough to compare. You might compare a wetter site to a drier one, a shaded site to a sunny one, or a disturbed site to a more natural one.
Because this method uses large and small plots together, make sure both sites are big enough and safe enough to mark clearly.
Req 8c6c2 — Marking Off Nested Plots
A nested plot places a smaller study area inside a larger one so you can compare different vegetation layers using a consistent layout. In this project, the largest plot is for trees, the middle plot is for trees and shrubs, and the smallest plot is for the ground layer.
Use stakes, flagging, measuring tape, or other clear markers. Label the corners so you know exactly where each plot begins and ends.
Req 8c6c3 — Recording a Nested Plot Inventory
This page is where the nested-plot method becomes real data. Start by writing down site conditions such as slope, moisture, shade, soil texture, disturbance, and anything else that helps explain why one site differs from the other.
Requirement 8c6c3a
The largest plot captures the canopy layer. Map each tree in a simple way so you can see spacing and species patterns. Measure diameter at breast height the same way for every qualifying tree.
Requirement 8c6c3b
This smaller plot focuses on the understory. Count individuals carefully and use the same plot size and method at both sites so your comparison stays fair.
Official Resources
🎬 Video: Tree Identification | Ask the Arborist (video) — https://youtu.be/7M4PUM_eIIQ
Requirement 8c6c3c
The smallest plot shows the ground layer in detail. Some plants can be counted as individuals. Others, like mosses or dense grasses, are better recorded by estimated cover. Use the same approach at both sites and explain how you made your estimates.
Turning Results Into a Chart
A bar graph works well if you want to compare numbers of species or individuals. A simple table works well if you want to compare tree counts, shrub counts, and ground-layer cover side by side. Choose the format that makes your results easiest to explain.
Req 8c6d — Visiting an Herbarium
An herbarium is a library of preserved plants. Instead of books, it stores labeled specimens that researchers can study for decades or even centuries. This option is a strong choice if you want to see how plant records support science.
Requirement 8c6d1
If you visit in person, contact the herbarium ahead of time. These are research collections, not always open-drop-in museums. If you use an online herbarium, take careful notes on what the collection includes and how the specimens are presented.
Official Resources
🎬 Video: What Is a Herbarium? The Scientific and Historical Treasures of the Cambridge University Herbarium (video) — https://youtu.be/wQkEYZAlnGw?si=LnLjPuh2pyMQpdAF
Requirement 8c6d2
Specimens are usually arranged by plant family, genus, and species so related plants stay together. Researchers use them to verify identifications, map where species have been found, study change over time, and compare older records to current populations.
Requirement 8c6d3
Voucher specimens are dried, mounted on archival paper, labeled carefully, and stored in cabinets that protect them from moisture, light, and pests. Handle them gently, keep them supported, and avoid touching brittle plant parts more than necessary.
Official Resources
🎬 Video: Pressing Plants for Herbarium Study (video) — https://youtu.be/zEevM61u4Ew
Requirement 8c6d4
Common tools include hand lenses, microscopes, forceps, mounting supplies, taxonomic keys, floras, maps, and digital databases. Modern herbaria also use scanners and imaging systems so specimens can be studied online.
Official Resources
🎬 Video: How Herbarium Specimens Are Prepared at the Cambridge University Herbarium (video) — https://youtu.be/fpfmfTZV4G4?si=W6olcrOUEL6u1VTA
Req 8c6e — Visiting a Plant Conservation Organization
This option connects plant science to real conservation work. Instead of studying specimens or plots alone, you learn from people whose job is protecting habitats and rare plant populations.
Requirement 8c6e1
Start with state natural heritage programs, botanical gardens, land trusts, native plant societies, or park agencies. Write ahead, explain that you are working on Plant Science merit badge, and ask whether someone can talk with you about plant-protection work.
Requirement 8c6e2
Activities may include field surveys, seed banking, restoration planting, land management, invasive-species control, monitoring rare populations, education, and policy work. Listen for how the organization balances science, public access, and long-term stewardship.
Requirement 8c6e3
Plant protection often means active management, not just leaving land alone. Controlled burns can restore fire-adapted habitats. Invasive-plant removal can reopen space for native species. Trail design, erosion control, and visitor education also protect sensitive areas.
Req 9 — Outdoor Ethics in Plant Science
Plant science puts you in places where a careless step can crush seedlings, spread invasive seeds, or damage habitat that took years to grow. Outdoor ethics matter here because the plants you study are often rooted in one place. They cannot move away from your impact.
Leave No Trace and Plant Science
Every Leave No Trace principle applies, but a few matter especially strongly for this badge:
- Plan ahead and prepare so you know where collecting is allowed and where sensitive areas should be avoided.
- Travel and camp on durable surfaces so you do not trample rare plants or compact fragile soil.
- Leave what you find except where you have permission to collect common specimens for the badge.
- Respect wildlife because plants and animals are connected through food webs, pollination, and habitat.
- Be considerate of others so everyone can enjoy and study natural places.
The Outdoor Code adds the Scout attitude behind those actions: be clean in your outdoor manners, be careful with fire, be considerate in the outdoors, and be conservation-minded.
What This Looks Like in Real Life
During field observation, good ethics can mean staying on trail when a site is fragile, brushing seeds off your boots before leaving, or taking photos instead of specimens when a plant is uncommon.
During specimen collection, it means getting permission first, collecting only common plants, taking only what you need, and leaving the population healthy.
During identification, it means handling living plants gently and not breaking branches or digging plants up just to get a better look.
Official Resources
Leave No Trace Basics (video) Short overview of the core Leave No Trace ideas that help you protect habitats while observing and studying plants outdoors. Link: Leave No Trace Basics (video) — https://vimeo.com/1115216743/63b20c0b33?share=copy🎬 Video: Leave No Trace Outdoor Ethics (video) — https://www.youtube.com/watch?v=jXO1uY0MvmQ
Extended Learning
Congratulations
You have worked through plant anatomy, pollination, soils, propagation, field observation, and real-world plant projects. That already makes you more observant than most people walking through a forest, field, or garden. The next step is not just learning more facts—it is learning how plants shape entire ecosystems and human lives.
How Plants Build Whole Communities
It is easy to think of a plant as a single organism rooted in one place. In reality, plants build habitats. A stand of native grasses changes soil temperature, insect life, and bird nesting behavior. A grove of trees changes light, moisture, and wind. Wetland plants slow water and trap sediment. The best plant scientists learn to ask not only “What is this plant?” but also “What happens because this plant is here?”
One way to deepen this skill is to revisit the same place in more than one season. Spring wildflowers, summer grasses, autumn seed heads, and winter buds all tell different stories about the same site.
Native Plant Restoration
Native plant restoration is one of the most practical ways to use plant science. Restoration projects try to rebuild healthier ecosystems by removing invasive species, restoring soil and water conditions, and replanting native species that belong in the area.
Good restoration is not just “planting something green.” It means choosing species that fit the site, support local pollinators, and work together over time. Even a small schoolyard, church lawn, or backyard strip can become a restoration project if it replaces low-value turf with regionally appropriate native plants.
Food Systems and Crop Science
If the badge pulled you toward agronomy or horticulture, keep following the food side of plant science. Ask where your food comes from, what crops dominate your state, how soil health affects farming, and how water limits production. The path from seed to meal passes through weather, pests, machinery, economics, and conservation.
A great next challenge is to compare two production systems—for example, conventional corn versus a cover-crop rotation, or a home garden versus a greenhouse operation. The more comparisons you make, the more clearly you will see how plant science connects to human choices.
Real-World Experiences
Visit a Native Plant Nursery
A native nursery can teach you how local species are propagated, sold, and used in restoration or landscaping. Ask which plants are easiest for beginners and which ones support pollinators best.
Join a Bioblitz or Plant Survey
Many parks, preserves, and conservation groups host events where volunteers help document the species on a site. This is a fun way to practice identification while contributing useful records.
Help With a Community Garden
Community gardens show how horticulture, soils, water, and teamwork all come together. They also give you repeated observation over a whole growing season.
Visit a University Herbarium or Botanic Garden
If you liked the field botany side of the badge, spend more time in a collection or research setting. A herbarium helps you think like a scientist; a botanic garden helps you compare plants from many habitats in one place.
Organizations
United States Botanic Garden
One of the country’s leading public plant-science institutions, with educational resources and plant collections.
Lady Bird Johnson Wildflower Center
A major center for native plant education, restoration, and conservation in the United States.
Native Plant Trust
Offers plant identification resources, conservation work, and regional education, especially useful for field botany.
https://www.nativeplanttrust.org/
USDA Natural Resources Conservation Service
Strong source for soils, plant materials, and conservation practice information.
Xerces Society
Well known for pollinator conservation and habitat restoration resources that connect directly to plant choice.