Plumbing Merit Badge — Complete Digital Resource Guide
https://merit-badge.university/merit-badges/plumbing/guide/
Introduction & Overview
Turn on a faucet and clean water appears. Flush a toilet and waste disappears. Most people never think about the pipes, vents, valves, and fittings that make that happen until something leaks, clogs, or stops working. Plumbing is the hidden system that keeps homes healthy, safe, and comfortable every single day.
The Plumbing merit badge gives you a look behind the walls. You will learn how water gets into a house, how wastewater leaves, how plumbers use specialized tools, and why good plumbing protects families from contamination, water damage, and disease. This badge mixes science, skilled trades, and hands-on problem solving.
Then and Now
Then
For most of human history, plumbing was simple and often unsafe. People hauled water by hand from wells, springs, or public pumps. Waste sometimes drained into open ditches, pits, or nearby waterways. Cities that grew quickly often suffered outbreaks of diseases such as cholera and typhoid because clean water and sewage were too close together.
Ancient civilizations did build impressive plumbing. The Romans used aqueducts, lead and clay pipes, public baths, and sewers. But even advanced systems were uneven, expensive, and not available to everyone. Modern plumbing only became widespread when cities began investing in safer water treatment, better sewer systems, and plumbing codes that required cleaner, more reliable installations.
Now
Today, plumbing is a health system as much as a convenience system. Water treatment plants clean drinking water before it reaches your home. Inside the house, pipes, shutoff valves, traps, vents, and fixtures work together to deliver water where you need it and carry waste away without letting sewer gases back in.
Modern plumbers also think about efficiency and sustainability. Low-flow fixtures, leak detection, insulated piping, and better materials help save water, reduce energy use, and prevent costly repairs. A well-designed plumbing system is easy to overlook because it quietly does its job every day.
Get Ready!
You do not need to become a licensed plumber to enjoy this badge. Bring curiosity, patience, and a willingness to look closely at how everyday systems work. By the end, you will notice plumbing details in homes, stores, and public buildings that most people walk past without ever seeing.
Kinds of Plumbing
Plumbing is not just one thing. Most building systems combine several different kinds of work.
Water Supply Plumbing
This part of the system brings clean water into a building and sends it to sinks, showers, toilets, dishwashers, water heaters, and outdoor spigots. Water supply lines have to hold pressure, resist leaks, and use safe materials that will not contaminate the water.
Drain, Waste, and Vent Plumbing
Drain, waste, and vent piping is often shortened to DWV. These pipes do not work under pressure like supply lines. Instead, they rely on gravity, proper slope, and venting to carry wastewater away while keeping sewer gases out of the living space.
Fixture and Appliance Plumbing
Fixtures are the parts people actually use: faucets, toilets, sinks, tubs, showers, water fountains, and more. Appliances such as water heaters, washing machines, and dishwashers also connect to the plumbing system. Good fixture work means safe connections, easy maintenance, and reliable shutoff points.
Service and Repair Plumbing
This is the problem-solving side of the trade. Service plumbers clear clogs, replace traps, repair leaks, install new fixtures, diagnose low water pressure, and track down hidden problems. They need both tool skills and detective skills.
Green Plumbing
Modern plumbers also help conserve water and energy. They install efficient fixtures, improve hot-water delivery, reduce leaks, and help homeowners choose materials and layouts that waste less water. Plumbing is one of the trades that directly affects both public health and environmental stewardship.
Now that you know why plumbing matters, start with the basics: how good plumbing protects people, what the rules are, and how to stay safe while doing repairs.
Req 1 — Healthy Plumbing Habits
This requirement builds your foundation for the whole badge. Before you cut pipe or replace a faucet, you need to understand why plumbing matters, what local rules are trying to prevent, and how to work without hurting yourself or damaging the home.
- Req 1a explains how plumbing protects health and safety.
- Req 1b points you toward local plumbing rules and what they are designed to prevent.
- Req 1c covers the repair safety habits you should use every time.
Requirement 1a
A good plumbing system does much more than move water around. It protects people from germs, contaminated drinking water, sewer gas, hidden leaks, mold, and burns from water that is too hot.
First, plumbing delivers clean water for drinking, cooking, bathing, and washing hands. If the supply system is damaged or connected incorrectly, dirty water can flow backward into clean-water pipes. That is why plumbers care so much about shutoff valves, approved materials, and backflow protection.
Second, plumbing removes wastewater and sewage safely. Toilets, sinks, tubs, showers, and appliances all create wastewater. If drains clog, leak, or are installed without the right slope, wastewater can back up into the house. That is unsanitary, unhealthy, and expensive to fix.
Third, plumbing blocks sewer gases from entering living spaces. Traps hold water that forms a seal. Vents help the drains flow correctly and keep pressure balanced. If a trap dries out or a vent is missing, bad-smelling and potentially dangerous gases can get into the building.
Finally, plumbing helps prevent water damage. Even a small leak under a sink can rot wood, ruin drywall, and create mold. Mold grows best in damp, hidden places, which is exactly why leaks need quick attention.
🎬 Video: How Plumbing Transformed Public Health (video) — https://youtu.be/MVGgjYigmDE?si=nwaqXmHn2CuYYAnK
Requirement 1b
Your exact answer should come from your own city, county, or state because plumbing rules vary by place. But most local codes focus on the same health goals. As you research, look for rules that match these common categories:
- Approved drinking-water pipe materials — Codes limit which materials may carry potable water so harmful substances do not leach into the supply.
- Backflow or cross-connection protection — These rules prevent dirty water from flowing backward into clean water lines.
- Trap and vent requirements — Codes require traps and vents so drains work properly and sewer gases stay out of the building.
- Fixture clearances and installation rules — Toilets, sinks, and water heaters need enough space and proper connections to work safely and be serviced.
- Water-heater temperature and pressure relief protection — These rules help prevent scalds, pressure buildup, and tank failure.
You may also find local rules about permits, inspections, freezing protection, sewer connections, cleanouts, or who may perform certain kinds of plumbing work.
How to Research Your Local Rules
Bring specific examples to your counselor- Start local: Search your city or county building department website for plumbing code summaries, permit guides, or homeowner repair rules.
- Write the rule in plain language: Do not just copy legal text. Translate it into what the rule requires.
- Add the health reason: Explain what problem the rule is preventing.
- Record the source: Bring the department name or web page with you so your counselor can see you used a real local source.
Requirement 1c
A simple plumbing repair can still involve hot water, slippery floors, sharp edges, sewage, electricity, and chemical exposure. Good plumbers slow down before they start.
🎬 Video: Plumbing Safety Tips (video) — https://youtu.be/gyWrbmQp5a0?si=mSS8s25KUFkV39Z5
Important repair precautions include:
- Know the shutoffs first: Find the fixture shutoff and the main house shutoff before you loosen anything.
- Protect your eyes and hands: Safety glasses and work gloves matter when cutting pipe, loosening corroded fittings, or cleaning out traps.
- Use the right tool: Wrong tools slip, round off nuts, and cause injuries.
- Keep the work area dry: Water on tile, vinyl, or concrete turns a small repair into a slip hazard.
- Expect dirty water: Put down towels or a bucket before opening traps or supply lines.
- Watch for heat and flame: Soldering requires fire-safe surroundings, ventilation, and adult supervision.
- Do not mix plumbing with guesswork: If you do not know what a pipe, valve, or fitting does, stop and ask.
By now you know why plumbing protects health and why safe habits come first. Next, follow the water itself through a home supply system and drainage system.
Req 2 — Home Water Systems
This page covers the two big halves of home plumbing:
- Water supply — how clean hot and cold water gets where it needs to go
- Drainage — how wastewater leaves the house safely
When you make your drawings for this requirement, the goal is not art. The goal is to show that you understand where water starts, where it goes, what controls it, and how the system stays safe in both summer and winter.
🎬 Video: How Your Home Plumbing Works (From Start to Finish) (video) — https://youtu.be/8jxRn-T_LCs?si=pwjNJvf0MCXM5gdY
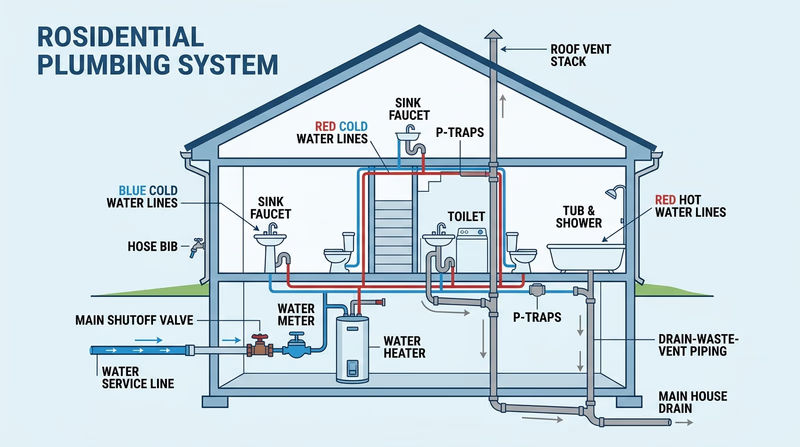
Requirement 2a
Start your drawing where water enters the building. In many homes, it comes in through a service line from a municipal water main. In others, it may come from a well system. Soon after entry, you will usually find a main shutoff valve and a water meter if the house uses city water.
From there, cold water branches out to fixtures and appliances. One branch also feeds the water heater, which sends heated water to sinks, showers, tubs, dishwashers, and clothes washers. Toilets normally use only cold water.
A good supply-system drawing often includes these parts:
- Water service entry point
- Main shutoff valve
- Water meter
- Cold-water branches to fixtures
- Water heater
- Hot-water branches to fixtures
- Fixture shutoff valves under sinks or behind toilets
How the supply side works
The water supply system works under pressure. That pressure pushes water through pipes when a faucet opens or a toilet refills. Pipes and fittings must be watertight because even a tiny opening can leak constantly under pressure.
How to make it safe from freezing
Frozen water expands. If water in a pipe freezes, it can split the pipe or crack a fitting. The leak often appears only after the ice melts and water pressure returns.
Ways to protect the system from freezing include:
- Insulate exposed pipes in crawl spaces, garages, basements, and exterior walls.
- Seal drafts around pipe penetrations where cold air enters.
- Disconnect and drain garden hoses before freezing weather.
- Shut off and winterize exterior hose bibs if needed.
- Keep some heat in vulnerable indoor spaces.
- In severe cold, let a faucet drip slightly if local guidance recommends it.
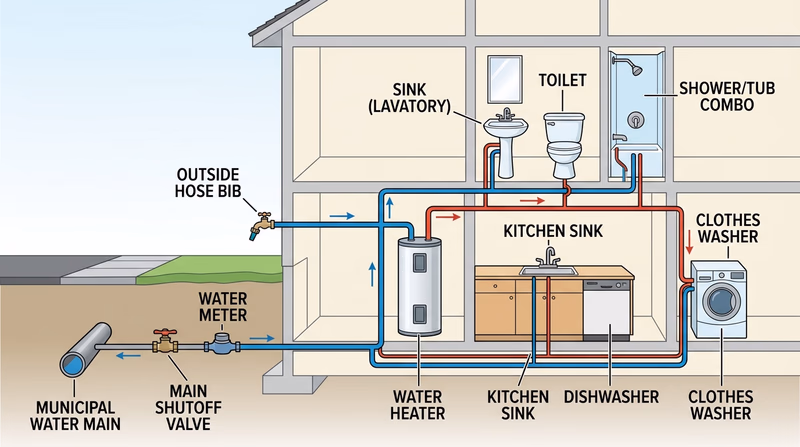
Requirement 2b
The drainage system is different from the supply system because it does not usually run under pressure. Most home drains work by gravity. Wastewater flows downhill through drainpipes to a building drain and then out to a sewer or septic system.
Your drawing should show how water leaves major fixtures such as sinks, tubs, showers, toilets, and appliances. It should also show two features many people never notice: traps and vents.
What drains do
Drains carry wastewater away. To work well, they need the right pipe size and the correct slope. Too flat, and solids may settle out. Too steep, and water can outrun solids in some cases, leaving clogs behind.
What vents do
Vents connect the drain system to outside air, usually through the roof. That may sound odd, but it is essential. Venting helps wastewater flow smoothly by preventing air-pressure problems inside the piping.
Without proper venting, drains can gurgle, empty slowly, or siphon water out of traps.
Why traps matter
A trap is the curved section of pipe under many sinks and fixtures. It holds a small amount of water that acts like a plug against sewer gases. If the trap seal is lost, odors and gases can enter the room.
What to Include in Your Drainage Drawing
Show the path of wastewater clearly- Fixtures: Sink, toilet, tub, shower, or laundry connection.
- Trap: Show the water seal under a sink or fixture.
- Drain branch: The horizontal line carrying wastewater away.
- Vent: The pipe that allows air into the system and usually goes upward through the roof.
- Main building drain: The larger pipe carrying waste out of the house.
By following both clean-water supply and wastewater drainage, you now have a full-system view of the house. Next, focus on the tools plumbers use to work on these systems safely and accurately.
Req 3 — Essential Plumbing Tools
A good plumber is not someone who owns the most tools. A good plumber knows which tool fits the job, how to use it without damaging the pipe or fitting, and when to stop before too much force turns a minor repair into a broken part.
🎬 Video: 6 Essential Plumbing Hand Tools...and Others to Keep Around! (video) — https://youtu.be/uppuvS8BShU?si=a2SBD-wzgASkoSy2
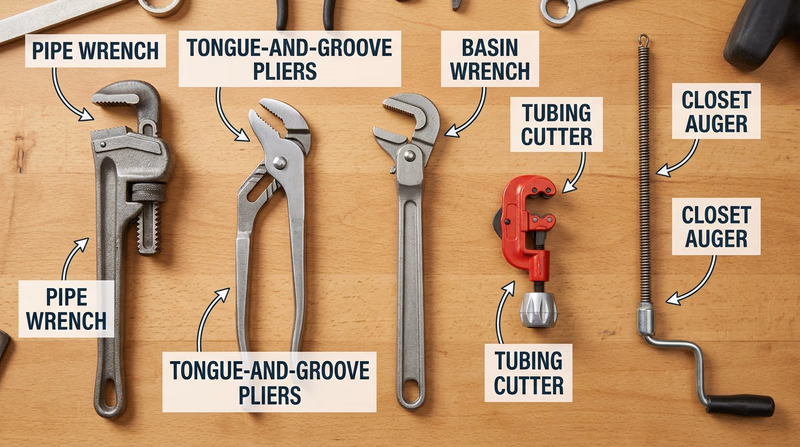
Five important plumber’s tools you can learn for this requirement include:
Pipe Wrench
A pipe wrench grips round pipe and threaded fittings. Its jaws bite harder as you pull. That is useful on steel pipe, but it can damage softer finishes, so it is not the right tool for every visible fixture.
Best use: Threaded metal pipe and sturdy fittings.
Tongue-and-Groove Pliers
These adjustable pliers are common in plumbing because they can grip different sizes of nuts, slip-joint connections, and some fittings. They are often safer and more flexible than using the wrong-size wrench.
Best use: Slip nuts, drain work, and general gripping.
Basin Wrench
A basin wrench is designed for the awkward nuts that hold a faucet under a sink. If you have ever tried reaching behind a sink bowl with a normal wrench, you already know why this tool exists.
Best use: Tight spaces under sinks, especially faucet mounting nuts.
Tubing Cutter or Plastic Pipe Cutter
Clean cuts matter in plumbing. A tubing cutter makes a smooth, square cut on copper. Plastic pipe cutters are made for materials such as PEX or some plastic pipe. A square cut helps fittings seal correctly.
Best use: Making clean cuts before soldering, crimping, or fitting pipe.
Plunger or Closet Auger
A plunger is often the first response to a simple clog. A closet auger is designed for toilets and reaches deeper into the trapway without damaging the bowl when used correctly.
Best use: Clearing simple drain or toilet blockages.
How to Demonstrate a Tool Well
Show your counselor more than just the name- Name the tool and the kind of job it is for.
- Point out the working parts such as jaws, cutting wheel, handle, or adjustment mechanism.
- Show safe hand placement before applying force.
- Explain what material or fitting the tool is meant to touch so you do not damage the job.
- Describe one mistake to avoid with that tool.
Once you know the tools, the next step is learning the language of plumbing parts so you can recognize what those tools are working on.
Req 4 — Plumbing Parts and Terms
Plumbing has its own vocabulary, and many terms sound simple until you see the parts in real life. The easiest way to learn them is to group them by what they do: sealing, joining, changing direction, draining, or measuring water use.
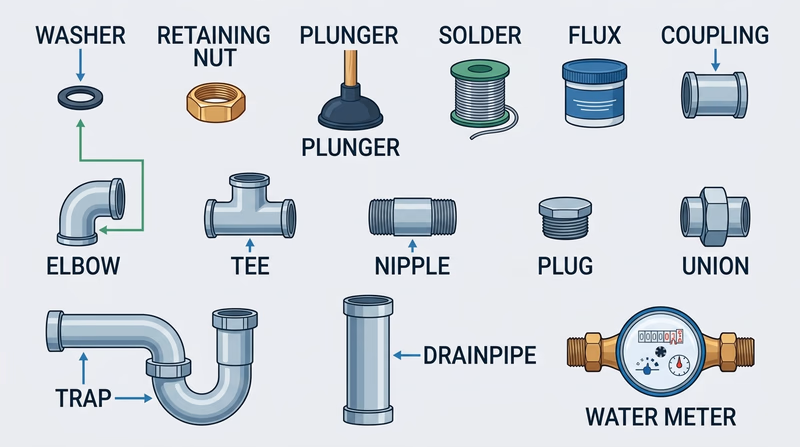
Sealing and Repair Parts
Washer — A washer is a small part, often rubber or another flexible material, that helps create a watertight seal. In some faucets, replacing a worn washer stops a drip.
Retaining nut — A retaining nut holds another part in place. You may see it securing faucet parts, drains, or cartridge assemblies.
Plunger (rubber force cup) — A plunger uses water pressure and suction to help clear simple clogs. The rubber cup seals against the drain opening so you can push and pull water through the blockage.
Materials Used in Joining Pipe
Solder — Solder is a metal filler used to join copper pipe and fittings. It melts at a lower temperature than the copper and flows into the cleaned joint.
Flux — Flux is a paste or liquid used before soldering. It helps clean the metal and allows solder to flow properly into the joint.
Fittings That Shape and Join Pipe
Elbow — An elbow changes the direction of a pipe, often by 45 or 90 degrees.
Tee — A tee fitting forms a branch, allowing one pipe to split into two directions.
Nipple — A nipple is a short piece of threaded pipe used to connect fittings.
Coupling — A coupling joins two pipes in a straight line.
Plug — A plug closes off an opening, usually by threading into a fitting.
Union — A union is a fitting designed to let a connection come apart more easily for service or replacement.
Drainage Parts
Trap — A trap is the curved section of pipe that holds water and blocks sewer gases from entering the room.
Drainpipe — A drainpipe carries wastewater away from a fixture toward the larger drainage system.
Measuring and Service Parts
Water meter — A water meter measures how much water a building uses. It is often near where the water service enters the home.
A Good Way to Study These Terms
Move from words to real objects- Look under a sink to find a trap, retaining nuts, and drain connections.
- Visit a hardware store to compare elbows, tees, couplings, plugs, and unions side by side.
- Inspect a faucet repair kit to see washers and other small sealing parts.
- Find the home water meter with an adult so you know where the service enters the building.
Now that the parts have names, you are ready to compare the pipe materials those parts connect to in real plumbing systems.
Req 5 — Common Pipe Materials
Not every plumbing job uses the same material. A pipe that works well for pressurized drinking water may be a poor choice for a drain line. A pipe that handles heat well may cost more or require more skill to install. Plumbers choose materials based on pressure, temperature, durability, corrosion resistance, local code, and cost.
The most common residential pipe materials today include copper, PEX, PVC, CPVC, and in some cases steel or ABS depending on the system and local practices.
Copper
Copper has been used for decades in water supply systems. It handles heat well, lasts a long time when installed correctly, and resists many kinds of damage. It is often used where durability matters and where plumbers want a rigid, time-tested material.
Why it is used: Reliable, durable, good for hot and cold water, and widely accepted by code.
PEX
PEX is a flexible plastic tubing used mainly for water supply. Because it bends, it can often make long runs with fewer fittings than rigid pipe. That can speed installation and reduce leak points.
Why it is used: Flexible, quick to install, good for retrofits, and resists freeze damage better than rigid pipe because it can expand somewhat.
PVC
PVC is common for cold-water applications and many drain, waste, and vent systems. It is lightweight and easy to cut and join with solvent cement.
Why it is used: Affordable, lightweight, corrosion-resistant, and common for drainage and some non-hot-water uses.
CPVC
CPVC is similar to PVC but is rated for hotter water temperatures, which makes it suitable for some hot- and cold-water supply uses.
Why it is used: Handles hot water better than standard PVC and is lighter than metal piping.
Steel or Galvanized Steel
Older homes may still have galvanized steel supply lines. Black steel is also used in some non-water applications such as gas piping, depending on the system and local code. Steel is strong, but it is heavier and can corrode over time.
Why it is used: Strength and durability, especially in older systems or specialty applications.
🎬 Video: Four Types of Pipes Explained! (video) — https://youtu.be/OJkj4T9_X9I?si=b2eBR2WGlANFrxyF
How Plumbers Choose a Pipe Material
Think about the job, not just the pipe- Hot or cold water? Some materials handle heat better than others.
- Supply or drain? Pressure supply lines and gravity drain lines have different needs.
- New work or repair? Flexible materials may help in tight retrofit spaces.
- Indoor or exposed to weather? Sunlight, freezing temperatures, and impacts matter.
- What does local code allow? The best answer in one town may not be allowed in another.

You now know the vocabulary and materials. Next comes the most hands-on part of the badge: choosing four supervised plumbing tasks to complete.
Req 6 — Choose Four Supervised Tasks
You must complete exactly four options from this list. This page helps you choose wisely before you start buying materials or taking apart fixtures.
Your Options
- Req 6a — Hardware Store Field ID: Visit a store and learn to identify common pipe materials, fittings, and specialty tools in real packaging. This is a great confidence-builder because it improves your vocabulary without requiring repairs at home.
- Req 6b — Solvent-Welded Plastic Pipe: Practice cutting, deburring, and solvent welding plastic pipe. You will learn careful prep work and why plumbing joints depend on clean surfaces and correct assembly.
- Req 6c — PEX Connections: Cut PEX and make a connection using a quick-connect or crimp fitting. This is a good introduction to modern flexible water-supply systems.
- Req 6d — Soldering Copper: Make a soldered copper joint with a gas torch. This is classic plumbing craft work, but it demands close supervision and strong safety habits.
- Req 6e — Replacing a Faucet: Remove an old kitchen or lavatory faucet and install a replacement. You will practice shutoffs, access in tight spaces, and leak checking.
- Req 6f — Cleaning a Drain Trap: Remove, clean or replace, and reinstall a trap. This teaches how simple drainage parts come apart and go back together.
- Req 6g — Applying Thread Tape: Apply thread tape the right way so threaded joints seal properly. It is a smaller task, but one that plumbers use constantly.
How to Choose
Choosing Your Four Tasks
Match the project to your setting and supervision- Time available: Store identification and thread tape can be done quickly; faucet replacement or soldering may take longer.
- Tools needed: PEX work, soldering, and faucet replacement may require specialized tools or supplies.
- Risk level: Soldering uses flame. Faucet and trap work can create leaks if shutoffs fail or parts are reassembled incorrectly.
- Best beginner options: 6a, 6f, and 6g are often easier starting points because they build familiarity without as much installation complexity.
- What you will gain: 6a builds recognition skills, 6b and 6c build joining skills, 6d builds metal-working confidence, 6e and 6f build real repair experience, and 6g builds good installation habits.
The first option is a great low-risk place to begin because it helps you recognize the materials and tools you will see in the rest of the requirement.
Req 6a — Hardware Store Field ID
This option turns a store visit into a field study. Instead of walking past shelves of fittings and tools, you will learn to recognize the materials by color, shape, labeling, and common use. That makes every later plumbing task easier.
- Req 6a1 focuses on PVC.
- Req 6a2 focuses on CPVC.
- Req 6a3 focuses on PEX.
- Req 6a4 focuses on copper.
- Req 6a5 focuses on steel.
- Req 6a6 adds specialty plumbing tools.
Requirement 6a1
How to identify PVC
PVC is usually rigid plastic pipe, often white, though some systems use other colors. In stores, look for straight pipe, elbows, tees, couplings, and adapters labeled PVC.
What PVC is commonly used for
PVC is often used in drain, waste, and vent systems and in some cold-water or specialty applications depending on local code.
What to notice in the aisle
Look for pipe size markings, matching fittings, and the solvent cement area nearby. Notice how many shape options are available just to change direction, add a branch, or adapt from one fitting style to another.
Requirement 6a2
How to identify CPVC
CPVC is another rigid plastic pipe. It is often cream or yellowish rather than bright white, though exact color can vary by brand and use.
What CPVC is commonly used for
CPVC is rated for hotter water than standard PVC, so it may be used for hot- and cold-water supply in some installations.
What to notice in the aisle
Compare CPVC fittings with PVC fittings and look for labeling that makes the temperature and material difference clear.
Requirement 6a3
How to identify PEX
PEX is flexible tubing, often sold in coils or long straight lengths. It is commonly red, blue, or white, which helps people distinguish hot and cold lines during installation.
What PEX is commonly used for
PEX is used for water supply lines because it is flexible, fast to route, and works well with modern connection systems.
What to notice in the aisle
Look for the tubing, crimp rings, expansion fittings, quick-connect fittings, and the specialized tools that go with each system.
Requirement 6a4
How to identify copper
Copper pipe has a reddish-metal color and is sold in rigid lengths or coils, depending on type and use. Copper fittings include elbows, tees, couplings, and adapters.
What copper is commonly used for
Copper is a long-trusted material for water supply lines and is valued for heat tolerance and durability.
What to notice in the aisle
Compare the fitting selection with plastic systems and notice the separate materials used for soldering, such as flux and solder.
Requirement 6a5
How to identify steel
Steel pipe is heavier and darker than copper or plastic. Threaded steel fittings often look rugged and industrial.
What steel is commonly used for
Steel appears in older plumbing systems and in specialty applications. It is strong, but heavy and more prone to corrosion than some modern materials.
What to notice in the aisle
Look at the threaded ends, threaded fittings, and how different the system feels from smooth plastic or soldered copper systems.
Requirement 6a6
How to identify specialty plumbing tools
These are the tools that make plumbing possible in tight spaces or with specific materials. You may see basin wrenches, tubing cutters, PEX crimpers, pipe threaders, closet augers, torch kits, deburring tools, and inspection mirrors.
What to learn from the tool section
Try to match each tool to a job. Which one cuts? Which one grips? Which one clears a clog? Which one makes a connection?
What to notice in the aisle
Specialty plumbing tools often sit near the materials they are used with. That is a clue: the store layout itself can help you understand the system.
Store Visit Strategy
How to make the most of your field trip- Take notes or photos if allowed so you can review later.
- Read labels carefully instead of guessing by color alone.
- Compare fitting shapes such as elbows, tees, and couplings in multiple materials.
- Ask your supervising adult questions about where they have seen each material used.

Now that you can identify the common materials, move on to a hands-on connection method by cutting and solvent welding plastic pipe.
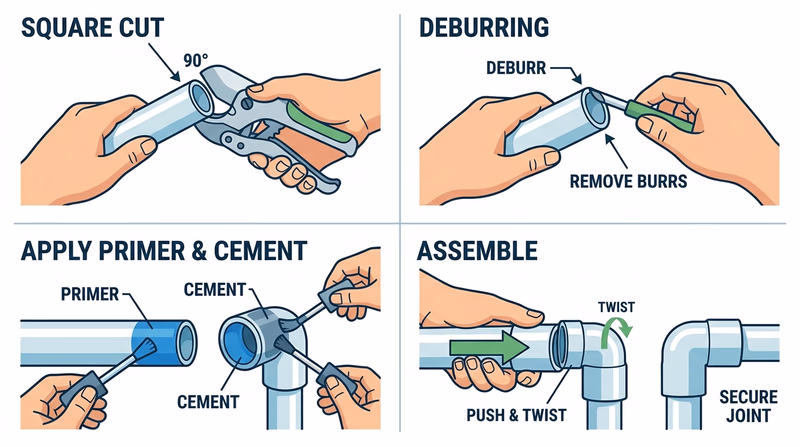
Req 6b — Solvent-Welded Plastic Pipe
This requirement is all about preparation. Solvent welding looks simple from a distance, but good joints depend on clean cuts, smooth pipe ends, correct alignment, and quick assembly before the cement sets.
🎬 Video: How To Cut, Prime & Cement PVC Pipe & Fittings Like A PRO (How To Bond PVC) Solvent Weld PVC (video) — https://youtu.be/gSNlq7QK8lc?si=DhCkTPDDKnnF_d0R
Step 1: Cut the pipe square
A crooked cut makes it harder for the pipe to seat evenly in the fitting. Use the correct cutter or saw for the material, then check that the cut is straight.
Step 2: Debur and clean the edge
After cutting, remove burrs and rough plastic from the inside and outside edge. Burrs can catch debris, affect flow, or keep the pipe from fitting correctly.
Step 3: Dry-fit the parts
Before opening primer or cement, assemble the pieces without glue. Confirm the order and orientation of your coupling, tee, and elbow.
Step 4: Prime and cement as directed
Some systems require primer, then solvent cement. Follow the instructions for the exact product you are using. Work with your supervising adult so you do not miss the timing window.
Step 5: Push, twist, and hold
Insert the pipe fully, give it a slight twist if recommended, and hold it in place briefly so it does not back out.
What Your Counselor Will Want to See
Demonstrate control, not speed- A clean square cut
- Deburred pipe ends
- Correct fitting identification: coupling, tee, and elbow
- Proper sequence of prep and assembly
- A neat finished setup that looks aligned and intentional
Plastic pipe joining teaches you the value of clean prep work. Next, compare that process with a very different modern system: flexible PEX connections.
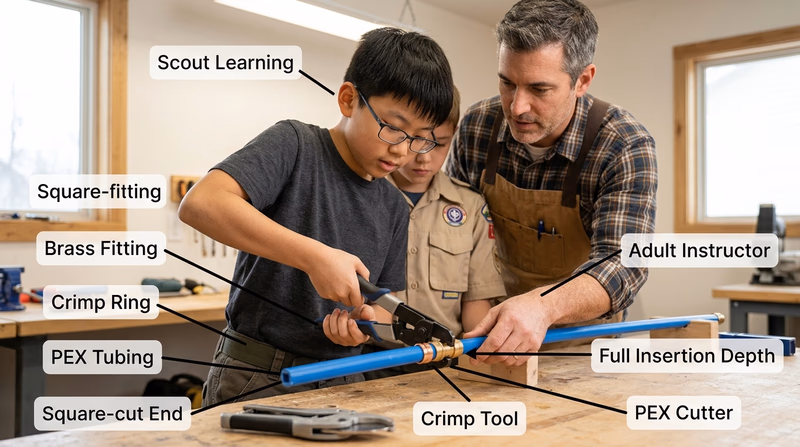
Req 6c — PEX Connections
PEX changed home plumbing because it is flexible, fast to route, and compatible with several connection systems. This requirement gives you practice with a material that many modern plumbers use every day.
🎬 Video: How To Cut And Crimp Pex - From A Professional (video) — https://youtu.be/vpnp3RayEPI?si=iieOezZIhF4ePAB-
What makes PEX different
Unlike rigid copper or PVC, PEX can bend around corners and snake through framing with fewer fittings. That can speed installation and reduce the number of joints hidden inside walls.
Making the cut
Use a PEX cutter so the end is clean and square. A ragged or angled cut may keep the tubing from sealing correctly.
Two common connection styles
Quick-connect fitting
A quick-connect fitting grips the tubing when it is pushed fully into place. It is convenient, but the tubing still has to be cut cleanly and inserted all the way.
Crimp fitting
A crimp fitting uses a ring and a specialized crimp tool. The tool compresses the ring around the tubing and fitting to make the seal.
PEX Success Habits
Small details matter- Cut square so the tubing seats correctly.
- Use the correct ring or fitting style for the system you are demonstrating.
- Fully insert the tubing before crimping or locking the connection.
- Inspect the finished joint instead of assuming it is good.
You have now practiced two very different joining methods. Next comes one of the most traditional plumbing skills: soldering copper with a torch.
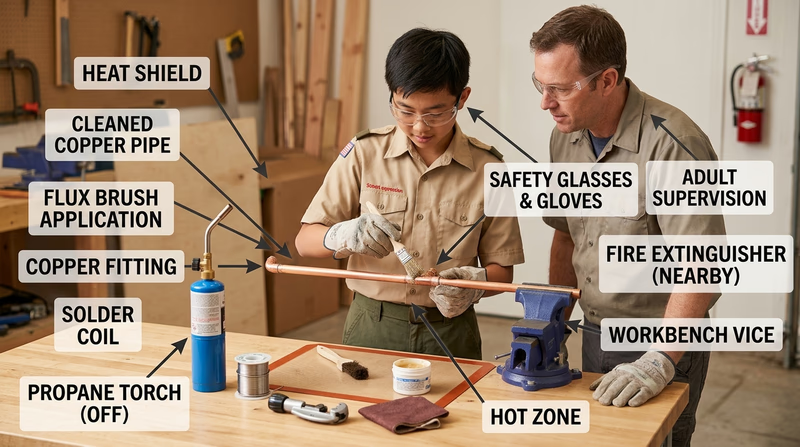
Req 6d — Soldering Copper
This is one of the most recognizable plumbing skills. A good soldered joint depends on preparation even more than on the flame itself. Clean metal, correct flux, even heating, and patience all matter.
🎬 Video: Copper Pipe Soldering-How to Solder for Beginners Video (video) — https://youtu.be/TOtOpixWTXE?si=Jl_jeHOlvComjB_k
The basic process
- Cut the copper cleanly.
- Debur the pipe.
- Clean the pipe and fitting surfaces until the metal is bright.
- Apply flux to the cleaned surfaces.
- Assemble the joint fully.
- Heat the fitting carefully with the torch.
- Touch solder to the heated joint so it flows into the connection.
The key idea is that you usually heat the joint, not the solder directly. If the metal is hot enough and properly prepared, the solder will flow where it needs to go.
Signs of Good Soldering Prep
Most joint problems start before heating- Pipe end is smooth and deburred
- Metal surfaces are cleaned bright
- Flux is applied only where needed
- The joint is assembled fully before heating
- The workspace is protected from flame and heat
Soldering teaches careful preparation and heat control. The next option shifts back to service work in tight spaces by replacing a faucet.
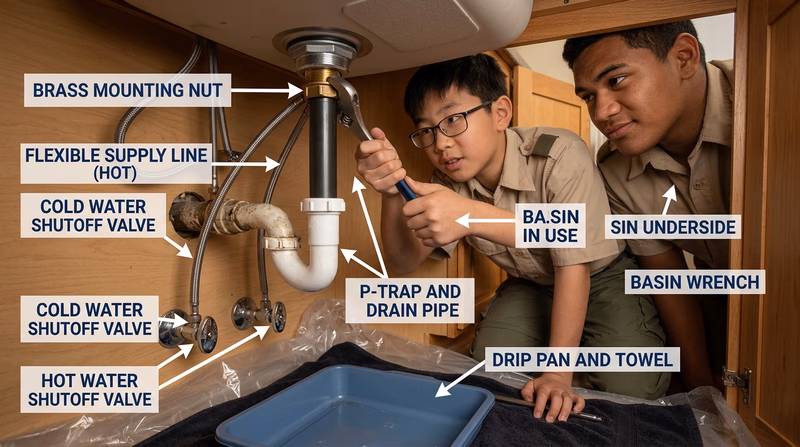
Req 6e — Replacing a Faucet
Faucet replacement is a great real-world plumbing project because it combines planning, tight-space tool use, shutoff control, and leak checking. It also reminds you that many plumbing jobs are more about patience than strength.
🎬 Video: Women's DIY Bathroom Remodel (video) — https://youtu.be/hyTeVMYgRM0?si=Vjs95F0m6dK-Ae11
Before you start
Make sure the replacement faucet matches the sink layout. Count the holes in the sink or countertop, and check that the new faucet kit fits.
A simple replacement sequence
- Shut off the hot and cold supply valves.
- Open the old faucet to relieve pressure.
- Put a towel or pan under the work area.
- Disconnect the supply lines.
- Remove mounting nuts and lift out the old faucet.
- Clean the sink surface before installing the new faucet.
- Set the new faucet, tighten the mounting hardware, and reconnect the supplies.
- Turn the water back on slowly and check carefully for leaks.
Where Faucet Jobs Often Go Wrong
Slow down at these points- Wrong faucet style for the sink opening pattern
- Supply valves that do not shut off fully
- Tight, awkward access under the sink
- Overtightening mounting hardware or supply connections
- Skipping the final leak check
After supply-side service work, the next task moves to the drainage side by taking apart and reinstalling a trap.
Req 6f — Cleaning a Drain Trap
A drain trap is one of the simplest plumbing parts to see and understand, which makes it a great learning project. It is also one of the first places where hair, soap scum, or debris can cause trouble.
🎬 Video: How To Install P-Trap And Bathroom Sink Drain Piping | Easy Installation For Beginners! (video) — https://youtu.be/OFui97xhln0?si=0j-wNeNigMTLVJHt
Why the trap matters
The trap holds water that blocks sewer gases from rising into the room. That means the trap is doing two jobs at once: carrying wastewater away and maintaining a protective water seal.
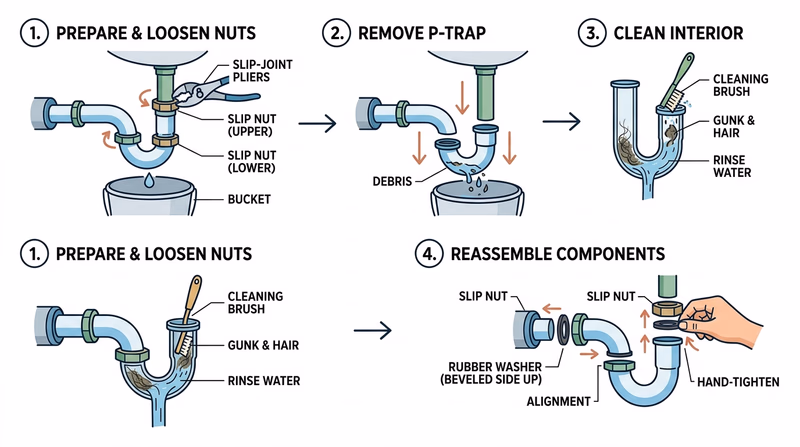
Basic trap service steps
- Put a bucket or pan underneath.
- Loosen the slip nuts carefully.
- Lower the trap and expect dirty water.
- Clean out debris or replace worn parts.
- Reassemble the trap in the correct orientation.
- Run water and inspect every connection for leaks.
What to look for during the job
- Cracks in plastic parts
- Corrosion on older metal pieces
- Misalignment that puts stress on the joints
- Worn washers or sealing surfaces
- Debris that explains the slow drain or odor
Trap Reassembly Check
Before you call the job finished- All nuts are hand-started correctly
- Washers face the correct direction
- The trap lines up naturally without forcing
- Water runs without drips
- No sewer odor appears after the trap refills
This repair teaches how drainage parts fit together. The next task is smaller, but it rewards the same careful attention to detail: applying thread tape correctly.
Req 6g — Applying Thread Tape
Thread tape looks simple, but it only works well when it is wrapped in the right direction and used on the right kind of connection. This is a small skill that teaches precision and attention to detail.
🎬 Video: How to Apply Teflon Tape Like a Plumbing Pro (video) — https://youtu.be/KJoO87dW30U?si=zlN2wJ1V8ciBaLEt
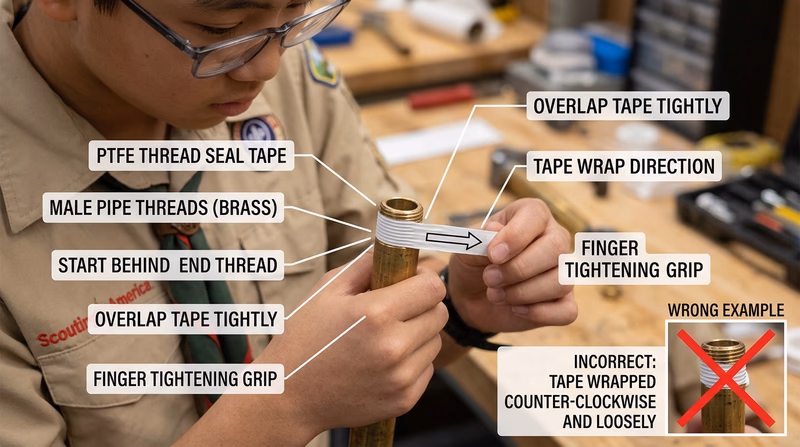
What thread tape does
Thread tape helps threaded joints seal more effectively and can reduce friction as the parts tighten together. It is used on the threads of certain connections, not on smooth slip joints.
The key technique
Wrap the tape in the same direction the fitting will turn when tightened. That way, the tape stays in place instead of bunching up or unraveling as you assemble the connection.
Good application habits
- Start on the threads, not hanging into the pipe opening.
- Keep the wrap neat and even.
- Use enough tape to cover the threads, but do not create a bulky mess.
- Smooth it down so it follows the thread shape.
Thread Tape Mistakes to Avoid
These are the common ones- Wrapping in the wrong direction so the tape unwinds
- Using tape on the wrong type of joint
- Leaving tape over the pipe opening where bits may get loose
- Applying too much and making the connection harder to seat properly
With the hands-on options complete, the final badge requirement looks ahead to the people who turn these skills into full-time careers.
Req 7 — Exploring Plumbing Careers
Plumbing is not just one job title. It is a trade with many paths, from residential service work to large commercial projects to inspection and business ownership. This requirement is your chance to look past the badge and ask, “What would it really be like to build a future in this field?”
Three career directions you could explore include:
Residential Service Plumber
These plumbers repair leaks, replace fixtures, clear clogs, diagnose water-heater issues, and solve day-to-day problems in homes. This path requires strong people skills because the plumber often works directly with homeowners.
Construction or Commercial Plumber
These plumbers install systems in new homes, schools, hospitals, offices, and industrial buildings. They read plans, coordinate with other trades, and help build large systems before the walls are closed up.
Plumbing Inspector, Estimator, or Business Owner
Some experienced plumbers move into code inspection, project estimating, sales, training, or running their own company. These paths use plumbing knowledge but add leadership, communication, and business skills.
🎬 Video: Why Plumbing is the Best Job Ever (video) — https://youtu.be/6cmAKvZScrQ?si=TbI4S2w6b0DMWN8A
🎬 Video: Plumbing Jobs Explained: From Odd Jobs to Owning a Small Business (video) — https://youtu.be/vIr4tUV9YNk?si=Gq8NZD-MQVrOokGr
What to research for your chosen career
For the career you pick, gather information about:
- Training path — apprenticeship, trade school, community college, or employer-based training
- Licensing or certification — what your state or local area requires
- Entry costs — tuition, tools, transportation, work clothes, and exam fees
- Starting pay — apprentice wages or entry-level salary
- Future growth — journeyman, master plumber, supervisor, estimator, inspector, or owner
Questions to Answer in Your Career Research
Bring useful details to your counselor discussion- What does a beginner need to do first?
- How long does training usually take?
- What tools or gear would you need to buy?
- What kind of work setting is most common?
- What would make this career appealing or unappealing to you?
You have reached the end of the badge requirements. The next page looks beyond them with more ways to keep learning about the trade, water systems, and the future of plumbing.
Extended Learning
Congratulations
You just worked through a badge that most people never think about until something goes wrong. That is part of what makes plumbing so interesting: when it works well, it quietly protects health, saves time, and keeps a home running. If you enjoyed this badge, you already think a little like a plumber — you notice systems, causes, and consequences.
Water Pressure and Flow in the Real World
A faucet that sputters, a shower that feels weak, or a toilet that refills slowly can all point to deeper system issues. Pressure, pipe size, mineral buildup, partially closed valves, and fixture design all affect how water moves. Learning to diagnose pressure and flow problems is one of the biggest steps between beginner plumbing knowledge and real troubleshooting skill.
One useful next question to explore is this: when a plumbing problem appears at one fixture, is it local to that fixture, or does it affect the whole house? That single question helps narrow the problem quickly.
Water Conservation and Leak Detection
Plumbing has a big environmental side. A leaking toilet flapper, dripping faucet, or hidden supply-line leak can waste large amounts of treated water. Newer fixtures are designed to deliver good performance with less water, but only if they are installed and maintained correctly.
Try reading your home’s water meter with an adult, then make sure no water is being used inside or outside. If the meter still changes, that can be a clue that a leak exists somewhere in the system.
Plumbing and Building Science
Plumbing does not exist by itself. It interacts with framing, insulation, ventilation, electrical work, and heating systems. For example, pipes placed in cold outside walls may freeze more easily. Poor bathroom ventilation can worsen moisture problems caused by even a minor leak. A water heater has plumbing connections, energy use, venting concerns, and safety controls all at once.
The more you learn, the more you see that good plumbing is part of good building design.
New Technology in the Trade
Modern plumbers may work with leak sensors, smart shutoff valves, tankless water heaters, press fittings, inspection cameras, and digital plan systems. The trade still values hand skills, but technology keeps changing how plumbers diagnose, install, and maintain systems.
Real-World Experiences
Visit a plumbing supply house
A plumbing supply house is different from a general hardware store. You may see pro-grade tools, specialty fittings, and materials that never appear in a typical homeowner aisle.
Tour a water treatment or wastewater facility
If your area offers public tours, this is one of the best ways to connect household plumbing to the larger systems that protect community health.
Shadow a repair or installation day
If a plumber you know is willing and safety rules allow it, observing a real workday can show you how much planning, communication, and troubleshooting are part of the trade.
Practice a simple home inspection walk-through
With an adult, walk through a home and identify shutoff valves, visible traps, hose bibs, the water heater, and the water meter. This builds system awareness even if you do not make repairs.