Req 6b — Solvent-Welded Plastic Pipe
This requirement is all about preparation. Solvent welding looks simple from a distance, but good joints depend on clean cuts, smooth pipe ends, correct alignment, and quick assembly before the cement sets.
🎬 Video: How To Cut, Prime & Cement PVC Pipe & Fittings Like A PRO (How To Bond PVC) Solvent Weld PVC (video) — https://youtu.be/gSNlq7QK8lc?si=DhCkTPDDKnnF_d0R
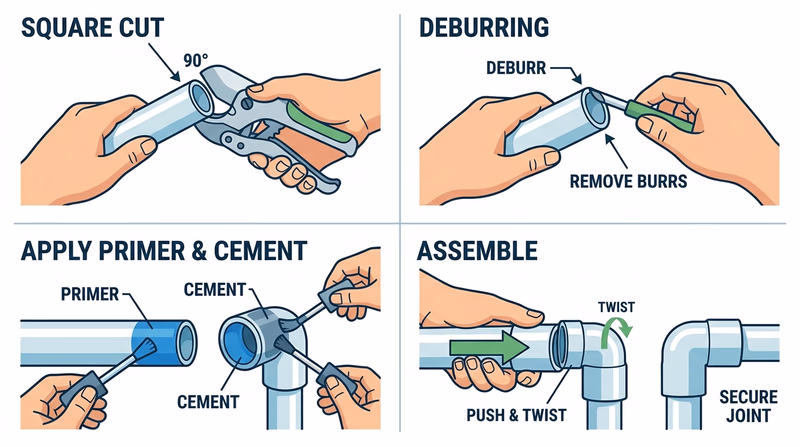
Step 1: Cut the pipe square
A crooked cut makes it harder for the pipe to seat evenly in the fitting. Use the correct cutter or saw for the material, then check that the cut is straight.
Step 2: Debur and clean the edge
After cutting, remove burrs and rough plastic from the inside and outside edge. Burrs can catch debris, affect flow, or keep the pipe from fitting correctly.
Step 3: Dry-fit the parts
Before opening primer or cement, assemble the pieces without glue. Confirm the order and orientation of your coupling, tee, and elbow.
Step 4: Prime and cement as directed
Some systems require primer, then solvent cement. Follow the instructions for the exact product you are using. Work with your supervising adult so you do not miss the timing window.
Step 5: Push, twist, and hold
Insert the pipe fully, give it a slight twist if recommended, and hold it in place briefly so it does not back out.
What Your Counselor Will Want to See
Demonstrate control, not speed
- A clean square cut
- Deburred pipe ends
- Correct fitting identification: coupling, tee, and elbow
- Proper sequence of prep and assembly
- A neat finished setup that looks aligned and intentional
Plastic pipe joining teaches you the value of clean prep work. Next, compare that process with a very different modern system: flexible PEX connections.