Req 6f — Cleaning a Drain Trap
6f.
Remove, clean or replace, and reinstall a sink or lavatory drain trap.
A drain trap is one of the simplest plumbing parts to see and understand, which makes it a great learning project. It is also one of the first places where hair, soap scum, or debris can cause trouble.
🎬 Video: How To Install P-Trap And Bathroom Sink Drain Piping | Easy Installation For Beginners! (video) — https://youtu.be/OFui97xhln0?si=0j-wNeNigMTLVJHt
Why the trap matters
The trap holds water that blocks sewer gases from rising into the room. That means the trap is doing two jobs at once: carrying wastewater away and maintaining a protective water seal.
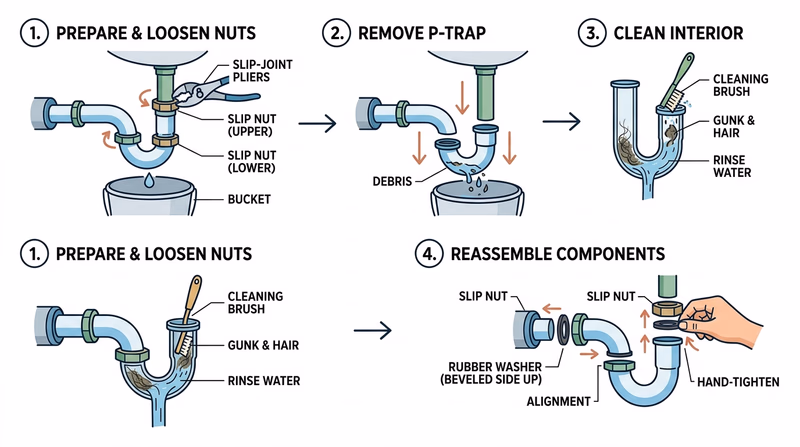
Basic trap service steps
- Put a bucket or pan underneath.
- Loosen the slip nuts carefully.
- Lower the trap and expect dirty water.
- Clean out debris or replace worn parts.
- Reassemble the trap in the correct orientation.
- Run water and inspect every connection for leaks.
What to look for during the job
- Cracks in plastic parts
- Corrosion on older metal pieces
- Misalignment that puts stress on the joints
- Worn washers or sealing surfaces
- Debris that explains the slow drain or odor
Trap Reassembly Check
Before you call the job finished
- All nuts are hand-started correctly
- Washers face the correct direction
- The trap lines up naturally without forcing
- Water runs without drips
- No sewer odor appears after the trap refills
This repair teaches how drainage parts fit together. The next task is smaller, but it rewards the same careful attention to detail: applying thread tape correctly.