Pottery Merit Badge — Complete Digital Resource Guide
https://merit-badge.university/merit-badges/pottery/guide/
Introduction & Overview
Pottery starts with a lump of soft clay and ends with something strong enough to last for centuries. A bowl, mug, tile, sculpture, or jar may look simple when it is finished, but every piece records choices about shape, moisture, heat, decoration, and patience.
This merit badge teaches you how clay behaves, how potters work safely, and how useful and artistic objects come to life. Along the way, you will sketch designs, learn studio vocabulary, build pieces by hand and on the wheel, and see how pottery connects art, chemistry, engineering, and history.
Then and Now
Then — Clay as Daily Technology
Long before people wrote history books, they were shaping clay. Pottery fragments help archaeologists date ancient sites because fired clay lasts so well underground. Jars stored grain, amphorae carried oil and wine, bowls served meals, and ceremonial vessels marked important events.
In many cultures, pottery was not a hobby. It was part of survival. A strong cooking pot meant safer food. A sealed jar meant dry grain through winter. A decorated vessel could show family identity, trade connections, or religious beliefs.
- Material: Local clay mixed by hand with sand, crushed shell, or other temper
- Tools: Hands, paddles, simple wheels, carving tools, open fires or early kilns
- Purpose: Storage, cooking, trade, ceremony, and storytelling
Now — Studio Art, Industry, and Innovation
Today, pottery still fills kitchens and galleries, but clay work reaches far beyond handmade mugs. Artists throw and sculpt in community studios. Schools teach ceramics as both art and design. Factories use advanced ceramics to make tiles, sinks, spark plugs, electronic parts, medical implants, and heat-resistant materials.
That is what makes pottery so interesting: it lives in two worlds at once. It is an ancient craft that rewards slow, careful hands, and it is also a modern field shaped by materials science and manufacturing.
- Material: Carefully formulated clay bodies for specific jobs
- Tools: Electric wheels, slab rollers, glaze labs, digital kilns, industrial furnaces
- Purpose: Art, function, architecture, electronics, medicine, and engineering
Get Ready!
You do not need to be a perfect artist to enjoy pottery. You do need to slow down, notice details, and be willing to try again when a wall gets too thin or a handle goes on crooked. That is part of the fun.
Kinds of Pottery
Functional Pottery
Functional pottery is made to be used. Mugs, bowls, plates, teapots, baking dishes, and vases all belong here. A good functional piece has to do more than look nice. It needs the right wall thickness, a comfortable handle or rim, and a stable base.
Sculptural Pottery
Some clay pieces are meant to be looked at rather than used. Figurines, masks, abstract forms, and animal sculptures all fall into this category. Sculptural work gives you more freedom with shape, texture, and storytelling.
Traditional and Cultural Pottery
Many communities have pottery styles that connect to place, family, and history. Pueblo pottery, Greek painted vessels, Japanese tea ware, and West African water jars all show how clay can carry culture as well as function.
Industrial Ceramics
Not every ceramic object sits on a shelf. Bricks, roof tiles, toilets, electrical insulators, and heat-resistant parts are all ceramic products. When you reach Req 6, you will see just how wide the field really is.
Next Steps
Your first requirement is about studio safety, and that is exactly where a smart potter begins. Before you shape a single piece, learn how to protect yourself, your workspace, and the people working around you.
Req 1 — Studio Safety
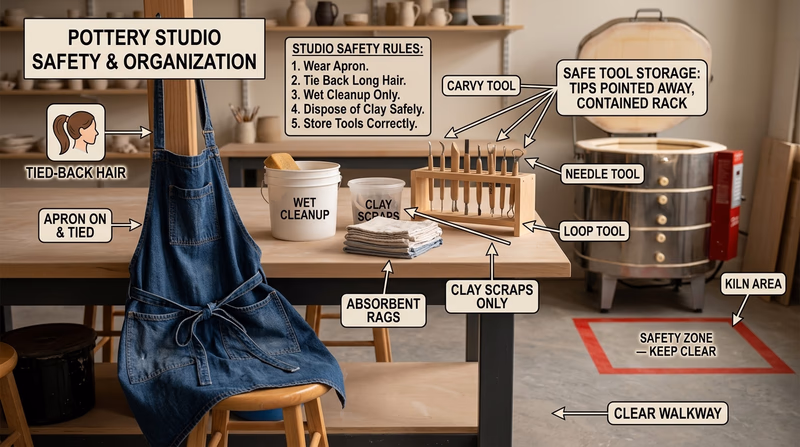
A pottery studio can feel calm and creative, but it includes the same kind of hazards you would find in a shop class: airborne dust, sharp tools, spinning machinery, heavy shelves, and extreme heat. Safe potters pay attention before they begin, not after something goes wrong.
The Biggest Hazards to Respect
Clay Dust and Silica
The most important safety habit in pottery is controlling dust. Dry clay, glaze ingredients, and sweeping can send tiny particles into the air. Some of that dust contains silica, which is dangerous to breathe over time.
That is why potters clean with a damp sponge or wet mop instead of dry sweeping. It is also why bags of dry materials should be opened carefully and mixed only with good ventilation and adult supervision.
Sharp Tools
Needle tools, trimming tools, fettling knives, wire cutters, and carving tools are useful because they cut cleanly. They can also cut skin just as easily. Keep blades pointed away from your body, pass tools handle-first, and store them where they cannot roll off the table.
Spinning Equipment
A wheel head can grab loose sleeves, hoodie strings, jewelry, or long hair. Before using a potter’s wheel, tie back long hair, roll up sleeves, and remove bracelets or dangling items. Sit in a stable position so you do not lean into the wheel while it is spinning.
Glazes and Other Materials
Some glaze ingredients are safe to use only when handled correctly. Never taste materials. Never assume a powder is harmless because it looks like flour or chalk. Read labels, keep containers closed, and wash your hands before eating or touching your face.
Kilns and Hot Ware
Kilns are never casual equipment. Even the outside of a kiln can be hot, and the inside can cause severe burns. Only load, unload, or operate a kiln with trained adult guidance. Use kiln shelves, posts, and tongs the right way, and stay clear of hot lids and peepholes.
Safe Studio Habits
Safe Habits Before You Start
A quick routine that prevents most pottery accidents- Dress for the studio: Wear closed-toe shoes and clothes that can get dirty. Avoid loose sleeves and dangling jewelry.
- Set up your space: Keep your table clear enough that tools, water, and clay are easy to reach without knocking things over.
- Know your equipment: Ask what each tool does before using it. If you do not know, stop and ask.
- Clean as you go: Use a sponge, bucket, and wet cleanup methods so slip and clay scraps do not pile up.
- Wash up well: Wash hands after glazing, mixing materials, or cleaning the studio.
What Good Judgment Looks Like
A counselor is not just listening for a memorized list. They want to hear that you understand why each precaution matters.
For example:
- You tie back your hair because a wheel spins fast enough to catch it.
- You wet-clean the floor because dry sweeping spreads silica dust.
- You ask before glazing because not every surface is food-safe.
- You stay with an adult near a kiln because heat injuries happen fast.
Official Resource
🎬 Video: 6 Steps to a Safe Pottery Studio (video) — https://youtu.be/6kH2KWwFW4w?si=cUxiSFBWOp3k5yA0
Watch for the same themes you just studied: dust control, tool awareness, and clear kiln safety rules. Afterward, try explaining those rules in your own words instead of repeating them word-for-word.
Now that you know how to work safely, you are ready to talk about the material itself. Next comes the question every potter has to answer: what kind of clay body works best for the job?
Req 2a — Clay Bodies for Two Jobs
This requirement covers two different pottery jobs, and they do not ask the clay to behave the same way:
- Making sculpture using the hand-building method
- Throwing on the wheel
A clay body is the recipe for your clay. Different recipes change how sticky, strong, smooth, plastic, and shrink-prone the clay feels. A good answer for your counselor compares the two jobs instead of pretending one clay body fits everything.
Requirement 2a1
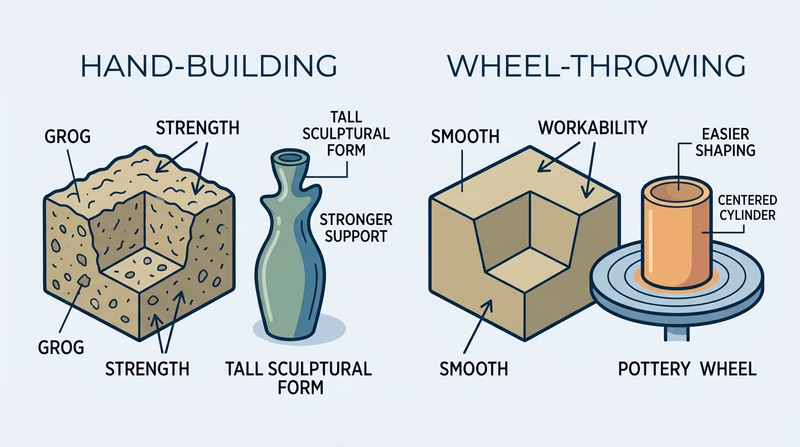
Hand-building clay needs to hold shape without slumping. When you stack coils, join slabs, or add a neck to a sculpture, the walls must support themselves before the piece dries.
Properties of a good hand-building clay body
A strong hand-building clay body usually has these traits:
- Good plasticity so it can bend and join without cracking
- Enough strength to stand up in slabs, coils, or sculpted forms
- Some tooth or texture so it does not collapse easily
- Moderate drying speed so details can be refined before the piece hardens
Hand-builders often like clay that feels a little firmer and less slippery than wheel clay. That extra body helps walls stay upright and lets details hold their shape.
Ingredients that help hand-building clay work well
Many hand-building clay bodies include:
- Clay particles for plasticity and workability
- Grog or sand-like material for strength and reduced shrinkage
- Fillers or temper to help the clay keep shape and dry more evenly
- Water in the right amount so the clay is workable but not mushy
Grog is especially useful for sculpture because it reduces warping and gives the clay a stronger internal structure. The trade-off is a rougher feel.
Requirement 2a2
Wheel throwing is different because the clay is being stretched and lifted while spinning fast. A wheel clay body needs to be smooth, even, and plastic enough to move under your hands without tearing apart.
Properties of a good wheel-throwing clay body
A strong wheel clay usually has these traits:
- High plasticity so it can be centered and pulled upward
- Smooth texture so your hands glide easily over the surface
- Even moisture response so the walls rise without cracking
- Enough strength while thin so cylinders and bowls can hold shape
Too much coarse material can make wheel clay feel scratchy and harder to pull evenly. Too little strength can make the walls buckle while you are working.
Ingredients that help wheel clay work well
Wheel clay bodies usually include:
- Fine clay particles for smoothness and plasticity
- Ball clay or similar ingredients to improve workability
- Controlled amounts of grog or filler if extra strength is needed
- Water balanced carefully so the clay centers well without turning sloppy
The smoother recipe helps the clay respond to pressure from your hands. That is why a clay body made for sculpture may feel sturdy but frustrating on the wheel, while a wheel clay may feel wonderful to throw yet too floppy for a tall hand-built form.
Official Resource
🎬 Video: Best Clay for Pottery: Hand-Building, Wheel Throwing & Sculpting Explained (video) — https://youtu.be/d2l-Aup2QMM?si=WqEsE2JrVKcD5MIK
Use this video to notice the language potters use when comparing clay bodies: smooth, gritty, plastic, stiff, forgiving, and strong. Those are exactly the kinds of comparisons your counselor wants to hear.
A strong comparison for your counselor
Try explaining the two clay bodies side by side- For hand-building: Emphasize shape support, strength, and added grog or texture.
- For wheel throwing: Emphasize smoothness, plasticity, and easy movement under the hands.
- For both: Explain that water content matters because clay that is too wet or too dry becomes hard to control.
Req 2b shifts from the clay recipe to the machine many potters use with it. Next, learn how different potter’s wheels create motion and control.
Req 2b — How Potters' Wheels Work
A potter’s wheel has one main job: spin the clay smoothly so your hands can shape it evenly from all sides. The big difference between wheel types is how that spinning starts, how fast it stays, and how much physical effort the potter has to supply.
Three common kinds of wheels
Kick wheel
A kick wheel is powered by the potter. You use your foot to push a heavy flywheel, and that motion turns the wheel head on top. The heavy lower wheel stores momentum, so the top keeps spinning even after each kick.
Kick wheels are simple, quiet, and great for learning rhythm. They also take more physical effort. If the potter stops kicking, the wheel slows down.
Treadle wheel
A treadle wheel also uses human power, but instead of kicking a heavy wheel directly, the potter pumps a pedal or treadle. That motion transfers power through a mechanical linkage to the wheel head.
Treadle systems let the potter keep both hands on the clay while a foot keeps the wheel moving. They still depend on steady body rhythm, but they can feel more controlled than a basic kick wheel.
Electric wheel
An electric wheel uses a motor to spin the wheel head. The potter controls the speed with a foot pedal or hand control. Because the motor keeps a steady speed, electric wheels are common in schools and community studios.
Electric wheels make it easier for beginners to focus on centering, opening, and pulling walls without also powering the wheel themselves. They still require good body position and touch, but they remove a lot of the physical effort.
How to compare wheel types
A quick way to organize your counselor discussion- Power source: Kick and treadle wheels use human power; electric wheels use a motor.
- Speed control: Human-powered wheels depend on rhythm; electric wheels use a pedal or control system.
- Feel while throwing: Kick and treadle wheels teach body timing; electric wheels offer steadier speed.
- Typical setting: Electric wheels are common in classrooms, while kick and treadle wheels are often used by traditional or specialty studios.
Why the wheel type matters
Different wheels shape the way a potter works. A kick wheel may encourage a slower pace and stronger awareness of rhythm. An electric wheel may help a beginner succeed faster because the speed stays more constant. Neither automatically makes better pottery. They just solve the same problem in different ways.
Official Resources
Selecting a Potter's Wheel (PDF) A simple overview of wheel features, controls, and practical differences between common models. Link: Selecting a Potter's Wheel (PDF) — https://select.schoolspecialty.com/wcsstore/SSICatalogAssetStore/ideas-resources/V2182323.pdf Pottery Wheels - a Buyers Guide (website) A broader comparison of wheel styles, useful for seeing how power, speed, and studio needs affect wheel choice. Link: Pottery Wheels - a Buyers Guide (website) — https://ceramic.school/pottery-wheels/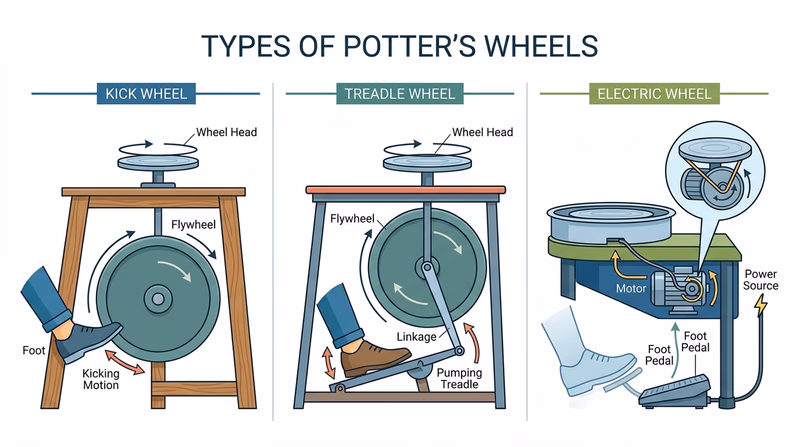
Once you understand clay bodies and wheels, the next step is designing a form before you build it. Req 3 moves from equipment to observation and planning.
Req 3 — Drawing Pottery Forms
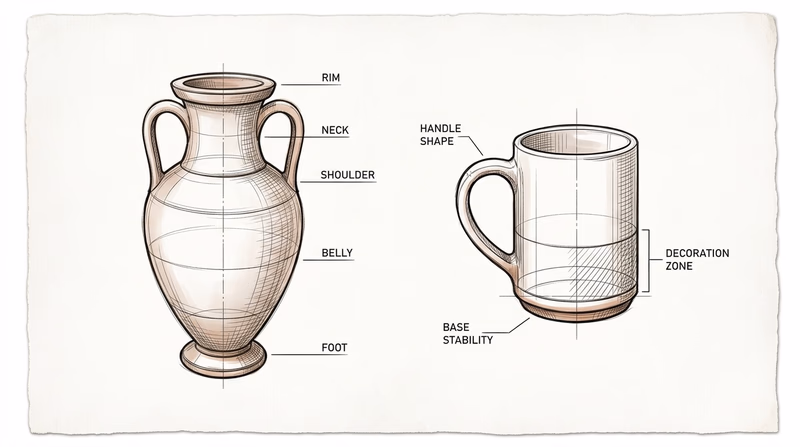
Before clay ever touches a wheel or table, a potter often starts with a drawing. Sketching helps you think about proportion, balance, handles, rims, feet, and decoration before you commit to a form that might take hours to build.
Drawing a historical pottery style
The goal is not just to copy an old pot. It is to notice what made that form useful or meaningful in its own time.
Ask yourself:
- Was it made for storage, pouring, cooking, serving, or ceremony?
- Does the shape look wide, narrow, tall, stable, heavy, elegant, or easy to carry?
- Where would decoration naturally go — on the shoulder, rim, body, or foot?
A Greek amphora, Pueblo jar, Japanese tea bowl, or Roman oil lamp all show different design priorities. Some were made to travel. Some were meant to pour without spilling. Some were meant to honor tradition more than efficiency.
Ancient Greek Pottery Shapes: The Pure and Useful Forms of Greek Vases (website) A visual guide to historical vessel shapes that can help you choose and understand a form for your first drawing. Link: Ancient Greek Pottery Shapes: The Pure and Useful Forms of Greek Vases (website) — https://thedelphiguide.com/ancient-greek-pottery-shapes/Drawing a form of your own design
Your second drawing lets you become the designer. Start with purpose. What should the piece do?
- Hold soup?
- Display flowers?
- Sit on a shelf as sculpture?
- Store pencils or tools?
Function changes form. A mug needs a handle that feels comfortable. A vase needs a stable base and an opening that supports stems. A sculpture can ignore some of those limits and focus more on shape, texture, and mood.
What to show in your drawings
Your counselor will learn more from a clear, thoughtful sketch than from a rushed piece of shading. Include details that show you understand form:
- Overall shape
- Height and width relationship
- Rim opening
- Body curve or wall angle
- Base or foot
- Handles, lid, spout, or decorative features if needed
A side view is often the most useful. If the piece has unusual decoration or a special top view, add a second small sketch.
Strong pottery sketch habits
Use these on both of your drawings- Start lightly: Block in the main silhouette before adding detail.
- Find the centerline: It helps you keep a symmetrical vessel balanced.
- Think in sections: Rim, neck, shoulder, belly, and foot each affect the final look.
- Label your ideas: Note materials, decoration, or what inspired the form.
The next requirement gives you the language potters use while making and talking about clay. Learning that vocabulary will help you describe what happens to a piece from wet clay to finished ceramic.
Req 4 — Pottery Vocabulary
Pottery has a lot of special vocabulary because clay changes so much from start to finish. Some words describe tools. Some describe materials. Some describe stages in a piece’s life. If you can explain these terms clearly, you will sound like someone who understands the process instead of someone guessing from the outside.
Tools and working methods
Bat — A removable round or flat surface attached to the wheel head. Potters use a bat so they can lift a freshly thrown piece without touching and warping it.
Wedging — Kneading clay to even out moisture, remove air pockets, and align the clay so it behaves better while building or throwing.
Throwing — Shaping clay on a spinning potter’s wheel with your hands and tools.
Grog — Fired clay that has been crushed into gritty particles and mixed into clay bodies to add strength and reduce shrinkage.
Slip — Clay mixed with water until it becomes creamy or liquid. Slip can be used for joining, decorating, or coating surfaces.
Score — Scratch or roughen two clay surfaces before adding slip and joining them. Scoring helps the pieces lock together.
Stages of drying and firing
Leather hard — Clay that has dried enough to hold its shape but is still damp enough to carve, trim, or attach pieces.
Bone dry — Clay that feels room-temperature dry and has no visible moisture left. At this stage it is very fragile.
Greenware — Any unfired clay object after it has been formed and dried.
Bisque — Pottery that has gone through its first firing. Bisque ware is harder than greenware but still porous enough to absorb glaze.
Pyrometric cone — A small cone made of special ceramic material that bends at a known heat-and-time combination inside the kiln. Potters use cones to measure how much firing work the kiln has done.
Clay families and surfaces
Terra-cotta — A reddish-brown fired clay, often low-fired, commonly used for flowerpots, tiles, and traditional earthenware.
Earthenware — Clay fired at a lower temperature. It is often more porous and can include terra-cotta bodies.
Stoneware — Clay fired hotter than earthenware, making it denser and stronger. Many mugs, bowls, and dinnerware pieces are stoneware.
Porcelain — A very fine, smooth clay body that fires hard and often white. It can be beautiful and translucent, but it is less forgiving to work with.
Glaze — A glass-like coating that melts onto pottery during firing. Glaze can add color, texture, shine, food-safe surfaces, or waterproofing.
A useful way to organize the terms
Group them by what they describe- Tools and methods: bat, wedging, throwing, score, slip
- Drying and firing stages: leather hard, bone dry, greenware, bisque, pyrometric cone
- Clay types and surfaces: terra-cotta, earthenware, stoneware, porcelain, glaze, grog
Official Resources
🎬 Video: Ceramics 101: Clay Vocabulary and Processes (video) — https://youtu.be/OdUBdRI3Iyw?si=agyum4noQ3XJTzH7
Req 5 puts this vocabulary to work. You will hand-build, sculpt, throw, and think about firing, so words like leather hard, score, bisque, and glaze will stop being definitions and start becoming real steps.
Req 5 — Build, Throw, and Fire
This requirement is where pottery becomes real. You are not just talking about clay anymore. You are shaping it in several different ways, finishing the surface yourself, and learning what happens before a piece is ready for the kiln.
The parent instruction matters here: every piece needs your own decorative choices. That does not mean every surface has to be fancy. It does mean you should think intentionally about color, texture, pattern, carving, or glaze rather than leaving the finish as an afterthought.
Requirement 5a
These three forms teach the core hand-building methods. Each one helps you understand clay structure a little differently.
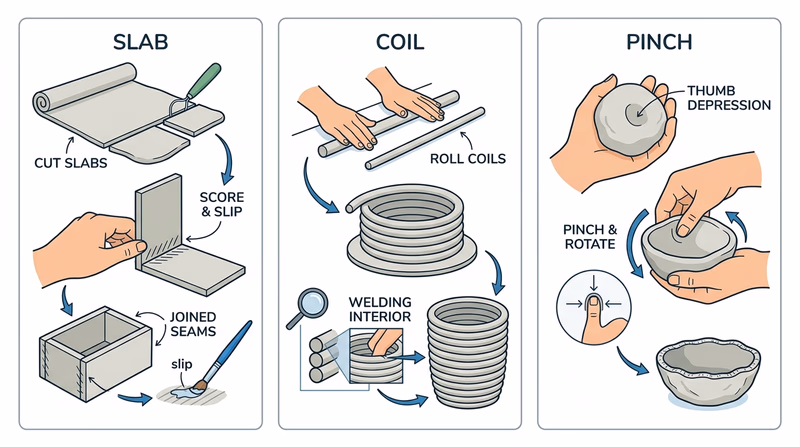
Slab pot
A slab pot starts with rolled-out sheets of clay. You cut shapes, score the edges, add slip, and join the pieces into a box, cup, tray, or other form. Slab work rewards careful measuring and clean edges.
Coil pot
A coil pot is built from rope-like coils stacked one row at a time. Coils can stay visible for texture or be smoothed together into a continuous wall. This method is great for building taller forms gradually.
Pinch pot
A pinch pot starts as a ball of clay with your thumb pressed into the center. You pinch and rotate the clay to open it evenly. It is one of the oldest pottery methods and one of the fastest ways to learn wall thickness by feel.
What makes hand-built pots stronger
Use the same habits on all three forms- Keep wall thickness even so one side does not dry or fire differently from another.
- Score and slip joins well so seams do not split apart.
- Compress the clay with fingers, ribs, or paddles to strengthen the surface.
- Dry slowly under light plastic if parts seem to be drying at different speeds.
🎬 Video: How to Make a Slab-Built Cup (video) — https://youtu.be/du2pWU4XlCk?si=fYc1HdnMT21PbSsr
🎬 Video: How to Use the Coil Hand Building Technique With Clay (video) — https://youtu.be/OdUBdRI3Iyw?si=PHYczPOJsfQ_9C38
🎬 Video: How to Make a Pinch Pot (video) — https://youtu.be/yCjClGmWHt4?si=WywL7M7feecMBBRV
Requirement 5b
Sculpture asks you to think less like a vessel-maker and more like a builder. The goal is shape, gesture, balance, and character.
Start with the biggest forms first. If you want to make an owl, dragon, or face, block in the body mass before fussing over eyes, feathers, or scales. Thin details can come later when the main structure is stable.
Strong sculpture habits
- Build around a solid form, not a pile of tiny details.
- Watch for weak overhangs like arms, ears, wings, or tails.
- Hollow very thick sections if your instructor recommends it so the piece dries and fires more safely.
- Add texture only after the main proportions look right.
🎬 Video: How to Sculpt a Human Face in Clay (video) — https://youtu.be/zIe2V-AtIfQ?si=1CqS59GVptHlrq4e
🎬 Video: Make a Dragon Out of Clay (video) — https://youtu.be/8-8qc9HVIuc?si=u2wvvvGST9de2HzA
🎬 Video: Clay Owl (video) — https://youtu.be/-ngZTmN4PPs?si=6sCuAga1MoAgSqRi
🎬 Video: Top 5 Sculpting Animals That Look Hard but Super Easy to Make (video) — https://youtu.be/vtYWm2fdy1Q?si=KdT-_SaoAVEzRvgi
Requirement 5c
A functional form is something meant to be used: a cup, bowl, cylinder, or small vase. For most beginners, a straight cylinder is the best starting point because it teaches centering, opening, and pulling walls.
Key wheel-throwing stages
- Center the clay so it spins without wobbling.
- Open the middle while keeping enough clay in the base.
- Pull the walls upward with steady pressure.
- Shape the form without making one area too thin.
- Compress the rim so it stays stronger.
🎬 Video: 5 Steps to Centering Clay on the Wheel (video) — https://youtu.be/5rGbj7JEAGI?si=2Rm_QlRq27ulOBNA
🎬 Video: How to Throw a Cylinder on the Potters Wheel (video) — https://youtu.be/I8OKU1hdTz8?si=cnPC0C2fSVEPGaD-
Requirement 5d
This part is about process and safety. Even if you do not operate the kiln yourself, you should understand the sequence clearly enough to describe it.
Loading a kiln
Pieces must be fully dry before firing. Potters place work with enough space for heat to circulate and for glazes not to run onto other pots or kiln shelves. Kiln shelves and posts create levels, and nothing should touch a heating element or block the kiln from closing properly.
Firing a kiln
A firing raises temperature in a controlled way. Early in the firing, leftover moisture must leave the clay safely. Later, the clay matures and the glaze melts at the right temperature range. Cones or digital controls help confirm the firing reached the intended amount of heat work.
Cooling matters too
Opening a kiln too early can crack ware or injure someone. Cooling is part of the firing, not an optional extra step.
🎬 Video: Loading Your Ceramics Kiln for Beginners (video) — https://youtu.be/RszdMD1WvwI?si=2yPatqCDUwON687Y
Bringing the whole requirement together
The four parts of Req 5 teach a big pottery truth: making is not one skill. It is a set of related skills. Hand-building teaches structure. Sculpture teaches form. Wheel throwing teaches control. Kiln knowledge teaches patience and process. Decoration ties all of it together by asking you to finish your work with intention.
Req 6 zooms out from your own projects to the much larger world of ceramics in American life.
Req 6 — The U.S. Ceramic Industry
If you only picture handmade mugs and art fair bowls, you are seeing just one corner of the ceramic world. In the United States, ceramics shows up in homes, schools, hospitals, vehicles, factories, and electronics. Pottery is the artistic doorway into a much bigger materials field.
What “the ceramic industry” includes
Ceramics are materials made from clay or other inorganic compounds that are shaped and then hardened by heat. That definition includes art pottery, but it also includes many products people never call “ceramics” in everyday speech.
Broadly, the industry includes:
- Art and studio ceramics — bowls, plates, sculpture, tile art, and one-of-a-kind work
- Construction ceramics — bricks, roof tiles, sewer pipe, and wall or floor tile
- Household ceramics — toilets, sinks, dishes, bakeware, and countertop surfaces
- Technical or advanced ceramics — spark plugs, electronic insulators, cutting tools, medical and aerospace components
Things made other than craft pottery
Here are examples worth mentioning to your counselor:
- Bathroom fixtures such as toilets and sinks
- Tile for floors, showers, and walls
- Bricks and masonry products for buildings
- Electrical insulators that help control current safely
- Spark plugs used in engines
- Heat-resistant parts used in furnaces and industrial equipment
- Dental crowns and medical implants made from specialized ceramic materials
- Protective and engineering parts in electronics, vehicles, and some aerospace uses
Why ceramics are used so widely
Ceramic materials are valuable because many of them can resist heat, wear, chemicals, or electricity better than other materials. Some are porous when that is useful. Others become dense and extremely hard after firing.
That is why a studio potter and an engineer might both care about firing temperature, shrinkage, and material composition even though their final products look nothing alike.
What Are Ceramics? (website) An overview from a ceramics organization that shows how pottery connects to engineering, manufacturing, and advanced materials. Link: What Are Ceramics? (website) — https://ceramics.org/about/what-are-ceramics/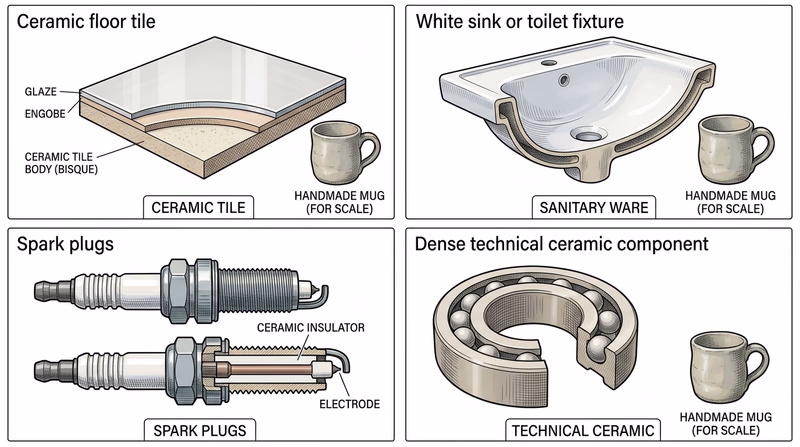
Req 7 asks you to choose a real-world pottery experience. That is a good next step, because the best way to understand a field is to see people doing it in real places.
Req 7 — Choosing Your Field Experience
You must choose exactly one option for this requirement. The best choice is the one you can actually complete well, with good notes and a thoughtful conversation afterward.
Your options
- Req 7a — Visit a Kiln Yard: Visit a college or craft-school kiln yard and learn how several types of kilns work. This option is best if you want to understand firing equipment and studio operations.
- Req 7b — Learn from Pottery in Person: Visit a museum, exhibit, gallery, artists’ co-op, or studio that features pottery. This option is best if you enjoy looking closely at finished work and learning from artists, collections, and displays.
- Req 7c — Pottery in History and Culture: Research pottery’s historical and cultural importance using books, magazines, and approved online sources. This option is best if travel is difficult or if you are especially interested in history and meaning.
How to choose
Choosing the best option for you
Compare the practical side and what you will gain- Time available: Option 7a and 7b may require scheduling a visit. Option 7c can be done more flexibly over several shorter sessions.
- Access to places: Option 7a works best if you can reach a college, craft school, or studio with multiple kilns. Option 7b works best if you have museums, galleries, or studios nearby.
- What you will gain: Option 7a builds technical understanding of kilns and firing. Option 7b sharpens observation and artistic judgment. Option 7c builds historical and cultural understanding.
- How you like to learn: Choose 7a if you like equipment and process, 7b if you learn best by seeing objects in person, and 7c if you enjoy reading, comparing, and discussing ideas.
| Option | Best for Scouts who want to… | Main challenge | Big payoff |
|---|---|---|---|
| 7a | Understand kilns and firing systems | Finding a visit location and asking good technical questions | You will see how heat, fuel, and kiln design affect pottery |
| 7b | Study finished pottery up close | Taking strong notes instead of just browsing | You will notice form, surface, and display choices like an artist |
| 7c | Explore meaning, history, and culture | Organizing research into a clear explanation | You will connect pottery to real people, places, and traditions |
You do not need to decide forever. You only need to choose the one option you can complete thoughtfully right now. The next page starts with the kiln-yard visit option.
Req 7a — Visit a Kiln Yard
A kiln yard is where pottery shifts from wet clay to finished ceramic. If you choose this option, your job is not just to walk around and say “that kiln looks big.” Your job is to notice what kind of heat each kiln uses, how the atmosphere changes the results, and why potters choose one firing style over another.
What to look for during the visit
Low-fire electric kilns
Electric kilns use heating elements powered by electricity. They are common in schools and community studios because they are relatively predictable and easier to control. Low-fire work often includes bright glaze colors and classroom-friendly production.
Gas or propane high-fire kilns
These kilns burn fuel and are often used for higher-temperature firings. Potters can adjust the kiln atmosphere, which affects glaze color and surface. They require more technical control and more safety awareness.
Wood or salt/soda kilns
Wood kilns create long, labor-intensive firings and can leave ash effects on the surface of pots. Salt and soda firings introduce vapor into the kiln atmosphere, which reacts with clay and glaze surfaces. These kilns are often chosen for distinctive, less predictable finishes.
Raku kilns
Raku firing is usually fast and dramatic. Pieces are often removed while still glowing hot and placed into combustible materials, creating smoky surface effects. Because of the heat and rapid handling, raku demands strict adult supervision and serious safety practices.
Questions worth asking
Good kiln-yard questions
Bring these so your visit becomes a real learning experience- What fuel or power source does this kiln use?
- What temperature range does it usually fire to?
- What kinds of clay or glaze work best in it?
- How long does a firing take, including cooling?
- What makes this kiln different from the others here?
Official Resource
Types of Kilns (website) A comparison of kiln styles and fuel systems that can help you prepare smart questions before your visit. Link: Types of Kilns (website) — https://www.kilncontrol.com/blog/types-of-kilns/
If you decide a kiln-yard visit is not the best fit, the next option shifts from firing equipment to pottery as art seen in person.
Req 7b — Learn from Pottery in Person
Pottery looks different when it is right in front of you. Photographs flatten scale, texture, and surface in a way real life does not. This option is about learning to observe carefully, not just strolling past display cases.
What to notice during your visit
Form
How is the piece shaped? Is it tall and narrow, wide and stable, or balanced in a surprising way? Ask what the form suggests before you even read the label.
Surface
Look closely at glaze, carving, paint, texture, burnishing, or firing marks. Does the surface feel smooth, rough, glossy, smoky, cracked, layered, or intentional in some other way?
Function or purpose
Can you tell whether the object was made for use, ceremony, storage, display, or storytelling? Some pieces are clearly functional. Others are more like sculpture.
Context
What does the label, gallery note, or artist statement tell you about where the work came from? Pottery often makes more sense when you know the culture, time period, or studio tradition behind it.
Good notes to bring back
Your counselor discussion will be stronger if you record more than “I liked it.” Try to bring back notes like these:
- Name of the place you visited
- Date of the visit
- One or two specific pieces you studied
- What stood out about form, decoration, or firing
- What you learned from labels, guides, or artists
- One idea you might borrow in your own pottery
The last option in Req 7 works well if you want to focus on history and cultural meaning instead of an in-person visit.
Req 7c — Pottery in History and Culture
Pottery matters to history because it lasts. A broken basket disappears. A burned wooden spoon disappears. A fired clay jar may survive for hundreds or even thousands of years. That makes pottery one of the best clues people leave behind.
Why pottery matters in history
Archaeologists study pottery to learn how people lived. Vessel shapes suggest what people cooked, stored, traded, or carried. Decorative patterns can show regional identity or religious meaning. Clay sources can even reveal trade routes when the material came from somewhere else.
Why pottery matters in culture
Pottery is more than a container. In many traditions, it carries memory, status, ceremony, and local identity. Some pottery styles are tied to particular communities and techniques passed from one generation to the next. A bowl can show not only how it was made, but who made it and what values shaped it.
Three strong directions for research
- Daily life: How pottery helped with cooking, storage, transport, and water
- Art and symbolism: How painted or carved pottery tells stories or marks rituals
- Cultural continuity: How living pottery traditions preserve skills and identity today
🎬 Video: History Behind Southwestern Arts: Pottery (video) — https://youtu.be/DredVZ9901c?si=t1q5qHJoiZYXT1sZ
🎬 Video: Artifact Exploration: Greek Vases (video) — https://youtu.be/lEtUExELKWM?si=t-eV0aXrNOoIlyB5
Turning research into a good counselor conversation
Your counselor does not need a huge report. They need a clear explanation of what you discovered.
A strong summary might include:
- one culture or time period you researched
- one example of how pottery was used
- one example of what pottery design or decoration communicated
- one reason pottery is still valuable to historians or communities today
A clear research summary
Organize your notes before meeting your counselor- Source: Where did the information come from?
- Place or culture: Who made the pottery?
- Importance: Why did it matter in that setting?
- Evidence: What form, material, decoration, or use showed that importance?
- Your takeaway: What surprised or interested you most?
Req 8 turns from history to the future by asking how pottery could connect to a career.
Req 8 — Pottery Careers
A career in pottery does not have to mean only “selling handmade bowls.” Clay work connects to teaching, studio ownership, industrial ceramics, museum work, materials science, and design. This requirement asks you to look at the real path behind one job and decide whether it fits your interests.
Career paths connected to pottery
Here are several directions you could explore:
- Studio potter — designs, makes, fires, and sells ceramic work
- Ceramics teacher or instructor — teaches pottery in schools, studios, or colleges
- Ceramic engineer or materials scientist — develops advanced ceramic products for industry
- Kiln technician or studio manager — maintains firing equipment and keeps a studio running safely
- Museum curator or collections specialist — studies, preserves, and interprets ceramic objects
- Tile or product designer — develops ceramic surfaces and functional products for homes or businesses
Pick one career and go deeper
Once you choose one profession, look for three things:
Education
Does the career usually require high school plus on-the-job training, a trade path, art school, college, or a specialized science or engineering degree?
Training
What hands-on skills does the person need? Throwing, glazing, kiln firing, teaching, chemistry, design software, lab work, or business skills may all matter depending on the role.
Experience
How do people get started? Internships, apprenticeships, assistant studio jobs, teaching practice, exhibitions, or engineering projects can all count as experience.
🎬 Video: Dream Jobs - Potter (video) — https://youtu.be/g6oEMTTDMj8?si=3zvLwHwlvCqg-bsP
Making your discussion stronger
Do not stop at “this job sounds cool.” Try to explain why it fits you.
For example:
- If you like teaching and working with people, ceramics instruction may appeal to you.
- If you like chemistry and engineering, advanced ceramics may be more exciting than studio pottery.
- If you enjoy building a personal style and selling creative work, studio pottery may be the right path to study.
Questions to answer for your chosen career
Use these to prepare for your counselor conversation- What does the person actually do each day?
- What education is commonly required?
- What training or practice builds skill in this field?
- What early experience helps someone get started?
- Why might this profession interest you personally?
You have reached the end of the requirements. The Extended Learning page keeps going with bigger ideas, deeper practice, and places to explore next.
Extended Learning
Congratulations
You have made it through a badge that asks for patience, observation, and a willingness to learn from both success and failure. Pottery rewards the Scout who keeps showing up, even after a cracked seam, a collapsed wall, or a glaze result that looked better in your head than on the shelf.
If that challenge hooked you, good news: pottery has deep roots and a long future. There is always another form to try, another firing style to study, and another artist or tradition to learn from.
Reading a Pot Like a Potter
Experienced potters do not look at a finished piece only as “pretty” or “not pretty.” They read evidence in it. They notice where the form swells, where the rim tightens, whether the foot feels heavy or light, and how the glaze pools at edges or breaks over texture.
Try studying a pot this way:
- What was the maker trying to emphasize: use, elegance, texture, or story?
- Does the form feel balanced when you imagine holding it?
- What would be difficult about making this piece well?
That kind of slow looking will make your own work better because you will start noticing choices instead of only results.
Firing Changes Everything
Many beginners think the exciting part of pottery ends once the form is built. In reality, firing is where clay becomes ceramic and where many visual surprises happen.
The same piece can look very different depending on clay body, glaze chemistry, kiln atmosphere, and firing temperature. Oxidation, reduction, wood ash, soda vapor, and cooling speed can all change the final surface. That is one reason potters often keep notebooks with clay recipes, glaze tests, cone results, and firing notes.
Pottery as Community
Pottery can be solitary, but it is often deeply social. Community studios share kilns, glaze buckets, wedging tables, and ideas. Potters learn by watching each other trim feet, pull handles, stack kilns, and solve glaze problems.
That means one of the best ways to improve is simply to spend time where pottery happens. Ask questions. Volunteer to help clean shelves. Watch a demonstration. Notice how experienced makers set up their tools and pace their work.
Traditions Worth Exploring
If you want to keep learning, pick one pottery tradition and follow it for a while. Study the forms, surfaces, and firing methods that make it distinctive.
Possible paths include:
- Pueblo pottery and its relationship to community, story, and place
- Greek painted vessels and how shape matched function
- Japanese tea ware and the beauty of irregular, hand-touched surfaces
- Modern studio pottery movements in the United States and Europe
The more traditions you compare, the more you realize there is no single “correct” pottery style.
Real-World Experiences
Take a community ceramics class
Look for parks departments, art centers, or community colleges that offer beginner wheel or hand-building classes.
Visit a pottery market or art fair
Compare many makers in one day and notice how different artists solve the same problems of form and surface.
Watch a live firing or demo
Seeing kiln loading, raku firing, or a wheel demonstration gives you timing and scale that videos cannot fully show.
Start a pottery notebook
Keep sketches, glaze ideas, vocabulary, artist names, and notes from visits so your learning keeps building over time.
Organizations
The American Ceramic Society
A major organization connecting ceramics art, science, engineering, and industry.
National Council on Education for the Ceramic Arts
Supports ceramic art, exhibitions, teaching, and professional development.
Archie Bray Foundation
A well-known ceramics center focused on residencies, exhibitions, and artist development.
Ceramic Arts Network
Offers articles, videos, and technique resources for ceramic artists and teachers.