Req 3 — Drawing Pottery Forms
Before clay ever touches a wheel or table, a potter often starts with a drawing. Sketching helps you think about proportion, balance, handles, rims, feet, and decoration before you commit to a form that might take hours to build.
Drawing a historical pottery style
The goal is not just to copy an old pot. It is to notice what made that form useful or meaningful in its own time.
Ask yourself:
- Was it made for storage, pouring, cooking, serving, or ceremony?
- Does the shape look wide, narrow, tall, stable, heavy, elegant, or easy to carry?
- Where would decoration naturally go — on the shoulder, rim, body, or foot?
A Greek amphora, Pueblo jar, Japanese tea bowl, or Roman oil lamp all show different design priorities. Some were made to travel. Some were meant to pour without spilling. Some were meant to honor tradition more than efficiency.
Ancient Greek Pottery Shapes: The Pure and Useful Forms of Greek Vases (website) A visual guide to historical vessel shapes that can help you choose and understand a form for your first drawing. Link: Ancient Greek Pottery Shapes: The Pure and Useful Forms of Greek Vases (website) — https://thedelphiguide.com/ancient-greek-pottery-shapes/Drawing a form of your own design
Your second drawing lets you become the designer. Start with purpose. What should the piece do?
- Hold soup?
- Display flowers?
- Sit on a shelf as sculpture?
- Store pencils or tools?
Function changes form. A mug needs a handle that feels comfortable. A vase needs a stable base and an opening that supports stems. A sculpture can ignore some of those limits and focus more on shape, texture, and mood.
What to show in your drawings
Your counselor will learn more from a clear, thoughtful sketch than from a rushed piece of shading. Include details that show you understand form:
- Overall shape
- Height and width relationship
- Rim opening
- Body curve or wall angle
- Base or foot
- Handles, lid, spout, or decorative features if needed
A side view is often the most useful. If the piece has unusual decoration or a special top view, add a second small sketch.
Strong pottery sketch habits
Use these on both of your drawings
- Start lightly: Block in the main silhouette before adding detail.
- Find the centerline: It helps you keep a symmetrical vessel balanced.
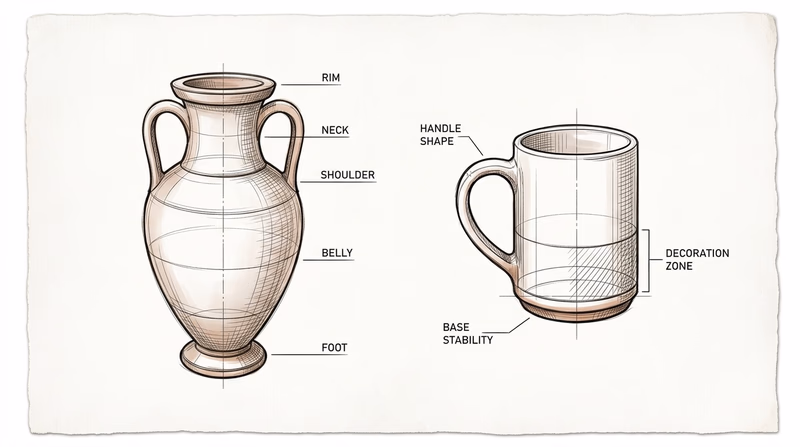
- Think in sections: Rim, neck, shoulder, belly, and foot each affect the final look.
- Label your ideas: Note materials, decoration, or what inspired the form.
The next requirement gives you the language potters use while making and talking about clay. Learning that vocabulary will help you describe what happens to a piece from wet clay to finished ceramic.