Req 5 — Build, Throw, and Fire
This requirement is where pottery becomes real. You are not just talking about clay anymore. You are shaping it in several different ways, finishing the surface yourself, and learning what happens before a piece is ready for the kiln.
The parent instruction matters here: every piece needs your own decorative choices. That does not mean every surface has to be fancy. It does mean you should think intentionally about color, texture, pattern, carving, or glaze rather than leaving the finish as an afterthought.
Requirement 5a
These three forms teach the core hand-building methods. Each one helps you understand clay structure a little differently.
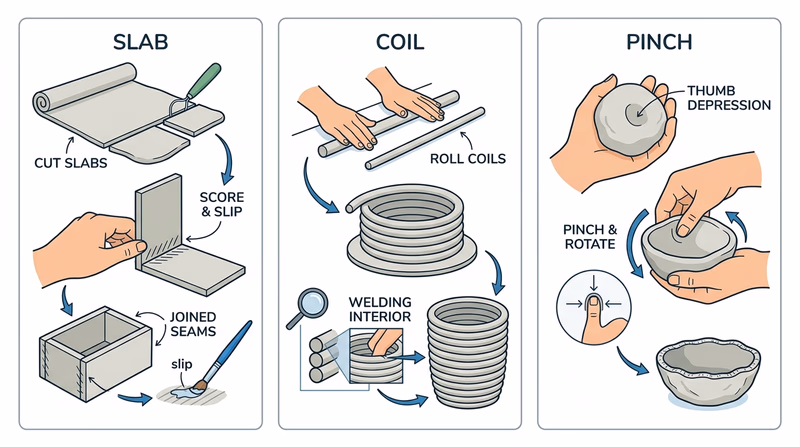
Slab pot
A slab pot starts with rolled-out sheets of clay. You cut shapes, score the edges, add slip, and join the pieces into a box, cup, tray, or other form. Slab work rewards careful measuring and clean edges.
Coil pot
A coil pot is built from rope-like coils stacked one row at a time. Coils can stay visible for texture or be smoothed together into a continuous wall. This method is great for building taller forms gradually.
Pinch pot
A pinch pot starts as a ball of clay with your thumb pressed into the center. You pinch and rotate the clay to open it evenly. It is one of the oldest pottery methods and one of the fastest ways to learn wall thickness by feel.
What makes hand-built pots stronger
Use the same habits on all three forms
- Keep wall thickness even so one side does not dry or fire differently from another.
- Score and slip joins well so seams do not split apart.
- Compress the clay with fingers, ribs, or paddles to strengthen the surface.
- Dry slowly under light plastic if parts seem to be drying at different speeds.
🎬 Video: How to Make a Slab-Built Cup (video) — https://youtu.be/du2pWU4XlCk?si=fYc1HdnMT21PbSsr
🎬 Video: How to Use the Coil Hand Building Technique With Clay (video) — https://youtu.be/OdUBdRI3Iyw?si=PHYczPOJsfQ_9C38
🎬 Video: How to Make a Pinch Pot (video) — https://youtu.be/yCjClGmWHt4?si=WywL7M7feecMBBRV
Requirement 5b
Sculpture asks you to think less like a vessel-maker and more like a builder. The goal is shape, gesture, balance, and character.
Start with the biggest forms first. If you want to make an owl, dragon, or face, block in the body mass before fussing over eyes, feathers, or scales. Thin details can come later when the main structure is stable.
Strong sculpture habits
- Build around a solid form, not a pile of tiny details.
- Watch for weak overhangs like arms, ears, wings, or tails.
- Hollow very thick sections if your instructor recommends it so the piece dries and fires more safely.
- Add texture only after the main proportions look right.
🎬 Video: How to Sculpt a Human Face in Clay (video) — https://youtu.be/zIe2V-AtIfQ?si=1CqS59GVptHlrq4e
🎬 Video: Make a Dragon Out of Clay (video) — https://youtu.be/8-8qc9HVIuc?si=u2wvvvGST9de2HzA
🎬 Video: Clay Owl (video) — https://youtu.be/-ngZTmN4PPs?si=6sCuAga1MoAgSqRi
🎬 Video: Top 5 Sculpting Animals That Look Hard but Super Easy to Make (video) — https://youtu.be/vtYWm2fdy1Q?si=KdT-_SaoAVEzRvgi
Requirement 5c
A functional form is something meant to be used: a cup, bowl, cylinder, or small vase. For most beginners, a straight cylinder is the best starting point because it teaches centering, opening, and pulling walls.
Key wheel-throwing stages
- Center the clay so it spins without wobbling.
- Open the middle while keeping enough clay in the base.
- Pull the walls upward with steady pressure.
- Shape the form without making one area too thin.
- Compress the rim so it stays stronger.
🎬 Video: 5 Steps to Centering Clay on the Wheel (video) — https://youtu.be/5rGbj7JEAGI?si=2Rm_QlRq27ulOBNA
🎬 Video: How to Throw a Cylinder on the Potters Wheel (video) — https://youtu.be/I8OKU1hdTz8?si=cnPC0C2fSVEPGaD-
Requirement 5d
This part is about process and safety. Even if you do not operate the kiln yourself, you should understand the sequence clearly enough to describe it.
Loading a kiln
Pieces must be fully dry before firing. Potters place work with enough space for heat to circulate and for glazes not to run onto other pots or kiln shelves. Kiln shelves and posts create levels, and nothing should touch a heating element or block the kiln from closing properly.
Firing a kiln
A firing raises temperature in a controlled way. Early in the firing, leftover moisture must leave the clay safely. Later, the clay matures and the glaze melts at the right temperature range. Cones or digital controls help confirm the firing reached the intended amount of heat work.
Cooling matters too
Opening a kiln too early can crack ware or injure someone. Cooling is part of the firing, not an optional extra step.
🎬 Video: Loading Your Ceramics Kiln for Beginners (video) — https://youtu.be/RszdMD1WvwI?si=2yPatqCDUwON687Y
Bringing the whole requirement together
The four parts of Req 5 teach a big pottery truth: making is not one skill. It is a set of related skills. Hand-building teaches structure. Sculpture teaches form. Wheel throwing teaches control. Kiln knowledge teaches patience and process. Decoration ties all of it together by asking you to finish your work with intention.
Req 6 zooms out from your own projects to the much larger world of ceramics in American life.