Railroading Merit Badge — Complete Digital Resource Guide
https://merit-badge.university/merit-badges/railroading/guide/
Introduction & Overview
Overview
Railroading is one of the forces that built America. Trains moved settlers west, carried coal and steel to industrial cities, and connected coasts in ways that no other technology could match. Today railroads haul nearly a third of all freight moved in the United States and carry millions of commuters every day — quietly, efficiently, and with a smaller carbon footprint per ton-mile than any other land transport. This badge takes you inside how that system works.
Then and Now
Then
On May 10, 1869, a golden spike was driven at Promontory Summit, Utah, completing the first transcontinental railroad. What had taken months by wagon now took days by train. By 1900 the United States had more miles of railroad track than the rest of the world combined. Steam locomotives thundered over mountain passes, telegraph lines followed the rails, and entire towns sprang up wherever a depot opened. The railroad industry was the largest employer in the country and set the pace for everything from standardized time zones to modern corporate management.
Now
Steam is long gone, but the railroad is far from a relic. Seven Class I freight railroads — including BNSF, Union Pacific, CSX, and Norfolk Southern — operate a combined network of roughly 140,000 miles and move everything from grain and coal to automobiles and intermodal containers stacked two-high. Passenger rail through Amtrak connects 500+ cities, while urban transit agencies run light rail, subways, and commuter trains in every major metro area. Precision scheduled railroading (PSR), positive train control (PTC), and battery-electric locomotives are reshaping operations for the 21st century.
Get Ready!
You don’t need to live near a rail yard or own a model railroad to earn this badge. You need curiosity and a willingness to look carefully — at maps, at equipment, at how large systems are organized. Every town in America has a railroad story. Most still have tracks nearby. Keep your eyes open as you work through these requirements and you’ll start seeing the network everywhere.
Kinds of Railroading
Railroading is not one thing — it’s a family of related industries and activities. Here is how the major branches break down:
Freight Rail
Freight railroads are private businesses that own and operate their own track. They haul bulk commodities (coal, grain, chemicals, lumber), intermodal containers, automotive shipments, and much more. Class I railroads are the giants — each earns more than $500 million annually and operates thousands of miles of track. Regional and shortline railroads fill in the gaps, connecting smaller communities to the Class I network.
Passenger Rail
Amtrak is the national intercity passenger railroad, created by Congress in 1970 to preserve long-distance rail travel after private railroads stopped running passenger trains. Amtrak operates on tracks mostly owned by freight railroads, running corridor trains (like the Northeast Corridor between Boston and Washington) as well as long-distance routes like the California Zephyr and the Empire Builder.
Transit Rail
Urban and suburban rail transit moves commuters inside and between cities. The major forms include heavy rail subways (New York, Chicago, Washington D.C.), light rail lines (Portland, Denver, Dallas), and commuter rail systems (Metra in Chicago, LIRR in New York, Caltrain in the Bay Area). These systems are publicly funded and operated, designed for high-frequency service over shorter distances.
Hobby Railroading
Model railroading is one of the most popular hobbies in the country. Enthusiasts build scaled-down layouts representing real or imagined railroads, using scales from tiny Z (1:220) to room-filling G (1:22.5). Railfanning — photographing, tracking, and documenting trains — is another active community. Both hobbies develop real skills in history, geography, electronics, and engineering.
Next Steps
Requirement 1 asks you to choose three areas of railroad knowledge to dig into. The four options cover freight train types, railroad geography, car identification, and locomotive technology — all fundamental to understanding how the rail network functions. Read the overview page for Requirement 1 to decide which three are the best fit for you.
Req 1 — Choose Three Rail Foundations
Requirement 1 has four options. You must complete exactly three of them. Each option builds a different kind of rail knowledge — train types, network geography, car identification, or locomotive technology. The four options stack well together; there is no wrong combination.
Your Options at a Glance
Req 1a — Modern Freight Trains — Name three types of modern freight trains and explain why unit trains are more efficient than mixed freight trains. Good for Scouts who like logistics, economics, and how large systems are organized. Mostly verbal/written — no models required.
Req 1b — Mapping a Railroad System — Pick one Class I or regional railroad and explain its route network: cities served, key terminals, service facilities, crew change points, and what it hauls. Good for Scouts who like maps, research, and understanding how businesses work geographically.
Req 1c — Freight and Passenger Cars — Using models or pictures, identify ten types of railroad cars and explain what each type carries or does. Good for Scouts who are visual learners or already interested in model railroading. Pictures from the internet count.
Req 1d — How Locomotives Make Power — Explain how a modern diesel or electric locomotive generates tractive effort, and explain the terms dynamic braking and radial steering trucks. Good for Scouts who like engines, mechanics, and physics.
How to Choose
Ask yourself:
- Do I want to work mostly from memory and discussion, or do I want pictures and models in front of me?
- Am I more interested in how trains run (1a, 1d) or what they look like and where they go (1b, 1c)?
- Does my counselor have any preference or materials that fit one option better?
There is no required order for completing the three options you choose. You can work through them in any sequence — the guide pages are organized 1a through 1d for convenience only.
Pick the three options that feel most useful or interesting, then move through them one at a time. You do not need to turn Requirement 1 into a paperwork exercise — the real goal is to understand the three areas well enough to talk through them confidently with your counselor.
Req 1a — Modern Freight Trains
Modern freight railroads do not run one kind of train — they run several, each optimized for a specific cargo or market. For this requirement you need to name three types and explain the efficiency advantage of unit trains over mixed freight trains.
Three Types of Modern Freight Trains
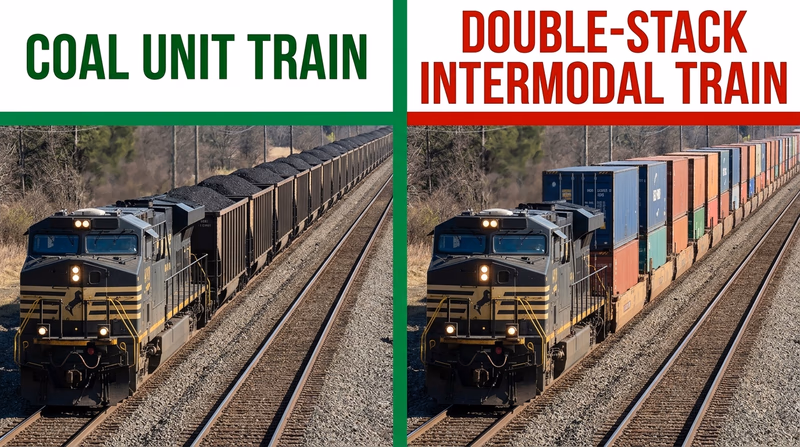
Unit Trains
A unit train carries a single commodity from one origin to one destination without stopping to switch cars. Every car on the train is the same type, loaded with the same product, and destined for the same terminal. Common unit train types include:
- Coal unit trains — 100–135 open hopper or gondola cars running from mine to power plant
- Grain unit trains — covered hoppers hauling corn, wheat, or soybeans from elevators to export terminals
- Intermodal unit trains — double-stack container cars running between ports and inland distribution centers
- Crude oil unit trains — tank cars moving petroleum from producing regions to refineries
- Potash and fertilizer unit trains — covered hoppers serving agricultural markets
Mixed Freight (Manifest) Trains
A manifest train carries a variety of car types and commodities picked up from and delivered to many different customers along the route. Cars are sorted and switched at classification yards. Manifest trains are more flexible than unit trains but require more handling and take longer to reach their destinations.
Intermodal Trains
Intermodal trains deserve special mention even though they are technically a subtype of unit train. They carry shipping containers — either international ocean containers or domestic trailers — in standardized well cars that allow two containers to be stacked. Intermodal has been the fastest-growing rail segment for decades because containers move seamlessly between ships, trains, and trucks.
Why Unit Trains Are More Efficient
This is the heart of what your counselor will ask about. Be ready to explain the efficiency difference clearly.
Unit Train Efficiency Factors
Know all of these for your counselor discussion- No switching delays — a unit train never stops to add or remove cars at intermediate yards. It runs point-to-point.
- Faster turnaround — the train can be loaded, run, unloaded, and returned in a predictable cycle. Many coal and grain unit trains operate as a continuous loop.
- Higher utilization — locomotives and crews spend more time moving and less time waiting in yards.
- Purpose-built equipment — all cars are identical and optimized for that one commodity, reducing empty space and weight.
- Easier scheduling — a single-product, single-destination train is simpler to plan and less likely to be delayed by yard congestion.
- Lower cost per ton-mile — fewer labor hours, less fuel wasted at idle, and higher average speed all combine to reduce the cost of moving each ton.
A mixed freight (manifest) train, by contrast, must visit multiple yards to sort and switch cars. Each switching move takes time, ties up yard crews, and delays the shipment. A carload of freight in manifest service might spend more time sitting in yards than actually moving.
How to Present This to Your Counselor
You will explain these concepts verbally — no written report is required unless your counselor asks for one. Practice saying out loud: “A unit train carries one commodity from one place to another without switching cars, so it’s faster and cheaper than a mixed freight train, which has to stop at yards to sort cars for different destinations.” That sentence covers the core idea.
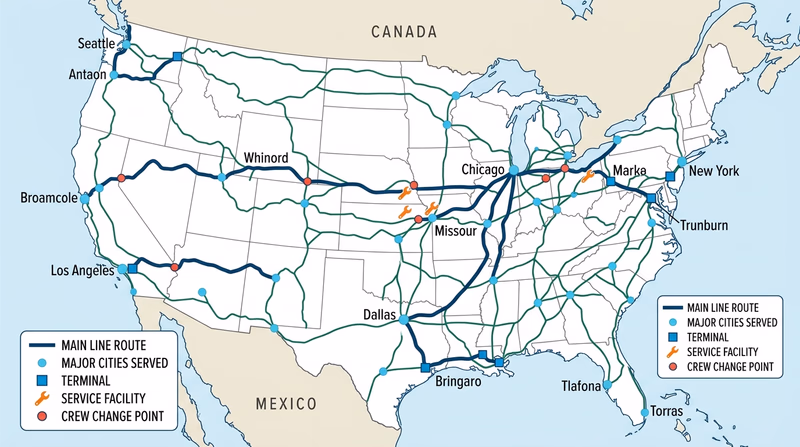
Req 1b — Mapping a Railroad System
This requirement asks you to study a real railroad as a complete system — not just its name, but its geography, its infrastructure, and its business. Think of it as building a mental map of one railroad’s world.
Step 1 — Choose Your Railroad
Class I railroads are the seven largest freight railroads in North America, each earning over $500 million in annual revenue:
| Railroad | Abbreviation | Primary Territory |
|---|---|---|
| BNSF Railway | BNSF | Western U.S., Pacific Northwest to Midwest |
| Union Pacific Railroad | UP | Western and Central U.S. |
| CSX Transportation | CSX | Eastern U.S., Southeast to Midwest |
| Norfolk Southern Railway | NS | Eastern U.S., Southeast and Appalachian region |
| Canadian National Railway | CN | U.S. Gulf Coast to Canada (operates in U.S.) |
| Canadian Pacific Kansas City | CPKC | Central U.S. corridor, Canada to Mexico |
| Soo Line / Canadian Pacific (merged) | — | See CPKC |
Regional railroads are mid-size freight railroads operating over shorter distances. Examples: Florida East Coast Railway, Kansas City Southern (now part of CPKC), Iowa Interstate Railroad.
Step 2 — Research the Four Elements
Once you pick your railroad, gather information on all four areas the requirement specifies:
Major Cities Served
List the major metropolitan areas on the railroad’s route map. For a Class I, this will be a long list — focus on the biggest hubs. For BNSF, for example: Chicago, Kansas City, Denver, Los Angeles, Seattle, Portland, Minneapolis, Fort Worth.
Major Terminals
Terminals are facilities where trains are assembled, disassembled, or switched. The largest are classification yards, where cars are sorted by destination. Famous examples:
- Barstow, CA (BNSF) — a major intermodal and classification hub in the Mojave Desert
- North Platte, NE (Union Pacific) — Bailey Yard, the world’s largest railroad classification yard
- Selkirk, NY (CSX) — a major Northeast classification yard
Also note any intermodal terminals (where containers are transferred between trains and trucks) and automotive facilities (where new vehicles are handled).
Service Facilities
Service facilities are where locomotives are fueled, inspected, and repaired. Look for your railroad’s main locomotive shops and engine terminals. These are often located at division points along the main line.
Crew Change Points
Crews work under federal regulations that limit how many hours they can be on duty without rest. When a crew reaches their limit, a fresh crew takes over — this happens at a crew change point or division point. These towns typically have a small rail presence: a crew hotel (called a “bunkhouse” or “crew facility”), a small yard or siding, and sometimes a service track. On a 1,500-mile run, there might be five or six crew changes.
Major Commodities
What does your railroad primarily haul? Class I railroads tend to specialize:
- BNSF — coal (Powder River Basin), grain, intermodal containers
- Union Pacific — chemicals, intermodal, automotive, agriculture
- CSX — intermodal, coal, chemicals, automotive
- Norfolk Southern — intermodal, coal, metals, agricultural products
Step 3 — Putting It Together
You do not need to memorize every detail. Your counselor wants to see that you understand how the railroad functions as a network — that cities, terminals, crew points, and commodities are all connected. Try sketching a rough map of your chosen railroad’s main route with five to ten cities marked. Add a symbol for each major terminal and note the top two or three commodities alongside the lines.
Req 1b Research Checklist
- Chosen a specific Class I or regional railroad by name
- Listed at least five major cities served
- Identified at least two major terminals (classification yards or intermodal hubs)
- Described where service facilities are located
- Explained what crew change points are and named at least one on your railroad
- Listed the top two or three commodities the railroad hauls
Req 1c — Freight and Passenger Cars
You need to identify ten car types and explain what each one does. “Using models or pictures” means you can work from photographs, diagrams, or physical models — you do not need to go out and find the cars in person. A printed or on-screen reference sheet works perfectly.
Ten Car Types to Know
Here is a solid set of ten that covers both freight and passenger rail. Learn the silhouette and function of each.
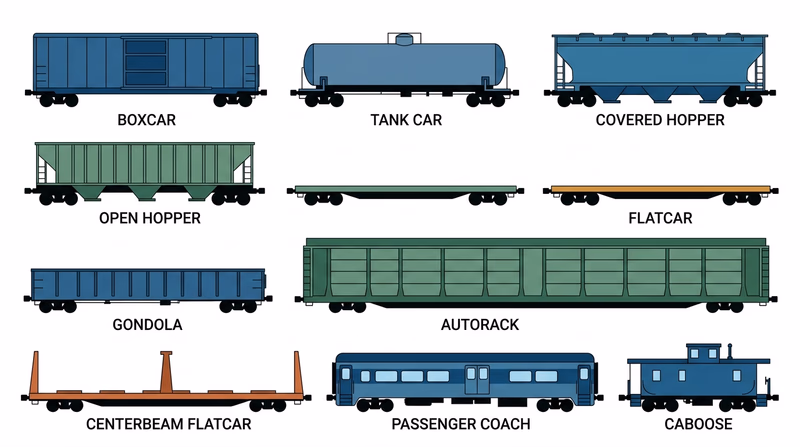
Freight Cars
1. Boxcar — A fully enclosed rectangular car used to protect cargo from weather. Carries everything from packaged goods and paper rolls to auto parts and canned goods. One of the most common and recognizable car types.
2. Flatcar — An open platform with no sides or roof. Used for large, heavy, or oddly shaped loads including lumber, steel beams, military vehicles, and construction equipment.
3. Gondola — An open-top car with fixed sides and a flat floor. Used for bulk loads that do not need weather protection: scrap metal, steel coils, sand, aggregate, and coal.
4. Hopper — An open-top car with sloped floors and bottom-discharge gates. Coal, grain, potash, and other loose bulk materials flow out through the bottom when the hatches are opened. Covered hoppers have a roof and are used for grain, cement, and plastic pellets that need to stay dry.
5. Tank Car — A cylindrical pressurized or non-pressurized tank mounted on a car frame. Carries liquids and gases: crude oil, ethanol, propane, chlorine, molten sulfur, and corn syrup. Tank cars are regulated by the DOT because many carry hazardous materials.
6. Well Car (Double-Stack Car) — A specialized car with a low center section (the “well”) that allows two standard ocean containers to be stacked on top of each other. Used exclusively in intermodal service — the backbone of modern long-distance container shipping by rail.
7. Autorack — A multi-level steel rack car that carries new automobiles and light trucks. Typically two or three levels high. The vehicles are driven on and secured at loading facilities. Autoracks carry virtually every new car sold in the U.S. that was not manufactured near its dealership.
8. Centerbeam Flatcar — A flatcar with a vertical steel beam down the center. Loads of lumber, wallboard, or fence posts are stacked on both sides and strapped to the beam for stability during transit.
9. Refrigerated Boxcar (Reefer) — An insulated boxcar with a mechanical refrigeration unit. Carries perishables such as produce, meat, frozen foods, and beer that must stay at controlled temperatures. Modern reefers can maintain precise temperatures for multi-day cross-country runs.
10. Passenger Coach — A climate-controlled car with seating for 50–80 passengers. Used on Amtrak trains and commuter rail services. Modern coaches include large windows, overhead luggage racks, electrical outlets, and accessible seating. Amtrak’s Superliner coaches are bi-level; single-level coaches are more common on commuter systems.
Bonus Types Worth Knowing
Once you have your ten solid, you might also be able to identify:
- Sleeper car (Amtrak, private roomettes for overnight travel)
- Dining car (kitchen and seating for meal service)
- Maintenance-of-way (MOW) equipment (ballast tampers, rail grinders — technically not revenue cars but often seen on tracks)
🎬 Video: Every Type of Railcar Explained in 15 Minutes — Practical Engineering — https://www.youtube.com/watch?v=psjExhXfvbI
How to Prepare
Req 1c Preparation Checklist
- Print or save a labeled photo reference for all 10 car types
- Practice identifying each type from the silhouette alone (cover the labels)
- Write one sentence for each car explaining what it carries and why that car type is used
- If you have model railroad cars, set them out by type as a visual aid for your counselor meeting
Req 1d — How Locomotives Make Power
Modern locomotives are engineering marvels — not purely mechanical machines but hybrid electrical systems that convert fuel or grid power into precise traction. This requirement covers three distinct concepts: the diesel-electric drive system, dynamic braking, and radial steering trucks. Learn all three.
How a Diesel-Electric Locomotive Develops Power
Despite the name, a diesel locomotive does not connect its engine directly to the wheels. It is actually a diesel-electric: the diesel engine drives a generator (or alternator), which produces electricity, which powers electric traction motors mounted on each axle. Here is the sequence:
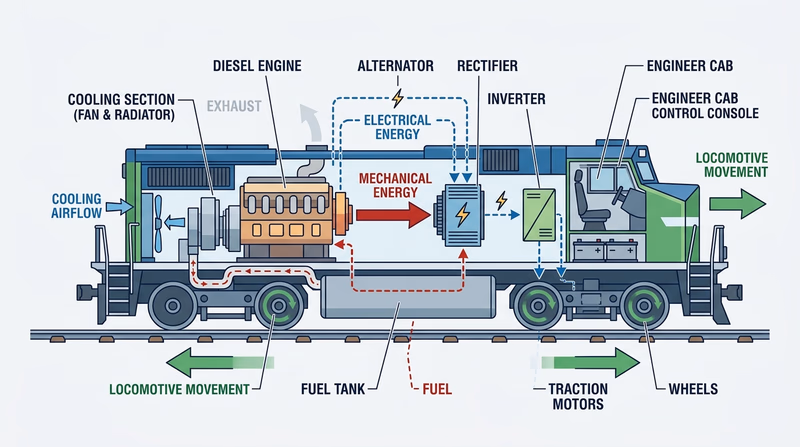
- Diesel engine — A large turbocharged diesel engine (typically 3,000–5,000 horsepower) burns fuel and produces mechanical rotation.
- Main alternator — The spinning diesel engine shaft turns a large alternator, converting mechanical energy into three-phase AC electricity.
- Rectifier / inverter — Electronic equipment converts and conditions the power for the traction motors.
- Traction motors — One or two AC or DC traction motors are mounted on each powered axle. They receive electrical power and convert it back into rotational force — torque — which spins the wheels.
- Wheelset — The traction motor’s torque is applied to the wheel through a gear reduction, giving the locomotive the ability to move enormous weight at low speed.
Why diesel-electric instead of direct mechanical drive? Electric motors deliver maximum torque at zero speed — exactly what you need to start a 15,000-ton train. A direct mechanical drivetrain would require an impossibly complex gearbox and clutch system. The diesel-electric arrangement elegantly solves the starting torque problem with off-the-shelf electrical components.
🎬 Video: How a Diesel-Electric Locomotive Works — Animagraffs — https://www.youtube.com/watch?v=cIQ0yIZgQeE
How an Electric Locomotive Develops Power
Electric locomotives work similarly to diesel-electrics, but skip the diesel engine entirely:
- They draw electricity from an overhead wire (catenary) or a third rail.
- Onboard transformers and inverters condition the voltage for the traction motors.
- The same AC traction motors drive the axles.
Electric locomotives produce no exhaust and can regenerate energy during braking (see dynamic braking below). They are common in high-speed and commuter rail in the U.S. Northeast Corridor, and dominant in European and Asian rail systems.
Dynamic Braking
Dynamic braking is a method of slowing a train by using the traction motors as generators. Here is how it works:
When the engineer selects dynamic braking, the traction motors are switched from motor mode to generator mode. The spinning wheels drive the motors, which now generate electricity. That electricity is routed to large resistor grids (banks of resistors mounted on the locomotive roof) where it is converted to heat and dissipated into the air. This braking force slows the train.
Why does this matter?
- Saves brake shoes and wheel treads. Friction brakes on each car wear out over time. Dynamic braking reduces how much the friction brakes are used, especially on long mountain descents.
- Controls speed on grades. On long downhill grades like the Rockies, a heavy loaded coal train needs continuous braking for miles. Dynamic braking can hold the train at a steady speed without overheating the brake shoes.
- Modern AC locomotives can also feed dynamic braking energy back into the electrical grid (regenerative braking) rather than wasting it as heat.
Radial Steering Trucks
A truck is the wheeled frame assembly under a rail car or locomotive — it carries the weight and transmits traction or braking to the rails. Most locomotives and cars have two trucks, one at each end.
A radial steering truck is a truck designed so the wheelsets can pivot slightly inward relative to each other as the truck enters a curve. This allows the wheels to follow the curve more naturally rather than being forced through it at a fixed angle.
Why it matters:
- Standard trucks with rigid wheelset spacing experience significant lateral force — called flange force — as the wheels are pushed through curves. This causes wear on both the wheel flanges and the rail.
- Radial steering trucks reduce this lateral force, which means:
- Less wear on wheels and rail
- Lower maintenance costs
- Better stability at speed
- The locomotive can navigate tighter curves more smoothly
Modern locomotives from GE (now Wabtec) and EMD (now Progress Rail) use radial steering trucks as standard equipment on high-horsepower units.
Req 1d Key Concepts Checklist
- Can explain diesel-electric drive in simple terms (engine → alternator → traction motors → wheels)
- Can describe why diesel-electric is used instead of direct mechanical drive
- Can define dynamic braking and explain what happens to the energy
- Can explain why dynamic braking is important on mountain grades
- Can define a truck (the wheel assembly under a locomotive)
- Can explain what radial steering trucks do differently from standard trucks and why that matters
Req 2 — Passenger Rail in America
Requirement 2 has two parts, both required. Part 2a takes you into the history and structure of Amtrak and asks you to plan a real trip using a timetable. Part 2b surveys all the forms of rail transit that move people in American cities. Together they give you a complete picture of passenger rail in the United States.
Requirement 2a
Why Amtrak Was Created
By the 1960s, private railroads had been losing money on passenger trains for decades. Freight was profitable; passengers were not. Railroads had to run passenger trains under their common-carrier obligations, even when the trains ran nearly empty. One by one, railroads petitioned the Interstate Commerce Commission to discontinue routes. Passenger service across the country was deteriorating rapidly.
In 1970, Congress passed the Rail Passenger Service Act, which created Amtrak (a contraction of “American track”). Amtrak launched on May 1, 1971, taking over the operation of most intercity passenger trains. The private railroads paid to join the program and handed off their passenger obligations; in return they could focus entirely on freight. The federal government would fund the losses.
Today Amtrak is a government-owned corporation (not a federal agency, but dependent on federal funding) that operates about 300 trains per day to more than 500 destinations in 46 states. It carries roughly 30 million passengers per year.
Planning Your Rail Trip
To complete 2a, you need to plan a specific trip between two cities at least 500 miles apart and present these details to your counselor:
- The departure city and destination city
- The train number and name (e.g., Train 3 — the Southwest Chief)
- Departure time from your origin city
- Arrival time at your destination
- Type of service you want (coach seat, roomette, bedroom, business class, etc.)
How to Find Amtrak Schedule Information
- Go to amtrak.com and use the trip planner to search your route
- Note the train number and name from the search results (e.g., Train 49/50 — Lake Shore Limited)
- Record the departure time listed for your origin station
- Record the scheduled arrival time at your destination
- Decide on your service class: Coach (seats), Roomette (private room for 1–2, includes meals), Bedroom (larger private room), Business Class (Acela/Northeast Corridor), or Sleeper
- Note the distance to confirm it is at least 500 miles
Sample trips over 500 miles:
- Chicago, IL → New York City, NY — Train 48 (Lake Shore Limited), ~960 miles
- Los Angeles, CA → Seattle, WA — Train 14 (Coast Starlight), ~1,380 miles
- Washington, D.C. → Chicago, IL — Train 29 (Capitol Limited), ~780 miles
- New Orleans, LA → New York City, NY — Train 20 (Crescent), ~1,380 miles
Service Types Explained
| Service Class | What You Get | Notes |
|---|---|---|
| Coach | Reclining seat, overhead storage | Most affordable; no meal included |
| Business Class | Wider seat, at-seat service | Available mainly on NEC and some corridor trains |
| Roomette | Private room for 1–2, fold-down beds, meals included | Available on long-distance trains |
| Bedroom | Larger private room, full bathroom, meals included | More spacious for overnight trips |
| Accessible Bedroom | Roomette-sized accessible room | Requires disability documentation |
🎬 Video: Amtrak Map USA: Understand America’s Train Routes — T1D Wanderer — https://www.youtube.com/watch?v=anKNW1YHBoU
Requirement 2b
Rail transit is not one thing — it is a family of systems, each designed for a different scale of city and density of ridership. Know the distinctions between the main types.
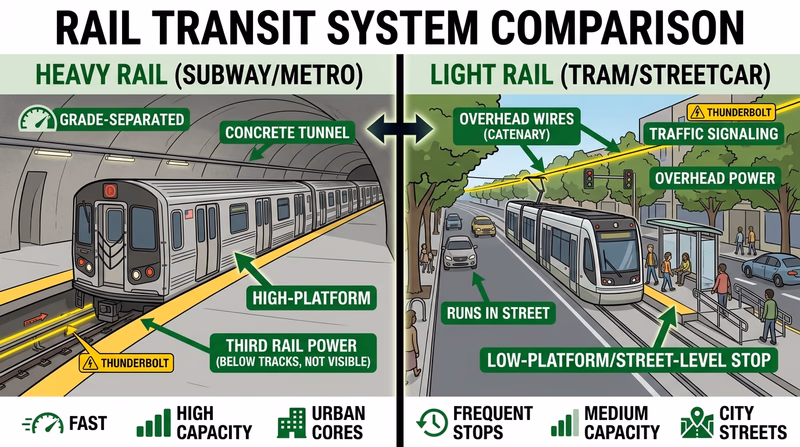
Heavy Rail (Rapid Transit / Subway)
What it is: High-capacity electric rail that operates on fully grade-separated track — meaning it never shares a street or highway with cars. Runs in subways, elevated structures, or dedicated surface corridors.
Characteristics: Very high frequency (trains every 2–5 minutes at peak), high capacity (600–1,200 passengers per train), powered by third rail or overhead catenary.
Examples in the U.S.: New York City Subway, Chicago L, Washington Metro (WMATA), BART (San Francisco Bay Area), Boston T (Red/Blue/Orange/Green Lines).
Light Rail Transit (LRT)
What it is: Electric rail that can share streets at grade level (running in traffic or in a mixed-traffic lane) as well as operate on dedicated rights-of-way. Lower capacity than heavy rail but more flexible and less expensive to build.
Characteristics: Typically single or two-car trains, quieter than heavy rail, can stop at pedestrian-level platforms.
Examples: Portland MAX, Dallas DART, Denver RTD, Salt Lake City TRAX, Minneapolis Metro Green Line.
Commuter Rail
What it is: Rail service that connects outlying suburbs and satellite cities to a central urban area, primarily for daily work commuters. Usually runs on tracks shared with or adjacent to freight railroads. Longer trip distances than subway or light rail.
Characteristics: Diesel or electric locomotives pulling bi-level or single-level coaches, stations spaced 3–10 miles apart, peak-hour oriented schedules.
Examples: Metra (Chicago), LIRR (Long Island to New York City), NJ Transit Rail, Caltrain (San Jose to San Francisco), MARC (Maryland/D.C. area).
Streetcar / Trolley
What it is: Low-speed electric rail that runs entirely in mixed traffic on city streets, at pedestrian-scale. Smaller and slower than light rail. Focuses on short-hop urban circulation rather than commuting.
Examples: Portland Streetcar, Kansas City Streetcar, New Orleans St. Charles streetcar line (the oldest continuously operating streetcar line in the world).
Monorail
What it is: A rail system that runs on a single beam, either suspended beneath it (hanging monorail) or balanced on top. Most common in amusement parks and airports, but a few city systems exist.
Examples: Seattle Monorail (short tourist/city link), Las Vegas Monorail (resort corridor), Disney’s WEDway/PeopleMover systems.
Automated People Movers (APM)
What it is: Driverless computer-controlled vehicles running on fixed guideways, usually within a large facility. Common in major airports to connect terminals.
Examples: Chicago O’Hare Airport ATS, Atlanta Hartsfield-Jackson Plane Train, Miami International Airport MIA Mover.
Maglev (Magnetic Levitation)
What it is: A system that uses magnetic fields to lift and propel vehicles — no wheels or rails in contact. Nearly silent, extremely low friction, capable of very high speeds. Currently operational in Japan (SCMaglev) and China (Shanghai Transrapid).
U.S. status: No operational maglev passenger line exists in the U.S. as of 2026, but projects have been proposed for the Northeast Corridor.
Req 2b Review Checklist
- Heavy rail (subway) — grade-separated, high capacity, third rail or catenary
- Light rail — can run at grade on streets, smaller trains, flexible routing
- Commuter rail — suburb-to-city, longer distances, peak schedules, shared freight track
- Streetcar / trolley — street-running, short trips, pedestrian scale
- Monorail — single-beam, limited U.S. examples
- Automated people movers — driverless, airport/campus use
- Maglev — no contact with track, very high speed potential
Req 3 — Explore Railroading Careers
Requirement 3 has four options. You complete exactly one. Each option explores a different dimension of how railroading works as a business and a career field. Choose the path that matches how you learn best and what interests you most.
Your Options at a Glance
Req 3a — Inside a Railroad Company — Name four departments of a railroad company and describe what each one does. Good for Scouts who are curious about how large organizations are structured. Mostly research and discussion — no outside contact required.
Req 3b — Rail Jobs That Interest You — Tell your counselor about the railroading opportunities that interest you most and explain why. This is a personal reflection option — there is no “right answer,” only your genuine reasoning. Good for Scouts who already have some curiosity about rail careers and want to explore it.
Req 3c — Rail Support Industries — Name four industries that support railroading (but are not railroads themselves) and describe what each one does. Good for Scouts interested in manufacturing, engineering supply chains, or how complex industries depend on each other.
Req 3d — Interview a Rail Professional — With your parent/guardian’s and counselor’s approval, interview someone who works in the rail industry. Learn what they do, how they got into it, and what education and training the job requires. Good for Scouts who are strong communicators and have access to a rail professional (or can find one through their counselor).
How to Choose
Think about these questions:
- Do I already know someone who works in railroading, or can my counselor connect me with someone? → Consider 3d.
- Am I interested in how big companies are organized and run? → Consider 3a.
- Do I want to explore my own future career interests? → Consider 3b.
- Am I curious about the companies that build and supply railroad equipment? → Consider 3c.
What Counts as “Rail Industry”?
For 3d especially, it helps to know the full scope. The rail industry includes:
- Operating railroad employees (engineers, conductors, dispatchers, maintenance crews)
- Railroad management and corporate staff
- Rail equipment manufacturers (locomotives, cars, signals, track hardware)
- Rail technology and software companies
- Rail consulting and engineering firms
- Port and terminal operators that depend heavily on rail
- Transit agency employees at any level
Req 3 Completion Checklist
Complete exactly ONE of the four options- Req 3a — Inside a Railroad Company (4 departments, described)
- Req 3b — Rail Jobs That Interest You (personal reflection, explained to counselor)
- Req 3c — Rail Support Industries (4 industries, described)
- Req 3d — Interview a Rail Professional (conducted with parent/guardian and counselor approval)
You need any ONE of the four above.
Req 3a — Inside a Railroad Company
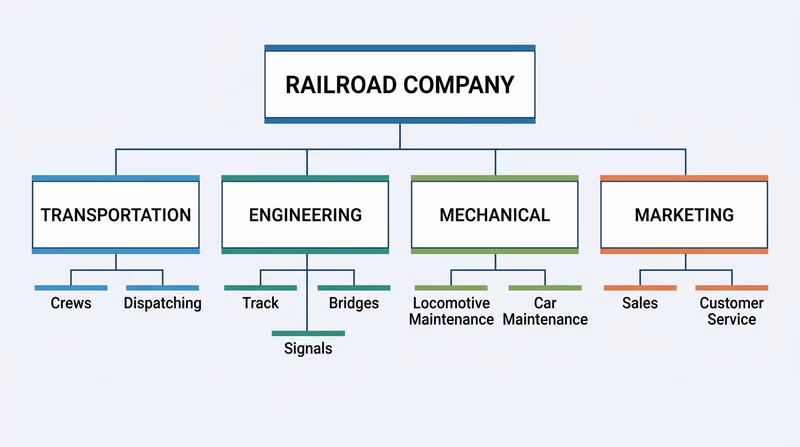
A Class I freight railroad is one of the most complex businesses in America — it operates across thousands of miles, employs tens of thousands of people, and manages billions of dollars in assets. Like any large company, it is divided into departments, each responsible for a piece of the whole operation.
You need to name four departments and describe what each one does. The departments below are real organizational units found at major U.S. freight railroads.
Four Departments to Know
1. Transportation (Operations)
The Transportation department is responsible for everything that moves: trains, crews, and cars. This is the department most people think of when they picture a railroad. It includes:
- Train dispatchers — These are the air traffic controllers of the railroad. They sit in centralized dispatch centers and authorize train movements across the entire network, using computer systems that display every train’s position in real time.
- Locomotive engineers — They operate the locomotive and are responsible for safely moving the train.
- Conductors — They manage the train as a whole: communicate with dispatch, supervise switching moves at yards, and are responsible for the crew.
- Yard crews — They switch cars in classification yards, building and breaking down trains.
The Transportation department’s goal is to move the maximum amount of freight in the minimum time with the maximum safety.
2. Engineering (Infrastructure & Maintenance of Way)
The Engineering department owns and maintains the physical infrastructure: track, bridges, tunnels, signals, and communications systems. No train moves safely without this department’s work.
Subdivisions within Engineering typically include:
- Track maintenance — Gangs of workers inspect, repair, and replace rails, ties (sleepers), and ballast on a continuous cycle.
- Structures — Engineers and inspectors maintain the thousands of bridges and culverts on the network.
- Signals and communications — Technicians maintain the signal system, grade-crossing equipment, and the communications backbone that connects dispatch to field crews.
3. Mechanical
The Mechanical department maintains and repairs locomotives and rolling stock (freight cars). A railroad’s locomotive fleet represents billions of dollars in assets that must stay in service to generate revenue.
Key functions:
- Running repairs — Quick fixes done at locomotive servicing facilities along the main line (fueling, oil checks, minor mechanical work).
- Heavy overhauls — Major rebuilds done at large back-shop facilities. A locomotive may receive a complete mechanical overhaul every few years.
- Car inspection — Federal regulations require that freight cars be inspected at regular intervals. Mechanical department car inspectors check brakes, couplers, wheels, and other components.
4. Marketing and Sales
The Marketing department is responsible for selling space on the railroad to shippers — the companies that actually have freight to move. Without customers, there is no revenue; without revenue, there is no railroad.
Key functions:
- Account management — Sales representatives maintain relationships with major shippers and negotiate contracts.
- Pricing — Analysts set rates for different commodities and services.
- New business development — Marketing teams identify new traffic opportunities, such as attracting a new intermodal terminal or winning a long-term coal supply contract.
- Customer service — Representatives handle inquiries, trace missing cars, and manage claims for damaged freight.
Other Departments Worth Knowing
If your counselor asks for more than four, you have options:
- Finance and Accounting — Manages the company’s financial reporting, capital allocation, and investor relations.
- Human Resources — Manages hiring, training, labor relations, and compliance with union agreements (most railroad operating crafts are unionized).
- Safety — Develops and enforces safety rules, investigates accidents, and manages regulatory compliance with the Federal Railroad Administration (FRA).
- Information Technology — Maintains the computer systems that run dispatch, car tracking, locomotive monitoring, and customer portals.
- Legal and Government Affairs — Manages regulatory relationships with the FRA and STB (Surface Transportation Board), handles litigation, and monitors legislation.
Req 3a Preparation Checklist
- Chosen four specific departments (from the list above or from research)
- Can describe what each department is responsible for in 2–3 sentences
- Can give at least one specific job title or role within each department
- Ready to explain the departments verbally without referring to notes
Req 3b — Rail Jobs That Interest You
This is the most personal option in Requirement 3 — there is no right answer, only your honest thinking. Your counselor wants to hear which part of railroading appeals to you and why you find it interesting. The depth of your explanation is what matters more than the specific jobs you name.
What “Opportunities” Means
The requirement says “opportunities in railroading,” which is intentionally broad. This includes:
- Operating careers — locomotive engineer, conductor, dispatcher, yardmaster
- Technical and engineering careers — civil engineer (track design), mechanical engineer (locomotive/car design), signal and communications technician, bridge inspector
- Business and management careers — operations manager, marketing and sales, supply chain analyst, finance, human resources
- Safety and regulatory careers — safety officer, FRA inspector, accident investigator
- Technology careers — IT systems, positive train control (PTC) development, digital dispatch systems
- Support industry careers — working for a locomotive manufacturer, a rail infrastructure supplier, or a technology company that serves the rail sector (see Req 3c)
- Hobby and preservation — volunteer at a heritage railroad, model railroad design and construction, railroad photography (railfanning)
- Government and policy — working for the FRA, STB, DOT, or an Amtrak policy office
You do not need to pick a career you are committed to. You need to identify what genuinely interests you and explain your reasoning.
How to Prepare Your Answer
Structuring Your Req 3b Answer
- Identify one or two specific areas of railroading that interest you most — be specific, not just “trains”
- Explain what that job or role involves — show that you did some thinking about it
- Explain why it appeals to you — connect it to your own skills, interests, or values
- Mention what it would take to pursue that path — education, training, certifications
- Be ready to follow up if your counselor asks a question
Sample Areas and What They Involve
Use this as a starting point for your research and reflection:
Locomotive Engineer
Engineers are responsible for operating the locomotive safely and efficiently. They follow the dispatcher’s instructions, manage throttle and brakes, and respond to signal indications. Becoming an engineer typically starts as a conductor, with a multi-year apprenticeship and qualification process. Engineers are well compensated — starting salaries at Class I railroads often exceed $70,000, with experienced engineers earning $100,000+.
Train Dispatcher
Dispatchers control train movements across a territory from a centralized control center. They use computer-aided dispatch systems to route trains, issue track authorities, and coordinate maintenance windows. Dispatchers must hold an FRA certification. The job requires strong situational awareness, calm under pressure, and excellent communication skills.
Railroad Civil/Track Engineer
Civil engineers design, maintain, and improve track infrastructure — alignment, grades, curves, bridges, and drainage. This is a traditional engineering career path requiring a civil engineering degree. Railroad engineering is a specialized field with a strong job market as Class I railroads invest heavily in infrastructure.
Rail Technology
Positive train control (PTC), advanced dispatch software, locomotive monitoring systems, and digital communications are transforming railroading. Software engineers, data scientists, and systems analysts are increasingly in demand at railroads and the companies that supply them.
Talking to Your Counselor
Your counselor is not grading you on whether you picked the “right” career. They are evaluating whether you:
- Can identify specific opportunities (not just “something with trains”)
- Understand what that opportunity actually involves
- Can explain your reasoning clearly
Req 3c — Rail Support Industries
Railroads do not build their own locomotives, manufacture their own rails, or develop all of their own software. A large ecosystem of specialized industries supplies the equipment, materials, and services that keep the rail network running. These are the rail support industries.
You need to name four and describe what each one does. The industries below are real sectors with well-known companies you can research further.
Four Rail Support Industries
1. Locomotive and Railcar Manufacturers
These companies design and build the motive power and rolling stock that railroads operate. Without them, there would be no locomotives to haul freight or passenger cars to carry travelers.
What they do:
- Design and engineer new locomotive models
- Build locomotives on contract for railroads
- Manufacture freight cars (hoppers, tank cars, flatcars, boxcars, etc.)
- Rebuild and remanufacture existing equipment
- Supply spare parts and components
Major companies: Wabtec (formerly GE Transportation) and Progress Rail (subsidiary of Caterpillar, formerly EMD) dominate new locomotive production in North America. Trinity Industries, Greenbrier Companies, and FreightCar America are major freight car manufacturers.
2. Track and Infrastructure Suppliers
The rail network depends on an enormous amount of physical infrastructure: hundreds of thousands of miles of steel rail, millions of concrete and wood ties, billions of tons of crushed stone ballast, thousands of switches and crossings, and miles of signaling hardware.
What they do:
- Manufacture steel rail in long sections at rolling mills
- Produce concrete and wood railroad ties (sleepers)
- Supply ballast (crushed stone) for track beds
- Manufacture switch machines, rail fasteners, and turnout hardware
- Build grade-crossing protection equipment (gates, signals, detectors)
Major companies: Voestalpine (rail manufacturing), L.B. Foster, Pandrol (rail fastening systems), Progress Rail, and dozens of regional ballast suppliers.
3. Signaling and Train Control Technology
Modern railroads operate sophisticated electronic systems that control train movements, prevent collisions, and manage traffic across thousands of miles of track. Positive Train Control (PTC) — the federally mandated collision-avoidance system — required hundreds of millions of dollars in technology from this sector.
What they do:
- Design and install wayside signals (trackside lights and signs)
- Develop PTC onboard and wayside hardware and software
- Build and maintain grade-crossing warning systems
- Provide dispatch software and traffic management systems
- Supply locomotive cab displays and event recorders
Major companies: Wabtec Signal (formerly GE Signaling), Alstom, Siemens Mobility, Hitachi Rail (formerly Ansaldo), and Ansaldo STS.
4. Maintenance-of-Way (MOW) Equipment Manufacturers
Even with the best track installed, rail infrastructure requires continuous maintenance. Specialized heavy machines perform this work — machines that most people never see but that are essential to safe operations.
What they do:
- Manufacture track geometry cars that detect rail defects and measure track alignment
- Build tamping machines that compact and level ballast under ties
- Produce rail grinders that resurface worn rail heads
- Supply spike drivers, tie inserters, and ballast regulators
- Design and build ultrasonic rail flaw detection vehicles
Major companies: Plasser & Theurer (tamping and maintenance machines), Loram Maintenance of Way (rail grinding and specialty services), Sperry Rail (ultrasonic testing), Herzog Companies (materials and MOW services).
Other Industries Worth Knowing
If your counselor wants more than four, you have additional options:
- Fuel suppliers — Railroads are major purchasers of diesel fuel. Fuel hedging and supply contracts are a significant part of railroad finance.
- Technology and software companies — Enterprise software for freight billing, crew scheduling, car tracking (real-time asset management), and customer portals.
- Insurance and financial services — Railroad operations carry enormous risk; specialized insurers and lenders serve the industry.
- Rail consulting and engineering firms — Independent firms that design new rail infrastructure, conduct environmental reviews, or advise railroads on operations.
- Intermodal terminal operators and logistics companies — Companies that manage the interface between rail and truck, operating inland ports and distribution centers.
Req 3c Preparation Checklist
- Chosen four rail support industries (not railroads themselves)
- Can describe what each industry produces or does in 2–3 sentences
- Can name at least one real company in each industry
- Ready to explain verbally why each industry is important to railroading
Req 3d — Interview a Rail Professional
Option 3d asks you to have a real conversation with a real person who works in the rail industry. You need to come away knowing three things: what they do, how they got into it, and what education and training their job requires. This is the most hands-on and potentially most memorable option in Requirement 3.
Before the Interview
Finding Someone to Interview
People who work in the rail industry include:
- Locomotive engineers, conductors, or dispatchers at any freight or passenger railroad
- Track or signal maintainers — field employees who keep the infrastructure running
- Railroad management or office staff — supervisors, managers, or corporate employees
- Employees of a transit agency — bus operators who also work with light rail, transit planners, maintenance crews
- Employees of a rail support industry — someone who works for a locomotive manufacturer, a track supplier, or a rail technology company
- Retired railroad employees — former employees count if they can speak to the industry from experience
Where to look:
- Ask your counselor — many counselors have connections in the rail industry
- Ask family members and neighbors if anyone works in rail
- Contact your local Amtrak or transit agency and ask if they can connect you with someone willing to speak to a Scout
- Reach out to a local rail preservation group or museum — volunteers often include retired railroad workers
Preparing Your Questions
Come to the interview with a written list of questions. Here are the three areas you must cover — plus some useful follow-up questions:
Interview Question List
Prepare these in advance and take notes duringWhat they do:
- What is your job title and what does your job involve on a typical day?
- What part of the work do you find most challenging?
- What do you enjoy most about it?
How they got into railroading:
- How did you first get interested in railroading?
- How did you get your first job in the industry?
- What was your career path to your current role?
Education and training:
- What education or credentials does your job require?
- What on-the-job training did you complete?
- Are there certifications or licenses required to do your work?
- What would you recommend for a young person interested in a similar career?
During the Interview
- Arrive or call on time, with your questions ready.
- Introduce yourself: “I’m working on the Railroading merit badge and I’m hoping to learn about your career.”
- Listen actively — ask follow-up questions when something is interesting or unclear.
- Thank the person at the end and ask if it’s okay to follow up with your counselor if additional questions come up.
After the Interview
You will report back to your counselor and describe what you learned. Be ready to discuss:
- Who you interviewed (name and job title — you do not need to share personal contact details)
- What their job involves on a daily basis
- The path they took into the industry
- What education or training their position required
- One thing they said that surprised you or that you found particularly interesting
Req 3d Completion Checklist
- Got approval from parent/guardian and counselor before contacting anyone
- Found and contacted a rail industry professional
- Prepared written interview questions in advance
- Conducted the interview and took notes
- Can tell the counselor what the interviewee does, how they got into it, and what training/education the job requires
- Ready to share one surprising or memorable thing from the conversation
Req 4 — Track Safety and Safe Behavior
Rail safety is not just a rule—it is the reason railroading can exist as a public good. Requirement 4 asks you to learn where these rules come from (4a), what they say about the track itself (4b), what they say about walking near tracks (4c), how drivers should behave at crossings (4d), and how to stay safe on light rail and commuter trains (4e). Work through all five sections and be ready to explain each one in your own words.
Requirement 4a
Operation Lifesaver (OL) is a nonprofit public-education program founded in 1972 in Idaho after a series of crossing accidents. It has since grown into a national effort involving railroads, state agencies, law enforcement, and volunteer presenters. The Federal Railroad Administration (FRA) supports it as the country’s primary rail-safety outreach program.
Mission statement (in your own words for the counselor): Operation Lifesaver’s mission is to end collisions, deaths, and injuries at highway-rail grade crossings and along railroad tracks through education, engineering, and enforcement.
What OL Does
- Trains volunteer “OL Ambassador” presenters who visit schools, community groups, and driving schools.
- Develops public-service campaigns aimed at pedestrians, drivers, and teens.
- Works with law enforcement to enforce crossing laws.
- Tracks national crossing-accident statistics published annually by the FRA.
- Advocates for engineering improvements like better crossing gates and sight-line clearance.
Key Statistics to Know
The FRA records every grade-crossing and trespassing incident in the United States. In a typical recent year, approximately 2,100 collisions occur at highway-rail grade crossings, and roughly 500 people are killed at crossings or along tracks. Most incidents involve a vehicle or pedestrian who did not yield to an active warning.
Operation Lifesaver — oli.org The official OL site with safety tips, presenter resources, and national crossing-incident statistics. Link: Operation Lifesaver — oli.org — https://oli.org/Requirement 4b
The requirement asks you to list nine tips. You should be able to say them aloud or write them from memory. These come directly from Operation Lifesaver and FRA guidance.
9 Track Safety Tips
Know all nine — you must list them for your counselor- 1. Stay off the tracks. Railroad tracks, bridges, and rights-of-way are private property. Trespassing is illegal and dangerous.
- 2. Never walk on, along, or between tracks. A train can come from either direction at any time, and you may not hear it until it is very close.
- 3. Do not attempt to hop a freight train. Moving trains are unpredictable. Cars can rock, roll, or shift without warning.
- 4. Cross only at designated crossings. Do not cut across tracks at random points or between cars in a train yard.
- 5. Never race a train to a crossing. A train traveling at 55 mph needs a mile or more to stop; it cannot yield to you.
- 6. Watch for multiple tracks. After one train passes, a second train may immediately follow on an adjacent track from the other direction.
- 7. Stay back from the edge of the platform. Stand well behind the yellow safety line until the train has fully stopped and doors open.
- 8. Do not retrieve items that fall onto the track. Alert a station employee or call the railroad’s emergency number instead.
- 9. Never stand or play near a railroad bridge or trestle. There is nowhere to go if a train approaches, and trains cannot stop in time.
Requirement 4c
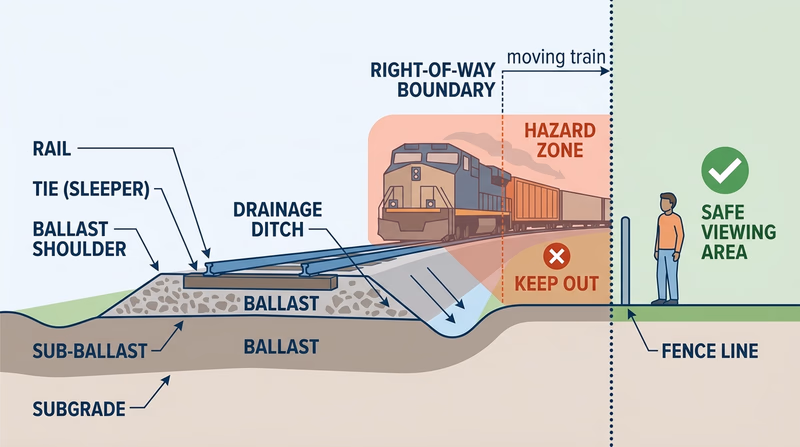
These nine considerations are specifically for pedestrians who may be legitimately near (but not on) a railroad corridor—for example, walking on a road that parallels tracks, crossing a street at a grade crossing, or waiting at a station.
9 Pedestrian Safety Considerations
For walking near (not on) railroad tracks- 1. Stay alert—remove headphones. Earbuds and loud music block the sound of an approaching train and crossing warnings.
- 2. Never assume a crossing is safe because it is quiet. Look both ways and check for approaching trains before stepping onto any crossing.
- 3. Obey all signals and gates immediately. When lights flash or a gate lowers, stop and wait, even if you do not see or hear a train yet.
- 4. Cross at a 90-degree angle to the tracks. This minimizes the time your feet are in the crossing zone.
- 5. Watch for overhang. A passing train extends 3 feet or more beyond the rail. Stand well back from the track edge.
- 6. Do not cross between the gates. If a gate lowers while you are on the crossing, keep moving to exit the crossing—do not turn back under a lowered gate.
- 7. Never assume tracks are abandoned. Overgrown or rusted tracks can still carry active train traffic.
- 8. Wait for the full train to pass before crossing. Vehicles have been struck by a second train immediately after the first one cleared.
- 9. Do not linger in the crossing area. Cross briskly and move at least 15 feet from the nearest rail before stopping.
Requirement 4d
This is a “tell” requirement—prepare a clear explanation, not just a list. Organize your answer around what happens before, at, and after a grade crossing.
Before the Crossing
- Slow down when you see the advance warning sign (the round yellow sign with a black X and two Rs). Expect a crossing ahead.
- Look and listen in both directions. Open the car window if visibility is poor.
- Never shift gears on or immediately before the crossing. Stay in a gear that keeps you moving smoothly through.
- Check for clearance on the other side before you start crossing. Do not move onto the tracks if traffic may force you to stop on them.
At the Crossing
- Obey all signals immediately. Flashing lights and a lowered gate mean a train is approaching or present—stop completely.
- Stop 15 feet from the nearest rail when required. This keeps you safely clear of the train’s overhang.
- Do not go around a lowered gate. It is illegal, and it means the system has confirmed a train is coming.
- Watch for multiple trains on multiple tracks. A freight train may hide a second train approaching on the adjacent track.
If Stalled on the Crossing
- Evacuate everyone immediately. Do not try to restart the vehicle.
- Move away from the tracks at a 45-degree angle in the direction of the approaching train—this keeps you clear of debris if the train strikes your vehicle.
- Call 911 and the emergency number on the ENS sign at the crossing (if visible) to alert the railroad dispatcher.
Requirement 4e
Light rail (streetcar-style systems in cities like Dallas, Denver, and Portland) and commuter rail (regional trains like Metra, LIRR, and Caltrain) share tracks and stations with pedestrian traffic. The precautions are distinct from highway-crossing safety.
At the Station or Platform
- Stand behind the yellow tactile strip or safety line at all times until the train has completely stopped and the doors open.
- Do not lean over the platform edge to look for the train.
- Keep luggage and belongings pulled close so nothing falls onto the track bed.
- If an item falls onto the tracks, do not jump down to retrieve it—report it immediately to a station employee.
Boarding and Exiting
- Wait for passengers to exit before you board.
- Move quickly but carefully across the gap between the platform and the train car; gaps can be wide on curved platforms.
- Do not hold doors open—train doors are not like elevator doors and can strike you if forced.
On the Train
- Brace yourself when the train is moving, especially around curves and when braking.
- Secure bicycles and large items so they cannot shift into other passengers.
- Know where the emergency intercom is located inside the car and how to use it.
Light Rail Specific
- Light rail often runs at street level through intersections. Treat any intersection with tracks like a grade crossing—look both ways, even mid-block.
- Light rail is quiet and fast; do not assume pedestrian crossing signals protect you from a light rail train running on a separate signal phase.
Req 5 — Reading Railroad Signs
Every railroad crossing and adjacent corridor is marked by a system of signs and devices that work together to tell a driver or pedestrian exactly what to expect and what to do. Some signs are static—they give information. Others are active—they change state when a train is detected. Knowing the difference, and what each specific sign looks like and requires of you, is what this requirement tests.
Work through each section below. For each sign or device, you should be able to describe its appearance (shape, color, symbols), where it is located, and what action it requires from a driver or pedestrian.
Requirement 5a — Passive Signs and Active Signs
The distinction between passive and active is foundational to understanding all the other signs and devices in this requirement.
Passive Signs
A passive sign is always present and always looks the same. It does not change state based on whether a train is present. Passive signs give you information and require you to take action based on your own observation.
- What they look like: Stationary signs: rectangular, triangular, round, or diamond-shaped panels mounted on posts. They do not flash, move, or make sound.
- Where you see them: Advance warning signs on the road approaching a crossing; crossbuck signs at the crossing itself; no-trespassing signs along the right-of-way.
- What they require: The driver or pedestrian must slow down, look, listen, and judge whether a train is coming. Passive signs do not tell you a train is present—you have to determine that yourself.
Active Signs and Devices
An active device changes state when a train is detected by track circuits. It does something—lights flash, gates lower, bells ring.
- What they look like: Electrically powered devices: flashing red lights, swinging gates with red lights, cantilever structures spanning multiple lanes, bells or sirens.
- Where you see them: At the crossing itself, mounted on the same post assembly or on overhead cantilever arms.
- What they require: Stop immediately and wait until the lights stop flashing, the gate rises fully, and it is safe to proceed. An active device that is operating means the system has detected a train—do not treat it as optional.
Requirement 5b — Devices at the Crossing
These are the active devices installed at the crossing itself. They are triggered by the train detection system.
Flashing Red Lights (with or without bells)
- Appearance: Two round red lights mounted side by side (or on a horizontal bar) that flash alternately—left, right, left, right. Often mounted below a crossbuck sign on the same post. A bell may be mounted on the same assembly and rings while lights flash.
- Where located: On a post at the right side of the road, at or just before the crossing. There is typically one on each side of the tracks.
- What it means: A train is approaching or is in the crossing area.
- Required action: Stop before the stop bar (or at least 15 feet from the nearest rail) and remain stopped until the lights stop flashing and it is fully safe to proceed. Do not go around or between the signals.
Flashing Red Lights and Gates
- Appearance: Same flashing red lights as above, plus a lowered gate—a striped red-and-white horizontal arm with reflective material and red lights along its length. The gate descends across your lane when the system activates.
- Where located: On the approach to the crossing, one gate per lane. On multi-lane roads, exit gates may be installed on the far side as well.
- What it means: A train is near. The gate physically blocks the lane.
- Required action: Stop before the gate. Never drive around, under, or through a lowered gate. If the gate lowers while you are already in the crossing, keep moving forward to clear the tracks—do not reverse under a gate.
Cantilever Flashing Lights
- Appearance: A horizontal arm extending over the road from a tall post, with multiple signal heads suspended from it to cover multiple lanes. Lights flash red in the same alternating pattern as standard signals. Used at wide roads or multi-lane highways.
- Where located: Arching over the lanes on the approach to the crossing, providing visibility to drivers in all lanes.
- What it means: Same as standard flashing lights—a train is approaching.
- Required action: Same as standard signals. All lanes must stop.
Requirement 5c — Markings on the Road
Road-surface markings give drivers guidance even before they reach the active device zone.
Pavement Markings (RXR)
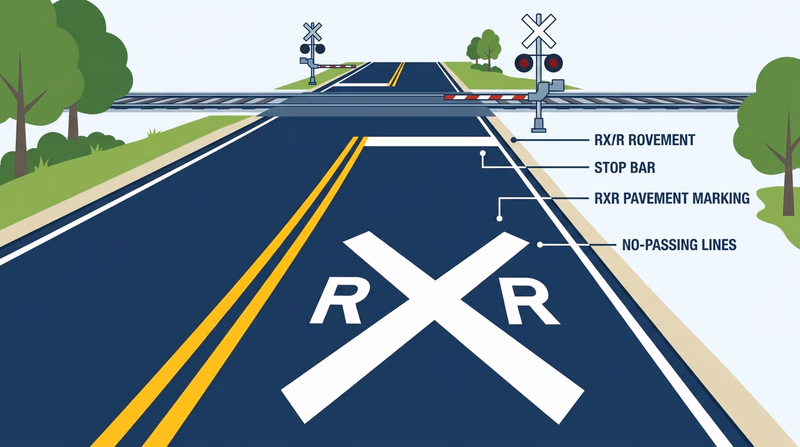
- Appearance: A large white “RXR” painted on the road surface, often accompanied by a large white X. Some crossings also have yellow no-passing lines approaching the crossing area.
- Where located: On the pavement on the road leading to the crossing, typically 50–100 feet before the stop bar.
- What they mean: A railroad crossing is ahead. Drivers should begin reducing speed and preparing to stop if needed.
- Required action: Begin looking and listening for trains. Prepare to stop.
Stop Bar
- Appearance: A solid white line painted across the full width of your lane (or lanes) perpendicular to the road.
- Where located: At the crossing, typically 15 feet or more back from the nearest rail.
- What it means: This is the stop line for the crossing. If any warning device is active, you must stop here—not at the rail.
- Required action: Stop with your front bumper at or behind this line when any signal is active or when you are yielding at a passive crossing.
Requirement 5d — Signs Before the Crossing
These signs appear on the road before you reach the crossing itself. They are all passive signs.
Advance Warning Sign
- Appearance: Round yellow sign with a black X and two Rs (the same symbol as the crossbuck). Round shape is unique—most warning signs are diamond-shaped, so the round shape of this sign is instantly recognizable.
- Where located: 250–750 feet before the crossing on the approach road, on the right side. Distance varies based on road speed.
- What it means: A railroad crossing is ahead.
- Required action: Slow down, prepare to stop, and start looking and listening for trains.
Advance Warning Sign for Side Streets
- Appearance: Same round yellow RXR design, but positioned to warn drivers turning from a side street that they will immediately encounter tracks.
- Where located: On the side street before the turn, so the driver is alerted before they make the turn and find themselves suddenly at a crossing.
- Required action: Same as the standard advance warning sign—slow down and be prepared for a crossing immediately upon turning.
No Train Horn Sign
- Appearance: Rectangular white sign with black text: “NO TRAIN HORN.” May include a graphic of a horn with a line through it. Sometimes called a “quiet zone” sign.
- Where located: On the approach road to a crossing in an officially designated quiet zone. Quiet zones require enhanced engineering safety measures to compensate for the absence of the horn.
- What it means: Trains do not routinely sound their horn at this crossing. Enhanced passive or active warning devices are present instead.
- Required action: Do not expect a horn warning. Be especially alert when approaching this crossing.
Low Ground Clearance Grade Crossing Sign
- Appearance: Yellow rectangular or diamond-shaped sign showing a train over a vehicle with a low clearance symbol. Sometimes shows a specific clearance height.
- Where located: Before crossings where the road dips or humps significantly at the tracks, creating a risk that a low-clearance vehicle (car hauler, RV, flatbed) could become high-centered on the rails.
- What it means: Vehicles with low ground clearance may become stuck on the crossing. This is a known hazard at this location.
- Required action: If you are driving a vehicle that may have low clearance, do not proceed. Use an alternate crossing.
Requirement 5e — Signs Along the Railroad Property
No Trespassing Sign
- Appearance: Rectangular white sign with black text: “NO TRESPASSING.” May include the railroad’s name, a case number reference, or a posted fine amount. Some railroads use orange or yellow versions.
- Where located: Along the right-of-way fence line, on bridge approaches, at tunnel portals, and at yard entry points. These signs are placed throughout railroad property boundaries.
- What it means: The railroad right-of-way is private property. Entering without authorization is illegal. Federal and state laws establish penalties.
- Required action: Stay off railroad property entirely unless you are at a designated public crossing or station.
Requirement 5f — Signs at the Crossing
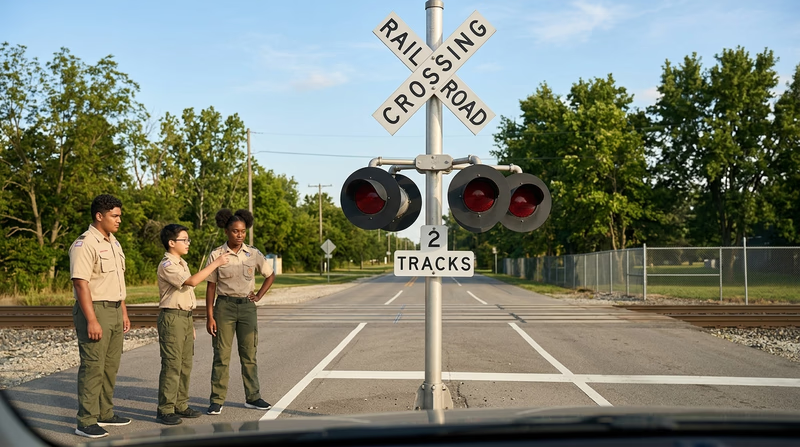
These signs are mounted at or immediately adjacent to the crossing itself.
Crossbuck Sign
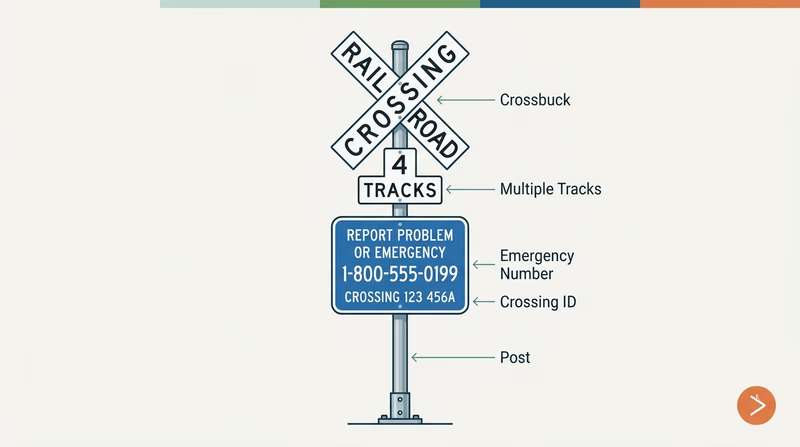
- Appearance: White X-shaped sign with the words “RAILROAD CROSSING” split across the two diagonal arms. One of the most recognized signs in the United States.
- Where located: At the crossing, on the right side of the road. At passive crossings (no lights or gates), this is often the only active sign at the location.
- What it means: You are at a railroad crossing.
- Required action: At a passive crossing with a crossbuck and no active devices, you must yield to any train. The crossbuck is a yield sign—slow down, look both ways, and cross only when you are certain no train is approaching.
Emergency Notification System (ENS) Sign
- Appearance: Blue rectangular sign with a phone number, a crossing identification number (DOT number), and the railroad company’s name. Sometimes reads “EMERGENCY NOTIFICATION” or simply shows the railroad’s emergency line.
- Where located: Mounted at the crossing, often on the signal post or crossbuck post.
- What it means: If there is an emergency at this crossing—a stalled vehicle, a collision, a gate malfunction—you can call this number to immediately reach the railroad’s dispatcher, who can stop approaching trains.
- Required action: In any emergency on the crossing, call this number first, then 911. The dispatcher can halt trains far faster than emergency services can respond. Write down or photograph the number before you need it.
Multiple Track Sign
- Appearance: Rectangular black-and-white sign mounted below the crossbuck sign, reading “2 TRACKS,” “3 TRACKS,” or the appropriate number.
- Where located: Directly below the crossbuck sign at crossings with more than one track.
- What it means: There are additional tracks beyond the first one you cross.
- Required action: After one train clears, do not move until you have looked for trains on all additional tracks. A second train can follow immediately on the adjacent track, often from the opposite direction and harder to see past the first train.
Stop Sign
- Appearance: Standard red octagonal stop sign with white “STOP” text—identical to the stop sign used in road traffic.
- Where located: At crossings where state law requires all vehicles to stop completely before proceeding. Less common than yield-only crossings.
- What it means: Every vehicle must come to a complete stop, look and listen, and proceed only when certain no train is approaching.
- Required action: Full stop, regardless of whether a train is visible or audible.
Yield Sign
- Appearance: Standard red-and-white triangular yield sign—identical to the yield sign used in road traffic.
- Where located: At passive crossings where a full stop is not legally required but drivers must yield to trains.
- What it means: Slow down and be prepared to stop if a train is approaching or present.
- Required action: Slow to a safe speed, look and listen carefully, and cross only when you have confirmed no train is approaching from either direction.
Signs at the Crossing — Quick Review
Make sure you can describe all five for your counselor- Crossbuck: White X, “RAILROAD CROSSING” — yield to trains at passive crossings.
- ENS sign: Blue, phone number + crossing ID — call in any emergency at the crossing.
- Multiple track sign: Below the crossbuck — counts additional tracks you must check.
- Stop sign: Red octagon — full stop required before crossing.
- Yield sign: Red-and-white triangle — slow down and yield to trains.
Req 6 — Signals, Horns, and Rear-End Devices
Trains cannot steer or stop quickly, so railroads rely on a sophisticated communication system—signals along the line, horn patterns at crossings, and devices at the rear of trains—to coordinate safe movement and alert people to a train’s presence and intentions. Requirement 6 asks you to understand how that system works from the ground up.
Work through all four sections. For 6a, you should be able to describe two signal types by color or configuration. For 6b, you should know three horn sequences by sound pattern and meaning. For 6c, you should be able to describe multiple emergency-stop methods. For 6d, you should be able to explain the EOTD/FRED’s function and why it replaced the caboose.
Requirement 6a
Railroad signals communicate track conditions to train crews. Unlike highway traffic lights, which operate on a time cycle, railroad signals respond directly to the position of trains detected in track circuits. Understanding how they work—and what two basic types look like—is what this section requires.
How Railroad Signals Operate
Railroad tracks are divided into blocks—defined sections of track, typically separated by insulated rail joints. When a train’s wheels (which are conductive steel) cross from one block into the next, they complete an electrical circuit between the two rails. That circuit is detected by the signal system, which then changes the signal at the entry of that block.
- Block occupied → the signal shows red (stop) to any following train.
- Block clear → the signal may show green (proceed) or yellow (approach with caution, next block may be occupied).
Modern systems add a second block of lookahead: a yellow signal means the next signal ahead is red, giving the engineer time to brake before reaching it. This is the basis for most approach-signal systems.
Signal Type 1: Color-Light Signal
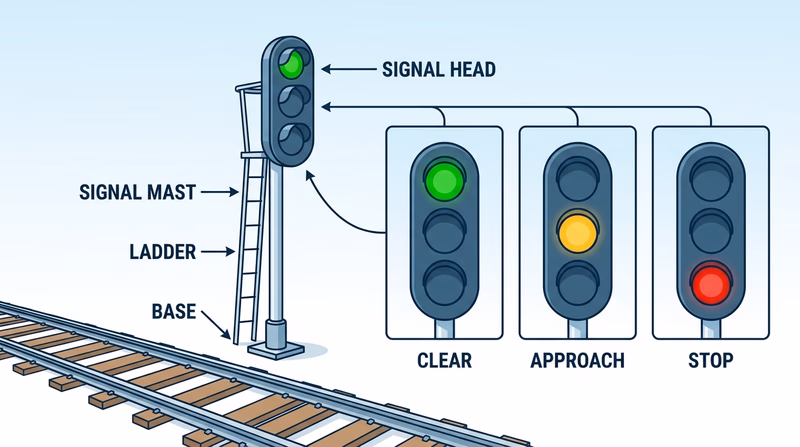
- Appearance: A signal head with multiple round lenses (usually three) arranged vertically—green on top, yellow in the middle, red on the bottom. The head is mounted on a mast or bridge.
- How it works: Only one light is illuminated at a time.
- Basic meanings:
- Green (clear): The block ahead is unoccupied. Proceed at authorized speed.
- Yellow (approach): The next signal ahead shows red. Prepare to stop at the next signal.
- Red (stop): The block ahead is occupied or a switch is misaligned. Stop before the signal.
- Where you see it: On main lines across North America, at yard throats, and at interlockings where tracks converge.
Signal Type 2: Semaphore Signal (Position-Light)
- Appearance: A horizontal arm mounted on a post that physically moves to different angles to convey meaning. Older semaphore signals are rare on Class I railroads today but remain in service on some heritage and commuter lines.
- How it works: A motor or relay moves the arm to one of three positions.
- Basic meanings (upper-quadrant semaphore):
- Arm up (45° above horizontal): Clear—proceed.
- Arm horizontal: Caution/approach.
- Arm down (45° below horizontal): Stop.
- Where you see it: Commuter rail lines in the Northeast (Metra, some LIRR territory), preserved steam railroads, and some European-style systems.
Signal Review
Be able to describe both types and explain the logic- Color-light signal: Multiple colored lenses—green (clear), yellow (approach), red (stop).
- Semaphore/position signal: Arm angle conveys meaning—up (clear), horizontal (caution), down (stop).
- How both operate: Track circuits detect train position; block occupancy changes the signal state.
- Why yellow matters: Yellow buys the engineer reaction distance. Without it, a red would appear too late to stop safely.
🎬 Video: How to Read Railroad Signals — The Central Texas Railfan — https://www.youtube.com/watch?v=Q1UlOEUdows
Requirement 6b
Train horn signals are a standardized communication system described in FRA regulations (49 CFR Part 222). Engineers sound the horn to alert pedestrians and drivers at crossings, communicate with crew members, and signal movement intentions. The patterns use long blasts (—) and short blasts (•).
Signal 1: Approaching a Public Grade Crossing
Pattern: — — • — (long, long, short, long)
This is the most important horn signal to know. Federal regulations require this signal to begin between ¼ mile and the crossing and to be repeated or prolonged until the engine occupies the crossing.
- Meaning: A train is approaching a public highway-rail grade crossing. This signal warns all road users that a train is about to pass through the intersection.
- Who it is for: Drivers and pedestrians near the crossing.
- What to do when you hear it: If you are near a crossing, stop clear of the tracks and wait. Do not attempt to beat the train.
Signal 2: Stop
Pattern: • (one short blast)
- Meaning: The engineer is commanding the train to stop, or is acknowledging a stop signal from a crew member. Also used when a train is standing and beginning a move in reverse at slow speed.
- Who it is for: Crew members on the ground or in another car, and anyone nearby in a yard.
- What to do when you hear it: If you are anywhere near railroad property, move away from the tracks and clear the area.
Signal 3: Proceed (after stop)
Pattern: — — (two long blasts)
- Meaning: The train is about to begin moving forward. Used when the train has been stopped and is about to start.
- Who it is for: Crew members and anyone near the tracks.
- What to do when you hear it: Clear the area and stay back from the tracks.
Three Horn Signals
Know the pattern and what it means- — — • — (long long short long): Approaching a public grade crossing — wait clear of tracks.
- • (one short): Stop. Also: reversing at slow speed in a yard.
- — — (two long): Proceeding forward from a stop.
Requirement 6c
If you witness an emergency at or near a railroad track—a stalled vehicle, a person on the tracks, a structural failure on a bridge ahead—the fastest ways to stop a train involve both direct signaling and calling the dispatcher.
Method 1: Call the Emergency Notification System (ENS)
The most effective and fastest method in modern railroading is to call the ENS number displayed on the blue sign at the nearest crossing (covered in Req 5f).
- How it works: The number connects directly to the railroad’s dispatcher. The dispatcher can communicate with the engineer over radio and can also set signals to stop approaching trains remotely.
- Why it works: Dispatchers have authority over the entire subdivision and can stop multiple trains simultaneously. They can also call ahead to other trains you cannot see.
- Also call 911: The dispatcher handles the train; 911 handles emergency services on the ground.
Method 2: Wave a Fusee (Railroad Flare)
A fusee is a red burning flare used by railroad crews. When placed on the track or waved by a person standing trackside, it is a recognized emergency stop signal.
- Signal: A fusee placed burning on the track means “stop immediately.” A person waving a red light or flare in circular motion from a position ahead of the train also signals stop.
- Why it works: Engineers are trained to stop for any fire or unexplained light on the track.
- Practical note: Fusees are carried by train crews, not the general public. The principle is important to understand even if you are unlikely to use one.
Method 3: Wave Any Object Vigorously
In a true emergency where no fusee or phone is available:
- Stand in a clearly visible position trackside (not on the track itself).
- Wave any large object (coat, backpack, shirt) in large sweeping motions across your body horizontally, or in circles.
- Engineers are trained to respond to any unusual and urgent trackside signal by applying brakes.
Requirement 6d
The End-of-Train Device (EOTD)—informally called FRED (Flashing Rear End Device)—is a small electronic unit attached to the rear coupler of the last car on a freight train. It replaced the traditional caboose beginning in the 1980s and is now required on most freight trains in North America.
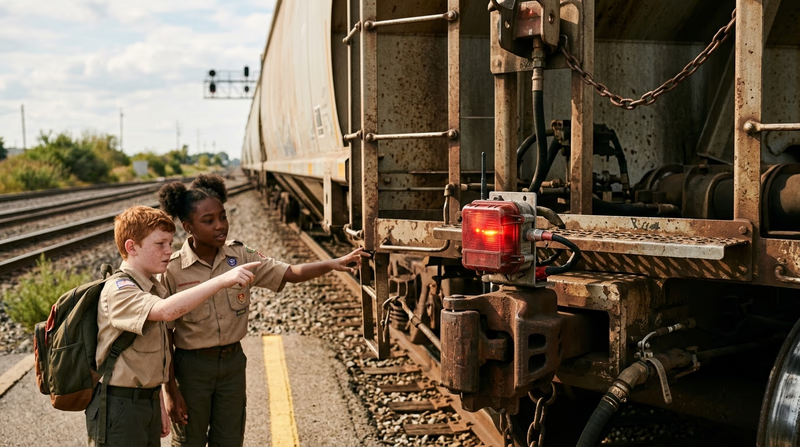
What It Looks Like
A compact box or cylinder, roughly the size of a large toolbox, attached to the rear coupler of the last car. It has:
- A red flashing light visible from behind (warning following trains and vehicles at crossings)
- A brake-pipe pressure gauge connected to the train’s air brake line
- A radio transmitter/receiver for two-way communication with the locomotive
- A motion sensor (on two-way units) to detect if the rear of the train has stopped moving
Primary Functions
1. Rear visual warning
The red flashing light on the rear of the train performs the same safety function the caboose’s red marker lights once served: it marks the end of the train so that following trains, crossing users, and maintenance workers know where the train ends. Without it, a very long freight train at night or in poor visibility could be impossible to identify as still moving through a crossing.
2. Brake-pipe pressure monitoring
The EOTD continuously monitors air pressure in the train line (the brake pipe) at the rear of the train and transmits that reading to the locomotive cab.
- Normal reading: Confirms brake integrity throughout the train length.
- Pressure drop: Signals a possible brake-line break, open hose, or emergency brake application from somewhere in the train.
3. Emergency brake application (two-way EOTD)
On modern two-way units, the engineer can command the EOTD to open the rear brake valve from the locomotive cab. This vents air from the rear of the train simultaneously with braking from the front, reducing the stopping distance of a long train significantly.
- Why this matters: A 10,000-foot freight train can take more than a mile to stop from highway speed. Applying emergency brakes from both ends simultaneously can cut that distance meaningfully.
- This function is required in the United States on trains exceeding a certain length or speed, per FRA regulations.
4. Motion detection (two-way EOTD)
The motion sensor confirms whether the rear of the train is still moving. This protects against a train separation—a scenario where the train breaks apart in the middle. If the locomotive is moving but the rear is stopped, the EOTD will alert the engineer immediately.
Why the Caboose Was Replaced
The caboose required a crew of conductors to ride at the rear to monitor the train and the track behind it. Advances in sensors, radio communication, and on-board monitoring technology made it possible to perform all of those monitoring functions electronically, without additional crew.
EOTD / FRED Key Points
Be able to explain each function clearly- Red flashing light: Marks the end of the train — warning for following trains and crossing users.
- Brake-pipe monitor: Continuously reads rear air pressure — detects line breaks or leaks.
- Emergency application (two-way): Engineer can vent brakes from rear simultaneously — shortens stopping distance.
- Motion sensor: Detects if rear of train stops while locomotive moves — catches train separations.
- Replaced the caboose in the 1980s because technology made human monitoring from the rear unnecessary.
Req 7 — Choose a Special Interest
Requirement 7 is your chance to go deep on the side of railroading that excites you most. You choose one of two paths — hands-on model railroading or real-world railfanning — and then complete two activities within that path.
Your Options
Option A — Model Railroading
Build things. Design layouts, assemble kits, create miniature scenery, and operate trains. This option is ideal if you enjoy hands-on craft projects, working at home or in a club setting, and the satisfaction of creating a miniature railroad world from scratch.
Within Option A, you’ll choose 2 of 8 activities, ranging from drawing a layout plan to understanding digital command control systems.
Explore the Model Railroading Option →
Option B — Railfanning
Get out and explore. Visit museums, ride historic railroads, research preservation groups, and plan a real rail trip. This option is ideal if you enjoy history, travel, photography, and experiencing the real railroad world firsthand.
Within Option B, you’ll choose 2 of 4 activities, each taking you outside and into genuine railroad culture.
Explore the Railfanning Option →
How to Choose
| Model Railroading | Railfanning | |
|---|---|---|
| Where it happens | Home, club, or workshop | Museums, depots, trains |
| Main skills | Building, designing, wiring | Researching, observing, documenting |
| Best if you like | Craft projects and scale models | History, travel, and photography |
| Cost | Moderate (kit materials) | Moderate (admission and tickets) |
| Works solo? | Yes | Yes, though a buddy or parent often joins |
Req 7a — Model Railroading Projects
You must complete exactly 2 of the 8 activities listed below. Read the summaries, then choose the two that best match your interests, skills, and what you have access to.
Your Eight Activities
7a1 — Plan a Layout
Draw a layout of your own model railroad — either one you could actually build, or a dream layout for your home. Your plan must include a point-to-point track or a loop with different routings, plus at least one of these features: turnaround, terminal, yard, or siding.
Best if you: Enjoy design and planning. No building required — this is a drafting and creative exercise.
7a2 — Build a Rolling Stock Kit
Assemble one model railroad car kit or one locomotive kit. This is a hands-on construction project — you’ll read instructions, handle small parts, and produce a finished, ready-to-run (or display) model.
Best if you: Enjoy model assembly, painting, and working with your hands.
Go to Build a Rolling Stock Kit →
7a3 — Scales and Gauges
Name the scale of four popular model railroad gauges. Then identify the scale of four specific model cars or locomotives. This is a knowledge-based activity you can do with catalog research or by examining equipment in a hobby shop or club layout.
Best if you: Like research, facts, and learning the vocabulary of the hobby.
7a4 — Makers and Magazines
Locate the websites of four model railroad manufacturers or magazine publishers. Print (or save) information about their products and services, then discuss what you found with your counselor.
Best if you: Are comfortable doing web research and enjoy discussing what you learn.
7a5 — Structures and Scenery
Build one railroad structure from a kit or from scratch. Paint and weather it, mount it on a layout or diorama, and make the surrounding area scenic. This is a multi-step craft project.
Best if you: Love miniature building, painting, and creating realistic environments.
Go to Structures and Scenery →
7a6 — Build and Run a Layout
Alone or with others, build a complete model railroad or modular layout — including ballast and scenery. Wire the electrical connections and operate a train. Then describe to your counselor what you enjoyed most.
Best if you: Want the full model railroading experience, from benchwork to running trains. Can be done as a group project.
Go to Build and Run a Layout →
7a7 — Switching Contest Skills
Participate in a switching contest on a Timesaver layout and record your time. The Timesaver is a classic puzzle-like track arrangement designed to test your ability to move cars efficiently.
Best if you: Enjoy operational challenges and problem-solving. Usually done through a local club.
Go to Switching Contest Skills →
7a8 — DC and DCC Control
Explain the difference between powering and controlling a model railroad using direct current (DC) versus Digital Command Control (DCC). This is a knowledge and explanation activity — no layout required.
Best if you: Are interested in electronics, technology, and the “how it works” side of the hobby.
How to Choose Your Two
| Activity | Hands-on building | Research / discussion | Needs club access |
|---|---|---|---|
| 7a1 Plan a Layout | — | ✓ | — |
| 7a2 Build a Kit | ✓ | — | — |
| 7a3 Scales & Gauges | — | ✓ | — |
| 7a4 Makers & Magazines | — | ✓ | — |
| 7a5 Structures & Scenery | ✓ | — | — |
| 7a6 Build & Run a Layout | ✓ | — | Helpful |
| 7a7 Switching Contest | ✓ | — | ✓ |
| 7a8 DC and DCC | — | ✓ | — |
Req 7a1 — Plan a Layout
This requirement is about design thinking — not construction. You are creating a track plan on paper (or digitally) that shows how a model railroad could fit in a real space. A well-thought-out layout drawing demonstrates that you understand how tracks connect, how trains move, and how the space works.
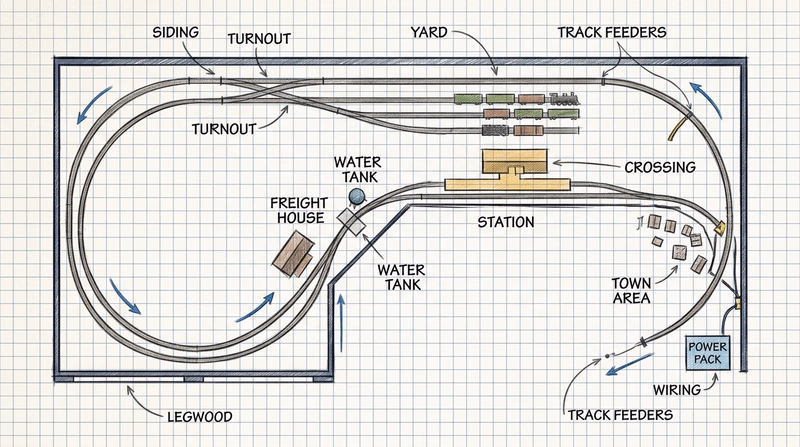
What the Drawing Must Include
Your plan needs three things:
- A track route — either a point-to-point line (train runs from Station A to Station B and back) or a loop (train can run continuously in circles, possibly with branches).
- Different routings — meaning the train can take more than one path. A simple oval with a single passing siding qualifies.
- At least one of: turnaround, terminal, yard, or siding.
Understanding the Four Features
Turnaround — A track arrangement (like a wye, loop, or balloon track) that lets a locomotive reverse direction without being uncoupled and lifted. On a point-to-point layout, a turnaround at each end allows continuous operation.
Terminal — A passenger or freight station where trains originate and terminate. It is typically a stub-end (dead-end) track arrangement with multiple tracks and a platform area.
Yard — A set of parallel tracks connected by switches (turnouts) where cars are sorted, stored, and assembled into trains. Even a small yard with three to five tracks counts.
Siding — A short section of track parallel to the main line, connected at both ends by switches. Sidings allow trains to pass each other on a single-track main line, or let cars be set out (parked) while other trains pass.
How to Draw Your Plan
Use graph paper. Assign a scale — for example, each grid square equals 6 inches of real-world space. Draw the benchwork outline (the table or shelf the layout would sit on) first, then sketch your track routes inside it.
Check your minimum curves. Every scale has minimum curve radii — go too tight and your locomotives will derail. HO scale standard minimum is typically 18 inches radius; N scale is 9–11 inches. Mark your curves as arcs on the plan.
Label everything. Mark your main line, sidings, yard leads, and the one required feature (turnaround, terminal, yard, or siding). Label the scale and the real-world dimensions of your benchwork.
Show your routing options. Use arrows or color coding to show the two different paths a train can take through your layout.
Talking to Your Counselor
Be ready to walk your counselor through the drawing and explain:
- What scale you chose and why
- How the routing options work (where the two different paths go)
- Which of the four required features you included and what purpose it serves
- Where a locomotive would turn around (or how continuous operation works on your loop)
Req 7a2 — Build a Rolling Stock Kit
This is a hands-on construction requirement. You buy a kit — a box with parts, instructions, and hardware — and assemble it into a finished model. The result is a car or locomotive ready to go on a layout or into a display case.
Choosing Your Kit
Car kit or locomotive kit — both count. A freight car kit (boxcar, flatcar, tank car, hopper) is typically simpler and cheaper, making it a great first kit. A locomotive kit is more involved and may require painting.
Scale matters for fit — match the scale of your kit to any layout you plan to run it on. HO (1:87) is the most common. N scale (1:160) is popular for smaller spaces. O scale (1:48) is large and very detailed.
Step-by-Step Assembly
While every kit is different, the general process follows the same sequence:
1. Read the instructions completely first. Do not start gluing until you have read all the steps and laid out the parts. Many beginner mistakes happen because of skipped steps.
2. Identify and sort the parts. Most kits have a numbered parts diagram. Check that all parts are present before you begin.
3. Prepare the body. Remove parts from sprues (plastic trees) using a hobby knife or sprue cutter — never pull or twist parts free. Clean up any flash (extra plastic at the cut points) with a knife or small file.
4. Follow the sub-assembly sequence. Kits often have you build sub-assemblies (interior, trucks, roof) before final assembly. Build these in order.
5. Glue carefully. Use model cement (plastic glue with a brush applicator) for plastic-to-plastic joins. Apply a small amount — excess glue causes cloudy spots on clear parts and weakens joints. Hold parts steady for 30–60 seconds.
6. Install wheels and trucks. Freight car trucks (the wheel assemblies) usually clip or screw on last. Check that they pivot freely.
7. Install couplers. Kadee-compatible knuckle couplers are the hobby standard. Follow the kit’s instructions for coupler height — this affects how well the car couples with other equipment.
8. Paint and weather (optional but recommended). A freshly assembled plastic car looks unrealistic. Even a light wash of diluted brown or grey acrylic paint in the crevices and a dry-brush of rust color on metal details adds convincing age. This step is optional for the requirement but will impress your counselor.
Assembly Checklist
Before showing your completed model- All body parts are joined with no visible gaps or excess glue
- Trucks pivot freely and all wheels contact the rails (or test track)
- Couplers move freely and are at the correct height
- Any clear windows are installed without glue smears
- Your name and the date are written in pencil on the inside of the car body
Discussing With Your Counselor
When you show the finished model, be ready to explain:
- What type of car or locomotive you built (prototype name and purpose)
- What scale it is and why you chose that scale
- One challenge you encountered during assembly and how you solved it
- Whether the prototype (the real railroad version) is still in service today
Req 7a3 — Scales and Gauges
This is a knowledge and identification requirement. You need to learn the vocabulary that every model railroader uses — “scale” and “gauge” — and apply it to real equipment. The difference between these two words trips up a lot of beginners, so let’s start there.
Scale vs. Gauge: What Is the Difference?
Scale is the ratio of the model’s size to the real thing. HO scale (1:87) means the model is 87 times smaller than the prototype (the real railroad car or locomotive).
Gauge is the distance between the inside faces of the two rails — measured in inches or millimeters. Standard prototype gauge in North America is 4 feet 8½ inches. Model gauges are scaled-down versions of this.
The confusion: many people use “gauge” when they really mean “scale.” In the hobby, they are technically different things, but the four gauges you need to know each have one standard scale associated with them.
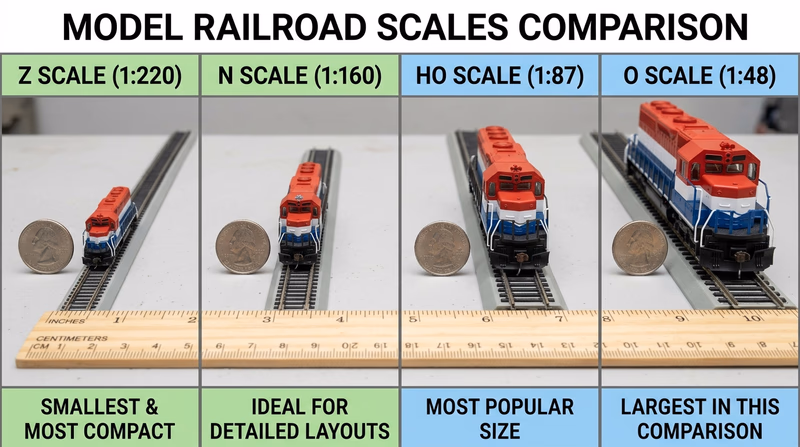
The Four Most Popular Model Railroad Gauges and Their Scales
Gauge Reference
Name these four for your counselor- Z Gauge — Scale 1:220. The smallest mainstream scale. Entire layouts can fit in a large briefcase. Track gauge is 6.5 mm.
- N Gauge — Scale 1:160. Very popular for space-constrained hobbyists. Track gauge is 9 mm. Second most popular in the US.
- HO Gauge — Scale 1:87. The most popular model railroad scale worldwide. Track gauge is 16.5 mm.
- O Gauge — Scale 1:48 (American standard; some manufacturers use 1:43.5). Large, detailed, very visible. Track gauge is 32 mm. Traditional Lionel and Marx trains use this gauge.
How to Identify the Scale of a Model Car or Locomotive
The scale is almost always printed:
- On the box — look for “HO Scale,” “N Scale,” etc.
- On the bottom of the model — manufacturers often molded or stamped the scale there
- In the catalog number or description at a hobby shop or online
If you do not have the box, you can measure the model’s length and compare it to known prototype dimensions. A standard 40-foot boxcar in HO scale should be about 5.5 inches long.
For the requirement, locate four specific models — actual cars or locomotives you can examine in person at a hobby shop, club layout, or from your own collection — and state the scale of each.
Ready for Your Counselor?
Make sure you can do all of these- Name Z gauge and its scale (1:220)
- Name N gauge and its scale (1:160)
- Name HO gauge and its scale (1:87)
- Name O gauge and its scale (1:48)
- Identify (by name and scale) four specific model cars or locomotives
Req 7a4 — Makers and Magazines
This requirement asks you to explore the commercial side of the hobby — the companies that make the trains, the track, the scenery materials, and the publications that document it all. You will visit four websites, gather information, and be ready to discuss what you found.
The Two Categories
You can choose any combination of manufacturers (companies that make physical products) and magazine publishers (publications that cover the hobby). You need four total — they can all be manufacturers, all be magazines, or any mix.
Major Manufacturers
These are well-established companies whose products you are likely to find at any hobby shop:
Locomotives and rolling stock:
- Athearn (athearn.com) — HO and N scale locomotives and freight cars; one of the largest American manufacturers
- Atlas Model Railroad (atlasrr.com) — Locomotives, freight cars, and track in HO and N scale; also makes track and accessories
- Kato USA (katousa.com) — Known for exceptionally smooth-running N and HO scale locomotives; Japanese heritage
- Bachmann Trains (bachmanntrains.com) — A wide range of scales from N to large G; popular entry-level and mid-range products
- Broadway Limited Imports (broadway-limited.com) — High-end HO and N scale steam and diesel locomotives with sound
Track and structures:
- Woodland Scenics (woodlandscenics.com) — The industry leader in scenery materials: ground foam, rock castings, trees, water effects, and more
- Walthers (walthers.com) — Structures, scenery, and locomotives in HO scale; also the largest model railroad catalog/retailer
DCC systems:
- Digitrax (digitrax.com) — One of the two dominant DCC system manufacturers in North America
- NCE (ncedcc.com) — The other major DCC system brand; popular with club layouts
Model Railroad Magazines
- Model Railroader (modelrailroader.com) — The world’s largest model railroad magazine; published monthly with layout features, product reviews, and how-to articles
- Railroad Model Craftsman (rrmodelcraftsman.com) — Long-running monthly with emphasis on scratchbuilding and fine craft
- Classic Toy Trains (classictoytrans.com) — Focused on O gauge and G gauge, including Lionel, Marx, and MTH
- N Scale Magazine (nscalemagazine.com) — Dedicated entirely to N scale modeling
What to Print or Save
The requirement says to “print information on their products and services.” You can:
- Print a product catalog page or a specific product description
- Save a PDF of an article or product guide
- Screenshot and print a key page
What to look for on each site:
- What scale(s) does this manufacturer produce?
- What is their flagship product line?
- What price range are their products?
- Do they offer resources for beginners (instructions, tutorials, FAQs)?
Discussing With Your Counselor
For each of the four sites you visited, be ready to explain:
- What the company or magazine makes or publishes
- Who their target audience is (beginners, advanced modelers, a specific scale)
- One specific product or article that interested you and why
- How the product or publication connects to something you have done or want to do in the hobby
Req 7a5 — Structures and Scenery
This requirement combines building, painting, weathering, and scenic landscaping into one complete project. The result is a finished diorama — a small, self-contained scenic scene with a structure at its center.
Choosing Your Structure
Kit or scratch-built — both count. A kit is faster and gives you pre-cut parts; scratch-building (constructing from raw materials like styrene sheet, wood, or cardboard) requires more planning but is more flexible.
Good first structures for this requirement:
- A small freight depot or station
- A section house (lineside maintenance building)
- A water tower
- A coaling tower or fuel shed
- A small industry building (grain elevator, warehouse)
Avoid very large, complex structures (roundhouses, large stations) for your first attempt — they require extensive time and may not produce a finished result for your counselor visit.
Step 1: Build the Structure
Follow kit instructions or your own plans. Take your time on joins and alignment — a square, tight structure looks far more convincing than one that leans or has gaps. Test-fit parts before gluing.
Step 2: Paint the Structure
Prime first. Even if the kit plastic is already colored, a light coat of grey or white primer helps paint adhere and reveals surface flaws to fix before final color.
Match the prototype. Real depot buildings were often painted in railroad company colors (look up the prototype railroad you are modeling). Industrial structures were often unpainted wood, corrugated metal, or brick.
Work in thin coats. Multiple thin coats give a smoother, more scale-realistic result than one heavy coat that obscures fine detail.
Step 3: Weather the Structure
Weathering ages the model and makes it look like it has been in the elements for years. Without weathering, a painted model looks like a toy; with it, it looks like a real building.
Basic weathering techniques:
Wash: Mix brown or black acrylic paint heavily with water (about 1 part paint to 10 parts water). Brush this over the whole structure and let it settle into crevices and wood grain. Wipe the surface clean before the wash fully dries, leaving color only in the recesses.
Dry brush: Load a stiff brush with a light color (white, cream, or light grey), wipe almost all the paint off on a paper towel, then drag the nearly-dry brush lightly across raised details. This highlights edges and makes wood grain pop.
Rust streaks: On metal details (downspouts, hardware, roofing), add streaks of orange-brown with a fine brush running downward from any metal surface.
Step 4: Build the Diorama and Add Scenery
Mount your structure on a base — a piece of 1/4-inch plywood, foam board, or a picture frame insert works well. The base should be large enough to include some surrounding ground.
Basic scenic steps:
Ground cover: Apply a white glue + water mixture (50/50) to the base. Sprinkle fine ground foam or fine sand while the glue is wet. Let dry fully, then seal with diluted glue again if needed.
Dirt road or gravel: A mix of fine sand, dirt-colored ground foam, or actual fine gravel creates a convincing road or yard surface.
Weeds and bushes: Clumps of static grass or ground foam in medium and coarse textures break up the monotony of the ground surface and add visual interest.
Final details: A fence post, a loading dock, a few barrels or crates near the building entrance all make the scene feel inhabited.
Finished Diorama Checklist
Before showing your counselor- Structure is fully assembled with no open seams or white glue showing
- Structure is painted with a prototype-appropriate color scheme
- Weathering has been applied (wash, dry brush, or rust streaks)
- Structure is mounted securely on a base
- Ground cover surrounds the structure
- At least one additional scenic element (road, weeds, bushes, or detail) is present
Req 7a6 — Build and Run a Layout
This is the most complete activity in the Model Railroading option. You build a layout — not just a structure or a plan — with ballasted track, basic scenery, and working electrical connections. Then you actually run a train on it and reflect on the experience.
What “Layout” Means Here
The requirement does not specify a size. A layout can be:
- A 4×8 sheet of plywood — the classic beginner benchmark
- A 2×4 or 2×6 modular section (a “module”) designed to connect with other modelers’ sections at a club
- A shelf layout — a long, narrow design along a wall (often 12–18 inches wide)
- A small test layout on a hollow-core door or piece of foam insulation board
You can build it alone or with others. Club builds and group Merit Badge projects where each Scout contributes a section are a valid approach.
What You Must Complete
The requirement has four distinct components:
1. Track with Ballast
Lay your track on a smooth roadbed (cork sheet or foam strip under the rails), then apply ballast — fine gray or brown crushed stone — between and around the ties. Ballast is glued down with diluted white glue (50% glue, 50% water, plus a drop of dish soap to break surface tension). Brush the ballast glue on carefully and let it dry overnight.
2. Scenery
Cover at least part of your layout with basic scenery — ground cover, at minimum. See the technique notes in activity 7a5 for approaches to basic scenic work. You do not need a fully detailed scene, but the layout should look like it represents a real environment, not bare plywood.
3. Electrical Connections
Your track needs power. With traditional DC power:
- Connect the power pack’s output leads to the track using rail joiners with screw-down or solder connections
- Test continuity with a multimeter or by placing a locomotive on the track
With DCC:
- Install a DCC command station and booster
- Connect the bus wires to the track bus
- Address each locomotive’s decoder
Key wiring principles:
- Use feeder wires at multiple points along the track — long runs of track without feeders cause voltage drop and stalling
- Keep track joints clean and tight — dirty or corroded joints are the most common cause of poor running
4. Operate and Describe
Run a locomotive (and some cars, if you have them) around your layout. Then tell your counselor what you enjoyed most. This can be the building process, the moment a train first ran, the scenery work, or the wiring challenge — anything genuine.
Ready to Show Your Counselor?
Your layout should include all of these- Track is laid on roadbed and secured
- Ballast is applied and glued around the ties
- Scenery covers at least a portion of the layout
- Electrical connections are made (DC or DCC)
- A locomotive runs without stalling under its own power
- You can describe what you enjoyed most about the project
Req 7a7 — Switching Contest Skills
The Timesaver is a classic model railroad puzzle invented by John Allen in the 1960s. It is a small, specialized track arrangement — not a scenic layout — designed to challenge the operator’s ability to move freight cars to their correct destinations in as few moves as possible. Switching contests are a staple at model railroad clubs and conventions.
What Is the Timesaver?
The Timesaver layout consists of:
- A single curved or angled main line (the “lead”)
- Five short stub tracks (spurs) of different lengths branching off the lead
- A set of freight cars placed on the spurs in a random starting order
The goal: rearrange the cars so that each spur holds a specific type of car (a designated “solution” or target arrangement) — using the locomotive to push, pull, and shunt cars through the track switches. The fewer moves and less time you use, the better.
Why the tracks are different lengths — this is the puzzle. Some spurs can hold two cars; some can hold only one. Your locomotive takes up space on the lead while it works. Getting one car into a short spur may require temporarily parking another car somewhere else, then retrieving it. This is exactly what real railroad yard crews do.
How a Switching Contest Works
- Setup: The contest host places cars in a starting arrangement on the spurs and gives you a target arrangement (where each car should end up).
- Timer starts: When you say “go,” the timer begins.
- You operate: Using only the throttle and track switches, move all cars to their correct destinations.
- Timer stops: When you announce the arrangement is complete, the timer stops.
- Your time is recorded. Contest standings compare times across participants.
Some events add a move penalty — each time you reverse direction counts as one move, and moves are added to your time. This rewards efficient planning over fast execution.
🎬 Video: Timesaver by John Allen explained by Allan Fenton — jamestowntrains — https://www.youtube.com/watch?v=jPFunbqYOfM
How to Find a Contest
Switching contests are most commonly held by:
- Local NMRA (National Model Railroad Association) divisions — check your division’s calendar on nmra.org
- Local model railroad clubs — many clubs have a Timesaver set up permanently at their layout for casual play and formal contests
- Model railroad shows and conventions — Timesaver contests are popular show floor activities
Recording Your Time
Write down your time immediately after the contest. When you meet with your counselor, bring your recorded time and be ready to describe:
- How the Timesaver works and why it is a challenge
- Your strategy for approaching the puzzle
- What you would do differently to improve your time
Req 7a8 — DC and DCC Control
This is an explanation requirement — no building or operating is needed. You need to understand how the two main control systems work and be able to clearly explain the difference to your counselor. The key is understanding not just what the names are, but how each system controls individual locomotives.
Direct Current (DC) Control
How it works: A DC power pack outputs a variable DC voltage to the track. Locomotives pick up this current through their wheels. The speed of a locomotive is controlled by the voltage level — higher voltage, faster speed. The direction is controlled by reversing the polarity of the current on the track (the power pack’s direction switch does this).
The critical limitation: Because the voltage goes to the track, every locomotive on that section of track receives the same voltage at the same time. If you raise the voltage to speed up one train, every locomotive on that block speeds up. If you want independent control of two trains, you must divide the layout into electrical blocks — sections of track that can be powered independently — and switch the power between them manually.
Block control: A complex DC layout may have dozens of blocks, each with its own toggle switch. The operator selects which block gets power from which throttle. This works, but requires significant wiring and careful attention while operating.
Digital Command Control (DCC)
How it works: DCC sends a constant full voltage to the track, but embeds digital instructions in that voltage signal — encoded as small variations in the power waveform. Each locomotive has a small decoder chip installed inside it. The decoder reads the digital signal and executes only the instructions addressed to its specific ID number.
The key difference: Because instructions are addressed to individual decoders, you can run multiple locomotives independently on the same track at the same time, with no block wiring. Locomotive 1 responds only to commands sent to address 1; locomotive 2 responds only to commands sent to address 2 — even if both are on the same section of track.
What decoders can do:
- Control speed and direction independently for each locomotive
- Control a locomotive’s lights (headlight, cab lights, ditch lights)
- Play digitally recorded sounds — actual engine sounds, horns, bells, and more
- Control acceleration and braking momentum for realistic operation
Side-by-Side Comparison
| DC Control | DCC | |
|---|---|---|
| Track voltage | Variable (0–12V typical) | Constant full voltage |
| Speed control | Voltage level | Digital command to decoder |
| Multiple trains | Requires block wiring | Independent, same track |
| Sound | Not possible | Yes, via sound decoders |
| Decoder in loco? | No | Yes, required |
| Setup cost | Lower | Higher initially |
| Wiring complexity | Increases with layout size | Stays simple |
🎬 Video: DC vs. DCC: What's BEST for Your Model Railroad?! — 5 Minute Modeler — https://www.youtube.com/watch?v=z5TiK_Ay-0g
What to Tell Your Counselor
Practice explaining these four points out loud before your counselor meeting:
- In DC, voltage controls speed — and all locomotives in a block respond to the same voltage
- In DCC, full voltage is always on the track, and decoders inside each locomotive respond only to commands addressed to them
- DCC allows independent operation of multiple locomotives without block switching
- DCC also enables sound, lighting effects, and more realistic momentum curves
Req 7b — Railfanning Adventures
You must complete exactly 2 of the 4 activities listed below. Railfanning is the hobby of observing, photographing, and exploring real railroads — past and present. Each activity takes you somewhere, connects you with history, or builds genuine knowledge of the railroad world.
Your Four Activities
7b1 — Museum or Public Event Visit
Visit a railroad museum, historical display, or a prototype railroad–sponsored public event. Photograph, sketch, or digitally record items of interest (with permission). Then explain what you saw and describe your documentation to your counselor.
Best if you: Have a railroad museum, heritage railway, or railroad-sponsored event within reasonable driving distance.
Go to Museum or Public Event Visit →
7b2 — Ride a Historic Railroad
Purchase tickets and ride a scenic or historic railroad. Under supervision, photograph the equipment. Then discuss with your counselor the historic significance of the operation.
Best if you: Want an immersive experience — the sights, sounds, and smells of a real operating historic train.
Go to Ride a Historic Railroad →
7b3 — Rail Preservation Groups
Locate the websites of four rail historical groups. Research the history of each group’s preservation operations and purpose. Talk with a member of one group and find out how you might help.
Best if you: Enjoy internet research and would like to explore volunteer or preservation opportunities.
Go to Rail Preservation Groups →
7b4 — Plan and Take a Rail Trip
Plan a trip by rail between two points. Obtain a schedule and identify when the train arrives at two intermediate stops. Purchase the tickets and make the trip. Explain to your counselor what you observed along the way.
Best if you: Want to experience modern passenger rail (Amtrak or commuter lines) and can plan a multi-stop journey.
Go to Plan and Take a Rail Trip →
How to Choose Your Two
| Activity | Requires travel | Research | Photography | Discussion |
|---|---|---|---|---|
| 7b1 Museum Visit | ✓ | — | ✓ | ✓ |
| 7b2 Ride a Railroad | ✓ | — | ✓ | ✓ |
| 7b3 Preservation Groups | — | ✓ | — | ✓ |
| 7b4 Rail Trip | ✓ | ✓ | — | ✓ |
Req 7b1 — Museum or Public Event Visit
This requirement gets you out to a real place where railroad history is preserved, displayed, or celebrated. Your job is to observe carefully, document what you find interesting, and be able to talk about it with your counselor.
Finding a Qualifying Venue
Railroad museums preserve historic equipment — locomotives, passenger cars, freight cars, maintenance vehicles — and display them with historical context. Most have indoor exhibits, outdoor equipment yards, and staff or volunteers who can answer questions.
Historical displays can be a single car or locomotive on permanent display in a park, depot, or town center — many communities have a restored locomotive as a monument. These count.
Prototype railroad–sponsored public events include open houses hosted by Amtrak, a short-line railroad, or a Class I railroad that invites the public onto property, hosts cab tours, or demonstrates equipment.
Getting Permission and Photographing
The requirement says “with permission” — this applies primarily to private or restricted areas. In most railroad museums, photography is encouraged in all public areas. However:
- Ask before photographing staff or volunteers in detail
- On railroad-sponsored events on active property, follow all posted rules and staff instructions
- Do not cross any safety barriers to get a better angle
What to photograph, sketch, or record:
- Locomotive wheel arrangements and running gear up close
- Builder’s plates (cast plates on locomotives showing the manufacturer, serial number, and year built)
- Cab interiors (gauges, controls, seats)
- Freight car types and markings you haven’t seen before
- Interpretive signs explaining a piece of equipment’s history
How to Prepare for Maximum Value
Before you go, spend 15 minutes looking up the museum or event online. Read about two or three specific items they have on display. When you arrive, find those items first — having a target makes the visit more focused and the explanation to your counselor more specific.
Bring:
- A charged phone or camera
- A small notebook (even one page of notes beats trying to remember everything)
- Your questions — what do you genuinely want to know about?
Talking to Your Counselor
Your counselor will ask you to explain what you saw and describe the photos, sketches, or video you captured. Prepare to discuss:
- The name and location of the museum or event
- At least two specific items you documented and what makes them historically significant
- One thing you saw that surprised you or that you did not know before
- Why that particular photograph, sketch, or clip captures something meaningful
Req 7b2 — Ride a Historic Railroad
This requirement asks you to experience a preserved or scenic railroad as a passenger — to purchase your own ticket, ride the train, photograph the equipment, and understand why this particular operation matters historically.
What Qualifies as a Scenic or Historic Railroad?
Heritage railroads are preserved operations that use historic locomotives (usually steam) and vintage passenger cars to operate excursion trains for the public. The equipment itself is historically significant — these are often the last surviving examples of a locomotive class or a car type once used across the country.
Scenic railroads operate historic or vintage equipment through spectacular landscapes — mountain passes, river gorges, coastal routes — where the scenery itself is the primary attraction. Many of these also use genuine historic equipment.
Both types qualify. Modern Amtrak or commuter rail trips do not qualify for this requirement (though they qualify for 7b4).
Purchasing Tickets
The requirement specifies that you purchase the tickets — this is intentional. Understanding how to find schedules, select a departure time, choose your fare class, and complete a purchase is part of the experience.
How to find and book tickets:
- Visit the railroad’s website directly — most have online ticketing
- Call their ticket office if online booking is unavailable
- Check whether there are group or youth discounts
- Read the cancellation/refund policy before purchasing
What to notice at booking:
- The route (start and end points, any stops)
- Trip duration (round trip vs. one-way)
- Equipment type (steam locomotive? diesel? vintage coaches?)
- Any special instructions (boarding time, parking, what to bring)
What to Photograph
The requirement says “under supervision, photograph the equipment.” Look for:
- The locomotive — from a safe distance on the platform, photograph the entire locomotive, then details: the drive wheels, boiler, headlight, number boards, and builder’s plate
- The cars — coach interiors, exterior lettering and paint schemes, truck assemblies
- The cab (if a cab tour is offered) — controls, gauges, firebox door, the engineer’s seat
- The lineside environment — depots, water towers, coaling facilities, signal equipment
Understanding Historic Significance
This is the key counselor conversation. You need to be able to explain why this operation matters — not just that it is a pretty train ride. Be prepared to discuss:
- When was this railroad originally built, and what purpose did it serve? (Logging? Mining? Passenger service between communities?)
- Why did it close or nearly close? Most heritage railroads were abandoned by Class I railroads as unprofitable, then saved by preservation organizations or the state.
- What makes the equipment significant? Is it the last surviving narrow-gauge steam locomotive of its class? A rare example of a particular car type?
- Who preserves it now? A nonprofit? A state agency? A private operator?
Research the answers before your trip using the railroad’s website, brochure, or a quick web search. Knowing this context transforms a pleasant ride into a genuine historical experience.
Req 7b3 — Rail Preservation Groups
This requirement has two parts: research and a conversation. You research four organizations online to understand what they do and why, then you reach out to a member of one and learn about volunteer or participation opportunities.
What Is a Rail Historical Group?
A rail historical group is a nonprofit organization (or formally organized club) whose mission is to preserve, document, restore, or promote the history of railroading. They do this through:
- Restoring locomotives and rolling stock — labor-intensive, skilled work to bring historic equipment back to operating condition
- Maintaining archives — collecting photographs, records, timetables, and documents from defunct railroads
- Operating museums and tourist railroads — running the preserved equipment for the public
- Publishing research — books, magazines, newsletters, and online resources about specific railroads, eras, or equipment types
Four Groups to Research
Here are well-established organizations to start with — feel free to substitute any legitimate rail historical society that interests you:
Railway and Locomotive Historical Society (RLHS) — rlhs.org One of the oldest railroad historical societies in North America (founded 1921). Publishes the Railroad History journal. Maintains a directory of member societies and preservation efforts across the US.
National Railway Historical Society (NRHS) — nrhs.com A large membership organization with chapters in cities and regions across the country. Hosts annual conventions, publishes the NRHS Bulletin, and maintains local chapter activities ranging from excursions to volunteer restoration work.
Railroad Preservation Alliance — Many individual railroads have their own preservation societies (e.g., the Friends of the 844 for Union Pacific’s famous steam locomotive No. 844, or the B&O Railroad Historical Society). Research a specific railroad that interests you and find its associated preservation group.
Tourist Railroad and Museum Association (TRMA) — trainhistory.org A trade association for heritage railroad operators and museum directors. Its member directory is a useful starting point for finding operating heritage railroads near you.
What to Find on Each Website
For each of the four organizations, note:
- When was the group founded and what was its original purpose?
- What railroad(s), era, or equipment type does it focus on?
- What preservation activities does it currently conduct?
- Does it have a local chapter or affiliated group near you?
Talking With a Member
The requirement asks you to talk with a member of one of the four groups and find out how you might help. This is the most important step — it connects research to real people and real opportunities.
How to reach someone:
- Most organizations list contact information for officers or chapter leaders on their website
- Email is fine; introduce yourself as a Scout working on the Railroading merit badge
- Many groups have open meetings or work sessions you can attend
What to ask:
- What does this group actually do on a regular basis — work sessions, meetings, excursions?
- Can Scouts participate as volunteers?
- Is there any minimum age for hands-on restoration work?
- What skills or background would be useful to develop?
For Your Counselor
Be ready to present your four organizations with a brief summary of each, and to describe the conversation you had with a member — what you learned about how to get involved and whether you are interested in following up.
Req 7b4 — Plan and Take a Rail Trip
This requirement puts you in the planner’s seat. You research a real route, read an actual schedule to identify intermediate stops and arrival times, buy the tickets, ride the train, and report back. It is both a practical exercise in using modern rail services and a genuine travel experience.
Choosing Your Route
The trip needs to have at least two intermediate points (stops between your origin and final destination) so that you can identify scheduled arrival times at each. A single non-stop run between two cities does not satisfy the requirement.
Amtrak is the most accessible option for most Scouts. Amtrak operates long-distance trains and regional corridors across the country, nearly all with multiple intermediate stops. Even a modest regional route — say, a three-stop corridor connecting cities in your state — qualifies.
Commuter rail systems (MARC, Metra, NJ Transit, Caltrain, etc.) also qualify. A commuter line from a suburb into a city, stopping at several stations along the way, meets the requirement.
Reading the Schedule
Go to Amtrak.com (or your commuter rail provider’s site) and search for your route. Find the timetable — a table showing each station and the scheduled arrival and departure times.
What to identify:
- Your origin station and departure time
- Intermediate stop 1 — its name and scheduled arrival time
- Intermediate stop 2 — its name and scheduled arrival time
- Your destination station and scheduled arrival time
Write these down. You will explain these times to your counselor before you take the trip and confirm whether the train ran on schedule after.
Purchasing the Tickets
Purchase the tickets yourself — this is part of the requirement. Options:
- Online: Amtrak.com or your commuter rail’s website
- App: The Amtrak app offers the same fares and a mobile ticket you can show on a phone
- At the station: Ticket window or self-service kiosk
Fare classes on Amtrak:
- Coach — standard seats, the lowest fare class, sufficient for any length trip
- Business — wider seats, extra legroom, some amenities; available on select corridor trains
- Sleeping car accommodations — Roomettes and bedrooms on long-distance overnight trains; not required for this requirement
Check whether there is a youth discount or a Scout group discount before purchasing.
On the Trip: What to Observe
The requirement ends with “explain to your counselor what you saw.” This is open-ended — you are not expected to file a formal report, just to have genuinely paid attention. Some things to notice:
- The station: Architecture, age, signage, what types of passengers are using it
- The right-of-way: Are you on a freight mainline? Dedicated passenger corridor? Can you see signals, bridges, crossings?
- Other trains: Did you pass or meet any freight trains or other passenger trains?
- On-time performance: Did the train arrive at intermediate stops on schedule? If not, did the crew make up time?
- The equipment: What type of locomotive (electric, diesel)? How old are the coaches?
Trip Planning Checklist
Complete this before your counselor meeting- Route chosen (origin and destination with at least two intermediate stops)
- Timetable pulled — write down arrival times at intermediate stops 1 and 2
- Tickets purchased (save the receipt or confirmation email)
- Trip taken
- Notes made on what you observed (on-time status, equipment, surroundings)
Extended Learning
Congratulations, Railroader!
You have covered a lot of ground — railroad history and economics, the workers who run the trains, the rules that govern how they operate, signaling and safety systems, and a deep dive into either model railroading or railfanning. The Railroading merit badge gives you a genuine foundation in one of the industries that built modern America.
But railroading is a deep hobby and a huge industry. The badge is a starting point. If any part of this subject caught your interest — the technology, the history, the craft of miniature modeling, or the adventure of rail travel — there is a lifetime of learning ahead.
A. The Future of Railroading
Railroads are in the middle of the most significant technological transformation since dieselization in the 1950s. Two developments are changing the industry right now.
Positive Train Control (PTC): PTC is a federally mandated safety system that uses GPS, digital radio communication, and on-board computers to monitor every train’s position and speed in real time. If an engineer misses a signal or fails to slow for a speed restriction, the system automatically applies the brakes. PTC was required after a 2008 collision in Los Angeles that killed 25 people. Implementing it across the US rail network took more than a decade and cost over $15 billion. Today it is active on all required mainlines and has already prevented several potential accidents.
Battery-electric and hydrogen locomotives: The diesel-electric locomotive has dominated North American railroading since the 1950s. Now multiple manufacturers are testing and deploying battery-electric switchers and road locomotives. BNSF and Wabtec are testing battery-electric road locomotives on revenue freight service in California. The appeal is enormous — freight railroads already move goods at roughly four times the fuel efficiency of trucks, and electric or hydrogen power could reduce that carbon footprint to near zero.
Autonomous and remote-control switching: Remote control locomotives (RCL) are already widely used in classification yards, where a ground operator controls the locomotive with a belt pack while walking alongside cars being switched. The next step — fully autonomous switching using computer vision and GPS — is in testing at several major yards. This will reshape how rail yards operate over the next decade.
Association of American Railroads — Technology The AAR tracks the major technology initiatives reshaping freight railroading in the United States, from PTC to precision scheduled railroading. Link: Association of American Railroads — Technology — https://www.aar.org/issue/railroad-technology-innovation/B. The Art and Engineering of Model Railroading
Model railroading at its highest levels is not a simple hobby — it is an intersection of fine art, precision engineering, historical research, and electronics. Here is what lies beyond the merit badge.
Prototype modeling: The most demanding segment of the hobby involves recreating specific real-world locations and eras with strict historical accuracy. A prototype modeler might spend months researching photographs to accurately recreate a specific small town as it appeared on a specific railroad in a specific decade — matching paint schemes, lettering styles, building conditions, and even the type of weeds growing alongside the track.
Layout construction techniques: Beyond the basics of track laying and ballasting, advanced modelers use techniques like rock casting (pouring plaster or hydrocal into rubber molds to create realistic rocky outcroppings), water effects (using products like Woodland Scenics Realistic Water or poured resin to simulate rivers and ponds), and lighting (installing LED streetlights, building interiors, and locomotive headlights that respond to throttle position).
Sound and DCC programming: Modern DCC sound decoders record the actual sounds of specific locomotive models — the distinct bark of an EMD 567 prime mover, the whoosh of a steam locomotive’s air pumps, the squeal of dynamic brakes. Programming these decoders involves setting dozens of configuration variables (CVs) to customize momentum curves, sound volumes, and lighting behavior.
Operations: Many advanced modelers are less interested in scenic display and more interested in realistic operation — running their layout like an actual railroad, with car forwarding systems, timetable and train order operation, and simulated industries that generate realistic traffic. This is closer to simulation than hobbycraft, and some layouts run formal operating sessions with crews of four to eight people acting as engineer, conductor, and dispatchers.
National Model Railroad Association The NMRA is the hobby's standards body and membership organization, with resources for modelers at every level, a convention circuit, and a merit award program. Link: National Model Railroad Association — https://www.nmra.org/C. Reading Railroad History
Understanding how American railroads were built, financed, competed, and consolidated is a legitimate academic subject — and a rich one. Here are a few places to start.
The Transcontinental Railroad: The construction of the First Transcontinental Railroad (1863–1869) is one of the most extraordinary engineering and logistical feats in American history. Two companies — the Union Pacific building west from Omaha and the Central Pacific building east from Sacramento — employed tens of thousands of workers (mostly Civil War veterans and Chinese immigrants) in brutal conditions to lay track across the Great Plains, the Rocky Mountains, and the Sierra Nevada. The human cost and the political corruption surrounding the project are just as interesting as the engineering.
The railroad barons: In the late 19th century, a small number of men — Cornelius Vanderbilt, Jay Gould, E.H. Harriman, James J. Hill — controlled enormous railroad empires. Their competition and consolidation shaped the geography of cities, the settlement of the West, and the development of American capitalism. Understanding their strategies — rate wars, pooling agreements, stock manipulation, and political influence — is a master class in business history.
The decline of passenger rail: In the 1940s, American railroads carried the majority of the country’s intercity passengers. By 1970, passenger rail had nearly vanished — killed by the interstate highway system, cheap air travel, and the railroads’ own preference for freight over passengers. The creation of Amtrak in 1971 was a last-ditch effort to save intercity rail. Understanding how this collapse happened — and what it means for current debates about rail investment — is highly relevant today.
Smithsonian National Museum of American History — Railroads The Smithsonian's railroad collection and online resources include photographs, artifacts, and historical essays spanning the full arc of American railroad history. Link: Smithsonian National Museum of American History — Railroads — https://americanhistory.si.edu/collections/subject_areas/transportation/railroadReal-World Experiences
Railroading connects to dozens of real activities. Here are specific experiences worth pursuing.
Organizations
These organizations can help you continue your railroading journey beyond the merit badge.
National Model Railroad Association (NMRA) The hobby's standards body and membership organization. Resources include a merit award program, clinic archive, standards library, and an events calendar for local and national meets. Link: National Model Railroad Association (NMRA) — https://www.nmra.org/ National Railway Historical Society (NRHS) A national organization with local chapters in most major cities, publishing the NRHS Bulletin and hosting excursions, meetings, and preservation activities. Link: National Railway Historical Society (NRHS) — https://www.nrhs.com/ Heritage Rail Alliance The trade association for heritage railroad operators and railroad museums in the US and Canada, with a searchable directory of member operations. Link: Heritage Rail Alliance — https://www.heritagerailalliance.com/ Amtrak The national passenger railroad — the primary way most Americans experience intercity rail travel. Amtrak's site includes route maps, timetables, and trip planning tools. Link: Amtrak — https://www.amtrak.com/ Railway and Locomotive Historical Society One of the oldest railroad historical societies in North America (est. 1921), publishing Railroad History and maintaining a directory of regional historical societies. Link: Railway and Locomotive Historical Society — https://www.rlhs.org/ Friends of the 844 Union Pacific's steam program — locomotive No. 844 has never been retired and is one of the last Class I steam locomotives still in regular operation. UP posts excursion schedules on this page. Link: Friends of the 844 — https://www.up.com/found/steam/index.htm