Req 7a1 — Plan a Layout
This requirement is about design thinking — not construction. You are creating a track plan on paper (or digitally) that shows how a model railroad could fit in a real space. A well-thought-out layout drawing demonstrates that you understand how tracks connect, how trains move, and how the space works.
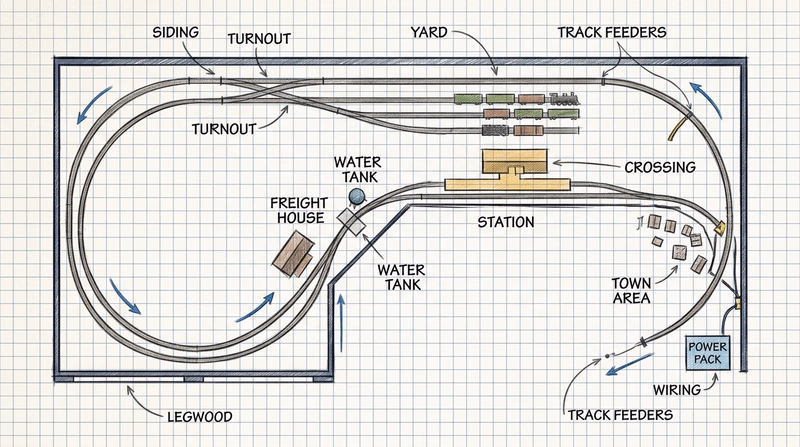
What the Drawing Must Include
Your plan needs three things:
- A track route — either a point-to-point line (train runs from Station A to Station B and back) or a loop (train can run continuously in circles, possibly with branches).
- Different routings — meaning the train can take more than one path. A simple oval with a single passing siding qualifies.
- At least one of: turnaround, terminal, yard, or siding.
Understanding the Four Features
Turnaround — A track arrangement (like a wye, loop, or balloon track) that lets a locomotive reverse direction without being uncoupled and lifted. On a point-to-point layout, a turnaround at each end allows continuous operation.
Terminal — A passenger or freight station where trains originate and terminate. It is typically a stub-end (dead-end) track arrangement with multiple tracks and a platform area.
Yard — A set of parallel tracks connected by switches (turnouts) where cars are sorted, stored, and assembled into trains. Even a small yard with three to five tracks counts.
Siding — A short section of track parallel to the main line, connected at both ends by switches. Sidings allow trains to pass each other on a single-track main line, or let cars be set out (parked) while other trains pass.
How to Draw Your Plan
Use graph paper. Assign a scale — for example, each grid square equals 6 inches of real-world space. Draw the benchwork outline (the table or shelf the layout would sit on) first, then sketch your track routes inside it.
Check your minimum curves. Every scale has minimum curve radii — go too tight and your locomotives will derail. HO scale standard minimum is typically 18 inches radius; N scale is 9–11 inches. Mark your curves as arcs on the plan.
Label everything. Mark your main line, sidings, yard leads, and the one required feature (turnaround, terminal, yard, or siding). Label the scale and the real-world dimensions of your benchwork.
Show your routing options. Use arrows or color coding to show the two different paths a train can take through your layout.
Talking to Your Counselor
Be ready to walk your counselor through the drawing and explain:
- What scale you chose and why
- How the routing options work (where the two different paths go)
- Which of the four required features you included and what purpose it serves
- Where a locomotive would turn around (or how continuous operation works on your loop)