Rifle Shooting Merit Badge — Complete Digital Resource Guide
https://merit-badge.university/merit-badges/rifle-shooting/guide/
Introduction & Overview
Overview
Rifle Shooting teaches you that accuracy, discipline, and safety are inseparable. Before you ever touch a trigger, you learn how a rifle works, what laws govern its use, and how to protect yourself and everyone around you. Then—under direct supervision of a certified instructor and range safety officer—you put that knowledge into practice on an approved range. The skills you build here carry over into hunting, competitive shooting, law enforcement, and a lifetime of responsible firearm ownership.
Then and Now
Then
Rifles shaped American history from the Kentucky long rifle of the colonial frontier to the Springfield used by soldiers in the Civil War. Settlers relied on marksmanship for food and protection. In the early 1900s, the NRA and Scouting both began formalizing rifle training for young people, recognizing that safe handling and accurate shooting were skills worth preserving across generations.
Now
Rifle shooting is one of the most widely participated shooting sports in the United States. Olympic and Paralympic competitors shoot air rifles with sub-millimeter precision. Hunters use modern cartridge rifles to ethically harvest game under carefully regulated seasons. Muzzleloader enthusiasts keep centuries-old traditions alive with black powder and patched round balls. Scouting’s program mirrors this breadth: you may choose modern cartridge, air rifle, or muzzleloading, each with its own history and technique.
Get Ready!
This merit badge rewards patience and practice. A Scout who comes to the range having already studied the four rules of safe gun handling, understood the vocabulary, and visualized the five shooting fundamentals will progress far faster than one who wings it. Use this guide to prepare before each range session, and use your range time to apply what you have studied.
How the Badge Works
Requirement 1 covers safety knowledge, laws, and community context—things you can research and discuss before you ever fire a shot. Requirement 2 is the hands-on shooting option you and your counselor choose: Option A (modern cartridge rifle), Option B (air rifle), or Option C (muzzleloading). Requirement 3 asks you to look forward and think about where this skill could take you.
Next Steps
Start with Requirement 1a, which establishes the core concept behind everything else in this badge: what a projectile is and why that simple fact demands serious responsibility.
Req 1a — Projectiles and Why They Demand Respect
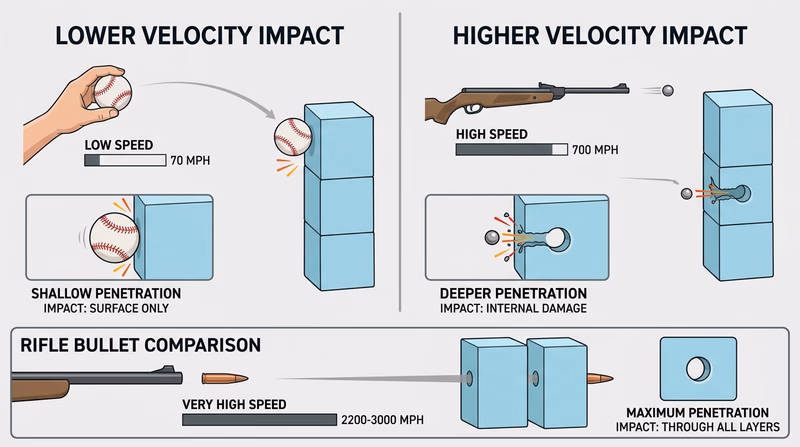
A projectile is any object propelled forward by a force—in the case of firearms, that force is rapidly expanding gas from burning propellant. The moment the trigger is pressed, the projectile leaves the muzzle at speeds ranging from roughly 400 feet per second for a BB gun up to 3,000 feet per second or more for a high-powered cartridge rifle. Once it leaves the barrel, you have no control over it.
Why Speed Changes Everything
The energy carried by a moving object increases with the square of its speed. Double the velocity and the energy quadruples. A rifle bullet carries enough energy to penetrate walls, ricochet off hard surfaces, and travel far beyond the intended target. That energy is exactly what makes a rifle useful for its intended purpose—and exactly what makes careless handling so dangerous.
Consider a few consequences of high-speed projectiles:
- Penetration: A .22 LR bullet can penetrate several inches of soft wood. It passes through interior walls, car doors, and other barriers that seem solid.
- Range: Even a BB fired horizontally can travel hundreds of feet. A rifle bullet can remain dangerous at distances of a mile or more.
- Ricochet: Hard or angled surfaces—rocks, metal, water—can redirect a projectile unpredictably.
- No recall: Unlike a ball you can throw and catch, a fired projectile cannot be recalled. Every shot is permanent.
Approved Locations Matter
“Approved locations” means ranges, fields, and areas that have been designed and designated for shooting:
- Backstops and berms are constructed to contain projectiles safely. Shooting outside a proper backstop puts people, animals, and property at risk.
- Range safety officers are present to ensure all shooters follow the same rules at the same time.
- Scouting America’s National Range and Target Activities Manual defines what makes a range site acceptable for Scout shooting activities. Your counselor will work with you only at an authorized location.
The Counselor Conversation
When your counselor asks you to explain this requirement, they want to hear two things: (1) a clear definition of a projectile in your own words, and (2) specific reasoning about why speed and energy make firearms fundamentally different from other tools—and why approved ranges are non-negotiable. Don’t just recite definitions; explain the physics and the logic.
Req 1b — The Four Rules of Safe Gun Handling
Four rules form the foundation of firearm safety. They apply to every firearm—rifle, handgun, shotgun—whether loaded or unloaded, in the field or in your hands at home. Follow all four rules all the time, and a negligent discharge cannot cause injury. Violate even one, and the margin for error shrinks dangerously.
The Four Rules
1. Treat every firearm as if it is loaded.
Never assume a gun is unloaded because someone told you so or because you just checked. Every time you pick up a firearm, verify its condition yourself. This rule eliminates complacency.
2. Never point the muzzle at anything you are not willing to destroy.
The muzzle is always directed somewhere. Make that somewhere safe—downrange, toward the ground, or into a safe direction designated by the range safety officer. On the range, this means the barrel stays pointed downrange except when holstered or secured.
3. Keep your finger off the trigger until your sights are on target and you have decided to shoot.
Your trigger finger stays straight along the frame, outside the trigger guard, until you are ready to fire. This is called “trigger discipline.” Most unintentional discharges happen because a finger inside the trigger guard catches on something or reacts instinctively during a stumble.
4. Know your target and what is beyond it.
A bullet does not stop at the target. Identify your target clearly before firing. Know what is beyond it—who, what, and how far. On a supervised range, the backstop handles this, but the mental habit must be automatic.
Why All Four Together
Each rule acts as a backstop for the others. If someone forgets Rule 1 and treats a gun as unloaded, Rule 2 still keeps the muzzle pointed safely. If Rule 2 is momentarily broken, Rule 3 ensures the trigger isn’t pressed. All four working together create multiple layers of protection.
Applying This in Your Counselor Discussion
Your counselor will likely ask you to recite and explain these rules, not just list them. Be ready to explain the reasoning behind each one and give a real-world example of what happens when a rule is broken. Practice saying them aloud before your session.
🎬 Video: Beginners Guide to Handling Rifles Safely | Rifle 101 with Top Shot Champion Chris Cheng — NSSF—The Firearm Industry Trade Association — https://www.youtube.com/watch?v=mK7uihP5oMY
Req 1c — A Friend Asks to See the Gun
This is one of the most practically important scenarios in the entire badge. Peer pressure around guns happens in real life. Having a clear, confident answer before the moment arrives is the difference between a safe outcome and a serious accident.
The Correct Response: Say No and Get an Adult
You should not retrieve or show a firearm to a friend on your own, even if you know exactly where it is and believe it is safely stored. The right steps are:
- Say no clearly and without embarrassment. Something like, “I’m not allowed to handle it without an adult present” is simple and true.
- Do not go get the gun yourself. Even walking to where it is stored keeps the situation moving in the wrong direction.
- Redirect or suggest involving a parent or guardian. If your friend genuinely wants to learn about firearms, that is a great conversation to have with an adult in the room who can handle it safely.
Why This Matters
Most accidental shootings involving young people happen when one person retrieves an unsupervised firearm to show another. Curiosity is natural. That curiosity becomes dangerous the moment an unsupervised person handles a loaded firearm.
Following the four rules from Req 1b (treating every firearm as loaded, never pointing at anything you don’t intend to shoot) is very hard to guarantee when you and a peer are handling a gun informally without supervision.
What If the Friend Pressures You?
Peer pressure is real. Practice this scenario in your head now. Your answer does not need to be long—“I’m not doing that” combined with a clear change of subject is perfectly fine. If a friend threatens or mocks you for following safe practices, that is a sign about the friend, not about you.
For Your Counselor
Describe the scenario in your own words and walk through your reasoning. Your counselor wants to hear that you have thought this through and are genuinely prepared—not just that you memorized a script.
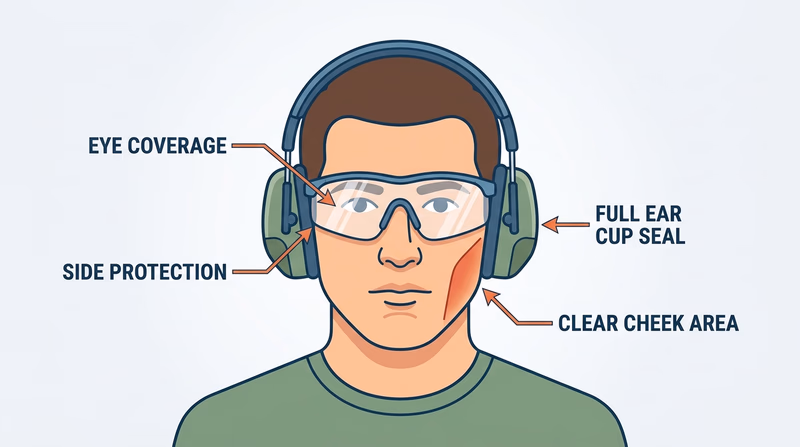
Req 1d — Eye and Hearing Protection
Eye and hearing protection are not optional on any shooting range. They protect against two hazards that are permanent and irreversible: eye injury from debris and noise-induced hearing loss.
Eye Protection
Why You Need It
When a cartridge fires, burning gas, powder residue, and fragments of the primer can blow back toward the shooter. Ejected brass casings fly to the side. On indoor ranges, particles can ricochet off walls. Any of these can cause serious eye injury.
Types
- Safety glasses / shooting glasses: Polycarbonate lenses rated to ANSI Z87.1+ impact standards. Most common. Available with clear, tinted, or color-enhancing lenses.
- Goggles: Wrap around the eye more completely. Useful at ranges with significant debris or when shooting in dusty conditions.
- Over-glasses (OTG): Designed to fit over prescription eyewear.
Proper Use
Safety glasses must be worn from the moment you step into a hot range (a range where shooting is occurring or may occur) until the range goes cold and is declared safe. Regular eyeglasses are not a substitute—they are not impact rated.
Hearing Protection
Why You Need It
A gunshot is one of the loudest sounds in everyday life—a .22 LR produces about 140 decibels at the shooter’s ear. OSHA considers 85 dB a threshold for hearing damage with prolonged exposure. A single unprotected shot can cause permanent hearing loss.
Types
- Foam earplugs: Compressed, inserted in the ear canal, and allowed to expand. Very effective (NRR 29–33 dB typical). Inexpensive and disposable.
- Earmuffs: Cup over the entire outer ear. Easy to put on and remove. NRR typically 20–30 dB.
- Electronic earmuffs: Use microphones and speakers to amplify soft sounds (voices, range commands) while electronically cutting off sounds above a safe threshold. Popular with experienced shooters because you can still communicate normally.
- Double protection: At indoor ranges or when shooting high-powered rifles, wearing both foam plugs and earmuffs provides the highest protection.
Proper Use
Hearing protection goes on before the first shot and stays on until the range is declared cold. Foam plugs must be properly inserted—rolled, inserted deep into the canal, and held until expanded—or they provide significantly less protection than rated.
Counselor Tips
Know the difference between passive earmuffs (simple sound blocking) and electronic earmuffs (sound limiting), and be able to explain why eye protection must be impact-rated rather than just any pair of glasses.
Req 1e — Gun Laws in Your Community and State
Firearm laws in the United States operate at three levels: federal, state, and local. A responsible shooter knows the basics at all three levels. Your counselor will ask you to explain laws relevant to your own state and community, so you need to do some research specific to where you live.
Federal Baseline
Several federal laws apply everywhere in the country:
- Minimum age: Federal law sets the minimum age to purchase a handgun from a licensed dealer at 21. For long guns (rifles and shotguns), the minimum age is 18. States may set higher ages.
- Background checks: Licensed dealers (FFLs) must run a National Instant Criminal Background Check System (NICS) check on every buyer. Certain convictions, adjudications, and other factors legally prohibit a person from possessing firearms.
- Prohibited persons: Federal law prohibits firearm possession by people convicted of felonies, domestic violence misdemeanants, those adjudicated as mentally defective, illegal drug users, and others listed in 18 U.S.C. § 922.
- Fully automatic weapons: Civilian ownership of machine guns manufactured after 1986 is heavily restricted under the National Firearms Act.
State Laws Vary Significantly
States have broad authority to set their own rules. Common state-level topics include:
- Permits or licenses: Some states require a permit to purchase or carry a firearm.
- Registration: A few states require firearms to be registered with the state.
- Magazine capacity limits: Some states restrict high-capacity magazines.
- Safe storage requirements: A growing number of states have laws requiring firearms to be stored locked when minors are present.
- Age restrictions: Some states set higher minimum ages than federal law.
Local Ordinances
Cities and counties sometimes add restrictions on top of state law—for example, discharge ordinances that prohibit firing within city limits except at licensed ranges, or regulations on transporting firearms.
How to Research Your State
Your state’s department of justice, attorney general’s office, or fish and wildlife agency typically publishes a summary of state firearms laws. State hunting regulations also outline laws specific to firearms used for hunting. Your counselor can help you find the right source.
For Your Counselor
You do not need to be a lawyer. Be prepared to name two or three key points from federal law and two or three points from your state’s laws. Know where you would look to find more information. Show that you understand the spirit of these laws: they exist to keep firearms out of the hands of people who would misuse them, and to reduce accidents.
Req 1f — Hunting and Wildlife Resources
Wildlife populations are not static. Animals reproduce, compete for food and habitat, and are subject to disease, predation, and environmental change. When wildlife populations grow beyond what their habitat can support, animals suffer—from starvation, disease outbreaks, and habitat degradation. Regulated hunting is one of the primary tools that wildlife managers use to keep populations in balance.
Renewable Wildlife Resources
“Renewable” means that wildlife populations can naturally replenish themselves through reproduction. Unlike minerals extracted from the ground, deer, turkey, waterfowl, and other game species produce new offspring each year. A well-managed population can sustain a harvest year after year indefinitely—this is the concept of sustainable yield.
How Regulated Hunting Supports Conservation
Seasons and bag limits are set by state wildlife agencies based on population surveys, habitat assessments, and harvest data. These limits ensure that more animals reproduce than are harvested, so the population remains healthy.
License fees and excise taxes are the financial engine of wildlife conservation in the United States. Under the Federal Aid in Wildlife Restoration Act (commonly called the Pittman-Robertson Act, passed in 1937), an 11% federal excise tax on firearms and ammunition funds wildlife habitat restoration, research, and hunter education programs. States cannot access these federal matching funds without running approved wildlife management programs. Hunters effectively pay into a system that benefits all wildlife—not just game species.
Hunters as stewards: Many conservation organizations dedicated to habitat protection—Ducks Unlimited, the Rocky Mountain Elk Foundation, Pheasants Forever, and others—were founded by and are largely supported by hunters. Their work protects millions of acres of wetlands, grasslands, and forests that benefit all wildlife and the people who enjoy the outdoors.
The Connection to Rifles
Rifles are one of the primary tools for hunting medium and large game at various distances. Using a rifle ethically for hunting requires the same marksmanship skills, safety discipline, and legal knowledge covered in this merit badge.
For Your Counselor
Be ready to explain the concept of carrying capacity (the number of animals a habitat can support), why overpopulation is harmful to wildlife, and how hunting seasons and harvest limits are set. You don’t need to memorize statistics—you need to understand the logic.
Req 1g — Hunter Education and State Hunting Laws
This requirement has two parts: how you get the information and what you do with it. You have two paths for gathering the information, and then you must complete both sub-requirements 1g1 and 1g2 regardless of which path you take.
Two Ways to Meet the “Or” Condition
Option 1 — Complete a state hunter education course. Most states offer hunter education either in person or online. The course covers firearms safety, hunting laws, ethics, and wildlife management. Completing it earns you a hunter education certificate that is required to purchase a hunting license in most states. This is the recommended path if you have any interest in hunting—the certificate never expires and opens doors.
Option 2 — Obtain a copy of your state’s hunting laws. Every state publishes a hunting regulations digest each year. You can download it from your state’s fish and wildlife agency website or pick up a printed copy where licenses are sold. This document contains all the information you need for requirements 1g1 and 1g2.
Talk with your counselor before committing to a path. If you have already completed hunter education, you are all set. If not, the course is the richer learning experience—but the digest alone satisfies the requirement.
Requirement 1g1
Your state’s hunting regulations will cover several main categories. Look for and be ready to explain each of these:
Seasons: Dates when specific species may be legally hunted. Seasons vary by species, weapon type (archery, muzzleloader, general), and sometimes by region within the state.
License and tag requirements: Who must purchase a license, what tags (if any) are required for specific game, and what age exemptions exist (some states exempt hunters under a certain age from license fees).
Legal shooting hours: Hunting is typically restricted to daylight hours or defined windows around sunrise and sunset. This varies by species.
Method of take restrictions: What types of firearms or ammunition are allowed for each species. For example, some states prohibit certain calibers for deer, or require non-toxic shot for waterfowl.
Special firearms laws: Some states have restrictions on semi-automatic rifles for big game, magazine capacity limits, or requirements on projectile type (e.g., copper bullets in certain areas to reduce lead exposure in condor habitat).
Trespass and land access rules: Where you are and are not allowed to hunt, and how to obtain permission to hunt private land.
Requirement 1g2
Your state regulations will have a complete list of game species. Typical categories include:
- Big game: deer (whitetail, mule deer, or black-tailed depending on region), elk, black bear, turkey, pronghorn, moose, bighorn sheep (varies widely by state)
- Small game: rabbit, squirrel, pheasant, grouse, quail, dove
- Migratory birds: waterfowl (ducks, geese), woodcock, snipe—these are regulated federally through the Migratory Bird Treaty Act and state regulations
- Furbearers: coyote, fox, raccoon, beaver (varies by state)
- Predators: mountain lion, wild boar (varies greatly by state)
Your list should reflect your actual state. Don’t list animals that aren’t found or legally hunted in your region. Your counselor will know if your list is accurate for your area.
Preparing for Your Counselor Discussion
Bring your hunter education certificate or a printed/downloaded copy of your state’s regulations to your counselor meeting. Be prepared to explain—not just recite—what the main laws mean and why they exist. Show that you understand the connection between these rules and wildlife conservation from Req 1f.
Req 1h — Hygiene on the Range
Lead is the primary health hazard on a shooting range. When a cartridge fires, lead from the bullet and the primer vaporizes and becomes airborne fine particles that settle on skin, clothing, and surfaces. Lead is a cumulative toxin—it builds up in the body over time, and it is especially harmful to children and adolescents. Following good hygiene on the range is not just courtesy; it protects your long-term health.
Before Shooting
- Tie back long hair and wear close-fitting clothing to reduce surface area for particles to cling to.
- Avoid eating or drinking on the range—lead particles on hands go directly into your mouth.
While Shooting
- Keep your mouth closed during firing, especially on indoor ranges where ventilation carries particles toward shooters.
- Avoid touching your face with your hands after handling ammunition or a firearm.
- Do not handle food, drinks, or lip balm while on an active range.
After Shooting
- Wash your hands thoroughly with soap and water, paying attention to under fingernails, before eating, drinking, or touching your face. This is the single most important step.
- Change clothes after an extended range session if possible, especially if you will be around young children at home.
- Shower and wash your hair after significant range time.
- Do not re-wear range clothing around infants or young children without washing it first—they are more vulnerable to lead exposure.
Indoor vs. Outdoor Ranges
Indoor ranges have higher concentrations of airborne lead because ventilation is limited. Outdoor ranges with good air movement are lower-risk but still require hand washing afterward.
Air Rifle Exception
If you are doing Option B (air rifle), lead exposure is much lower because air rifles use lower-velocity projectiles and do not have primer-based propellant. However, lead pellets still leave residue on your hands, so the same post-shooting hand washing rules apply.
For Your Counselor
Be prepared to explain the source of lead exposure on a range (primer and bullet vapor), when it is most critical to wash hands, and why food and drinks do not belong at the firing line.
Req 1i — Range and Target Activities Near You
Knowing where you can shoot legally and safely is the first step toward turning this merit badge into a continuing activity. This requirement asks you to actually go and find out what is available in your area—not just recite that gun clubs exist.
Types of Venues to Look For
Rod and Gun Clubs / Shooting Clubs Local shooting clubs are the most common venue for recreational rifle shooting. Many offer monthly membership at affordable rates, maintain multiple ranges (outdoor rifle, indoor pistol, trap fields), and run organized competitions and safety programs. Search for clubs affiliated with the NRA or USA Shooting in your area.
Public Shooting Ranges Some state and local parks departments operate public ranges. These typically charge a small daily range fee and are open to any licensed shooter. Hours, rules, and caliber restrictions vary.
Commercial Indoor Ranges Indoor ranges operated as businesses offer hourly lane rentals. They are generally more expensive than clubs but have no membership requirement. Some offer youth programs or supervised introductory sessions.
Scouting Shooting Sports Programs Many Scouting councils operate summer camp shooting sports programs. Some councils have year-round ranges or partner with local clubs. Ask your council’s advancement or activities staff what shooting sports programs they offer for Scouts.
4-H Shooting Sports 4-H Shooting Sports is a nationally recognized youth program with clubs in most counties. If you are also involved in 4-H, this is a natural overlap.
JROTC and School Programs Some middle and high schools have air rifle teams sanctioned through USA Shooting’s JROTC program. If your school participates, ask about team membership.
How to Find Places
- Ask your merit badge counselor—they almost certainly know local ranges.
- Search the NRA’s range locator.
- Contact your council’s Scout executive or program director.
- Check local hunting and fishing license dealers—they often know about nearby clubs.
For Your Counselor
Come prepared with at least two or three specific places you identified—names, locations, and a sentence about what each offers. Your counselor wants to see that you actually looked, not that you guessed.
Req 1j — Sources of Information on Firearms
Part of being a responsible shooter is knowing where to find accurate, reliable information—and knowing the difference between a credible source and unreliable internet opinion. This requirement asks you to build a personal reference list you could actually use.
Categories of Sources
Certified Instructors and Counselors
Your merit badge counselor and NRA-certified instructors are the most immediately accessible sources of verified information. They know local regulations, can demonstrate technique, and can answer safety questions in real time.
Organizations
- National Rifle Association (NRA): Publishes safety materials, educational courses, and a range of publications for recreational and competitive shooters.
- USA Shooting: The national governing body for Olympic and Paralympic shooting sports. Resources focus on competitive development.
- Civilian Marksmanship Program (CMP): A federally chartered corporation that promotes rifle marksmanship and sells surplus military rifles to qualified citizens. Offers club programs, competitions, and training clinics.
- National Muzzle Loading Rifle Association (NMLRA): The primary organization for muzzleloading enthusiasts. Hosts competitions, publishes educational materials, and maintains historical records of black powder shooting.
- Your state’s fish and wildlife agency: The authoritative source for hunting regulations and license requirements.
Books and Publications
- The Scouting America Rifle Shooting merit badge pamphlet is your primary reference for this badge.
- Manufacturer’s owner manuals are authoritative for the specific firearm they accompany—always read the manual for any new firearm.
- American Rifleman and Shooting Sports USA are NRA publications with a range of informational articles.
Local Experts
Gun shop professionals, range safety officers, and experienced hunters in your community often have practical knowledge that no book fully captures. They know local regulations, local ranges, and local conditions.
Evaluating Sources Critically
Not all information about firearms is equally accurate. When evaluating any source, ask:
- Is it published by a recognized organization or subject-matter expert?
- Is it current? Firearm laws change, and information even a few years old may be outdated.
- Does it cite its own sources or present verifiable facts?
Social media videos and forums can be entertaining and sometimes useful, but they are not reliable as primary sources for safety rules or legal information.
For Your Counselor
Prepare a short list (five to eight sources) across different categories. Be ready to explain why you trust each one and what type of question you would use it to answer. This is a discussion, not a recitation—your counselor wants to know that you can think critically about where you get information.
Req 2 — Pick Your Option
You will complete exactly one of the three options below. Read through all three before deciding, and talk with your counselor about which option your authorized range supports. Your choice may be partly determined by what equipment is available at the range where your counselor operates.
The Three Options at a Glance
Option A — Modern Cartridge Rifle You shoot a bolt-action .22 caliber rimfire rifle at 50 feet from a benchrest or supported prone position. You learn the three main parts of a rifle, cartridge types, the five shooting fundamentals, range procedures, cleaning, and how to zero and score groups. This is the most common choice for Scouts with access to an outdoor or indoor rifle range. It introduces you to the foundational skills of centerfire and rimfire shooting.
Option B — Air Rifle You shoot a BB gun or pellet rifle at 15 or 33 feet. Air rifles require no propellant powder or primer, making them well-suited for indoor ranges at Scout camps and community facilities. The shooting fundamentals are identical to Option A. This option is ideal if your council’s camp has an air rifle range and you want a lower barrier to entry, or if you are younger and want to build fundamentals before moving to cartridge rifles.
Option C — Muzzleloading Rifle You shoot a .45 or .50 caliber muzzleloader at 50 feet. This option covers the history and mechanics of traditional black powder firearms, including how to safely load, fire, and clean a muzzleloader. It is more involved than the other options and requires a range equipped for muzzleloading. Choose this option if you have a strong interest in historical firearms, hunting traditions, or the NMLRA competitive circuit.
How to Choose
| Option A | Option B | Option C | |
|---|---|---|---|
| Firearm | .22 LR bolt-action | BB gun or pellet rifle | .45/.50 cal muzzleloader |
| Distance | 50 feet | 15 ft (BB) or 33 ft (pellet) | 50 feet |
| Propellant | Rimfire cartridge | Compressed air or CO₂ | Black powder |
| Complexity | Moderate | Lower | Higher |
| Special venue needed | Rifle range | Air rifle range | Muzzleloader range |
The most important factor is what your counselor’s authorized range supports. Ask your counselor before making a final decision.
Req 2a — Option A Overview
Option A is built around a bolt-action .22 LR rifle—one of the most widely used teaching platforms in the world. It is accurate, mild-recoiling, and mechanically clear enough to see all the fundamentals in action. You will work through eleven sub-requirements that progress logically from knowledge to range skills to scored shooting performance.
What You’ll Complete
- Req 2aa — Three Main Parts of a Rifle: Identify the stock, action, and barrel, and explain what each does.
- Req 2ab — Safe Storage and Handling: Know the rules for keeping a rifle stored safely and handling it on and off the range.
- Req 2ac — Two Types of Cartridges: Learn the difference between rimfire and centerfire cartridges, their parts, and how they function.
- Req 2ad — Misfire, Hangfire, and Squib Fire: Understand the three types of firing failures and the correct procedure for each.
- Req 2ae — The Five Fundamentals of Shooting: Master aiming, breath control, hold control, trigger control, and follow-through.
- Req 2af — Range Procedures and Commands: Know the range commands and demonstrate safe behavior throughout a range session.
- Req 2ag — Cleaning Safety Rules and Materials: Learn what makes cleaning safe and what tools you need.
- Req 2ah — Clean a Rifle Properly: Demonstrate the full cleaning process from breach to muzzle.
- Req 2ai — Selecting a Rifle: Discuss the factors that go into choosing a rifle for a purpose.
- Req 2aj — First Grouping Exercise: Zeroing: Fire five three-shot groups at 50 feet that fit under a quarter, then learn to zero the sights.
- Req 2ak — Scored Grouping Exercise: Fire five five-shot groups and meet the minimum score thresholds for your target type.
Preparation Tips
Study the knowledge requirements (2aa–2ai) before your first range session so your time on the range is focused on shooting, not scrambling to learn vocabulary. Your counselor may quiz you on parts, cartridge types, and procedures while you are at the range.
Practice the five fundamentals dry (without ammunition) at home in front of a mirror or with an unloaded, verified-safe rifle if your family owns one and a parent supervises. Trigger control and breath control improve dramatically with dry-fire practice.
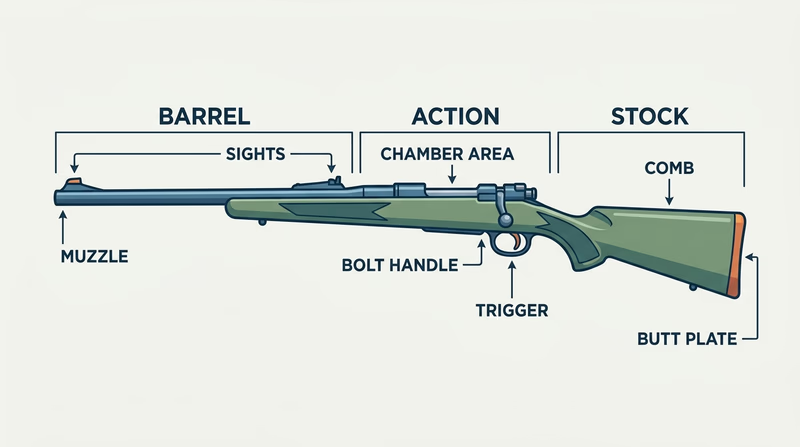
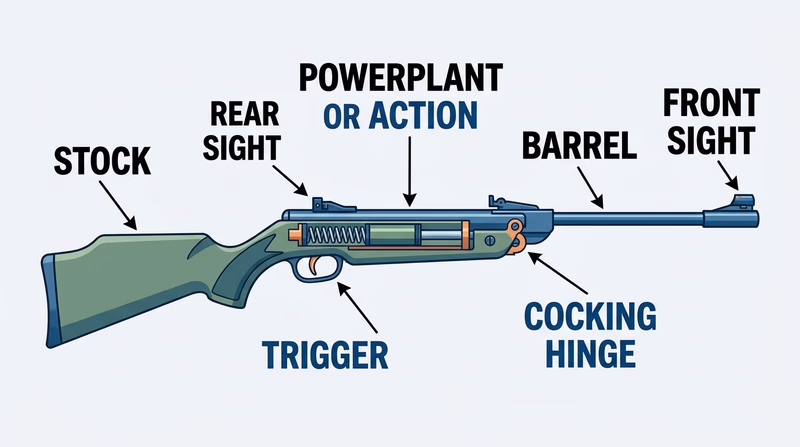
Req 2aa — Three Main Parts of a Rifle
Every rifle, from a simple single-shot .22 to a precision bolt gun, is built from three main assemblies: the stock, the action, and the barrel. Understanding what each part does tells you how the whole system works.
The Three Parts
1. Stock
The stock is the wooden, polymer, or composite body that you hold and shoulder. It performs several functions:
- Mounting platform: The action and barrel are bedded into or attached to the stock.
- Cheekweld: The comb (top of the stock) supports your cheek at a consistent height, aligning your eye with the sights.
- Grip and stability: The pistol grip (or straight wrist on traditional stocks) lets you control the trigger while the butt plate rests against your shoulder.
- Recoil management: The stock distributes recoil across your shoulder and cheek.
Stock materials range from traditional walnut to modern synthetic polymers. Adjustable stocks let shooters change length of pull, comb height, and butt plate position to fit different body sizes.
2. Action
The action is the mechanical heart of the rifle. It performs every step in the firing cycle:
- Loads a cartridge from the magazine or manually into the chamber.
- Locks the bolt (on a bolt-action) or otherwise seals the chamber for firing.
- Fires the cartridge when the trigger releases the firing pin or striker, which strikes the primer.
- Extracts the spent case after firing.
- Ejects the case clear of the action.
For a bolt-action rifle (the type used in Option A), the shooter manually lifts, pulls back, pushes forward, and locks down the bolt to cycle the action. This deliberate process reinforces control and is why bolt actions are preferred for teaching beginners.
3. Barrel
The barrel is the metal tube through which the bullet travels after firing. It does two important jobs:
- Directs the bullet: The bore (interior of the barrel) channels the bullet precisely toward the target.
- Imparts spin via rifling: The spiral grooves cut into the bore’s interior cause the bullet to spin in flight, stabilizing it and dramatically improving accuracy. This is where the word “rifle” comes from.
Barrel length affects velocity and sight radius. Longer barrels generally produce higher velocities (more complete powder burn) and longer sight radii that make aiming more precise. Barrel diameter at the bore is the caliber of the rifle.
Putting It Together
When you pull the trigger, the action’s firing pin strikes the primer, which ignites the propellant, generating high-pressure gas that propels the bullet down the rifled barrel. The stock keeps all of this controlled and pointed in the right direction.
Req 2ab — Safe Storage and Handling
Safe storage prevents unauthorized access. Safe handling prevents accidents during use. Both are required for any responsible rifle owner. You must be able to identify the rules and demonstrate them—meaning your counselor will observe you following them in person.
Safe Storage Rules
1. Store firearms unloaded. A stored firearm should never have a cartridge in the chamber or magazine attached. Verify this before storing and before removing from storage.
2. Lock it up. Use a gun safe, locking gun cabinet, or at minimum a trigger lock or cable lock. The goal is to prevent unauthorized users—especially children—from accessing the firearm without the key or combination.
3. Store ammunition separately. Storing ammunition in a separate locked container from the firearm adds a second layer of prevention. Even if someone accesses the rifle, they cannot load it without also finding the ammunition.
4. Keep the action open when practical. A rifle stored in a rack or displayed (in a locked area) should have its action open so a quick visual check confirms it is unloaded.
Safe Handling Rules on the Range
Apply the four rules from Req 1b constantly, plus these range-specific practices:
- Keep the muzzle pointed downrange at all times while on the firing line. The only exception is when racking (securing) a rifle in a rack during a cease-fire, in which case follow the range safety officer’s instructions for safe direction.
- Verify the chamber is clear every time you pick up a rifle, even if you set it down for only a moment.
- Do not load until directed: Load a magazine or place a cartridge in the chamber only on the command “commence firing” or its equivalent from the range safety officer.
- Keep the action open and visually show clear during a cease-fire. When the range safety officer calls “cease fire,” immediately stop shooting, remove the magazine, open the bolt, and step back from the firing line.
- Carry correctly: When moving with a rifle (e.g., from the rack to the firing line), carry it muzzle-up or muzzle-down in a safe direction with the action open.
Demonstrating for Your Counselor
Your counselor will watch you handle the rifle. They want to see:
- You verify the chamber before and after handling.
- You maintain muzzle discipline (never point at anything off-range).
- You keep your finger off the trigger until ready to fire.
- You open the action during a cease-fire without being reminded.
Practice these behaviors until they are automatic—not something you have to think about.
Req 2ac — Two Types of Cartridges
A modern rifle cartridge is a self-contained unit that holds everything needed to fire one shot. The two types differ in where their primer is located.
Parts of a Cartridge (Both Types)
Every cartridge has four parts:
- Case: The brass, steel, or aluminum shell that holds all other components together. It also expands slightly on firing to seal the chamber and contains the pressure.
- Primer: A small, sensitive explosive compound. When struck by the firing pin, it ignites and sends a flash into the propellant.
- Propellant (powder): The chemical charge that burns rapidly when ignited, producing the expanding gas that drives the bullet.
- Bullet: The projectile itself. It is seated in the case mouth and is what actually leaves the barrel and travels to the target.
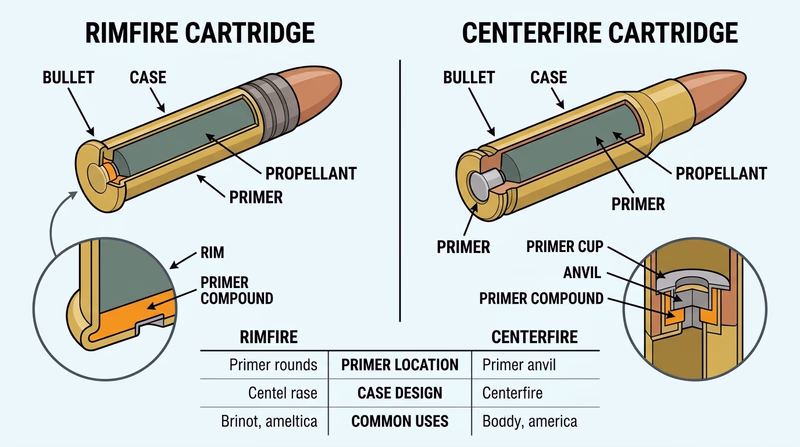
Type 1: Rimfire
In a rimfire cartridge, the primer compound is distributed inside the thin, folded rim of the case base. When the firing pin strikes the rim, it crushes the rim against the chamber edge and ignites the primer compound.
- Examples: .22 Short, .22 Long Rifle, .17 HMR
- Characteristics: Less expensive to manufacture, but the case cannot be reloaded because the rim is crushed on firing. Generally lower pressure and used for smaller calibers.
- The .22 LR you use in Option A is a rimfire cartridge. It is the most-produced cartridge in history.
Type 2: Centerfire
In a centerfire cartridge, the primer is a separate replaceable cup seated in the center of the case head. The firing pin strikes the center of the case base, detonating the primer cup.
- Examples: .308 Winchester, .30-06 Springfield, 5.56 NATO, 9mm Luger (handgun)
- Characteristics: More reliable ignition, higher pressure tolerance, and the case can often be reloaded multiple times by replacing the spent primer.
- Used for medium and large game hunting, military and law enforcement, and most competitive rifle sports above .22 caliber.
Identifying the Difference
Hold two cartridges side by side: a .22 LR and a .308 Winchester (or any centerfire round). The .22 LR has a smooth, rounded rim with no visible primer in the center. The .308 has a small circle in the center of its base—that circle is the primer.
Why This Matters
Understanding cartridge types helps you:
- Know why you cannot use centerfire ammunition in a .22 rimfire rifle.
- Understand why a misfire response differs (rimfire cases may fail if the rim strike is off-center; centerfire primers are more consistent).
- Discuss cartridge selection intelligently when choosing a rifle.
🎬 Video: Firearm Basics: Parts of a Cartridge — NRApubs — https://www.youtube.com/watch?v=rnkKZuYGH4Y
Req 2ad — Misfire, Hangfire, and Squib Fire
Three abnormal firing events can occur with any cartridge-firing rifle. Knowing what each one is and responding correctly prevents serious injury. These are not common, but when they happen, you have seconds to make the right decision.
Misfire
What it is: You press the trigger, the firing pin falls, but nothing happens—no bang, no movement. The cartridge did not fire.
Cause: A faulty or wet primer, a light firing pin strike, or a defective cartridge.
Response:
- Keep the rifle pointed downrange.
- Wait at least 30 seconds with the rifle still aimed downrange. (This is the hangfire wait—described below.)
- After 30 seconds, carefully open the bolt and extract the cartridge, keeping the muzzle pointed downrange.
- Set the cartridge aside in a designated dud container. Do not pocket it or throw it in the trash immediately. Do not attempt to fire it again.
- Inform the range safety officer.
Hangfire
What it is: You press the trigger, the firing pin falls, and there is a delay—sometimes a second or more—before the cartridge fires. The propellant ignites late.
Cause: Moisture in the propellant, degraded powder, or an inconsistent primer.
Why it is dangerous: A hangfire looks identical to a misfire in the first moment. If you open the bolt immediately thinking it misfired, the cartridge may fire with the action open, directing the blast sideways instead of down the barrel.
Response: Identical to misfire—wait 30 seconds with the rifle pointed downrange before opening the action. The 30-second wait gives any delayed ignition time to occur safely.
Squib Fire
What it is: The cartridge fires, but the bullet does not have enough force to fully exit the barrel. You hear a reduced bang or pop, feel very little recoil, and see a puff of smoke. The bullet is lodged somewhere in the bore.
Cause: No propellant or severely reduced propellant charge. The primer alone fired, which was just enough to push the bullet partway down the barrel.
Why it is extremely dangerous: If you fire the next shot without realizing the bore is obstructed, the barrel will rupture violently, injuring or killing the shooter and bystanders.
Response:
- Stop immediately. Do not fire another shot.
- Keep the muzzle pointed downrange, engage the safety, and unload.
- Visually and physically verify whether the bore is obstructed—do this with the rifle unloaded, using a cleaning rod from the muzzle end under the supervision of your instructor.
- Do not fire again until the obstruction is confirmed clear.
- Inform the range safety officer.
Remembering the Three
- Misfire: No fire at all. Wait 30 seconds, then extract.
- Hangfire: Delayed fire. Wait 30 seconds—same procedure as misfire until you know which it is.
- Squib: Weak fire with possible obstruction. Stop, unload, inspect the bore.
The common thread: never rush after any anomalous firing event. Thirty seconds of patience can prevent a catastrophic injury.
Req 2ae — The Five Fundamentals of Shooting
Every accurate shot is the result of applying five fundamentals in sequence. A breakdown in any one of them opens the door to error. The good news is that all five can be practiced and improved—and a significant portion of that practice can happen without firing a single shot.
1. Aiming
Aiming establishes the relationship between your eye, the sights, and the target.
Open (iron) sights: Your eye looks through the rear sight notch, aligns the front post in the notch with equal space on both sides, and places the top of the front post at the center of the target (or at 6 o’clock below the bull, depending on the sight picture your instructor uses). All three elements—rear sight, front sight, and target—must be aligned simultaneously. Your eye can only focus sharply on one plane; the front sight gets the focus.
Scope sights: If your rifle is equipped with a telescopic sight, you look through the scope and place the crosshairs on the target. Ensure consistent eye relief (the distance from your eye to the scope’s eyepiece) to keep the full sight picture visible.
The key to consistent aiming is a consistent natural point of aim: position your body so the rifle points naturally at the target with no muscular effort to hold it on aim. Muscle fatigue causes shots to drift.
2. Breath Control
Your breathing creates a slow, rhythmic rise and fall of the rifle. To eliminate this movement during the shot, you fire in the natural respiratory pause—the brief, relaxed moment after exhaling and before inhaling again.
The process:
- Take one or two normal breaths to oxygenate.
- Exhale normally (do not force all air out—that creates tension).
- Hold at the natural pause—typically 3–5 seconds.
- Complete the shot within that pause.
If you miss your window or feel the need to breathe, lower the rifle, breathe normally for a moment, and start again. Never hold your breath to the point of strain.
3. Hold Control
Hold control means keeping the rifle as still as possible while on aim. This depends more on your position than on muscular effort. A well-supported position (benchrest or supported prone) uses bone structure and furniture to support the rifle’s weight so your muscles are as relaxed as possible.
Common hold errors:
- Gripping the stock too tightly (creates tremor)
- Hunching over the rifle instead of settling behind it
- Inconsistent cheekweld
Your grip on the pistol grip should be firm but not white-knuckle tight. The supporting hand should guide, not force.
4. Trigger Control
Trigger control is the most technically demanding of the five fundamentals because it is where most accuracy is lost or gained.
The goal: Move the trigger straight rearward, smoothly, without disturbing the sight picture.
The technique: Apply steady, increasing pressure to the trigger pad (the center of the first segment of the index finger)—not the joint or the tip. The shot should feel like a surprise when it breaks. If you know exactly when it will fire and you anticipate it, your body will flinch or push.
Dry-fire practice is the fastest way to improve trigger control. With a verified-unloaded rifle, aim at a small target on the wall, press the trigger slowly, and watch whether the sights move at the moment the trigger breaks. If they do, you are anticipating. Keep practicing until the sights are still at the break.
5. Follow-Through
Follow-through means maintaining your sight picture, position, and trigger contact through and after the shot fires. Many shooters relax their position the instant they expect the shot to break, causing the muzzle to move during the critical moment the bullet is still in the barrel.
The practice: After the shot fires, call your shot—note where the sights were at the exact moment of firing. This tells you whether your sight picture was correct when the bullet left the barrel. Good follow-through and accurate shot calling are signs of a skilled shooter.
Putting It Together
Apply the five fundamentals in order: establish aim, control your breath, settle into a steady hold, press the trigger without disturbing the sight picture, and follow through. With practice, the sequence becomes fluid rather than a checklist.
Req 2af — Range Procedures and Commands
A shooting range operates on a clear structure of commands and procedures. Everyone on the line follows the same rules at the same time. Your safety and the safety of everyone around you depends on understanding and responding correctly to every command.
Range Commands
“CEASE FIRE” Stop shooting immediately. Take your finger off the trigger. Do not fire again until you are instructed to. If you hear this command and you are mid-shot, stop. The range safety officer may call cease fire for any reason—including someone downrange.
“MAKE THE RANGE SAFE” / “OPEN YOUR ACTIONS” After cease fire, unload your rifle: remove the magazine (if applicable), open the bolt, and visually inspect the chamber to confirm it is empty. Leave the action open. Step back from the firing line. On some ranges, you will be asked to lay the rifle on the bench with the action open facing up, or place it in a rack.
“THE RANGE IS COLD” / “GO DOWNRANGE” All rifles are verified safe and staged. Only now may anyone go downrange to check or set targets. Never go downrange on a hot range (one where rifles are loaded or shooters are present on the line without an explicit cold range call from the RSO).
“THE RANGE IS HOT” / “COMMENCE FIRING” Everyone is back behind the firing line. Shooters may approach the line, load, and fire.
“LOAD” Insert a magazine or load the chamber as instructed.
“FIRE” / “BEGIN SHOOTING” Firing may now commence.
Firing Line Conduct
- When not actively shooting, keep the rifle in the rack or on the bench with the action open and bolt back.
- Do not walk behind a shooter who is actively firing without permission or a break in fire.
- If you see a safety violation, call “CEASE FIRE” immediately and loudly—you do not need the RSO’s permission to call cease fire. This is every shooter’s right and responsibility.
- Do not handle your firearm when the range is cold and people are downrange.
Your Attitude on the Range
The requirement mentions “attitude” deliberately. The RSO and your counselor are evaluating how you carry yourself. They want to see someone who:
- Pays attention and responds to commands immediately without hesitation.
- Handles the rifle with steady, deliberate care—no horsing around, no casual pointing.
- Asks questions when uncertain rather than guessing.
- Stays focused throughout the session, not distracted by conversation or devices.
Being on a rifle range is a privilege. The attitude of a safe shooter shows in every small action.
🎬 Video: Introduction to Range Safety and Etiquette - Firearm Safety — NSSF—The Firearm Industry Trade Association — https://www.youtube.com/watch?v=COvFyw-6Fqs
Req 2ag — Cleaning Safety Rules and Materials
Cleaning a rifle is a separate activity from firing it, but the safety rules are just as strict. More accidents involving firearms happen during cleaning and maintenance than many shooters realize—usually because someone assumed the gun was unloaded.
Safety Rules for Cleaning
1. Verify the rifle is completely unloaded before beginning. Open the action, remove the magazine, visually inspect the chamber, and physically check with your finger if your line of sight into the chamber is limited. Do this every single time, even if you know you already unloaded it.
2. Point the muzzle in a safe direction throughout cleaning. Just as on the range, muzzle discipline applies at the cleaning bench. Point the muzzle toward a solid exterior wall or in a direction where an accidental discharge would not endanger anyone.
3. Keep all ammunition away from the cleaning area. Remove ammunition from the room or lock it in a separate container before cleaning begins. This eliminates the possibility of accidentally loading a round during cleaning.
4. Work in a ventilated area. Cleaning solvents contain chemicals that produce vapors. Open a window or work outdoors. Avoid open flames—some solvents are flammable.
5. Wash hands after cleaning. Cleaning solvents, lead residue, and lubricants should not be ingested. Wash thoroughly with soap and water when finished.
Materials Needed
A basic cleaning kit for a .22 LR rifle includes:
- Cleaning rod: A sectional or one-piece rod long enough to pass from breach to muzzle. Use a rod with a rotating (swivel) tip to match the spin of the rifling.
- Patches: Small fabric squares that fit through the bore on a patch holder or jag. Used to apply solvent and remove fouling.
- Bore brush: A bronze or nylon brush sized for .22 caliber. Scrubs fouling from the grooves of the rifling.
- Patch holder/jag: Attaches to the cleaning rod. Holds patches.
- Bore solvent: A chemical solvent that loosens carbon, copper, and lead fouling. Common brands include Hoppes No. 9.
- Lubricant/oil: A light gun oil applied to metal surfaces after cleaning to prevent rust and lubricate moving parts.
- Cleaning patches: A supply of clean patches.
- Cleaning cloth/rag: For wiping down exterior metal and wood or polymer.
Optional but useful: a bore snake (a pull-through alternative to a cleaning rod), a flashlight or bore light to inspect the bore, and a toothbrush-style brush for scrubbing the action.
Req 2ah — Clean a Rifle Properly
Cleaning a rifle preserves its accuracy, prevents corrosion, and ensures reliable function. For a .22 LR bolt-action used in Option A, cleaning after each range session (or at least every few sessions for rimfire) keeps it running well. Your counselor will watch you perform the full process.
Before You Begin
- Clear the rifle: Open the action, remove the bolt (if the design allows), and visually confirm the chamber is empty.
- Remove all ammunition from the cleaning area.
- Gather your materials: cleaning rod, bore brush, patches, patch holder, solvent, oil, and cleaning rag. Work on a clean, protected surface—a cleaning mat or folded towels protect the stock finish.
Cleaning the Bore
The bore is where residue accumulates most critically. Work from the breech (chamber end) toward the muzzle whenever possible to avoid pushing fouling into the chamber. If your rifle’s design requires cleaning from the muzzle, use a muzzle guide to protect the crown.
- Attach the bore brush to the cleaning rod. Dip or spray the brush lightly with bore solvent.
- Pass the brush through the bore with smooth, full strokes—all the way through to the muzzle, then all the way back. Do this 10–15 times to loosen fouling.
- Remove the brush and attach the patch holder with a solvent-soaked patch. Pass it through the bore to pick up loosened fouling.
- Repeat with clean patches until patches come out nearly clean (they will rarely be perfectly white with a heavily shot .22).
- Inspect the bore with a bore light to check for remaining fouling, pitting, or obstruction.
- Run a lightly oiled patch through the bore to coat the metal and prevent rust. Do not over-oil—a thin coating is all that is needed.
Cleaning the Action
- Use a cleaning cloth or toothbrush-style brush to wipe carbon and debris from the bolt face, bolt body, and chamber area.
- Apply a small amount of oil to the bolt’s locking lugs and sliding surfaces.
- Avoid applying oil to the firing pin channel—oil there can slow or dampen the pin strike.
Cleaning the Exterior
- Wipe down all exposed metal surfaces (barrel, receiver) with a lightly oiled cloth to prevent rust.
- Wipe the stock with a dry or slightly damp cloth. Do not apply gun oil directly to wood stocks (it can damage the finish) unless using a product designed for wood.
Reassembly and Final Check
Reassemble the rifle according to its design. After reassembly, function-check the safety and trigger with the rifle pointing in a safe direction and confirmed unloaded. Dry-fire (if appropriate for the action type) to confirm the firing pin functions.
Store the cleaned rifle unloaded in a locked case or safe with the action closed or open according to your storage method.
Req 2ai — Selecting a Rifle
The best rifle is the one that fits the shooter, the purpose, and the budget. This requirement is a discussion—your counselor wants to hear your reasoning, not just a list of specifications.
Key Selection Factors
Intended Purpose
The most important question: what will the rifle be used for? The answer shapes every other choice.
- Target shooting/competition: Accuracy is paramount. Rifles optimized for benchrest, silhouette, or NRA precision events have precision triggers, free-floated barrels, and adjustable stocks.
- Small game / varmint hunting: .22 LR or similar small calibers work well. Bolt-action or semi-auto depending on the hunting context.
- Big game hunting: Caliber must be appropriate for the game (energy on target, terminal performance). Legal requirements in your state may specify minimum calibers.
- General plinking and skill development: A .22 LR bolt-action is hard to beat—affordable ammunition, light recoil, accurate, widely available.
Caliber
Caliber determines recoil, range, ammunition cost, and appropriate targets. A beginning shooter almost always benefits from starting with .22 LR—low cost, low recoil, and all the same fundamentals apply.
Action Type
- Bolt-action: Manual cycling between shots. Most accurate, simplest, and clearest to learn on. Preferred for precision shooting and hunting.
- Semi-automatic: One shot per trigger press, with the action cycling automatically. Faster for target shooting. More complex mechanically.
- Single-shot: No magazine; must reload after each shot. Very safe for beginners. Common in .22 training rifles and some specialty rifles.
Fit (Length of Pull and Stock Dimensions)
A rifle that is too long or too short causes uncomfortable shooting positions that hurt accuracy. Length of pull is the distance from the trigger to the butt plate. A Scout should be able to comfortably reach the trigger with the butt seated firmly in the shoulder pocket.
Adjustable stocks (common on youth and competition rifles) allow the length and comb height to be customized. If buying a rifle for a young shooter, choose one with an adjustable or youth-sized stock.
Sights
- Open (iron) sights: Standard and durable. Good for learning fundamentals.
- Aperture (peep) sights: Rear sight is a small hole (aperture). Provides a more precise sight picture than open V-notch sights.
- Telescopic scopes: Magnifies the target and provides a crosshair aiming point. Appropriate for longer distances or shooters with vision challenges.
Budget and Availability
New rifles range from under $200 (entry-level .22s) to several thousand dollars (precision bolt guns). Ammunition availability and cost are equally important—a rifle chambered in an uncommon caliber may be harder to feed.
Safety Features
Look for a positive manual safety that is intuitive to operate. A trigger with a crisp, consistent pull of appropriate weight helps beginners develop good trigger technique.
For Your Counselor
Structure your answer around a specific scenario: “If I were choosing a rifle for [purpose], I would look for [caliber, action, fit considerations, sights, budget] because…” Your counselor will ask follow-up questions.
Req 2aj — First Grouping Exercise: Zeroing
This is your first live-fire performance exercise. You must fire five separate three-shot groups, and each group must be tight enough that a standard quarter (diameter approximately 0.955 inches) can touch all three bullet holes.
What “Group” Means
A group is a set of shots fired with the same aim point and the same hold. The size of the group reflects your consistency. A smaller group means you are applying the five fundamentals consistently. The quarter standard is not especially tight—it is achievable by any Scout who has practiced the fundamentals and has a steady supported position.
Position: Benchrest or Supported Prone
Benchrest: You sit at a table with the rifle resting on a front bag (sandbag) and a rear bag under the stock. Your hands guide the rifle but do not support its weight. This is the most stable position for beginners and the most common position used for this requirement.
Supported prone: You lie flat on your stomach with the rifle rested on a bipod, shooting bags, or your support hand over a rolled jacket. Also very stable.
Either position eliminates most muscle fatigue from hold control so you can focus on trigger control and breath control.
The Shooting Process
- Get into position and establish your natural point of aim—let the rifle settle on the aiming point without muscular effort.
- Take a breath, exhale to the natural pause.
- Apply smooth, steady trigger pressure until the shot breaks.
- Call your shot—note where the sights were at the break.
- Open the bolt, verify the chamber is clear, and wait for the next command or proceed with the next shot.
- Fire three shots per group, then step back or wait for the range safety officer’s instruction before retrieving or examining targets.
Zeroing the Sights
After your five groups, examine where the group centers are relative to your aim point. Zeroing means adjusting the sights so that the center of your group hits your intended point of aim.
How to adjust open sights:
- Elevation (up/down): Adjust the rear sight. Raise the rear sight to move the group up; lower it to move the group down.
- Windage (left/right): Move the rear sight in the direction you want the group to move. If the group is left of center, move the rear sight right.
The adjustment rule for rear sights: move the sight in the same direction you want to move the group (opposite is true for front sights, which you rarely adjust on a fixed-front-sight .22).
Scope adjustments are measured in MOA (minute of angle, approximately 1 inch per 100 yards) or milliradians. Each click of a scope dial moves the point of impact by a known increment—typically ¼ MOA per click.
Your counselor will ask you to explain the zeroing process using your actual targets. Be prepared to point to your group center, compare it to your aim point, and explain which direction and how far you would adjust.
Req 2ak — Scored Grouping Exercise
This is the final shooting performance exercise for Option A. You fire five groups of five shots each and each shot must score at or above the minimum for the target type being used.
The Two Paths
If your rifle’s sights can be adjusted (most bolt-action .22s have adjustable rear sights or come scoped): Your instructor will have you adjust the sights to center your group from Req 2aj, then fire five five-shot groups. Each individual shot must meet the minimum score for your target.
If the sights cannot be practically adjusted (e.g., a borrowed rifle with non-adjustable or fixed sights): Your instructor may waive the adjustment. You explain how you would adjust if you could, then fire five five-shot groups where every single shot in every group can be touched by a quarter.
Understanding the Minimum Scores
Different NRA target designs use different scoring rings. The minimum score tells you which ring each bullet must land in or inside:
- A-32 target: Each shot must score 9 or better (9-ring or X)
- A-17 or TQ-1 target: Each shot must score 7 or better
- A-36 target: Each shot must score 5 or better
Your instructor will specify which target you are using. If you are unsure of the scoring rings on your target, ask before you begin.
Tips for the Final Exercise
- Apply the same five fundamentals from Req 2ae on every single shot. There is no shortcut.
- Between groups, take a moment to breathe normally and reset—don’t rush from one group to the next.
- If a group opens up (shots spreading out), mentally review your trigger control and breath control. Most spread is caused by anticipating the shot (flinching) or breathing during the trigger press.
- Use the quarter check for groups if the exact scoring lines are unclear—if all five shots fit under a quarter, you almost certainly met the minimum score threshold.
- Call every shot. If you know the shot went high-right before you even see the target, your follow-through and natural point of aim need attention.
After the Final Exercise
When your groups are complete, your counselor will review the targets with you. Be ready to discuss what you notice about your shot groups—are they centered? Consistent in size? Scattered in a pattern that suggests a consistent error? This kind of analysis is part of what makes you a thinking shooter rather than someone who just pulls the trigger.
🎬 Video: Two-Shot Sight-In: How to Zero a Rifle in Two Shots - Rifle Tip — NSSF—The Firearm Industry Trade Association — https://www.youtube.com/watch?v=TiOpQY2ORo4
Req 2b — Option B Overview
Option B uses either a BB gun or a pellet rifle. Air rifles propel projectiles with compressed air or CO₂ rather than burning powder, making them well-suited for indoor ranges and Scout camp facilities. The shooting fundamentals are identical to Option A—the target is smaller and the distance shorter, but precision and discipline matter just as much.
What You’ll Complete
- Req 2ba — Three Main Parts of an Air Rifle: Identify the stock, action, and barrel of an air rifle and explain how each functions.
- Req 2bb — Safe Storage and Handling: Know the rules for storing and handling an air rifle safely.
- Req 2bc — Two Types of Air Rifle Ammunition: Identify BBs and pellets, their differences, and correct uses.
- Req 2bd — The Five Fundamentals of Shooting: Apply aiming, breath control, hold control, trigger control, and follow-through to air rifle shooting.
- Req 2be — Range Procedures and Commands: Demonstrate safe range behavior and respond correctly to all range commands.
- Req 2bf — Cleaning Safety Rules and Materials: Know the safety rules for cleaning and the materials needed.
- Req 2bg — Clean an Air Rifle Properly: Demonstrate the cleaning process for an air rifle.
- Req 2bh — Selecting an Air Rifle: Discuss the factors you would consider when choosing an air rifle.
- Req 2bi — First Grouping Exercise: Fire five three-shot groups at 15 feet (BB) or 33 feet (pellet) that fit under a quarter.
- Req 2bj — Scored Grouping Exercise: Fire five five-shot groups and meet the minimum scores for your target and distance.
Key Differences from Option A
Air rifles do not use propellant powder or primers. They produce no muzzle blast and minimal noise compared to cartridge rifles. However:
- The four safety rules apply just as strictly—an air rifle can still cause serious injury.
- BBs and pellets are projectiles that penetrate skin and can cause eye injury at close range.
- Many air rifles require a cocking stroke before firing (spring-piston type), which requires proper technique to avoid injury from the lever.
Req 2ba — Three Main Parts of an Air Rifle
Like any rifle, an air rifle consists of three main parts: the stock, the action, and the barrel. The difference is in how the action generates the force to propel the projectile.
The Three Parts
1. Stock
The air rifle stock functions identically to a cartridge rifle stock: it houses the action and barrel, provides cheekweld, and gives the shooter a consistent way to shoulder and aim the rifle. Air rifle stocks are often made of hardwood, beech, or synthetic materials. Competition air rifles often have highly adjustable stocks that accommodate shooters of different sizes.
2. Action (Powerplant)
The “action” of an air rifle is more accurately called its powerplant—the mechanism that generates the air pressure to propel the projectile. There are three common types:
Spring-piston (break-barrel or underlever): Cocking the rifle compresses a spring-driven piston. Pulling the trigger releases the spring, which drives the piston forward rapidly, compressing the air ahead of it and propelling the pellet. Break-barrel designs are the most common type in Scout programs.
Pre-charged pneumatic (PCP): A reservoir of compressed air (filled with a hand pump, diving cylinder, or carbon fiber tank) is regulated to a set pressure. Each shot uses a metered burst of that stored air. These are used in Olympic competition air rifles.
CO₂-powered: A small CO₂ cartridge provides the propellant gas. Common in BB guns (many use this system). Simple and inexpensive, but gas pressure decreases as the CO₂ cylinder empties and in cold weather.
BB guns (often spring or CO₂ powered) and pellet rifles (usually spring-piston or PCP) are both acceptable for Option B, at different distances.
3. Barrel
The barrel of an air rifle channels the projectile from the action to the target. Pellet rifle barrels are rifled (spiral grooves cut inside) to spin-stabilize the pellet and improve accuracy—identical in principle to a cartridge rifle. BB gun barrels are smooth bore (no rifling) because round steel BBs do not benefit from spin.
Putting It Together
When you cock a spring-piston air rifle, you are storing mechanical energy in the compressed spring. When the trigger releases the spring, the piston fires forward, compresses air in the chamber ahead of it, and that air pressure pushes the BB or pellet down the barrel.
Req 2bb — Safe Storage and Handling
Air rifles are sometimes treated casually because they are “not real guns.” This is a dangerous attitude. An air rifle fires a projectile at significant velocity and can cause serious injury, including eye injury from a ricochet or direct hit. The same four safety rules from Req 1b apply fully.
Safe Storage Rules
1. Store the rifle uncocked and unloaded. A spring-piston air rifle that is stored cocked over a long period can weaken the spring (not all designs are affected, but it is good practice to de-cock before storage). Never store a rifle loaded with a pellet in the breech or a BB in the chamber.
2. Lock it up. Like a cartridge firearm, an air rifle should be stored in a locked cabinet or case to prevent unauthorized access by children.
3. Remove CO₂ cartridges before long-term storage. A leaking CO₂ cartridge can damage seals or corrode internal parts. Remove and dispose of partially spent cartridges before storage.
4. Store BBs and pellets separately. Keep ammunition in a separate container away from the rifle.
Safe Handling Rules
Apply all four safety rules:
- Treat every air rifle as if it is ready to fire.
- Never point it at anything you do not intend to shoot.
- Keep your finger off the trigger until ready to fire.
- Know your target and what is beyond it.
Additional air rifle specifics:
- Break-barrel models: when cocking, keep the barrel pointed in a safe direction and keep fingers and hands clear of the pivot joint (the hinge mechanism can close quickly and pinch fingers if released).
- Never cock a break-barrel rifle and then set it down unattended—it is ready to fire.
- Do not fire CO₂-powered guns in temperatures below about 40°F (4°C) without checking the manufacturer’s guidance—cold reduces CO₂ pressure and the gun may not cycle properly.
Demonstrating for Your Counselor
Your counselor will observe you handling the air rifle on the range. Demonstrate muzzle discipline, trigger discipline, verifying the chamber/breech, opening the action to show clear during a cease-fire, and the correct method of cocking (for spring-piston designs) with hands and fingers in safe positions.
Req 2bc — Two Types of Air Rifle Ammunition
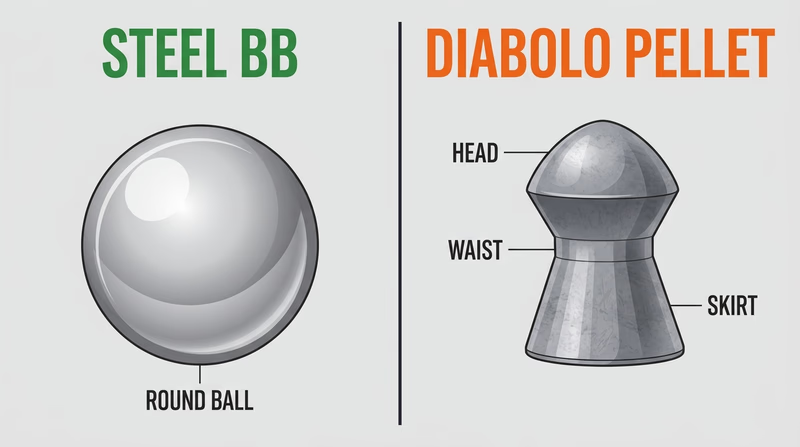
The two most common types of air rifle ammunition are BBs and pellets. They are different in shape, material, and intended use—and they are not interchangeable.
BBs
A BB is a small, round steel ball (historically made of lead, now typically steel with a thin coating). Standard BB diameter is 0.177 inches (4.5mm).
- Common use: Smooth-bore BB guns designed specifically for BBs. Multi-pump pneumatics and CO₂-powered BB guns.
- Shape: Perfectly round.
- Material: Steel (most common today); sometimes copper-coated or zinc-coated.
- Distance for this badge: 15 feet (or 5 meters).
- Accuracy: BBs are less accurate than pellets at longer ranges because they are not spin-stabilized (smooth bore) and their round shape is not aerodynamically ideal.
Do not use BBs in a rifled pellet rifle barrel. Steel BBs can damage rifled barrels and may cause dangerous pressure situations in some designs.
Pellets
A pellet is a diabolo-shaped lead projectile with a narrow waist and flared skirt. The skirt expands slightly when fired and grips the rifling grooves, imparting spin.
- Common use: Pellet rifles with rifled barrels. These are the type used in Olympic air rifle competition.
- Shape: Diabolo (hourglass with a flat or domed head and a cupped skirt).
- Material: Lead (most common). Lead-free tin alloys exist.
- Common caliber: 0.177 inches (4.5mm) is standard for most training and competition. 0.22-caliber pellets are used in some hunting-oriented air rifles.
- Distance for this badge: 33 feet (10 meters) for 0.177 pellets; 25 feet for some configurations.
- Types: Wadcutter (flat head, cuts clean holes in paper—best for target shooting), domed (round head, better ballistics for longer range), pointed (hunting applications).
Key Distinction
| BB | Pellet | |
|---|---|---|
| Shape | Round ball | Diabolo (waisted, skirted) |
| Material | Steel | Lead |
| Barrel | Smooth bore | Rifled |
| Accuracy range | Short | Moderate to long |
| Competition use | Limited | Yes (Olympic) |
Req 2bd — The Five Fundamentals of Shooting
The five fundamentals for air rifle shooting are the same as for cartridge rifle shooting. The concepts in Req 2ae apply here without modification. What changes is the context: shorter distances, a lighter trigger, and for spring-piston rifles, a unique handling characteristic called “hold sensitivity.”
The Five Fundamentals (Air Rifle Context)
1. Aiming
Most air rifles used in Scout programs have open sights or adjustable aperture (diopter) sights. Olympic-grade rifles use precision diopter sights with interchangeable apertures. Regardless, the process is the same: align the rear sight, front sight, and target, and focus on the front sight.
At 15–33 feet, the short distance means even small sight misalignments are noticeable on target—which is actually an advantage for learning.
2. Breath Control
The same rule as with cartridge rifles: exhale to your natural pause, then fire within 3–5 seconds. Do not hold your breath to the point of tension.
3. Hold Control
This is where spring-piston air rifles differ from cartridge rifles and require special attention.
Hold sensitivity: Spring-piston air rifles are extremely sensitive to how you hold them. The recoil cycle of a spring-piston gun is unusual—it actually moves forward briefly before recoiling backward (because the piston springs forward first). If you grip the rifle tightly or brace it firmly against a hard rest, the rifle cannot move naturally during that cycle, and your groups will be inconsistent.
The technique for spring-piston air rifles is called the artillery hold: rest the forestock lightly in your open, relaxed hand (not gripping). Do not clamp it to a bench or sandbag—let it recoil freely. This sounds counterintuitive, but it is essential for accuracy with this type of action.
PCP and CO₂ air rifles do not have this same hold sensitivity because they lack the spring-piston cycle.
4. Trigger Control
Air rifles, particularly Olympic pellet rifles, have very light, precise triggers. Apply the same steady-pressure technique as with cartridge rifles: smooth rearward pressure on the trigger pad without disturbing the sight picture.
5. Follow-Through
Maintain your sight picture and position through and after the shot. Call your shot.
For Your Counselor
Your counselor will observe you applying all five fundamentals at the range. For a spring-piston rifle, demonstrate the artillery hold specifically—your counselor will look for it.
Req 2be — Range Procedures and Commands
Range procedures for air rifles follow the same framework as for cartridge rifles. The commands and the discipline are identical—only the equipment changes. Review the same range commands covered in Req 2af (if you’ve read that section): cease fire, cold range, hot range, commence firing.
Air Rifle Range Specifics
Indoor range considerations: Most air rifle ranges are indoors. All the same rules about muzzle direction apply—the backstop is typically a thick pellet trap directly behind the targets at short range.
Cocking safety: With break-barrel rifles, cocking is done only at the firing line and only when directed. Cock the rifle, load a single pellet, and fire. Do not walk between stations with a cocked rifle.
Cease fire with a cocked rifle: If cease fire is called while your rifle is cocked but not yet fired, keep it pointed downrange. Your instructor or RSO will direct you how to safely de-cock or discharge safely into the trap.
Position between shots: When not actively firing, lay the rifle on the bench with the action open (muzzle downrange), or hold it with muzzle in a safe direction as directed by the RSO.
Attitude on the Range
The same expectations from Req 2af apply: immediate response to commands, muzzle discipline, trigger discipline, and focused, deliberate handling at all times. Air rifle ranges in Scout programs often involve multiple Scouts shooting simultaneously—your behavior affects everyone’s safety.
Req 2bf — Cleaning Safety Rules and Materials
Air rifles require less frequent cleaning than cartridge rifles because there is no propellant residue. However, lead pellets do deposit residue in the bore over time, and all mechanical parts benefit from periodic light lubrication. The same safety principles apply.
Safety Rules for Cleaning an Air Rifle
1. Verify the rifle is uncocked and unloaded. Open the action, check the breech, and confirm there is no pellet or BB loaded. For spring-piston break-barrel rifles, confirm the barrel is in the latched (not cocked) position.
2. For CO₂ rifles, remove or exhaust the CO₂ cartridge before cleaning the breech area. Do not attempt to clean around a live CO₂ cartridge.
3. Point the muzzle in a safe direction during cleaning.
4. Keep all ammunition away from the cleaning area.
5. Work in a ventilated area and wash hands afterward. Lead pellets leave residue that should not be ingested.
Important: Do Not Over-Lubricate
This is the most common cleaning mistake with air rifles. Excess oil in the compression chamber of a spring-piston air rifle can cause dieseling—the oil vaporizes and ignites from the heat of compression, producing a sharp bang and a potential pressure spike that can damage seals or injure the shooter. Use only the small, specific amounts recommended by the manufacturer.
Never use petroleum-based oil inside the compression chamber. Use only silicone chamber oil (specifically designed for air guns) in that area.
Materials Needed
- Cleaning rod sized for the bore (typically .177 or .22 caliber)
- Bore patches cut to the appropriate size
- Patch holder or jag
- Pellet solvent or dry patches: Many air rifle bores are cleaned with dry patches alone (no solvent) to avoid introducing oil into the bore.
- Silicone chamber oil: For lubricating the compression chamber and piston seal on spring-piston rifles (use very sparingly).
- Light gun oil: For external metal surfaces and the bolt/breech mechanism.
- Cleaning cloth/rag
Req 2bg — Clean an Air Rifle Properly
Cleaning an air rifle is simpler and less frequent than cleaning a cartridge rifle, but the same care applies. Your counselor will observe you performing the process.
Before You Begin
- Verify the rifle is uncocked and unloaded. Open the action or barrel (for break-barrels), check the breech, and confirm no pellet is loaded.
- Remove any CO₂ cartridge (if applicable) before cleaning around the breech.
- Remove ammunition from the cleaning area.
- Gather materials: cleaning rod, patches, patch holder, dry cloth, silicone oil (if needed), light gun oil.
Cleaning the Bore
- Attach the patch holder to the cleaning rod.
- Use a dry patch first—pass it through the bore from breech to muzzle. Remove and inspect. Lead fouling will appear as grey or black streaks on the patch.
- Continue with clean dry patches until they come out relatively clean.
- Some instructors apply a single very lightly oiled patch as a final pass to protect the bore—use this sparingly and consult your range’s guidance.
- Inspect the bore with a bore light if available.
Do not use solvent unless directed by your instructor. Many manufacturers of spring-piston air rifles recommend dry cleaning only, as solvents can damage seals.
Cleaning the Breech and Action
- Wipe the breech face and loading port with a clean, dry cloth or lightly oiled cloth.
- If there is visible debris in the action area, use a toothbrush-style brush to dislodge it.
- Apply one tiny drop of light oil to the breech sliding surfaces if specified in the owner’s manual.
External Surfaces
Wipe down the barrel and metal receiver with a lightly oiled cloth to prevent rust. Wipe the stock with a dry cloth.
What Not To Do
- Do not oil the compression chamber with anything other than silicone chamber oil in the exact amount specified by the manufacturer.
- Do not fire the rifle immediately after applying any oil to the chamber—cycle the action a few times first to distribute and any dieseling risk dissipates.
Reassembly and Function Check
For rifles that were field-stripped (if your model allows), reassemble according to manufacturer instructions. Verify the safety functions and the trigger functions with the muzzle in a safe direction.
Req 2bh — Selecting an Air Rifle
Choosing an air rifle starts with the same question as any firearm: what is it for? Answer that first, then let purpose drive the other decisions.
Key Factors
Purpose
- Skill development and target shooting: A basic spring-piston or single-stroke pneumatic in .177 caliber is ideal. Affordable, accurate enough to build fundamentals, and low-cost to operate.
- Competition (NRA or USA Shooting): A precision PCP air rifle with a diopter sight and adjustable stock is required. These rifles offer very consistent shot-to-shot performance.
- Plinking and casual backyard shooting (where legal): A break-barrel spring-piston or CO₂ BB/pellet combo gun is affordable and easy to maintain.
- Small game hunting (where legal and appropriate): A higher-powered PCP or spring-piston rifle in .22 caliber provides the energy needed for ethical dispatch at short ranges.
Power Source
- Spring-piston: Self-contained, no CO₂ or pump needed. Requires cocking stroke before each shot. Subject to hold sensitivity.
- Multi-stroke pneumatic: Pump 3–10 times to charge the reservoir before each shot. Consistent shot-to-shot power. Good for beginners. Tiring over many shots.
- CO₂: Easy and fast. Less consistent in cold temperatures and as the cartridge depletes.
- PCP (pre-charged pneumatic): Most consistent and accurate. Requires a fill source (hand pump or dive tank). Higher cost.
Caliber
- .177 (4.5mm): Standard for paper target shooting. Higher velocity, flatter trajectory.
- .22 (5.5mm): Heavier pellet, more energy. Better for hunting small game or longer ranges.
For Scout programs and merit badge work, .177 is nearly always the specified caliber.
Fit
The same stock-fit considerations from Option A apply. Youth models with shorter length of pull allow younger Scouts to reach the trigger comfortably. Competition rifles often have fully adjustable stocks.
Budget
Entry-level spring-piston air rifles suitable for target shooting start under $100. Mid-range precise spring-piston and pneumatic rifles run $150–$400. Olympic-class PCP rifles can cost $1,000 or more. For learning fundamentals, an entry to mid-range rifle is entirely sufficient.
Safety Features
Look for a manual safety that is positive and easy to operate. A two-stage trigger with an adjustable pull weight is preferable for learning good trigger technique.
Req 2bi — First Grouping Exercise
This is your first live-fire grouping exercise for Option B. The distance is shorter than Option A, but the quarter standard is identical. Your goal: five three-shot groups, each tight enough that a standard quarter can touch all three holes.
Distances
- BB gun: 15 feet (approximately 5 meters)
- Pellet rifle: 33 feet (approximately 10 meters)
Position
Shoot from a benchrest (rifle resting on a front bag, you seated at a bench) or supported prone (lying flat, rifle supported by a bipod or bags). For spring-piston pellet rifles, use the artillery hold described in Req 2bd—rest the forestock on an open, relaxed hand rather than clamping it down.
What to Focus On
The shorter distances of Option B mean that trigger control and sight alignment errors show up clearly on the target—which is a useful feedback tool. If your groups are stringing vertically, suspect breath control. If they are stringing horizontally, suspect trigger control (likely flinching or pushing). If groups are centered but larger than expected, suspect inconsistent cheekweld.
The Quarter Standard
A U.S. quarter has a diameter of approximately 0.955 inches (about 24mm). Three holes made by .177 pellets or 4.5mm BBs are very small individually—your goal is that all three are so close together that the quarter, placed anywhere touching one hole, can simultaneously touch the other two. This is achievable with consistent application of the fundamentals.
After Each Group
Between groups, examine the target and call the group: where was your sight picture when each shot broke? If you are calling shots correctly and the holes land where you called, your fundamentals are solid. If holes land somewhere other than where you called them, investigate your sight alignment.
Req 2bj — Scored Grouping Exercise
This is the final shooting performance exercise for Option B. Fire five groups of five shots each. Each shot must score at or above the minimum for your target and distance.
Minimum Score Requirements
| Setup | Target | Minimum Score per Shot |
|---|---|---|
| BB rifle at 15 ft (5m) | TQ-5 | 8 |
| Pellet rifle at 25 ft | TQ-5 | 8 |
| Pellet rifle at 33 ft (10m) | AR-1 | 6 |
Your instructor will specify which setup you are using. If you are unsure of the scoring rings on your target, ask before beginning.
Sight Adjustment
If your air rifle’s sights can be adjusted, your instructor will have you center your group from Req 2bi before beginning this exercise. Adjustment principles for air rifle sights are the same as for cartridge rifle sights:
- Move the rear sight in the direction you want the group to move.
- Aperture sights have calibrated adjustment turrets for elevation and windage—each click moves the point of impact by a known amount.
If adjustment is not practical (borrowed rifle, fixed sights), explain the process to your counselor and then fire the five groups with the quarter standard replacing the score requirement.
Execution Tips
- At 33 feet with a pellet rifle, small sight errors are magnified compared to the 15-foot BB distance. Focus especially on consistent cheekweld and front sight focus.
- Manage between-group fatigue: set the rifle down, relax your arms and shoulders, breathe normally, then pick it back up with the same relaxed grip.
- Call every shot. If you know a shot went wide before you see the target, note it. Identifying your own errors is the fastest route to improvement.
Req 2c — Option C Overview
Option C introduces you to one of the oldest forms of rifle shooting—the muzzleloading rifle. Unlike cartridges that contain all components in a single unit, a muzzleloader is loaded from the front of the barrel with separate charges of black powder, wad, and projectile. This is the technology that shaped American history, and it remains an active sport and hunting tradition today.
Option C is the most involved of the three options. It has fourteen sub-requirements covering history, mechanics, propellant safety, loading procedures, firing failure responses, range procedures, cleaning, and two live-fire exercises.
What You’ll Complete
- Req 2ca — History of Muzzleloading Rifles: A brief history of muzzleloader development from flintlock to percussion cap.
- Req 2cb — Principal Parts and How They Work: Identify and explain the major parts of a muzzleloading rifle.
- Req 2cc — Safe Storage and Handling: Know the rules for storing and handling a muzzleloader safely.
- Req 2cd — Grades of Black Powder: Identify the different grades and explain their uses.
- Req 2ce — Black Powder Storage Safety: Understand the specific requirements for storing black powder safely.
- Req 2cf — Components of a Load: Discuss the powder charge, patch, and ball or conical projectile.
- Req 2cg — Loading Procedures and Accessories: Identify the tools and correct sequence for loading safely.
- Req 2ch — Misfires, Hangfires, and Squib Fires: Understand failure modes unique to muzzleloaders and how to respond.
- Req 2ci — Range Procedures and Commands: Demonstrate safe range behavior for muzzleloader shooting.
- Req 2cj — Cleaning Safety Rules and Materials: Know the safety rules and materials for cleaning a muzzleloader.
- Req 2ck — Clean a Muzzleloader Properly: Demonstrate the cleaning process for a muzzleloading rifle.
- Req 2cl — Selecting a Muzzleloading Rifle: Discuss the factors for choosing a muzzleloader.
- Req 2cm — First Grouping Exercise: Fire three three-shot groups at 50 feet that fit under a soft drink can base.
- Req 2cn — Scored Grouping Exercise: Fire three five-shot groups meeting minimum score thresholds.
Before You Begin
Muzzleloading requires a range equipped for black powder, with appropriate ventilation and fire safety measures. Confirm with your counselor that the range is set up for this option before proceeding.
Req 2ca — History of Muzzleloading Rifles
Muzzleloading rifles have a history spanning nearly five centuries. Understanding that history gives context to why the equipment works the way it does and why the techniques are what they are.
Early Smoothbore to Rifled Barrel
Early matchlock and wheellock firearms (1400s–1500s): The earliest firearms were simple smoothbore tubes ignited by a burning match or mechanical wheel. They were heavy, slow to load, and relatively inaccurate beyond short range.
Development of rifling: Gunsmiths discovered that spiral grooves cut into the bore (rifling) imparted spin to the projectile, dramatically improving accuracy. By the mid-1500s, rifled muzzleloaders were being made in central Europe.
Kentucky (Pennsylvania) Long Rifle (late 1700s): German immigrant gunsmiths in Pennsylvania developed the American long rifle—a long-barreled, small-caliber flintlock rifle known for exceptional accuracy. It became iconic in the frontier period and the American Revolution. The long barrel and smaller caliber (.40–.45) allowed for more complete powder combustion and longer sight radius.
Ignition System Evolution
Flintlock (1600s–early 1800s): A spring-loaded flint strikes a steel plate (the frizzen), creating sparks that fall into a small pan of powder. The pan ignites and sends a flash through a touch hole into the main charge. Flintlocks are weather-sensitive and have a noticeable delay between trigger pull and bullet departure.
Percussion cap (1820s–1850s): The Reverend Alexander Forsyth in Scotland invented fulminate-based ignition in the early 1800s. By the 1820s, small copper percussion caps placed over a nipple replaced the flintlock pan. Percussion locks ignite faster, more reliably, and are far less sensitive to moisture. This advancement allowed muzzleloaders to be practical military arms into the Civil War era.
Civil War muzzleloaders: The Model 1861 Springfield and similar percussion rifles were the primary infantry weapon of the Civil War. They used the Minié ball—a conical lead projectile with a hollow base that expanded on firing to grip the rifling—which significantly improved range and accuracy over round balls.
Decline and Revival
The introduction of breech-loading metallic cartridge firearms after the Civil War rapidly replaced muzzleloaders for military and hunting use. However, muzzleloading never died. Today it is:
- A competitive shooting sport (NMLRA competitions use historical equipment and rules)
- An early muzzleloader hunting season in most states (separate from general firearms season, allowing hunters more time in the field)
- A living history and reenactment tradition
For Your Counselor
Prepare to discuss at least three points in this history: a key development in ignition systems, the role of the Kentucky long rifle in American history, and how muzzleloading survived as a sport and hunting tradition after cartridge firearms appeared.
Req 2cb — Principal Parts and How They Work
A percussion-cap muzzleloading rifle (the type most commonly used in Scout programs) shares some parts with a modern rifle but has several components that are unique to its ignition and loading system.
The Main Parts
Stock
Same function as in a modern rifle—it houses the barrel and lock, provides cheekweld and shoulder contact, and allows the shooter to aim and control the firearm.
Barrel
A long, rifled metal tube. Muzzleloaders for Scout programs are typically .45 or .50 caliber, meaning the bore diameter is 0.45 or 0.50 inches. The muzzle (front opening) is where the powder, patch, and ball are loaded. The breech end is the closed rear where the charge is ignited.
The flash channel (drum and nipple, or in flintlocks the touch hole) connects the ignition system to the powder charge inside the barrel.
Lock
The lock is the ignition mechanism. On a percussion lock, the lock consists of:
- Hammer: Falls on the percussion cap when the trigger is pulled.
- Nipple: A small threaded cone on which the percussion cap is placed. The nipple has a small hole that directs the flash from the cap into the powder charge.
- Percussion cap: A small copper cup containing a fulminate primer. Placed on the nipple; struck by the hammer to ignite.
- Mainspring: Powers the falling hammer.
- Trigger and sear: Releases the hammer when the trigger is pressed.
Ramrod
A long rod stored under the barrel in a ramrod channel. Used to push the powder charge, patch, and ball down the barrel during loading, seating them firmly against the breech.
Front Sight and Rear Sight
Open sights used to aim. Similar in concept to iron sights on a modern rifle.
Patch Box (on some rifles)
A small compartment in the stock, often with a decorative brass cover, for storing pre-lubed patches. Not present on all muzzleloaders.
How It Works
- A measured powder charge is poured down the barrel.
- A greased patch and round ball (or conical projectile) are placed at the muzzle.
- The ramrod seats the load firmly against the powder.
- A percussion cap is placed on the nipple.
- The hammer is cocked.
- Pulling the trigger drops the hammer onto the cap. The cap fires, sending a flash through the nipple into the powder charge.
- The powder burns rapidly, generating gas that propels the ball down the rifled barrel.
Req 2cc — Safe Storage and Handling
Muzzleloading rifles have unique storage and handling considerations beyond those for modern cartridge rifles, primarily because of the black powder propellant and the percussion cap ignition system.
Safe Storage Rules
1. Store the rifle unloaded. After a range session, fully unload the rifle: remove the powder charge, patch, and ball from the barrel (see cleaning procedures) and remove or discharge any remaining cap from the nipple.
2. Store the rifle with the hammer at half-cock or fully down on an empty nipple. Never store a muzzleloader with a percussion cap on the nipple. The cap is the last thing placed on the rifle before firing, and the first thing removed after.
3. Store black powder separately in an approved powder container. Black powder is a Class A explosive. It must be stored in its original container or in a metal powder horn/flask designed for storage. Keep it away from heat sources, sparks, and flame. Store separate from the rifle.
4. Lock the rifle. As with any firearm, store in a locked case or cabinet to prevent unauthorized access.
Safe Handling Rules
Apply the four universal safety rules at all times. Additional muzzleloader-specific rules:
- Do not pour powder directly from a powder horn or flask into the barrel while the muzzle is near a flame or hot barrel. Wait for the barrel to cool between shots. (This is especially relevant at a range after sustained shooting—a smoldering ember in the bore can ignite an incoming powder charge.)
- Keep the muzzle pointed in a safe direction during all loading operations.
- Do not place a percussion cap on the nipple until you are on the firing line and ready to fire.
- Do not use smokeless powder. Standard smokeless powder generates far higher pressures than a muzzleloader barrel is designed to handle. Use only black powder or a black powder substitute (such as Pyrodex) in specified grades.
- When carrying the rifle to the firing line, carry it with the lock at half-cock and no cap on the nipple.
Demonstrating for Your Counselor
Be prepared to show: correctly carrying the rifle to the line, placing a cap on the nipple (or simulating with a blank), and how to make the rifle safe (remove the cap, return to half-cock) on the range.
Req 2cd — Grades of Black Powder
Black powder is graded by granule size, which controls how quickly it burns. Finer granules have more surface area and burn faster (generating higher pressure more quickly). Coarser granules burn slower and build pressure more gradually. Matching the correct grade to the firearm and application is essential for both safety and performance.
The Standard Grades
Black powder grades are designated by the letter “F” and the number of F’s indicates granule fineness (more F’s = finer granules):
| Grade | Granule Size | Primary Use |
|---|---|---|
| Fg (1F) | Largest | Large-bore rifles (over .75 caliber), cannon, and shotguns |
| FFg (2F) | Medium-large | Most .45–.75 caliber muzzleloading rifles. This is the most common grade for .45 and .50 caliber rifles. |
| FFFg (3F) | Medium-small | Small-bore rifles (.36–.45 caliber), pistols, and priming flintlocks |
| FFFFg (4F) | Finest | Priming powder for flintlock pans only. Not used as a main charge. |
Which Grade for .45 or .50 Caliber Rifles
For the .45 and .50 caliber percussion rifles typically used in Option C, FFg (2F) is the standard grade for the main powder charge. Some shooters use FFFg (3F) in .45 caliber—follow your instructor’s and the rifle manufacturer’s guidance.
Black Powder Substitutes
Pyrodex and other black powder substitutes are formulated to perform similarly to black powder but with different chemical compositions. They are generally classified by the black powder grade they replace (e.g., Pyrodex RS is roughly equivalent to FFg). Substitutes must be measured by volume, not weight—they are less dense than black powder. Follow manufacturer instructions for the specific substitute being used.
Critical Safety Rule
Never use smokeless powder (the type used in modern cartridge ammunition) in a muzzleloader. Smokeless powder burns far faster at much higher pressures than muzzleloaders are designed to withstand. Using it would likely cause the barrel to rupture catastrophically.
For Your Counselor
Know at minimum: the four main grades (Fg, FFg, FFFg, FFFFg), the general rule (finer = faster burn = higher pressure), which grade is correct for a .45 or .50 caliber rifle, and why you cannot substitute smokeless powder.
Req 2ce — Black Powder Storage Safety
Black powder is a Class A explosive—it burns very rapidly and can ignite from a spark, friction, or heat. Unlike smokeless powder, it does not require containment to explode; it can ignite and burn violently in the open air. Proper storage is not optional.
Storage Rules
1. Keep black powder in its original container or an approved metal powder flask. Do not transfer black powder to glass, plastic, or improvised containers. Use the manufacturer’s original container (typically a metal or fiber canister) or a dedicated metal powder flask.
2. Store in a cool, dry location away from all heat sources. Keep away from furnaces, water heaters, fireplaces, and direct sunlight. Elevated temperatures can cause black powder to deteriorate or, in extreme cases, self-ignite.
3. Keep away from all sources of spark and flame. No smoking, open flame, or electrical equipment that could spark near stored black powder. Static electricity is a hazard—avoid plastic bags or synthetic materials in contact with black powder.
4. Store in small quantities. Purchase only what you need for planned use. Do not accumulate large quantities. Many jurisdictions have legal limits on how much black powder a private individual can store without a commercial license.
5. Store separately from percussion caps and other primers. Caps should be stored in a separate container. Caps ignite from a blow or heat; keeping them separate from the powder reduces the risk of a chain ignition.
6. Keep away from children and locked when not in use. Same as all ammunition and firearms—locked storage prevents access by unauthorized persons.
7. Never store black powder in a house or occupied dwelling beyond small quantities for personal use. Many fire codes restrict black powder storage inside occupied buildings. Know your local regulations.
At the Range
At a range, only the measured charge for the next shot should be present at the firing line. The main supply of black powder should remain in the original container in a safe location, not sitting open on a bench near shooters.
For Your Counselor
Be prepared to explain why black powder requires more careful storage than smokeless powder and cartridge ammunition, and what specific conditions can trigger ignition.
Req 2cf — Components of a Load
A muzzleloading rifle load consists of three main components: the powder charge, the patch (for round ball loads), and the projectile. Each must be the correct type and size for the rifle being used.
1. Powder Charge
The powder charge is the amount of black powder or substitute that provides the propellant energy. It is measured by volume in grains (not weight—powder measures are volumetric tools calibrated in grains of black powder).
Correct charge weight: Always use the charge recommended by the rifle’s manufacturer or by your instructor. A common starting load for a .50 caliber percussion rifle is 80–100 grains of FFg. Too light a charge may cause a squib; too heavy a charge generates excessive pressure.
Measure precisely: Use a calibrated powder measure. Never estimate. Never pour directly from a flask into the barrel—measure first into a separate measure, then pour.
2. Patch (for Round Ball)
For a round ball load, a fabric patch wraps around the ball and serves two functions:
- It engages the rifling, providing the spin that stabilizes the ball in flight.
- It seals the bore behind the ball, trapping the propellant gas for maximum velocity.
Material: Tightly woven cotton or linen. Pre-cut to the correct size for the bore diameter. Lubrication: Patches are lubricated with a patch lube (typically a beeswax-based product or commercial patch lubricant) to reduce friction during loading and to help keep fouling soft in the bore between shots.
3. Projectile
Round ball: The traditional projectile for muzzleloading rifles. A solid lead sphere sized to the bore diameter (e.g., a .490 ball for a .50 caliber rifle—the patch takes up the remaining space). Round balls are accurate at the ranges used in Scout programs but lose velocity faster than conical bullets.
Conical bullet (Minié ball or similar): A hollow-base lead projectile. The skirt expands on firing to grip the rifling. No patch required. Typically used at longer hunting ranges. For Merit Badge purposes, round balls with patches are most commonly specified.
Getting the Combination Right
Patch thickness and ball diameter must be matched so the ball and patch together fit snugly in the bore—enough to engage the rifling without requiring excessive force to seat with the ramrod. If you can push the ball down with your hand it is too loose; if you cannot seat it with firm ramrod strokes it is too tight. Your instructor will specify the correct combination for the rifle you are using.
Req 2cg — Loading Procedures and Accessories
Loading a muzzleloader requires a specific sequence performed carefully. Following the correct sequence prevents double charges, powder spills, and accidental discharges. Your instructor will supervise every loading operation.
Loading Accessories
Powder measure / charger: A calibrated volumetric measure that ensures the correct powder charge every time. Never estimate.
Powder horn or flask: Stores the black powder supply at the range. Designed to deliver a controlled pour into the powder measure.
Starter (short starter): A short wooden tool with a flat palm plate and a short rod used to start the ball and patch into the muzzle before using the full-length ramrod. The short stroke of the starter pushes the ball just past the muzzle without requiring full ramrod leverage.
Ramrod: Either the one stored under the barrel or a separate range ramrod (more durable for heavy use). Used to seat the ball and patch (or conical) firmly against the powder charge.
Capper / capbox: Stores and dispenses percussion caps. A capper device allows you to place a cap on the nipple without fumbling for a loose cap.
Nipple pick (vent pick): A thin wire or pick used to clear fouling from the nipple’s vent hole to ensure reliable ignition.
Patch and ball: Pre-cut patches and round balls of the correct diameter.
Lube: Patch lubricant; also used to lube the bore between shots in a sustained session.
Loading Sequence
This sequence is performed with the muzzle pointed in a safe direction throughout. Perform it only on the firing line under your instructor’s supervision.
- Inspect the bore: Run a dry patch down the bore to confirm it is clean and unobstructed. Remove the patch.
- Check the nipple: Clear the vent hole with a nipple pick if needed.
- Snap a cap (optional pre-firing check): Before adding powder, some instructors have you place a cap on the nipple and fire (dry) to confirm the nipple is clear. This also ensures there are no smoldering embers in the bore.
- Pour the measured powder charge: Measure the powder in the measure, then pour it down the barrel in one smooth motion. Give the barrel a gentle tap to settle the powder.
- Place the patch: Center a lubricated patch over the muzzle.
- Seat the ball: Place the round ball in the center of the patch. Use the starter to push the ball and patch into the muzzle, about 1 inch down.
- Seat with the ramrod: Use the ramrod to push the ball and patch firmly and evenly down to the powder charge. Apply firm, steady pressure—do not pound. The ball should seat solidly without a large gap.
- Mark and remove the ramrod: Note the seating depth (some shooters mark their ramrod with a line at the fully seated position). Remove the ramrod and return it to its storage.
- Place the cap: Place a fresh percussion cap firmly on the nipple. The rifle is now fully loaded and cocked.
Critical: One Charge Only
Loading a double charge (pouring powder twice without firing) is extremely dangerous and will cause barrel failure. Always verify the bore is clear and contains no previous charge before loading.
🎬 Video: How To Load & Shoot Your CVA Muzzleloader — CVA — https://www.youtube.com/watch?v=lfSIpk60Z6U
Req 2ch — Misfires, Hangfires, and Squib Fires
Muzzleloaders experience the same three firing failures as cartridge rifles—misfire, hangfire, and squib fire—but the causes are somewhat different because of how muzzleloaders are loaded and ignited. You must know both the causes and the responses.
Causes of Firing Failures in Muzzleloaders
Cap-related failures:
- A defective or damaged cap fails to detonate when struck.
- A cap that falls off the nipple before firing leaves the powder charge unignited.
Vent/nipple blockage:
- Fouling from previous shots can partially or fully block the nipple’s vent hole, preventing the cap’s flash from reaching the powder charge.
- Oil or moisture in the vent hole from bore cleaning can block ignition.
Powder problems:
- Wet or moisture-contaminated powder may fail to ignite or burn incompletely.
- Powder that has been compressed excessively during seating can ignite irregularly.
Improper seating:
- A ball or conical that is not seated firmly against the powder charge creates an air gap. When the powder fires, the ball acts as a projectile starting with a running start—but without the bore sealing correctly, pressure builds abnormally.
Preventive Measures
- Clear the vent hole with a nipple pick before loading each shot.
- Snap a cap on an empty nipple before loading powder to verify ignition path is clear (see loading sequence).
- Keep powder dry: protect the barrel from rain and moisture. A muzzle cap and a leather flap over the lock are traditional protections.
- Replace old or damaged caps before shooting.
- Seat the ball firmly all the way to the powder charge, and verify depth with your ramrod mark.
Misfire
What it is: Trigger pulled, hammer falls, cap fires (or cap fails)—but no main charge ignition.
Response:
- Keep the muzzle pointed downrange.
- Wait at least 60 seconds (longer than with a cartridge—black powder can be slower to ignite through fouled vents).
- After waiting, try a fresh cap. If it fires, good. If not, consult your instructor about unloading procedures.
Hangfire
What it is: A delay between the cap firing and the main charge igniting.
Response: Identical to misfire—keep the muzzle downrange and wait at least 60 seconds before any action. A hangfire in a muzzleloader can take several seconds to ignite.
Squib Fire
What it is: The cap fires and possibly the powder partly ignites, but the projectile does not exit the barrel or is weakly propelled.
What to watch for: Reduced or no report, very little smoke, the ball possibly lodged partway down the bore.
Response:
- Stop immediately. Do not attempt to load another charge.
- Keep muzzle pointed downrange, engage the safety (if any), and consult your instructor.
- The instructor will supervise the process of removing the obstructed ball, which involves specialized tools (a ball puller that threads into the lead ball).
- Do not fire again until the bore is confirmed clear.
For Your Counselor
Be ready to explain all three failure types and demonstrate the correct response posture and sequence. Your counselor may ask you to simulate a misfire and show the correct muzzle direction, wait time, and next step.
Req 2ci — Range Procedures and Commands
Muzzleloader range procedures follow the same command framework as cartridge and air rifle ranges (see Req 2af). There are additional rules specific to muzzleloaders because the loading process is more involved and black powder introduces specific hazards.
Standard Range Commands
The same commands apply: cease fire, make the range safe, the range is cold, the range is hot. Respond to all of them immediately without hesitation.
Muzzleloader-Specific Range Conduct
Loading only on the firing line and only when directed: Because loading a muzzleloader takes time and involves loose powder, all loading must happen on the firing line under the RSO’s supervision.
No open powder flasks or horns near lit fuses or other shooters: At a multi-shooter range, keep the powder horn closed and away from the muzzle when others are firing.
After a cease fire with a loaded rifle: Keep the muzzle pointed downrange. Do not attempt to unload the rifle. Wait for the RSO’s instructions—they will direct you whether to fire the load downrange safely or keep the rifle staged for the cold range.
At cold range with a loaded rifle: A loaded muzzleloader cannot be made safe instantly. Your RSO will have a specific protocol (often, loaded muzzleloaders remain at the firing line staged safely, not carried downrange). Follow the RSO’s instructions exactly.
After firing: Keep the muzzle downrange, open the lock (remove the cap if percussion), and keep the rifle on the bench until the RSO instructs the next step.
Handling the Ramrod on the Range
Never leave the ramrod in the barrel while the rifle is pointed at the target. A ramrod accidentally fired downrange can cause serious injury. The ramrod goes back in its storage as soon as the ball is seated.
Your Attitude
The same expectations as described in Req 2af: immediate response to commands, focused attention, deliberate and careful handling of both the rifle and the black powder. A calm, methodical approach to the loading sequence reflects well-trained shooter behavior.
Req 2cj — Cleaning Safety Rules and Materials
Cleaning a muzzleloading rifle is more involved than cleaning a cartridge rifle and must be done promptly after each shooting session. Black powder fouling is corrosive and hygroscopic (it attracts moisture), which means a muzzleloader left uncleaned after firing will begin to corrode internally within hours.
Safety Rules for Cleaning
1. Verify the rifle is unloaded before beginning. For a percussion muzzleloader: confirm no cap is on the nipple, and confirm there is no powder charge or ball in the bore. Run a ramrod down the barrel and compare the position to the known empty-bore length. If in doubt, consult your instructor.
2. Remove all black powder from the cleaning area. Return the powder flask or horn to its storage location. Do not clean near open powder.
3. Remove the percussion cap and nipple (if cleaning the nipple separately) before cleaning.
4. Work in a ventilated area. Black powder fouling is water-soluble, so cleaning typically uses water or a water-based solvent that generates some steam. Fouling residue is caustic—wash hands thoroughly when done.
5. Keep the muzzle in a safe direction throughout cleaning.
6. Use water-based cleaners on the bore—not petroleum solvents. Black powder fouling is corrosive mineral salt residue that does not dissolve well in petroleum-based solvents. Water, warm soap-and-water solution, or commercial black powder solvent (which is water-based) are correct. After water cleaning, always apply oil to prevent flash rust.
Materials Needed
- Cleaning rod (usually brass or wood—avoid steel on a muzzleloader bore that may have a soft barrel)
- Jag or patch holder sized to the bore
- Cleaning patches (plenty—muzzleloader bores require more patches than cartridge rifles)
- Water-based black powder solvent (or warm soapy water)
- Nipple pick and nipple wrench (if removing the nipple for cleaning)
- Gun oil or bore butter (applied as a final protective coat)
- Cleaning cloth or rag
- Container for water or solvent
- Optional: bore brush for heavy fouling
Req 2ck — Clean a Muzzleloader Properly
Muzzleloaders must be cleaned promptly—ideally the same day they are fired. Black powder fouling is chemically aggressive. If left overnight or longer, it absorbs atmospheric moisture and produces an acid that corrodes the bore and metal surfaces.
Before You Begin
- Verify the rifle is unloaded: No cap on the nipple, no ball or powder in the bore. Confirm with the ramrod.
- Move the powder and all ammunition away from the cleaning area.
- Gather your materials: cleaning rod with jag, plenty of patches, black powder solvent or warm soapy water, nipple pick and wrench, gun oil.
Cleaning the Nipple
- Remove the percussion cap (already off from the range session).
- Use a nipple pick to clear any fouling from the vent hole.
- If your instructor directs it, use a nipple wrench to remove the nipple entirely. Soak it in solvent, scrub the vent hole, rinse, dry, and apply a small amount of oil before reinstalling.
Cleaning the Bore
- Attach the jag to the cleaning rod. Wet a patch with black powder solvent or warm soapy water.
- Run the solvent-wet patch down the bore from the muzzle. The patch will pick up black fouling.
- Continue with successive wet patches until they come out noticeably cleaner.
- If fouling is heavy, use a bore brush with solvent to scrub the bore, then continue with wet patches.
- Follow with dry patches to remove remaining moisture.
- Final oil patch: Run a lightly oiled patch through the bore to coat the metal and prevent flash rust. Use a general gun oil or bore butter.
Cleaning the Lock and Action
- Wipe down the hammer, hammer face, and lock mechanism with a dry or lightly oiled cloth.
- Remove any black residue around the nipple seat area (this area gets heavy fouling from cap blowback).
- Apply a light coat of oil to the lock mechanism moving parts.
Cleaning External Surfaces
- Wipe down all metal surfaces (barrel exterior, lock plate, trigger guard) with an oiled cloth.
- Wipe the stock with a dry cloth. Do not apply gun oil directly to wood.
Inspection After Cleaning
Once clean, shine a bore light down the barrel from the muzzle to inspect for remaining fouling, pitting, or cracks. The bore should appear bright with visible rifling. If pitting is found, note it and inform your instructor.
Store the rifle unloaded with the hammer at half-cock, action clean and lightly oiled.
Req 2cl — Selecting a Muzzleloading Rifle
Selecting a muzzleloading rifle is more complex than selecting a modern rifle because the choices include lock type, barrel type, caliber, and whether you want a historically accurate rifle or a modern inline design. As with Reqs 2ai and 2bh, structure your counselor discussion around a specific purpose.
Key Selection Factors
Lock Type
Flintlock: Uses a flint striking steel to ignite priming powder. Historically significant—this is the lock on the Kentucky long rifle. Slower ignition, more sensitive to wet weather, and more complex to operate than percussion. Preferred by traditional/historical purists.
Percussion cap (side lock): Uses a percussion cap on a nipple. More reliable ignition, less weather-sensitive. The standard for most Scout programs and most modern traditional muzzleloading.
Inline (modern muzzleloader): A modern design with a coaxial percussion system where the ignition mechanism is inline with the bore. Much faster ignition, more weatherproof, and often accepts synthetic stocks and telescopic sights. Common for hunters using muzzleloader seasons. Not considered traditional by historical shooting purists.
Caliber
For general target shooting and small-to-medium game: .45 caliber is a good choice—smaller and lighter, with modest recoil. For large game (deer, elk, black bear): .50 caliber is the most popular modern hunting caliber. More energy on target and a wider selection of projectile weights. The requirement specifies .45 or .50 caliber—either is appropriate.
Barrel Length
Longer barrels (28–36 inches, typical of traditional long rifles) provide:
- More complete powder combustion and higher velocity.
- Longer sight radius for better open-sight accuracy.
- Traditionally associated with the Kentucky/Pennsylvania style.
Shorter barrels (20–26 inches, typical of carbine styles) are lighter and more maneuverable.
Barrel Twist Rate
The twist rate determines whether the rifle shoots round balls (slow twist, typically 1:48 or slower) or conical bullets accurately (faster twist, typically 1:28–1:32). If you want to shoot only round balls, choose a rifle with a slow twist. Some “compromise” twist rates (1:48) handle both adequately.
Stock Style
Traditional maple, cherry, or walnut stocks reflect period craftsmanship. Synthetic stocks are more durable and weather-resistant. For a youth or beginner, a carbine-length synthetic stock is often easier to handle.
New vs. Kit vs. Used
New factory rifles: Most accessible. Brands like Traditions, Lyman, and CVA offer reliable, affordable percussion and inline muzzleloaders. Kit rifles: Some enthusiasts build from a part kit—this is a deep learning experience but requires additional skill. Used rifles: Often excellent value, but require careful inspection for bore condition, nipple condition, and stock integrity.
For Your Counselor
Choose a purpose (target shooting, deer hunting, historical reenactment) and walk through your selection reasoning. Your counselor wants to hear your thinking, not just a list of features.
Req 2cm — First Grouping Exercise
This is your first live-fire grouping exercise for Option C. The standard is more generous than Option A or B—a standard soft drink can base is approximately 2.5 inches in diameter—reflecting the larger caliber and the inherent variation in the muzzleloading process.
The Standard
A standard 12-oz soft drink can has a base diameter of approximately 2.5 inches. Each three-shot group must fit within that circle—meaning all three holes, if you placed a can base over them, would be covered. Fire three such groups (nine shots total, three at a time).
The Loading Process During the Exercise
Between each three-shot group, you will reload the rifle following the full loading sequence (Req 2cg). This is part of the exercise—loading between shots at a measured pace with your instructor supervising.
Between shots within a group: Run a damp patch down the bore to remove the worst fouling before reloading. This is called “swabbing between shots.” It keeps the bore consistent and makes seating the next ball easier.
Position
Shoot from a benchrest or supported prone, same as Options A and B. Use a sandbag to support the forestock (muzzleloaders, like spring-piston air rifles, can be sensitive to how they rest on the bag—ask your instructor about any specific hold guidance for the rifle you are using).
What to Expect
Muzzleloaders at 50 feet with round balls are capable of excellent accuracy for this standard. Common issues for first-time shooters:
- Inconsistent seating: Vary in how firmly the ball is seated, and groups open up. Seat to the same depth every time.
- Trigger anticipation: Same as with any rifle—apply the five fundamentals and let the shot break as a surprise.
- Fouling buildup: As the bore becomes fouled, resistance when seating the ball increases. Swab between shots to maintain consistency.
Req 2cn — Scored Grouping Exercise
This is the final shooting performance exercise for Option C. Fire three groups of five shots each, with each shot scoring 7 or better on the specified NRA or NMLRA targets.
Distances and Targets
| Distance | Target | Minimum Score per Shot |
|---|---|---|
| 25 yards | NRA A-23 or NMLRA 50-yard target | 7 |
| 50 yards | NRA A-25 or NMLRA 100-yard target | 7 |
Your instructor will specify the distance and target. Note that these distances—25 and 50 yards—are longer than the 50 feet used in the first grouping exercise. At 25 yards you are at approximately 75 feet; at 50 yards you are at 150 feet. The step up in distance is significant.
Sight Adjustment
Using the group centers from Req 2cm as a reference, your instructor will help you adjust the sights to center the group. For muzzleloaders with adjustable rear sights, the same rear-sight adjustment rule applies: move the rear sight in the direction you want the group to move.
If sights cannot be adjusted, explain the process to your counselor and use the soft drink can base standard instead of the scored target.
Execution at Distance
At 25–50 yards, small errors in sight alignment become much more visible. Focus especially on:
- Consistent cheekweld at every shot—even a few millimeters of variation in your eye position relative to the rear sight notch changes where the shot lands.
- Natural point of aim—let the rifle settle on aim naturally between shots.
- Swabbing consistently between each shot to keep bore conditions uniform.
- Applying the five fundamentals on every shot without rushing.
Fifteen Total Shots
Three groups of five = fifteen individual shots, each requiring a clean load, seat, and trigger press. Pace yourself through the exercise. This is a test of your consistency and discipline as much as your marksmanship.
Req 3 — Pathways, Training, and Goals
This requirement asks you to think past the merit badge and consider where safe, responsible firearm skills could take you—whether as a career, a competitive sport, a hunting tradition, or a lifelong hobby. Research matters here: your counselor wants specific information, not vague ideas.
Step 1: Identify Your Direction
Think about which aspect of rifle shooting appeals to you most. The categories below are starting points:
Competitive Shooting
Target shooting at the club, regional, national, or Olympic level. Disciplines include:
- NRA rifle competitions (precision rifle, high power, smallbore)
- USA Shooting (the national governing body for Olympic/Paralympic shooting sports)
- JROTC and collegiate shooting programs
- International Practical Shooting Confederation (IPSC)
- Muzzleloading competition through NMLRA
Hunting
Using rifles responsibly to harvest game under regulated seasons. Requires:
- Hunter education certification
- Annual hunting license and applicable tags
- Ongoing firearms maintenance skills
- Familiarity with game regulations and conservation principles
Law Enforcement and Military
Many careers in law enforcement, military service, and security require firearms qualification. While the firearms used in those settings differ from sport rifles, the fundamentals of safe handling, marksmanship, and discipline are directly relevant.
Gunsmiths and Firearms Industry
Careers in gunsmithing, firearms manufacturing, retail, or instruction. Requires technical training often available at trade schools, community colleges, and dedicated gunsmithing programs.
Firearms Instruction
NRA-certified instructors, range safety officers, hunter education instructors, and Scouting shooting sports staff. Instruction careers require both subject expertise and communication skill.
Step 2: Research What It Takes
For the pathway you identify, research three areas:
Additional Training and Experience
- What certifications or courses are required or beneficial?
- What level of shooting proficiency is expected?
- How long does it typically take to reach that level?
- Are there youth development programs that provide a pathway (USA Shooting’s Junior Olympic program, for example, or CMP youth leagues)?
Costs
Be realistic about expenses:
- Ammunition: How much does a range session cost? For centerfire, even .223 can cost $0.30–$0.70 per round or more. A training session might use 50–100 rounds.
- Equipment: Entry-level competition rifles for NRA precision events run several hundred to several thousand dollars. Optics, bags, and accessories add more.
- Range fees: Club membership or commercial range fees.
- Entry fees: Competition entry fees range from a few dollars to hundreds for major matches.
- Training courses: NRA instructor courses, USA Shooting clinics, and similar programs have registration fees.
- Travel: Regional and national competitions require travel.
Organizations That Can Help
- National Rifle Association: Training programs, club affiliation, competitions, scholarships
- USA Shooting: Olympic pathway programs, junior development, national team selection
- Civilian Marksmanship Program (CMP): Affordable training clinics, youth leagues, firearm access for qualified participants
- NMLRA: Muzzleloading competition, rendezvous events, educational resources
- 4-H Shooting Sports: Available in most counties, excellent entry point
- JROTC: School-based program with a well-developed air rifle and rifle team structure
- State wildlife agencies: Hunter education programs, mentored hunting programs
Step 3: Set Short-Term and Long-Term Goals
Your counselor will ask you to share goals. Be specific and personal—not generic.
Short-term goals (next 6–18 months): Examples:
- “I want to join the club I identified in Req 1i and shoot at least once a month.”
- “I want to complete the NRA Basic Rifle Shooting course.”
- “I want to earn my hunter education certificate this fall.”
- “I want to try one JROTC air rifle competition.”
Long-term goals (3–10 years): Examples:
- “I want to earn a spot on my school or college shooting team.”
- “I want to qualify as an NRA-certified rifle instructor before I turn 21.”
- “I want to hunt deer with a muzzleloader on the early season my state offers.”
- “I want to pursue gunsmithing training after high school.”
Goals do not have to be career-oriented. A goal of “shooting safely and accurately for recreation for the rest of my life” is legitimate and valuable.
For Your Counselor
Come to this discussion having done real research—specific program names, costs you looked up, organizations you know about. Your counselor is not evaluating your ambitions; they are looking for evidence that you have thought seriously about how the skills from this badge connect to your future.
Extended Learning
Congratulations!
You have covered safety, law, wildlife conservation, hands-on shooting fundamentals, and looked ahead to where these skills can take you. Rifle Shooting is one of the few merit badges where the knowledge you built here carries direct consequences in the real world—safe gun handling is not a test topic, it is a life skill.
The Extended Learning section is for Scouts who want to go further: deeper concepts, competition pathways, real-world experiences, and the organizations that connect serious shooters with serious opportunities.
Dig Deeper
Ballistics: What Happens After the Trigger
The five fundamentals take the bullet to the muzzle. Ballistics takes over from there. Two areas are worth understanding:
Internal ballistics: How pressure builds inside the barrel from ignition to bullet exit. The burning rate of propellant, barrel length, and chamber pressure interact to determine muzzle velocity.
External ballistics: How the bullet behaves in flight. Concepts include trajectory (the arc the bullet travels), wind drift (how crosswinds push the bullet laterally), and spin drift (the slight curve caused by rifling-induced spin). For a .22 LR at 50 feet, these effects are negligible—but as distance increases, understanding them becomes essential for accuracy.
Terminal ballistics: What happens when the bullet reaches the target. For hunters, this means understanding energy transfer and projectile construction. For target shooters, it means understanding how bullet weight and velocity affect scoring ring penetration.
The Physics of Rifling
Rifling spin-stabilizes a bullet the same way throwing a football with a spiral stabilizes it in flight. The twist rate (expressed as 1:X, meaning one full rotation in X inches) must match the bullet’s length and weight. A heavier, longer bullet needs a faster twist to stabilize. Understanding this is why bullet selection for a given rifle matters.
Competitive Shooting Formats
NRA Precision Rifle: Long-distance (beyond 300 yards) precision shooting at steel targets. Requires understanding of MOA or milliradian adjustments, wind reading, and positional shooting skills.
Benchrest Shooting: The pursuit of the smallest possible group. Competition benchrest shooters fire three- or five-shot groups and measure group size with calipers. The sport has driven nearly all advances in modern rifle accuracy.
Palma Match: A long-range discipline with rifles firing iron sights at 800, 900, and 1,000 yards. Considered the most demanding form of iron-sight rifle shooting.
3-Gun (Multi-Gun): Combines rifle, handgun, and shotgun in timed stages. Requires rapid target transitions, movement, and positional shooting. One of the fastest-growing shooting sports.
Silhouette Shooting: Metal targets shaped like animals at set distances. Both rifle (NRA silhouette) and air rifle (USA Shooting) versions exist. Excellent for developing precision and wind-reading skills.
The Optics Rabbit Hole
Modern rifle scopes are precision optical instruments with reticles (crosshairs) marked in MOA or milliradians. Learning to read a reticle, calculate holds for drop and wind, and dial scope adjustments is a deep skill set that competition and hunting shooters spend years developing. Entry-level scopes are affordable; competition-grade optics can cost as much as a quality rifle.
Try This Next
Join or visit a local rifle club: Most clubs welcome visitors. Attend a club match as an observer before competing—watch how experienced shooters manage their equipment, call their shots, and analyze errors.
Attend a CMP (Civilian Marksmanship Program) clinic or match: CMP clinics are specifically designed to develop junior and adult shooters. Some are free or low-cost and include loaner equipment.
Try a different option: If you completed Option A, consider taking an air rifle session to experience the hold sensitivity differences. If you did Option B, the jump to .22 LR is straightforward and educational.
Enter a postal or indoor league: Some clubs run postal competitions where you mail your targets in. These allow competition without travel and are a low-pressure introduction to scored shooting.
Start dry-fire practice at home: With a verified-clear rifle (family permission required), dry-fire practice is one of the highest-value training activities available. Ten minutes of deliberate trigger-control practice per day accelerates improvement faster than sporadic live fire.
Read a ballistics reference: The Shooter’s Bible (published annually) is a comprehensive firearms and ammunition reference. The NRA Firearms Sourcebook covers the technical side of rifle design and ballistics in accessible detail.
Organizations and Resources
National Rifle Association (NRA) The largest firearms training and education organization in the United States. Offers youth programs, club affiliations, competitions at all levels, instructor certifications, and scholarships for competitive shooters.
USA Shooting The national governing body for Olympic and Paralympic shooting sports. Manages the Junior Olympic Development Program, which feeds into the national team pipeline. Air rifle is the entry point for most junior competitive shooters.
Civilian Marksmanship Program (CMP) A federally chartered corporation promoting rifle marksmanship. Offers CMP Junior and Open competitions, training clinics, and programs designed specifically for youth. Has operated since 1903.
National Muzzle Loading Rifle Association (NMLRA) The premier organization for muzzleloading sport and history. Hosts the annual National Championship at Friendship, Indiana, publishes Muzzle Blasts magazine, and maintains the largest archive of historical muzzleloading information.
4-H Shooting Sports The nation’s largest youth shooting sports program with clubs in nearly every county. Covers multiple disciplines including rifle, pistol, shotgun, archery, and muzzleloading. Excellent entry point for younger Scouts.
Scholastic Shooting Sports Foundation (SSSF) Manages Scholastic Action Shooting Program (SASP) and Scholastic Steel Challenge for middle and high school students. Team-based, coach-led, and rapidly growing.
State fish and wildlife agencies Beyond hunting regulations, many state agencies offer mentored hunting programs, hunter education clinics, and partnerships with local clubs. A resource for anyone interested in connecting shooting sports with conservation.