Robotics Merit Badge — Complete Digital Resource Guide
https://merit-badge.university/merit-badges/robotics/guide/
Introduction & Overview
Robots are machines that sense the world, make decisions, and do work. You already see them in factories, hospitals, warehouses, farms, and even living rooms. Robotics Merit Badge shows you how those machines are designed, programmed, tested, and improved — and then challenges you to build part of that process yourself.
This badge is exciting because it mixes several skills at once. You will think like an engineer, code like a programmer, troubleshoot like a mechanic, and explain your choices like a team leader. By the end, you will not just know what robots are — you will understand why good robots are built on clear goals, safe habits, and careful testing.
Origins and Where We Are Today
Origins
The word robot comes from a 1920 play by Czech writer Karel Čapek. His “robots” were imaginary workers, but the idea caught on fast. By the mid-1900s, inventors were building real machines that could repeat the same motion over and over, which made them useful in factories where speed and consistency mattered.
Early industrial robots were powerful but limited. Most could only follow a set path. If a part was in the wrong place, the robot did not adapt. It just kept moving. That worked for simple jobs, but it was not much like the flexible robots people imagined in science fiction.
Where We Are Today
Modern robots combine motors, sensors, software, and mechanical design. A warehouse robot can map a room. A surgical robot can help a doctor make tiny, precise movements. A competition robot can use a camera or distance sensor to react to changing conditions instead of following the same path every time.
Today, robotics matters because it solves hard problems. Robots handle dangerous jobs, repeat boring work accurately, explore places people cannot easily go, and help humans do tasks with greater precision. That makes robotics one of the clearest examples of how engineering turns ideas into useful tools.
Get Ready!
You do not need a giant humanoid robot to succeed in this badge. A simple machine that senses something, decides what to do, and moves in a useful way is enough to teach the real lessons. Bring curiosity, patience, and a willingness to test ideas more than once.
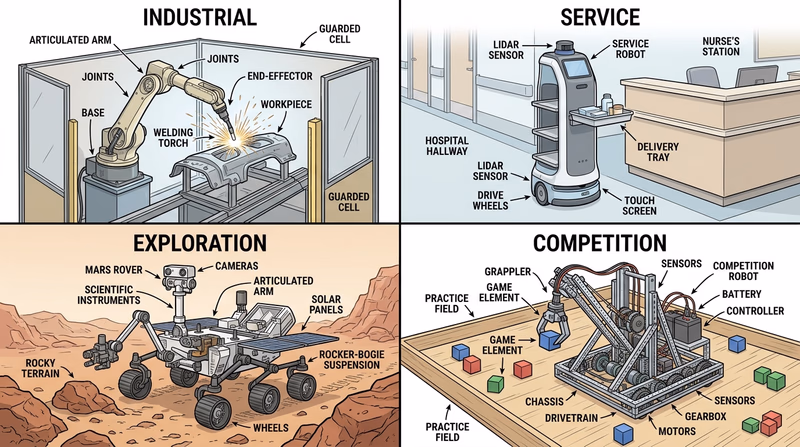
Kinds of Robotics
Industrial Robotics
Industrial robots work in factories and production lines. They weld, paint, sort, assemble, and move parts. These robots are usually built for speed, repeatability, and safety inside a controlled workspace.
Service Robotics
Service robots help people outside the traditional factory setting. That includes hospital delivery carts, floor-cleaning robots, agricultural machines, and bomb-disposal robots. The challenge here is dealing with messy, changing environments.
Exploration Robotics
Exploration robots go where people cannot safely or easily go. That might mean deep underwater, inside a collapsed structure, or across another planet. These robots must be tough, energy-efficient, and able to work with limited human control.
Educational and Competition Robotics
This is the kind of robotics many Scouts meet first. Educational robots help you learn design, sensors, programming, teamwork, and troubleshooting. Competition robots add strategy, deadlines, and real pressure — which is why they are such good training for real engineering work.
You have the big picture. Next, start with the skill that every good robotics team uses before turning on the power: safety.
Req 1 — Workshop Safety
Robotics mixes electricity, moving parts, sharp tools, batteries, heat, and crowded workspaces. That means safety is not a side topic. It is part of every build, every test run, and every competition day.
This requirement covers two connected jobs:
- Spotting hazards before they hurt someone
- Knowing basic first aid for common robotics injuries
Requirement 1a:
A robotics workspace can look harmless right up until something spins, slips, sparks, or tips over. Good builders learn to scan the area before they start. Ask yourself three questions: What can move? What can get hot? What can cut, pinch, shock, or fall? That simple habit catches most problems early.
The hazards you are most likely to see
Pinch points and moving parts can grab fingers, hair, hoodie strings, or loose sleeves. Gears, chains, belts, wheels, arms, and linkages all create places where something can get pulled in fast.
Sharp edges and tools show up everywhere in robotics. Cut metal, plastic zip ties, hobby knives, drills, wire strippers, and broken parts can all cause cuts or punctures.
Electrical and battery hazards are common too. Reversed polarity, damaged wires, exposed terminals, short circuits, and overcharged batteries can heat up parts quickly. Rechargeable battery packs deserve special respect because they can deliver a lot of current in a very short time.
Heat hazards come from soldering irons, motors under load, resistors, batteries, glue guns, and friction in moving parts. Something does not have to glow red to burn you.
Flying debris can come from drilling, grinding, cutting, or a part that snaps loose during testing. Even a tiny chip can injure an eye.
Trip hazards appear when chargers, wires, tools, and parts spread across the floor. Competition pits get crowded fast, so neat workspaces matter.
Safety scan before you begin
Run this quick check every time you power up a robot- Power source secure: battery seated, wires intact, no exposed metal touching where it should not.
- Workspace clear: no loose tools, backpacks, cords, or parts where people walk.
- Robot stable: wheels chocked, frame supported, or test area marked so the robot cannot lunge into someone.
- Emergency stop plan: everyone knows how to shut off power immediately.
- Protective gear on: safety glasses first, then other gear as needed.
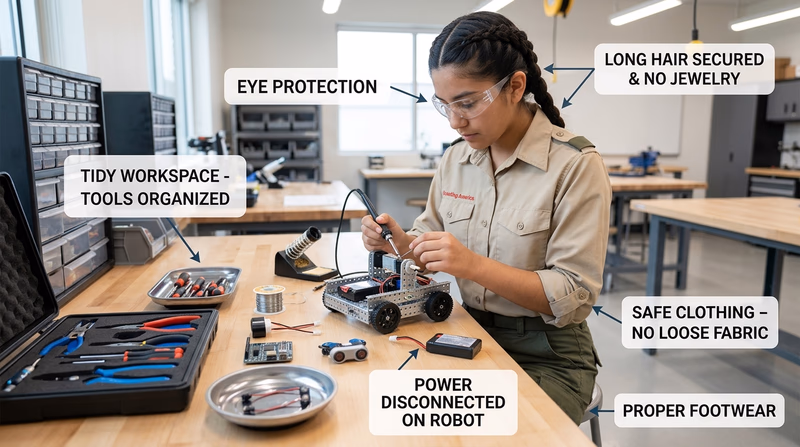
Safety gear and clothing
For most robotics work, safety glasses are the basic must-have item. If you are drilling, cutting, or testing a machine with moving parts, your eyes need protection.
Depending on the task, you may also need:
- Closed-toe shoes so dropped tools or metal parts do not hit bare feet
- Work gloves for handling rough material or sharp stock, but not around rotating tools where gloves could catch
- Hearing protection when using loud shop tools
- Aprons or shop coats to protect clothes from dirt, grease, or hot debris
- Heat-resistant tools or mats when soldering
Notice that the “right gear” depends on the job. That is the point of good safety thinking. You do not wear extra gear just to look prepared. You choose what actually reduces the risk in front of you.
🎬 Video: Hazards and Robot Safety (video) — https://youtu.be/7v3cylLL9hw?list=PLHGEvyG5wuthXQZzTc-mLwFrP5F6_1Lce
Requirement 1b:
Most robotics injuries are minor, but minor injuries still need quick, correct care. The goal is simple: stop the harm, protect the injured area, and get adult or medical help when needed.
Cuts
Cuts usually come from sheet metal, snapped plastic, knives, or tools slipping. For a small cut, wash your hands if possible, apply direct pressure with clean gauze or a cloth, rinse the wound, and cover it with a clean bandage. If bleeding does not stop, if the cut is deep, or if something is stuck in the wound, get adult help right away.
Eye injuries
Eye injuries are more serious because even a small particle can scratch the surface of the eye. If dust or debris gets into an eye, do not rub it. Blink several times or rinse gently with clean water. If something is embedded in the eye, cover both eyes loosely and get medical help immediately. Never try to remove an object stuck in the eye.
Burns
A heat burn can come from a soldering iron, hot motor, or heated metal part. Cool the burned area under cool running water for several minutes. Do not put ice directly on the burn. Cover it lightly with a clean, dry dressing.
A chemical burn can happen if a battery leaks or a chemical cleaner splashes. Flush the area with plenty of water right away and tell an adult immediately. Battery chemicals are not something to “wait and see” about.
🎬 Video: How to Treat Cuts and Scrapes (video) — https://www.youtube.com/watch?v=0jp5FgLmKtk&list=PLHGEvyG5wuthXQZzTc-mLwFrP5F6_1Lce&index=1
In Req 4e, you will test your own robot. The safer you are now, the easier it will be to test with confidence later.
Req 2 — Robots in Action
This requirement gives you the industry tour. You will look at where robots are useful, how different control styles change what a robot can do, and why engineers pick one movement system over another. If Req 1 was about working safely, Req 2 is about learning to see robots as tools built for a specific job.
Requirement 2a:
Robots are best at jobs that are dull, dirty, dangerous, or demand high precision. A robot does not get bored welding the same seam 2,000 times. It does not mind inspecting shelves all night in a warehouse. It can hold a camera steadier than a human hand during surgery or repeat a pick-and-place motion with tiny differences each time.
That does not mean robots replace people in every situation. Humans are still better at open-ended judgment, creativity, empathy, and adapting to surprises with very little information. The best real-world systems usually mix both: humans set the goal, handle exceptions, and make decisions; robots handle the repeated or risky physical work.
Good jobs for robots
- Factory work such as welding, painting, assembly, and sorting
- Warehouse work such as moving totes, scanning inventory, and delivering items
- Medical support such as surgical assistance, pharmacy delivery, or rehabilitation devices
- Exploration such as Mars rovers, underwater ROVs, and bomb-disposal robots
- Home and service jobs such as vacuuming, mowing, or floor cleaning
🎬 Video: TYPES OF ROBOTS | Robots Classification (video) — https://youtu.be/fc_Cynqr6jM
Requirement 2b:
These three systems can look similar from the outside, but they think and act in different ways.
Remote-control vehicles
A remote-control vehicle does exactly what the operator commands right now. If you stop sending commands, it stops or keeps doing its last simple action. A toy RC car is the easy example. It does not understand the world. It just follows live human input.
Telerobots
A telerobot is also controlled by a human, but it is designed to let the human act from a distance in a more capable way. A bomb-disposal robot, surgical robot, or underwater ROV often sends back video, sensor readings, or tool feedback. The robot becomes the operator’s “hands” somewhere unsafe or unreachable.
Autonomous robots
An autonomous robot senses its environment and makes at least some decisions on its own. A warehouse robot may detect obstacles and reroute. A rover may slow down when terrain changes. A line-following robot at a competition is a simple autonomous machine because it is using sensor feedback instead of waiting for a driver to steer every move.
Similarities and differences
All three types may use motors, batteries, controllers, and sensors. The biggest difference is where the decision-making happens.
- Remote control: human decides almost everything, instantly
- Telerobot: human still decides most actions, but the robot extends reach and often adds feedback
- Autonomous robot: robot handles some decisions by itself based on programming and sensor data
🎬 Video: What's The Difference Between Autonomous Robots and Controlled Robots? (video) — https://youtu.be/kdYJyGQwtL4
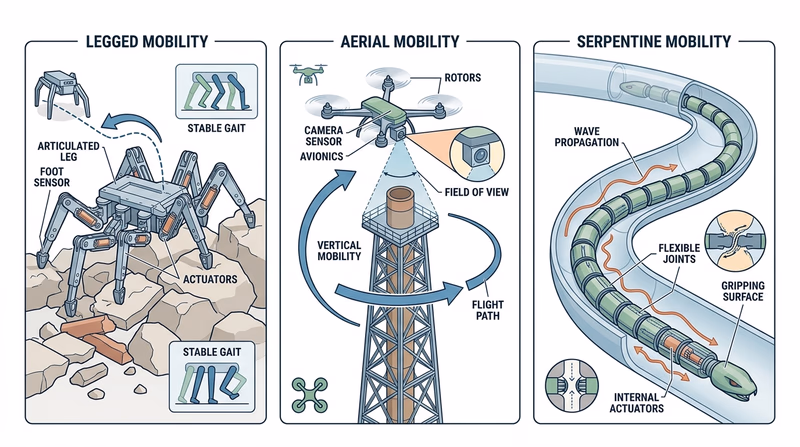
Requirement 2c:
Wheels and tracks are common because they are simple and efficient. But some jobs need a different style of motion.
Legs
Legged robots can step over obstacles, climb uneven terrain, and keep moving when the ground is rough. That makes them useful for stairs, rubble, rocky ground, or spaces where wheels would get stuck. The tradeoff is complexity. Legs need more joints, more control, and usually more energy.
Propellers or rotors
Flying robots use propellers to lift and steer. A quadcopter can inspect a roof, map a disaster area, or check the top of a tower much faster than a ground robot. The tradeoff is short battery life and greater safety concerns around spinning blades.
Arms, inchworm motion, or snake-like motion
Some robots do not move by rolling at all. A snake robot can wiggle through pipes or tight gaps. An inchworm-style robot can grip, extend, and pull itself forward. These methods work well in cramped inspection spaces where a normal chassis could not fit.
When would you choose each?
- Legs: rough terrain, stairs, or obstacle-heavy environments
- Rotors: aerial inspection, photography, or hard-to-reach high places
- Snake or inchworm motion: pipes, narrow passages, or confined search areas
🎬 Video: The No Wheel, Circular Gear, or Sprocket Robot Race (video) — https://youtu.be/aVuNcVW-gzE?si=xoginEhjVnWEPiMd
By now you should be seeing a pattern: every robot is a set of tradeoffs. In Req 4b, that same idea will guide your own design choices.
Req 3 — Core Robotics Systems
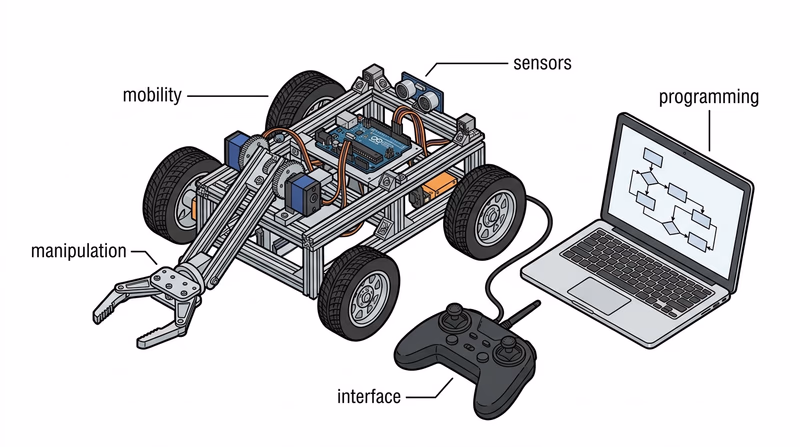
Imagine a robot delivering medicine in a hospital. It has to move down hallways, detect people, carry a load, follow software instructions, and give humans a way to tell it where to go. That one machine already uses all five major fields of robotics. This requirement helps you understand those fields so you can talk about a robot as a complete system instead of just a pile of parts.
The five major fields
Human-robot interface
The human-robot interface is how people communicate with the robot and how the robot communicates back. That might be a handheld controller, touchscreen, app, keyboard, indicator lights, voice commands, or a status screen. A great robot is not just mechanically capable. It is also understandable to the human using it.
If the interface is confusing, the robot becomes frustrating or unsafe. Clear buttons, readable feedback, and simple control options matter just as much as hardware.
Mobility
Mobility is how the robot gets around or changes position. Wheels, tracks, legs, propellers, and fixed robotic arms all fit here. Engineers choose a mobility system based on terrain, speed, stability, power use, and the job to be done.
A warehouse robot and a rover on rough ground need very different mobility solutions because they face different environments.
Manipulation
Manipulation means interacting physically with the world. Robotic arms, grippers, claws, suction tools, and lifting mechanisms all count. Some robots do not need much manipulation at all. Others, like factory arms or surgical systems, depend on it.
A robot can move perfectly and still be useless if it cannot grab, carry, sort, or position the object it was built to handle.
Programming
Programming is the logic that tells the robot what to do and when to do it. This includes simple commands, sensor-based decisions, state machines, loops, conditionals, and safety rules. Programming is what turns hardware into behavior.
If mobility is the body, programming is the plan. It makes separate parts work together toward a goal.
Sensors
Sensors are the robot’s way of gathering information. Touch sensors, limit switches, encoders, color sensors, ultrasonic distance sensors, cameras, gyros, and temperature sensors all give the robot data about itself or its environment.
Without sensors, a robot is mostly guessing. With sensors, it can react, correct errors, and make smarter choices.
🎬 Video: 5 Sub-Disciplines of Robotics (video) — https://youtu.be/exEBkd1Gn0I
One robot, five fields
A good way to discuss this requirement is to pick one robot and map the five fields onto it. For example, think about a competition robot that picks up game pieces and scores them.
- Human-robot interface: driver controls, dashboard, status lights
- Mobility: wheels or other drive system
- Manipulation: intake, arm, claw, elevator, or launcher
- Programming: drive code, autonomous routines, safety limits
- Sensors: encoders, gyro, limit switches, camera, or distance sensor
That approach helps you show your counselor that the fields are connected. A weak sensor system makes the programming less useful. A poor interface makes the robot harder to drive. A great manipulator is wasted if the robot cannot get into position.
How to prepare for your counselor discussion
Choose one of these two paths- Pick one robot system: explain how at least three of the five fields appear in that robot.
- Talk about the fields in general: define each one and give a real-world example.
- Bring visuals: a photo, sketch, or video makes your explanation clearer.
- Use plain language: your goal is to show understanding, not to sound complicated.
Now it is time to stop talking about robotics in general and start planning your own machine.
Req 4 — From Idea to Finished Robot
This requirement is the heart of the Robotics merit badge. You are no longer just discussing robots. You are creating one project from start to finish.
This requirement covers five connected steps:
- choose a clear task
- design the robot
- build the robot or subsystem
- show the logic with code or a flowchart
- test it and improve it
The official videos below are especially helpful before you begin, because they show what counts as a qualifying robotics project, how robots move, and what engineers mean by degrees of freedom.
🎬 Video: What Qualifies as a Robot for Robotics Merit Badge? (video) — https://youtu.be/6dYq9bBSaWc?list=PLHGEvyG5wuthXQZzTc-mLwFrP5F6_1Lce
🎬 Video: Methods Robots Use to Move (video) — https://youtu.be/T0JeYyU7R-c?list=PLHGEvyG5wuthXQZzTc-mLwFrP5F6_1Lce
🎬 Video: Robotics: Degrees of Freedom (video) — https://youtu.be/55O-DGeoFic?list=PLHGEvyG5wuthXQZzTc-mLwFrP5F6_1Lce
Req 4a — Choose the Mission
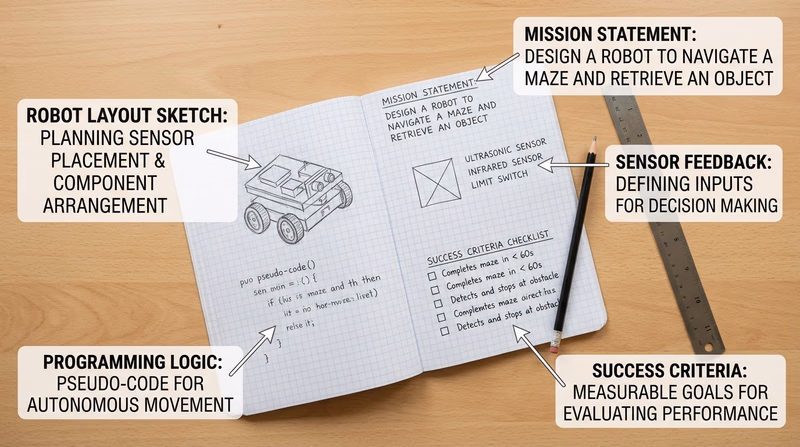
A robot project goes wrong fastest when the mission is fuzzy. “Build a cool robot” is not a mission. “Build a robot that drives to a line, stops within 2 inches, and raises a small arm when a button is pressed” is a mission. The clearer the task, the easier it is to design, build, program, and test.
Pick a task that is real and reachable
Your task should be just hard enough to show real robotics skills, but not so huge that you run out of time. A good robotics merit badge project usually has three parts:
- A specific job the robot must accomplish
- At least one sensor that affects behavior
- Programming logic that makes decisions or sequences actions
Examples of strong project ideas include:
- a robot that follows a line and stops at a marked zone
- a robotic arm that sorts two object types by color or position
- a robot that backs away when it senses an obstacle
- a subsystem that raises and lowers an attachment to set positions using a limit switch or encoder
A weak project is one where the sensor is just decoration. If the robot would behave the same way with the sensor unplugged, the task probably needs improvement.
🎬 Video: What Qualifies as a Robot for Robotics Merit Badge? (video) — https://youtu.be/6dYq9bBSaWc?list=PLHGEvyG5wuthXQZzTc-mLwFrP5F6_1Lce
What to record in your engineering notebook
Your notebook does not need to be fancy. It needs to be clear. Write down:
- the task you chose
- why you chose it
- what the robot must sense
- what the robot must decide
- what counts as success
- limits such as time, size, parts, or budget
Try writing a short mission statement like this:
My robot will carry a small object from a start zone to a target zone, stop when a distance sensor detects the wall, and release the object using a servo-controlled arm.
That statement already includes action, sensor feedback, and programming.
Mission definition checklist
Use these questions before you ask for counselor approval- Clear goal: Can I describe exactly what the robot should do in one or two sentences?
- Sensor role: What input will the robot use to react to the world?
- Program logic: What decision or sequence will the code control?
- Testable result: How will I know whether it succeeded?
- Realistic scope: Can I finish this with the parts, time, and skills I have?
The mission comes first. Next, turn that mission into a design you can actually build.
Req 4b — Sketch the System
This is the point where your robot stops being an idea and becomes a plan. A strong design shows how the parts connect, what the robot needs to sense, and how it will move in more than one way. That last part matters because degrees of freedom means the robot can move through at least two independent motions, not just roll straight ahead.
Start with the big picture
Your design should answer four questions:
- What is the frame or structure?
- How does it move or act on the world?
- What sensor information does it use?
- What motions count as its degrees of freedom?
For a small drive robot with an arm, one degree of freedom might be forward-and-back drive movement, and another might be the arm lifting up and down. For a robotic arm, one degree of freedom might be shoulder rotation and another might be gripper open-and-close.
What “2 degrees of freedom” means
A degree of freedom is one independent way a system can move. If one motor motion changes and another can still change separately, you probably have multiple degrees of freedom.
Examples:
- Drive + arm lift
- Arm shoulder + elbow joint
- Turret rotation + launcher angle
- Lift motion + claw open/close
That does not mean you need two fancy arms or a complex humanoid robot. It means your design should do more than one distinct motion in a useful, controllable way.
🎬 Video: Methods Robots Use to Move (video) — https://youtu.be/T0JeYyU7R-c?list=PLHGEvyG5wuthXQZzTc-mLwFrP5F6_1Lce
🎬 Video: Robotics: Degrees of Freedom (video) — https://youtu.be/55O-DGeoFic?list=PLHGEvyG5wuthXQZzTc-mLwFrP5F6_1Lce
What to draw and describe in your notebook
Your notebook entry should include more than one sketch if needed. A side view, top view, and close-up of a mechanism can be more helpful than one crowded drawing.
Include labels for:
- battery and controller location
- motors or servos
- sensors
- drive system or mechanism
- important dimensions
- where the robot will hold, lift, push, or detect something
Add a short written description under the sketch that explains how the parts work together. Imagine that another Scout had to build your robot from your notes.
Design review questions
Use these before you start building- Stability: Will the robot tip when the arm lifts or the mechanism extends?
- Access: Can I reach the battery, controller, and wiring easily?
- Sensor placement: Can the sensor actually “see” or detect what it needs to detect?
- Simplicity: Am I solving the task with the fewest moving parts that still work?
- Buildability: Do I have the parts and tools to make this design real?

Your plan is on paper. Next, turn those drawings into real parts and a working prototype.
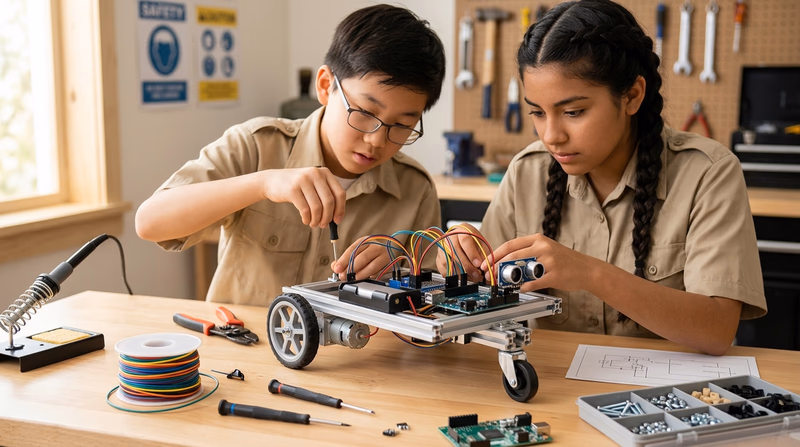
Req 4c — Build Your Prototype
Building is where your ideas meet reality. Holes do not line up perfectly. Wires end up longer than expected. A mechanism that seemed smooth on paper may bind or wobble in real life. That is normal. The goal is not perfection on the first try. The goal is building a version that works well enough to test and improve.
Build in stages
Trying to assemble everything at once makes troubleshooting harder. Instead, build in chunks:
- Frame or base — make the structure solid first
- Motion system — wheels, arm, lift, or gripper
- Electronics — controller, motors, power, sensors
- Cable management — secure wires so they cannot snag or drag
- Simple power-on checks — test one subsystem at a time
If you build in stages, you always know what changed last. That makes it easier to find problems.
Watch for common build problems
Loose structure causes wobble and throws off sensor readings. Tighten hardware and brace long pieces when needed.
Poor wire routing leads to disconnects, pinched insulation, and moving parts chewing through cables.
Overcomplicated mechanisms create more friction and more failure points. If a simple direct drive works, use it.
Misaligned sensors are one of the most common hidden problems. A distance sensor pointed slightly upward may miss a target. A line sensor mounted too high may not read the line clearly.
Build what the mission requires — not more
A strong merit badge robot is often simpler than a competition robot. That is okay. If your task is to detect an obstacle and stop, you do not need a complicated arm, a camera, and six sensors. Extra parts make debugging harder.
Try to keep every part connected to the mission from Req 4a. If you cannot explain why a part is there, it may not belong in version one.
Prototype readiness
Use this before moving on to programming choices- Structure feels solid when you pick up or drive the robot.
- Power system works without loose connections.
- Motors move in the direction you expect.
- Sensors are mounted where they can actually gather useful data.
- The robot can safely perform a simple dry run.
You now have hardware to work with. Next, choose whether you will show the robot’s logic as working code or as a clear flowchart.
Req 4d — Pick Your Programming Path
You must choose exactly one option from this requirement.
Your options
- Req 4d1 — Write the Code: Program the robot directly and include a sample of the source code in your notebook. This option is best if your robot is already wired and ready to run.
- Req 4d2 — Map the Logic: Create a flowchart that shows the robot’s steps and decision points based on sensor inputs. This option is best if you want to prove the logic clearly, even before the final code is done.
How to choose
Choosing your programming option
Think about what evidence you can show most clearly- Current stage of your robot: If the hardware is ready to test, 4d1 may be the stronger fit. If the robot is still being finished, 4d2 can help you clarify the logic first.
- What you want to demonstrate: 4d1 shows real implementation. 4d2 shows clear planning and decision-making.
- Your comfort level: If you are comfortable with blocks or text code, 4d1 may feel natural. If you think visually, 4d2 may help you explain the same logic better.
- What you will gain: 4d1 builds programming confidence and debugging experience. 4d2 strengthens planning, sequencing, and systems thinking.
In both options, sensor feedback matters. Your robot should not just run a timed script with no input from the world. It should sense something and respond.
Req 4d1 — Write the Code
This option is about turning your design into behavior. Your code does not have to be huge. It does have to be understandable. When your counselor looks at it, they should be able to see how the program helps the robot sense, decide, and act.
Focus on the core loop
Most robot programs follow the same pattern:
- Read inputs from sensors or controls
- Decide what should happen next
- Command motors or mechanisms
- Repeat or move to the next step
If your code can do those jobs clearly, it is doing real robotics work.
What your program should show
A good merit badge program usually includes some combination of:
- starting conditions
- movement commands
- sensor checks
- if/then decisions
- stop conditions or safety limits
- comments or labels that explain key sections
For example, a simple robot might drive forward until a distance sensor sees an obstacle, then stop and raise an arm. Another robot might follow a line until a color sensor detects a finish marker.
VEXcode VR (website) A browser-based environment for practicing robot logic with sensors, movement, and block or text programming. Link: VEXcode VR (website) — https://www.vexrobotics.com/vexcode/vr?srsltid=AfmBOopvcCE5uFUVB__bxV0UiLP20ZZQwq0WrNHHJWuIQUDXmLAwl8UL%5CWhat to include in your notebook
Your notebook should contain a sample of the source code, not just a sentence saying you coded it. Include the part that best shows the robot’s logic. That might be:
- the whole short program, if it fits clearly on the page
- the main loop
- the function that reacts to sensor input
- an autonomous routine
You can also add brief notes such as:
- what each sensor does
- what counts as a trigger
- why you chose a threshold value
- what bug you had to fix
Code sample checklist
Before you show it to your counselor- Sensor input is visible somewhere in the code.
- Motor or mechanism output is visible somewhere in the code.
- The task from Req 4a is clearly connected to the logic.
- Variable names or comments make the sample readable.
- The sample matches what the real robot actually does.
In Req 4e, you will test and improve the robot. Save version notes now so you can later explain what changed and why.
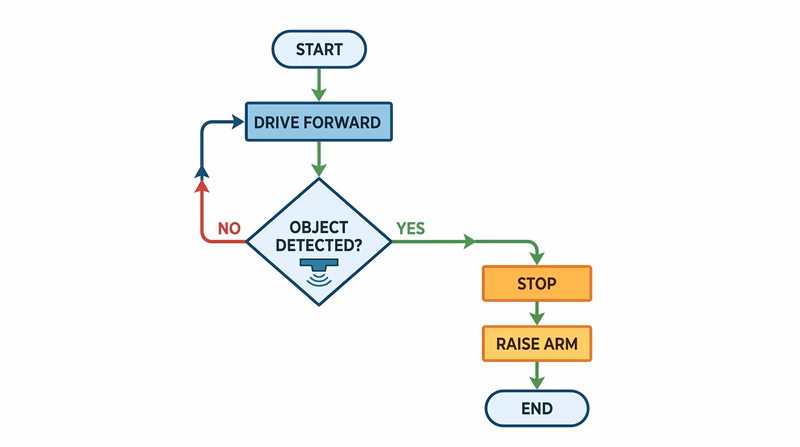
Req 4d2 — Map the Logic
A flowchart is a picture of your robot’s thinking. It helps you show the order of actions, the decision points, and what happens when the sensor sees one thing instead of another. This option is great because it proves you understand the logic even if you are not presenting full code.
What a strong robotics flowchart includes
A useful flowchart does more than show a straight line from start to finish. It should include:
- a start point
- one or more actions such as drive forward, lift arm, or stop motor
- one or more decision diamonds based on sensor input
- arrows showing what happens for yes/no or true/false results
- a clear end or repeat loop
For example, your chart might say:
- Start
- Drive forward
- Read distance sensor
- Obstacle detected?
- Yes → stop → raise arm → end
- No → keep driving → check again
That is real robotic logic because the next step depends on input from the world.
🎬 Video: General Guide to Creating Flowcharts (video) — https://youtu.be/SWRDqTx8d4k
🎬 Video: Flowchart Tutorial for Beginners (video) — https://youtu.be/c8asK8iCaRk
Use standard shapes clearly
You do not need advanced diagram software. Pencil and paper is fine if it is neat. What matters is that the symbols make sense.
- Oval: start or end
- Rectangle: an action or process
- Diamond: a decision
- Arrow: direction of flow
If you use those shapes consistently, your counselor can follow your robot’s plan quickly.
Flowchart quality check
Make sure your logic is easy to follow- The mission from Req 4a is obvious from the chart.
- Sensor inputs appear in decision points, not just in a note on the side.
- Every decision has a clear outcome path.
- The chart does not skip major actions.
- Someone else could use the chart to write code later.
Whether you chose code or a flowchart, the next step is the same: test the robot, record the results, and learn from what happened.
Req 4e — Test, Record, Improve
Testing is where engineering becomes honest. A design sketch can look perfect. A finished robot can still drift left, miss a target, stall under load, or misread a sensor. That is why good builders do not ask, “Did it work once?” They ask, “How well does it work, and what does the evidence show?”
Test on purpose
A good test has a clear goal. Decide what you want to measure before you start.
Examples:
- Does the robot stop within the target zone?
- Does the arm lift the object every time?
- Does the sensor react at the right distance?
- Does the robot complete the task in the expected order?
Run the same test more than once. One lucky success is not enough to prove the design is reliable.
What to record in your notebook
Your notes should show what happened, not just whether you liked it.
Record:
- date of the test
- test setup
- what the robot was supposed to do
- what it actually did
- any measurements, counts, or observations
- what you changed before the next run
You should also include pictures or sketches of the finished robot. Those visuals help your counselor see the final design and understand the system you built.
Useful test notes
Write down enough detail to learn from each run- Trial number and test condition
- Result: success, partial success, or failure
- Specific problem noticed
- Suspected cause
- Planned fix or next adjustment
Improvement ideas matter
The improvement section is not a penalty. It is proof that you are thinking like an engineer. Common improvements include:
- moving a sensor for better readings
- lowering the center of gravity for stability
- changing gear ratios for more torque or speed
- strengthening a weak frame section
- cleaning up wiring
- adjusting code thresholds or timing
In the next requirement, you will demonstrate the robot and share what you learned. The stronger your test notes are now, the easier that conversation will be.
Req 5 — Show and Explain Your Robot
This requirement is your chance to show that the project is real. Your counselor is not just looking for a robot that moves. They are looking for evidence that you understand what it was supposed to do, how well it did it, and what you learned from the design process.
This requirement covers two connected jobs:
- showing the robot in action
- explaining the engineering decisions behind it
Requirement 5a:
A good demonstration is simple and repeatable. Start by explaining the task from Req 4a in one sentence. Then run the robot through the main action you designed it to do.
Before you demonstrate, prepare the area so the run is easy to understand. Mark the start point, the target area, or the obstacle with tape or simple labels. If your robot uses a sensor, point out what it is reading and what behavior that input is supposed to trigger.
What makes a strong demonstration?
- the goal is clear before the run starts
- the audience can see the important parts of the robot
- the robot shows the sensor-driven behavior, not just random motion
- you can explain what happened afterward
Requirement 5b:
Your notebook tells the story of the project. It should show the mission, design sketches, build notes, code or flowchart, tests, and improvement ideas. When you share it, do not just hand it over. Walk your counselor through the highlights.
How well did the robot accomplish the task?
Be honest and specific. “It worked” is not enough. Explain what it did reliably, what failed sometimes, and what evidence you collected during testing. If the robot only completed part of the mission, say that clearly and explain why.
What would you improve next time?
This is where real engineering thinking shows. Maybe the sensor needed better placement. Maybe the robot was top-heavy. Maybe the code needed a cleaner state change. Maybe the mechanism had too much friction. Improvement ideas matter because no first version is perfect.
What did you learn about the design process?
The design process is usually less like a straight line and more like a loop:
- define the problem
- imagine solutions
- plan and sketch
- build
- test
- improve
That last step sends you back around again. If you learned that simple designs are easier to debug, or that testing early saves time, or that your first mission was too ambitious, those are strong lessons to share.
Demo day checklist
Bring these talking points to your counselor- The mission you chose in Req 4a
- The main sensor and what it does
- The robot’s two degrees of freedom
- One test result that proved success
- One problem you had to solve
- One improvement you would make in version two
By demonstrating and reflecting, you are doing something every real robotics team does after a build season: show the machine, review the results, and think about what comes next.
Req 6 — Choose a Competition Path
You must choose exactly one option from this requirement.
Your options
- Req 6a — Attend and Observe: Go to a real robotics competition and report what you saw about the event, the robots, and the way teams are organized.
- Req 6b — Compare Youth Leagues: Research three youth robotics competitions and compare how they work, how much time they take, and who participates.
How to choose
Choosing your competition option
Think about access, time, and what you want to learn- Time available: Req 6a depends on event schedules. Req 6b can be done from home or a library on your own timeline.
- Access to events: If a local tournament is nearby, 6a gives you a vivid first-hand view. If not, 6b is more practical.
- What you will gain: 6a helps you understand team culture, pit setup, and event energy. 6b helps you compare programs and find one that fits your interests.
- Best fit for you: Choose 6a if you learn best by seeing things in person. Choose 6b if you enjoy research and side-by-side comparison.
🎬 Video: About FIRST Robotics Competition (2021) (video) — https://youtu.be/Jd29kzjclV0
🎬 Video: About VEX Robotics (video) — https://youtu.be/Mi6E37oU8yc
Once you know the two paths, start with the event-observation option first.
Req 6a — Attend and Observe
A robotics competition is one of the fastest ways to understand how real engineering teams work under pressure. You see more than machines. You see planning, teamwork, deadlines, repairs, scouting, strategy, judging, and communication all happening at once.
What to watch for
When you attend, pay attention to more than the matches. The pit area often teaches as much as the field.
Look for:
- how teams divide jobs
- who handles repairs and tools
- how drivers, programmers, and builders communicate
- how teams transport batteries, parts, and notebooks
- how judges or volunteers interact with teams
- how strategy changes during matches
You are trying to understand both the robots and the organization behind them.
Team roles you may notice
Many teams split responsibilities into roles such as:
- driver or operator
- programmer
- builder or mechanical lead
- electrical lead
- scouting or strategy member
- team captain or student leader
Not every team uses those exact titles, but most successful teams make sure important work is clearly assigned.
Competition observation notes
Use these prompts while you watch- What kind of game or challenge are teams trying to complete?
- How are teams grouped, ranked, or matched?
- What does the pit area look like and how is it organized?
- What jobs do different team members seem to handle?
- What impressed you most about the robots or the teamwork?
A live event often makes Req 5 feel even more real, because you can compare your own project to the teamwork and systems used in larger programs.
Req 6b — Compare Youth Leagues
This option helps you compare the youth robotics world from a bigger view. Different leagues are built for different ages, budgets, build styles, and time commitments. Learning those differences can help you find a competition program that fits your goals.
Three strong leagues to compare
FIRST Robotics Competition (FRC)
FRC is the large-scale high school program in the FIRST family. Teams build larger robots for a game that changes every season. The time commitment can be heavy during build season, and teams often meet several times a week. FRC teams can be large, with students specializing in mechanical design, programming, electrical work, media, outreach, and scouting.
VEX Robotics Competition (V5RC)
VEX teams usually build smaller robots than FRC teams, but the competition is still serious and strategic. Seasons often run through local qualifiers and larger championship events. Team size can vary from a few students to a full club, and the time commitment is often moderate to high depending on how competitive the team is.
FIRST Tech Challenge (FTC)
FTC is another FIRST program, generally for middle school and high school students. The robots are smaller than FRC robots, and teams often have a good balance between design challenge and manageable scale. FTC can be a strong fit for students who want serious robotics without the size and budget of FRC.
A comparison chart
| Competition | Type of competition | Typical age group | Time commitment | Team size / scale |
|---|---|---|---|---|
| FIRST Robotics Competition | Large field game with custom-built robots | High school | High during season | Often large teams |
| VEX Robotics Competition | Repeated match play with compact robots | Elementary through high school divisions | Moderate to high | Small to medium teams |
| FIRST Tech Challenge | Medium-scale field competition with smaller robots | Middle school and high school | Moderate to high | Small to medium teams |
What each one teaches
- FRC teaches large-team coordination, advanced fabrication, and project management.
- VEX teaches iterative design, match strategy, and efficient building within a compact system.
- FTC teaches strong all-around robotics skills with a balance of hardware and code.
By this point, you have explored how robotics can grow from a merit badge project into clubs, teams, and bigger challenges. The last choice in the badge asks you to think about your own future.
Req 7 — Choose Your Future Path
You must choose exactly one option from this requirement.
Your options
- Req 7a — Explore Robotics Careers: Research three jobs that use robotics skills, then dig deeply into one career path.
- Req 7b — Build a Robotics Hobby: Explore how robotics skills could support a personal hobby and what it would take to grow that interest.
How to choose
Choosing your future path option
Pick the one that gives you the most honest look ahead- Choose 7a if you want to know what training, pay, and advancement look like in a real robotics-related career.
- Choose 7b if you want to connect robotics to something you already love doing for fun.
- What you will gain: 7a helps you think long-term about work and education. 7b helps you imagine how robotics can stay part of your life even outside a job.
- Best starting point: If you are career-curious, go with 7a. If you are still discovering your interests, 7b may feel more personal.
Start with the career option first, then compare it with the hobby option.
Req 7a — Explore Robotics Careers
Robotics is not one job. It is a cluster of careers that mix mechanical design, software, electrical systems, testing, manufacturing, research, and field support. That means this requirement is really about finding where your interests fit inside a larger world.
Three careers to consider
Robotics technician
A robotics technician helps build, install, maintain, and troubleshoot robotic systems. This role is often hands-on and practical. Technicians may work in factories, labs, hospitals, or field service settings.
Robotics engineer
A robotics engineer usually focuses more on design and system integration. That can include mechanical systems, control logic, sensor integration, or full product development. Many engineers work with teams rather than alone, because robotics combines multiple specialties.
Automation or controls specialist
This career focuses on systems that use sensors, controllers, and programmed logic to run machines. It overlaps heavily with robotics, especially in manufacturing and industrial settings.
🎬 Video: Learn About the Careers of Robotics Technicians (video) — https://youtu.be/0dwkGhRPQW4
🎬 Video: Careers in Robotics (video) — https://youtu.be/5YTYFrrSdV4?list=PLHGEvyG5wuthXQZzTc-mLwFrP5F6_1Lce
What to research about one career
Once you pick one career, dig into these questions:
- What education is typical: certificate, associate degree, bachelor’s degree, or more?
- Are certifications helpful or required?
- What beginner experience helps someone get started?
- What does the cost of training look like?
- What is the demand for this kind of job?
- What are starting pay and advancement paths like?
You do not need exact numbers memorized forever. You do need a clear picture of what the path looks like.
Career research notes
Bring these points to your counselor discussion- Three robotics-related careers you identified
- Which one you researched most deeply
- Education or training needed
- Likely costs and time investment
- Job outlook and possible advancement
- Whether the career sounds interesting to you and why
Whether or not you choose robotics as a career, the same skills can still power hobbies, side projects, and creative work.
Req 7b — Build a Robotics Hobby
Robotics does not have to become your job to become part of your life. The same skills you used in this badge — designing, wiring, coding, testing, and improving — fit naturally into many hobbies. That makes robotics one of the most flexible skills a Scout can learn.
Hobbies that connect well with robotics
Maker projects
If you enjoy building things, robotics can turn ordinary maker projects into interactive ones. A simple model can become a moving display. A garden project can become automated with sensors and watering controls. A room light can react to motion or sound.
Drones and aerial photography
If you like photography, mapping, or aviation, robotics skills help you understand controllers, sensors, flight logic, and maintenance. This hobby often needs extra safety knowledge and, in some cases, rule awareness about where and how you fly.
Smart home and home automation
Home automation uses many robotics-style skills: sensors, control logic, data, and programmed responses. You might build automatic lighting, environmental monitors, or door alerts.
Craft and art technology
Robotics skills can support creative hobbies too. Motorized quilting systems, kinetic sculptures, animated props, and interactive art all combine engineering with creativity.
🎬 Video: How to Make Anything - Learn to Think Like an Engineer (video) — https://www.youtube.com/watch?v=IIwTCyu2wS4
🎬 Video: Why Try Computer Quilting ? (video) — https://youtu.be/Z_ftO9LanyI?si=p7e9HkOE8mGD2RpS
🎬 Video: How I Built a Difference | My Engineering Journey (video) — https://youtu.be/PCQHSzoPoO8
🎬 Video: Tertill Weeding Robot Overview Video (video) — https://youtu.be/wAMXnxXa3UU?si=U8BNl3na8OfxNTWd
What to research for your chosen hobby
Pick one hobby path and study what it would really take to get started.
Research:
- what beginner skills you already have
- what new training you would need
- what the starter costs are
- what clubs, leagues, maker spaces, or online communities could help
- what short-term goal you could try first
- what long-term goal would keep the hobby interesting
For example, if you are interested in robot gardening, a short-term goal might be building a moisture-sensing plant monitor. A long-term goal might be building a small automated weeding or watering system.
Hobby planning notes
Turn the idea into something real- Hobby I chose
- Robotics skills that connect to it
- New training or practice needed
- Estimated starting cost
- Organization, club, or community that could help
- One short-term goal and one long-term goal
You have now reached the end of the requirement pages. The next section looks beyond the badge and shows where robotics can lead next.
Extended Learning
Congratulations
You built your way through one of Scouting’s most hands-on STEM badges. That matters. Robotics asks you to combine ideas from mechanics, electronics, programming, testing, and teamwork — and you do not really learn those by reading alone. You learn them by trying, adjusting, and trying again.
The best part is that robotics keeps opening doors. A simple line-following robot can lead to competition teams, maker projects, coding skills, engineering classes, and creative hobbies you have not even discovered yet.
Designing for reliability
A robot that works once is exciting. A robot that works the same way over and over is engineering. Reliability comes from repeatable structure, solid wiring, realistic testing, and systems that can handle small changes in the environment.
As you keep learning, pay attention to questions like these:
- What makes the robot behave consistently?
- What failures happen only sometimes?
- Which parts are doing too many jobs at once?
- How could a simpler design be stronger?
These are the same questions used by serious teams and companies building machines for real work.
Smarter sensors, smarter behavior
Many beginner robots use one sensor and one response. More advanced robots combine several sensor sources at once. A robot might use encoders to measure distance, a gyro to hold heading, and a camera to identify targets. The challenge is no longer just reading data. It is deciding which information matters most and when.
If this topic interests you, look up ideas like sensor fusion, feedback control, and state machines. You do not need to master them yet to start noticing how they shape smarter machines.
Human-centered robotics
The most impressive robot is not always the most powerful one. Sometimes the best robot is the one that makes a person’s job easier, safer, or less tiring. That is why human-centered design matters in robotics.
Ask questions like:
- Is the robot easy to understand?
- Can a beginner operate it safely?
- Does it solve a real problem for a real person?
- Is maintenance simple enough to be practical?
Thinking this way makes your future projects more useful, not just more complicated.
Real-World Experiences
Experiences worth trying
Each one helps you keep learning after the badge- Visit a local robotics competition: Watch how teams organize tools, scouting, repairs, and match strategy under pressure.
- Tour a maker space or STEM lab: Many communities have shared workshops where you can see 3D printers, electronics benches, and robot projects in progress.
- Try a home automation mini-project: Build a simple sensor-triggered system like a room monitor, plant alert, or automatic light.
- Follow a season of a youth robotics league: Notice how teams improve from kickoff through the final event.