Rowing Merit Badge — Complete Digital Resource Guide
https://merit-badge.university/merit-badges/rowing/guide/
Introduction & Overview
A shell gliding across flat water looks effortless, but rowing is a skill sport built on timing, balance, teamwork, and judgment. The Rowing merit badge teaches you how to move a boat with purpose, stay safe when conditions change, and understand why rowers care so much about rhythm and technique.
Some Scouts come to rowing because they like being on the water. Others come for fitness, racing, or the simple challenge of making a boat go exactly where they want. This badge gives you all three: practical boat-handling skills, rescue habits, and a look at how rowing works as recreation, transportation, and competition.
Then and Now
Then
People have rowed for thousands of years. Long before engines, oars moved fishing boats, ferries, patrol craft, cargo boats, and warships. In many places, rowing was simply how people traveled from one shore to another.
By the 1800s, rowing had also become a sport. Universities, river clubs, and military academies organized races that rewarded teamwork and technique as much as strength. Boatbuilders started shaping lighter hulls, better oars, and sliding seats that let rowers use their legs more effectively.
Now
Today, rowing still does double duty. Recreational rowers use fixed-seat boats on ponds, rivers, and camps. Competitive crews row sliding-seat shells built for speed, precision, and race strategy. Coaches use video, heart-rate data, and indoor rowing machines, but the basic challenge is still the same: catch the water cleanly, move the boat efficiently, and make smart decisions when wind, waves, or fatigue try to throw you off.
Modern rowing also reaches more people than ever. Clubs, camps, schools, and adaptive rowing programs make it possible for beginners to learn the sport in many settings, from quiet lakes to organized regattas.
Get Ready!
You are about to learn a badge that asks you to think and act at the same time. You will study hazards, practice rescues, handle boats at docks and piers, and learn enough technique to explain why good rowing looks smooth instead of frantic. Bring patience, because rowing rewards steady improvement more than shortcuts.
Kinds of Rowing
Recreational Rowing
Recreational rowing focuses on enjoyment, fitness, and practical boat handling. You may row a fixed-seat boat from a dock, a camp waterfront, or a shoreline launch. The pace is usually slower than racing, but the skill matters just as much. Launching, landing, backing, turning, and helping a passenger all live here.
Competitive Rowing
Competitive rowing is about speed, consistency, and crew timing. Boats are lighter, seats slide, and every stroke is shaped to keep the shell running efficiently. A race crew spends hours practicing starts, power application, and timing so the whole boat feels like one machine.
Sculling and Sweep Rowing
In one meaning of sculling, a rower uses two oars, one in each hand. In sweep rowing, each rower handles one oar on one side of the boat. The badge also uses the word sculling in the fixed-seat sense of propelling a boat with a single oar over the stern or side. You will sort out those two meanings later in the guide.
Fixed-Seat and Sliding-Seat Rowing
A fixed-seat boat keeps your seat in place, so you generate power mostly with your back, arms, and body swing. A sliding-seat boat lets you compress at the catch and drive with your legs, which is one reason racing shells can move so fast.
Next Steps
This badge starts where all safe boating should start: understanding hazards, common injuries, and the Safety Afloat habits that protect every trip. Once you build that foundation, the rest of the badge makes much more sense.
Req 1 — Hazards, Injuries & Safety Afloat
This requirement covers three parts of safe rowing:
- The hazards that can turn a simple outing into a problem
- The injuries and illnesses rowers need to catch early
- The Safety Afloat habits that organize a safe trip before the boat launches
A rowing boat moves quietly, which can make risk easy to miss. Wind builds one gust at a time. Sunburn happens one forgotten layer at a time. Trouble usually starts small, so the best rowers learn to notice small things early.
Requirement 1a
A rower is low on the water, often far enough from shore that a fast exit is not possible. That means you should think about hazards in layers: the sky above you, the water under you, and the boat around you.
Weather Hazards
Wind is one of the biggest rowing hazards because it affects both control and energy. A light breeze can become a hard headwind on the way back. Crosswinds can push a shell sideways. Strong gusts can make docking much harder than launching.
Thunderstorms are even more serious. Lightning and open water do not mix. Rain can also reduce visibility, chill a crew, and make it harder to spot traffic or shoreline landmarks.
Sun and heat matter too. Rowers often face reflected sunlight from the water while working hard for long periods. That combination can lead to dehydration, heat exhaustion, and sunburn before you notice how far it has gone.
Water and Environment Hazards
Cold water is dangerous even on a mild day. If you capsize, the first danger may be the shock of immersion, not distance from shore. Waves, wakes, current, shallow hazards, submerged branches, and slippery docks all deserve attention. On shared waterways, you also need to watch for motorboats, anglers, swimmers, and paddlecraft.
Anticipate, Prevent, Mitigate, Respond
To anticipate hazards, check the forecast, inspect the launch area, and look at the whole route instead of just the first few yards. To prevent problems, wear your life jacket, launch in conditions that match the group’s skill, and stay alert to changes. To mitigate risk, carry the right gear, stay together, and know your bailout options. To respond, get off the water early when conditions worsen and ask for trained help when the problem is beyond your skill.
Hazard Scan Before Rowing
Questions smart rowers answer before launch- What is the weather doing now and later? Wind, storms, temperature, and lightning all matter.
- What is the water like? Check for current, wakes, cold temperature, weeds, and hidden obstacles.
- Who else is using the area? Motorboats, paddlers, and swimmers affect your route.
- What is the return plan? Do not plan a route that is easy going out but dangerous coming back.
- Where can you land fast? Know the nearest safe shore, dock, or sheltered area.
Requirement 1b
Rowing injuries often start as small warnings. A hot spot becomes a blister. Fatigue becomes sloppy posture. A dry mouth becomes poor judgment. This requirement is really about catching trouble while it is still fixable.
Prevention
Blisters are often caused by repeated friction on the oar handle. Good grip habits, early treatment of hot spots, and properly fitted hands or gloves where appropriate can help. Hypothermia starts with poor clothing choices and underestimating water temperature. Heat illness, dehydration, and sunburn often show up together when a rower works hard in open sun without enough water or protection. Sprains and strains are more likely when carrying boats badly, rushing dock moves, or forcing technique with tired muscles.
Symptoms
Learn the warning signs your counselor will expect you to recognize:
- Blisters: hot spots, rubbing, tenderness, raised skin
- Hypothermia: shivering, clumsiness, poor speech, confusion
- Heat illness: headache, dizziness, nausea, heavy sweating, weakness
- Dehydration: thirst, dark urine, dry mouth, low energy, poor focus
- Sunburn: red or painful skin that may blister later
- Sprains and strains: swelling, pain, weakness, or reduced range of motion
First Aid
Basic first aid follows the same pattern as good rowing judgment: notice the problem early and stop it from getting worse. Protect blisters before they open. Get a cold rower dry, sheltered, and warmed. Move a heat-exhausted rower to shade, cool them, and rehydrate. Rest and protect sprains and strains instead of trying to “row through it.”
American Red Cross — First Aid Steps Trusted first-aid guidance for many of the injuries and illnesses rowers may face. Link: American Red Cross — First Aid Steps — https://www.redcross.org/get-help/how-to-prepare-for-emergencies/types-of-emergencies/first-aid.htmlRequirement 1c
Safety Afloat is the framework behind every safe Scout boating activity. In rowing, it turns vague ideas like “be careful” into real choices about supervision, swimming ability, planning, equipment, and discipline.
How Safety Afloat applies to rowing
- Qualified supervision: A trained adult leader oversees the activity and matches the outing to the group’s skill.
- Personal health review: Leaders know who has asthma, injuries, heat concerns, or other conditions that matter on the water.
- Swimming ability: Scouts complete the swimmer test before advanced on-the-water work.
- Life jackets: Properly fitted life jackets are worn whenever required for the activity.
- Buddy system: No one rows unnoticed or gets separated without someone knowing.
- Skill proficiency: Beginners learn basics in controlled settings before harder water or more complex drills.
- Planning: Route, weather, float plan, and emergency response are thought through ahead of time.
- Equipment: Boats, oars, lines, and safety gear are checked before launch.
- Discipline: When the leader says stop or land, everyone responds immediately.
What your counselor wants to hear
Your explanation should connect each part of the policy to a real rowing decision. For example, planning means checking wind and lightning before launch. Equipment means inspecting the shell, oars, and life jackets before they fail. Discipline means no horseplay on docks or in unstable boats.
Explain Safety Afloat Like a Rower
Turn the policy into practical examples- Name the point. Say which part of the policy you mean.
- Connect it to rowing. Show how it changes what the group actually does.
- Give an example. Weather checks, swimmer tests, life jackets, and launch discipline are strong examples.
- Show the big picture. The points work together. Planning supports equipment, supervision, and discipline.
You now have the safety foundation for the whole badge. Next comes the swimmer test that proves you are ready for the badge’s hands-on rowing work.
Req 2 — Swimmer Test Readiness
A rower plans not to go in the water, but smart rowers prepare as if they might. That is why this requirement comes before your on-the-water skills. If a boat swamps, a launch goes wrong, or you have to help someone else, your swimming ability becomes part of the rescue.
Passing the swimmer test proves more than speed. It shows you can stay calm, move efficiently, and finish with control after real effort. Those are exactly the traits you want in a Scout handling a boat offshore from the dock.
Why This Comes First
Requirements 4 through 7 ask you to launch, maneuver, recover from a swamped boat, and tow a swimmer. None of that should happen until everyone involved has honest water skills. Rowing safety depends on the idea that preparation happens before the drill, not during it.
In Req 1, you saw how Safety Afloat starts with qualified supervision, swimming ability, planning, and discipline. This requirement is where those ideas become personal. You are showing that you belong in the water environment, not just the boat.
How to Prepare for the Swimmer Test
A calm, steady approach works best- Know the sequence: Ask your counselor or aquatics staff to review the exact test steps before you begin.
- Pace yourself early: The test is not won in the first few strokes. Start smooth and stay relaxed.
- Use efficient form: Long, controlled strokes waste less energy than frantic splashing.
- Control your breathing: Exhale in the water and settle your breathing before fatigue builds.
- Finish strong: The last part still counts. Save enough energy to complete the whole test cleanly.
Skills That Carry Over to Rowing
Strong swimmers often make safer rowers because they panic less around deep water. They also understand how tiring water can be. That matters when you are talking through a swamped-boat drill or towing a swimmer in Req 7.
The swimmer test also teaches an important mental habit: honesty. If you are tired, rusty, or nervous in the water, say so. Good rowers do not hide weakness. They train it.
Scouting America — Safety Afloat See how swimming ability fits into Scouting's broader water-safety policy for boating activities. Link: Scouting America — Safety Afloat — https://www.scouting.org/health-and-safety/safety-afloat/Once your swim readiness is confirmed, the next layer of protection is the piece of gear you should always wear on the water: a correctly chosen and correctly fitted life jacket.
Req 3 — Life Jacket Choice and Fit
A rowboat can feel stable right up until it is not. A shift in balance, a bad landing, cold water, or a surprise wake can put you in the water faster than you can think about reaching for gear. That is why rowers wear a life jacket instead of stowing one nearby.
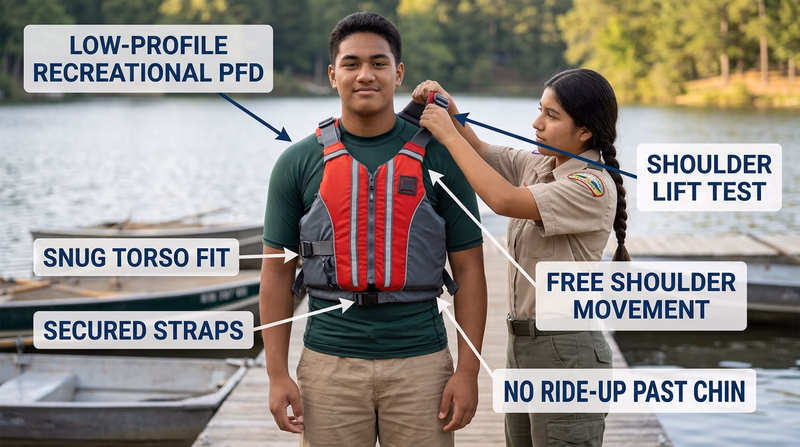
For rowing, the best life jacket is usually one that lets you move your shoulders freely while still fitting snugly enough to stay in place in the water. Comfort matters, because uncomfortable gear gets loosened, unbuckled, or worn wrong.
What to Look For
A rowing life jacket should have these traits:
- U.S. Coast Guard approval so you know it meets real flotation standards.
- Good shoulder and arm mobility because rowing uses long, repeated strokes.
- A snug fit that does not ride up toward your chin.
- Secure closures such as zippers, buckles, and adjustment straps.
- The right size for your body based on the label.
Type III flotation aids and paddlesport-style Type V life jackets are often the most practical choices for rowing because they balance buoyancy and freedom of movement.
How to Select the Right One
Start with the label. Youth life jackets are sized by weight range. Adult life jackets are usually sized by chest measurement. If you are between sizes, try both and choose the one that stays snug without making it hard to breathe.
Then think about the activity. A bulky offshore jacket may float well but make rowing awkward. A slim paddlesport vest may be much easier to row in while still giving the flotation you need.
How to Fit It
- Loosen the straps before putting the life jacket on.
- Zip and buckle every closure.
- Tighten from the bottom up until the fit is snug.
- Raise your arms and mimic rowing strokes to check freedom of movement.
- Do the lift test: have a buddy pull up at the shoulders. If the jacket rides up past your chin or ears, it is too loose.
A properly fitted life jacket should feel secure, allow deep breathing, and stay put when lifted.
Quick Fit Check
Use this before every launch- Correct size: Read the inside label instead of guessing.
- All closures fastened: Every buckle and zipper matters.
- Straps snug: Tight enough to stay put, not so tight that breathing is restricted.
- Lift test passed: The jacket does not slide up toward your face.
- Full rowing motion: You can reach, recover, and swing without binding.
Why Rowers Must Always Wear It
Rowers spend time around docks, shells, launches, and cold water. A capsize may happen close to shore, but that does not make it harmless. Cold shock, injury, tangled gear, and simple surprise can all steal time. A life jacket buys that time back.
It also helps rescuers help you. In a swamped-boat drill or a real emergency, flotation keeps your head higher, reduces panic, and lets you focus on the next step instead of fighting to stay above water.
US Coast Guard — Choosing the Right Life Jacket Official guidance on life jacket types, sizing, and fit for recreational boaters. Link: US Coast Guard — Choosing the Right Life Jacket — https://www.uscgboating.org/recreational-boaters/life-jacket-wear-types.phpNow that you know how to protect yourself, it is time to choose which rowing path you want to complete first: practical boat-handling skills or the team-racing option.
Req 4 — Choose Your Rowing Path
You must choose exactly one path for this requirement. One path focuses on practical boat handling in a rowboat. The other focuses on joining a real competitive crew and racing as part of a team.
Your Options
- Req 4a — Boat Handling Skills: Launch, row straight, pivot, backwater, land, and tie the knots that keep your craft secure. This path builds all-around handling skills that make you more confident in a boat.
- Req 4b — Race Day as a Teammate: Train with a team for at least 10 hours and compete in a meet against other organizations. This path shows you how rowing works as a disciplined team sport.
How to Choose
Choosing Your Option
Compare the two experiences before you decide- Time required: Req 4a can usually be practiced in shorter skill sessions. Req 4b requires repeated team practices plus a meet day.
- Equipment and setting: Req 4a works well at a camp, waterfront, or club with rowboats. Req 4b usually requires access to a school or club racing program.
- Skill focus: Req 4a builds independent control, docking, backing, and knots. Req 4b builds crew timing, discipline, and race experience.
- What you gain: Req 4a makes you a stronger all-around small-boat operator. Req 4b teaches how individual effort fits into a team shell moving as one unit.
If you are new to rowing or want broad practical skill, Req 4a is usually the better fit. If you already have access to a crew program and want to experience racing culture, Req 4b may be the better choice.
The first option page covers the hands-on boat-handling route. Even if you choose the race path instead, it is worth understanding what those rowboat skills involve.
Req 4a — Boat Handling Skills
This option is a complete small-boat handling workout. You are not just rowing for distance. You are launching cleanly, controlling direction, backing, turning, landing safely, and finishing with the knots that secure the craft.
Treat the whole requirement as one connected skill set. A smart launch leads to cleaner tracking. Clean tracking makes your pivot easier. Good control on the return sets up a safer landing.
Requirement 4a1
Prepare before launch
Launching begins before the hull touches open water. Check your oars, seat, foot position if present, life jacket, and the space around the dock or shore. Make sure the boat is pointed the right way and the path ahead is clear.
Launch with balance
Step or settle in smoothly, keeping your weight centered. Sudden side-to-side movement is a common reason beginners feel unstable at the dock. If you have a passenger, explain who moves first and when.
Push off with control
A good launch is quiet and deliberate. Push away enough to clear the dock, then organize your first strokes before you start trying to build speed.
Requirement 4a2
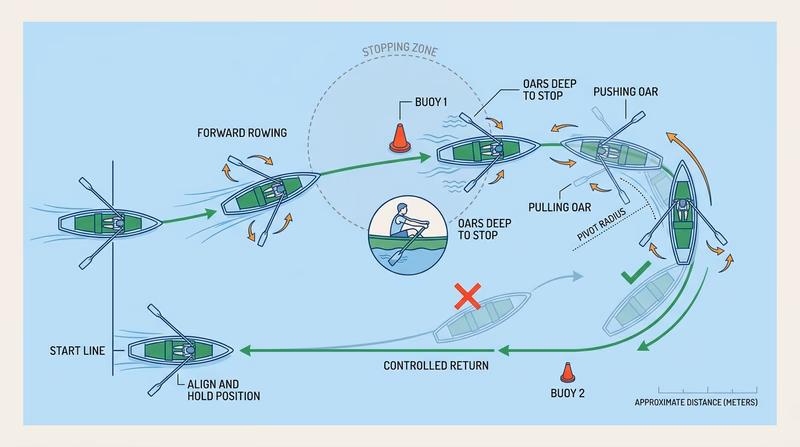
Row in a straight line
Straight tracking comes from even pressure, matched catches, and noticing drift early. Many beginners wait too long to correct, then overcorrect. Think of steering as a series of small adjustments, not one giant fix.
Pick a landmark ahead of you instead of staring at the bow. That makes it easier to notice whether the boat is wandering.
Stop with intention
Stopping is a skill, not an accident. Reduce power and use controlled strokes so the boat settles without wobbling or drifting into something you did not plan for.
Pivot and return
A pivot turns the boat around efficiently. Use a combination of stroke length, pressure difference, and backing as needed to swing the bow. Then re-establish straight tracking on the way back instead of rushing the first few strokes.
What Makes Straight Rowing Work
Simple habits that improve control- Eyes on a landmark ahead, not just the boat.
- Even pressure on both oars whenever possible.
- Small corrections made early.
- A calm stop before the pivot.
- A deliberate first stroke after the turn.
Requirement 4a3
Backwater in control
Backwatering means moving the boat backward by reversing the action on the oars. It is useful near docks, in tight spaces, and whenever you need to change position without spinning first. The challenge is that steering can feel reversed at first.
Make a turn underway
Turning while the boat is already moving teaches real control. Instead of stopping everything and starting over, you learn to guide the boat as it keeps momentum. That is valuable around traffic, docks, and narrow shorelines.
A good underway turn is smooth. The boat should feel guided, not yanked around.
Requirement 4a4
Approach the landing under control
Do not charge at the dock or shore and hope to stop in time. Reduce speed early. Account for wind and current. Aim for a landing you can step out of safely, not one that looks fast.
Secure the boat correctly
Once landed, the job is not over. A boat left half-secured can drift, bang into pilings, or damage another craft. Mooring means tying it safely in place. Racking means storing it correctly where it belongs.
Requirement 4a5
Know what each knot does
These knots are not random rope tricks. They solve common dockside problems.
- Clove hitch: fast way to secure a line around a post, though it may need backup depending on the load.
- Roundturn with two half-hitches: strong choice when a line may stay under steady tension.
- Bowline: makes a fixed loop that is easy to untie after load.
- Wellman’s knot: useful in rowing traditions for securing boats quickly at a dock.
- Mooring hitch: designed for temporary attachment that can still be released efficiently.
Practice for real use
Your counselor is not only looking for names. They want to see that you can tie the knots neatly enough to trust them around a boat.
By the end of this option, you should look like someone who belongs around a rowboat from launch to storage. Even if you choose the team-racing option instead, these handling habits make you more useful on any waterfront.
Req 4b — Race Day as a Teammate
A rowing race may only last a few minutes, but the real work happens in practice. This requirement is about showing that you can be part of a crew: arrive prepared, listen to coaching, row in time with others, and contribute to a team performance under pressure.
What the 10 Practice Hours Are Really For
Those hours are not just a rule to satisfy. They give you time to learn commands, seat responsibilities, starts, recovery rhythm, and how the boat feels when timing is right. A crew boat gets faster when every rower helps the shell run between strokes instead of fighting it.
By the end of your practice hours, you should understand the basic rhythm of a workout, how coaches give feedback, and what changes when the boat rows well. Even if you are not the strongest athlete in the boat, you can still help by being steady, coachable, and consistent.
How to Be a Good Team Member
Show up ready
Come early enough to carry boats, warm up, and listen. Racing programs run on timing. A late rower slows down everyone else.
Row the team plan
In a race shell, doing your own thing is not a strength. Your job is to match blade work, timing, and intensity to the crew’s plan. Smooth connection matters more than dramatic effort.
Learn the language
Teams use short commands because they need fast response. You may hear terms about rating, length, catches, finishes, pressure, and set. Ask questions in practice so race day is not your first time hearing them.
What to Learn Before the Meet
Ten practice hours should build these habits- Boat handling on and off the dock so the shell and crew stay safe.
- Basic commands from the coach or coxswain.
- Seat awareness so you know your role in the lineup.
- Starts and steady-state rowing because races feel different from drills.
- Recovery habits so you can stay composed when a piece gets hard.
What Happens at a Meet
A competitive meet usually includes rigging and launching, warm-up rows, lineup instructions, marshaling, the race itself, then cooldown and boat care. The boats may be from schools, clubs, or other organizations, which is why this requirement specifies different sponsors.
Your job is not just to row the race. It is to behave like a teammate all day: help move equipment, stay focused, follow directions, and take care of the boat after the event.
What You Gain From This Option
Competitive rowing teaches a kind of discipline that solo skill work cannot. You learn how much speed depends on timing, trust, and repeated practice. You also learn that teamwork in rowing is visible. If one rower is out of sync, everyone feels it immediately.
That lesson carries beyond the water. A fast crew is not just strong. It is coordinated, honest, and willing to practice details until they stop being details.
USRowing The national governing body for rowing in the United States, with pathways into clubs, events, and athlete development. Link: USRowing — https://www.usrowing.org/After race-day teamwork, the guide moves back to another choose-one requirement focused on dockside handling skills in fixed-seat or sliding-seat boats.
Req 5 — Choose Your Dockside Skill
You must choose exactly one option here. Both options are about control next to a pier, where many rowing mistakes happen because the boat is close to hard surfaces, changing balance, and other people.
Your Options
- Req 5a — Passenger Handling & Sculling: In a fixed-seat rowboat, bring the boat alongside a pier, help a passenger in and out, change positions, and demonstrate sculling over the stern or side. This option builds balance, communication, and low-speed boat control.
- Req 5b — Sliding-Seat Dock Exchange: In a sliding-seat rowboat, come alongside a pier and exchange positions with your buddy safely. This option focuses on careful movement in a lighter, more sensitive craft.
How to Choose
Choosing Your Option
Think about the boat, the setting, and the skills you want to show- Boat type available: Req 5a needs a fixed-seat rowboat. Req 5b needs a sliding-seat rowboat.
- Balance challenge: Req 5a adds passenger communication and sculling technique. Req 5b adds the precision of moving around a more delicate shell at the pier.
- What you gain: Req 5a teaches practical passenger handling and one of rowing’s older propulsion skills. Req 5b teaches careful dock work in a racing-style setup.
- Best fit: Choose the option you can practice well with qualified supervision and the correct boat.
The first option page shows the fixed-seat path in detail, including the special meaning of sculling used in this badge.
Req 5a — Passenger Handling & Sculling
This requirement tests quiet control in the place where many boats feel least comfortable: right next to a pier with another person moving around. You are showing that you can manage balance, communicate clearly, and keep the boat calm while people get in, switch places, and get out.
Come Alongside the Pier
The key is to approach slowly and under control. Angle matters. Speed matters. Wind matters. If you come in too hot, the boat bangs the pier. If you approach badly in crosswind, the boat may slide away just as your passenger tries to board.
Set up your final strokes early. You want the boat already calm by the time the passenger moves.
Help a Passenger In and Out Safely
A passenger may not understand how sensitive the boat feels. Your job is to explain simple steps before they move.
- Tell them where to put hands and feet.
- Ask them to stay low and move one action at a time.
- Keep the boat close enough to the pier for a controlled step, not a jump.
The same is true when helping them out. A rushed exit can destabilize the whole boat at the exact moment the hull is closest to hard surfaces.
Change Positions Without Losing Control
Switching positions in the boat tests balance and communication. Plan the move before anyone stands or shifts. Decide who moves first, what handholds they will use, and how the other person will counterbalance.
Smooth position changes feel almost choreographed. That is the goal.
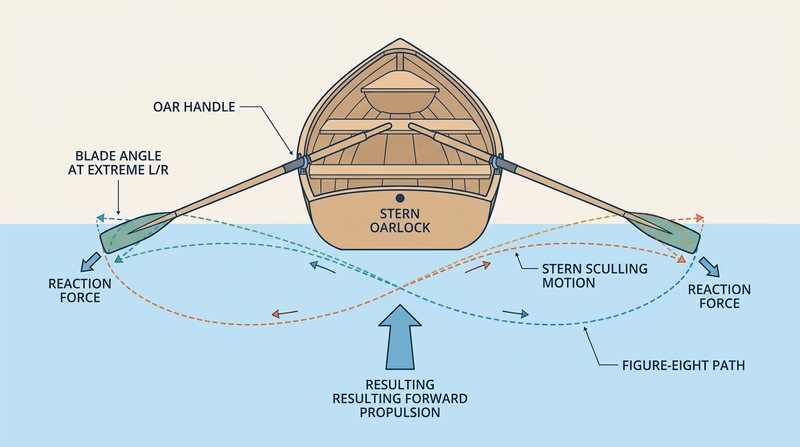
Sculling Over the Stern or Side
Here, sculling does not mean using two small oars in a racing shell. It means moving the boat with one oar worked in a controlled figure-eight style over the stern or alongside the hull. It is an older, useful technique for moving quietly in tight spaces.
Sculling works because the blade changes angle through the water and keeps producing useful pressure on each part of the motion. It takes touch more than strength. Too much force usually makes it worse.
Dockside Communication Script
Simple phrases that keep the boat calm- “Wait until I say move.” Prevents surprise shifts.
- “One foot, then sit low.” Keeps the passenger balanced.
- “Hold here, not the gunwale edge.” Gives safer hand placement.
- “Move slowly on three.” Turns movement into teamwork.
Return and Land Cleanly
After the position change and sculling demonstration, resume your rowing seat, return to the pier, and set up another calm landing. A Scout who rows well in the middle of the lake but loses control at the dock is not done yet. Finish the skill the same way you started it: steady, deliberate, and aware of the passenger.
This option is a great reminder that rowing is not only about moving fast. It is also about helping other people feel safe in a boat because you are in charge of the details.
The other option focuses on similar pier work in a sliding-seat boat, where the shell is lighter and movement has to be even more careful.
Req 5b — Sliding-Seat Dock Exchange
A sliding-seat rowboat is usually lighter, narrower, and less forgiving than a camp rowboat. That means pier work has to be calm and deliberate. This requirement is about safe exchange, not speed. If it looks rushed, it is probably wrong.
Approach the Pier Under Control
Come alongside slowly enough that you can stop exactly where you want. Plan for wind and current. In a sliding-seat craft, small bumps and side pressure matter more, so protect the hull and keep the boat stable before anyone starts moving.
Get Out Onto the Pier Safely
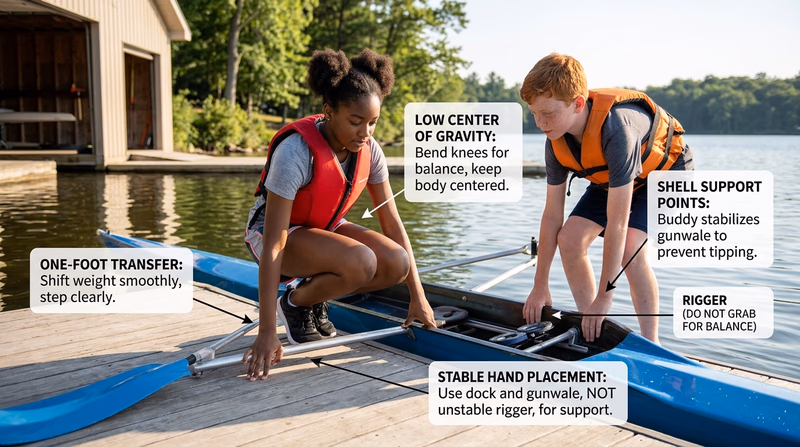
Your buddy assists because this is a teamwork skill. Communicate before you move. Decide which hand stays on the boat, where the first foot goes, and when the second person should stabilize the shell.
Keep your center of gravity low. A fast, upright step can roll the boat or push it away from the pier.
Help Your Buddy Into the Boat
Helping someone board is not just being polite. It is part of boat control. Give clear instructions. Keep the shell close enough to the pier to avoid a jump. Have your buddy move one step at a time and settle into the boat before any other motion happens.
Pier Exchange Basics
How to keep a sliding-seat boat calm during boarding- Approach slowly and parallel to the pier.
- Communicate before anyone moves.
- Keep one stable point of contact at all times.
- Move low and smoothly, never with a hop.
- Wait until the boat settles before the next step.
Reverse Roles and Repeat
The repeat matters because it proves both Scouts understand the process. It is easy to look steady once when someone else is doing the hard part. Reversing roles shows that each person can board, disembark, and assist safely.
This is also a good lesson in empathy. Once you help another person into a delicate boat, you understand how clear instructions and patient timing make the experience safer for everyone.
This option teaches an important truth about rowing shells: low-speed control and careful teamwork matter just as much as powerful strokes. Next, the guide moves into rescue work, starting with how to recover from a swamped boat.
Req 6 — Swamped Boat Recovery
A swamped boat drill is where rowing safety becomes real. It is cold, awkward, and tiring even in controlled conditions. That is exactly why you practice it before you ever need it for real.
The big idea is simple: the boat is usually your best flotation, your biggest target for rescuers, and your easiest way to stay together. Unless the boat is creating immediate danger, you stay with it.
Right the Craft
A boat that has rolled or swamped may need to be turned back into a more stable position before anyone can reboard or move it. This step is easier when everyone stays calm and works together instead of pulling in opposite directions.
Righting is about leverage, not panic strength. Listen to the instructor’s method for the specific craft you are using.
Stabilize Before Reboarding
Many people rush from “boat upright” to “climb in now.” That is how the boat flips again. Stabilization comes first. Get the hull positioned, spread weight carefully, and prepare for the reboarding move.
Reboard in Deep Water
Deep-water reentry feels very different from climbing into a boat at a dock. The boat moves, your clothes may feel heavy, and cold water can make your hands clumsy. Reboarding works best when you stay low, use the agreed technique, and avoid wild kicking or grabbing that rolls the boat back over.
🎬 Video: How to Get Back into Your Scull after Flipping — rowingwithcalmwaters — https://www.youtube.com/watch?v=nhtv53MOrqA
Make Headway
Once back aboard or stabilized with the boat, the goal is to move with purpose. “Making headway” means the craft is no longer just drifting helplessly. You are regaining control and moving toward safety, even if slowly.
This part matters because rescue is not complete just because the boat is upright. You still need to get somewhere safer or easier for help to reach.
Swamped Boat Priorities
Think in this order, not all at once- Stay calm and stay with the boat.
- Check people first. Make sure everyone is accounted for.
- Right the boat if trained to do so.
- Stabilize before reboarding.
- Reboard low and deliberately.
- Move toward safety once control returns.
Why You Should Stay With the Boat
A swamped boat floats better than you do, shows up better than a swimmer’s head, and keeps people together. It also gives rescuers something obvious to aim for. A person who abandons the boat may waste energy, separate from others, and become much harder to see.
The boat may feel like the problem in the moment, but most of the time it is actually the solution.
US Coast Guard — Cold Water Survival Official boating-safety guidance on immersion, flotation, and surviving unexpected time in the water. Link: US Coast Guard — Cold Water Survival — https://www.uscgboating.org/recreational-boaters/cold-water-survival.phpThe next rescue skill adds another layer: using the boat to reach and tow a swimmer while keeping both of you as safe as possible.
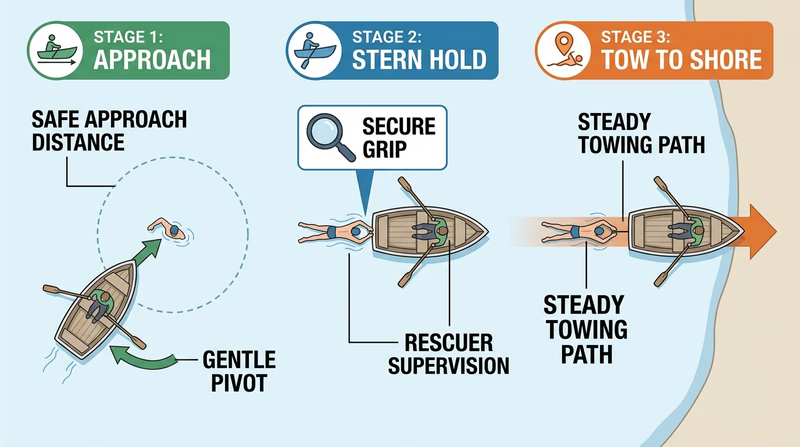
Req 7 — Towing a Swimmer
A swimmer rescue from a rowboat is a control problem before it is a strength problem. If you rush the approach, let the swimmer grab the wrong part of the boat, or forget to talk, the rescue can become less stable for both of you.
The stern tow works because it keeps the swimmer away from the oars and lets the rower keep better control of the boat.
Push Off and Approach the Swimmer
Launch cleanly and row toward the swimmer with enough speed to reach them, but not so much that you overshoot or create confusion. Keep watching the swimmer’s condition. A calm swimmer can follow directions. A panicked swimmer may need very short, clear commands.
Give Instructions Early
Do not wait until the swimmer is already grabbing the hull. Tell them what you want before they touch the boat.
Useful instructions are short:
- “Stay calm.”
- “I am turning the stern toward you.”
- “Hold the stern, not the sides.”
- “Keep your body behind the boat.”
Pivot the Boat for the Stern Hold
The pivot is the heart of the requirement. You are positioning the safest part of the boat for contact. The stern gives the swimmer a stable point without interfering with your oars.
Once the swimmer has the stern, check that they are actually secure before you start towing.
Swimmer-Tow Sequence
Do the rescue in a calm order- Approach under control.
- Talk before contact.
- Turn the stern to the swimmer.
- Confirm a safe hold.
- Tow steadily to shore.
- Avoid sudden changes that could shake the swimmer loose.
Tow to Shore
A tow is easier when you stay smooth. Sudden power changes can make the swimmer lose grip or swallow water. Choose the shortest safe route to shore, but do not head through obstacles, traffic, or breaking waves if there is a safer angle.
This requirement also reminds you why Req 2 matters. Rescue work is tiring. The rower needs enough swimming and water confidence to stay calm while the boat is only partly under ideal control.
A good rescue rower does not just reach the swimmer. They keep the whole situation organized. Next, the guide shifts from rescue skills to rowing knowledge about craft types, materials, and oarlocks.
Req 8 — Craft, Materials & Oarlocks
This requirement covers the equipment side of rowing:
- The kinds of boats people row in different settings
- The materials boats are built from
- The hardware that lets an oar pivot efficiently
A rower who understands equipment makes better decisions about safety, storage, performance, and maintenance.
Requirement 8a
Commercial rowing craft
Commercial craft are built for work, transport, or tourism rather than racing speed. Think of ferryboats moved by oars in earlier eras, workboats on calm waters, or guided recreation boats used by outfitters. These boats usually value capacity, durability, and stability.
Competitive rowing craft
Competitive boats are usually called shells. They are long, narrow, and designed to reduce drag. Sliding seats, riggers, and lightweight materials help the rower or crew apply power efficiently. Examples include singles, doubles, fours, and eights.
Recreational rowing craft
Recreational rowboats often sit between those extremes. They may be wider and sturdier than racing shells, with fixed seats, more forgiving hulls, and easier dock handling. Camp rowboats, club training boats, and family rowboats fit here.
Requirement 8b
Wood
Wood looks beautiful and can feel lively on the water. It is repairable and traditional, but it needs careful maintenance. Moisture, rot, and warping are real concerns if storage is poor.
Aluminum
Aluminum is tough, durable, and common in utility boats. It resists rot and can take hard use, but it may be heavier and louder on the water. In extreme heat or cold, it can also feel less comfortable to handle.
Fiberglass
Fiberglass allows builders to shape smooth hulls and make relatively light recreational boats. It resists many weather problems better than wood, but impacts can crack or chip it, and repairs may require special materials.
Carbon fiber or composite materials
High-performance shells often use carbon fiber or related composites because they are light and stiff. That helps speed and responsiveness. The tradeoff is cost and a lower tolerance for careless handling. A fast shell can also be a fragile one.
Material Tradeoffs
A simple way to compare boatbuilding choices- Wood: classic look, repairable, high maintenance.
- Aluminum: durable, affordable, often heavier.
- Fiberglass: shaped efficiently, moderate weight, can crack.
- Carbon/composite: very light and stiff, expensive, needs careful handling.
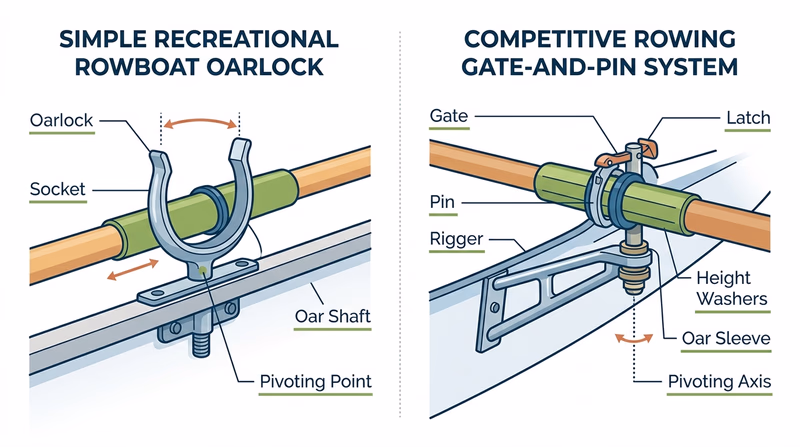
Requirement 8c
Recreational oarlocks
Recreational rowboats often use simple metal oarlocks with a U-shaped cradle or pin arrangement. They are built for durability and easy use, especially on wider, sturdier boats.
Competitive oarlocks
Competitive rowing usually uses a more refined gate-and-pin system mounted on a rigger. These setups hold the oar securely while allowing precise adjustment of angle and position. Small setup changes can affect comfort and performance.
The basic purpose is the same in both cases: the oarlock acts as the pivot point that turns your handle movement into blade power against the water.
🎬 Video: An insider look at rowing equipment — World Rowing — https://www.youtube.com/watch?v=HYH1hANh1Ms
Knowing the hardware is helpful, but advanced rowing also depends on technique, weather judgment, and seasonal boat care. That is what the next requirement covers.
Req 9 — Technique, Weather & Boat Care
This requirement gathers the kind of rowing knowledge that helps you sound like a real rower instead of someone who only memorized a few strokes. It covers technique, weather judgment, maintenance, gear sizing, and how rowing supports health.
Requirement 9a
Feathering means turning the blade flatter to the wind during recovery instead of leaving it vertical. The advantage is reduced air resistance and a cleaner recovery motion. In windy conditions especially, a feathered blade is less likely to catch the air and upset balance.
It also helps the rower develop smoother hand control. Feathering is one of those small technique details that makes the whole boat feel more efficient.
Requirement 9b
Strong winds and heavy waves change everything: speed, steering, balance, docking, and rescue difficulty. The best precaution is often not launching at all.
If you are already on the water, stay calm, lower your risk, and head for the safest reachable shore or dock. Keep the bow positioned as instructed for the conditions and avoid choices that let waves hit you broadside if that increases instability.
National Weather Service Use official forecasts and warnings to make smart decisions before and during rowing activities. Link: National Weather Service — https://www.weather.gov/Requirement 9c
In season, boats need regular inspection and care. Check hull condition, seats, slides if present, riggers, oarlocks, lines, and any fittings that loosen over time. Clean dirt, sand, and plant matter out before they cause wear.
For winter or long storage, clean the boat thoroughly, dry it well, relieve unnecessary stress on the hull, and store it where moisture, freezing, and impact are less likely to damage it. A boat stored badly often needs repairs before it ever touches spring water.
Requirement 9d
Proper oar length depends on the kind of boat, the rowing setup, and the intended use. A good match helps the rower apply power comfortably without awkward handle overlap or poor blade work.
You do not usually guess this by eye alone. Rowing programs often choose oar size based on boat type, rigging, and rower needs. The main idea for your counselor is that oars are matched to the system, not chosen randomly.
Requirement 9e
In fixed-seat rowing, the seat stays put and power comes mostly from body swing, back, and arms. In sliding-seat rowing, the legs join the drive through the moving seat. That changes both the power potential and the rhythm of the stroke.
Sliding-seat rowing is usually faster and more efficient for racing. Fixed-seat rowing often feels simpler, sturdier, and more practical for recreational boats and traditional rowing.
Requirement 9f
In sliding-seat competitive rowing, sculling usually means one rower using two oars, one in each hand. In fixed-seat boat handling, sculling can mean propelling the boat with a single oar worked over the stern or side.
Same word, different context. A strong answer to your counselor makes that distinction clear.
Requirement 9g
Rowing is a strong fitness activity because it combines aerobic endurance with muscular work from the legs, back, core, and arms. It can build stamina, coordination, and posture awareness while staying relatively low-impact compared with some land sports.
It also rewards discipline. Regular rowing improves more than muscles. It trains pacing, breath control, and the ability to stay technically sound while tired.
Why Rowing Is Good Exercise
Benefits you can explain clearly to your counselor- Works large muscle groups together instead of isolating only one area.
- Builds endurance through repeated rhythmic effort.
- Improves coordination because timing and sequence matter every stroke.
- Can be low impact compared with many running-based workouts.
- Supports mental focus because efficient rowing depends on attention and rhythm.
By this point, you can talk about rowing as a skill, a safety activity, a team sport, and a piece of equipment knowledge all at once. That is what turns a badge requirement into real understanding.
Extended Learning
Congratulations
You have built more than a badge checklist. You now understand how rowing connects safety, technique, teamwork, and judgment. That combination is why people stay in rowing for years: there is always another layer to improve, whether that means cleaner catches, better race awareness, smarter weather decisions, or helping newer rowers feel confident on the dock.
Learning to Make the Boat Run
One of the biggest ideas beyond the badge is something rowers call boat run. A shell should not feel like it stops between strokes. Good rowers place the blade cleanly, drive hard, then recover in a way that lets the boat keep moving instead of getting checked by sloppy timing.
This is why great rowing can look almost easy. The power is real, but so is the patience. Advanced rowers spend huge amounts of time improving catches, finishes, posture, and recovery sequence because every tiny improvement helps the boat glide farther.
If you want to grow quickly, video yourself or ask a coach to watch one small detail at a time. Trying to fix everything in one outing usually fixes nothing.
What Racing Teaches That Practice Alone Cannot
A practice row can teach technique. A race teaches decision-making under pressure. Starts feel sharper, mistakes feel bigger, and fatigue arrives faster because everyone around you is pushing. That environment teaches composure.
Racing also changes how you think about teamwork. In a crew boat, the question is not “How hard can I pull?” It is “How hard can I pull while still making the crew faster?” That is a valuable lesson in any team activity.
Even if you never become a serious competitor, watching or participating in regattas helps you understand boat classes, crew roles, pacing, and why organized rowing culture values consistency so much.
Rowing as a Lifetime Fitness Sport
Many sports get harder on the body as athletes age. Rowing can scale more gracefully. Young athletes may race hard in eights, older rowers may move into singles or masters programs, and many people keep rowing indoors on ergometers when weather or schedule limits water time.
That makes rowing unusual. It can be a school sport, a camp skill, a club activity, or a lifelong fitness habit. It also blends well with other pursuits such as swimming, strength training, birding, photography, and waterfront leadership.
A good next step is to explore how indoor rowing supports outdoor rowing. Ergometers cannot replace boat feel, but they are excellent for building endurance, practicing rhythm, and learning how pacing works.
Real-World Experiences
Visit a Local Regatta
Try an Erg Session with a Coach
Volunteer at a Boathouse Work Day
Take a Learn-to-Row Program
Organizations
The national governing body for rowing in the United States. It connects athletes, clubs, events, and coaching pathways, and is a strong starting point for finding real rowing opportunities.
Organization: USRowing — https://www.usrowing.org/
The international governing body for rowing, with race coverage, boat classes, athlete stories, and a broad view of how competitive rowing works worldwide.
Organization: World Rowing — https://worldrowing.com/
Scouting’s boating-safety policy remains useful long after the badge. Revisit it whenever you help plan or supervise rowing activities.
Organization: Scouting America Safety Afloat — https://www.scouting.org/health-and-safety/safety-afloat/
Reliable boating safety guidance on life jackets, cold-water survival, and recreational boating judgment that applies to rowers as well as other boaters.
Organization: U.S. Coast Guard Boating Safety Division — https://www.uscgboating.org/
Offers first-aid and CPR education that complements the injury and rescue awareness you used throughout this badge.
Organization: American Red Cross — https://www.redcross.org/