Sculpture Merit Badge — Complete Digital Resource Guide
https://merit-badge.university/merit-badges/sculpture/guide/
Introduction & Overview
Sculpture is art you can walk around, look over, and sometimes even touch. Instead of working only on a flat surface, sculptors build form in three dimensions using clay, wood, plaster, metal, stone, digital tools, and found objects. This merit badge helps you notice shape, balance, texture, and space—then use your own hands and ideas to turn raw material into something real.
What makes sculpture special is that it connects seeing and making. You learn to observe a face, a fruit, a gallery wall, or a public monument more carefully because you begin thinking like the person who built it. That habit of close looking carries into every requirement in this badge.
Then and Now
Then
People were making sculpture long before they were writing books about it. Early humans shaped bone, clay, stone, and wood into small figures, ritual objects, and tools with decorative meaning. Ancient civilizations used sculpture to honor leaders, tell stories, mark graves, decorate temples, and show what mattered most to their communities.
Over time, sculptors developed many approaches. Some carved away material from stone or wood. Others modeled soft clay and then fired it. Others cast forms in bronze or plaster using molds. Each method asked the artist to think differently about planning, structure, and finish.
Now
Modern sculpture is wider than ever. A sculptor might still model a portrait head in clay, but another might weld steel for an outdoor plaza, carve foam for a movie prop, use 3D software to design a character, or build an installation that changes how people move through a room. Public memorials, museum pieces, playground art, and digital fabrication all belong to the same bigger conversation.
That is one reason Sculpture merit badge is so interesting: it is not limited to one material or one style. It teaches you how artists solve problems in space, how tools change the result, and how visual art can shape the way people feel about a place.
Get Ready!
You do not need to be a “natural artist” to do well here. What you do need is patience, curiosity, and a willingness to revise your work when the first version is not quite right. Sculpture rewards Scouts who keep looking closely, keep adjusting, and keep learning from the material in front of them.
Kinds of Sculpture
Modeling
Modeling means shaping a soft material by adding, pressing, pinching, smoothing, and refining it. Clay is the classic modeling material. This approach is forgiving because you can move material around while you work. If a nose is too large or a shoulder sits too low, you can reshape it instead of starting over.
Carving
Carving works the opposite way. You begin with a solid block of wood, plaster, stone, or another firm material and remove what you do not need. That means planning matters. Once material is gone, you usually cannot put it back. Carving teaches patience and tool control.
Casting
Casting lets you make a copy by creating a mold and then filling that mold with another material. This is how a sculptor can repeat a form, preserve a model, or move from a soft original to a harder final version. Requirement 2b gives you a small-scale version of that process.
Assemblage and Construction
Some sculpture is built by joining parts instead of carving or modeling one whole mass. Wire, cardboard, wood, found objects, and metal pieces can all become sculpture when arranged with intention. In this kind of work, balance, structure, and negative space matter just as much as surface detail.
Digital Sculpture
Today, sculptors also work on screens. With 3D modeling software, artists can shape characters, creatures, and forms digitally before printing, machining, or casting them. The tools are different, but the core ideas—proportion, volume, silhouette, and structure—are the same.
Next Steps
Your first requirement is all about studio safety. That may not sound exciting at first, but it is what lets every later project happen well. Before you shape clay, carve plaster, or use tools around dust and sharp edges, you need safe habits.
Req 1 — Studio Safety
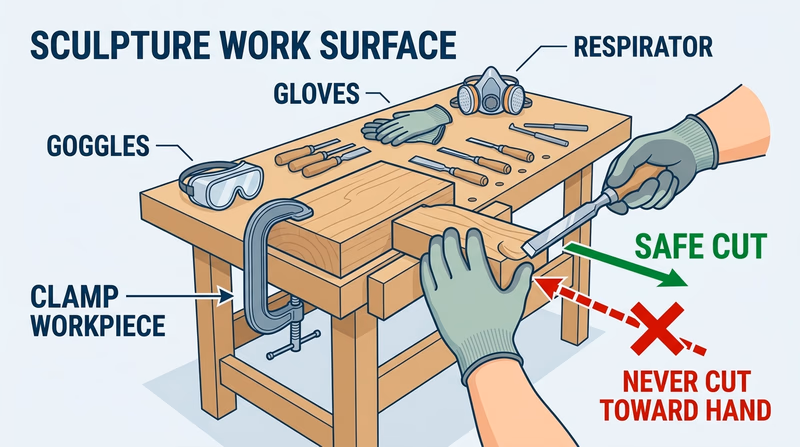
A sculpture studio can look calm, but it contains real hazards. Sharp tools can slip. Dust can get into your lungs. A kiln or oven can produce dangerous heat and fumes. Wet clay and plaster seem harmless until you forget to wash up, leave food nearby, or let dust build up on surfaces. This requirement is really about showing your counselor that you know how to think ahead before you make art.
The safest sculptors do not wait until something feels dangerous. They build habits from the start. They choose the right protective gear, set up their work area before cutting or mixing anything, and slow down when the tool or material changes.
Start With the Workspace
A good workspace protects both you and the project. Clear away clutter so tools are not hidden under scraps or rags. Give yourself enough room to move your elbows without bumping into another person. Make sure the piece you are working on is supported so it will not slide while you cut, carve, or shape it.
If you are working indoors, ventilation matters. Dust and vapors should not stay trapped in the room. Open windows if appropriate, work near proper ventilation, and follow any studio rules about fans or exhaust systems.
Safe setup before you begin
Do these things before the first cut, mix, or sculpting session- Clear the table and floor so you are not stepping over cords, tools, or scraps.
- Tie back loose hair and remove loose sleeves, jewelry, or anything that could catch in tools or equipment.
- Set out only the tools and materials you need for this stage of the project.
- Keep water, snacks, and drinks away from the work area.
- Know where protective gear, first aid supplies, and cleanup materials are located.
Tool Safety
Different tools create different risks. Soft clay tools may seem mild, but loop tools, wire cutters, knives, rasps, chisels, and carving gouges can all cause injury when used carelessly.
The sculpture pamphlet gives a few especially important reminders. When using knives and chisels for wood or other carving work, carve away from your body. Pay attention to where your fingers are holding the material. Take your time instead of forcing the cut. When carving or chipping, wear protective goggles so flying chips do not hit your eyes.
If you use electrical equipment such as a grinder, avoid loose-fitting clothes that could catch. Follow the instructions for the specific tool, and do not use equipment unless a qualified adult has shown you how.
The official safety video below is useful because it shows how everyday studio habits—apron use, cleanup, and careful handling of tools—matter long before anything goes wrong.
🎬 Video: Working Safely With Clay & DIY Modeling Tools (video) — https://youtu.be/-fX0YeZnEME?si=suWmdxmEVZaWz3L2
Dust, Vapors, and Skin Contact
One of the biggest sculpture hazards is the one you do not always notice right away: breathing in dust. Sanding, carving plaster, handling dry clay, or working with glazes and paints can put fine particles into the air. The pamphlet specifically warns that lightweight paper dust masks are not enough protection against toxic dust and vapors. When dust or fumes are a real concern, use a respiratory mask approved by NIOSH.
The pamphlet also recommends disposable gloves and work clothing made from materials that do not hold dust. If your clothing gets dusty, keep it separate from other laundry and wash it regularly. Avoid eating or drinking in the work area. If you work with clay using bare hands, wash thoroughly with soap and water afterward.
Premixed clay is often safer for beginners than mixing dry materials from scratch because it reduces exposure to loose dust. That is a practical example of safety planning: the safest choice is sometimes the one that creates less risk before you even start.
The Essential Rules of Clay Safety: What You Need to Know (website) A Scout-friendly overview of clay dust, ventilation, cleanup, and studio habits that support the safety points in this requirement. Link: The Essential Rules of Clay Safety: What You Need to Know (website) — https://artabys.com/the-essential-rules-of-clay-safety-what-you-need-to-know/Heat and Firing Safety
Some sculptural materials harden in an oven or kiln. That does not make them casual kitchen projects. The pamphlet says polymer clays such as Sculpey should be heated only with precautions and with advice from an instructor. Kilns should be used only under the direct supervision of a qualified adult who understands their operation.
Heat safety also includes ventilation. If clay is scorched or burned, it can release dangerous fumes. The kiln area needs to be well ventilated and have an adequate exhaust system. Looking directly into a firing kiln is also a hazard; the pamphlet notes that proper infrared eye protection or a suitable shield is needed.
What Your Counselor Wants to Hear
A strong explanation does more than list goggles and gloves. It shows judgment. You should be able to say which precautions matter for soft clay, which matter for carving, and which matter for firing or dusty materials. For example, a loop tool used on wet clay mainly calls for careful hand placement and cleanup, while sanding plaster calls for respiratory protection and dust control.
That kind of answer shows you understand the connection between tool, material, and risk—which is exactly what a real artist or studio assistant has to think about every day.
Now that you know how to work safely, you are ready to choose two sculpture experiences and decide how you want to learn by doing.
Req 2 — Choose Your Projects
This requirement covers three different ways to learn sculpture, and you must complete exactly two of them. One path focuses on modeling a human head and then building a second figure. One path teaches mold making and casting. One path sends you into an art space to look, think, and discuss what visual art does in a community.
Your Options
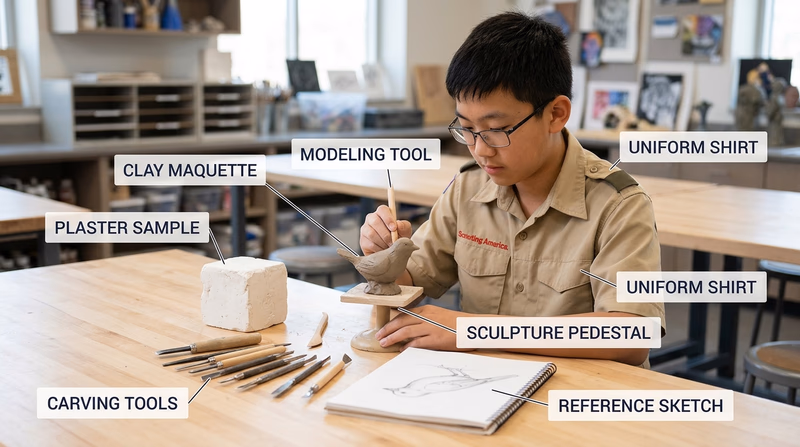
- Req 2a — Head and Figure Study: Build observation and modeling skills by shaping a life-size clay head and then making a smaller animal or person. This option teaches proportion, structure, and how sculptors use tools to refine form.
- Req 2b — Mold and Cast: Learn the basic idea behind mold making by creating a plaster mold of a fruit or vegetable and using it to make a copy. This option teaches planning, surface detail, and the difference between an original form and a cast.
- Req 2c — Art in Public and Community Life: Visit a museum, gallery, co-op, exhibit, or studio and then discuss what you learned. This option teaches close looking, art vocabulary, and how visual art supports culture, empathy, and community life.
How to Choose
Choosing your two options
Think about tools, access, and what you most want to learn- Time in the studio: Req 2a usually takes the most hands-on shaping time because you are building two sculptural studies.
- Mess and materials: Req 2b involves plaster and cleanup planning. It is very rewarding, but it needs careful setup.
- Travel and observation: Req 2c depends on counselor approval plus a visit to an art space with a parent or guardian’s permission.
- What you will gain: Req 2a builds form and proportion, Req 2b teaches process and reproduction, and Req 2c sharpens your eye for how art affects people and places.
- Best pairing: Many Scouts pair one making option (2a or 2b) with the visit option (2c) so they get both hands-on practice and art appreciation.
If you enjoy drawing faces, character design, or working directly with clay, Req 2a is a natural fit. If you like process, problem-solving, and seeing how one form becomes another, Req 2b may be especially satisfying. If you are curious about museums, public art, or how people respond to artwork, Req 2c gives you strong discussion material.
Planning Ahead
Before you start, check your access to materials and adult help. Req 2a may need modeling clay, a support board, and simple sculpting tools. Req 2b needs plaster supplies, a good workspace, and careful cleanup. Req 2c needs a destination, permission, and a plan for what you will observe.
It is also smart to think about what evidence you want to show your counselor. Photos of each stage, notes about tools used, and a short reflection after a museum visit can all make your conversation smoother.
You are ready to begin with the first project option. Even if you later choose a different pair, reading it will help you understand the kind of work this requirement is asking for.
Req 2a — Head and Figure Study
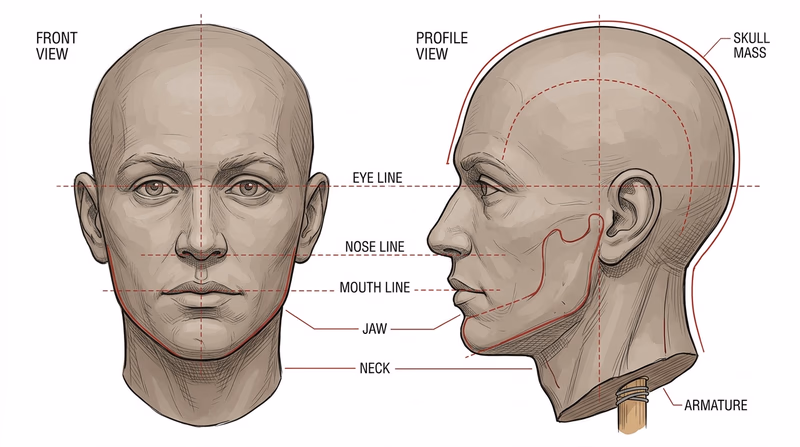
A human head is one of the toughest subjects in sculpture because people notice mistakes immediately. If the eyes sit too high, the jaw is too narrow, or the back of the skull is missing, the whole piece feels off—even if no one can explain why. That is why this requirement is so useful. It trains your eye to see proportion and your hands to build form step by step.
The requirement then asks you to switch gears and make a smaller animal or person. That second piece helps you think about method. You can stay with modeling clay, try carving wood or plaster, or use 3D software. Your counselor wants to hear how your process changed based on the material.
Part 1: Build a Life-Size Head
Do not start with tiny details like eyelashes or lips. Start with the biggest forms first: the ball of the skull, the front plane of the face, the neck, and the overall tilt of the head. If the large shapes are wrong, no amount of detail will fix the sculpture.
A simple way to think about the head is as a set of masses:
- the rounded cranium
- the face block attached to the front
- the wedge of the jaw
- the neck supporting the whole structure
Many beginners make the face too flat and forget the size of the back of the skull. Others place the eyes too high. In most heads, the eye line sits about halfway between the top of the skull and the bottom of the chin.
Life-size head workflow
Build from big forms to small refinements- Block in the overall head size before adding features.
- Check the tilt of the head from the front and the side.
- Mark the eye line, nose line, and mouth line lightly before modeling details.
- Compare the left and right sides often so one side does not drift out of balance.
- Step back every few minutes to look at the silhouette, not just the surface.
The first official video is helpful because it shows how a portrait head grows out of large planes and masses instead of random detail.
🎬 Video: Sculpting a Head in Clay (video) — https://youtu.be/6dnyYu4Ff7U?si=j9qg_lNcXGVH7HnQ
The second video gives you another view of portrait modeling so you can compare how different artists handle proportion, smoothing, and facial structure.
🎬 Video: Portrait Sculpting in Clay (video) — https://youtu.be/G-Drvb5WTM0?si=PbFCpiwrwnoTyGOl
Part 2: Make a Small-Scale Animal or Person
Your second piece can teach a different skill depending on the method you choose.
If you model in clay
Modeling is flexible. You can add and subtract material, test poses, and adjust proportions as you go. This works well for animals because you can establish the rib cage, hips, shoulders, and head as simple volumes before refining the pose.
If you carve in wood or plaster
Carving asks you to plan more carefully. Instead of adding clay, you remove what you do not need. That means you should sketch the shape from more than one angle before starting. Keep the design simple and protect thin parts that could snap off. In plaster especially, smooth tools and a rasp can help shape broad surfaces before you move toward smaller details.
If you use 3D modeling software
Digital sculpting still depends on real sculptural thinking. You are still balancing proportion, silhouette, planes, and structure. The advantage is that you can rotate the model, undo mistakes, and test forms quickly. The challenge is that software can tempt you to over-detail before the big shapes are correct.
Tools You Might Use
The pamphlet points out that your fingers are often the most useful tools for soft clay. A loop tool helps trim excess clay and shape transitions. Wooden modeling tools can press planes, define edges, or smooth surfaces. If you carve plaster or wood, rasps, files, gouges, and chisels become more important—but they also require much more attention to safety, as you learned in Req 1.
The official tools video is useful here because it helps you connect tool shape to the marks and surfaces it creates.
🎬 Video: Clay Sculpting Tools (video) — https://youtu.be/IyBRSsVQOTY?si=w4VRR1chFY0pE7ns
How to Explain Your Method to Your Counselor
The last sentence of the requirement matters. Your counselor is not only judging the finished sculpture. They also want to hear how you worked.
A strong explanation usually includes:
- Material choice: Why you used clay, wood, plaster, or software
- Construction method: Whether you added, carved away, or digitally shaped the form
- Tools used: Fingers, loop tools, wooden tools, rasps, files, gouges, stylus tools, or digital brushes
- Main challenge: Proportion, symmetry, stability, texture, or getting the pose right
- Adjustment process: What you changed after stepping back and reevaluating the piece
If you complete Req 2b as well, notice how different mold making feels from direct modeling. In this page you shape the original form directly. In Req 2b, you shape a form and then create a system for reproducing it.
Now move to the mold-and-cast option, where surface detail and careful preparation matter just as much as artistic vision.
Req 2b — Mold and Cast
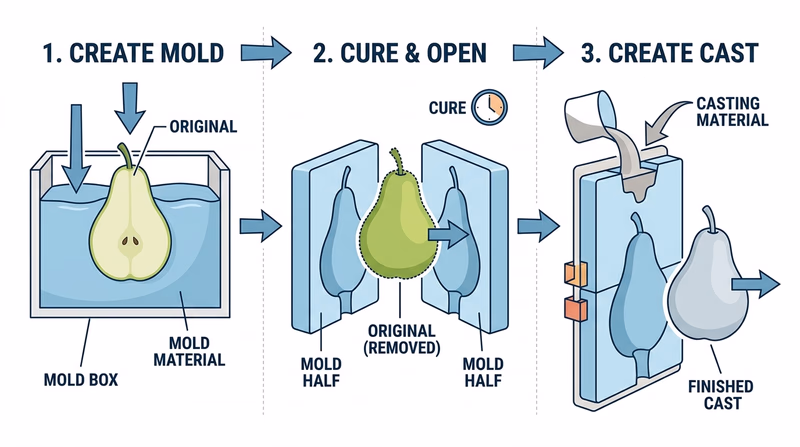
This requirement teaches one of the most important ideas in sculpture: the difference between an original form and a cast made from it. A banana, pear, pepper, or apple may seem simple, but fruits and vegetables are full of curves, ridges, stems, dimples, and surface texture. That makes them excellent practice subjects for mold making.
When you make a mold, you are creating a negative space that matches the original object. When you fill that mold, the negative space becomes a positive copy. Understanding that switch—from positive form to negative cavity and back again—is a huge step in thinking like a sculptor.
Choose the Right Subject
Pick a fruit or vegetable with an interesting shape but not too many fragile parts. A pear, pepper, lemon, small squash, or apple usually works better than something with thin leaves or an awkward branching stem. If the object is badly bruised or soft, the mold may capture flaws you do not want.
Look closely at the object before starting:
- Where are the deepest curves?
- Does the shape need a one-part mold or a two-part approach?
- What surface texture do you want to preserve?
- How will you remove the original without damaging the mold?
Think in Three Stages
1. Prepare the original
Clean and dry the fruit or vegetable. Decide how it will sit while the mold material goes around it. You may need clay, a tray, or another support to keep it stable.
2. Build the mold
Plaster sets quickly, so have your materials ready before mixing. Work neatly and watch for trapped air bubbles. Your goal is to capture the shape without making the mold too thin or weak.
3. Make the copy
Once the mold is ready, you can create a copy by filling it with casting material. The copy will reveal how well you planned the mold, sealed details, and handled cleanup.
Mold-making success habits
Small setup choices make a big difference- Protect the table before mixing plaster.
- Measure and organize supplies before the plaster starts setting.
- Keep the original object stable so it does not shift mid-process.
- Work gently to avoid trapping bubbles against the surface.
- Let the mold set fully before trying to remove the original or cast the copy.
Watch for Common Problems
Mold making can fail in ways that are useful to learn from. If the cast surface looks pitted, you may have trapped air bubbles. If the mold breaks, it may have been too thin or removed too roughly. If the copy sticks, the mold design may not allow easy release.
That is why your explanation to the counselor matters. Even if the result is not perfect, you can still show strong understanding by explaining what happened and what you would change next time.
The official website resource below walks through a fruit-and-vegetable mold project that can help you picture the full sequence before you begin.
Fruit and Vegetable Art - Silicone Moulds and Plaster Casts (website) A step-by-step example of turning produce into molds and casts, useful for visualizing the process before you make your own. Link: Fruit and Vegetable Art - Silicone Moulds and Plaster Casts (website) — https://www.instructables.com/Fruit-and-Vegetable-Art-Silicone-Moulds-and-Plaste/The official video gives you a quick visual reference for how a finished plaster fruit cast can come together.
🎬 Video: Plaster Fruit Cast (video) — https://youtu.be/FN7WLH5tNaY?si=mxbwZBRnf3lv6s6f
Tools and Materials You May Mention
Your exact materials may vary, but your counselor will likely want to hear about items such as:
- mixing container and stir tool
- plaster or casting material
- support tray or work surface protection
- release strategy if your counselor recommends one
- cleanup tools and water source
- carving or smoothing tools for light finishing after the cast is removed
This is also a good place to connect back to Req 1. Plaster dust, messy cleanup, and rushed handling are all safety issues as well as technique issues.
What to Discuss With Your Counselor
When you explain your method, walk through the project in order:
- which fruit or vegetable you chose and why
- how you set it up for molding
- how you mixed and applied the plaster
- how you removed the original
- how you made the copy in the mold
- what worked and what you would improve
That explanation shows that you understand mold making as a process, not just a lucky outcome.
If you also complete Req 2a, compare the two experiences. In Req 2a you directly shaped the final form. Here you shaped a system that could reproduce the form. That contrast is one of the most valuable lessons in the entire badge.
Next comes the visit-based option, where you practice looking at sculpture the way artists, viewers, and curators do.
Req 2c — Art in Public and Community Life
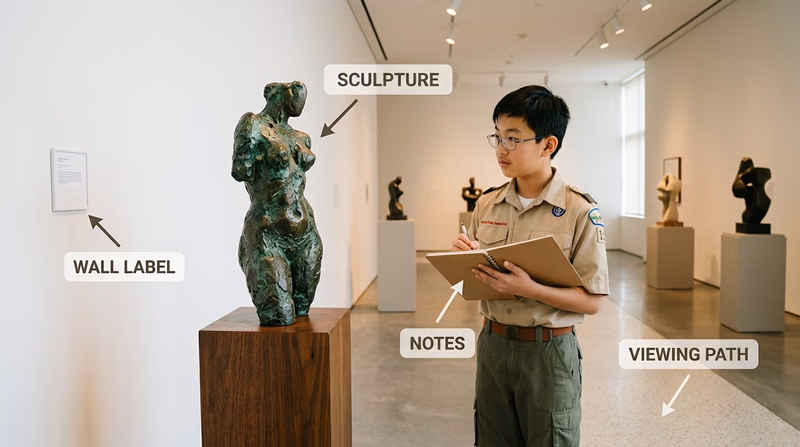
A sculpture looks different when you stand in the same room with it. Size becomes real. Surface texture catches light differently as you move. The artwork takes up space—and sometimes changes the way you feel about the whole room, hallway, plaza, or park around it. This requirement is about more than “going somewhere.” It is about learning how to notice what visual art does to people and places.
The Sculpture pamphlet suggests approaching your visit from several points of view: as the artist showing the work, as the viewer, and as the gallery owner or museum director. That is excellent advice. It reminds you that art spaces are shaped by many decisions—what gets displayed, how it is lit, what people can touch, what story the space is trying to tell, and how viewers are invited to respond.
🎬 Video: How to Visit an Art Museum (video) — https://youtu.be/drrBd1bCiW0?si=K3DwDeSzVPwmYDyy
Before You Go
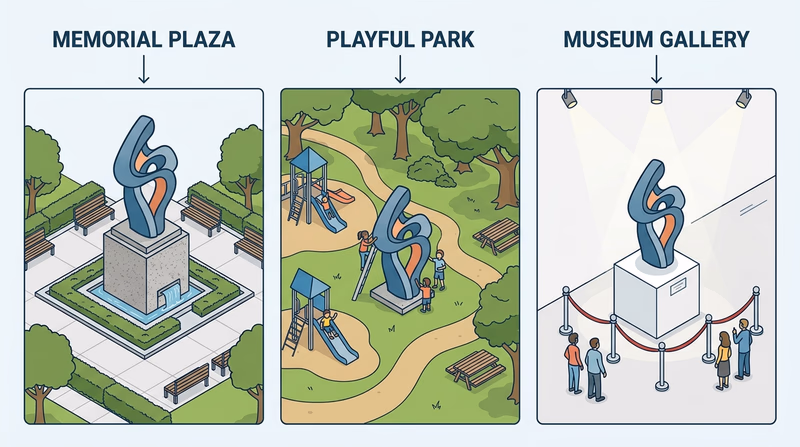
A strong visit starts with a plan. Find out what kind of place you are visiting and what artwork is there. A museum may focus on preserving and interpreting important works for the public. A commercial gallery is usually trying to sell art. An artists’ co-op gives artists shared space to show work. A studio lets you see art where it is made.
The pamphlet also notes that museums hold artwork for public enjoyment rather than sale, while galleries and co-ops often focus on exhibiting and selling living artists’ work. Knowing that difference gives you more to talk about later.
Questions to carry into your visit
These will help you come back with more than just 'I liked it'- Which artwork pulled me in first, and why?
- How do size, materials, and placement change the experience?
- What emotions or ideas does the sculpture communicate?
- Who is the intended audience for this space?
- How would this experience change if the same work were shown somewhere else?
What to Notice During the Visit
Look at the sculpture itself
Notice material, scale, color, texture, balance, and evidence of process. Can you tell whether a piece was modeled, carved, cast, assembled, welded, or digitally fabricated? Does the surface invite close viewing or feel more powerful from a distance?
Look at the setting
Sculpture is never seen in a vacuum. Lighting, wall color, labels, pedestals, windows, pathways, and the distance between works all affect how you experience the art. A quiet museum gallery encourages slow looking. A busy studio may show tools, works in progress, and mistakes that never appear in a finished exhibit.
Look at people
How do visitors behave around the work? Do they pause, smile, take notes, whisper, argue, or move on quickly? Public art and gallery art both create conversations, even when those conversations are silent.
Why Visual Arts Matter
The second half of this requirement asks for something bigger than a field trip report. You need to discuss why visual arts matter and how they support social tolerance plus cultural, intellectual, and personal development.
Visual arts build social tolerance
Art lets people encounter lives, beliefs, histories, and perspectives other than their own. A memorial can help viewers think about justice, grief, courage, or public memory. A contemporary sculpture can challenge assumptions about what counts as beauty or whose stories deserve space. When you look carefully at art made by people from different cultures or experiences, you practice empathy and curiosity instead of instant judgment.
Visual arts build cultural understanding
Sculpture carries cultural memory. It can preserve traditional forms, materials, symbols, and community values. Visiting museums or galleries exposes you to ideas that might not appear in your everyday routine. That matters because culture is not just information—it is a way of understanding how people express meaning.
Visual arts build intellectual growth
Good art asks questions. What is the artist trying to say? Why this material? Why this scale? Why this location? Even when you do not fully understand a piece at first, the process of observing, comparing, and interpreting strengthens your thinking skills.
Visual arts build personal growth
Art can make people feel seen, challenged, comforted, unsettled, or inspired. It gives you language for thoughts that may be hard to explain any other way. For a Scout, that can mean growing more confident in your own responses and more respectful of how others respond differently.
How to Report What You Learned
A strong discussion with your counselor usually includes:
- where you went and what kind of place it was
- one or two artworks that stood out
- what materials or methods you noticed
- something you learned about how art is shown or interpreted
- your own thoughts on how visual art helps people and communities
If you kept notes during the visit, this is a great moment to use them. If you are also doing Req 3 later, your visit may give you ideas about careers such as curator, museum educator, gallery owner, conservator, or teaching artist.
You have now looked at both making art and experiencing art. Next, you will decide whether to explore sculpture as a future career path or as a long-term hobby.
Req 3 — Career or Hobby
This requirement asks you to choose one future-facing path. You can investigate a career connected to sculpture, or you can explore how sculpture could become a hobby that keeps growing after the badge ends. Both options matter because they help you move beyond one-time badge work and think about how art fits into real life.
Your Options
- Req 3a — Research a Sculpture Career: Investigate one profession connected to sculpture or the visual arts. You will look at education, training, costs, duties, salary, advancement, and why the work might appeal to you.
- Req 3b — Build a Hobby Path: Explore how sculpture could become a long-term hobby. You will look at training, expenses, support organizations, and your own short-term and long-term goals.
How to Choose
Choosing between career and hobby
Pick the option that will lead to the most honest conversation with your counselor- Choose Req 3a if you like researching jobs, talking with professionals, and comparing training pathways.
- Choose Req 3b if you already enjoy making art and want a realistic plan for continuing without turning it into a job.
- Time and access: Req 3a may work best if you can interview or observe someone in the field. Req 3b may be easier if you have local classes, maker spaces, or art centers nearby.
- What you will gain: Req 3a builds career-research skills; Req 3b helps you build goals and habits for a creative life.
There is no wrong choice here. In fact, many adults in the arts do some version of both. A person might work as a museum educator or foundry technician while also making sculpture at home or in a shared studio.
What Strong Answers Have in Common
Whether you choose career or hobby, your counselor will want specifics. Vague answers like “it sounds fun” or “I might keep doing this” are not enough. You should be ready to talk about costs, training, opportunities, obstacles, and the next steps you would actually take.
That means naming programs, studios, organizations, schools, or local opportunities when you can. It also means being honest. A strong answer can include concerns such as cost, limited time, transportation, or the challenge of finding workspace.
Now start with the career path and see what a full professional investigation looks like.
Req 3a — Research a Sculpture Career
A sculpture-related career does not have to mean “famous gallery artist.” The Sculpture pamphlet points out that people can work around art in many roles: sculptor, mold maker, foundry worker, gallery owner, art consultant, art historian, conservator, museum educator, teacher, writer, and more. That is good news, because it means you can match your interests to the part of the art world that fits you best.
Start by Choosing One Career
Pick a career that is concrete enough to research deeply. Good examples include:
- professional sculptor
- foundry worker or mold maker
- museum curator or conservator
- art teacher or museum educator
- gallery owner or art consultant
- art critic or reviewer
The pamphlet also notes an important truth about self-employed sculptors: many do not support themselves only by selling artwork. They often combine sculpture with teaching, workshops, commissions, fabrication work, or related art jobs. That is the kind of detail that makes your research realistic.
Questions your career research should answer
These are the key parts your counselor expects you to cover- What does this person actually do during a normal week?
- What training, degrees, apprenticeships, or certifications are common?
- What does that training cost in time and money?
- What are the job prospects and salary range?
- How does someone move forward or specialize in this field?
- What part of the work sounds appealing to you—and what part sounds difficult?
Training and Education
The pamphlet says that a future professional sculptor needs studio lessons and hands-on training. That may begin with shop, art, or design classes in high school. Later, a person might apprentice with another artist, attend an art school, or enroll in a college program leading to a BFA or MFA.
Not every sculpture-related job uses the same path. A museum conservator may need advanced academic training in conservation. A gallery owner may need business experience plus deep art knowledge. A foundry worker may learn through hands-on technical training. An art teacher in public school usually needs a bachelor’s degree and teacher certification.
That means part of your job is to connect the training path to the exact profession you chose—not just say “go to art school.”
The official career website is a good starting point for seeing how broad sculpture-related careers can be.
12 Careers for Sculptors (website) A useful overview of sculpture-related roles that can help you narrow your research to one realistic career path. Link: 12 Careers for Sculptors (website) — https://www.indeed.com/career-advice/finding-a-job/careers-for-sculptorsPay, Prospects, and Advancement
A serious career report includes practical realities. What does the job pay? Are openings common or competitive? Does advancement come through promotions, a stronger portfolio, advanced degrees, larger commissions, or a better professional network?
For many art careers, advancement is not a straight ladder. A sculptor may advance by winning commissions, showing in stronger venues, or developing a reputation. A museum educator may move into program leadership. A conservator may specialize in particular materials. A foundry worker may become a highly trusted fabricator on larger and more complex projects.
Daily Work Matters Too
A career can sound exciting in theory but feel different in practice. Ask what the person does on an average day. Do they spend most of their time making art, repairing artwork, teaching classes, meeting clients, writing grants, installing exhibits, or managing a studio?
The pamphlet emphasizes self-motivation and self-discipline for working artists. That is worth discussing. A person with great talent still needs to meet deadlines, keep working when a project gets difficult, and often handle business tasks too.
The two official videos below can help you picture both the artist path and the broader craft-artist path.
🎬 Video: How To Become an Artist/Sculptor (video) — https://youtu.be/N6HeVopwRmQ?si=YJyPrJ4CvPLj9cx0
🎬 Video: Craft Artist Careers (video) — https://youtu.be/T_X9ZdUq-2Q?si=p0lV3ApJiQH0OqXe
A Good Way to Present Your Findings
You do not need a fancy slideshow unless your counselor asks for one. A clear discussion can be enough if it covers the required parts. One good structure is:
- Career chosen
- What the job involves
- Education and training needed
- Costs and time commitment
- Pay and job outlook
- How someone advances
- Why it does or does not interest you
If you choose Req 3b instead, notice the difference: career research asks, “Could I do this as work?” The hobby path asks, “How could I keep doing this meaningfully even if it never becomes my job?”
Next, explore that hobby path and think about goals, training, and long-term enjoyment.
Req 3b — Build a Hobby Path
Not every meaningful skill has to become a career. Sculpture can be a hobby that helps you observe more carefully, work with your hands, solve design problems, and make space in your life for patience and creativity. This requirement is about proving that a hobby can still be serious, structured, and worth growing.
Think About the Kind of Hobby You Want
“Sculpture as a hobby” can mean very different things. One Scout may want to make small clay figures at home. Another may want to take weekend classes at a community arts center. Another may be excited by digital sculpting and 3D printing. Another may mainly want to visit sculpture parks, study artists, and make one or two larger projects each year.
Your first step is deciding which version feels realistic and exciting for you.
Questions that shape a sustainable hobby
Use these to turn 'I might keep doing this' into an actual plan- What materials can I afford and store safely?
- Where would I work—in a garage, classroom, makerspace, or community studio?
- How often could I realistically practice?
- What kind of projects would keep me interested for six months or a year?
- Do I want instruction, or do I learn better by guided experimentation?
Training and Expenses
A hobby still has startup costs. Clay, modeling tools, plaster, carving tools, digital software, class fees, or makerspace memberships all add up. The trick is to start with a version of the hobby that matches your budget and space.
Training does not always mean a degree. For a hobbyist, it may mean:
- beginner classes at a local arts center
- workshops at a museum or community college
- open-studio sessions with staff guidance
- online tutorials paired with deliberate practice
- school art classes or club projects
A hobby grows best when the training level matches your next challenge. If you are new, a good beginner course is more useful than buying expensive tools you do not yet know how to use.
Exploring the Benefits of Sculpting as a Hobby (website) A general overview of why sculpting can be rewarding as a long-term creative hobby and how regular practice builds skill over time. Link: Exploring the Benefits of Sculpting as a Hobby (website) — https://metamuu.com/archives/21536Organizations and Communities Matter
A hobby lasts longer when other people care about it too. Local studios, museum classes, community art centers, school art rooms, and online artist communities can all help you keep going. Organizations give you classes, exhibitions, workshops, artist talks, and sometimes shared equipment that would be too expensive to own yourself.
You do not have to become an expert alone. In fact, most people improve faster when they have somewhere to ask questions, see examples, and get feedback.
Set Short-Term and Long-Term Goals
The requirement specifically asks for goals, so make them concrete.
Short-term goals
These are goals you could reasonably begin in the next few weeks or months.
- take one beginner class
- make three small studies using one material
- visit a sculpture garden or gallery and take notes on five works
- build a simple home tool kit and organize a workspace
- learn one new skill such as armature building, mold making, or digital blocking-in
Long-term goals
These goals look farther ahead.
- complete a more ambitious project over a school break
- join a recurring studio program or art club
- enter a youth art exhibit or community show
- learn a second method, such as carving after modeling
- build a small portfolio of your best work
What to Tell Your Counselor
A strong discussion answers four things clearly:
- what kind of sculpture hobby you want to pursue
- what training or support you would use
- what the hobby would cost or require
- what your short-term and long-term goals are
If your goals connect back to Req 2a, 2b, or 2c, mention that. For example, maybe you discovered you enjoy figure modeling, museum visits, or casting more than you expected. That helps show that your hobby plan grew out of real experience rather than wishful thinking.
You have now reached the end of the main requirement flow. The next section goes beyond badge minimums and shows you where sculpture can lead next.
Extended Learning
Congratulations
You have finished a badge that asks you to observe carefully, work patiently, and think in three dimensions. Those are not small skills. They are the same habits that help artists design monuments, build maquettes, shape public spaces, and communicate ideas without using a single sentence.
If sculpture grabbed your attention, you do not have to stop here. There are many ways to keep learning—through materials, public art, history, digital tools, and communities of makers.
Learn to Read Form, Not Just Subject
Beginning sculptors often focus first on what a piece shows: a face, a bird, a hand, a spiral, a monument. More experienced viewers also look at how the form works. Where is the weight? Where does the eye travel? Which surfaces catch light? Where does the negative space open up around the object?
Try this with any sculpture you see next:
- walk around it instead of staying in one place
- squint and notice the biggest silhouette shapes
- look for where the form feels balanced or intentionally off-balance
- ask whether texture is supporting the idea or distracting from it
That habit will improve your own artwork because you will start making decisions on purpose instead of only reacting to the subject.
Study Maquettes and Armatures
Many large sculptures begin as something small. A maquette is a small model used to test an idea before building the full piece. An armature is the internal support that helps a sculpture hold its shape while you work.
Those two ideas are worth studying because they solve real problems. A maquette helps you test pose, proportion, and overall design before investing more time and material. An armature helps weak areas—like necks, legs, wings, or extended arms—stay stable while the form develops.
Even if you only make small projects right now, thinking like a sculptor who plans structure will make your work stronger.
Explore Public Art as a Community Voice
Public sculpture does more than decorate a space. It can honor history, invite play, challenge a community, or give a place its identity. A memorial asks people to remember. A sculpture in a park may invite climbing, touching, or gathering. A sculpture outside a library, courthouse, or school can signal what that place values.
The next time you see public art, ask questions such as:
- Why was this placed here?
- Who was meant to see or use it?
- Does it feel welcoming, solemn, surprising, or playful?
- How would the meaning change if it were moved indoors or outdoors?
That kind of thinking connects directly to what you practiced in Req 2c.
Try Digital and Traditional Methods Together
You do not have to choose between hand tools and technology. Many modern artists sketch on paper, model in clay, scan or photograph the form, adjust it digitally, and then return to physical materials. Others start digitally and then print a model for casting or finishing by hand.
Trying both approaches can teach you what each one does best. Clay teaches touch, pressure, and immediate response. Digital tools make rotating, scaling, and revising easier. Both teach form.
Real-World Experiences
Visit a sculpture garden or park
Outdoor sculpture changes with weather, distance, and movement. Notice how scale and setting affect your experience differently than indoor work.
Take a community studio class
Many art centers offer clay modeling, figure sculpture, mold making, or mixed-media construction classes for beginners.
Watch an artist demo or open studio
Seeing how a sculptor organizes tools, stages a project, and fixes mistakes teaches lessons that are hard to get from finished artwork alone.
Sketch sculptures in a museum
Quick drawings of major shapes, silhouettes, and negative spaces will sharpen your eye even if you do not consider yourself a strong drawer.
Try a maquette challenge
Build three tiny versions of the same idea with different poses or proportions. You will learn fast which design reads best in three dimensions.
Organizations
International Sculpture Center
Supports sculptors through publications, community, events, and resources focused specifically on sculpture practice.
National Sculpture Society
Promotes sculpture through exhibitions, education, and opportunities to study contemporary and traditional approaches.
National Sculptors' Guild
Highlights working sculptors and public art while showing how sculpture connects with galleries, collectors, and installations.
Sculpture Magazine
A publication connected to the sculpture world that can help you discover artists, exhibitions, materials, and current conversations.