Req 2a — Head and Figure Study
A human head is one of the toughest subjects in sculpture because people notice mistakes immediately. If the eyes sit too high, the jaw is too narrow, or the back of the skull is missing, the whole piece feels off—even if no one can explain why. That is why this requirement is so useful. It trains your eye to see proportion and your hands to build form step by step.
The requirement then asks you to switch gears and make a smaller animal or person. That second piece helps you think about method. You can stay with modeling clay, try carving wood or plaster, or use 3D software. Your counselor wants to hear how your process changed based on the material.
Part 1: Build a Life-Size Head
Do not start with tiny details like eyelashes or lips. Start with the biggest forms first: the ball of the skull, the front plane of the face, the neck, and the overall tilt of the head. If the large shapes are wrong, no amount of detail will fix the sculpture.
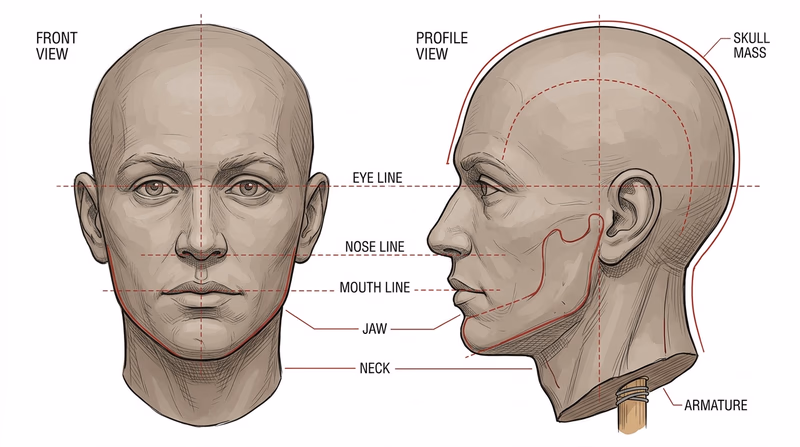
A simple way to think about the head is as a set of masses:
- the rounded cranium
- the face block attached to the front
- the wedge of the jaw
- the neck supporting the whole structure
Many beginners make the face too flat and forget the size of the back of the skull. Others place the eyes too high. In most heads, the eye line sits about halfway between the top of the skull and the bottom of the chin.
Life-size head workflow
Build from big forms to small refinements
- Block in the overall head size before adding features.
- Check the tilt of the head from the front and the side.
- Mark the eye line, nose line, and mouth line lightly before modeling details.
- Compare the left and right sides often so one side does not drift out of balance.
- Step back every few minutes to look at the silhouette, not just the surface.
The first official video is helpful because it shows how a portrait head grows out of large planes and masses instead of random detail.
🎬 Video: Sculpting a Head in Clay (video) — https://youtu.be/6dnyYu4Ff7U?si=j9qg_lNcXGVH7HnQ
The second video gives you another view of portrait modeling so you can compare how different artists handle proportion, smoothing, and facial structure.
🎬 Video: Portrait Sculpting in Clay (video) — https://youtu.be/G-Drvb5WTM0?si=PbFCpiwrwnoTyGOl
Part 2: Make a Small-Scale Animal or Person
Your second piece can teach a different skill depending on the method you choose.
If you model in clay
Modeling is flexible. You can add and subtract material, test poses, and adjust proportions as you go. This works well for animals because you can establish the rib cage, hips, shoulders, and head as simple volumes before refining the pose.
If you carve in wood or plaster
Carving asks you to plan more carefully. Instead of adding clay, you remove what you do not need. That means you should sketch the shape from more than one angle before starting. Keep the design simple and protect thin parts that could snap off. In plaster especially, smooth tools and a rasp can help shape broad surfaces before you move toward smaller details.
If you use 3D modeling software
Digital sculpting still depends on real sculptural thinking. You are still balancing proportion, silhouette, planes, and structure. The advantage is that you can rotate the model, undo mistakes, and test forms quickly. The challenge is that software can tempt you to over-detail before the big shapes are correct.
Tools You Might Use
The pamphlet points out that your fingers are often the most useful tools for soft clay. A loop tool helps trim excess clay and shape transitions. Wooden modeling tools can press planes, define edges, or smooth surfaces. If you carve plaster or wood, rasps, files, gouges, and chisels become more important—but they also require much more attention to safety, as you learned in Req 1.
The official tools video is useful here because it helps you connect tool shape to the marks and surfaces it creates.
🎬 Video: Clay Sculpting Tools (video) — https://youtu.be/IyBRSsVQOTY?si=w4VRR1chFY0pE7ns
How to Explain Your Method to Your Counselor
The last sentence of the requirement matters. Your counselor is not only judging the finished sculpture. They also want to hear how you worked.
A strong explanation usually includes:
- Material choice: Why you used clay, wood, plaster, or software
- Construction method: Whether you added, carved away, or digitally shaped the form
- Tools used: Fingers, loop tools, wooden tools, rasps, files, gouges, stylus tools, or digital brushes
- Main challenge: Proportion, symmetry, stability, texture, or getting the pose right
- Adjustment process: What you changed after stepping back and reevaluating the piece
If you complete Req 2b as well, notice how different mold making feels from direct modeling. In this page you shape the original form directly. In Req 2b, you shape a form and then create a system for reproducing it.
Now move to the mold-and-cast option, where surface detail and careful preparation matter just as much as artistic vision.