Req 2b — Mold and Cast
This requirement teaches one of the most important ideas in sculpture: the difference between an original form and a cast made from it. A banana, pear, pepper, or apple may seem simple, but fruits and vegetables are full of curves, ridges, stems, dimples, and surface texture. That makes them excellent practice subjects for mold making.
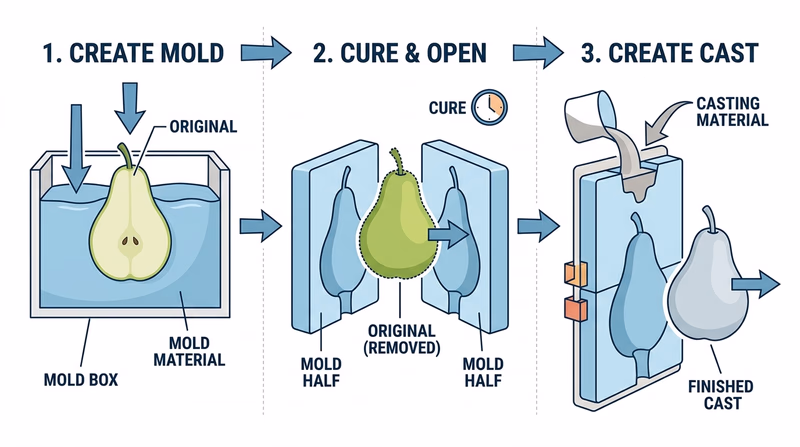
When you make a mold, you are creating a negative space that matches the original object. When you fill that mold, the negative space becomes a positive copy. Understanding that switch—from positive form to negative cavity and back again—is a huge step in thinking like a sculptor.
Choose the Right Subject
Pick a fruit or vegetable with an interesting shape but not too many fragile parts. A pear, pepper, lemon, small squash, or apple usually works better than something with thin leaves or an awkward branching stem. If the object is badly bruised or soft, the mold may capture flaws you do not want.
Look closely at the object before starting:
- Where are the deepest curves?
- Does the shape need a one-part mold or a two-part approach?
- What surface texture do you want to preserve?
- How will you remove the original without damaging the mold?
Think in Three Stages
1. Prepare the original
Clean and dry the fruit or vegetable. Decide how it will sit while the mold material goes around it. You may need clay, a tray, or another support to keep it stable.
2. Build the mold
Plaster sets quickly, so have your materials ready before mixing. Work neatly and watch for trapped air bubbles. Your goal is to capture the shape without making the mold too thin or weak.
3. Make the copy
Once the mold is ready, you can create a copy by filling it with casting material. The copy will reveal how well you planned the mold, sealed details, and handled cleanup.
Mold-making success habits
Small setup choices make a big difference
- Protect the table before mixing plaster.
- Measure and organize supplies before the plaster starts setting.
- Keep the original object stable so it does not shift mid-process.
- Work gently to avoid trapping bubbles against the surface.
- Let the mold set fully before trying to remove the original or cast the copy.
Watch for Common Problems
Mold making can fail in ways that are useful to learn from. If the cast surface looks pitted, you may have trapped air bubbles. If the mold breaks, it may have been too thin or removed too roughly. If the copy sticks, the mold design may not allow easy release.
That is why your explanation to the counselor matters. Even if the result is not perfect, you can still show strong understanding by explaining what happened and what you would change next time.
The official website resource below walks through a fruit-and-vegetable mold project that can help you picture the full sequence before you begin.
Fruit and Vegetable Art - Silicone Moulds and Plaster Casts (website) A step-by-step example of turning produce into molds and casts, useful for visualizing the process before you make your own. Link: Fruit and Vegetable Art - Silicone Moulds and Plaster Casts (website) — https://www.instructables.com/Fruit-and-Vegetable-Art-Silicone-Moulds-and-Plaste/The official video gives you a quick visual reference for how a finished plaster fruit cast can come together.
🎬 Video: Plaster Fruit Cast (video) — https://youtu.be/FN7WLH5tNaY?si=mxbwZBRnf3lv6s6f
Tools and Materials You May Mention
Your exact materials may vary, but your counselor will likely want to hear about items such as:
- mixing container and stir tool
- plaster or casting material
- support tray or work surface protection
- release strategy if your counselor recommends one
- cleanup tools and water source
- carving or smoothing tools for light finishing after the cast is removed
This is also a good place to connect back to Req 1. Plaster dust, messy cleanup, and rushed handling are all safety issues as well as technique issues.
What to Discuss With Your Counselor
When you explain your method, walk through the project in order:
- which fruit or vegetable you chose and why
- how you set it up for molding
- how you mixed and applied the plaster
- how you removed the original
- how you made the copy in the mold
- what worked and what you would improve
That explanation shows that you understand mold making as a process, not just a lucky outcome.
If you also complete Req 2a, compare the two experiences. In Req 2a you directly shaped the final form. Here you shaped a system that could reproduce the form. That contrast is one of the most valuable lessons in the entire badge.
Next comes the visit-based option, where you practice looking at sculpture the way artists, viewers, and curators do.