Shotgun Shooting Merit Badge — Complete Digital Resource Guide
https://merit-badge.university/merit-badges/shotgun-shooting/guide/
Introduction & Overview
Overview
Shotgun Shooting teaches you to handle a shotgun safely, understand the laws and ethics that govern its use, and break clay targets on an approved range under qualified supervision. Unlike a rifle, a shotgun fires a spread of pellets at a moving target—so you learn to read a target’s flight, move with it, and fire through it. The skills you build here apply to trap, skeet, sporting clays, and responsible hunting for the rest of your life.
Then and Now
Then
The shotgun has been part of American life since the colonial era. Settlers used smoothbore muskets—the ancestors of modern shotguns—for game birds and small game because a spread of shot was far more effective against fast-moving targets than a single ball. By the mid-1800s, breech-loading shotguns made reloading faster and safer. Trap shooting, where clay targets launched from a mechanical trap replaced live pigeons, became one of the first organized shooting sports in the United States. Shotgun events appeared in the first modern Olympics in 1900 and have been part of the Games ever since.
Now
Modern shotgun sports include trap, skeet, and sporting clays—each with its own target presentation and challenge level. Shotguns remain the primary tool for upland bird hunting, waterfowl hunting, and home defense. Competitive shooters fire tens of thousands of rounds per year, chasing scores measured in fractions of a second of reaction time and fractions of an inch of lead. Scouting’s program gives you two paths: modern shotshell (the most common) or muzzleloading shotgun (for Scouts who want to connect with the traditions of black powder shooting).
Get Ready!
This merit badge combines classroom knowledge with live fire on an approved range. A Scout who arrives at the range already knowing the safety rules, the parts of a shotgun, and the vocabulary of the shooting sports will spend more time breaking targets and less time catching up. Use this guide to prepare before each session.
How the Badge Works
Requirement 1 covers safety, laws, wildlife conservation, hygiene, and the shooting-sports community through ten connected sub-requirements. Requirement 2 is the hands-on shooting option: Option A (modern shotshell) or Option B (muzzleloading shotgun). Requirement 3 asks you to look ahead and plan where safe, responsible firearms skills could take you next.
Next Steps
Start with the Requirement 1 overview page to see the full list of safety topics and begin working through all ten.
Req 1 — Safety and Responsibility Overview
Requirement 1 has ten sub-requirements (1a through 1j), and together they form the safety and responsibility foundation for the entire badge. Work through each one carefully before your first range session if possible.
These pages move from core firearm safety into laws, conservation, hygiene, and the wider shotgun-sports community. The knowledge you build here is the foundation for everything in Requirement 2.
The Ten Sub-Requirements
- Req 1a — Projectiles and Why They Demand Respect: Define what a projectile is and explain why high-speed projectiles demand careful handling and approved locations.
- Req 1b — Safe Gun Handling Rules: Learn and explain the universal rules of safe gun handling.
- Req 1c — A Friend Asks to See the Gun: Describe exactly how you would respond if a friend asked to see a firearm at your home.
- Req 1d — Eye and Hearing Protection: Understand why and how to protect your eyes and ears on the range.
- Req 1e — Gun Laws in Your Community and State: Research and explain the main points of firearms law where you live.
- Req 1f — Hunting and Wildlife Resources: Connect hunting to the responsible management of renewable wildlife populations.
- Req 1g — Hunter Education and State Hunting Laws: Complete hunter education or obtain your state’s hunting regulations, then explain key laws and list huntable wildlife.
- Req 1h — Hygiene on the Range: Explain the hygiene practices that protect shooters from lead and other hazards.
- Req 1i — Shotgun Sports and Local Opportunities: Identify three shotgun sports, find local places to practice, and explain how to get involved.
- Req 1j — Sources of Information on Firearms: Build a list of reliable sources for firearms information and discuss them with your counselor.
Planning Your Path
Most counselors work through these in order, but the sequence is flexible. If your troop has a range day scheduled and you have limited preparation time, prioritize 1a, 1b, 1d, and 1h—those topics directly affect your safety on the firing line. The research-based requirements (1e, 1f, 1g, 1i, 1j) can be completed before or after your range session.
Req 1a — Projectiles and Why They Demand Respect
A projectile is any object propelled forward by a force. In a shotgun, that force is rapidly expanding gas from burning propellant inside a shotshell. When the trigger is pulled, a charge of pellets (shot) exits the muzzle at roughly 1,100 to 1,300 feet per second. A slug—a single solid projectile sometimes fired from a shotgun—can exceed 1,600 feet per second. Once shot leaves the barrel, you have zero control over where it goes.
Why a Shotgun’s Projectiles Are Unique
Unlike a rifle, which fires one bullet, a shotgun fires hundreds of pellets in a single shot. Those pellets spread outward in a cone-shaped pattern as they travel. This spread is what makes a shotgun effective against fast-moving birds and clay targets—but it also means more projectiles are in the air with each trigger pull.
Key consequences of high-speed projectiles from a shotgun:
- Penetration: Even small birdshot can penetrate skin, eyes, and thin walls at close range. Larger shot sizes and slugs penetrate far deeper.
- Range: Birdshot can travel over 200 yards. Buckshot and slugs remain dangerous at much greater distances.
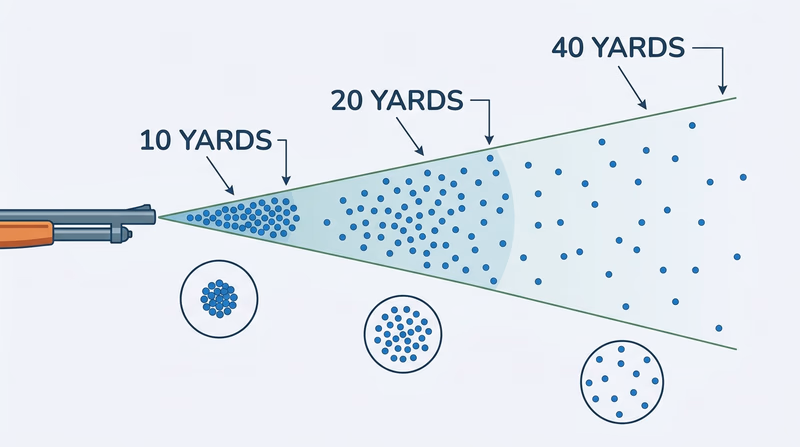
- Spread: The shot pattern widens with distance, increasing the area affected by a single pull of the trigger.
- Ricochet: Shot pellets can bounce off water, rocks, and hard surfaces in unpredictable directions.
- No recall: Every pellet that leaves the barrel is permanently beyond your control.
Approved Locations Matter
“Approved locations” means places specifically designed and designated for shooting:
- Backstops, berms, and overhead baffles contain projectiles safely. Shooting ranges are engineered for this purpose.
- Range safety officers enforce rules so everyone follows the same procedures at the same time.
- Scouting America’s National Range and Target Activities Manual defines what qualifies as an approved range for Scout shooting activities. Your counselor will only work with you at a location that meets these standards.
Shooting anywhere else—a backyard, an open field without proper containment, or an unapproved area—puts people, animals, and property at risk.
The Counselor Conversation
Your counselor wants to hear a clear definition of “projectile” in your own words and specific reasoning about why speed and energy make firearms different from other tools. Explain the physics—energy increases with the square of velocity—and connect that directly to the need for approved, supervised locations.
Req 1b — Safe Gun Handling Rules
These rules are universal. They apply to shotguns, rifles, handguns, air guns, and muzzleloaders. They apply whether the firearm is loaded, unloaded, on a range, in a home, or in transit. Memorize them, internalize them, and follow them every single time.
The Four Universal Rules
1. Treat every firearm as if it is loaded. Never assume a gun is unloaded. Every time you pick up a firearm—even one you just set down—check its condition. Open the action, look into the chamber, and verify it is clear. This habit prevents the most common type of firearms accident: the one that begins with “I didn’t know it was loaded.”
2. Always point the muzzle in a safe direction. A “safe direction” means a direction where, if the gun were to fire, no person would be injured and no property would be damaged. On a range, that means downrange. At home, that means away from people, walls with people on the other side, and windows. This is the single most important rule: if the muzzle is always pointed safely, nothing else can cause a tragedy.
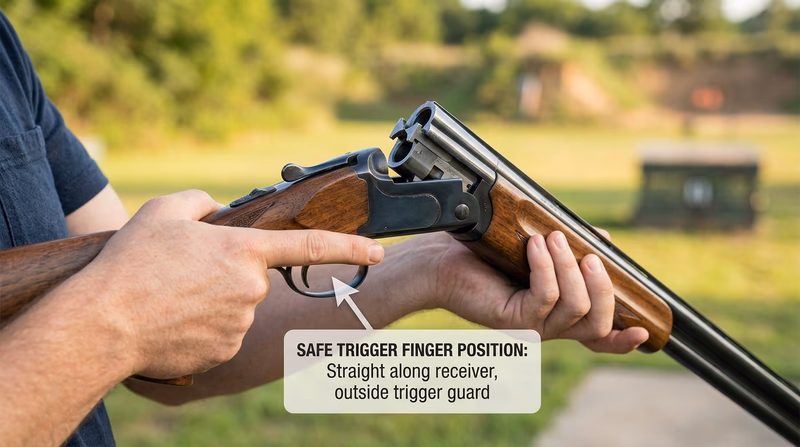
3. Keep your finger off the trigger until you are ready to shoot. Your finger rests along the side of the receiver or the trigger guard—never inside the guard—until the instant you have made the decision to fire and have the target in your sight. This prevents unintentional discharges caused by stumbling, flinching, or being startled.
4. Be sure of your target and what is beyond it. Before you fire, you must positively identify your target and know what lies behind and around it. Shotgun pellets can pass through a clay target and continue traveling. In a hunting scenario, you must see the entire animal clearly—never shoot at sound, movement, or a shape you cannot identify.
Why All Four Rules Work Together
Each rule is a backup for the others. If you break one rule but follow the remaining three, no one gets hurt. Accidents happen when two or more rules are violated at the same time. That layered protection is what makes these rules so effective—but only if you follow all of them, all the time.
The Counselor Conversation
Be ready to state all four rules from memory and explain the reasoning behind each one. Your counselor may present a scenario—“You’re walking through a field and you trip”—and ask which rules protect you and the people around you.
Req 1c — A Friend Asks to See the Gun
This requirement tests whether you can make the right decision under social pressure. A friend asks to see a gun—maybe out of curiosity, maybe to impress someone. What you do next either reinforces safe habits or opens the door to a serious accident.
The Right Response, Step by Step
Say no clearly and without apology. Something like: “I can’t show it to you without my parent (or guardian) here.” You are not being rude; you are being responsible.
Do not touch the firearm yourself. Even if you know where it is stored, even if you know the combination or key, even if you think it is unloaded—do not retrieve it to show a friend without a parent or guardian present and supervising.
Get an adult involved. If the friend is genuinely interested, offer to ask your parent or guardian later. With adult supervision, a properly cleared firearm can be shown safely—but never casually and never without an adult present.
If a friend finds an unsecured firearm, the same NRA Eddie Eagle message applies: Stop. Don’t touch. Run away. Tell an adult. This applies to you and to anyone in your home.
Why This Matters
Most firearms accidents involving young people happen in homes, not on ranges. Curiosity is natural, but curiosity combined with an unsecured firearm and no adult supervision is the most dangerous combination in firearms safety. Your response to this situation is not theoretical—it may happen to you.
Proper Storage Prevents the Situation
Firearms should always be stored unloaded, with the action open, in a locked safe, cabinet, or case. Ammunition should be stored separately. If firearms in your home are stored this way, a friend cannot easily access them even if tempted. Part of this requirement is understanding that proper storage is the first line of defense.
The Counselor Conversation
Your counselor wants to hear your specific response—the words you would actually say and the actions you would actually take. Practice saying it aloud. A vague “I’d be careful” is not enough. Show that you would refuse, explain why, and involve an adult.
Req 1d — Eye and Hearing Protection
Eye and hearing protection are mandatory on every shooting range. No exceptions. Damage to your eyes or ears from shooting is cumulative and often permanent—meaning each unprotected exposure adds to the total, and the damage does not heal.
Eye Protection
Why You Need It
When a shotgun fires, hot gases, unburned powder, and fragments of the shotshell exit the chamber area. Ejected hulls fly sideways. Clay target fragments fall from the sky. Any of these can reach your eyes. A single fragment can cause permanent vision loss.
Types of Eye Protection
- Impact-rated safety glasses (ANSI Z87.1): The minimum standard. Look for the “Z87+” marking on the lens or frame. Regular sunglasses or prescription glasses are not rated for impact and should not be substituted.
- Shooting glasses with interchangeable lenses: Many shooters use amber or orange lenses for clay target sports because they increase contrast against the sky, making the target easier to see. Clear lenses work for overcast days. Gray or smoke lenses reduce brightness on sunny days.
- Wraparound styles: Provide side protection against ejected hulls and debris.
Proper Use
Wear your eye protection before any firearms are handled and keep it on until the range is declared safe and all firearms are cased or racked. Eye protection goes on first, comes off last.
Hearing Protection
Why You Need It
A 12-gauge shotgun produces roughly 150–160 decibels at the shooter’s ear. Permanent hearing damage begins at about 140 decibels for a single impulse. Every unprotected shot costs you hearing you will never get back. The damage is painless at first, which is why many shooters do not realize the harm until years later.
Types of Hearing Protection
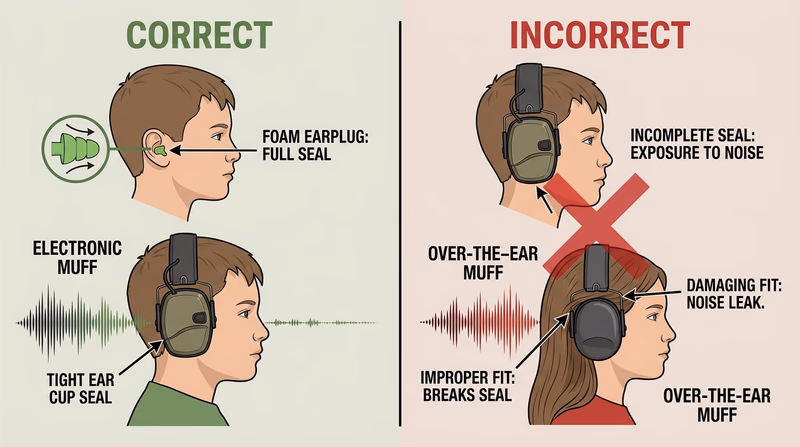
- Foam earplugs: Inexpensive, disposable, and effective (NRR 25–33). Roll them tightly, insert into the ear canal, and let them expand. Proper insertion is essential—a loosely inserted plug provides almost no protection.
- Over-the-ear muffs: Easier to put on correctly and visible to range officers. NRR 22–30 for most models. Some shooters find muffs more comfortable for extended sessions.
- Electronic muffs: Amplify normal conversation and range commands while blocking impulse noise above a safe threshold. More expensive, but they let you hear your instructor clearly. Popular on shotgun ranges where communication matters.
- Doubling up: For maximum protection, wear foam plugs under muffs. Many competitive shotgun shooters do this, especially on busy ranges where multiple shooters are firing.
Proper Use
Insert or don ear protection before any firearms are loaded and keep it on until the line is clear. On a shotgun range, you may be standing near other shooters who are also firing—so even when you are not shooting, your hearing is at risk.
The Counselor Conversation
Your counselor will want you to explain both the need and the types for each. Be specific about NRR ratings and why proper fit matters. Mention that damage is cumulative and irreversible—that is the key concept.
Req 1e — Gun Laws in Your Community and State
Firearms laws vary significantly by state and even by city or county. Your job for this requirement is to research the laws that apply where you actually live—not general national rules.
Where to Find Your Laws
- Your state legislature’s website: Search for your state’s firearms statutes. Many states publish a summary or FAQ page.
- Your state’s fish and wildlife agency: Publishes hunting regulations and often summarizes firearms transport and use laws.
- Local police department or sheriff’s office: Can direct you to municipal ordinances about firearms.
- NRA-ILA (Institute for Legislative Action): Maintains a state-by-state summary of firearms laws at nraila.org.
Categories to Research
Every state’s laws will address most of these topics. Be prepared to explain the main points of each:
Ownership and purchase: Minimum age to own or purchase a shotgun. Whether a permit is required. Background check requirements for purchases from licensed dealers.
Youth possession: Whether minors can possess a shotgun and under what conditions (supervised by an adult, on a range, while hunting with a license, etc.).
Transport: How firearms must be transported in a vehicle—typically unloaded, in a case, and sometimes in the trunk or a locked compartment.
Concealed carry and open carry: While these laws primarily apply to handguns, some states have provisions that apply to long guns as well. Know the basics.
Discharge restrictions: Many municipalities prohibit discharging a firearm within city limits except at an approved range. Rural areas may allow shooting on private land with restrictions.
Storage laws: Some states or cities require firearms to be stored locked or with trigger locks, especially when minors are in the home.
The Counselor Conversation
Your counselor is looking for evidence that you did real research specific to your area. Bring notes. Be able to explain at least four or five main points of your state’s laws and any local ordinances you discovered. If a law surprised you, say so—that shows genuine engagement.
Req 1f — Hunting and Wildlife Resources
Wildlife is a renewable resource—populations reproduce and grow naturally. But “renewable” does not mean “unlimited.” Without management, wildlife populations can crash from habitat loss, disease, or overharvest. Hunting, when properly regulated, is one of the most effective tools for keeping wildlife populations healthy and in balance with their habitat.
The North American Model of Wildlife Conservation
The United States and Canada share a wildlife management system built on seven principles. Two are especially relevant here:
Wildlife is held in trust by the government for the benefit of all citizens. No one “owns” wild animals. State and federal agencies manage wildlife populations on behalf of the public.
Hunting is regulated by law. Seasons, bag limits, and legal methods are set by wildlife biologists based on population data. These regulations ensure that harvest does not exceed what the population can sustain.
How Hunting Funds Conservation
Hunters pay for conservation directly through several mechanisms:
- License and tag fees: Revenue goes directly to state wildlife agencies for habitat management, population surveys, and enforcement.
- Federal excise taxes (Pittman-Robertson Act): An 11% tax on firearms, ammunition, and archery equipment generates hundreds of millions of dollars annually. This money is distributed to state agencies for wildlife restoration, habitat acquisition, and hunter education.
- Habitat stamps: Many states sell duck stamps and habitat stamps whose revenue funds wetland and habitat conservation.
The connection is not abstract. Waterfowl hunting with shotguns is directly tied to wetland conservation. Hunters’ dollars have restored populations of whitetail deer, wild turkeys, wood ducks, and many other species from historic lows.
🎬 Video: Since 1937: How the Pittman-Robertson Act Transformed Wildlife Conservation — NSSF—The Firearm Industry Trade Association — https://www.youtube.com/watch?v=LcI4wA65q4U
Shotguns and Hunting
Shotguns are the primary firearm for bird hunting—both upland (pheasant, quail, grouse, dove) and waterfowl (ducks and geese). They are also widely used for small game (rabbit, squirrel) and, with slugs or buckshot, for deer in some states. The spread pattern of shot makes shotguns effective for fast-moving, flying targets where a single bullet would be impractical.
The Counselor Conversation
Explain the connection between regulated hunting and wildlife population health. Mention the funding mechanisms. Your counselor wants to see that you understand hunting is a management tool, not just a recreational activity—and that the money hunters spend directly supports conservation for everyone, including non-hunters.
Req 1g — Hunter Education and State Hunting Laws
This requirement has two parts: how you get the information and what you do with it. You have two paths for gathering the information, and then you must complete both sub-requirements 1g1 and 1g2 regardless of which path you take.
Two Ways to Meet the “Or” Condition
Option 1 — Complete a state hunter education course. Most states offer hunter education in person, online, or as a combination. The course covers firearms safety, hunting laws, ethics, wildlife management, and survival skills. Completing it earns you a hunter education certificate required to purchase a hunting license in most states. This is the recommended path if you have any interest in hunting—the certificate is usually valid for life.
Option 2 — Obtain a copy of your state’s hunting laws. Every state publishes a hunting regulations digest each year. You can download it from your state’s fish and wildlife agency website or pick up a printed copy where licenses are sold. This document contains all the information you need for 1g1 and 1g2.
Talk with your counselor before committing to a path. If you have already completed hunter education, you are all set. If not, the course is the richer learning experience, but the digest alone satisfies the requirement.
Requirement 1g1
Your state’s hunting regulations will cover several main categories. Look for and be ready to explain each:
Seasons: Dates when specific species may be legally hunted. Seasons vary by species, weapon type (archery, muzzleloader, general), and sometimes by region within the state.
License and tag requirements: Who must purchase a license, what tags are required for specific game, and what age exemptions exist.
Legal shooting hours: Hunting is typically restricted to daylight hours or defined windows around sunrise and sunset. This varies by species.
Method of take restrictions: What types of firearms or ammunition are allowed for each species. For shotgun hunters, common restrictions include non-toxic shot requirements for waterfowl (steel, bismuth, or tungsten instead of lead) and minimum gauge or shot size for certain game.
Special firearms laws: Some states restrict magazine capacity for hunting, require plugged magazines (limiting a shotgun to three shells total), or prohibit certain ammunition types in specific areas.
Trespass and land access rules: Where you are and are not allowed to hunt, and how to obtain permission for private land.
Requirement 1g2
Your state regulations will have a complete list of game species. Typical categories include:
- Upland birds: pheasant, quail, grouse, dove, chukar, woodcock (varies by state)
- Waterfowl: ducks, geese, and other migratory birds—regulated federally through the Migratory Bird Treaty Act and by state regulations
- Big game: deer, elk, turkey, bear, pronghorn, moose (varies widely by state)
- Small game: rabbit, squirrel, hare
- Furbearers: coyote, fox, raccoon, beaver (varies by state)
Your list should reflect your actual state. Don’t list animals that are not found or not legally hunted in your region. Your counselor will know if your list is accurate.
Preparing for Your Counselor Discussion
Bring your hunter education certificate or a printed/downloaded copy of your state’s regulations. Be prepared to explain—not just recite—what the main laws mean and why they exist. Connect these rules back to the wildlife conservation concepts from Req 1f.
Req 1h — Hygiene on the Range
Shooting exposes you to lead, carbon residue, and chemical by-products of combustion. These hazards are manageable if you follow consistent hygiene practices, and dangerous if you ignore them. Lead is the primary concern: it is present in shot pellets, primers, and the residue that accumulates on hands, clothing, and surfaces at a range.
Lead Exposure: Why It Matters
Lead is a toxic heavy metal. It enters your body through ingestion (hand-to-mouth contact) and inhalation (airborne particles from primer combustion). Even low-level lead exposure over time can affect your nervous system, kidneys, and blood chemistry. Young people are more vulnerable than adults because their bodies absorb lead more readily.
Hygiene Guidelines for Every Range Session
Before Shooting
- Avoid eating, drinking, or touching your face after handling firearms or ammunition until you have washed your hands.
- Wear eye and hearing protection (covered in Req 1d).
- Consider wearing a hat with a brim to reduce exposure to airborne residue on outdoor ranges.
During Shooting
- Do not eat, drink, chew gum, or use tobacco products on the firing line. Any hand-to-mouth contact transfers lead and residue directly.
- Avoid rubbing your eyes or nose.
- If you need to take a water break, leave the firing line and wash your hands first.
After Shooting
- Wash your hands thoroughly with cold water and soap before eating, drinking, or touching your face. Use cold water—hot water opens pores and can increase lead absorption through the skin. Specialized lead-removing wipes or soaps (such as D-Lead) are even more effective than regular soap.
- Change or launder clothes worn on the range before sitting on furniture or wearing them around the house. Lead residue settles on fabric.
- Shower as soon as practical after a range session, especially before eating a meal.
- Clean firearms in a well-ventilated area, not at the kitchen table. Cleaning solvents and accumulated lead residue are both hazards in enclosed spaces.
On Indoor Ranges
Indoor ranges concentrate airborne lead and require stronger precautions. Most indoor ranges have ventilation systems that pull air downrange away from shooters. Follow any additional hygiene rules posted by the facility—these often include required hand-washing before leaving the range area.
The Counselor Conversation
Your counselor expects you to explain the lead hazard clearly and list at least four or five specific hygiene practices you would follow. Mention the cold-water hand-washing detail—it shows you understand the reasoning, not just the rules.
Req 1i — Shotgun Sports and Local Opportunities
Shotgun sports revolve around breaking clay targets (also called “birds” or “clays”) launched from mechanical traps. Each sport presents targets differently, and each develops a different set of skills. Here are the three most widely available sports you should know:
Three Shotgun Sports
Trap
In trap, shooters stand at five stations arranged in a line behind a single trap house. The trap throws targets away from the shooters at varying angles. You do not know the exact angle until the target launches, so you must react quickly and shoot the target as it moves away from you. Most trap targets are rising and moving outward.
- Stations: 5, in a line (the “trap line”)
- Targets per round: 25 (5 from each station)
- Key skill: Quick target acquisition and consistent mount
- Why it’s popular: Trap is the most widely available shotgun sport in the United States. Many Scout camps with shotgun programs use trap-style setups.
Skeet
In skeet, two trap houses—a “high house” on the left and a “low house” on the right—throw targets across a fixed flight path. Shooters move through eight stations arranged in a semicircle. Targets cross in front of you, so you must lead the target (shoot ahead of its flight path). Some stations present doubles—one target from each house simultaneously.
- Stations: 8, in a semicircle
- Targets per round: 25 (singles and doubles)
- Key skill: Leading crossing targets and handling doubles
- Why it’s popular: Skeet teaches you to read crossing angles, which is directly useful for bird hunting.
Sporting Clays
Sporting clays is often called “golf with a shotgun.” Shooters walk a course of 10–15 stations, each presenting targets that simulate different hunting scenarios—incoming birds, crossing shots, overhead targets, rabbits (targets rolling along the ground), and more. No two stations are the same, and no two courses are the same.
- Stations: 10–15 per course
- Targets per round: Typically 50 or 100
- Key skill: Adapting to varied presentations
- Why it’s popular: The variety makes sporting clays one of the fastest-growing shotgun sports. It rewards versatility over repetition.
🎬 Video: Difference between Skeet, Trap, 5-Stand and Sporting Clays | Shotgun Games Explained — Jackson Hole Shooting Experience — https://www.youtube.com/watch?v=AtQ_9QTNwyA
Finding Local Opportunities
To identify places in your community where you can practice:
- Search the National Shooting Sports Foundation (NSSF) range finder at wheretoshoot.org for ranges near you that offer trap, skeet, or sporting clays.
- Contact your local gun club: Many communities have clubs that host weekly trap or skeet nights. Most welcome new shooters and offer rental guns and instruction.
- Check with your Scout council: Your council may operate a shotgun range at a camp property, and shooting sports directors can point you to approved ranges nearby.
- Ask your counselor: Merit badge counselors for Shotgun Shooting are often active at local clubs and can connect you directly.
Getting Involved
Most clubs allow walk-on participation for a per-round fee. If you decide to continue, many offer annual memberships, youth programs, and coached leagues. Organizations like 4-H Shooting Sports, the Scholastic Clay Target Program (SCTP), and USA Shooting have structured youth programs with team-based competition.
The Counselor Conversation
Be ready to name and explain three sports, identify at least one real location near you where each is available (or explain what you found when you searched), and describe the steps you would take to get started.
Req 1j — Sources of Information on Firearms
This requirement asks you to think about where you would go for reliable, trustworthy information about firearms—not random internet searches, but established sources with genuine expertise.
Categories of Reliable Sources
Organizations
- National Rifle Association (NRA): Training programs, safety courses, instructor certifications, and publications. The NRA’s education division is the most widely recognized source of firearms training curricula in the United States.
- National Shooting Sports Foundation (NSSF): The trade association for the firearms industry. Publishes safety materials, maintains the “Where to Shoot” range finder, and promotes responsible firearm ownership.
- USA Shooting: The national governing body for Olympic and Paralympic shooting sports. Manages competition programs, coaching education, and the Junior Olympic Development Program.
- Civilian Marksmanship Program (CMP): A federally chartered program promoting marksmanship training, particularly for youth. Offers clinics, competitions, and educational materials.
- 4-H Shooting Sports and Scholastic Clay Target Program (SCTP): Youth-focused programs with trained adult leaders and structured curricula.
Government and Regulatory Sources
- Your state’s fish and wildlife agency: Authoritative source for hunting laws, seasons, license requirements, and hunter education.
- Bureau of Alcohol, Tobacco, Firearms and Explosives (ATF): Federal agency that regulates firearms commerce, manufacturing, and importation. Publishes federal firearms laws and regulations.
Local Sources
- Your merit badge counselor: A certified NRA shotgun instructor with hands-on expertise.
- Local gun clubs and ranges: Staffed by experienced shooters who can answer questions about equipment, technique, and local regulations.
- Hunter education instructors: Trained and certified by your state wildlife agency.
- Sporting goods stores with firearms departments: Staff at reputable stores can answer equipment questions and point you to local resources.
Publications
- NRA publications (American Rifleman, Shooting Sports USA): Cover equipment reviews, safety articles, competition results, and legislative updates.
- Scouting America’s National Range and Target Activities Manual: The definitive reference for shooting sports programs within Scouting.
The Counselor Conversation
Come prepared with a written list of at least five or six specific sources. For each, be ready to explain what kind of information that source provides and why you consider it reliable. Your counselor is looking for critical thinking—not just a list, but an understanding of what makes a source trustworthy.
Req 2 — Pick Your Option
You will complete exactly one of the two options below. Read through both before deciding, and talk with your counselor about which option your authorized range supports. Your choice may be largely determined by what equipment is available where your counselor operates.
The Two Options at a Glance
Option A — Shotgun Shooting (Modern Shotshell Type) You shoot a modern break-action, pump, or semi-automatic shotgun using factory-loaded shotshells at clay targets. You learn the principal parts, action types, gauges, shotshell construction, safe storage and handling, range procedures, cleaning, and how to select a shotgun. Then you demonstrate shooting skill by breaking clay targets using the four fundamentals: position, mount, vision, and movement. This is the most common choice—the vast majority of Scout camps and commercial ranges support it.
Option B — Muzzleloading Shotgun Shooting You shoot a percussion-cap muzzleloading shotgun using black powder and loose shot. This option covers the history of muzzleloading shotguns, principal parts, black powder grades and storage, loading procedures, firing failures, range procedures, cleaning, and shotgun selection. You finish by breaking clay targets with the same four fundamentals. This option is more involved and requires a range equipped for muzzleloading. Choose it if you have a strong interest in historical firearms or black powder traditions.
How to Choose
| Option A — Modern Shotshell | Option B — Muzzleloading | |
|---|---|---|
| Firearm | Break-action, pump, or semi-auto | Percussion-cap muzzleloader |
| Propellant | Factory-loaded shotshell | Black powder (loose) |
| Loading | Insert shells into chamber | Measure powder, wads, shot |
| Sub-requirements | 10 (a through j) | 13 (a through m) |
| Availability | Very common | Less common |
| Complexity | Moderate | Higher |
The most important factor is what your counselor’s authorized range supports. Ask your counselor before making a final decision.
Option A Overview
Option A covers the modern shotgun from the ground up—how it works, how to handle and store it safely, how shotshells function, how to maintain the gun, and finally how to shoot clay targets. You will work through ten sub-requirements that progress from knowledge to range skills to scored shooting.
What You’ll Complete
- Req 2A-a — Principal Parts and Action Types: Identify the principal parts of a shotgun and explain how different action types work.
- Req 2A-b — Safe Storage and Handling: Know and demonstrate the rules for safely storing and handling a shotgun.
- Req 2A-c — Parts of a Shotgun Shell: Identify the components of a shotshell and explain what each does.
- Req 2A-d — Shotgun Gauges: Learn the various gauges, their uses, and how to choose the right one.
- Req 2A-e — Misfires, Hangfires, and Squib Fires: Understand firing failures and the correct response to each.
- Req 2A-f — Range Procedures and Commands: Demonstrate safe behavior and follow range commands throughout a session.
- Req 2A-g — Cleaning Safety Rules and Materials: Learn the safety rules for cleaning and identify the materials you need.
- Req 2A-h — Clean a Shotgun Properly: Demonstrate the full cleaning process.
- Req 2A-i — Selecting a Shotgun: Discuss the factors that go into choosing a shotgun for a specific purpose.
- Req 2A-j — Shooting Moving Targets: Shoot clay targets using the four fundamentals and meet the minimum score.
Preparation Tips
Study the knowledge requirements (2A-a through 2A-i) before your first range session so your time on the range is focused on shooting, not scrambling to learn vocabulary. Your counselor may quiz you on parts, gauges, and procedures while you are at the range.
If you have access to an unloaded, verified-safe shotgun at home with a parent’s supervision, practice mounting it to your shoulder smoothly and consistently. A good mount is the foundation of shotgun shooting—the stock needs to come to the same spot on your cheek every time.
Req 2A-a — Principal Parts and Action Types
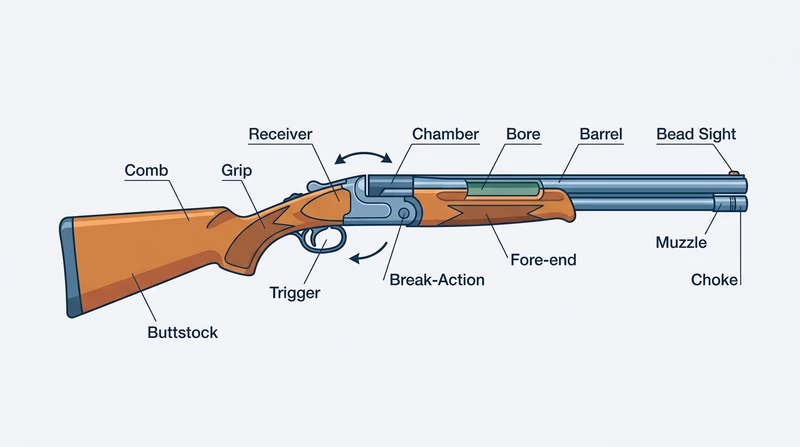
Every shotgun, regardless of action type, has three main groups of parts: the stock, the action (or receiver), and the barrel. Understanding these groups gives you the vocabulary to discuss any shotgun you encounter.
The Three Main Groups
Stock
The stock is the part you hold. It includes:
- Buttstock: Fits against your shoulder. The shape and length of the buttstock determine how the gun mounts and how recoil is transmitted to your body.
- Comb: The top edge of the buttstock where your cheek rests. Comb height affects where your eye lines up with the barrel.
- Grip (or wrist): Where your trigger hand wraps around the stock behind the receiver.
- Fore-end (or forend): The part your support hand holds under the barrel. On a pump-action, the fore-end slides back and forth to cycle the action.
Action (Receiver)
The action houses the firing mechanism—the trigger, hammer or striker, safety, and the mechanism that loads and ejects shells. The action type defines how the gun operates (see below).
Barrel
The barrel is the long tube through which shot travels. Key features include:
- Chamber: The rear section of the barrel where the shotshell sits before firing.
- Bore: The interior diameter of the barrel, measured as “gauge.”
- Choke: A constriction at the muzzle end that controls how tightly the shot pattern stays together. Common chokes range from cylinder (no constriction, widest spread) to full (tight constriction, narrowest spread).
- Bead sight: A small bead at the muzzle end used as a visual reference. Some shotguns have a second mid-bead for alignment.
Action Types
Break-Action (Hinge-Action)
The barrel hinges open at the receiver, exposing the chamber for loading and unloading. Break-actions come in two forms:
- Single-shot: One barrel, one shot. Simple, reliable, and the lightest option. Common at Scout camps.
- Over-under (O/U): Two barrels stacked vertically, each with its own chamber. The standard for competitive trap, skeet, and sporting clays.
- Side-by-side (SxS): Two barrels arranged horizontally. Traditional for upland hunting.
How it works: Push the top lever, break the gun open, insert shells, close the gun. After firing, open the gun to extract or eject the spent hull.
Pump-Action
The shooter manually slides the fore-end rearward and forward to eject the spent hull and chamber the next round. Pump-actions hold multiple shells in a tubular magazine under the barrel.
How it works: Load shells into the magazine tube. Slide the fore-end forward to chamber the first round. Fire. Slide the fore-end back to eject the hull, then forward to chamber the next round. Repeat.
Semi-Automatic (Autoloader)
The gun uses gas pressure or recoil energy from the fired shell to eject the spent hull and chamber the next round automatically. The shooter only needs to pull the trigger for each shot.
How it works: Load shells into the magazine tube. The first round is chambered manually. After each shot, the action cycles automatically—ejecting the spent hull and loading the next shell.
The Counselor Conversation
Be ready to identify all three groups of parts on an actual shotgun (or a diagram) and explain what each part does. Then name and describe at least two action types, including how shells are loaded, fired, and ejected in each.
Req 2A-b — Safe Storage and Handling
Safe storage and proper handling are two sides of the same coin. Storage prevents unauthorized access when you are away from the gun. Handling rules protect everyone when the gun is in your hands.
Safe Storage Rules
- Store firearms unloaded with the action open. For a break-action, this means broken open. For a pump or semi-automatic, this means the bolt locked to the rear.
- Lock firearms in a safe, cabinet, or locked case. A trigger lock or cable lock adds an additional layer if a dedicated safe is not available, but a locked container is always preferred.
- Store ammunition separately from firearms—ideally in a different locked container or a different location.
- Keep keys and combinations private. Only authorized adults should have access.
- Store firearms out of sight even when locked. A gun safe in a closet is better than one visible from a hallway.
Safe Handling Rules
These build on the four universal rules from Req 1b and add shotgun-specific procedures:
- Always check the action first. When you pick up a shotgun, open the action immediately and visually verify the chamber and magazine are empty. Do this every time, even if someone just told you it is unloaded.
- Keep the action open whenever the gun is not actively being fired on the line. On a shotgun range, an open action is the universal signal that the gun is safe.
- Carry the shotgun with the muzzle pointed in a safe direction. On a range, approved carry positions include muzzle-up (vertical), muzzle-down at the ground ahead of you, or broken open (for break-actions). Your range officer will specify which carry method is required.
- Never hand a loaded shotgun to another person. Unload, open the action, then hand it over with the action open so the other person can verify it is clear.
- Engage the safety when not actively shooting. The safety is a mechanical device and can fail, so it supplements—but never replaces—the other handling rules.
Demonstration
Your counselor will ask you to physically demonstrate these rules on a range with an actual shotgun. Practice the sequence: pick up the gun, open the action, check it visually, carry it properly, and hand it to someone else safely. Smooth, deliberate actions show competence.
Req 2A-c — Parts of a Shotgun Shell
A shotgun shell (also called a shotshell) is a self-contained unit of ammunition. Unlike a rifle cartridge that fires a single bullet, a shotshell fires a charge of many small pellets. Understanding each part helps you select the right ammunition and recognize problems.
The Parts, from Base to Top
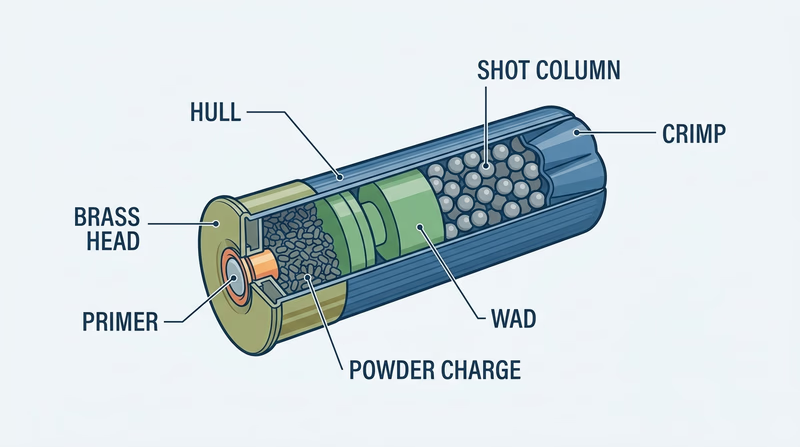
Brass Head (Base)
The metal base of the shell. It contains the primer pocket and reinforces the hull where chamber pressure is highest. The gauge marking and shell length are stamped here.
Primer
A small, impact-sensitive cap pressed into the center of the brass head. When the firing pin strikes the primer, it detonates and sends a flash of flame into the powder charge. This is what initiates the entire firing sequence.
Powder Charge (Propellant)
Smokeless powder sits above the primer. When ignited by the primer flash, it burns rapidly and produces expanding gases. The amount and type of powder determine the shell’s velocity and pressure.
Wad
A plastic cup-and-piston assembly between the powder and the shot. The wad serves three functions:
- Seals gas pressure behind the shot column so expanding gases push the shot forward instead of leaking past it.
- Cushions the shot during the initial acceleration, reducing pellet deformation.
- Holds the shot together as it travels down the bore, releasing it at the muzzle.
Shot (Payload)
The projectiles themselves—small spherical pellets made of lead, steel, bismuth, tungsten, or other materials. Shot size is designated by a number: smaller numbers mean larger pellets (No. 2 shot is bigger than No. 8 shot). Larger pellets carry more energy per pellet but provide fewer pellets in the pattern.
Crimp
The folded closure at the top of the hull that holds everything inside. When the powder ignites, pressure forces the crimp open and releases the wad and shot. Most modern shells use a star crimp (folded inward) rather than a roll crimp.
Hull (Case)
The plastic (or sometimes paper) tube that holds all the components together. Hulls are color-coded by manufacturer and type, but color is not a reliable indicator of gauge—always read the markings on the brass head.
How It All Works Together
Trigger pull → firing pin strikes primer → primer ignites powder → expanding gases push wad and shot forward → crimp opens → wad separates from shot after leaving the muzzle → shot spreads into a pattern.
The Counselor Conversation
Be ready to identify all parts on a cutaway shell or diagram and explain the function of each. Your counselor may hand you a live shell and ask you to point to where each component is located.
Req 2A-d — Shotgun Gauges
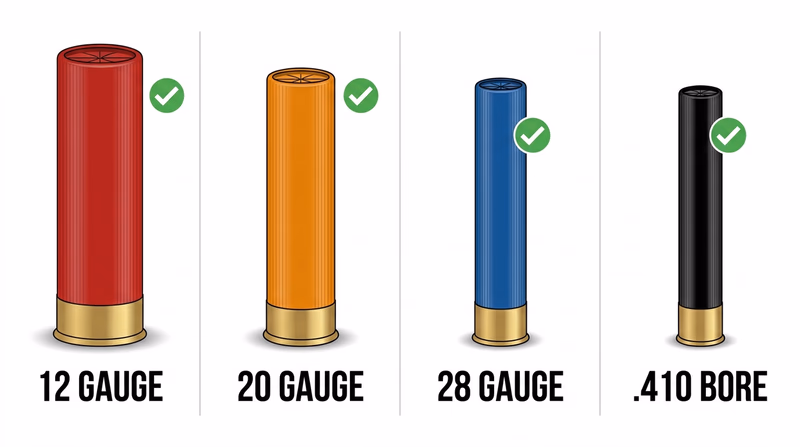
“Gauge” is how shotgun bore diameter is measured. The system dates back centuries: the gauge number equals the number of lead balls of that bore diameter it takes to make one pound. A 12-gauge bore fits a lead ball weighing 1/12 of a pound. A 20-gauge bore is smaller—it fits a ball weighing 1/20 of a pound. Lower gauge number = larger bore.
The one exception is the .410, which is measured in caliber (inches of bore diameter), not gauge.
Common Gauges
| Gauge | Bore Diameter | Typical Use |
|---|---|---|
| 10 gauge | 0.775" | Waterfowl (less common today) |
| 12 gauge | 0.729" | Most versatile; trap, skeet, sporting clays, hunting |
| 16 gauge | 0.662" | Upland hunting (niche but loyal following) |
| 20 gauge | 0.615" | Youth and smaller-framed shooters, upland hunting |
| 28 gauge | 0.550" | Skeet, sporting clays (sub-gauge events) |
| .410 bore | 0.410" | Small game, introductory shooting |
Choosing a Gauge for a Purpose
For clay target sports (trap, skeet, sporting clays): The 12 gauge is the standard. It throws the most shot, produces the densest patterns, and gives you the best chance of breaking targets. Most ranges and competitions are built around the 12 gauge. The 20 gauge is a good second choice for youth shooters who find 12-gauge recoil uncomfortable.
For upland bird hunting (pheasant, quail, grouse): The 12 or 20 gauge are the most popular. The 20 gauge is lighter to carry over long walks, produces less recoil, and is effective at typical upland distances (under 40 yards). The 16 gauge is a traditional favorite in this role.
For waterfowl hunting (ducks and geese): The 12 gauge dominates because it throws enough non-toxic shot (steel or bismuth) to produce effective patterns at the longer distances waterfowl require. Some hunters use 10 gauge for geese.
For a youth shooter or beginner: A 20 gauge or .410 generates less recoil, making it easier to develop good fundamentals without flinching. However, the .410’s small shot charge makes breaking targets harder—so many instructors prefer starting youth on a 20 gauge for clay target work.
Why Gauge Matters for Safety
Never fire ammunition of a different gauge in a shotgun. A 20-gauge shell can slide partway down a 12-gauge barrel, creating a catastrophic obstruction if a 12-gauge shell is then loaded and fired behind it. Always verify that the ammunition matches the gauge stamped on the barrel.
The Counselor Conversation
Be ready to name at least four gauges, explain the gauge numbering system, and recommend a specific gauge for two or three different scenarios with your reasoning.
Req 2A-e — Misfires, Hangfires, and Squib Fires
A failure to fire is any situation where you pull the trigger and the expected discharge does not happen—or does not happen correctly. There are three types, and the correct response is different for each. Getting this wrong can cause serious injury or death.
Misfire
What it is: You pull the trigger, the firing pin strikes the primer, and nothing happens. No bang, no recoil, no sound.
Common causes: Defective primer, contaminated ammunition (moisture or oil on the primer), weak firing pin spring, or improper seating of the shell in the chamber.
Procedure:
- Keep the muzzle pointed downrange.
- Wait at least 30 seconds. (A misfire can occasionally be a hangfire in disguise.)
- Open the action carefully, keeping the muzzle downrange.
- Remove the unfired shell and set it aside—do not put it back in your ammunition supply.
- Inspect the primer. If the firing pin left a visible dent but the shell did not fire, the primer or powder was defective.
Hangfire
What it is: You pull the trigger and there is a noticeable delay—from a fraction of a second to several seconds—before the gun fires. The primer ignited but the powder was slow to catch.
Common causes: Deteriorated or contaminated powder, old ammunition, or primer that produced insufficient flame to ignite the powder charge immediately.
Why it is dangerous: If you lower the gun or open the action during the delay, the shell can fire while the muzzle is pointed in an unsafe direction.
Procedure:
- Keep the muzzle pointed downrange.
- Wait at least 30 seconds with the muzzle downrange and your finger off the trigger. Do not open the action.
- After 30 seconds, if the gun still has not fired, treat it as a misfire: open the action carefully, remove the shell, and set it aside.
The 30-second rule exists because you cannot tell the difference between a misfire and a hangfire at the moment of the click. Both start the same way. Waiting protects you.
Squib Fire
What it is: The gun fires but with noticeably less recoil, a quieter report, or a “pop” instead of a “bang.” This means the powder charge did not burn fully, and the wad or shot may be lodged in the barrel.
Common causes: Insufficient powder charge (often from a reloading error), severely deteriorated ammunition, or contaminated powder.
Why it is extremely dangerous: If a wad or shot charge is stuck in the barrel and you fire another round behind it, the barrel can burst. This is a catastrophic failure.
Procedure:
- Stop immediately. Do not fire another round.
- Keep the muzzle downrange. Open the action.
- Unload the gun completely.
- Visually inspect the bore from the breech end (look through the barrel from the chamber toward the muzzle) for any obstruction.
- If anything is lodged in the bore, do not attempt to clear it by firing. Use a cleaning rod to push the obstruction out, or hand the gun to your instructor.
Prevention
- Use factory-loaded ammunition from reputable manufacturers.
- Store ammunition in a cool, dry place.
- Inspect shells before loading—look for dented hulls, corroded brass, or moisture.
- Never use ammunition that has been submerged in water.
- If you reload (handload) ammunition, follow published load data exactly.
🎬 Video: Common Shotgun Malfunctions | Shotgun 101 with Top Shot Chris Cheng — NSSF—The Firearm Industry Trade Association — https://www.youtube.com/watch?v=csBUFUb0Gf4
The Counselor Conversation
Your counselor will likely quiz you on all three types: what each one sounds like, what causes it, and the exact procedure to follow. The 30-second wait rule and the danger of a barrel obstruction from a squib fire are critical safety points.
Req 2A-f — Range Procedures and Commands
This requirement is not a written test—it is a performance evaluation. Your counselor and the range safety officer will observe your behavior from the moment you arrive at the range through your last shot and beyond. Every action you take demonstrates whether you have internalized safe habits.
Standard Range Commands
Shotgun ranges use a specific set of verbal commands. Know what each means and respond immediately:
“Eyes and ears!” — Put on your eye and hearing protection. This command is given before any firearms are handled.
“Load!” or “Shooters, load!” — You may now load your shotgun with the number of shells specified (usually one or two, depending on the drill). Keep the muzzle pointed downrange and the safety engaged until you call for your target.
“The line is ready” or “Shooters ready” — The range officer confirms all shooters are in position and prepared to fire.
“Pull!” — The shooter’s call for a target to be thrown. On some ranges, the shooter says “Pull” and the trapper releases the target. On others, the range officer manages target release.
“Cease fire!” — Stop shooting immediately. Do not fire, even if a target is in the air. Open your action, remove any shells, and keep the muzzle pointed downrange. This command may be given by anyone who sees a safety concern.
“Unload and open actions” or “Make safe” — Remove all shells from your gun, open the action, and keep the muzzle pointed in a safe direction. This is the standard end-of-string command.
“The range is clear” or “Range is cold” — All firearms are unloaded with actions open. It is now safe to go forward of the firing line if needed.
Attitude and Behavior
Your counselor is evaluating more than your knowledge of commands. They are watching for:
- Consistent muzzle awareness: Your muzzle stays in a safe direction at all times—while loading, between shots, while talking, and while walking.
- Immediate response to commands: When you hear “cease fire,” you stop instantly. No hesitation, no finishing a shot.
- Action discipline: Your action stays open whenever the gun is not actively being fired.
- Composure: You remain calm, focused, and in control even when you miss targets or experience a malfunction.
- Respect for others: You do not distract other shooters, cross behind them carelessly, or handle their equipment without permission.
🎬 Video: Introduction to Range Safety and Etiquette - Firearm Safety — NSSF—The Firearm Industry Trade Association — https://www.youtube.com/watch?v=COvFyw-6Fqs
A Typical Range Session Flow
- Arrive at the range. Receive the safety briefing.
- “Eyes and ears” — put on protection.
- Move to the firing line with the shotgun action open and muzzle pointed safely.
- Wait for the load command. Load the specified number of shells.
- Engage the safety. Call “Pull.” Disengage safety, mount, track, fire.
- Repeat as directed.
- At “cease fire” or end-of-string, unload, open the action, and remain in place.
- When the line is cleared, step back and case or rack the gun.
The Counselor Conversation
This requirement is demonstrated, not just discussed. Show your counselor through your actions on the range that you understand and follow every command, handle the shotgun safely at all times, and maintain the right attitude throughout the session.
Req 2A-g — Cleaning Safety Rules and Materials
Cleaning a shotgun is maintenance, not recreation. It removes fouling (residue from burning powder and shot) that can degrade accuracy, damage the bore, and cause malfunctions. But cleaning involves chemicals, lead residue, and a firearm—so the process has its own safety rules.
Safety Rules for Cleaning
Verify the shotgun is completely unloaded before beginning. Open the action, visually inspect the chamber and magazine, and physically check with a finger. Remove all ammunition from the cleaning area entirely—not just from the gun, but from the table or bench.
Clean in a well-ventilated area. Bore solvents and lead residue produce fumes that should not be inhaled in an enclosed space. A garage with the door open, a covered porch, or an outdoor bench is ideal.
Point the muzzle in a safe direction throughout cleaning, just as you would during handling.
Wear gloves or wash hands thoroughly after cleaning. Lead fouling accumulates on cleaning patches and the cleaning rod. Follow the hygiene guidelines from Req 1h.
Keep solvents away from skin, eyes, and mouth. Bore solvents are chemical products. Read the label. If you get solvent in your eyes, flush with water immediately.
Never look down the muzzle of a shotgun. When checking the bore, look from the breech (chamber) end with the action open and light shining in from the muzzle end.
Materials Needed
- Cleaning rod: A one-piece rod long enough to pass through the entire barrel. Shotgun cleaning rods are typically sized for 12 or 20 gauge.
- Bore brush: A bronze or nylon brush that matches your gauge. The brush scrubs fouling from the bore walls.
- Cleaning patches: Cotton or synthetic patches that fit your gauge. Used with solvent to wipe the bore clean.
- Bore solvent: A chemical cleaner that dissolves powder fouling and lead or plastic residue. Follow the manufacturer’s instructions.
- Gun oil or lubricant: Applied lightly to metal surfaces after cleaning to prevent rust and ensure smooth action operation.
- Clean rags or paper towels: For wiping down external surfaces.
- Patch holder (jag or slotted tip): Attaches to the cleaning rod and holds patches in the bore.
The Counselor Conversation
Be ready to list the safety rules from memory and name the materials. Your counselor may point to items in a cleaning kit and ask you to identify each one and explain its purpose. The next requirement (2A-h) is where you demonstrate the actual cleaning process.
Req 2A-h — Clean a Shotgun Properly
This is a hands-on demonstration. Your counselor will watch you clean a shotgun from start to finish, evaluating both your technique and your safety habits throughout the process.
Step-by-Step Cleaning Process
1. Make the Gun Safe
Open the action. Visually and physically verify the chamber and magazine are empty. Remove all ammunition from the cleaning area.
2. Disassemble as Needed
For a break-action, separate the barrel(s) from the receiver by opening the gun fully and releasing the forend latch. For a pump-action, remove the barrel per the manufacturer’s instructions. You do not need to fully disassemble the gun—just separate the barrel from the action so you can access the bore from the breech end.
3. Run the Bore Brush
Attach the bore brush to the cleaning rod. Insert the rod from the breech end and push it all the way through the barrel and out the muzzle. Pull it back through. Repeat 5–10 times. The brush loosens fouling from the bore walls.
4. Apply Solvent with a Patch
Switch to the patch holder. Thread a cleaning patch through the jag or slotted tip, apply bore solvent, and push it through the bore from breech to muzzle. Let the solvent sit for a minute or two to dissolve fouling.
5. Run Clean Patches
Push clean, dry patches through the bore from breech to muzzle. Each patch picks up dissolved residue. Continue with fresh patches until a patch comes out clean—no dark residue, no color.
6. Oil the Bore Lightly
Run one patch with a light coating of gun oil through the bore. This leaves a thin protective film that prevents rust during storage. If you will be shooting again soon, you may skip this step or wipe the bore dry before your next session (excess oil in the bore can affect the first shot).
7. Wipe Down External Surfaces
Use a lightly oiled rag to wipe down all metal surfaces—the receiver, trigger guard, barrel exterior, and any exposed metal on the action. This removes fingerprints (which contain moisture and salt) and prevents rust.
8. Reassemble and Store
Put the gun back together. Open the action. Store the gun unloaded with the action open in a locked safe or case.
Common Mistakes to Avoid
- Cleaning from the muzzle end: Always clean from breech to muzzle. Cleaning from the muzzle can damage the crown (the edge of the bore at the muzzle), which affects shot pattern.
- Over-oiling: A thick layer of oil collects dust and gums up the action. Use a thin film only.
- Skipping the bore brush: Patches alone will not remove hard fouling. The brush does the scrubbing work.
🎬 Video: How to Clean Your Shotgun — Texas Parks and Wildlife — https://www.youtube.com/watch?v=Hy764uvX6PA
The Counselor Conversation
Demonstrate the entire process while narrating what you are doing and why. Your counselor is checking that you verify the gun is empty before you start, clean from breech to muzzle, use the correct sequence, and handle the gun safely throughout.
Req 2A-i — Selecting a Shotgun
Choosing a shotgun is not about buying the most expensive model—it is about matching the gun to the shooter and the intended use. Here are the factors that matter.
Intended Use
What will you do with the shotgun? The answer shapes every other decision.
- Trap, skeet, or sporting clays: An over-under or semi-automatic in 12 gauge with a 28"–32" barrel is standard. Longer barrels swing more smoothly on moving targets.
- Upland bird hunting: A lighter 12 or 20 gauge with a 26"–28" barrel. You will carry it for miles, so weight matters.
- Waterfowl hunting: A 12 gauge (sometimes 10) with a longer barrel and the ability to accept steel or non-toxic shot. Many waterfowl hunters prefer pump-actions or semi-automatics for their ability to fire multiple shots.
- Home defense: A 12 or 20 gauge pump-action with an 18"–20" barrel is the most common choice. Not a primary consideration for this merit badge, but worth noting.
Fit
Fit is the single most important factor for shotgun accuracy. Unlike a rifle, you do not aim a shotgun with sights aligned to your eye—you point it. If the gun fits your body, your eye naturally looks straight down the rib (the flat strip on top of the barrel) when you mount the stock to your cheek and shoulder.
Key fit dimensions:
- Length of pull: The distance from the trigger to the center of the buttpad. Too long, and you cannot mount the gun smoothly. Too short, and your thumb hits your nose during recoil.
- Drop at comb: How far below the rib the top of the stock sits. This controls where your eye aligns relative to the barrel.
- Cast: Whether the stock is offset slightly to the left or right to align with the shooter’s dominant eye.
Many youth shotguns have adjustable stocks or shorter lengths of pull designed for younger shooters. A gun that fits you now may not fit you in two years as you grow.
Gauge
Covered in detail in Req 2A-d. The 12 gauge is the most versatile. The 20 gauge is a common choice for younger or smaller-framed shooters.
Action Type
Covered in Req 2A-a. Break-actions are the simplest and safest for beginners. Pump-actions are reliable and affordable. Semi-automatics reduce felt recoil but are more complex.
Weight and Balance
A heavier gun absorbs more recoil but is harder to carry. A lighter gun is easier to carry but kicks harder. Balance—where the gun’s weight is centered—affects how smoothly it swings on a moving target. A well-balanced gun pivots naturally at the hands.
Budget
Shotguns range from under $200 for a basic single-shot to many thousands for competition over-unders. For a Scout starting out, a used pump-action or single-shot in good condition is an excellent and affordable choice. Do not let budget pressure push you toward a gun that does not fit or is unreliable.
The Counselor Conversation
Your counselor wants a thoughtful discussion, not a shopping list. Be ready to explain how you would match a shotgun to a specific purpose and shooter, and why fit matters more than brand or price.
Req 2A-j — Shooting Moving Targets
This is the scored shooting exercise—where you put everything together. You must hit at least 12 out of 25 clay targets in two separate 25-target groups, for a minimum of 50 shots total. The two groups do not have to be shot back-to-back.
The Four Fundamentals of Shotgun Shooting
Unlike rifle shooting, where you aim using sights on a stationary target, shotgun shooting requires you to track and lead a moving target. The four fundamentals work together as a single fluid motion:
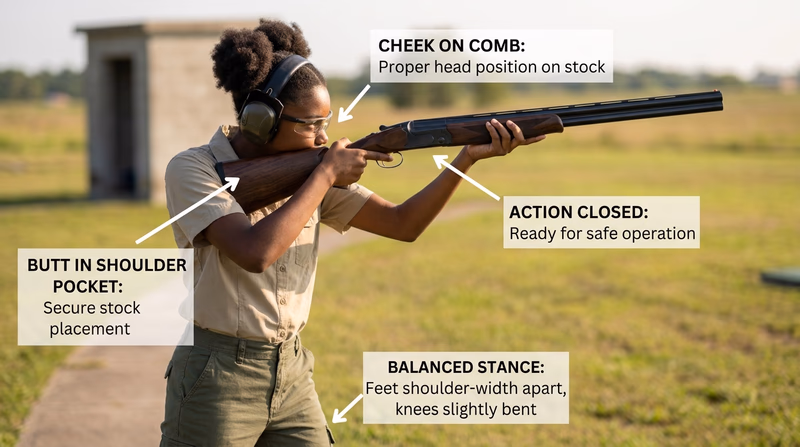
1. Position (Stance)
Stand with your feet about shoulder-width apart, with your lead foot (left foot for right-handed shooters) slightly forward. Your weight should be slightly forward, on the balls of your feet. Keep your knees slightly bent and your upper body leaning slightly toward the target. This athletic stance lets you rotate your whole body smoothly.
2. Mount
Bring the stock to your cheek and shoulder in one smooth motion. The comb of the stock contacts your cheek first, then the buttpad seats into the pocket of your shoulder. A consistent mount puts your eye in the same position relative to the barrel every time—this is what makes pointing accurate.
3. Vision (Eyes on the Target)
Keep both eyes open and focused on the target—not the barrel, not the bead. Your eyes should track the clay target the same way they track a ball thrown to you. The barrel stays in your peripheral vision. If you shift your focus to the barrel, you will lose the target’s speed and trajectory.
4. Movement (Swing and Lead)
Start the gun moving with the target before you mount. As you mount, accelerate the barrel past the target (this creates “lead”—the distance ahead of the target where you need the shot to be when it arrives). Fire while the gun is still moving and continue the swing after the shot. This follow-through prevents you from stopping the gun at the instant of firing, which is the most common cause of misses.
The Scoring Standard
- Two groups of 25 targets each.
- Hit at least 12 out of 25 in each group.
- The groups do not need to be shot consecutively.
- A minimum of 50 total shots must be fired.
- Shooters must shoot in rounds of 25, though the rounds do not have to happen on the same day.
Twelve out of twenty-five is a more demanding standard than the old 5-of-15 benchmark, so consistency matters. Most Scouts who struggle are stopping the gun, rushing the mount, or shifting focus from the target to the barrel.
Target Setup Rules
Your counselor and range officer will manage the target setup, but you should understand the rules:
- Targets may be thrown by a hand trap, manual mechanical trap, or on a standard trap or skeet field.
- On a trap field, you shoot from station 3 with the trap set to throw straightaway targets.
- On a skeet field, shoot from station 7, low house.
- All targets should be thrown at a reasonable speed, in the same direction, and climbing after release.
- Use an age-appropriate 12-, 16-, or 20-gauge target shotgun with commercially manufactured ammunition only. Reloads are not permitted in Scouting America range and target activities.
Tips for Success
- Focus on the target, not the score. Worrying about your count causes tension, which disrupts your mount and follow-through.
- Follow through on every shot. Keep the gun moving after you pull the trigger, even if you think you missed.
- Breathe. Take a breath before calling for each target. Tension and held breath cause jerky movements.
- Accept misses. Even experienced shooters miss. Focus on the process, and the hits will come.
🎬 Video: How to Shoot Trap | Shotgun Tips with Gil Ash — NSSF—The Firearm Industry Trade Association — https://www.youtube.com/watch?v=yOcxjSEDPmk
Option B Overview
Option B takes you back to the roots of shotgun shooting. You will learn to load, fire, and clean a percussion-cap muzzleloading shotgun using black powder, wads, and loose shot—the same basic process used for centuries before modern shotshells were invented. This option has thirteen sub-requirements that cover history, safety, loading, shooting, maintenance, and scored target work.
What You’ll Complete
- Req 2B-a — History of the Muzzleloading Shotgun: Discuss the development of the muzzleloading shotgun with your counselor.
- Req 2B-b — Principal Parts and How They Work: Identify the principal parts and explain their functions.
- Req 2B-c — Safe Storage and Handling: Know and demonstrate safe storage and handling rules.
- Req 2B-d — Grades of Black Powder: Identify the various grades and explain their proper use.
- Req 2B-e — Black Powder Storage Safety: Discuss how black powder must be stored safely.
- Req 2B-f — Components of a Load: Learn what goes into a muzzleloading shotgun charge.
- Req 2B-g — Loading Procedures and Accessories: Identify the procedures and accessories for safely loading.
- Req 2B-h — Misfires, Hangfires, and Squib Fires: Understand firing failures and the correct response for a muzzleloader.
- Req 2B-i — Range Procedures and Commands: Demonstrate safe behavior and follow commands on the range.
- Req 2B-j — Cleaning Safety Rules and Materials: Learn the rules and materials for cleaning a muzzleloader.
- Req 2B-k — Clean a Muzzleloader Properly: Demonstrate the full cleaning process.
- Req 2B-l — Selecting a Muzzleloading Shotgun: Discuss what to consider when choosing a muzzleloading shotgun.
- Req 2B-m — Shooting Moving Targets: Break clay targets with a muzzleloader and meet the minimum score.
Preparation Tips
Option B has three additional sub-requirements compared to Option A because muzzleloading requires you to understand the propellant (black powder), its safe storage, and the manual loading process—none of which apply to modern shotshells.
Study the knowledge requirements (2B-a through 2B-l) before your range day. Loading a muzzleloader on the firing line takes significantly longer than inserting a modern shotshell, so the more familiar you are with the sequence beforehand, the smoother your range session will go.
Req 2B-a — History of the Muzzleloading Shotgun
The muzzleloading shotgun evolved over roughly four centuries, driven by one goal: a reliable way to launch a spread of shot at moving game.
Key Eras
Matchlock Fowling Pieces (1400s–1600s)
The earliest smoothbore firearms designed for shot were called “fowling pieces” because their primary use was hunting birds (fowl). The matchlock ignition system used a slow-burning cord (match) clamped in a mechanical arm. When the trigger was pulled, the match lowered into a pan of priming powder, which flashed and ignited the main charge through a small hole in the barrel. Matchlocks were slow, unreliable in wet weather, and dangerous—the constantly lit match was a hazard near loose powder.
Flintlock Era (1600s–1840s)
The flintlock replaced the match with a piece of flint held in a spring-loaded jaw (the cock). Pulling the trigger drove the flint against a steel plate (the frizzen), producing sparks that ignited priming powder in the pan. Flintlocks were faster, more weatherproof, and eliminated the need for a burning match. Flintlock fowling pieces became the standard smoothbore for bird hunting across Europe and colonial America. Many of the long-barreled fowling pieces used in the American colonies were flintlocks.
Percussion Cap Era (1820s–1870s)
The invention of the percussion cap by the Reverend Alexander John Forsyth (patented 1807, practical caps developed by the 1820s) was a revolution. A small copper cap containing a shock-sensitive chemical (fulminate of mercury, later replaced by safer compounds) was placed on a nipple at the breech. When the hammer struck the cap, it produced a reliable, instant flash that ignited the main charge. Percussion caps were weatherproof, fast, and simple. This is the ignition system used in the muzzleloading shotguns approved for this merit badge.
The Transition to Breech-Loading
By the 1870s, self-contained shotshells and breech-loading designs made muzzleloading shotguns obsolete for most practical purposes. But the skills and traditions of muzzleloading live on in competitive shooting, historical reenactment, and hunting seasons reserved for muzzleloading firearms.
The Counselor Conversation
Be ready to describe the progression from matchlock to flintlock to percussion cap and explain what each improvement solved. You do not need to memorize exact dates, but you should understand the cause-and-effect chain of innovation.
Req 2B-b — Principal Parts and How They Work
A muzzleloading shotgun shares the same three major groups as a modern shotgun—stock, action, and barrel—but several parts are unique to the muzzleloading design.
Stock
- Buttstock: Fits against your shoulder, just like a modern shotgun. Muzzleloader stocks are often made of walnut or maple.
- Comb: The top edge of the buttstock where your cheek rests.
- Wrist (grip): The narrow section behind the action where your trigger hand grips.
- Fore-end (forend): Held by the support hand. On many muzzleloading shotguns, the forend is secured to the barrel by wedge pins or barrel bands.
Barrel
- Muzzle: The open end of the barrel where you load the charge from the front.
- Bore: The interior of the barrel. Muzzleloading shotguns have smoothbore barrels (no rifling). Bore diameter corresponds to gauge, just as in modern shotguns.
- Breech plug: A threaded plug that seals the rear end of the barrel. The main powder charge sits in front of it.
- Touch hole / drum and nipple: On a percussion-cap muzzleloader, the nipple is a small metal post threaded into the drum (or directly into the barrel) at the breech. The percussion cap sits on top of the nipple. When the hammer strikes the cap, flame travels through the nipple’s flash channel into the powder charge.

Action / Lock
The “lock” is the firing mechanism of a muzzleloader:
- Hammer: A heavy, spring-loaded arm that strikes the percussion cap on the nipple. The hammer has two positions: half-cock (a safety position where the hammer is pulled partway back and should not fall if the trigger is pulled) and full-cock (the firing position).
- Trigger: Releases the hammer from full-cock.
- Lock plate: The metal plate on the side of the stock that houses the internal spring and tumbler mechanism.
Ramrod
A long rod (usually wooden or fiberglass) stored under the barrel in a channel called the ramrod thimbles. The ramrod is used to push the powder charge, wads, and shot down the barrel during loading, and to seat them firmly against the breech plug. It is an essential tool, not an accessory.
How They Work Together
- Powder is poured down the muzzle.
- Wads and shot are pushed down on top of the powder with the ramrod.
- A percussion cap is placed on the nipple.
- The hammer is pulled to full-cock.
- The trigger is pulled, releasing the hammer.
- The hammer strikes the cap, sending flame through the nipple into the powder.
- The powder ignites, and expanding gases drive the wads and shot out of the barrel.
The Counselor Conversation
Be ready to point to each part on an actual muzzleloading shotgun (or diagram) and explain what it does. Pay special attention to the nipple, hammer positions (half-cock vs. full-cock), and the ramrod—these are the parts unique to muzzleloading.
Req 2B-c — Safe Storage and Handling
The four universal rules of safe gun handling (Req 1b) apply fully to muzzleloaders. But muzzleloading adds several unique considerations because the gun’s loaded/unloaded status is harder to verify and because black powder requires special storage precautions.
Safe Storage Rules
- Store unloaded. A muzzleloader is unloaded when the barrel is empty of powder, wads, and shot, and no percussion cap is on the nipple. Unlike a modern shotgun where you can visually check the chamber, a muzzleloader requires you to use the ramrod to check whether a charge is present (see “checking the bore” below).
- Remove the percussion cap before storing. A capped muzzleloader can fire if the hammer falls—and an uncapped gun with a loaded barrel is still dangerous.
- Store in a locked safe, cabinet, or case, just as with any firearm.
- Store black powder and percussion caps separately from the gun and from each other. Black powder is far more sensitive to sparks and flame than modern smokeless powder.
Safe Handling Rules
- Never assume a muzzleloader is unloaded. Use the ramrod to check: insert it into the barrel and note where it stops. If it stops short of the breech plug, the gun may contain a charge. Compare the ramrod depth to the barrel length.
- Keep the muzzle pointed in a safe direction at all times. During loading, the muzzle will point upward—keep others clear of that direction.
- Keep the hammer at half-cock when handling a loaded gun you are not about to fire. Half-cock is the safety position; it should prevent the hammer from falling if the trigger is bumped. But never rely on half-cock alone—keep the muzzle safe regardless.
- Never cap the nipple until you are on the firing line and ready to shoot. Capping the gun is the last step before firing, not a transport or carry step.
- Never blow into the muzzle to check for a charge or clear debris. This is extremely dangerous if any residual embers remain in the bore.
- Never lean over the muzzle while loading. Stand to the side, and keep your face and body away from the muzzle opening.
Demonstration
Your counselor will ask you to physically demonstrate proper handling—picking up the muzzleloader, checking it with the ramrod, carrying it safely, and handing it to another person with the hammer down and the nipple uncapped.
Req 2B-d — Grades of Black Powder
Black powder is the propellant used in muzzleloading firearms. Unlike modern smokeless powder (used in shotshells and cartridges), black powder is an explosive—it can be ignited by spark, flame, static electricity, or friction. Understanding its grades and proper handling is essential for safety.
What Black Powder Is
Black powder is a mixture of potassium nitrate (saltpeter), charcoal, and sulfur. When ignited, it burns rapidly and produces a large volume of gas, which propels the wads and shot out of the barrel. It also produces a dense cloud of white smoke—which is why muzzleloading is sometimes called “smoke pole” shooting.
Grades of Black Powder
Black powder is classified by granule (grain) size. The designations use the letter “F” (for “fine”):
| Grade | Granule Size | Typical Use |
|---|---|---|
| Fg (1F) | Coarsest | Large-bore muskets and cannons |
| FFg (2F) | Medium | Shotguns and large-caliber rifles (.50 cal and up) |
| FFFg (3F) | Fine | Smaller rifles (.45 cal and under), priming pans on flintlocks |
| FFFFg (4F) | Very fine | Priming powder for flintlock pans only |
For muzzleloading shotguns, FFg (2F) is the standard grade. Its granule size burns at the right rate to produce safe pressures in a shotgun bore without creating dangerous pressure spikes.
Why Grade Matters
Finer-grained powder burns faster and produces higher peak pressures. Using too fine a grade (like FFFg) in a shotgun can generate excessive pressure, potentially damaging the barrel or causing a catastrophic failure. Never substitute a finer grade than what is specified for your firearm.
Black Powder Substitutes
Products like Pyrodex, Triple Seven, and Blackhorn 209 are synthetic substitutes designed to mimic black powder’s performance with less fouling and easier cleanup. They are classified by volume equivalence (not weight) to black powder. Some substitutes are approved for percussion-cap muzzleloaders; others require different ignition systems. Your counselor will tell you whether your range uses real black powder or an approved substitute.
Critical safety rule: Never use modern smokeless powder in a muzzleloader. Smokeless powder generates far higher pressures than black powder and will destroy the gun.
The Counselor Conversation
Be ready to name the common grades, identify which grade is used in shotguns (FFg), explain why using the wrong grade is dangerous, and state the absolute prohibition against smokeless powder in a muzzleloader.
Req 2B-e — Black Powder Storage Safety
Black powder is classified as an explosive, not merely a propellant. It is sensitive to spark, flame, friction, and static electricity. Improper storage can cause a fire or explosion. These rules are non-negotiable.
Storage Rules
Store in the original manufacturer’s container. Black powder containers are designed to limit the consequences of accidental ignition. The lid is intended to blow off rather than allow pressure to build. Never transfer black powder into a glass jar, metal can, or any non-approved container.
Keep in a cool, dry location. Heat increases the sensitivity of black powder. Moisture can degrade it. A cool, dry area away from direct sunlight and heat sources (furnaces, water heaters, stoves) is required.
Store away from any ignition source. No open flames, no smoking, no sparks, and no electrical equipment that could produce a spark. This includes keeping black powder away from workbenches where grinding, welding, or soldering takes place.
Store separately from percussion caps. Caps are themselves a source of ignition. If stored together and a cap detonates accidentally, it could ignite the powder. Keep them in separate locations or at minimum in separate locked containers.
Store separately from firearms. A loaded firearm near a powder supply creates an unacceptable risk chain.
Limit the quantity stored. Local fire codes and federal regulations (enforced by the ATF) limit how much black powder an individual may store. Common residential limits are 1–5 pounds. Know your local laws.
Keep locked and inaccessible to unauthorized persons. Children, unauthorized family members, and visitors should not be able to access stored black powder.
Label the storage location. If your local fire code requires it, mark the exterior of the storage area so firefighters know explosives are present inside.
On the Range
At the range, only the amount of powder needed for the session should be out. The main powder supply stays in its sealed container, away from the firing line. Powder is measured and poured using the powder measure—never pour directly from the container into the muzzle, because a residual ember in the bore could ignite the stream of powder back to the container.
The Counselor Conversation
Be ready to list at least five specific storage rules and explain the reason behind each. The counselor may ask: “What would happen if you stored black powder next to a furnace?” or “Why shouldn’t you pour from the main container?”
Req 2B-f — Components of a Load
A muzzleloading shotgun charge is assembled by the shooter, one component at a time, directly into the barrel. Every component matters—getting the sequence wrong or using the wrong amount can cause a dangerous failure.
The Components, in Loading Order
1. Powder Charge
A measured amount of FFg (2F) black powder. The charge is measured by volume using a powder measure or pre-measured tubes—never weighed on a scale (black powder loads are specified by volume, not weight). The amount depends on the gauge and the manufacturer’s recommendations for your specific gun. A typical 12-gauge muzzleloading shotgun uses 70–90 grains (by volume) of FFg.
2. Over-Powder Wad
A thick, firm wad placed directly on top of the powder charge. Its job is to seal the bore so that expanding gases push the shot forward instead of leaking past it. Traditional over-powder wads are made of fiber (cardboard) or felt. Some shooters use a plastic wad cup similar to modern shotshell wads.
3. Cushion Wad (Optional)
A softer wad placed on top of the over-powder wad. The cushion wad compresses during the initial acceleration, reducing deformation of the shot pellets. This improves pattern quality. Fiber or felt cushion wads are common.
4. Shot Charge
Loose shot pellets poured on top of the wad stack. The shot charge is also measured by volume. The amount and size of shot depend on the target and the gauge. For clay targets, No. 7½ or No. 8 shot is typical.
5. Over-Shot Wad (Card)
A thin, firm cardboard disc placed on top of the shot charge and pressed down snugly. The over-shot wad holds the shot in place so pellets do not roll out of the muzzle when the barrel is tilted forward. Some shooters seal the edge with a light dab of beeswax or glue, but this is optional.
Why the Sequence Matters
The components form a sealed column inside the barrel. If you reverse the order—shot below powder, for example—the gun will not fire correctly and could be dangerous. If you leave out the over-powder wad, gas leaks around the shot and the charge scatters ineffectively. If you use too much powder, chamber pressure can exceed what the barrel is designed to handle.
The Counselor Conversation
Be ready to name all five components in order and explain what each one does. Your counselor may ask you to walk through the loading sequence verbally before you do it live on the range in Req 2B-g.
Req 2B-g — Loading Procedures and Accessories
Loading a muzzleloader is a multi-step process that must be performed in the correct order, with the right tools, every time. Rushing or skipping a step creates serious risk.
Loading Accessories
- Powder measure: A volumetric measure (often a small adjustable brass cup) set to the correct charge weight for your gun. Powder is measured once, poured into the barrel, and the measure is refilled from the powder container—never pour from the main container directly into the barrel.
- Powder flask or pre-measured tubes: A flask dispenses a set volume of powder. Pre-measured tubes (speed loaders) hold one charge each and are the safest option because they limit the amount of powder exposed at any time.
- Shot measure or dipper: A cup set to the correct volume of shot for your load.
- Wads: Over-powder wads, cushion wads, and over-shot cards, pre-cut to your gauge.
- Ramrod: The rod used to push components down the barrel. The ramrod must be long enough to reach the breech plug.
- Short starter (optional for shotguns): A short, stout rod used to start a tight-fitting wad into the muzzle before switching to the ramrod.
- Capper or cap holder: A device that holds percussion caps and places them on the nipple without fumbling. Keeps your fingers away from the nipple.
- Vent pick or nipple pick: A thin wire used to clear the flash channel in the nipple if it becomes clogged.
Step-by-Step Loading Procedure
- Point the muzzle in a safe direction (upward and away from people) throughout loading.
- Verify the barrel is empty using the ramrod (mark the ramrod at muzzle level when the barrel is known to be empty so you can compare later).
- Snap a cap on the empty barrel (optional but recommended). Firing a cap on an empty barrel clears moisture and oil from the flash channel, ensuring reliable ignition of the main charge.
- Measure the powder charge using your powder measure. Pour the measured charge into the muzzle.
- Seat the over-powder wad. Place it in the muzzle and push it down with the ramrod until it seats firmly on the powder. Use steady pressure—do not slam or bounce the ramrod.
- Add the cushion wad (if used) and push it down on top of the over-powder wad.
- Measure and pour the shot charge into the barrel.
- Seat the over-shot card on top of the shot and push it down snugly with the ramrod.
- Mark the ramrod at the muzzle with your thumb. This confirms the load is properly seated.
- Place the hammer at half-cock.
- Place the percussion cap on the nipple only when on the firing line and ready to shoot.
Critical Safety Rules During Loading
- Never pour powder from the main container into the barrel. A smoldering ember in the bore could ignite the stream of powder back to the container. Always use the powder measure as an intermediary.
- Never smoke or allow open flames near the loading area.
- Keep your face and body to the side of the muzzle during all steps.
- Do not double-charge. If you lose track of whether you added powder, use the ramrod depth mark to check.
The Counselor Conversation
Your counselor will likely ask you to walk through the loading sequence verbally, identify each accessory, and then demonstrate the procedure on the range. Narrate each step as you perform it.
Req 2B-h — Misfires, Hangfires, and Squib Fires
Muzzleloaders are more prone to firing failures than modern firearms because the ignition chain has more points of failure: the cap, the flash channel, and the powder charge are all separate components loaded by the shooter. Understanding the three types of failure—and responding correctly—can prevent serious injury.
Misfire
What it is: The hammer falls on the cap, the cap may or may not pop, but the main charge does not ignite. No bang, no recoil.
Common causes in a muzzleloader:
- Clogged nipple flash channel (oil, fouling, or debris blocks the flame)
- Moisture in the powder charge
- Insufficient or deteriorated powder
- Defective percussion cap
- Nipple not properly seated
Procedure:
- Keep the muzzle pointed downrange.
- Wait at least 60 seconds. (Muzzleloader wait times are longer than for modern firearms because smoldering black powder can ignite with a long delay.)
- Keep the hammer at half-cock.
- Replace the percussion cap with a fresh one and try again.
- If the gun still does not fire, clear the flash channel with a nipple pick, recap, and try once more.
- If it still fails, the barrel must be carefully unloaded—your instructor will manage this process, as it involves pulling the charge from the muzzle end.
Hangfire
What it is: There is a noticeable delay between the hammer falling and the main charge igniting. The cap fires, but the powder is slow to catch—sometimes a fraction of a second, sometimes several seconds.
Common causes: Partially damp or deteriorated powder, weak cap flash due to a partially clogged nipple, or insufficient priming of the flash channel.
Why it is dangerous: If you lower the gun or turn away during the delay, the gun can fire while the muzzle is pointed in an unsafe direction.
Procedure:
- Keep the muzzle pointed downrange.
- Wait at least 60 seconds. Do not open, move, or attempt to reload the gun.
- If the gun has not fired after 60 seconds, treat it as a misfire and follow the misfire procedure above.
Squib Fire
What it is: The gun fires with noticeably less power—a weak “pop” instead of a full report, reduced recoil, and little or no smoke. This means only part of the charge burned, and the wads, shot, or both may be stuck in the barrel.
Common causes: Too little powder, severely deteriorated powder, moisture-damaged charge, or an incomplete ignition chain.
Why it is extremely dangerous: Firing a second charge into a barrel with an obstruction can cause the barrel to burst.
Procedure:
- Stop immediately. Do not reload.
- Keep the muzzle downrange.
- Place the hammer at half-cock and remove the cap.
- Check the bore with the ramrod. If the ramrod stops short of where an empty barrel should register, there is an obstruction.
- Do not fire again. Hand the gun to your instructor, who will clear the barrel safely.
Prevention
- Snap a cap on the empty barrel before loading to clear the flash channel.
- Use fresh, properly stored black powder and caps.
- Keep powder and caps dry—especially on humid or rainy days.
- Clean the nipple regularly during a shooting session.
- Measure the powder charge carefully—never guess.
The Counselor Conversation
Know all three failure types, their causes specific to muzzleloaders, and the exact procedure for each. Emphasize the 60-second wait (longer than the 30-second rule for modern firearms) and the absolute prohibition against firing into an obstructed barrel.
Req 2B-i — Range Procedures and Commands
This is a performance evaluation, just as in Option A. Your counselor and the range safety officer will observe your behavior from arrival through your last shot. But muzzleloading ranges have additional procedures because loading happens on the firing line and takes longer.
Standard Range Commands (Muzzleloading)
Many commands are the same as for modern shotgun ranges, but the loading sequence adds steps:
“Eyes and ears!” — Put on your eye and hearing protection before any firearms are handled.
“Shooters to the line” — Move to the firing line with your muzzleloader and loading supplies. The gun should be unloaded and uncapped.
“Load!” — You may begin the loading sequence (powder, wads, shot, over-shot card). Keep the muzzle pointed in a safe direction (upward, downrange). Do not cap the nipple yet.
“Cap and make ready!” or “Cap your guns!” — Place the percussion cap on the nipple and pull the hammer to full-cock. You are now ready to call for a target.
“Pull!” — The shooter’s call for a target to be released.
“Cease fire!” — Stop all activity immediately. If you have not yet fired, place the hammer carefully to half-cock. Keep the muzzle downrange. Do not attempt to unload.
“Unload” or “Make safe!” — Remove the cap from the nipple (use the capper to lift it off or let the hammer down gently on an empty nipple). Place the hammer at half-cock. On a muzzleloading range, if the barrel is still charged, the range officer will direct the procedure—you may be asked to fire the remaining charge downrange before clearing.
“Range is clear” or “Range is cold” — All guns are uncapped with hammers at half-cock or down. It is safe to go forward of the firing line if needed.
Muzzleloading-Specific Behavior
Your counselor is watching for everything in the Option A range section, plus:
- No capping until instructed. The percussion cap is the trigger for the entire ignition chain. Capping too early is the muzzleloading equivalent of loading a modern gun before the load command.
- Muzzle awareness during loading. Your face and body stay to the side of the muzzle at all times—especially when seating wads with the ramrod.
- Powder discipline. Powder containers stay closed and away from the firing line when not actively measuring a charge. No loose powder on the bench.
- Patience. Muzzleloading is slower. Rushing the loading sequence to keep up with other shooters is where mistakes happen.
The Counselor Conversation
This requirement is demonstrated on the range. Show that you handle the muzzleloader safely during every phase: transport, loading, capping, shooting, and clearing. Narrate your actions if asked.
Req 2B-j — Cleaning Safety Rules and Materials
Cleaning a muzzleloader is not optional—it is urgent. Black powder residue is highly corrosive and will pit the bore if left even overnight. A muzzleloading shotgun must be cleaned the same day it is fired, and ideally within a few hours.
Safety Rules for Cleaning
- Verify the gun is unloaded before cleaning. Check with the ramrod—compare the depth to your known-empty mark. Remove the percussion cap and ensure the hammer is down.
- Remove all powder, caps, and ammunition from the cleaning area. Cleaning solvents and water are involved; you do not want powder or caps nearby.
- Clean in a well-ventilated area. Black powder residue and cleaning solvents produce fumes.
- Point the muzzle safely throughout the process.
- Wear gloves or wash hands thoroughly after cleaning. Lead shot residue and black powder fouling contain lead and sulfur compounds.
- Never look down the muzzle. Inspect the bore from the breech end.
Materials Needed
- Hot, soapy water: The primary cleaning agent for black powder fouling. Hot water dissolves the potassium salts in black powder residue more effectively than any commercial solvent. Use dish soap.
- Cleaning rod: Long enough to pass through the full barrel length.
- Bore brush (bronze or nylon): Matches your gauge. Scrubs stubborn fouling.
- Cleaning patches: Cotton patches that fit your gauge, used with the jag or slotted tip.
- Patch holder (jag or slotted tip): Attaches to the cleaning rod and holds patches in the bore.
- Nipple wrench: Removes the nipple from the drum or barrel for separate cleaning of the flash channel.
- Pipe cleaners: For cleaning inside the nipple, drum, and flash channel.
- Gun oil or rust-preventive lubricant: Applied after cleaning to protect all metal surfaces from rust.
- Clean rags or paper towels: For wiping down external surfaces.
- Bucket or tub: To hold hot soapy water. Some shooters submerge the breech end of the barrel and pump water through the bore using the ramrod and a tight-fitting patch (the “water pump” method).
Why Muzzleloader Cleaning Is Different
Modern smokeless powder residue is relatively non-corrosive and a gun can wait a day or two before cleaning without serious harm. Black powder residue is the opposite—the sulfur and salt compounds absorb moisture from the air and begin corroding steel within hours. If you fire a muzzleloader and do not clean it promptly, you will find rust and pitting in the bore the next time you look.
The Counselor Conversation
Be ready to name the materials, explain why hot water is the primary solvent for black powder, and state the urgency rule: clean the same day, no exceptions.
Req 2B-k — Clean a Muzzleloader Properly
This is a hands-on demonstration. Your counselor will watch you clean the muzzleloader from start to finish, evaluating both technique and safety.
Step-by-Step Cleaning Process
1. Make the Gun Safe
Verify the gun is unloaded using the ramrod. Remove the percussion cap. Let the hammer down.
2. Remove the Nipple
Use the nipple wrench to carefully unscrew the nipple from the drum or barrel. Set the nipple aside for separate cleaning. Removing the nipple opens the flash channel so water and solvent can flow through the breech during bore cleaning.
3. Remove the Barrel (if applicable)
On many muzzleloading shotguns, the barrel can be separated from the stock by removing wedge pins or barrel bands and lifting the barrel off the tang. This makes cleaning easier and prevents water from reaching the stock and lock mechanism.
4. Scrub the Bore
Method 1 — Water pump: Place the breech end of the barrel in a bucket of hot, soapy water. Attach a tight-fitting cleaning patch to the ramrod jag. Push the ramrod in and out of the barrel like a pump. Soapy water is drawn in through the nipple hole and pushed out the muzzle (or vice versa), flushing the bore thoroughly. This is the most effective method for black powder.
Method 2 — Patch and brush: If a bucket is not available, wet a patch with hot soapy water, push it through the bore from breech to muzzle, and repeat. Follow with the bore brush to loosen stubborn fouling. Continue with wet patches until they come out clean.
5. Dry the Bore
Push several dry patches through the bore until no moisture remains. Any water left in the bore will cause rust.
6. Clean the Nipple and Flash Channel
Soak the nipple in hot soapy water. Use a pipe cleaner to scrub inside the flash channel. Dry thoroughly. Clean the drum or nipple seat in the barrel the same way.
7. Oil All Metal Surfaces
Run a lightly oiled patch through the dry bore. Apply a thin coat of gun oil to all external metal surfaces—barrel, tang, lock plate, and hammer. A thin film prevents rust; heavy oil collects dust.
8. Reassemble
Replace the nipple (do not overtighten). Reattach the barrel to the stock. Place the hammer down or at half-cock.
9. Store Properly
Store the gun uncapped, unloaded, and in a locked safe or case in a dry location.
Common Mistakes
- Skipping the nipple removal: Without removing the nipple, you cannot flush the flash channel, and corrosive residue will accumulate there.
- Using cold water: Hot water dissolves black powder salts much more effectively and evaporates faster, reducing the chance of missed moisture.
- Leaving moisture in the bore: Even a small amount of residual water will cause rust. Dry patches are essential.
The Counselor Conversation
Demonstrate the entire process while narrating each step. Your counselor is looking for verification that the gun is empty, correct use of hot water, thorough drying, and proper oiling.
Req 2B-l — Selecting a Muzzleloading Shotgun
The muzzleloading shotgun market is smaller than the modern shotgun market, but the same core principles apply: match the gun to the shooter and the intended use.
Ignition System
For this merit badge, only percussion-cap muzzleloaders are approved. Matchlock, wheellock, and flintlock firearms are not allowed. If you continue in muzzleloading sports or hunting beyond Scouting, flintlock shotguns are popular in historical reenactment and primitive weapons hunting seasons—but they require different skills and equipment.
Gauge
Muzzleloading shotguns are available in 10, 12, 16, and 20 gauge. The 12 gauge is the most common and the most versatile. A 20 gauge is a good choice for younger shooters who want reduced recoil and a lighter gun to carry. Larger gauges (10) produce more recoil and are heavier, but they throw a bigger payload of shot.
Barrel Length
Muzzleloading shotgun barrels are typically longer than modern shotgun barrels—28" to 36" is common. A longer barrel gives black powder more time to burn completely, producing higher velocity and less unburned powder residue. For clay target work, a 28"–32" barrel is a practical range.
Single vs. Double Barrel
- Single barrel: Simpler, lighter, less expensive. You load and fire one shot at a time. This is the most common type used at Scout muzzleloading ranges.
- Side-by-side double: Two barrels, each loaded and fired independently. Heavier, more expensive, and more traditional. Some competition muzzleloading events use doubles.
Fit
Just as with a modern shotgun, fit matters. Length of pull, drop at comb, and weight all affect how well you can mount the gun consistently. Many muzzleloading shotguns are built on traditional patterns with longer stocks intended for adult shooters—if you are still growing, work with your counselor to find a gun that fits your current frame.
Build Quality and Condition
If buying a used muzzleloading shotgun:
- Inspect the bore for pitting, rust, or thinning from years of corrosive fouling. A pitted bore is a safety concern.
- Check the nipple and drum for wear. These are replaceable parts but should be in good condition.
- Verify the lock mechanism works smoothly—the hammer should stay at both half-cock and full-cock without slipping.
- Check the stock for cracks near the wrist or around the lock mortise.
Budget
New muzzleloading shotguns range from roughly $200 for a basic import single-barrel to over $1,000 for a quality double. Used guns are often available at gun shows and muzzleloading rendezvous events for less. For a Scout starting out, a basic percussion single-barrel in good condition is all you need.
The Counselor Conversation
Be ready to discuss at least four points you would consider (ignition type, gauge, barrel length, fit, condition, budget) and explain your reasoning for each. This is a discussion, not a quiz—your counselor wants to see that you can think through the decision logically.
Req 2B-m — Shooting Moving Targets
This is the scored shooting exercise for the muzzleloading option. The scoring standard and the four fundamentals are the same as Option A, but shooting a muzzleloader adds unique challenges: a longer lock time (the delay between pulling the trigger and the shot leaving the barrel), more recoil, and the need to reload between every shot.
The Four Fundamentals (Review)
The four fundamentals of shotgun shooting apply identically to muzzleloading:
1. Position (Stance)
Feet shoulder-width apart, lead foot slightly forward, weight on the balls of your feet, knees slightly bent. This athletic stance lets you rotate your body smoothly to track the target.
2. Mount
Bring the stock to your cheek and shoulder in one smooth motion. The comb contacts your cheek first, then the buttpad seats into the pocket of your shoulder. Consistency is everything—if the mount changes, the point of impact changes.
3. Vision (Eyes on the Target)
Both eyes open, focused on the target. Do not look at the barrel or the bead. Track the clay target the way you would track a ball thrown to you.
4. Movement (Swing and Lead)
Start the gun moving with the target. Accelerate past it to establish lead. Fire while still moving. Follow through—keep swinging after the shot.
Muzzleloading-Specific Challenges
Longer lock time: From the moment you pull the trigger, the hammer must fall, the cap must fire, the flame must travel through the flash channel, and the powder must ignite. This takes longer than a modern shotgun’s firing sequence. You must maintain your swing through this entire delay. If you stop the gun at the trigger pull, you will miss behind.
Recoil: Black powder loads in a 12-gauge muzzleloader can produce significant recoil. A solid, consistent mount absorbs recoil better than a loose one. Lean into the gun.
Reload time: After each shot, you must reload—powder, wads, shot, over-shot card, cap. This takes 30–60 seconds even for experienced shooters. Use the time to relax, breathe, and mentally rehearse the fundamentals before calling for your next target.
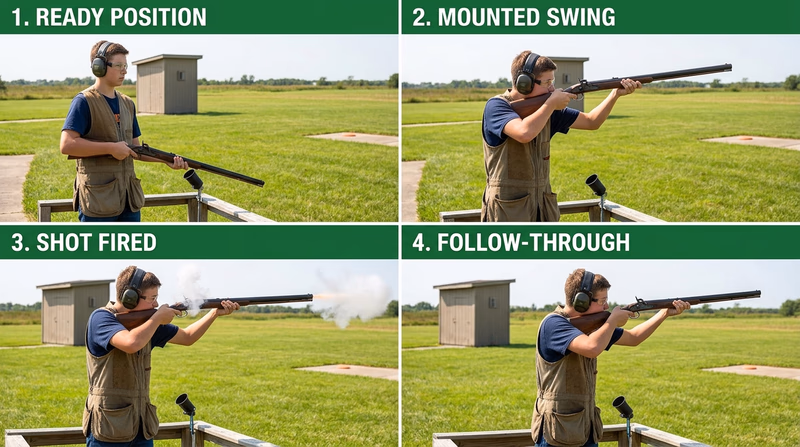
The Scoring Standard
- Two groups of 15 targets each.
- Hit at least 5 out of 15 in each group.
- The groups do not need to be shot consecutively.
- A minimum of 30 total shots must be fired.
Because of the longer lock time and slower reloading, 5 out of 15 is a solid achievement with a muzzleloader. Focus on smooth, consistent fundamentals rather than trying to force hits.
Tips for Success
- Maintain your swing. The number-one cause of misses with a muzzleloader is stopping the gun at the trigger pull because of the longer lock time. Trust the process and keep moving.
- Focus on the target, not the score. Counting hits and misses during a string breaks your concentration.
- Stay relaxed between shots. Reloading time is recovery time. Breathe.
- Trust your preparation. If you have loaded correctly and the gun is functioning, the fundamentals will get you hits.
Req 3 — Pathways, Training, and Goals
This requirement asks you to think past the merit badge and consider where safe, responsible shotgun skills could take you—whether as a career, a competitive sport, a hunting tradition, or a lifelong hobby. Research matters: your counselor wants specific information, not vague ideas.
Step 1: Identify Your Direction
Think about which aspect of shotgun shooting appeals to you most:
Competitive Shooting
Clay target competition at the club, regional, national, or Olympic level. Disciplines include:
- USA Shooting: The national governing body for Olympic/Paralympic shooting sports. Shotgun events include trap and skeet.
- Amateur Trapshooting Association (ATA): Manages trap shooting competition across the country, from local clubs to the Grand American.
- National Skeet Shooting Association (NSSA): Governs skeet shooting competition at all levels.
- National Sporting Clays Association (NSCA): Governs sporting clays competition.
- Scholastic Clay Target Program (SCTP): Team-based youth competition for middle and high school students.
Hunting
Using shotguns responsibly to harvest game under regulated seasons. Requires:
- Hunter education certification
- Annual hunting license and applicable stamps (duck stamp, habitat stamp)
- Ongoing firearms maintenance skills
- Knowledge of game regulations, conservation, and ethics
Law Enforcement and Military
Shotguns are used in law enforcement for specific tactical applications. The safe handling, discipline, and marksmanship fundamentals from this badge are directly relevant. Military careers also involve firearms qualification and ongoing proficiency.
Firearms Instruction
NRA-certified shotgun instructors, range safety officers, Scouting shooting sports directors, and hunter education instructors. Instruction careers require both shooting skill and communication ability.
Gunsmiths and Firearms Industry
Careers in gunsmithing, shotgun fitting, firearms manufacturing, retail, or ammunition development. Technical training is available at trade schools and dedicated gunsmithing programs.
Step 2: Research What It Takes
For the pathway you identify, research three areas:
Additional Training and Experience
- What certifications or courses are required?
- What level of shooting skill is expected?
- How long does it typically take to reach that level?
- Are there youth development programs that provide a pathway?
Costs
Be realistic:
- Ammunition: A round of 25 trap targets costs roughly $8–$15 in ammunition (12 gauge). A serious competitor may fire 200–500 rounds per week.
- Equipment: A quality over-under for competition can range from $1,000 to $10,000+. A reliable pump-action for hunting is $300–$600.
- Range fees: Club memberships or per-round fees at commercial ranges.
- Entry fees: Competition entries range from a few dollars at the club level to hundreds for nationals.
- Travel: Regional and national competitions require travel.
Organizations That Can Help
- National Rifle Association: Training, certifications, competitions, and scholarships
- USA Shooting: Olympic pathway programs and junior development
- ATA, NSSA, NSCA: Sport-specific competitive organizations
- Scholastic Clay Target Program (SCTP): Youth team competition
- 4-H Shooting Sports: Available in most counties
- State wildlife agencies: Hunter education, mentored hunting programs
Step 3: Set Short-Term and Long-Term Goals
Be specific and personal.
Short-term goals (next 6–18 months):
- “I want to join the local gun club and shoot trap once a month.”
- “I want to earn my hunter education certificate this fall.”
- “I want to try an SCTP team at my school.”
- “I want to shoot a round of 25 at trap and break at least 15.”
Long-term goals (3–10 years):
- “I want to qualify for my state’s ATA team.”
- “I want to become an NRA-certified shotgun instructor.”
- “I want to hunt pheasant in South Dakota with my family.”
- “I want to pursue gunsmithing training after high school.”
Goals do not have to be career-oriented. A goal of “shooting safely and responsibly for recreation my entire life” is legitimate and valuable.
For Your Counselor
Come with real research—specific program names, actual costs you looked up, organizations you identified. Your counselor is not evaluating your ambitions; they are looking for evidence that you have thought seriously about how the skills from this badge connect to your future.
Extended Learning
Congratulations!
You have covered safety, law, wildlife conservation, hands-on shooting fundamentals, and looked ahead to where these skills can take you. Shotgun Shooting is one of the few merit badges where the knowledge you built carries direct consequences in the real world—safe gun handling is not a test topic, it is a life skill. The four fundamentals of position, mount, vision, and movement will serve you whether you shoot trap next weekend or hunt waterfowl twenty years from now.
The Extended Learning section is for Scouts who want to go further: deeper concepts, competition pathways, real-world experiences, and the organizations that connect serious shooters with serious opportunities.
Dig Deeper
Choke and Pattern: The Science of Spread
The choke at the muzzle end of the barrel controls how tightly the shot column stays together as it travels downrange. Understanding choke is what separates a beginning shooter from an intermediate one.
- Cylinder (no constriction): Widest spread. Useful at very close range.
- Improved Cylinder: Slight constriction. Good for close-range clays and upland birds flushing nearby.
- Modified: Moderate constriction. The most versatile choice for general hunting and sporting clays.
- Full: Tight constriction. Keeps the pattern dense at longer distances. Standard for trap shooting and pass shooting at waterfowl.
To see your choke’s effect, shoot a pattern board: fire at a large sheet of paper at 40 yards and count the pellet holes inside a 30-inch circle. The percentage of pellets inside the circle defines the choke’s performance.
Shotshell Reloading
Many competitive shotgun shooters reload (handload) their own ammunition to reduce cost and customize performance. Reloading involves resizing the hull, replacing the primer, measuring powder, inserting a wad, adding shot, and crimping the hull closed. It requires a reloading press, published load data, and meticulous attention to measurement. Reloading is an excellent technical hobby that deepens your understanding of how shotshells work—but it is not a shortcut. Careless reloading is a leading cause of squib fires and other malfunctions.
Wingshooting: Shooting at Live Birds
Everything you learned on the trap range translates directly to hunting flying birds. The target is smaller, faster, and unpredictable—but the four fundamentals are identical. Wingshooting adds variables: wind, terrain, vegetation, and the ethical requirement to identify your target before firing. Many experienced shooters say that breaking 20 out of 25 clays on a trap line correlates well with consistent success in the field.
How Lead and Steel Shot Differ
Federal law requires non-toxic shot (steel, bismuth, or tungsten) for all waterfowl hunting. Steel shot is lighter and harder than lead, which means it patterns differently: steel pellets do not deform, so patterns are tighter and more uniform, but each pellet carries less energy. Hunters compensate by using larger shot sizes (e.g., No. 2 steel instead of No. 4 lead). Understanding the ballistic differences between shot materials is essential for any serious waterfowl hunter.
Try This Next
Join or Visit a Local Gun Club
Shoot All Three Clay Target Disciplines
Try the Other Option
Enter a Youth Competition
Start a Shooting Log
Pattern Your Shotgun
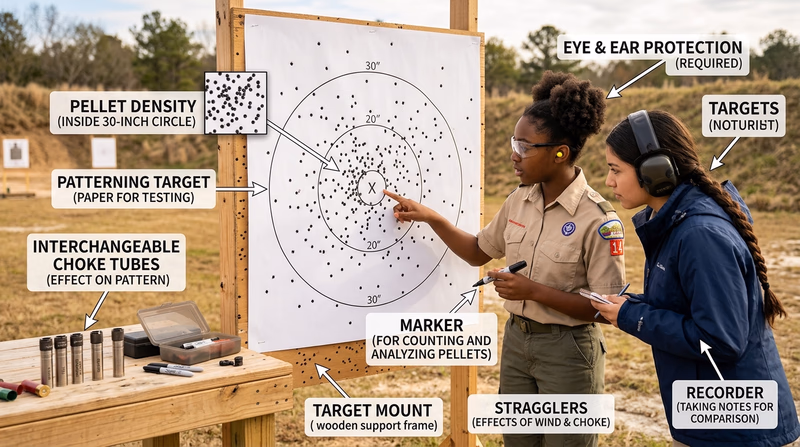
Organizations and Resources
The largest firearms training and education organization in the United States. Offers youth programs, club affiliations, competitions at all levels, instructor certifications, and scholarships for competitive shooters.
Organization: National Rifle Association (NRA) — https://www.nra.org/
The national governing body for Olympic and Paralympic shooting sports. Manages the Junior Olympic Development Program, which feeds into the national team pipeline. Shotgun events — trap and skeet — are core Olympic disciplines.
Organization: USA Shooting — https://www.usashooting.org/
Governs registered trap shooting in the United States. Hosts the Grand American — the world’s largest trap shooting event — held annually in Sparta, Illinois. Youth programs and state-level competition are widely available.
Organization: Amateur Trapshooting Association (ATA) — https://www.shootata.com/
Governs registered skeet shooting. Hosts the World Skeet Championships annually. Offers a classification system that matches you against shooters of similar skill.
Organization: National Skeet Shooting Association (NSSA) — https://www.mynssa.com/
Governs sporting clays competition. Sporting clays is one of the fastest-growing shotgun sports, and NSCA events range from local club shoots to the national championship.
Organization: National Sporting Clays Association (NSCA) — https://www.mynsca.com/
The largest youth clay target program in the country. Team-based, coach-led, and available to middle and high school students. Disciplines include trap, skeet, sporting clays, and international formats.
Organization: Scholastic Clay Target Program (SCTP) — https://www.sssfonline.org/sctp
The nation’s largest youth shooting sports program, with clubs in nearly every county. Covers shotgun along with rifle, pistol, archery, and muzzleloading. An excellent entry point for younger Scouts.
Organization: 4-H Shooting Sports — https://4-hshootingsports.org/
The premier organization for muzzleloading sport and history. Hosts the annual National Championship at Friendship, Indiana. Publishes Muzzle Blasts magazine. Essential for Scouts who chose Option B and want to go deeper.
Organization: National Muzzle Loading Rifle Association (NMLRA) — https://www.nmlra.org/
Beyond hunting regulations, many state agencies offer mentored hunting programs, hunter education clinics, and partnerships with local clubs — a resource for connecting shooting sports with conservation.
Organization: State Fish and Wildlife Agencies — https://www.fishwildlife.org/afwa-inspires/member-list