Signs, Signals, and Codes Merit Badge — Complete Digital Resource Guide
https://merit-badge.university/merit-badges/signs-signals-and-codes/guide/
Introduction & Overview
Overview
Humans have been finding clever ways to share information across distance, darkness, and noise for as long as civilization has existed. The Signs, Signals, and Codes merit badge takes you on a tour of those systems—from the dots and dashes of Morse code to the raised dots of braille, from waving semaphore flags to building your own secret cipher. Along the way you’ll practice hands-on skills, explore why different systems exist, and come away with a new appreciation for the language all around you.
Then and Now
Then
Before phones or radios existed, people needed ways to send messages quickly and reliably. Ancient Greeks used fire beacons on hilltops. Sailors developed elaborate flag systems. The military invented hand signals so soldiers could coordinate silently under fire. In 1836, Samuel Morse and Alfred Vail developed a code of dots and dashes that made long-distance electrical telegraphy practical—and within decades messages could cross continents in seconds.
Now
Many of those same systems are still in active use. Coast Guard vessels fly nautical signal flags. Aircraft carrier decks still rely on precise hand signals where radio chatter is impossible. Referees blow whistles and wave arms to manage play on every sports field. And digital encryption—the modern descendant of secret codes—protects every password and credit card number you use online. Knowing how these systems work makes you a more aware, more capable communicator.
What You’ll Practice
This badge combines knowledge and skill in equal measure. Here’s a quick map of what’s ahead:
- Communication history and theory — why societies develop shared signals (Req 1)
- Emergency signaling — how to attract rescuers when it counts most (Req 2)
- Morse code and ASL — two landmark communication systems, each practiced hands-on (Req 3)
- Semaphore and nautical flags — flag-based systems still used on ships and airfields (Reqs 4a–4c)
- Braille — communication by touch, grounded in real history (Req 5)
- Sound signals and Scout signals — from foghorns to patrol hand signals (Req 6)
- Trail signs — marking and following a real outdoor trail (Req 7)
- Specialized signal systems — sports, heavy equipment, aircraft carriers, cycling, and more (Req 8)
- Symbols and everyday life — traffic signs, maps, emoticons, and your own design (Req 9)
- Cryptography — the history and craft of secret codes (Req 10)
Get Ready!
Each section of this guide prepares you for a specific requirement with background knowledge, practical tips, and clear preparation steps. Read it through, practice the hands-on parts, and you’ll be ready to demonstrate your skills with confidence.
Req 1 — Why Humans Need Shared Signals
Why We Need More Than Words
Speaking works well when two people are face to face, but human life quickly pushes beyond that situation. You might be far away, in the dark, surrounded by noise, or communicating with someone who doesn’t share your spoken language. Signs, signals, and codes exist to solve those problems.
Consider a few scenarios where spoken words fall short:
- A hiker is lost in dense forest with no phone signal. She uses a mirror to flash sunlight toward a search plane she can hear overhead.
- A referee on a football field blows a whistle and raises both arms. Players and fans hundreds of yards away instantly understand what happened.
- A sailor needs to report an illness outbreak to the port authority. He raises a yellow flag—a universally understood signal.
- Two astronauts in spacesuits can’t shout to each other across a lunar surface. Hand signals and radio codes keep the mission on track.
In each case, a shared system of signs or signals replaces or supplements spoken words because the situation demands it.
Three Big Reasons Shared Systems Matter
Distance. Sound carries only so far. Light and movement carry farther, and coded messages can travel indefinitely over wire, radio, or the internet.
Environment. Loud machinery, deep water, or radio silence during a military operation can block normal speech. Alternative systems fill that gap.
Inclusion. Not everyone can hear or speak. ASL and braille give people full access to communication that speech-only channels would deny them.
A Brief History
Humans have been developing communication systems for thousands of years. Here are some milestones worth knowing for your counselor discussion:
| Era | Development |
|---|---|
| Ancient Greece | Fire beacons on hilltops warned of approaching armies across long distances |
| ~500 BCE | Greek soldiers used the scytale rod to encode military messages |
| 1400s | European navies developed flag codes for ship-to-ship signaling |
| 1795 | Claude Chappe built a mechanical semaphore tower network across France |
| 1824 | Louis Braille adapts a military night-writing system into the tactile alphabet used worldwide today |
| 1836 | Samuel Morse and Alfred Vail develop Morse code for electrical telegraphy |
| 1900s | Radio codes, military hand signals, and highway sign standards are formalized worldwide |
| Today | Digital encryption, emoji, and international symbol standards extend the tradition into the 21st century |
Key Terms to Know
Before your counselor meeting, make sure you can explain the difference between these three terms:
- Sign — a visual symbol with an agreed meaning, like a red octagon on a stop sign or a thumbs-up gesture.
- Signal — an action or event used to convey information, often in real time, like a flashing light or a whistle blast.
- Code — a system that represents information in a different form, like Morse code or a cipher alphabet.
These categories often overlap in practice, but understanding the distinctions shows your counselor you’ve thought carefully about the topic.
Preparing for Your Discussion
Your counselor will want a genuine conversation, not a recitation. To prepare:
- Think of two or three real-world examples of communication systems you’ve personally used or seen (traffic lights, referee signals, emoji, road signs).
- Be ready to explain in your own words why spoken language alone isn’t enough for all human communication needs.
- Have at least three historical examples ready—dates and names help, but the story behind each development matters most.
Req 2 — Distress Signals That Get You Found
Why Emergency Signaling Is Different
When you’re lost or injured in the wilderness, cell service is usually the first thing to go. Emergency signaling relies on signals that can be seen or heard from a distance—by a searching aircraft, a rescue boat, or a helicopter crew scanning the terrain below. The goal is simple: make yourself impossible to miss.
Every outdoor traveler should understand these signals before they ever need them. Knowing what to do in the first hour after getting lost dramatically improves rescue outcomes.
Signals for Airborne Search-and-Rescue
Rescue aircraft scan large areas quickly, so your signal must be visible from the air. Here are the main types—bring illustrations or drawings to show your counselor:
Ground-to-Air Symbols
International ground-to-air signals use body positions and patterns you can form on the ground with rocks, logs, or trampled vegetation. The standard signals include:
| Symbol | Meaning |
|---|---|
| V | Require assistance |
| X | Require medical assistance |
| → | Traveling in this direction |
| F | Need food and water |
| LL | All is well |
| N | No / Negative |
| Y | Yes / Affirmative |
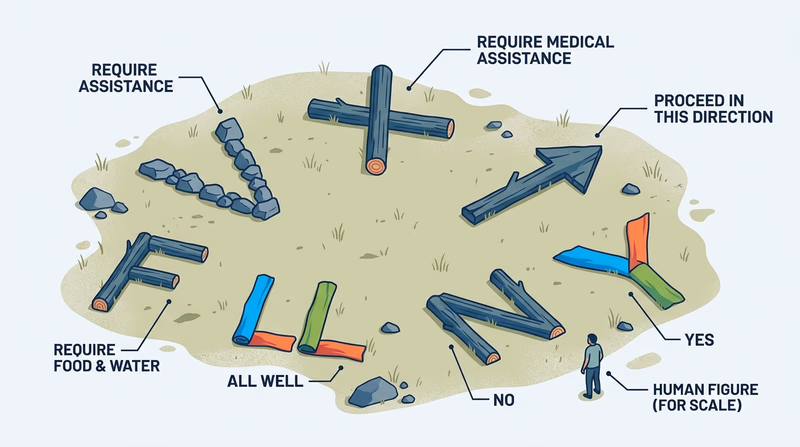
Make these symbols large—at least 10 feet across—and use high-contrast materials against the ground. Dark rocks on snow, or bright cloth on dark soil, work well.
Signal Mirror
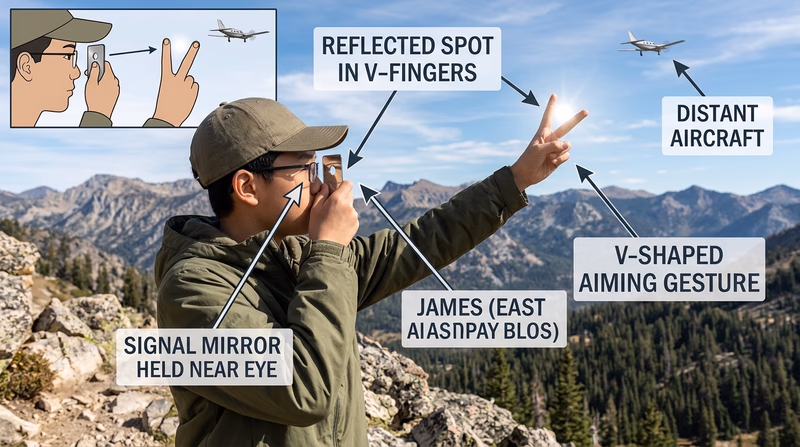
A signal mirror is one of the most effective long-range daylight signals. Even on a partly cloudy day, a mirror flash can be seen up to 10 miles away by aircraft. Use a dedicated signal mirror with a sighting hole if possible, or improvise with any reflective surface.
How to use a signal mirror:
- Hold the mirror near your eye.
- Extend your other arm and create a “V” with two fingers aimed at the aircraft.
- Tilt the mirror until the reflected sun lands in the “V.”
- Flash slowly three times—the universal distress signal.
Fire and Smoke
Three fires or three smoke columns in a triangle pattern is an internationally recognized distress signal. During daylight, black smoke (from burning rubber or plastic if available) stands out against a bright sky. At night, flames are visible from miles away.
Whistle
Three blasts of a whistle is the universal distress signal for sound. A good rescue whistle (not your voice) can be heard up to a mile away with little effort. Blow three times, pause, repeat.
Bright Clothing and Color Panels
Bright orange and red are the most visible colors against natural terrain. Spread a brightly colored tarp, jacket, or space blanket in an open area to create a visual target visible from the air.
Flashlight or Headlamp
At night, use your flashlight to signal SOS in Morse code: · · · — — — · · · (three short flashes, three long, three short). Flash slowly enough that the pattern is clear. You’ll learn more about SOS in Requirement 3.
Preparing Your Illustrations
The requirement asks you to illustrate these signals with photos or drawings. Good options:
- Sketch each ground-to-air symbol with dimensions shown
- Photograph yourself demonstrating mirror signaling
- Draw the three-fire triangle pattern from an aerial perspective
- Create a comparison chart of daytime vs. nighttime signals
You don’t need to be an artist—clear, labeled diagrams communicate better than vague sketches.
Before Your Counselor Meeting
- Can explain why emergency signaling matters when electronics fail
- Can describe and sketch the six main ground-to-air symbols
- Know how to use a signal mirror
- Know the three-fire distress signal
- Know the whistle distress signal (three blasts)
- Have illustrations or drawings ready to show
Req 3 — Morse Code and ASL in Action
This requirement covers two very different communication systems that solve the same fundamental problem: getting a message across when speech alone isn’t enough. Morse code turns language into patterns of sound or light. American Sign Language turns language into movement and shape. Both are worth knowing—and both take hands-on practice to master.
Read the section for each sub-requirement, then spend time actually practicing before your counselor meeting.
Requirement 3a — Morse Code
What Is Morse Code?
Morse code is a system invented by Samuel Morse and Alfred Vail in the 1830s that represents each letter of the alphabet (and digits) as a sequence of short signals (dots) and long signals (dashes). It was originally designed for electrical telegraph wires, but the genius of the system is that “short” and “long” can mean almost anything—a click, a flash, a beep, a mirror reflection, even a tapped finger.
How Morse Code Can Be Sent
Morse code is remarkably flexible. The same message can travel by:
- Sound — tapping a table, a buzzer, a horn, a whistle, or radio static
- Light — a flashlight, headlight, searchlight, lantern, blinker, or mirror
- Electrical pulses — the original telegraph wire
- Flag — waving a flag or cloth with short and long motions
- Radio — continuous wave (CW) radio transmission
- Written marks — dots and dashes on paper
Amateur radio operators still use Morse code (called CW mode) on the air today. The military, maritime services, and aviation use it in various forms as well.
The Morse Code Alphabet
Here are all 26 letters:
| Letter | Code | Letter | Code | |
|---|---|---|---|---|
| A | · — | N | — · | |
| B | — · · · | O | — — — | |
| C | — · — · | P | · — — · | |
| D | — · · | Q | — — · — | |
| E | · | R | · — · | |
| F | · · — · | S | · · · | |
| G | — — · | T | — | |
| H | · · · · | U | · · — | |
| I | · · | V | · · · — | |
| J | · — — — | W | · — — | |
| K | — · — | X | — · · — | |
| L | · — · · | Y | — · — — | |
| M | — — | Z | — — · · |
SOS — the universal distress signal in Morse code — is · · · — — — · · · (three dots, three dashes, three dots, sent as one continuous sequence without spacing).
Spelling Your Name and Sending a Message
Before your counselor meeting:
- Spell your first name in Morse code on paper. Practice saying it aloud (dit-dah for · —, dah-dit for — ·, etc.).
- Write out a six-to-ten-word message in Morse code.
- Practice sending it by tapping on a table or flashing a light. Each letter should be clearly separated; each word should have a longer pause between it and the next.
- Have a friend or family member try to receive your message.
Morse Code Readiness
- Can describe what Morse code is and who invented it
- Can name at least five different ways Morse code can be sent
- Have spelled my first name in Morse code
- Have written out a 6–10 word message in Morse code
- Can send or receive the message by sound or light
- Know the SOS signal: · · · — — — · · ·
🎬 Video: LEARN MORSE CODE from a MEMORY CHAMP (in 15 minutes) — Nelson Dellis — https://www.youtube.com/watch?v=D8tPkb98Fkk
Requirement 3b — American Sign Language
What Is ASL?
American Sign Language (ASL) is a complete, natural language that uses hand shapes, movement, facial expressions, and body posture to communicate. It is not a signed version of English—it has its own grammar, syntax, and vocabulary developed independently over centuries.
ASL is the primary language of many Deaf communities in the United States and Canada. Estimates suggest more than 500,000 people use it as their primary language, and millions more know it as a second language.
How ASL Is Used Today
- Deaf individuals use ASL as a complete first language for daily communication, storytelling, debate, humor, and art.
- Interpreters provide ASL interpretation at schools, hospitals, government agencies, courts, concerts, and public events.
- Hearing families of Deaf children often learn ASL as their household language.
- Hearing people learn ASL to communicate with Deaf friends, coworkers, or customers—or simply to expand their communication skills.
- Emergency services train staff in basic ASL to assist Deaf callers and clients.
The ASL Manual Alphabet
The manual alphabet (also called fingerspelling) lets you spell out English words letter by letter using hand shapes. It’s used for names, places, and technical terms that don’t have their own ASL signs.
Each letter of your name maps to a distinct hand shape held near your dominant shoulder. Practice forming each shape slowly and clearly.
Tips for Learning Your Name and a Message
- Find your letters — look up each letter of your name in a fingerspelling chart and practice each hand shape until it feels natural.
- Spell smoothly — work toward smooth transitions between letters rather than pausing at each one.
- Add a simple message — learn six to ten common ASL signs (simple signs like HELLO, MY, NAME, I, LIKE, SCOUT, THANK YOU are great starting points).
- Use your face — ASL grammar uses facial expressions for yes/no questions, negation, and emphasis. Even for fingerspelling, a natural expression helps.
- Watch native signers — short videos of native ASL signers online show natural rhythm and fluency better than static charts.
🎬 Video: ASL: Basic Signs 1 - Everyday Vocabulary in ASL — Miacademy & MiaPrep Learning Channel — https://www.youtube.com/watch?v=fnFWAzd3Kfw
ASL Readiness
- Can describe what ASL is and how it is different from signed English
- Can explain at least three ways ASL is used today
- Can fingerspell my first name clearly
- Have learned a 6–10 word ASL message
- Can send or receive the message with a partner
Req 4a — How Semaphore Works
What Is Semaphore?
Semaphore (also called flag semaphore) is a system for sending messages by holding arms or flags in positions that correspond to letters and digits. Each of the 26 letters maps to a specific arm position, allowing a trained sender and receiver to spell out any message without radios, wires, or electricity.
The word “semaphore” comes from the Greek for “sign bearer.” The modern arm-flag system was standardized for military and maritime use in the 19th century and is still formally defined by international standards today.
Why Semaphore Is Used
Semaphore has a few key advantages that keep it relevant even in the age of radio:
- No equipment failure — it works as long as the human body works
- No battery, no power — completely off-grid
- Visually unambiguous — arm positions are distinctive enough to decode clearly under difficult conditions
- Tactical — in military use, it leaves no radio frequency to intercept
It is also used in Scouting as a foundational communication skill—learning semaphore trains you to think in terms of precision, practice, and encoded information.
How Semaphore Is Used
The sender holds a flag (or colored cloth, or even bare arms in a pinch) in each hand and moves both arms to the position for each letter. Letters are sent one at a time, with a brief “interval” or “rest” position (arms pointing straight down) between letters or between words.
Standard control signals include:
| Signal | Meaning |
|---|---|
| Arms straight down (rest) | Interval / letter space |
| Both arms raised at 45° outward | Attention — “ready to receive” |
| IMI (I-M-I sequence) | Repeat (“say again”) |
| AR | End of message |
| R | Received / Roger |
The receiver watches from a position where the sender is clearly visible and facing them. Semaphore is a line-of-sight system—it works best in daytime, at distances typically under a mile, and requires an unobstructed view between sender and receiver.
Where Semaphore Is Used
- Maritime (naval) signaling — Navies around the world use semaphore as a backup to radio communication. Sailors are trained to send and receive when radios are down.
- Airfield signaling — Aircraft ground crew sometimes use semaphore-derived signals to direct aircraft without radio contact.
- Scouting — Many Scouting programs use semaphore as a classic communication skill, often in patrol competitions and camporees.
- Parades and ceremonies — Military color guards and drill teams use modified semaphore in ceremonies.
Flags and Appearance
Semaphore flags don’t have to meet a strict standard for the Scouting requirements—you can improvise with cloth or colored paddles. Standard semaphore flags used at sea are typically divided diagonally: red and yellow for naval/international use. On land or in Scouting contexts, blue and white or red and white flags are common.
The key is contrast: flags should be easy to distinguish against the background sky or terrain.
🎬 Video: How To Do The Semaphore Alphabet (Old Scout Field Guide) — Christian Strevy — https://www.youtube.com/watch?v=LFWQ6usrSCM
Req 4b — Semaphore Flags vs. Nautical Flags
Two Flag Systems, Two Different Purposes
Both semaphore flags and nautical flags are used in maritime environments, but they work in completely different ways. Confusing the two is a common mistake—this page will help you explain the distinction clearly.
Semaphore Flags
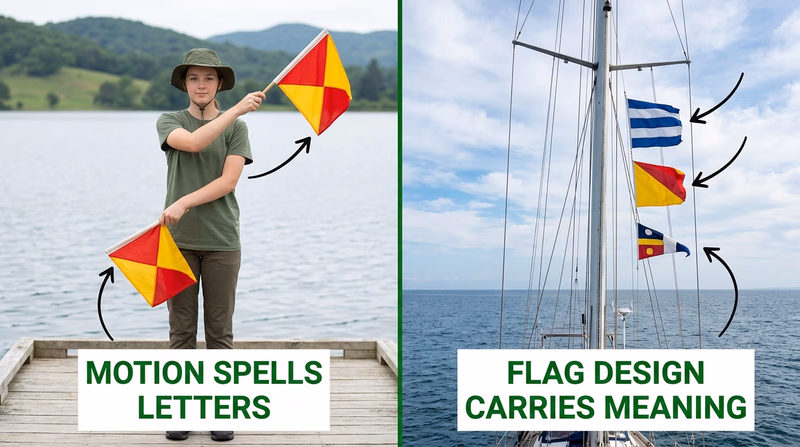
Semaphore flags are tools for sending letters. The flags themselves carry no meaning. What matters is the position of the person’s arms. Each arm angle corresponds to a letter of the alphabet, and you spell out words letter by letter.
Key characteristics of semaphore flags:
- Used to spell messages in real time by arm movement
- The flag color and design don’t encode meaning—only the position does
- Flags are typically small, square, and easy to hold in one hand
- Standard naval color scheme: red and yellow divided diagonally
- Scouting/land use: often blue and white or red and white
- Requires a trained sender and receiver who both know the alphabet positions
Think of semaphore flags like the keys on a keyboard—the keyboard key has a letter printed on it, but it’s pressing the key (making the position) that sends the information.
Nautical (Signal) Flags
Nautical flags—also called the International Code of Signals—are a set of 40 distinct flags (26 letter flags, 10 numeral pennants, and 4 substitute flags) where each flag has a fixed, pre-agreed meaning. Certain combinations of two or three flags form standardized messages that any vessel can look up in the International Code of Signals book.
Key characteristics of nautical flags:
- Each flag has its own specific design, color pattern, and meaning
- Flown from masts and halyards rather than waved by hand
- Can be used without real-time communication—a flag combination raised on the mast conveys a message that any passing ship or port authority can read
- Used by commercial shipping, navies, coast guards, and private vessels worldwide
Important Single-Flag Signals
Many individual nautical flags carry important standalone messages:
| Flag | Letter | Standalone Meaning |
|---|---|---|
| Alpha (A) | A | “I have a diver down; keep clear.” |
| Bravo (B) | B | “I am carrying dangerous cargo.” |
| Charlie (C) | C | “Yes / Affirmative.” |
| Delta (D) | D | “Keep clear; I am maneuvering with difficulty.” |
| Golf (G) | G | “I require a pilot.” |
| Hotel (H) | H | “I have a pilot on board.” |
| November (N) | N | “No / Negative.” |
| Oscar (O) | O | “Man overboard.” |
| Quebec (Q) | Q | “My vessel is healthy; request clearance.” |
| Victor (V) | V | “I require assistance.” |
| Whiskey (W) | W | “I require medical assistance.” |
| X-ray (X) | X | “Stop carrying out your intentions and watch for my signals.” |
Warning Flags
Nautical flags are also used in weather warning systems at ports and marinas:
| Display | Meaning |
|---|---|
| Small-craft advisory pennant | Winds 18–33 knots expected |
| Gale warning (two pennants) | Winds 34–47 knots expected |
| Storm warning (square red flag) | Winds 48–63 knots expected |
| Hurricane warning (two square red flags) | Winds 64+ knots expected |
The Core Difference
| Semaphore Flags | Nautical Flags | |
|---|---|---|
| How meaning is encoded | Arm positions (not the flag design) | The specific flag design and combination |
| How displayed | Waved/held by a person in motion | Hoisted stationary on a mast or halyard |
| Who must be present | Two trained people, both know the alphabet | Any vessel with the code book can decode |
| Primary use | Real-time message spelling | Pre-coded messages, status, and warnings |
🎬 Video: Nautical & Sailing Flags Meanings, International Code of Signals — Flagsbook — https://www.youtube.com/watch?v=gGOtPA8sNJA
Req 4c — Practice With Flags
This is the hands-on payoff for everything you learned in 4a and 4b. The two tasks are independent: one is about performing semaphore, the other is about identifying and discussing nautical flags. Work through both before your counselor meeting.
Requirement 4c1 — Semaphore Practice
You must complete both parts: spelling your name and sending or receiving a multi-word message.
Spelling Your Name in Semaphore
Each letter corresponds to a specific combination of arm angles. There are eight basic positions for each arm, giving 64 combinations—more than enough for the full alphabet.
How to practice:
- Look up the semaphore alphabet chart (you’ll find it in the badge pamphlet or online).
- Practice each letter of your name in front of a mirror until the arm positions feel natural.
- Practice transitions between letters smoothly—return to the rest position (arms straight down) between letters.
- Have a partner watch and confirm each letter.
Sending or Receiving a Six-to-Ten-Word Message
If you’re sending:
- Write out your message before starting.
- Signal the “attention” position first (both arms raised outward at 45°) and wait for acknowledgment.
- Send each letter, pausing briefly at the rest position between letters and slightly longer between words.
- End with the AR signal (end of message) and wait for R (received) from your receiver.
If you’re receiving:
- Keep your eyes on the sender and read each arm position as a letter.
- Write down letters as they come, grouping them into words.
- Signal R when you’ve received the full message.
- Signal IMI if you missed a word and need the sender to repeat it.
Semaphore Practice Checklist
- Have learned all semaphore positions for the letters in my name
- Can spell my name smoothly, returning to rest position between letters
- Have written out a 6–10 word practice message
- Can send or receive the message with a partner
- Know the Attention, IMI, AR, and R control signals
Requirement 4c2 — Nautical Flag Identification
Picking Your Ten Flags
You need to identify 10 flags using illustrations or photos—these can be from a book, printed charts, or photos you take yourself. Choose flags that have clear visual designs and meaningful standalone messages, so your discussion with your counselor is substantive.
Good flags to include:
| Flag | Letter | Why It Matters |
|---|---|---|
| Alpha | A | Diver down—boaters worldwide recognize this; ignoring it can kill a diver |
| Bravo | B | Dangerous cargo—warns all nearby vessels |
| Oscar | O | Man overboard—one of the most urgent emergency signals |
| Victor | V | Require assistance—the universal distress request |
| Whiskey | W | Require medical assistance—critical at sea |
| Quebec | Q | Vessel clear/requesting entry—used at every international port |
| November | N | No/Negative—used in multi-flag messages |
| Charlie | C | Yes/Affirmative—used in multi-flag messages |
| Juliet | J | I am on fire with dangerous cargo |
| Golf | G | I require a pilot |
You could also include the small-craft advisory, gale, storm, or hurricane warning flags to round out a discussion of weather-related maritime signaling.
Discussing Their Importance
For each flag, your counselor discussion should cover:
- What the flag looks like (its design/colors)
- What letter it represents
- What its standalone message means, if any
- Why that message matters in a real maritime context
Req 5 — Reading and Writing Braille
What Is Braille?
Braille is a tactile writing system—a system you read with your fingertips instead of your eyes. It was created by Louis Braille, a French teenager who lost his sight at age three in a workshop accident. In 1824, at age 15, he adapted a military communication system called “night writing” (developed by Charles Barbier for soldiers to read orders in the dark) into what became the standard tactile alphabet used worldwide today.
Barbier’s original system used 12 raised dots arranged in two columns of six. Louis Braille recognized that the cell was too tall to feel with one fingertip, so he reduced it to six dots arranged in a two-wide, three-tall grid—the standard braille cell still used today.
How Braille Is Read
Each braille cell is a rectangle of six dot positions arranged like this:
· ·    (dot positions 1 and 4 — top row)
· ·    (dot positions 2 and 5 — middle row)
· ·    (dot positions 3 and 6 — bottom row)
A letter is represented by which of these six positions have a raised dot. Because any combination of six dots can be raised or flat, the system can represent 64 possible characters—more than enough for the full alphabet, punctuation, and numbers.
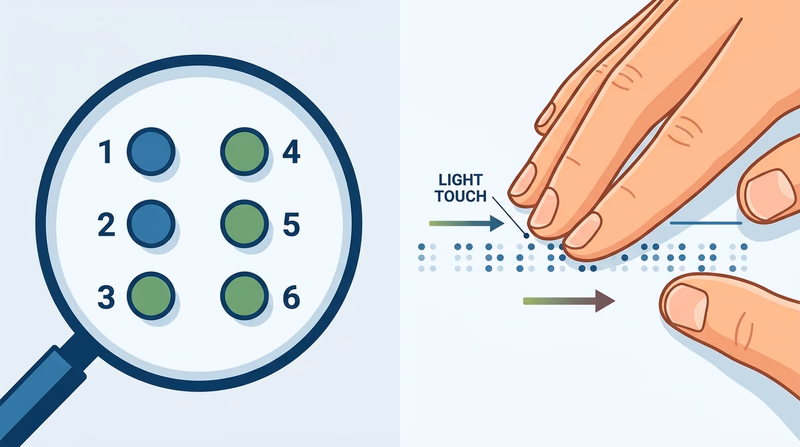
The reading technique: A braille reader lightly passes the pads of their fingertips (usually the index fingers of both hands) horizontally across the line of cells. The touch should be light and moving—pressing down hard actually reduces sensitivity. Experienced readers can read at over 100 words per minute this way.
Why Braille Matters
Without braille, a person with sight impairment would have no independent access to written material—no books, no menus, no labels, no instructions. Braille gives:
- Independence: the ability to read privately, at your own pace, without assistance
- Literacy: access to the same written information sighted people take for granted
- Employment: workplaces use braille labels, technical manuals, and accessibility tools
- Navigation: elevator buttons, public signage, ATMs, and medicine labels all use braille
Today braille appears everywhere from elevator floors to braille-printed playing cards to braille sheet music.
Requirement 5a — Read Braille
Learning the Braille Alphabet
You can complete 5a either by sight (reading a braille chart and visually identifying the raised-dot pattern) or by touch (actually feeling the dots with your fingertips on a braille page or embossed printout).
The braille alphabet for letters A–J (all use only the top two rows of the cell):
| Letter | Dots raised |
|---|---|
| A | 1 |
| B | 1, 2 |
| C | 1, 4 |
| D | 1, 4, 5 |
| E | 1, 5 |
| F | 1, 2, 4 |
| G | 1, 2, 4, 5 |
| H | 1, 2, 5 |
| I | 2, 4 |
| J | 2, 4, 5 |
Letters K–T add dot 3 to the corresponding A–J pattern. Letters U–Z use the bottom row of the cell in various ways.
Decoding a Six-Word Message
For the six-word decoding task:
- Find or create a braille message (braille translation tools online can convert any text).
- Identify each cell by its dot pattern using a reference chart.
- Write out the decoded letters and words.
If decoding by touch, practice on embossed braille paper—printer embossing services and some libraries can produce this.
Req 5a Readiness
- Can identify each braille letter that spells my name (by sight or touch)
- Can decode a braille message at least six words long
Requirement 5b — Write Braille
Creating Your Braille Message
You have several options for creating a braille message:
Option 1: Write it out using a braille chart. Draw the six-dot cell grid for each letter, filling in the raised dots. Present the chart as your braille message. This is the simplest approach and works fine for the requirement.
Option 2: Use a braille translation tool. Many websites (such as the American Foundation for the Blind’s tools or dedicated braille converters) will translate any English text into a printable braille graphic. Print the result and bring it to your counselor.
Option 3: Use a braille slate and stylus. A braille slate is a small metal template; the stylus presses dots into paper. Braille is written right-to-left when using a slate so it reads left-to-right when turned over. This is the most authentic method and shows real understanding of the system.
Option 4: Use braille-embossing software. If your school or library has a braille embosser, you can produce an actual tactile braille document.
Choose a message that means something to you—your name and patrol, a Scout motto, or a short meaningful sentence.
Req 5b Readiness
- Have created a braille message at least six words long
- Can explain what method I used to create it
- Ready to share with my counselor and explain how to decode it
Putting It All Together
Braille is a reminder that communication systems are designed by people for people—they evolve when someone sees a problem and finds a better solution. Louis Braille was a teenager when he created his system, and it has given independent literacy to millions of people around the world ever since.
When you talk with your counselor, be ready to explain both the technique (how the six-dot cell works and how it’s read) and the significance (why independent access to written language matters to people with sight impairments).
Req 6 — Sound Signals and Silent Scout Signals
This requirement covers two complementary signal systems: sound signals that work across distance and without line of sight, and silent Scout signals that allow a patrol or troop to maneuver quietly in the field. They solve different problems—6a is about knowledge and comparison, 6b is about demonstration.
Requirement 6a — Sound Signals
Six Sound-Only Signals in Use Today
You need to describe six real, currently-used sound signals. Here are eight good examples to choose from—pick six and be prepared to describe each one clearly:
1. Fog Horn / Ship’s Horn Ships sound fog horns in reduced visibility as required by international maritime regulations. One prolonged blast (4–6 seconds) means “I am under way on a power vessel.” Multiple blasts communicate other status messages. The sound carries far over water even when visibility is near zero.
2. Train Horn / Locomotive Whistle Trains sound specific patterns at road crossings: two long, one short, one long (- - · -). These patterns are standardized by regulation and warn pedestrians and drivers at crossings where a visual signal alone isn’t reliable.
3. Emergency Vehicle Sirens Police, fire, and ambulance vehicles use distinctive electronic sirens to clear traffic. Different patterns (wail, yelp, pierce) have different meanings to trained drivers. Air-horn blasts may accompany the siren at intersections.
4. Tornado/Civil Defense Siren Outdoor warning sirens sound a steady rising-and-falling tone to alert people of severe weather or other public emergencies. One long steady tone may mean “all clear.”
5. Smoke Alarm / Carbon Monoxide Alarm Smoke detectors emit a piercing beep pattern (typically three beeps, pause, three beeps) standardized nationally. Carbon monoxide alarms use a different pattern to distinguish the danger. These are one of the most common life-saving sound signals in everyday life.
6. Distress Whistle (Three Blasts) Three short blasts on a whistle is the universal outdoor distress signal—recognized in wilderness search and rescue, boating, and outdoor education contexts. A rescue whistle carries farther than a shout with far less energy.
7. Buoy Bell / Whistle Buoy Navigational buoys in harbors and shipping channels use bells, whistles, or horns powered by wave action to signal their location in fog. Mariners listen for these when visibility drops.
8. Factory/School Bell or Buzzer School bells, factory shift buzzers, and fire alarm bells in buildings are simple but effective sound signals that communicate “start,” “stop,” “evacuate,” or “change” to large numbers of people simultaneously.
Pros and Cons: Sound Signals vs. Other Types
Your counselor will want a genuine pros-and-cons comparison. Here’s a framework:
Advantages of sound signals:
- Work in darkness, fog, smoke, or when line-of-sight is blocked
- Cover a wide area simultaneously without aiming
- Require no special training to recognize simple alerts (alarm = leave the building)
- Can be heard around corners and through obstacles
- Often impossible to ignore (sirens, alarms)
Disadvantages of sound signals:
- Direction is hard to pinpoint accurately (where is the siren coming from?)
- Noise pollution in urban environments reduces their effectiveness
- Cannot convey complex information quickly—limited to simple alerts
- Hearing-impaired individuals may not receive them
- Sound carries in all directions—can’t target one person without broadcasting widely
- Weather and terrain affect range significantly
Req 6a Readiness
- Can describe six different sound-only signals used today
- Can explain the pros and cons of sound signals vs. visual or other signals
- Ready to discuss which situations favor sound over light or coded signals
🎬 Video: Colregs Sound Signals - Rule 34 Manoeuvring and Warning Signals — Get Lost Sailing & Powerboat Training — https://www.youtube.com/watch?v=364HF22NeTs
Requirement 6b — Silent Scout Signals
Why Silent Signals?
Silent Scout signals let a patrol move, react, and coordinate without making a sound. This is valuable in orienteering, stalking games, Scout craft exercises, and any situation where staying quiet matters. The signals must be agreed upon in advance and visible to everyone in the group—they require clear line of sight from the signaler to each person.
The Standard Scout Silent Signals
The badge pamphlet describes these core signals. Practice them until each motion is crisp and unambiguous:
| Signal | How to Make It | Meaning |
|---|---|---|
| Scout Sign (Attention) | Raise right hand with three fingers extended, palm forward | “Be silent and pay attention to me” |
| Gather / Come Here | Raise arm straight up, circle hand | “Everyone come to me” |
| Line Up | Extend arm horizontally, palm flat | “Form a line” |
| Half-Circle / Semicircle | Swing arm in a wide arc | “Form a half-circle around me” |
| Single File | Extend arm straight back, index finger pointing | “Fall into single-file line” |
| Follow Me | Move extended arm forward in a sweeping motion | “Follow me in this direction” |
| Go That Way | Point with extended arm in the direction of travel | “Move in that direction” |
| Hurry Up | Rapid circles with hand raised | “Move faster / urgency” |
| Stop | Raise arm with open palm facing outward | “Halt / stop where you are” |
| Get Down | Lower hand palm-down, pushing toward ground | “Crouch down / take cover” |
| Disregard / Never Mind | Wave both arms crossed overhead | “Cancel that signal / ignore last instruction” |
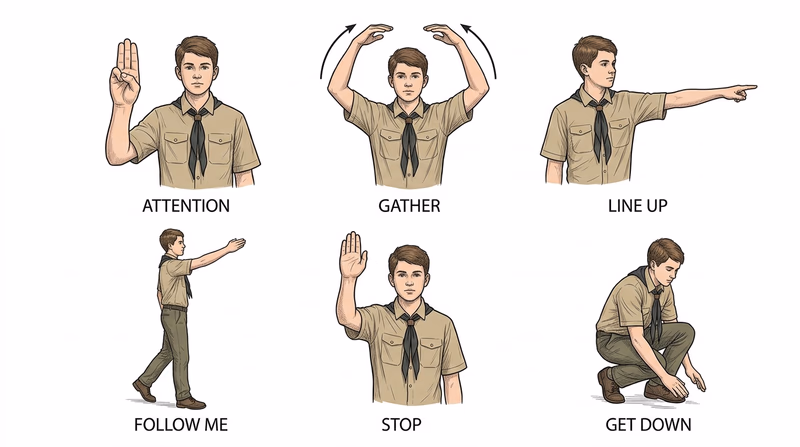
You need to demonstrate six of these. Choose six that feel natural together—for example, Attention, Follow Me, Stop, Spread Out, Get Down, and Gather covers common patrol maneuver situations well.
Demonstrating With Your Patrol
For the counselor demonstration, you’ll use the signals to direct real movement of your patrol or troop. Here’s how to prepare:
- Practice each signal until it’s smooth and confident—hesitation confuses the group.
- Run through a short scenario with your patrol: give the attention signal, then lead them through a sequence of movements using only silent signals.
- Make sure everyone in your patrol knows the signals before the demonstration—they need to respond correctly for it to work.
Req 6b Readiness
- Know at least six silent Scout signals and can describe each one
- Can make each signal clearly and confidently
- Have practiced with my patrol so they respond correctly
- Ready to demonstrate directing patrol movement using only silent signals
Req 7 — Trail Markers With Outdoor Ethics
Trail Signs as Communication
Trail signs are one of the oldest forms of outdoor communication. Before GPS and blazed hiking trails, travelers marked routes for those who followed by arranging natural materials—sticks, stones, grass—into simple patterns with agreed-upon meanings. Scouts have used these signs for over a century.
This requirement combines practical signaling skill with the Leave No Trace ethic: you create a message in the landscape, and then you erase it.
Trail Sign Vocabulary
You need at least six different signs. Here are the standard signs from Scouting tradition:
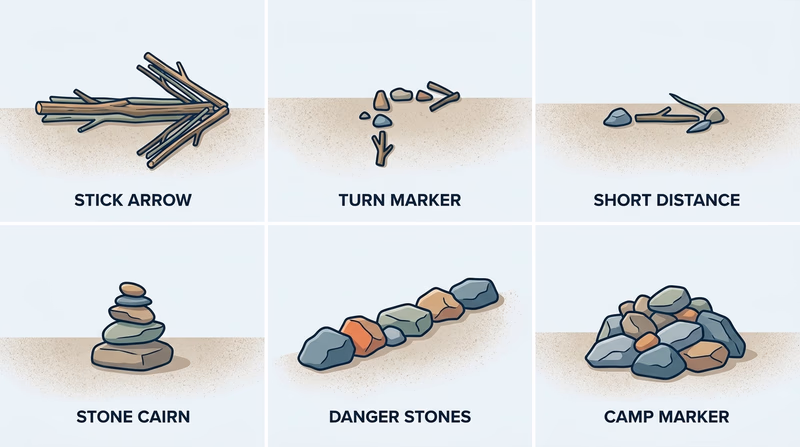
Made from Sticks
| Sign | How to Make It | Meaning |
|---|---|---|
| Arrow | Two sticks forming a V-shape pointing in a direction, or a straight stick with a cross-stick | This is the way / Go this direction |
| Turn right / Turn left | An arrow-shaped marker angled to the right or left | Trail turns in this direction |
| Short distance | Short stick or small pile | A small distance ahead |
| Long distance | Long stick or larger pile | A longer distance ahead |
Made from Stones
| Sign | How to Make It | Meaning |
|---|---|---|
| Trail marker | Small cairn (stack of 3 stones) | You are on the trail |
| Turn right | Three stones, with the rightmost offset | Trail turns right |
| Turn left | Three stones, with the leftmost offset | Trail turns left |
| Danger | Three stones in a row | Warning / do not go this way |
Made from Grass or Vegetation
| Sign | How to Make It | Meaning |
|---|---|---|
| This is the way | Tied tuft of grass pointing in the direction of travel | Follow this way |
| Not this way | Grass tied in a knot or crossed sticks | Wrong direction |
| Water nearby | Grass tuft pointing toward water source | Water in this direction |
| End of trail / Camp | Circular arrangement of stones or a cross formed from sticks | Destination is here |
You can also combine signs—for example, an arrow pointing right plus a “short distance” marker together means “turn right in a short while.”
Planning Your Trail
Before the outing, plan carefully:
- Walk the route first. Know where your turns, hazards, and landmark points are.
- Map your signs. Make a note of where each of your six-plus signs will go and what material you’ll use.
- Use natural, moveable materials. Sticks, stones, and grass. Do not cut living vegetation, carve trees, or permanently alter the landscape.
- Space the signs so followers can find the next one from the previous one. Roughly 50–100 feet apart works well in open terrain; closer in dense forest.
- Confirm a briefing point. Before the following Scouts start, make sure they know what each sign means—your trail is only useful if they can read it.
Leave No Trace: Before You Leave
The requirement is explicit: after the trail is completed, restore the markers to their original locations or remove them entirely. This is not optional—it’s a core part of the requirement and reflects the Outdoor Code.
What to do:
- Scatter any stone cairns back to natural positions
- Return moved sticks and stones to where you found them
- Untie or release any tied grass
- Walk the full trail one more time to confirm no signs remain
Leave No Trace Principles Relevant Here
The Leave No Trace Seven Principles most directly relevant to this requirement:
- Leave what you find — take only the markers you placed; don’t disturb other natural features
- Travel and camp on durable surfaces — walk on established paths where possible; don’t create new routes
- Minimize campfire impacts — not directly applicable here, but the spirit of reducing impact applies
- Respect wildlife — don’t disturb animal habitat while placing or collecting signs
The Outdoor Code commitment to being “considerate of others” applies too: your signs are temporary communications, not permanent alterations to shared natural spaces.
Req 7 Readiness
- Have planned a route of at least one mile
- Have identified at least six different signs to use
- Know what natural materials I’ll use at each point
- Have briefed the following Scouts on the sign vocabulary
- Have a cleanup plan—know who collects markers on which section
- Know the Leave No Trace principles relevant to this activity
Req 8 — Choose Three Real-World Signal Systems
You must choose exactly three of the five options. For each one you choose, you’ll demonstrate five specific signals and explain what each means and why it’s used. Read the summaries below to help you choose wisely.
Your Five Options
Req 8a — Sports Officiating Signals
Demonstrate five signals that a sports official uses during a real game—then tell what each signal means and why referees communicate this way rather than shouting. Good if you play or follow organized sports. Signals from basketball, football, soccer, or baseball all qualify.
Req 8b — Heavy-Equipment Hand Signals
Demonstrate five standardized hand signals used by riggers or ground workers to direct crane and heavy-equipment operators—then explain what each means and why precise silent communication matters when a load weighing tons is swinging overhead. Good if you’re interested in construction, engineering, or safety.
Req 8c — Aircraft Carrier Deck Signals
Demonstrate five signals used by catapult or flight-deck crew to direct aircraft launches and landings on a carrier deck—then explain what each means and why the deck crew can’t rely on radio contact. Good if you’re interested in military aviation or naval careers.
Req 8d — Cyclist Hand Signals
Demonstrate five hand signals that cyclists use to communicate with drivers and other riders—then explain what each means and why these signals matter for road safety. Good if you ride a bike regularly or are interested in cycling as a sport or transportation.
Req 8e — Your Custom Signal Set
Work with your counselor to choose an activity with its own signal system—diving hand signals, baseball catcher signals, air traffic control signals, ski patrol signals, marching band commands, or something else entirely. Then demonstrate five signals from that system and explain them.
How to Choose Your Three
Think about what you genuinely know or care about. The demonstration will be stronger if you pick systems you’re familiar with or interested in learning:
- Played team sports? → 8a is a natural fit
- Interested in construction, machinery, or safety? → 8b is worth learning
- Fascinated by military aviation? → 8c is genuinely impressive
- Cyclist or road safety interest? → 8d is practical and immediately useful
- Have a sport, hobby, or career field with its own signals? → 8e gives you flexibility
You can also pick two easier ones and learn a new, challenging system for the third—that combination shows breadth.
What “Demonstrate” Means
For each of your three choices, you must physically perform the signals—not just describe them. Your counselor wants to see:
- The signal made clearly and correctly
- Your verbal explanation of what it means
- Your explanation of why that signal exists (why is a hand signal better than words in this context?)
Five signals per activity × three activities = 15 total demonstrations. Read each option page for specific signal suggestions and preparation guidance.
Req 8a — Sports Officiating Signals
Why Officials Use Hand Signals
Sports officials use hand signals because stadiums and fields are loud, players are spread across large distances, and the action happens fast. A clearly made hand signal communicates instantly and unambiguously to players, coaches, fans, and other officials—no matter how much noise is in the arena. Signals also let officials communicate the same ruling in every stadium, in every country, without language barriers.
Choosing Your Sport
You can use signals from any organized sport. Strong choices include:
- Basketball — a rich, standardized signal set; refs make calls constantly
- American football — dramatic, well-known signals visible across a large field
- Baseball / softball — umpire signals for strikes, outs, fair/foul, and more
- Soccer — referee and assistant referee signals
- Wrestling — mat official signals
- Volleyball — line judge and referee signals
Pick the sport you know best, or a combination of sports for variety.
Suggested Signal Set (Basketball Example)
Basketball has some of the clearest, most practiced signals in organized sports:
| Signal | How to Make It | Meaning | Why used |
|---|---|---|---|
| Personal foul | Raise one fist above head, other arm extended | A player made illegal physical contact | Stops play and assigns the foul to a specific player clearly visible to the scorer’s table |
| Traveling | Rotate forearms in circles in front of the body | Ball carrier took illegal steps without dribbling | Quickly communicates the rule violation from mid-court without shouting |
| Technical foul | Form a T with both hands at chest level | Non-contact rule violation or unsportsmanlike conduct | Distinguishes from a physical-contact foul; triggers free throws |
| Three-second violation | Extend three fingers, move hand toward lane | Offensive player stayed in the paint too long | Communicates the specific violation and which team it’s against |
| Jump ball | Point thumb upward, extend other arm with palm up | Neither team has clear possession; jump ball situation | Visible to both teams and the scorer’s table simultaneously |
Suggested Signal Set (American Football Example)
Football signals must be visible at 100+ yards:
| Signal | How to Make It | Meaning | Why used |
|---|---|---|---|
| Touchdown / field goal | Both arms extended overhead | Score is good | Visible to all 80,000 fans and both teams |
| Roughing the passer | Grab own forearm with other hand, raise | Defense hit the QB after release | Penalty must be communicated to both benches and the press box before the whistle stops |
| Holding | Grab own wrist, raise above head | Player illegally grabbed opponent | Describes the specific foul to coaches who missed the play |
| False start | Rotate forearms repeatedly before snap | Offensive player moved illegally | Communicates before play resumes |
| First down | Point arm toward the team’s end zone | The offense gained 10 yards | Quick confirmation to both teams about game state |
Demonstrating Your Five Signals
- Choose your five signals and practice each one until it looks deliberate and clear.
- For each signal, briefly describe the context (e.g., “this is a basketball personal foul call”), make the signal, state what it means, and explain why hand signals work better than shouting in that situation.
- Consider demonstrating with your patrol watching—having a small audience makes it feel natural.
Req 8b — Heavy-Equipment Hand Signals
Why Hand Signals on a Job Site?
A crane operator sitting high inside a cab often can’t hear anything on the ground below. Radios can fail, and verbal instructions in a noisy construction environment lead to misunderstandings—sometimes fatal ones. The solution is a standardized set of hand signals that a ground worker (called a rigger or signal person) uses to direct the operator from a visible position.
These signals are not optional on professional job sites. In the United States, OSHA (Occupational Safety and Health Administration) and ASME (American Society of Mechanical Engineers) publish the standardized hand signal charts that every qualified signal person must know. When a multi-ton load is swinging on a hook, there’s zero room for ambiguity.
Five Standard Heavy-Equipment Hand Signals
| Signal | How to Make It | Meaning | Why it matters |
|---|---|---|---|
| Hoist | Extend arm upward, index finger pointing up, rotate in small horizontal circles | Raise the load | Unmistakable upward motion—operator lifts the load |
| Lower | Extend arm downward, index finger pointing down, rotate in small horizontal circles | Lower the load | Mirror of hoist—opposite direction, no ambiguity possible |
| Stop | Extend arm horizontally, palm down, hold firm | Stop all movement immediately | A firm, held horizontal arm is impossible to confuse with a motion signal |
| Emergency stop | Extend both arms horizontally, palms down, hold firm | Emergency—stop everything now | Both arms adds urgency; operator must stop immediately |
| Boom up | Point thumb upward, fingers closed, move fist upward | Raise the crane boom | Distinct from “hoist”—affects the boom angle, not the load directly |
Additional commonly used signals include:
| Signal | How to Make It | Meaning |
|---|---|---|
| Boom down | Point thumb downward, move fist downward | Lower the crane boom |
| Swing | Extend arm horizontally, point in direction of swing | Rotate the crane in that direction |
| Travel | Grasp wrists at waist, rotate fists around each other | Move the crane forward/travel |
| Dog everything / hold | Clasp hands together at waist | Stop work; secure the load in place |
Demonstrating Your Five Signals
- Practice each signal until it looks clear and deliberate.
- For each one: state what situation would call for this signal, make the signal clearly, say what it means, and explain why using hand signals rather than shouting is safer here.
- If possible, watch a short video of real crane signal persons to understand the proper speed and authority of the signals.
🎬 Video: Crane Operator Hand Signal Training Video | Crane U — Crane U — https://www.youtube.com/watch?v=me2fjrX9hf8
Req 8c — Aircraft Carrier Deck Signals
The Most Dangerous Workplace in the World
An aircraft carrier flight deck is one of the noisiest, most dangerous work environments ever created. Jet engines run at full power just feet from crew members. Aircraft land at high speed on a deck that’s pitching in open ocean. Massive catapults fling 50,000-pound aircraft to 165 mph in two seconds.
In this environment, radio chatter between deck crew is impossible. The noise level would drown it out instantly. Instead, the U.S. Navy’s carrier flight deck operates on an intricately choreographed system of hand signals, body signals, and colored jersey assignments—every crew member knows their role and their signals exactly.
The deck crew wears color-coded jerseys that identify their specialty at a glance: yellow (aircraft handling officers, catapult/arresting gear), green (catapult crew, aircraft handlers), red (ordnance, crash crew), blue (aircraft directors and elevator operators), purple (fuel), brown (plane captains), and white (safety and medical).
Five Key Carrier Deck Signals
The requirement specifies “catapult crew signals” specifically. The following are drawn from U.S. Navy catapult launch operations:
| Signal | How to Make It | Meaning | Why it’s used |
|---|---|---|---|
| Tension / take tension | Point both index fingers forward at waist, pull toward body | Apply launch bar tension; aircraft ready to take tension on catapult | The catapult officer confirms the aircraft is aligned and ready for attachment; this is the beginning of the launch sequence |
| Wipe out controls / final check | Move arm in sweeping motion across front of body | Pilot: cycle all control surfaces for a final visual check | The catapult officer observes ailerons, elevator, and rudder moving to confirm all flight controls work before launch |
| Run up engines | Point index finger in a circle above head, then point in direction of takeoff | Bring engines to full power | Gives the pilot the signal to advance throttle to full military power before catapult release |
| Two-finger salute (ready for launch) | Pilot touches helmet with two fingers, salutes | “I am ready for launch” | The pilot communicates readiness to the shooter (catapult officer) without radio—this is the pilot’s authorization signal |
| Launch (firing) | Touch deck, then sweep arm forward in a wide arc toward bow | Fire the catapult | The final launch signal—the catapult officer touches the deck (a ritual safety check), then sweeps the arm forward to signal the shooter to fire; the aircraft launches 0.5 seconds later |
Additional signals used in carrier flight operations:
| Signal | Meaning |
|---|---|
| Both fists crossed overhead | Emergency stop / abort launch |
| Raised closed fist | Hold; do not proceed |
| Point to aircraft, then taxi signal | Taxi to designated position |
| Thumb down | Lower aircraft on elevator |
Demonstrating Your Five Signals
- Practice the arm motions until they look confident and deliberate—carrier deck signals need to be unambiguous at 30 feet.
- For each signal: describe the scenario on the flight deck, make the signal clearly, state what it means, and explain why radio communication isn’t an option in that moment.
- Knowing the color-jersey system helps give your explanation context—mention it when explaining why the crew is close enough to signal but can’t speak.
Req 8d — Cyclist Hand Signals
Why Cyclists Use Hand Signals
A cyclist sharing the road with motor vehicles has no horn, no turn indicator lights, and no brake lights. Hand signals are the only way to communicate intent to drivers, pedestrians, and other cyclists. In most U.S. states, cyclists are legally required to signal turns when riding on public roads.
Beyond legal requirements, hand signals protect the cyclist’s life. A driver who doesn’t see a cyclist turn can hit them. A group of riders who can’t communicate hazards causes pile-ups. Clear signals give everyone on the road a chance to react.
Five Standard Cyclist Hand Signals
| Signal | How to Make It | Meaning | Why used |
|---|---|---|---|
| Left turn | Extend left arm straight out horizontally | Turning left | Mirrors what drivers see from their left-side mirror; legally recognized in all 50 states |
| Right turn (traditional) | Extend left arm out, bend at elbow pointing upward | Turning right | Traditional signal when right arm is needed for braking or balance; still legally recognized |
| Right turn (modern) | Extend right arm straight out horizontally | Turning right | More intuitive and immediately clear to drivers; increasingly preferred |
| Stop / slowing | Extend left arm out, bend at elbow pointing downward, palm back | Stopping or slowing significantly | Warns following riders and drivers before you brake; prevents rear-end collisions |
| Hazard in road | Point toward hazard with index finger, or sweep arm to indicate passing side | Obstacle in roadway (pothole, gravel, debris) | Essential in group riding—the front rider spots a hazard and signals every rider behind them before they reach it |
Additional signals used in group cycling:
| Signal | How to Make It | Meaning |
|---|---|---|
| Single file | One arm raised, index finger pointing up | Form single-file line (narrow road ahead) |
| Slow down / ease up | Extend arm down, pat air with palm | Reduce speed |
| On your left | Call out verbally + point | Passing another cyclist on the left |
| Car back | Pat hip | Vehicle approaching from behind |
| Car up | Point forward | Vehicle approaching ahead (narrow road) |
Demonstrating Your Five Signals
- Find a bike (or simply stand and demonstrate on foot—the arm signals are the same).
- For each signal: describe the road scenario that would call for it, make the signal clearly, explain what it means, and explain why silent hand signals are more reliable than verbal calls at road speed.
- If you ride regularly, think about which signals you’ve actually used—that personal context makes your explanation stronger.
🎬 Video: How To Use Hand Signals Whilst Cycling | Essential Group Ride Communication For Bike Riders — Global Cycling Network — https://www.youtube.com/watch?v=prYMM7D2qF8
Req 8e — Your Custom Signal Set
Choose Something You Know
This option lets you pick any signal system—as long as it has a real, established set of signals that you and your counselor agree on. The best choice is something you’re already involved in or genuinely curious about, because your enthusiasm and familiarity will make the demonstration much stronger.
Strong Candidate Activities
Here are activities with well-defined signal systems that make excellent choices:
Scuba / Underwater Diving Hand Signals Divers can’t speak underwater, making hand signals essential for safety and communication. Five good signals: OK, thumbs up (ascend), thumbs down (descend), I’m low on air, look at that.
Baseball/Softball Catcher Signals Catchers use finger signals to call pitches from the hitter’s blind side. Five signals: fastball, curveball, changeup, intentional ball (pass), pickoff at first. This is a great pick if you play baseball.
Air Traffic Control Ground Signals Ground controllers direct aircraft on taxiways and aprons with standardized arm and wand signals. Five signals: turn left, turn right, stop, proceed (start taxi), shutdown engines. Good if you’re interested in aviation careers.
Ski Patrol / Mountain Rescue Signals Ski patrol and mountain rescue teams use hand signals on slopes and in noisy outdoor environments. Signals indicate “all clear,” “send next,” “stop,” “need assistance,” and “injury on scene.”
Marching Band Hand Signals (Drum Major) Drum majors lead full bands using baton and arm signals. Five signals: attention, mark time, move forward, halt, increase tempo.
Military Infantryman Hand Signals Ground troops use a standardized set of hand signals for silent patrol coordination. Five signals: halt, move out, enemy sighted, form online, take cover.
Wilderness First Aid / Rescue Signals Wilderness EMTs and rescue coordinators use hand signals for triage and coordination. Five signals: need help, proceed, stop, patient critical, all clear.
Sign Language (another variety) British Sign Language, International Sign, or another national sign language system would also qualify if you and your counselor agree.
How to Propose Your Activity to Your Counselor
When you contact your counselor, mention:
- What activity you want to use
- Where the signals come from (a recognized organization, training program, or official standard)
- Which five specific signals you plan to demonstrate
Your counselor may have suggestions or preferences. Agree on the activity and the specific signals before you start preparing.
Preparing Your Five Signals
Regardless of which activity you choose:
- Find a reliable source for the signals—an official training manual, a recognized organization’s published guide, or a verified instructional resource.
- Practice each signal until it looks deliberate and clear.
- Understand the context — for each signal, be able to explain the real situation where it would be used.
- Explain the “why” — your counselor wants to know why hand signals work better than words in this activity’s environment.
Req 8e Readiness
- Have agreed on my chosen activity with my counselor
- Have found a reliable source for the signal system
- Can demonstrate five signals clearly
- Can explain what each signal means
- Can explain why silent signals are used in this activity
Req 9 — Symbols in Daily Life
Symbols Everywhere You Look
A symbol is a visual shorthand—a shape, color, or icon that carries an agreed meaning without words. You encounter hundreds of them every day: the red circle on your phone’s battery indicator, the peace symbol on a t-shirt, the recycling arrows on a bottle, the heart emoji in a text. Symbols work because they cross language barriers, communicate instantly, and take up almost no space.
Before diving into the sub-requirements, the parent requirement asks you to do two things:
1. Collect 10 everyday symbols. Think beyond traffic signs—everyday life is full of symbols from multiple categories:
- Recycling and environmental symbols
- Medical and pharmacy symbols (caduceus, red cross, Rx)
- Technology icons (Wi-Fi signal, Bluetooth, USB, play/pause/stop)
- Religious and cultural symbols
- Currency symbols ($, €, £, ¥)
- Hazard symbols (skull and crossbones, biohazard, radiation)
- Laundry care symbols on clothing tags
- Map symbols
- Sports logos and team symbols
Bring your list of 10 to the counselor meeting. Be ready to name each symbol, explain what it means, and say where you’d see it in real life.
2. Design your own symbol. Create something original—a symbol that represents a concept, value, group, or idea that matters to you. Sketch it clearly, give it a name, and be prepared to explain what it means and why you made the design choices you did.
Requirement 9a — Traffic Signs
Traffic signs use three systems to communicate: shape, color, and symbol or text. Even without reading, drivers can understand sign messages from these cues.
Sign Shapes and Their Meanings
| Shape | Meaning |
|---|---|
| Octagon | Stop |
| Triangle (inverted) | Yield |
| Diamond | Warning |
| Rectangle (vertical) | Regulatory |
| Rectangle (horizontal) | Guide / informational |
| Pentagon | School zone |
| Circle | Railroad crossing |
Ten Traffic Signs to Know
| Sign | Description | Meaning |
|---|---|---|
| Stop | Red octagon, white text | Come to a complete stop before the stop line |
| Yield | Red and white inverted triangle | Give right-of-way to crossing traffic |
| Speed Limit | White rectangle, black numerals | Maximum speed in miles per hour |
| Do Not Enter | Red circle, white horizontal bar | Do not enter this road from this direction |
| No U-Turn | White rectangle, U with red slash | U-turns prohibited |
| Railroad Crossing (round yellow) | Yellow circle, black X and R-R | Railroad crossing ahead |
| School Zone | Yellow-green pentagon | Reduced speed ahead near school |
| Slippery When Wet | Yellow diamond, car with squiggly lines | Road surface becomes slick in wet conditions |
| Pedestrian Crossing | Yellow or fluorescent yellow-green diamond, walking figure | Pedestrians may cross here |
| Dead End | White rectangle, black text | Road ends; no through traffic |
For your counselor meeting, bring photos, printed images, or a drawing of your 10 signs. Point to each one and explain its meaning and what action a driver should take.
Requirement 9b — Topographic Map Legend
What Is a Map Legend?
A map legend (also called a map key) is a small box printed on the map that explains what each symbol, color, and line pattern means. Without the legend, a map is just a puzzle. With the legend, every mark on the map communicates specific real-world information.
A topographic map uses symbols to represent the physical landscape in a compact, standardized way. You might see:
- Blue for water features (streams, lakes, swamps)
- Green for forests and vegetation
- Brown contour lines showing elevation changes
- Black for roads, trails, and structures
- Red or purple for overprints like survey boundaries
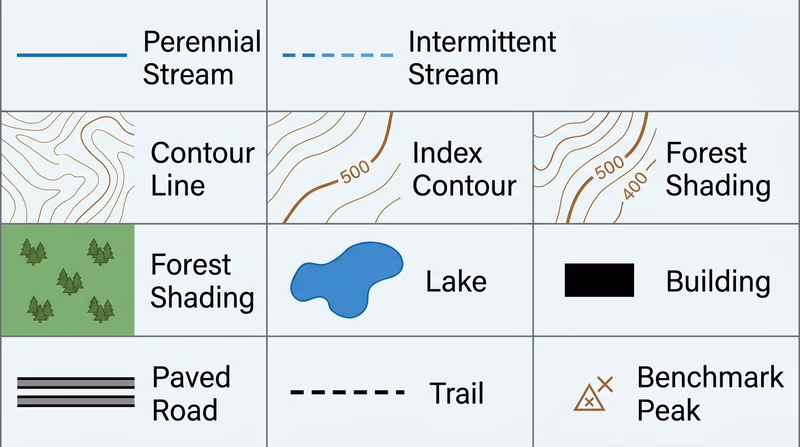
Ten Common Topographic Map Symbols
| Symbol | What It Represents |
|---|---|
| Blue solid line | Perennial stream (flows year-round) |
| Blue dashed line | Intermittent stream (seasonal) |
| Contour lines (brown) | Lines of equal elevation—how steep the terrain is |
| Index contour (thicker brown) | Every fifth contour line, labeled with elevation |
| Green shading | Forest/woodland |
| Blue filled shape | Lake or pond |
| Black rectangle or square | Building |
| Double parallel black lines | Paved road |
| Dashed black line | Trail |
| Triangle with dot | Survey benchmark / mountain peak |
Use a USGS topographic map (available free at nationalmap.gov) or a printed topo map for this exercise. Having a real map open during your counselor discussion makes it more concrete and interesting.
Requirement 9c — Text Symbols and Emoticons
Why Text Symbols Exist
Written language lacks the emotional cues of face-to-face speech: no tone of voice, no facial expression, no body language. A message like “Sure, sounds great” can be enthusiastic or sarcastic depending on context. Text symbols—and especially emoji—add that emotional layer back into written messages.
Text symbols also let people communicate quickly and expressively within character limits and on small keyboards. An emoji can replace a whole sentence of emotional context.
Origins: From Emoticons to Emoji
The earliest text symbols were ASCII emoticons—combinations of standard keyboard characters:
:-)— happy:-(— sad:-P— joking/sticking out tongue;-)— winking
These were invented in the early 1980s because typed text could be misread as serious when it was actually joking. Over time, dedicated emoji (originally developed in Japan in the late 1990s) replaced ASCII emoticons and became standardized across all devices through the Unicode standard.
Today there are over 3,600 officially standardized emoji, and new ones are added every year through a formal proposal process.
Choosing Your Ten Symbols
Pick symbols that are genuinely meaningful to you—your counselor discussion should reflect your real experience with digital communication. After you present them, challenge your counselor (or a parent or guardian) to identify what each one means. Pay attention to any gaps or misunderstandings—that’s the interesting part of the discussion.
Tip: mix a few universally understood emoji (😂, 👍, ❤️) with a few that are more contextual or generational (🧢, 💀, 🫡). The contrast between what you understand and what your counselor recognizes makes for a great conversation about how symbols evolve with communities.
Req 10 — Secret Codes and Cryptography
Codes, Ciphers, and Cryptology
Before diving into history, it helps to know three related terms:
- Code — a system where entire words or phrases are replaced by other words, numbers, or symbols. Codes require a codebook. Example: “The eagle has landed” meaning “mission accomplished.”
- Cipher — a system where individual letters or characters are systematically replaced or rearranged. Ciphers use an algorithm and often a key. Example: shifting every letter three positions forward in the alphabet.
- Cryptology — the broader science of making messages secret (cryptography) and breaking secret messages (cryptanalysis).
The requirement calls your creation a “code,” but in practice you’ll most likely be creating a cipher. Either is fine—just understand the distinction.
A Brief History of Secret Writing
Secret writing is as old as warfare and diplomacy. Here are the key milestones:
Ancient Times
The Spartan Scytale (~700 BCE) — Spartan commanders used a cylindrical rod called a scytale. A strip of leather was wound around the rod and the message was written along the rod’s length. When unwound, the leather showed only a meaningless jumble. Only a rod of the same diameter could decode it—the first known transposition cipher.
Caesar Cipher (~50 BCE) — Julius Caesar used a simple substitution cipher: shift every letter three positions forward in the alphabet. A became D, B became E, and so on. Simple by modern standards, but effective against enemies who had no idea alphabetic substitution was being used.
Renaissance to Early Modern
Leon Battista Alberti’s Cipher Disk (1467) — Italian architect Leon Battista Alberti invented the polyalphabetic cipher and a mechanical cipher disk to implement it. Instead of a single fixed shift, the disk rotated to use a different substitution for each letter of the message. This was a major advance over Caesar—and was still being used in modified forms 400 years later.
The Pigpen Cipher (18th century) — Used by Freemasons and later popularized widely, the pigpen cipher replaces letters with geometric shapes based on a grid. Each letter is drawn as the grid segment around it, with or without a dot. It’s visually unusual and memorable, which is why it’s still used in puzzles and escape rooms today.
Jefferson Wheel (~1795) — Thomas Jefferson invented a cipher wheel made of 26 discs, each with the alphabet scrambled in a different order. The sender aligned the discs to spell the message, then copied any other row as the ciphertext. The receiver used an identical wheel to find the only row that spelled readable English.
World Wars
German Enigma Machine (WWII) — The Enigma machine was an electromechanical cipher device used by Nazi Germany to encrypt military communications. It used multiple rotating cipher wheels to create an astronomically large number of possible settings—the transmitting operator set the machine to a prearranged daily setting, and all recipients had identical machines. The Allies cracking Enigma (through the work of Alan Turing and others at Bletchley Park) is considered one of the decisive intelligence victories of the war.
Battle of Midway (1942) — American cryptanalysts broke the Japanese naval code JN-25 well enough to determine that Japan was targeting a location coded as “AF.” The US planted disinformation suggesting AF’s water supply was failing; Japanese communications confirmed AF meant Midway. This intelligence allowed the US Navy to position its carriers for the ambush that turned the tide of the Pacific War.
Modern Cryptography
Today’s cryptography is mathematical rather than mechanical. Public-key encryption (developed in the 1970s) uses pairs of mathematically linked keys—a public key that anyone can use to encrypt a message, and a private key that only the recipient holds for decryption. This is how your browser creates a secure HTTPS connection, how your bank protects your login, and how every email, text, and password on the internet is kept private.
Breaking modern encryption requires computational power that doesn’t exist—cracking a 256-bit key by brute force would take longer than the current age of the universe.
Designing Your Own Code
You need to create a code, write a 25-word message using it, share the message with a friend or Scout, then show your counselor both the message and the key.
Simple Starting Points
Substitution cipher — Replace each letter with a different letter, number, or symbol. Create a table mapping A→#, B→?, etc. Simple to make, but frequency analysis can crack it (common letters like E, T, A appear most often even in coded text).
Caesar-style shift — Shift the alphabet by a number of your choosing (shift 7: A→H, B→I, etc.). Easy to use, but easy for a clever solver to crack.
Symbol substitution — Create your own set of symbols for each letter—geometric shapes, simple icons, or alien-looking marks. The same weakness as substitution (frequency), but more visually interesting.
Rail fence cipher (transposition) — Write your message in a zigzag pattern across two or more rows, then read across each row in order. “HELLO WORLD” in a two-rail fence becomes HLOOL / ELWRD → ciphertext “HLOOLELWRD”. This rearranges rather than substitutes.
Mixed code — Combine substitution with a keyword: agree on a key word, remove duplicate letters, write the keyword first, then continue the remaining alphabet. This makes frequency analysis harder.
Tips for a Stronger Code
- Add a null character (a symbol or letter that means “ignore this”) to confuse pattern analysis
- Split words differently in the ciphertext so word lengths don’t hint at the plaintext
- Use numbers for vowels to break up common letter patterns
- Add a simple transposition after substitution for a two-layer cipher
What to Bring to Your Counselor Meeting
- Your plaintext message (the original words)
- Your ciphertext message (the encoded version)
- Your code key (the table or algorithm to encode/decode)
- Evidence that a friend or Scout tried to decode the message from the ciphertext
- Your assessment of its strengths and weaknesses
Req 10 Readiness
- Can briefly describe the history of cryptography with at least three historical examples
- Can distinguish between a code, a cipher, and cryptology
- Have created my own cipher/code system
- Have written a message of up to 25 words using my code
- Have shared the message (not the key) with a friend or Scout
- Ready to share both the message and the key with my counselor
- Ready to discuss how effective my code is and how it could be improved
Extended Learning
Congratulations!
You’ve explored communication systems across languages, senses, distances, and centuries. The skills you’ve practiced—Morse code, ASL, semaphore, braille, trail signs, secret ciphers—connect you to a long tradition of humans finding ingenious ways to share information under difficult conditions. That tradition is very much alive in every encrypted website you visit and every emoji you send.
Dig Deeper
Amateur Radio (Ham Radio)
Morse code is the original language of amateur radio, and it’s still used by licensed ham radio operators worldwide. The Amateur Radio Relay League (ARRL) offers licensing programs starting with the Technician class license. Many Scouts earn the Radio merit badge and discover amateur radio as a lifelong hobby. Morse code on the air sounds very different from tapping a table—learning to copy it at 15–20 words per minute is a genuine skill.
The Deaf Community and Linguistics
ASL is a complete natural language with its own grammar, dialects, and literature. If you found ASL interesting, explore introductory courses offered by community colleges, local Deaf community organizations, or free online platforms. Learning a visual language rewires the way you think about communication and gives you access to a vibrant, welcoming community.
International Code of Signals
The full International Code of Signals (INTERCO) is a published volume covering single-flag, two-flag, and three-flag combinations used in maritime communication worldwide. It covers everything from medical emergencies to navigational hazards. Coast Guard and maritime career programs teach the full system.
Cryptography and Computer Science
Modern encryption is built on mathematics—specifically number theory and problems that are easy to compute in one direction but nearly impossible to reverse. If you enjoyed designing your own cipher, explore:
- How the Caesar cipher connects to modular arithmetic
- How public-key cryptography (RSA) uses prime factorization
- How the Enigma machine’s weakness was its inability to encode a letter as itself
Computer science programs from high school through university include cryptography courses. The field is in high demand—every technology company, government agency, and financial institution employs cryptographers.
Codebreaking History
The story of Bletchley Park in WWII—where Alan Turing and hundreds of codebreakers broke the German Enigma cipher—is one of the most compelling intelligence stories ever told. Seek out books like The Hut Six Story by Gordon Welchman or The Code Book by Simon Singh for the full history. The work done there is estimated to have shortened the war by two to four years.
Navigation and Cartography
Topographic maps and map legends connect to the Orienteering merit badge, Hiking merit badge, and Navigation merit badge. If you enjoyed the map symbols section of Req 9, pursue map and compass navigation skills—it’s one of the most practically useful outdoor skills you can develop.
Try This Next
- Get your Technician ham radio license and make your first CW (Morse code) contact on the air
- Attend a Deaf community event or a local ASL conversation circle to practice your signing in a real context
- Run a patrol cryptography night — challenge each patrol member to crack each other’s ciphers using only frequency analysis
- Visit a maritime museum that has signal flag displays or a ship’s communications exhibit
- Download a braille translation app and write a note in braille for someone who reads it
Organizations and Resources
Provides braille resources, assistive technology information, and accessibility advocacy for people with sight impairments.
Organization: American Foundation for the Blind (AFB) — https://www.afb.org
Advocacy and information resource for the Deaf and hard-of-hearing community in the United States, including ASL resources.
Organization: National Association of the Deaf (NAD) — https://www.nad.org
The national association for amateur radio operators. Licensing resources, Morse code training, and club finder for new ham radio operators.
Organization: American Radio Relay League (ARRL) — https://www.arrl.org
Lighthouse history and preservation, with information about historical maritime signaling and lighthouse communication methods.
Organization: U.S. Lighthouse Society — https://uslhs.org
Free access to USGS topographic maps online and downloadable. Great for Req 9b map legend practice and navigation badge work.
Organization: USGS National Map (topographic maps) — https://www.usgs.gov/programs/national-geospatial-program/national-map
Online museum of cipher machines, encryption history, and the history of secret communication from ancient times through the Cold War.
Organization: Cryptomuseum.com — https://cryptomuseum.com