Req 7 — Trail Markers With Outdoor Ethics
Trail Signs as Communication
Trail signs are one of the oldest forms of outdoor communication. Before GPS and blazed hiking trails, travelers marked routes for those who followed by arranging natural materials—sticks, stones, grass—into simple patterns with agreed-upon meanings. Scouts have used these signs for over a century.
This requirement combines practical signaling skill with the Leave No Trace ethic: you create a message in the landscape, and then you erase it.
Trail Sign Vocabulary
You need at least six different signs. Here are the standard signs from Scouting tradition:
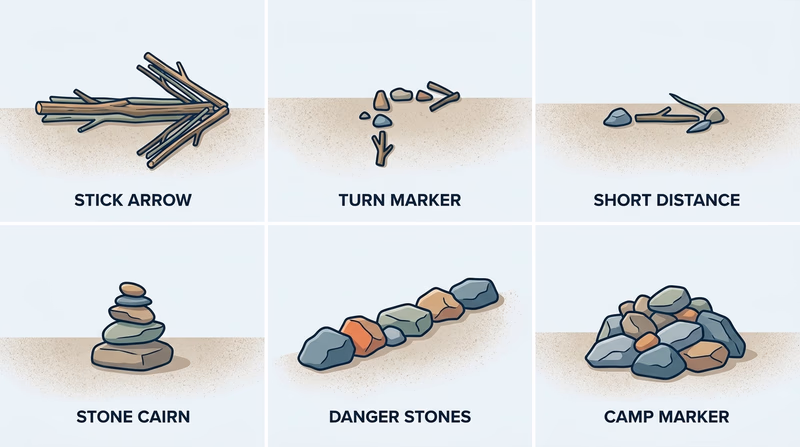
Made from Sticks
| Sign | How to Make It | Meaning |
|---|---|---|
| Arrow | Two sticks forming a V-shape pointing in a direction, or a straight stick with a cross-stick | This is the way / Go this direction |
| Turn right / Turn left | An arrow-shaped marker angled to the right or left | Trail turns in this direction |
| Short distance | Short stick or small pile | A small distance ahead |
| Long distance | Long stick or larger pile | A longer distance ahead |
Made from Stones
| Sign | How to Make It | Meaning |
|---|---|---|
| Trail marker | Small cairn (stack of 3 stones) | You are on the trail |
| Turn right | Three stones, with the rightmost offset | Trail turns right |
| Turn left | Three stones, with the leftmost offset | Trail turns left |
| Danger | Three stones in a row | Warning / do not go this way |
Made from Grass or Vegetation
| Sign | How to Make It | Meaning |
|---|---|---|
| This is the way | Tied tuft of grass pointing in the direction of travel | Follow this way |
| Not this way | Grass tied in a knot or crossed sticks | Wrong direction |
| Water nearby | Grass tuft pointing toward water source | Water in this direction |
| End of trail / Camp | Circular arrangement of stones or a cross formed from sticks | Destination is here |
You can also combine signs—for example, an arrow pointing right plus a “short distance” marker together means “turn right in a short while.”
Planning Your Trail
Before the outing, plan carefully:
- Walk the route first. Know where your turns, hazards, and landmark points are.
- Map your signs. Make a note of where each of your six-plus signs will go and what material you’ll use.
- Use natural, moveable materials. Sticks, stones, and grass. Do not cut living vegetation, carve trees, or permanently alter the landscape.
- Space the signs so followers can find the next one from the previous one. Roughly 50–100 feet apart works well in open terrain; closer in dense forest.
- Confirm a briefing point. Before the following Scouts start, make sure they know what each sign means—your trail is only useful if they can read it.
Leave No Trace: Before You Leave
The requirement is explicit: after the trail is completed, restore the markers to their original locations or remove them entirely. This is not optional—it’s a core part of the requirement and reflects the Outdoor Code.
What to do:
- Scatter any stone cairns back to natural positions
- Return moved sticks and stones to where you found them
- Untie or release any tied grass
- Walk the full trail one more time to confirm no signs remain
Leave No Trace Principles Relevant Here
The Leave No Trace Seven Principles most directly relevant to this requirement:
- Leave what you find — take only the markers you placed; don’t disturb other natural features
- Travel and camp on durable surfaces — walk on established paths where possible; don’t create new routes
- Minimize campfire impacts — not directly applicable here, but the spirit of reducing impact applies
- Respect wildlife — don’t disturb animal habitat while placing or collecting signs
The Outdoor Code commitment to being “considerate of others” applies too: your signs are temporary communications, not permanent alterations to shared natural spaces.
Req 7 Readiness
- Have planned a route of at least one mile
- Have identified at least six different signs to use
- Know what natural materials I’ll use at each point
- Have briefed the following Scouts on the sign vocabulary
- Have a cleanup plan—know who collects markers on which section
- Know the Leave No Trace principles relevant to this activity