Skating Merit Badge — Complete Digital Resource Guide
https://merit-badge.university/merit-badges/skating/guide/
Introduction & Overview
Skating comes in many forms — gliding across a frozen pond, cruising a roller rink, blading along a bike path, or dropping into a skate park halfpipe — but they all share one thing: the exhilarating feeling of moving under your own power on a thin layer between you and the ground. The Skating merit badge lets you dive deep into whichever discipline speaks to you while building the safety awareness, technical knowledge, and physical skill every skater needs.
Whether you are a first-timer lacing up rented ice skates or a skateboarder already landing kickflips, this guide will help you understand the requirements, prepare your counselor conversation, and pick up technique tips along the way.
Then and Now
Then — A History on Wheels and Blades
Skating is one of the oldest forms of human-powered transportation. The earliest ice skates were carved from animal bones and strapped to the feet with leather thongs — archaeologists have found examples dating back more than 3,000 years in Scandinavia and the Netherlands. People used bone skates to travel quickly across frozen lakes and canals during northern European winters long before roads were plowed or horses were common.
By the 1700s, iron-bladed skates allowed longer, faster glides. The first indoor ice rink opened in London in 1876, using refrigeration technology to create artificial ice year-round. Figure skating became an Olympic sport at the 1908 London Games — the first winter sport to appear at the Olympics.
Roller skating arrived in the mid-1700s when a Belgian inventor rolled into a party on wooden-spooled devices strapped to his shoes and crashed into a mirror. Quad skates (four wheels in a rectangular pattern) became popular in the 1870s, and roller rinks boomed in the early 20th century. In-line skates, which place wheels in a single row mimicking an ice blade, were commercially introduced by Rollerblade in the early 1980s and sparked an outdoor skating craze.
Skateboarding was born in the late 1950s when California surfers attached wooden boards to roller skate trucks so they could “surf” the streets on flat days. By the 1970s, urethane wheels and empty swimming pools had ignited the vertical skating revolution. Street skating exploded in the 1980s and 1990s, and in 2021 skateboarding debuted as an Olympic sport at the Tokyo Games.
- Purpose: Transportation, recreation, sport, art
- Mindset: A timeless urge to slide, glide, and defy gravity
Now — Four Disciplines, One Badge
Today, skating is a global culture. Millions of recreational ice skaters hit the rink each winter. Roller derby has become a worldwide competitive sport. Inline skating is a favorite fitness tool in cities around the world. Skateboarding attracts tens of millions of participants globally and has spawned an entire creative subculture of video, photography, fashion, and music.
Modern equipment is lighter, safer, and more precise than anything skaters dreamed of a generation ago. Helmets now meet rigorous safety standards. Boot materials blend stiffness and comfort. Skateboard decks are engineered from layered Canadian maple for the perfect flex. And coaching resources — including videos, clinics, and apps — make it easier than ever to progress quickly.
- Purpose: Fitness, freedom, creativity, competition, community
- Mindset: Pick your discipline, respect the gear, skate smart, and keep pushing your limits
Get Ready! Every skater started exactly where you are now. The skills build on each other, the falls teach you as much as the wins, and the joy of finally nailing a technique you have been working on is worth every bit of effort. Let’s get rolling!
Kinds of Skating
The Skating merit badge covers four distinct disciplines. Before you choose, here is a quick overview of each.
Option A — Ice Skating
Ice skating takes place on a frozen surface — either an indoor arena or a natural outdoor body of water. Ice blades are precision tools: hockey blades are flat for speed and lateral movement; figure skate blades have a toe pick and a slight curve (rocker) for jumps and spins; speed skate blades are long and nearly flat for maximum velocity. The Ice Skating option (Option A) takes you from basic safety and equipment knowledge through forward and backward skating, stops, crossovers, and race safety. It is fourteen subrequirements built on progressive skill development.
Option B — Roller Skating
Roller skating uses four wheels arranged in two pairs on a “quad” skate. The classic quad design is stable and forgiving, making it a popular choice for beginners and rink skaters. The Roller Skating option (Option B) covers safety, skate care, forward and backward techniques, crossovers, slalom patterns, spins, and sport skills like dribbling a basketball on skates — thirteen subrequirements that build coordination and rink confidence.
Option C — In-Line Skating
In-line skates place three to five wheels in a single row, creating a profile similar to an ice blade. This design is faster and more aggressive than quad skates and is the platform used for aggressive skating, speed skating, and fitness inline. Option C covers safety gear, skate care, forward and backward techniques, the heel brake stop, crossovers, swizzles, the mohawk turn, downhill slaloms, and street skills — sixteen subrequirements that make you a well-rounded inline skater.
Option D — Skateboarding
Skateboarding is unique among the four options: it blends technical knowledge (history, anatomy, maintenance), practical skills (push, stop, carve, ollie, drop-in), and creative expression (tricks from five categories). Option D is fourteen subrequirements, with the final requirement asking you to demonstrate three tricks from five possible trick categories. If you are interested in skate parks, street skating, or vert ramps, this is your option.
Next Steps
Every option in Requirement 2 requires working under the supervision of an experienced adult, so start thinking about who your skating counselor will be and whether they have experience in your chosen discipline. Before you pick your option, make sure you complete Requirement 1 — the hazard awareness and first-aid knowledge that applies to all four disciplines.
Req 1 — Safety & First Aid
Requirement 1 applies to every Scout taking this badge, regardless of which skating discipline you choose. It has two closely related parts: first, you need to explain the hazards that come with skating and how to handle them; second, you need to demonstrate first-aid knowledge for the injuries and conditions a skater might face. Complete both subrequirements before moving on to Requirement 2.
Requirement 1a
Skating hazards vary by discipline, but the framework for thinking about them is the same for all four options. Your counselor wants you to use four verbs — anticipate, prevent, mitigate, and respond — to show that you think about safety proactively, not just reactively.
The Hazard Framework
| Step | What It Means | Skating Example |
|---|---|---|
| Anticipate | Identify a hazard before it happens | Noticing thin ice near the edges of an outdoor pond before stepping onto it |
| Prevent | Take action so the hazard doesn’t become an incident | Checking ice thickness, wearing full protective gear, staying off wet pavement |
| Mitigate | Reduce the severity if something does go wrong | Wearing a helmet and wrist guards so a fall causes minor scrapes rather than serious injury |
| Respond | Handle the situation after an incident occurs | Knowing how to perform an ice rescue or treat a sprain on the spot |
Common Skating Hazards
Collision and fall hazards. Skaters travel fast, share space with others, and sometimes lose control. Beginners often fall forward or backward without being able to brace properly. Even experienced skaters can collide with other skaters, obstacles, or barriers.
Thin or deteriorating ice. For ice skaters going outdoors, ice thickness is critical. Ice conditions change with temperature, snow cover, currents below, and salt content. Ice can look solid from the surface while being dangerously weak underneath.
Traffic and street hazards (in-line and skateboarding). Outdoor skaters on public roads and paths share space with cars, pedestrians, cyclists, and unpredictable obstacles like gravel, cracks, wet leaves, and curbs.
Overheating and dehydration. Skating is vigorous exercise, especially at a rink or skate park. On warm days or in enclosed indoor arenas, heat exhaustion is a real risk. Stay hydrated even when you do not feel thirsty.
Cold-weather exposure. Ice skaters and outdoor in-line skaters in colder climates face hypothermia and frostbite risk, especially in wet or windy conditions.
Equipment failure. Loose trucks on a skateboard, worn bearings on roller skates, or dull or damaged ice skate blades can cause sudden loss of control. Regular equipment inspection is a key preventive measure.
Protective Gear That Mitigates Hazards
Standard Skating Safety Gear
Know what each piece protects- Helmet: Protects the skull and brain from impact — required for skateboarding and in-line skating, strongly recommended for all skating
- Wrist guards: Prevent the most common skating injury — wrist fractures from falls
- Knee pads: Absorb impact and protect the knee joint and kneecap
- Elbow pads: Protect the elbow joint and surrounding skin from abrasion
- Mouth guard: Recommended for hockey and aggressive skating to protect teeth and reduce concussion risk
- High-visibility clothing: Critical for outdoor skaters sharing space with vehicles
Official Resources
Skateboard Safety (website) Scouting America's official safety moment for skateboarding, covering protective gear requirements and safe skating practices — directly relevant to the hazard discussion your counselor expects. Link: Skateboard Safety (website) — https://www.scouting.org/health-and-safety/safety-moments/skateboard-safety/Requirement 1b
Your counselor needs to see that you can describe the signs, symptoms, and correct first-aid response for each condition on the list. You do not need to demonstrate every skill on a real patient — explaining the steps clearly and correctly is what counts. Work through each condition so you can speak to it confidently.
The Conditions You Must Know
Hypothermia (dangerous drop in core body temperature)
- Signs: Intense shivering, confusion, slurred speech, loss of coordination, pale or blue skin; in severe cases, shivering stops and the person becomes unresponsive.
- First aid: Move to a warm environment. Remove wet clothing. Warm the core first (chest, neck, groin, armpits) with blankets or body heat. Give warm (not hot) beverages if the person is conscious and can swallow. Seek emergency medical help for moderate or severe hypothermia.
Frostbite (freezing of skin and underlying tissue)
- Signs: Waxy, grayish-yellow or white skin; numbness; skin feels hard to the touch; blistering may appear after rewarming.
- First aid: Get to a warm environment. Do not rub the affected area. Rewarm in warm water (99–104°F) only if there is no risk of refreezing. Do not break blisters. Seek medical attention.
Lacerations (cuts through the skin)
- First aid: Apply direct pressure with a clean cloth to control bleeding. Elevate the injured area if possible. Once bleeding is controlled, clean the wound and cover with a sterile dressing. Deep or gaping lacerations may require stitches — seek medical care.
Abrasions (“road rash” — skin scraped away)
- First aid: Rinse thoroughly with clean water to remove debris. Apply antibiotic ointment and cover with a non-stick dressing. Keep clean and dry until healed.
Fractures (broken bones)
- Signs: Pain, swelling, deformity, tenderness, and an inability or unwillingness to use the injured limb.
- First aid: Immobilize the injury in the position found using a splint. Do not try to straighten the limb. Apply ice wrapped in cloth to reduce swelling. Seek medical attention for all suspected fractures.
Sprains and Strains
- Sprain: Ligament injury at a joint (most common at the ankle).
- Strain: Muscle or tendon injury.
- First aid: Use the RICE method — Rest, Ice (wrapped in cloth, 20 minutes on, 20 minutes off), Compression (elastic bandage), Elevation. Seek medical care if the Scout cannot bear weight or if pain and swelling are severe.
Concussions (mild traumatic brain injury)
- Signs: Headache, confusion, “seeing stars,” nausea, sensitivity to light or noise, memory gaps about the event, slurred speech, or loss of consciousness (even briefly).
- First aid: Remove the skater from activity immediately. Do not leave them alone. Seek medical evaluation — a concussion requires a doctor’s clearance before returning to skating. When in doubt, sit it out.
Blisters (fluid-filled bubbles from friction)
- Prevention: Properly fitted boots, moisture-wicking socks, and lacing boots correctly reduce blister risk.
- First aid: Do not pop blisters — they protect the new skin underneath. Cover with a padded bandage. If a blister bursts, clean it, apply antibiotic ointment, and cover.
Heat-Related Reactions
| Condition | Signs | First Aid |
|---|---|---|
| Heat cramps | Muscle cramps during activity in heat | Rest, cool environment, drink water or sports drink |
| Heat exhaustion | Heavy sweating, weakness, cool/pale/moist skin, fast/weak pulse, nausea | Move to cool area, loosen clothing, apply cool cloths, drink water; seek medical help if no improvement |
| Heat stroke | Hot/red/dry or moist skin, fast/strong pulse, possible unconsciousness | Call 911. This is a life-threatening emergency. Cool the person rapidly (ice bath, cool water immersion). Do not give fluids to an unconscious person. |
Shock (inadequate blood flow to the body’s organs)
- Signs: Pale, cool, clammy skin; rapid/weak pulse; rapid breathing; weakness, dizziness, confusion; nausea.
- First aid: Have the person lie down with legs elevated (unless a head, neck, spine, or leg injury is suspected). Keep them warm and calm. Do not give food or water. Treat the underlying cause (control bleeding). Call 911 — shock is a life-threatening emergency.
Official Resources
Skating Injuries - Types and Prevention (website) A medical overview of common skating injuries organized by type, including treatment and prevention guidance useful for your counselor conversation. Link: Skating Injuries - Types and Prevention (website) — https://www.icliniq.com/articles/first-aid-and-emergencies/skating-injuriesReq 2 — Pick Your Option
You must choose exactly one of the four options below. Each option is a complete set of skills and knowledge requirements for a specific skating discipline. Read through all four options before deciding — your best choice is the one where you have access to the right equipment, venue, and a qualified adult supervisor who can work with you on that discipline.
Your Options
Req 2a — Ice Skating Overview: Complete 14 subrequirements covering ice safety, skate equipment, and progressive skating skills from basic stops through crossovers and a hockey stop. Best for Scouts with access to an ice rink or frozen pond.
Req 2b — Roller Skating Overview: Complete 13 subrequirements covering quad skate safety, skate care, forward and backward skills, slalom, spins, and sport skills like dribbling a basketball on skates. Best for Scouts with access to a roller rink.
Req 2c — In-Line Skating Overview: Complete 16 subrequirements covering in-line skate safety and gear, care and maintenance, forward and backward skills, stops, crossovers, swizzles, the mohawk turn, downhill slaloms, and street skills. Best for Scouts who can skate outdoors on smooth pavement.
Req 2d — Skateboarding Overview: Complete 14 subrequirements covering skateboarding history, benefits, safety, equipment anatomy and assembly, stance, basic riding skills, an ollie, a drop-in, and three trick types from five categories. Best for Scouts with access to a skate park or smooth paved area.
Choosing Your Option
Consider these questions before committing:
Do you have the right venue? Ice skating requires an ice rink or safe frozen water. Roller skating is best done at an indoor rink. In-line skating needs smooth pavement, a trail, or a path. Skateboarding requires a skate park or large flat paved area.
Do you have access to equipment? Rinks typically rent ice skates and roller skates. In-line skates and skateboards often need to be purchased or borrowed from someone with the correct size.
Do you have a qualified supervisor? Your merit badge counselor or another experienced adult must supervise all Option 2 activities. Choose the option where your counselor has real experience — someone who can evaluate your skating firsthand and give you useful feedback.
Where are your existing skills? You can earn this badge even as a beginner, but starting with a discipline you have already tried will let you focus on the specific skill milestones rather than learning from scratch.
Req 2a — Ice Skating Overview
Option A covers everything you need to skate safely and competently on ice — from understanding your equipment and the rink environment to executing specific skills in front of your counselor. Work through each subrequirement in order; the skills build on one another.
What You’ll Complete
- Req 2a1 — Ice Safety & Courtesy: Explain the general safety rules and skater courtesy that keep everyone safe at the rink or on outdoor ice.
- Req 2a2 — Outdoor Ice & Ice Rescue: Discuss preparations for outdoor ice skating and explain the steps to rescue someone who has fallen through the ice.
- Req 2a3 — Parts of Ice Skates: Identify and explain the function of the parts of different types of ice skates.
- Req 2a4 — Carrying Skates: Describe the safe way to carry ice skates at the rink and during travel.
- Req 2a5 — Storing Skates: Describe proper long-term storage to protect blades and boots between seasons.
- Req 2a6 — Forward Skating & Stop: Skate forward at least 40 feet and come to a complete stop using a snowplow stop.
- Req 2a7 — Forward Glide: Glide forward on two feet and then on one foot, right and left.
- Req 2a8 — T-Position Stroking: Start from a T position and stroke forward around the test area.
- Req 2a9 — Backward Glide: Glide backward on two feet for a distance at least twice your height.
- Req 2a10 — Backward Skating: Skate backward continuously for at least 20 feet on two skates.
- Req 2a11 — 180° Turn Around Cone: Glide forward and make a 180° turn around a cone, first right then left.
- Req 2a12 — Forward Crossovers: Perform forward crossovers in a figure-eight pattern.
- Req 2a13 — Ice Race Safety: Explain safety considerations for participating in an ice-skating race.
- Req 2a14 — Hockey Stop: Perform a hockey stop.
Before You Begin
Make sure you have access to a rink (indoor or outdoor) and that your counselor can observe your skill demonstrations in person. Skates that fit properly make an enormous difference — your heel should be snug in the boot and there should be no more than a finger-width of space at the toe. Dull or damaged blades make many of these skills much harder, so have your skates sharpened if they have not been used recently.
Official Resources
🎬 Video: How to Play Figure Skating (video) — https://youtu.be/-53axkfHUHk
🎬 Video: How to Ice Skate (video) — https://youtu.be/8uDfC7sZ7ag
Req 2a1 — Ice Safety & Courtesy
Before you step onto the ice, you need to understand the rules that keep every skater safe and the ice session enjoyable for everyone. Your counselor wants you to explain these guidelines in your own words — not just recite a list, but show that you understand why each rule matters.
Safety Guidelines
Always skate in the correct direction. Public skating sessions flow in a single direction (usually counterclockwise). Going against traffic puts you on a collision course with every other skater on the ice.
Stay aware of your surroundings. Look ahead and to the sides continuously. Faster skaters approaching from behind cannot always stop quickly — it is the slower skater’s responsibility to be predictable, and the faster skater’s responsibility to pass safely.
No horseplay. Racing other skaters, playing tag, or pushing and shoving creates sudden speed changes and unpredictable directions — the most common recipe for a collision.
Fall and get up quickly. If you fall, get off the ice surface as fast as you can. Lying still leaves you at risk of being skated over, and other skaters cannot always see you in time to stop.
No hockey sticks, pucks, or equipment during public sessions. These items create projectile hazards and are only permitted during designated hockey sessions.
Obey rink staff. Guards and rink monitors can stop the session for any safety issue. Follow their directions immediately.
Enter and exit the ice carefully. Ice near the gate is often scratched and uneven from foot traffic. Hold the boards for balance when first stepping on.
Courtesy Guidelines
Give beginners room. If you see someone struggling near the boards, skate past with extra clearance. Beginning skaters can fall or grab unexpectedly.
Call your pass. If you are overtaking someone from behind, give a wide berth rather than cutting close. In a crowded session, a quick “coming around” warning is appropriate.
No skating across the center ice during public sessions. Many rinks reserve center ice for figure skaters practicing jumps and spins. Check your rink’s rules.
Keep the ice surface clear when resting. Sit in the penalty box or on a bench near the boards, not in the skating area.
Respect the Zamboni schedule. Flooding (resurfacing) happens between sessions. Clear the ice promptly when instructed and do not step onto the fresh ice until the rink supervisor allows it.
Official Resources
No official resources are listed in the requirements for this subrequirement. The guidelines above reflect standard rink policies across Scouting America’s skating guidance.
Req 2a2 — Outdoor Ice & Ice Rescue
Outdoor ice skating on ponds, lakes, and rivers is a tradition with real risks that indoor rink skating does not have. You need to understand what to check before anyone steps on natural ice — and what to do if someone falls through.
Preparations for Outdoor Ice Skating
Check ice thickness. Thickness is the most important safety factor. Clear, blue-black ice is the strongest; white or opaque ice has air bubbles and is weaker. Snow-covered ice is unpredictable — snow insulates and slows freezing, and may hide weak spots.
| Ice Thickness | Safe Use |
|---|---|
| Less than 4 inches | Stay off |
| 4 inches | One person on foot (skating) |
| 5–7 inches | Small group of people on foot |
| 8–12 inches | Snowmobile or ATV |
| 12+ inches | Small vehicle |
Check thickness by drilling or chiseling test holes every 150 feet across the area you plan to use. Do not rely on one measurement — ice thickness varies across a body of water.
Check for hazards below the surface. Springs, inlets, outlets, and currents beneath the ice weaken it. Avoid areas near running water, docks, bridge pilings, or spots where people or animals have been walking (they may have broken through and refrozen).
Never skate alone. Always skate in groups with a buddy system, within sight of shore, and let someone onshore know your plan and expected return time.
Carry rescue equipment. Before anyone skates, have these items at the ice’s edge: a throw rope or ring buoy, a long branch or ladder, and a first-aid kit. Cell phones should be waterproofed in a pocket close to your body (warmth keeps batteries alive in cold).
Dress appropriately. Wear insulating layers and a life jacket under an outer layer if ice is marginal. Ice picks (a pair of pointed handles on a lanyard worn around the neck) can help a person self-rescue by stabbing the ice edge to pull themselves out.
Plan your escape. Know where the nearest warm shelter, vehicle, or building is before you skate. Hypothermia can set in faster than people expect.
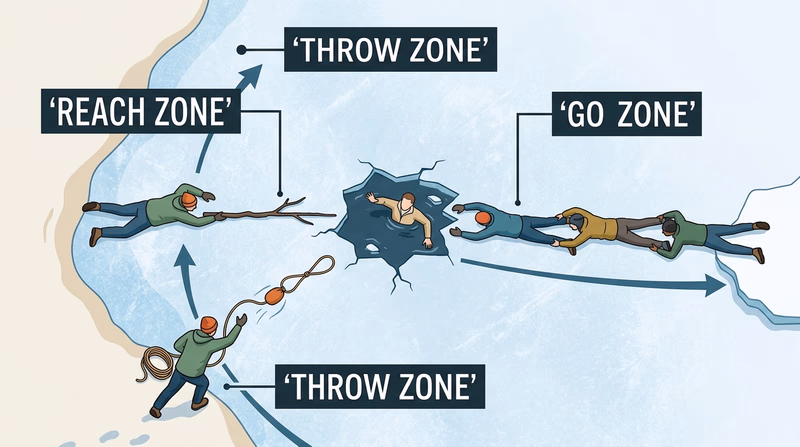
How to Make an Ice Rescue
When someone falls through the ice, the instinct to run toward them is wrong — the same weak ice that failed for them can fail for you. Use the Reach-Throw-Go method and always put your own safety first.
Reach. Stay on solid ice near shore. Lie flat to distribute your weight. Extend a rope, branch, belt, ladder, jumper cables, or any long object to the victim. Have them kick to the ice surface and pull them out horizontally.
Throw. If you cannot reach them directly, throw a rope, ring buoy, or tied-together clothing items to the victim. Have them wrap it under their arms and pull.
Go (with caution). As a last resort, form a human chain — rescuers lie flat and grip each other’s ankles, extending the chain toward the victim. Never stand when approaching a victim on weak ice.
After the rescue. Treat for hypothermia immediately — get the victim to a warm, dry environment, remove wet clothing, and wrap in blankets. Call 911 or activate emergency services. Even someone who seems fine after a cold-water immersion should be evaluated medically.
Official Resources
🎬 Video: How To Know if Ice Is Safe To Walk On (video) — https://youtu.be/KmYeulVH8IE
🎬 Video: Test Ice Thickness (video) — https://youtu.be/BWLvW-d5jBY
🎬 Video: How to Save Someone Who Falls Through Ice (video) — https://youtu.be/yVXJQq41tTA
Req 2a3 — Parts of Ice Skates
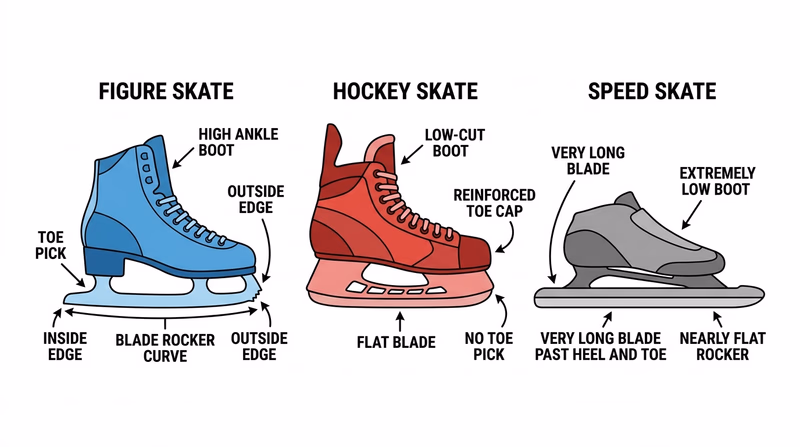
There are three main types of ice skates — figure skates, hockey skates, and speed skates — and each is engineered for a specific purpose. Understanding the parts of each type will help you choose the right skate and discuss them confidently with your counselor.
Parts Common to All Ice Skates
| Part | Function |
|---|---|
| Boot | Encases and supports the foot and ankle |
| Blade | The steel runner that contacts the ice and creates the gliding surface |
| Blade holder / chassis | Mount that attaches the blade to the sole of the boot |
| Toe cap | Hard reinforced area at the front of the boot protecting the toes |
| Heel counter | Stiff section at the rear of the boot that cups and stabilizes the heel |
Figure Skates
Figure skates are designed for jumps, spins, and precise edge work. The boot is high-cut and stiff for ankle support. The blade has a distinctive toe pick — a serrated section at the front used to launch jumps. The blade has a slight curve called the rocker that lets skaters balance on the front, middle, or back of the blade for different moves. Two edges — the inside edge and the outside edge — are separated by a hollow ground into the bottom of the blade.
Hockey Skates
Hockey skates prioritize speed, lateral mobility, and durability. The boot is lower-cut than a figure skate to allow ankle flexion for quick direction changes, and is reinforced with hard materials to protect against puck and stick impacts. The blade is flatter (less rocker) and shorter relative to foot length, which helps with explosive acceleration and fast stops. Hockey skates have no toe pick.
Speed Skates
Speed skates maximize gliding efficiency. The boot is very low-cut to allow full ankle range of motion. The blade is long — often extending beyond both the toe and heel of the boot — and nearly flat. Speed skates have no toe pick. Two types exist: short-track skates (for 111-meter indoor ovals) and long-track skates (for 400-meter ovals), with the long-track version sometimes using a clap-skate mechanism that hinges at the toe to increase push-off power.
Official Resources
🎬 Video: Figure Skates vs. Hockey Skates (video) — https://youtu.be/H6hUVU57Wpk
Req 2a4 — Carrying Skates
Ice skate blades are sharp and can cause cuts or damage a bag if handled carelessly. Carrying them correctly protects both you and the equipment.
At the Rink
Carry skates by the laces or use a skate bag. Hold the skates with blades facing away from your body. If carrying a pair together, hold them with blades side by side, pointing down and away from you and anyone nearby.
Use blade guards when walking off the ice. Plastic or rubber blade guards protect the blades (and people) when walking on hard floors. Put guards on before stepping off the ice and remove them before stepping back on. Never skate with guards on — they slip unexpectedly and cause falls.
Walk slowly near the ice surface. Even with blade guards, smooth rink floors can be slippery. Use the rubber mats near the ice entrance.
For Travel
Use a skate bag or backpack with protection. A dedicated skate bag has a padded interior. If using a regular backpack, wrap each skate in a towel or use blade covers so the blades do not cut through the bag material.
Dry blades thoroughly before packing. Damp blades rust. After skating, wipe every part of the blade with a dry cloth before putting skates in any bag or case.
Protect the boot structure. Do not stack heavy items on top of skate boots — this can permanently deform the stiff heel counter and ankle support. Pack other gear around the boots, not on top of them.
Official Resources
No official resources are listed in the requirements for this subrequirement.
Req 2a5 — Storing Skates
Proper off-season storage extends the life of your blades and boots. Skates that are stored incorrectly — with damp blades, in compressed bags, or in extreme heat — can arrive next fall rusty, cracked, or misshapen.
Steps for Seasonal Storage
1. Dry the blades completely. After the last skate of the season, wipe the blades with a dry cloth. Let the skates air-dry completely — several hours in a room-temperature space — before storage. Never store damp skates.
2. Do not use hard blade guards for long-term storage. Hard plastic guards trap moisture against the blade and accelerate rust. After drying, switch to cloth blade covers (also called “soakers”) or store blades bare in a breathable skate bag.
3. Loosen the laces. Lacing boots tightly during storage compresses the interior padding and can weaken the boot structure over time. Loosen the laces fully or remove them for multi-month storage.
4. Store upright or supported. Keep boots upright (as if standing) rather than lying on their sides, which can deform the blade holder or boot sole over time. Some skaters stuff the boots with newspaper or a boot shaper to help them hold their shape.
5. Avoid temperature extremes. Store skates in a cool, dry, well-ventilated area — not in a car trunk, an unventilated attic in summer, or a damp garage. Heat can cause glues to break down, and humidity promotes rust and mold.
6. Check blade condition before next season. When you retrieve your skates, inspect the blades for rust spots (treat lightly with a rust-removing cloth if needed), check that all screws are tight, and get a sharpening if the blades have not been used in months.
Official Resources
🎬 Video: How Do I Store My Skates Correctly? (video) — https://youtu.be/xCibThdzynI
Req 2a6 — Forward Skating & Stop
This is your first performance requirement. Your counselor needs to see you skate continuously for at least 40 feet with reasonable control, then come to a complete stop using a snowplow technique. Partial stops or coasting into the boards do not count.
Skating Forward
Before you can stop effectively, you need to move forward with basic technique:
- Bend your knees. A slight bend in the knees lowers your center of gravity, improves balance, and makes every movement more stable. Standing straight up is the most common beginner mistake.
- Lean slightly forward from the ankles — not the waist — so your weight is over the balls of your feet, not your heels.
- Push with the inside edge. Each stroke pushes off to the side using the inside edge of the blade. Alternate feet, letting the free foot glide while the other pushes.
Two-Foot Snowplow Stop
The two-foot snowplow is the standard beginner stop. Both feet remain on the ice throughout.
- Glide forward with feet parallel, about shoulder-width apart.
- Turn both toes slightly inward (pigeon-toed) and push both heels slightly outward.
- Apply equal pressure on both inside edges, creating a wedge shape — like a pizza slice with the point in front.
- The friction from both inside edges scrapes the ice and slows you to a stop.
- Increase pressure on the edges to stop faster; ease pressure to slow gradually.
One-Foot Snowplow Stop
The one-foot snowplow stops you with a single blade while the other foot remains as a glide foot.
- Glide forward on two feet.
- Shift your weight onto the glide foot (usually your non-dominant foot).
- Turn the stopping foot’s toe inward and push the heel out while pressing the inside edge into the ice.
- The dragging action of that single blade slows you to a stop.
Official Resources
🎬 Video: Snowplow Stop (video) — https://youtu.be/rhQY1_bTjVs
Req 2a7 — Forward Glide
Gliding is the foundation of balance on ice. This requirement tests whether you can maintain a centered, controlled glide — first with the security of two feet on the ice, then balancing entirely on a single skate.
Two-Foot Glide
After a few strong forward strokes:
- Bring your feet parallel, shoulder-width apart.
- Let both feet remain flat on the ice and coast forward without pushing.
- Keep your knees slightly bent, arms out to the sides for balance, eyes forward.
- Hold the glide as long as momentum carries you — aim for at least 10–15 feet.
One-Foot Glide — Right Foot
- Build forward speed with several strokes.
- Set both feet down in a parallel glide position.
- Shift your entire body weight over your right foot.
- Lift the left foot off the ice and hold it slightly behind and to the side of your right foot.
- Keep your right knee bent, your arms out, and your gaze forward.
- Hold the one-foot glide as long as possible — aim for at least your body length.
Then repeat on the left foot using the same technique.
Common Issues
Tipping to the side. If you wobble off your single-foot glide quickly, your weight is probably over the inside edge rather than centered on the blade. Try to feel the pressure in the middle of your boot sole, directly under the ankle bone.
Falling forward or backward. Check your knee bend and upper-body lean. Too upright = falling back; leaning too far from the waist = falling forward.
Lifting the free foot too high. Keep the free foot only a few inches off the ice at first. A lower free leg is a more stable free leg.
Official Resources
🎬 Video: Forward Stroking (video) — https://youtu.be/-7QqRz2EZAM
Req 2a8 — T-Position Stroking
The T position is the standard ready stance for ice skaters — heels together, toes pointing outward so the feet form a T shape. Starting from this position teaches you to initiate forward movement correctly using the inside edge, not the toe pick.
Setting Up the T Position
- Stand still on the ice with your heels touching.
- Rotate both feet so your toes point outward — your feet should form roughly a 90° angle with the back heel of one foot touching the middle of the other foot’s arch (a “T” shape when viewed from above).
- Bend your knees slightly and keep your weight centered.
Stroking Forward from the T
- From the T position, push off with the back foot using the inside edge. This is your first push stroke.
- As you begin to glide on the front foot, bring the back foot forward and set it down in parallel with the glide foot.
- Shift weight to the other foot and push with the inside edge again.
- Continue alternating — glide and push, glide and push — around the test area.
Avoiding the Toe Pick
If you are wearing figure skates, the toe pick is at the front of the blade. Using it to push off creates a choppy, inefficient stride and can trip you. To avoid it:
- Keep your ankle slightly extended (heel down, toe slightly up) during the push.
- Push from the mid-blade area, not the front.
- Listen for scraping sounds — the toe pick dragging on the ice makes a distinctive scrape. If you hear it, you are pushing too far forward.
Official Resources
🎬 Video: Forward From a T Position (video) — https://youtu.be/-7QqRz2EZAM
Req 2a9 — Backward Glide
Backward movement is one of the most significant milestones for a beginner ice skater. This requirement focuses specifically on a controlled glide — not a full backward skate stroke, just a balanced coast backward on two feet. The distance needed is at least twice your height, so if you are 5 feet tall, you need to glide backward at least 10 feet.
How to Begin a Backward Two-Foot Glide
- Start from a wall or boards. Push gently backward off the boards to give yourself initial momentum without needing to generate it yourself.
- Feet parallel, shoulder-width apart. Keep both skates on the ice, parallel to each other.
- Bend your knees. A deeper knee bend gives you more stability. Think of sitting slightly back, as if hovering over a chair.
- Arms out for balance. Hold both arms out to the sides, slightly in front of your body.
- Look over your shoulder. You cannot see where you are going when skating backward — glance alternately over each shoulder to check for obstacles and to navigate.
- Resist the urge to lean forward. Leaning forward shifts your weight to the toe picks (on figure skates) or front of the blade, which digs in and stops you. Stay upright or lean very slightly backward.
Common Mistakes
Feet drifting apart or crossing. If your feet keep spreading or crossing, focus on keeping them parallel at all times. Think of rail tracks — parallel and constant.
Bending from the waist. Bend from the knees, not the waist. Waist-bending pulls your weight forward and makes balance much harder.
Stopping too soon. If you are only gliding a few feet, you may not be generating enough initial push, or you may be catching an edge. Practice pushing more firmly off the boards.
Official Resources
🎬 Video: Skate Backward (video) — https://youtu.be/dZsfWfYxqzw
Req 2a10 — Backward Skating
Requirement 2a9 asked you to glide backward (coasting). This requirement goes further: you need to actively skate backward — generating your own propulsion — for at least 20 feet on two skates. The key technique is the backward swizzle (also called a “C-cut” or “scull”).
Backward Skating with C-Cuts
The C-cut moves both feet outward and inward in a synchronized motion to push you backward.
- Start in a balanced two-foot stance with feet parallel.
- Push both heels outward simultaneously — your feet will spread wider apart — while pressing through the outside edges.
- Then bring both feet back to parallel by pulling your toes inward. This inward motion is the propulsive push.
- Repeat in a smooth, rhythmic pattern: push out, pull in, push out, pull in.
- Your skates trace two half-circle paths on the ice — like two letter C shapes facing each other.
Each cycle propels you backward a few feet. String them together smoothly to cover your 20 feet.
Tips for Consistent Backward Propulsion
- Stay low. Keep your knees bent throughout the cycle. Straightening up mid-stroke interrupts the flow and slows you down.
- Push through the full arc. Many beginners only push halfway — they spread their feet but do not pull back fully. Make each C-cut complete.
- Keep weight balanced between both feet. If one foot is doing more work than the other, your path will curve rather than go straight.
- Look over your shoulders regularly. Check for other skaters behind you every few strokes.
Official Resources
No additional official resources are listed for this subrequirement. See the backward skating video on Req 2a9 for visual reference.
Req 2a11 — 180° Turn Around Cone
This requirement tests your ability to control a two-foot glide through a turn. Starting from forward speed, you will drop into a two-foot glide and steer around a cone in a full half-circle — once clockwise (turning right) and once counterclockwise (turning left).
How to Execute a Two-Foot Glide Turn
- Build speed. Take 4–6 strong forward strokes to build comfortable skating speed.
- Set feet parallel. Bring feet to a shoulder-width parallel stance and begin gliding forward on two feet.
- Tilt and steer. To turn right, apply pressure to the right inside edge and the left outside edge simultaneously — this creates a slight right lean. Your body tilts gently in the direction of the turn.
- Curve around the cone. Maintain that edge pressure throughout the 180° arc. Your body should feel like it is leaning slightly inward toward the cone.
- Complete the turn. After 180°, you will be heading back the way you came. Straighten your edges to exit the turn.
- Repeat the full sequence to the left.
Placement
The cone is set at a distance your counselor chooses. Typically you set up 20–30 feet away, build speed, and enter the turn a body-length before the cone so the cone ends up inside your arc.
Common Mistakes
Feet spreading during the turn. If your feet wander apart in the turn, focus on keeping them shoulder-width — the turn happens through edge lean, not foot spreading.
Stepping instead of gliding. The requirement specifies a glide — both feet stay on the ice throughout. If you are picking feet up and stepping through the turn, practice flattening your feet and relying on edge pressure alone.
Losing speed. If you are decelerating too fast in the turn, you may be pressing too hard into the ice. A smooth edge lean, not a skid, is what curves you.
Official Resources
🎬 Video: Turns Around a Cone (video) — https://youtu.be/Lm1PXq9iFog
Req 2a12 — Forward Crossovers
Forward crossovers are how skaters maintain and build speed while turning. Instead of gliding through a curve, you actively cross one foot over the other to push through each arc. Performing them in a figure-eight pattern means completing a full circle to one side, then reversing through a full circle to the other side.
How Forward Crossovers Work
When turning to the right, your body leans into the right curve:
- Left foot crosses over the right. Pick the left foot up and set it down across and in front of the right foot, pushing through the outside edge of the left blade.
- Right foot steps under. The right foot simultaneously steps out to the right to become the new outside foot.
- Alternate. Keep crossing left over right in a smooth, rhythmic rhythm as you travel around the circle.
The crossing motion provides continuous forward push — each cross-step generates power that keeps your speed up through the curve.
For a left circle, reverse the feet: right crosses over left.
The Figure-Eight Pattern
A figure eight consists of two circles sharing a center point:
- Skate a complete circle (360°) turning in one direction, then pass through the center point.
- Begin the second circle in the opposite direction.
- Complete that circle to return to the starting point.
Your counselor will assess whether your crossovers show reasonable rhythm and edge control — they do not need to be competition-level quality.
Building the Skill
If crossovers are new to you:
- First practice the lean and glide through a circle without crossing — just step wide on the outside foot.
- Then add the cross: step the inside foot over the outside foot in a slow, deliberate motion.
- Gradually speed up the rhythm until the two steps blend into a smooth crossing pattern.
Official Resources
🎬 Video: How To Do Back Crossovers in a Figure 8 (video) — https://youtu.be/krBVgF52z8M
Req 2a13 — Ice Race Safety
Ice racing — whether informal at the rink or competitive speed skating — creates unique hazards compared to recreational public skating. High speeds, close proximity to other skaters, and sharp corners demand extra preparation and awareness.
Safety Considerations for Ice Races
Equipment and protective gear. Helmets are mandatory in any race situation. Speed skaters at the competitive level also wear cut-resistant gloves (blades can slice skin if a skater falls in front of you), shin guards, and neck protectors. Even in informal races, full head protection is non-negotiable.
Know the race format. Different race formats have different safety rules:
- Individual time trials are the lowest-contact format — you skate the course alone.
- Mass-start races involve multiple skaters on the ice simultaneously, creating the highest collision risk. Passing rules and lane discipline are critical.
- Relay races require coordinated tag-passing, often at high speed, creating timing hazards.
Track awareness and corners. Racing speeds mean braking distance is much longer than in public skating. Approach corners prepared for the extra centrifugal force. In indoor speed skating, the track corners are banked; on natural ice, they are not — adjust accordingly.
Falling safely at speed. If you fall during a race, tuck and protect your head. Try to slide to the inside of the track rather than into the path of oncoming skaters.
Drafting and passing etiquette. Cutting off another skater or making sudden lateral moves at speed can cause chain collisions. Racers should pass on the outside and signal their intent whenever possible.
Pre-race warm-up. Cold muscles do not absorb impacts or respond to sudden direction changes as well as warm muscles. A thorough warm-up on the ice before racing reduces injury risk.
Know the emergency stop signal. Race officials use a specific signal (often a waving flag or whistle) to stop the race for a safety incident. Know what it looks like and obey immediately.
Official Resources
How Speed Skaters Stay Safe on the Ice (website) A sports medicine perspective on speed skating injury prevention, covering gear, technique, and the specific risks of skating at competitive speeds — directly applicable to your race safety discussion. Link: How Speed Skaters Stay Safe on the Ice (website) — https://healthcare.utah.edu/healthfeed/2022/02/how-speed-skaters-stay-safe-ice Safety Tips: Ice Skating (website) KidsHealth's overview of ice skating safety for parents and youth, covering protective gear, ice conditions, and rink rules — useful for reinforcing the foundational safety points. Link: Safety Tips: Ice Skating (website) — https://kidshealth.org/en/parents/safety-ice-skating.htmlReq 2a14 — Hockey Stop
The hockey stop is one of the most dramatic and satisfying techniques in ice skating — a sudden, powerful halt that sends a spray of ice shavings forward. It is the standard stopping method for hockey players and is more advanced than the snowplow stop you learned in Requirement 2a6.
How to Perform a Hockey Stop
- Build real speed. The hockey stop works best with momentum behind it — approach your stopping point with strong forward skating speed.
- Turn both feet sharply sideways. In one quick motion, rotate both feet 90° so they are perpendicular to your direction of travel. If you were skating left to right, your feet now point toward or away from the boards.
- Dig in both inside edges. As you turn, press both inside edges hard into the ice. Your knees bend sharply as you sink into the stop.
- Let your body follow the turn. Your hips and shoulders rotate with your feet — do not try to keep your torso facing forward while your feet turn sideways.
- The ice shavings fly. Done correctly, the grinding edges throw a spray of ice in front of you and you come to a complete halt within one to two body lengths.
Which Side to Stop On?
Skaters typically stop on a preferred side (most commonly stopping to the left, or “heel side,” for right-handed skaters). Your counselor does not require you to stop on both sides, but practicing both will make you a more versatile skater.
Common Mistakes
Turning only the lower body. If your upper body fights the rotation, you will spin out or fall. Rotate everything together.
Not committing to the edge pressure. A tentative hockey stop is an incomplete stop. You need to trust the edges and commit to the full weight shift.
Trying it at slow speed. Counterintuitively, hockey stops are easier with more speed. At very slow speeds, the edge scrape just makes you stumble — you need momentum for the edges to bite cleanly.
Official Resources
🎬 Video: Perform a Hockey Stop (video) — https://youtu.be/nIfU38nAYYk
Req 2b — Roller Skating Overview
Option B covers quad roller skating — the classic four-wheeled skate used in roller rinks worldwide. Work through all 13 subrequirements in order with your counselor. Skills build progressively, so complete them as a sequence.
What You’ll Complete
- Req 2b1 — Roller Safety & Etiquette: Explain the safety rules and etiquette guidelines that keep everyone safe at a roller rink.
- Req 2b2 — Parts of a Roller Skate: Describe the parts of a roller skate and what each part does.
- Req 2b3 — Roller Skate Care: Describe five essential steps to good roller skate care.
- Req 2b4 — Forward Skating & Stop: Skate forward with smooth linked strokes for at least 100 feet in both directions and demonstrate proper stopping techniques.
- Req 2b5 — One-Foot Glide: Skate forward and glide at least 15 feet on one skate at a time.
- Req 2b6 — Forward Crossover: Perform a forward crossover.
- Req 2b7 — Backward Skating: Skate backward at least 40 feet on two skates, then at least 15 feet on one skate.
- Req 2b8 — Forward Slalom: Skate forward in a slalom pattern for at least 40 feet on two skates, then 20 feet on one skate.
- Req 2b9 — Backward Slalom: Skate backward in a slalom pattern for at least 15 feet on two skates.
- Req 2b10 — Shuttle Skate: Shuttle skate once around the rink, bending twice along the way, without stopping.
- Req 2b11 — Spins or Hop-Skip-Jump: Perform two consecutive spins, OR hop, skip, and jump on skates for at least 10 feet.
- Req 2b12 — Stepover: Perform a stepover.
- Req 2b13 — Dribble or Hockey Ball: While skating, dribble a basketball or push a hockey ball with a stick for at least 40 feet and back.
Before You Begin
Access to a roller rink is ideal for this option. Quad skates are available for rental at most rinks. Make sure your skates fit snugly — your heel should not lift inside the boot when you take a step. Wheel condition matters: old, flat, or hard wheels roll less predictably. Ask about wheel condition at the rental counter.
Req 2b1 — Roller Safety & Etiquette
Roller rinks have clear safety rules that protect everyone on the floor. Your counselor wants you to explain these in your own words — showing you understand not just the rules, but why each one matters.
Safety Rules
Skate in the correct direction. Roller rink sessions flow in a single direction around the oval floor (typically counterclockwise). Going against traffic means you are heading directly toward every other skater at combined speed.
No racing or reckless skating. Public sessions are not a race. Weaving aggressively between skaters, sudden speed bursts, and roughhousing create serious collision hazards.
Stay upright and be predictable. Sudden changes of direction without warning are one of the top causes of roller rink collisions. Move in smooth arcs, not sharp cuts.
No sitting or lying on the skating surface. If you fall, get up quickly. A fallen skater on the floor is a tripping hazard for everyone behind them.
Obey rink staff. Floor guards enforce safety rules and can remove skaters for dangerous behavior. Follow their directions immediately.
Check your equipment before skating. Loose wheel nuts, deteriorating toe stops, or cracked boots can cause sudden loss of control. Inspect skates before every session.
Etiquette Guidelines
Give beginners extra room. Skaters near the wall or obviously struggling deserve wide clearance — they can fall or grab unpredictably.
Announce passes. If you are overtaking a slower skater, pass with a wide margin and do not cut back in front of them immediately.
No stopping in the skating lane. If you need to rest, adjust equipment, or tie a lace, move to the center area or off the floor entirely — not in the traffic lane.
Respect the center floor. Many rinks reserve the center area for advanced skating, couples skating, or special sessions. Check the rink’s rules for center use.
Leave the floor during Zamboni or waxing breaks. Clear the floor when staff signal for it and wait for the official signal before returning.
Official Resources
🎬 Video: Getting Started with Roller Skating (video) — https://youtu.be/eXzKkXQCY_Q
Req 2b2 — Parts of a Roller Skate
A quad roller skate looks simple but is an engineered piece of equipment with several components, each affecting performance and comfort.
Key Parts and Their Functions
| Part | Function |
|---|---|
| Boot | Encloses and supports the foot and ankle; can be leather, synthetic, or soft |
| Toe stop | A rubber bumper at the front of the plate used to brake and perform tricks |
| Plate | The metal or nylon chassis mounted to the boot sole that holds all rolling components |
| Trucks | The pair of axle assemblies (front and rear) that hold the wheels; allow the skate to tilt side to side for turning |
| Pivot pin | The pin that allows each truck to pivot, enabling smooth turns |
| Cushions / bushings | Rubber or urethane inserts around the pivot pin that control how easily the trucks tilt; softer cushions = easier turning, harder cushions = more stability |
| Wheels | Four polyurethane wheels (two per truck); hardness (durometer) affects grip vs. speed |
| Bearings | Precision ball bearings inside each wheel hub that allow wheels to spin smoothly; rated by the ABEC scale |
| Axle nuts | Hold wheels onto the axles; must be checked regularly for tightness |
| Toe box | Hard front section of the boot protecting the toes |
| Heel counter | Stiff rear section of the boot that stabilizes the heel |
| Laces / closure system | Strap or lace that secures the boot to the foot |
Official Resources
No official resources are listed in the requirements for this subrequirement.
Req 2b3 — Roller Skate Care
Well-maintained roller skates perform better, last longer, and are safer to ride. Here are the five essential care steps your counselor expects you to describe.
Five Essential Steps
1. Clean wheels regularly. Wheels pick up debris, hair, and dirt from rink floors or outdoor surfaces. Wipe wheels down with a damp cloth after each use. Remove buildup from the wheel groove with a pick or toothpick. Dirty wheels reduce grip and put extra load on bearings.
2. Inspect and maintain bearings. Spin each wheel by hand — it should spin freely and quietly. A grinding, crunching, or squealing sound means the bearings need cleaning or replacement. Clean bearings by removing them from the wheel, soaking in a bearing cleaner solvent, air-drying completely, and applying a small drop of skate-bearing oil before reinstalling. Replace bearings that are pitted, rough, or permanently noisy.
3. Check and tighten axle nuts. Loose axle nuts allow wheels to wobble, creating an unstable skate. Check each axle nut with a skate wrench before every session. Tighten if loose, but do not overtighten — wheels should spin freely with just a tiny amount of side play.
4. Inspect and adjust cushions (bushings). Over time, cushions crack, flatten, or harden, changing how the trucks respond. Inspect them by removing the truck bolt. Replace cracked or severely deformed cushions. Adjust cushion tightness (truck bolt tension) to match your preferred turning stiffness.
5. Care for the boot. Leather boots should be treated with leather conditioner periodically to prevent cracking. After skating, loosen laces and allow the boot to dry fully before storing. Do not store skates in direct sunlight or extreme heat, which can dry out leather and degrade adhesives.
Official Resources
No official resources are listed in the requirements for this subrequirement.
Req 2b4 — Forward Skating & Stop
This is your first performance requirement for Option B. You need to demonstrate:
- Smooth, linked forward strokes for at least 100 feet going around the rink in both the normal direction and the reverse direction.
- At least one proper stopping technique.
Forward Stroking Technique
Bent-knee starting position. Before each stroke, bend your knees — a slight knee bend lowers your center of gravity and lets you push more powerfully.
Push from the inside edge. Each stroke pushes diagonally outward using the inside wheel edge. The push drives you forward; the recovery brings the foot back in.
Link strokes smoothly. “Smooth, linked strokes” means the transition between feet is fluid — as one foot finishes its stroke and recovers, the other is already beginning its push. There should be no pause or hesitation between strokes.
Upper body posture. Keep your upper body upright and relaxed, arms slightly out to the side for balance. Avoid hunching forward or swinging arms wildly.
Stopping Techniques
Toe stop drag. Lift the toe of one foot slightly and drag the toe stop (rubber bumper at the front) along the floor. Gradually increase the drag pressure until you stop. This is the most common beginner stop.
T-stop. Bring the stopping foot behind the gliding foot, perpendicular to it, in a T shape. Press down on the wheels of the trailing foot to create friction. Requires more balance than the toe stop drag.
Plow stop (roller version). Turn both toes inward and press outward with the inside wheels — similar to a snowplow on ice but using wheel friction on the floor.
Official Resources
🎬 Video: Skating Forward (video) — https://youtu.be/znYKw5GQZVA
Req 2b5 — One-Foot Glide
Gliding on a single skate tests your balance and weight transfer — skills that feed directly into crossovers, spins, and almost every advanced skating move. You need to sustain a 15-foot glide on each foot separately.
How to Glide on One Skate
- Build forward speed. Take several strong strokes to get moving comfortably.
- Bring feet parallel. Coast on two feet briefly to settle your balance.
- Shift weight to one foot. Smoothly transfer all your weight over one skate by leaning that direction from the ankles (not the waist).
- Lift the free foot. Pick the other foot up a few inches and hold it just behind and beside your gliding foot.
- Hold the glide. Keep your gliding knee slightly bent, both arms out for balance, eyes forward. Count out 15 feet or time yourself.
- Set the free foot back down, build speed again, and repeat on the other foot.
Balance Cues
Center your weight over the middle of the wheel row. If you feel like you are tipping to the inside wheel, try pressing the outer edge of your foot into the boot. If you are tipping to the outside wheel, press from the ball of your foot.
Keep the free foot close to the floor. Lifting the free foot high raises your center of gravity and makes balance harder. A few inches off the floor is enough.
Avoid leaning from the waist. All weight shift should come from ankles and knees, not from bending your torso sideways. Waist-leaning causes skate wobble.
Official Resources
No official resources are listed in the requirements for this subrequirement.
Req 2b6 — Forward Crossover
A forward crossover lets you maintain and build speed while turning. Instead of gliding through a curve, you actively cross one foot over the other to generate continuous push through the arc. This technique is used constantly by advanced rink skaters.
How to Perform a Forward Crossover (Turning Left)
- Begin skating in a left-curving arc. Lean gently into the left turn.
- The right foot crosses over. Pick up the right foot and set it down to the left of (and slightly in front of) the left foot, pushing through the outside wheels. Your right leg crosses over your left.
- The left foot steps under and out. As the right foot sets down, the left foot steps out to the left to become the new outside foot.
- Repeat. Continue the over-and-under rhythm: right crosses over, left steps out, right crosses over, left steps out.
- Lean into the turn. Your whole body should be leaning slightly into the circle, not upright. The lean and the cross create the turning force.
For a right-hand crossover, reverse the feet: left crosses over, right steps under.
Building Up to Crossovers
- Start by practicing the side step without crossing: just step out and in as you circle.
- Then add a small cross — lift one foot over the other just a few inches.
- Gradually increase the crossing distance and speed.
Official Resources
🎬 Video: Skating Crossovers (video) — https://youtu.be/VrgT9TPLANY
Req 2b7 — Backward Skating
This requirement has two parts: backward skating on two skates for 40 feet, then backward on one skate for 15 feet. The one-skate portion requires the same balance principles from Requirement 2b5, applied while moving in reverse.
Backward Two-Skate Skating (C-Cuts)
Use the same backward C-cut (scull) motion described in other skating options:
- Stand with feet parallel, shoulder-width apart.
- Push both heels outward simultaneously while pressing the outside wheels.
- Pull both toes inward to return to parallel — this inward arc propels you backward.
- Repeat rhythmically: out and in, out and in.
- Look over your shoulder every few strokes to navigate.
For 40 feet, you will complete about 8–12 C-cut cycles. Focus on rhythm and consistent push, not speed.
Backward One-Skate Glide (15 feet)
After building backward speed on two skates:
- Transfer your weight entirely onto one skate.
- Lift the free foot a few inches off the floor.
- Hold the one-foot backward glide for at least 15 feet — roughly three to four body lengths.
- Keep your supporting knee slightly bent throughout.
This requires more balance than the forward version because you cannot see the direction you are drifting. Keep glances over each shoulder.
Official Resources
🎬 Video: Roller Skating Backwards (video) — https://youtu.be/c7MLviMbw6A
Req 2b8 — Forward Slalom
A slalom pattern means weaving side to side around a series of cones or markers — like a ski slalom course on wheels. This requirement tests your directional control: first weaving on two skates for 40 feet, then weaving on one skate for 20 feet.
Two-Skate Forward Slalom
Set up cones (or use floor markers) in a straight line with even spacing, about 4–6 feet apart.
- Approach the first cone at moderate speed.
- Shift your weight and edge pressure to one side to curve around the cone.
- Transfer edge pressure to the opposite side to curve around the next cone.
- Continue the S-curve pattern through the remaining cones.
- Keep your upper body relaxed and let your lower body steer — hips and ankles do the turning, not the shoulders.
For 40 feet, you will typically navigate 6–8 cones.
One-Skate Forward Slalom
This is significantly harder: balance on one skate while steering through the same cone pattern for 20 feet.
- Commit all your weight to one foot.
- Use subtle ankle rolls to shift edge pressure and steer through each cone.
- The free foot stays lifted a few inches — low enough for stability, not dragging.
- 20 feet of one-foot slalom is approximately 3–4 cones at standard spacing.
Official Resources
No official resources are listed in the requirements for this subrequirement.
Req 2b9 — Backward Slalom
The backward slalom combines backward propulsion (from Req 2b7) with the directional control of a slalom (from Req 2b8). You need to weave backward through a cone pattern for at least 15 feet on two skates.
How to Execute a Backward Slalom
- Position yourself facing away from the cone line with the first cone behind you.
- Begin your backward C-cut motion to generate backward momentum.
- As you approach the first cone (now behind you), shift edge pressure and hip angle to curve around it.
- Transfer the edge pressure to curve around the next cone in the opposite direction.
- Continue the backward weaving motion through the remaining cones for 15 feet.
Check over your shoulder. You cannot see the cones directly. Alternate glancing over each shoulder to track the cone positions and stay on course.
Keep the C-cuts going. It is tempting to coast through the slalom rather than continuing to push. Keep the scull motion going between cones to maintain control.
Common Challenges
Losing track of cones. Since you are moving backward, you lose visual contact with cones quickly. Slow down and practice with widely spaced cones at first. Narrow spacing can be added as your spatial awareness improves.
Overcorrecting. In backward slalom, edge shifts move you quickly. Start with subtle corrections and build confidence with small adjustments before making big direction changes.
Official Resources
No official resources are listed in the requirements for this subrequirement.
Req 2b10 — Shuttle Skate
A shuttle skate is a continuous circuit around the rink that includes two intentional bends — meaning you crouch down low (bending at the knees and hips) at two designated points during the lap without stopping your forward momentum. This tests your ability to stay low, maintain balance, and change body position while in motion.
What “Bending” Means
A “bend” in this context is a controlled crouch: knees bent significantly, hips lowered, and upper body leaning slightly forward. The goal is a smooth, deliberate dip in body position — not a full squat that halts your momentum. Think of the position speed skaters use when rounding the corners of a track.
The two bends can be at any two points your counselor designates — typically at the near and far ends of the rink, or at two marked spots on the floor.
How to Execute
- Begin skating at a comfortable pace — not maximum speed, but genuinely moving.
- Approach the first designated bend point.
- Gradually lower your center of gravity by bending both knees deeply and pushing your hips back slightly. Keep your upper body balanced over your feet — not leaning too far forward.
- Hold the low position for the length of the bend zone (typically 3–5 feet), then rise smoothly back to upright.
- Continue around the rink without stopping.
- Repeat the bend at the second designated point.
- Complete the full lap and cross the finish point.
Why This Matters
The shuttle skate tests two things: your aerobic endurance (can you sustain a full rink lap without stopping?) and your dynamic balance (can you change body height without losing control?). Bending while skating shifts your center of gravity and requires deliberate compensation — it is exactly the kind of skill that reveals whether a skater is truly comfortable on wheels.
Official Resources
No official resources are listed in the requirements for this subrequirement.
Req 2b11 — Spins or Hop-Skip-Jump
You get to choose between two skill options here. Pick whichever plays to your strengths or interests.
Option 1: Two Consecutive Spins
A roller skating spin rotates you in a complete circle (or more) on your skates while your feet stay in approximately the same spot on the floor.
Basic Two-Foot Spin
- Start from a near-stationary position or slow movement.
- Shift your weight to the balls of your feet slightly.
- Begin rotating your upper body in the direction of the spin.
- Let your lower body follow — both feet pivot on their wheel centers.
- Use your arms to control spin speed: arms out = slower spin, arms pulled in = faster spin.
- Complete one full revolution and continue immediately into a second revolution for the “consecutive” requirement.
The spin does not need to be fast or performance-quality — two clear full rotations on skates satisfies the requirement.
Option 2: Hop, Skip, and Jump (10 feet)
This option tests your ability to perform athletic movements — lifting off the floor — while in roller skates. You must cover at least 10 feet using this pattern.
- Hop: Jump off one foot and land on the same foot. The key is a clean takeoff and controlled landing with knee bend to absorb impact.
- Skip: A step-hop pattern alternating feet: step right, hop on right, step left, hop on left. Like a basic skip, but in skates.
- Jump: A two-foot takeoff landing on two feet. Bend your knees on landing to absorb the impact — landing stiff-legged in skates causes falls.
Perform this sequence continuously for 10 feet. You do not need to perform hop, skip, and jump as three separate isolated actions — weave them together into a flowing 10-foot movement.
Official Resources
🎬 Video: Roller Skating Two-Foot Spins (video) — https://youtu.be/d6Z91xZXNxE
Req 2b12 — Stepover
A stepover is a footwork pattern in which you step one foot completely over the other while skating, crossing your legs. It is a building block for dance skating moves and demonstrates balance and coordination on wheels.
How to Perform a Stepover
- Skate forward at a comfortable speed.
- While gliding, pick up one foot and step it across and in front of the other foot, setting it down on the far side. Your legs will briefly cross.
- Then bring the back foot through and forward to return to a normal stride position.
- The sequence: skate normally → step one foot across → uncross and continue.
You can perform the stepover as a single action or repeat it several times in sequence as you travel down the floor.
Key Points
Lift high enough. The stepping foot needs enough clearance to pass over the standing foot without catching the wheels. Lift from the knee, not just the ankle.
Stay balanced on the standing foot. While stepping, you are briefly on a single skate. This requires the one-foot balance you practiced in Req 2b5. If your one-foot glide is solid, the stepover will follow.
Do it smoothly. A stepover is most impressive (and easiest to evaluate) when it is done with fluid, continuous movement — not as a hesitant foot-shuffle.
Official Resources
No official resources are listed in the requirements for this subrequirement.
Req 2b13 — Dribble or Hockey Ball
This final Option B requirement combines skating skill with ball-handling coordination. You must travel at least 40 feet and back (80 feet total), either dribbling a basketball or pushing a hockey ball with a stick — all while maintaining control of both your skates and the ball.
Option 1: Dribble a Basketball
- Start at one end of a 40-foot distance (marked by a cone or natural boundary).
- Begin skating forward at a controlled speed — not maximum speed, but real momentum.
- Bounce-dribble the basketball continuously with one hand while skating.
- Reach the 40-foot mark and return to the start without stopping the skate or the dribble.
Tips:
- Skate with a slightly lower stance to keep your center of gravity down — reaching for a dribble from upright causes wobble.
- Dribble slightly ahead of and to the side of your skates, not directly beneath your feet (where a wheel might hit the ball).
- Slow down to make the dribble manageable before trying at full speed.
Option 2: Push a Hockey Ball with a Stick
- Place a hockey ball at the start and hold a hockey stick (floor hockey stick works fine).
- Skate forward, pushing the ball ahead of you with the stick blade.
- Maintain control of the ball as you travel 40 feet, then reverse direction and return to the start.
Tips:
- Short, controlled stick taps are more effective than long pushes — they keep the ball close.
- Push the ball slightly to the side of your skate path rather than directly in front, so your wheels do not roll over it.
- At the turn, use the stick to stop the ball before reversing.
Official Resources
No official resources are listed in the requirements for this subrequirement.
Req 2c — In-Line Skating Overview
Option C covers in-line skating — three to five wheels arranged in a single row, creating a profile similar to an ice blade. Work through all 16 subrequirements with your counselor. The skills build progressively, so complete them in sequence.
What You’ll Complete
- Req 2c1 — In-Line Safety & Courtesy: Explain safety rules and courtesy guidelines for in-line skating.
- Req 2c2 — Parts of In-Line Skates: Describe the components of an in-line skate and what each part does.
- Req 2c3 — Required Safety Gear: Describe required and recommended protective equipment for in-line skating.
- Req 2c4 — In-Line Skate Care: Explain four essential steps to good in-line skate care.
- Req 2c5 — Forward Skating: Skate forward with smooth, linked strokes for at least 100 feet.
- Req 2c6 — One-Foot Glide: Skate forward and glide at least 15 feet on each foot separately.
- Req 2c7 — Heel Brake Stop: Stop on command on flat pavement using the heel brake.
- Req 2c8 — Forward Crossover: Perform a forward crossover.
- Req 2c9 — Forward Swizzles: Perform a series of forward, linked swizzles for at least 40 feet.
- Req 2c10 — Backward Swizzles: Skate backward for at least 40 feet in a series of linked backward swizzles.
- Req 2c11 — Lunge Turn: From a strong pace, perform a lunge turn around an object.
- Req 2c12 — Mohawk: Perform a mohawk.
- Req 2c13 — One-Foot Downhill Slalom: Perform a series of at least four one-footed downhill slaloms on a gentle slope.
- Req 2c14 — Passing from Behind: Describe how to pass a pedestrian or another skater from behind.
- Req 2c15 — Avoiding Obstacles: Describe at least three ways to avoid an unforeseen obstacle while skating.
- Req 2c16 — Curb Techniques: Describe two ways to get on and off a curb and demonstrate at least one.
Before You Begin
You will need access to smooth, flat outdoor pavement or a paved path for most of these requirements. Some (like 2c13) require a gentle hill with a safe run-out at the bottom. Make sure your in-line skates fit properly — the heel should be snug with minimal movement inside the boot. Inspect wheels for wear and bearings for smooth rolling before any session.
Req 2c1 — In-Line Safety & Courtesy
In-line skating often happens outdoors — on bike paths, sidewalks, and paved trails — sharing space with cyclists, pedestrians, and sometimes motor vehicles. Safety rules and courtesy guidelines protect everyone in these shared environments.
Safety Rules
Always wear full protective gear. Helmet, wrist guards, knee pads, and elbow pads are required every time. No exceptions, regardless of skill level or distance.
Skate on the right side of shared paths. Follow the same rules as cyclists: stay right, pass on the left. On sidewalks, yield to pedestrians.
Control your speed. In-line skates can reach surprising speeds quickly, especially downhill. Stay at a speed where you can stop within a safe distance. Beginners should skate slowly enough to stop using the heel brake comfortably.
Never skate in traffic. In-line skates are not street vehicles. Skate on designated paths, bike lanes, or low-traffic areas only. Avoid roads with fast-moving vehicles.
Skate with a buddy. Especially on outdoor terrain, skating with a partner means help is close by if you are injured. Let someone know your route and expected return time.
Check your equipment before every session. Inspect heel brakes, wheel tightness, bearing condition, and boot closure before skating. Equipment failure at speed is dangerous.
Courtesy Guidelines
Announce passes. When overtaking someone from behind on a path, call “On your left!” before passing. Give pedestrians especially wide clearance — they may step sideways without warning.
Slow down near pedestrians. Skaters move much faster than walkers. Slow to walking pace when passing pedestrians in confined spaces, near children, or near pets.
Yield to emergency vehicles. Move completely off the path immediately for ambulances, fire trucks, or police vehicles.
Leave the path for stops. If you need to rest, adjust gear, or check a map, step off the skating surface so you do not block the path for others.
Do not skate in areas where it is prohibited. Many parks, plazas, and downtown areas prohibit skating. Check signage and respect posted rules.
Official Resources
No official resources are listed in the requirements for this subrequirement.
Req 2c2 — Parts of In-Line Skates
An in-line skate has several distinct components, each affecting how the skate performs. Understanding each part helps you maintain skates, troubleshoot problems, and buy appropriate replacements.
Parts and Functions
| Part | Function |
|---|---|
| Boot | Encases and supports the foot; can be soft (like a shoe) or hard-shell; stiffness determines ankle support and control |
| Liner | The padded inner layer inside the hard shell that provides comfort and a custom fit |
| Frame (chassis) | The structural base attached to the boot sole that holds the wheels in a single-row alignment |
| Wheels | Polyurethane cylinders mounted in the frame; size (in mm) affects speed and maneuverability; hardness (durometer) affects grip vs. glide |
| Bearings | Two per wheel; precision ball bearings inside the wheel hub that allow the wheels to spin; rated by ABEC quality scale |
| Axle bolts | Hold each wheel to the frame; must be tightened to the correct torque for smooth spin without wobble |
| Heel brake | A replaceable rubber block mounted at the rear of the frame; dragging it on the ground creates friction to stop |
| Buckles / laces / velcro closure | Systems that secure the boot around the foot; many skates use a combination of laces at the toe and buckles at the ankle |
| Cuff | The upper section of the boot above the ankle; stiffness and height affect ankle stability and maneuverability |
| Cuff buckle | The closure at the cuff; allows precise tightening at the ankle independent of the foot |
Types of In-Line Skates
Recreational skates. Soft or hard-shell boots with 3–5 wheels; designed for fitness skating and general use; usually include a heel brake.
Aggressive/street skates. Shorter frame, smaller harder wheels, and no heel brake; designed for tricks, grinds, and skate park use.
Speed skates. Longer frame with 5 wheels, very low boot for maximum ankle flexion; built purely for racing efficiency.
Official Resources
🎬 Video: Types and Parts of Inline Skates (video) — https://youtu.be/dKYpuWcZ_Ak
Req 2c3 — Required Safety Gear
In-line skating gear falls into two categories: equipment that is required to skate safely, and equipment that is recommended for additional protection. Know both categories and be able to explain why each item matters.
Required Equipment
Helmet. Protects the skull and brain from impact. Must fit correctly: the helmet should sit level on your head, two fingers above your eyebrows, with the chin strap adjusted so only two fingers fit between strap and chin. A bicycle or multi-sport helmet certified to CPSC or ASTM standards is appropriate.
Wrist guards. Protect the wrist from the most common in-line skating injury — fractures from falling forward with outstretched hands. The hard plastic splint inside the guard distributes impact over a wider area. Wrist guards that fit poorly (too loose) do not protect effectively; snug fit is essential.
Knee pads. Protect the kneecap and surrounding tissue from impact and abrasion. Hard-cap knee pads are more protective than soft-cap varieties. Make sure the cap is centered directly over the kneecap.
Elbow pads. Protect the elbow joint and the bony point of the elbow (the olecranon) from direct impact. Many falls in in-line skating result in elbow contact with the pavement.
Recommended Equipment
Padded shorts. Provide hip and tailbone protection for beginning skaters who fall frequently. The coccyx (tailbone) is highly vulnerable to impact in backward falls.
Mouth guard. Recommended for aggressive skating or when skating at speed; protects teeth and reduces concussion risk from jaw impacts.
Reflective clothing or vest. Important for skating in low-light conditions or near roads. Motorists need to see you — bright colors by day, reflective by night.
Padded gloves. Provide hand protection in addition to wrist guards; useful for aggressive skating and tricks.
Gear Checklist
Complete before every in-line skating session- Helmet — correctly fitted and buckled
- Wrist guards — snug fit, hard plate facing palm side
- Knee pads — centered over kneecap
- Elbow pads — centered over elbow joint
- Skates — wheels tight, brake intact, closures secure
Official Resources
🎬 Video: Safety Gear for In-Line Skating (video) — https://youtu.be/z10SQgx_kRA
🎬 Video: Putting on Your Protective Gear (video) — https://youtu.be/GF4fs9-zMq8
Req 2c4 — In-Line Skate Care
Properly maintained in-line skates are safer, faster, and longer-lasting. Here are the four essential care steps.
Step 1: Rotate Wheels Regularly
Wheels wear unevenly — the inside edge (the push-off side) wears faster than the outside. Rotating wheels redistributes the wear across all four (or five) wheel positions, extending wheel life.
A standard rotation pattern for four wheels: move wheel 1 to position 3 (flipping it), wheel 3 to position 1, wheel 2 to position 4 (flipping), wheel 4 to position 2. Check the wheel manufacturer’s recommended rotation pattern. Most skaters rotate wheels every 20–30 skating hours.
Step 2: Maintain Bearings
Each wheel has two bearings. Over time, bearings collect dirt and moisture, increasing rolling resistance and noise. Signs of worn bearings: wheel does not spin freely, grinding sound, or visible rust.
Basic bearing maintenance: Remove wheels, pop out bearings with a bearing removal tool or a pointed object, clean in bearing solvent, air-dry, apply 1–2 drops of skate bearing oil, and reinstall. Replace bearings that remain rough after cleaning.
Step 3: Inspect and Replace the Heel Brake
The heel brake is a sacrificial rubber block designed to wear down through use. Check the brake pad thickness before every session — most heel brakes have a wear indicator line. When the pad is worn to the indicator (or worn unevenly), replace it. Skating with a worn-out brake dramatically increases stopping distance.
Step 4: Care for the Boot and Liner
After every skate session, remove the liner (if removable) and allow both the liner and boot to air-dry completely before storing. Moisture trapped inside the boot promotes bacteria growth (causing odor) and can degrade materials over time. Treat leather boots with leather conditioner periodically. Store skates in a breathable bag or on an open shelf — not in a sealed plastic bag that traps moisture.
Official Resources
🎬 Video: Maintaining and Caring for Your In-Line Skates (video) — https://youtu.be/67xp-AyQb3g
🎬 Video: Cleaning Your In-Line Skates (video) — https://youtu.be/Jcery4HP7_s
Req 2c5 — Forward Skating
Your first performance skill in Option C: demonstrate controlled, efficient forward skating for at least 100 feet with smooth, linked strokes — meaning each stroke flows directly into the next without hesitation or shuffling.
Forward Stroking Technique
Ready position. Bend your knees to about 30° of flexion, keep your back straight (no slouching), and lean slightly forward from the ankles. This is your power base.
The stroke. Push diagonally outward with one foot using the inside wheel edges. Extend the push leg fully to the side and slightly behind, then recover it by dragging or swinging it back under your body. As one foot is recovering, the other begins its push. This overlap creates the “smooth, linked” feel the requirement asks for.
Arm swing. Swing your arms in opposition to your feet — like walking but exaggerated slightly. Arm motion helps generate momentum and keeps your upper body balanced over the skates.
Look ahead, not down. Looking at the pavement under your feet is the most common beginner error. Keep your gaze 20–30 feet ahead.
100 Feet
On most outdoor paths or parking lots, 100 feet is about 33 steps. Set a visible marker at your start and finish point. Your counselor will watch for consistent technique over the full distance, not just the first few strokes.
Official Resources
🎬 Video: Skating Forward (video) — https://youtu.be/fg1eMFnl61U
Req 2c6 — One-Foot Glide
Gliding on a single in-line skate is similar to the same skill on roller skates (Req 2b5) but requires slightly more lateral ankle stability because the wheel row is narrower. You need 15 feet on each foot.
Technique
- Build forward speed with several good strokes.
- Bring feet parallel and begin coasting.
- Smoothly shift all body weight onto one foot — transfer from the ankles, not by leaning at the waist.
- Lift the free foot a few inches and hold it behind and slightly to the side of the glide foot.
- Keep the gliding knee slightly bent. Hold the glide for 15 feet.
- Set down, build speed, and repeat on the other foot.
Balance on an In-Line Skate
In-line skates are narrower (front-to-back) than quad skates and have less lateral stability than ice skates. This makes side-to-side balance more demanding:
- Center over the wheel row. Your weight should be centered directly over the wheel row — neither tilted to the inside edge (would send you sideways) nor the outside edge.
- Use your arms as stabilizers. Arms held slightly out and forward help fine-tune balance.
- Micro-adjustments are normal. Small ankle corrections are how you maintain balance on a narrow wheel row. Fighting them makes things worse — let your ankle move.
Official Resources
🎬 Video: Gliding on One Skate (video) — https://youtu.be/iwtS9vr4r-Y
Req 2c7 — Heel Brake Stop
The heel brake is the primary stopping device on recreational in-line skates. This requirement asks you to stop on command — meaning your counselor will call for a stop at an unspecified moment during your skating, and you need to execute a complete halt using the heel brake.
How to Use the Heel Brake
- Skate forward at a comfortable speed. The technique works at any speed but is most clearly demonstrated with real momentum.
- Shift weight to the braking skate. The heel brake is attached to one skate (usually the right). Shift most of your weight to that foot.
- Push the braking foot forward. Slide the braking foot forward past the non-braking foot. This tips the heel down toward the pavement.
- Lift the toe of the braking foot. Flex your ankle upward to bring the heel down and the rubber brake pad into contact with the pavement.
- Apply progressive pressure. Press downward through the brake pad. Increase pressure steadily to slow down smoothly, or press hard for a rapid stop.
- Maintain balance. As the brake pad bites, your weight shifts backward. Counter this by keeping your non-braking foot planted and using your arms for balance.
Common Mistakes
Not pushing the foot far enough forward. If the heel does not extend past your body’s center of gravity, the brake pad cannot contact the ground. Exaggerate the forward push until you feel the pad engage.
Braking too suddenly. Jamming the brake at full force causes a sudden deceleration that throws your weight backward. Apply progressive pressure for a controlled stop.
Forgetting to transfer weight first. If you try to brake without first shifting weight to the brake skate, the brake foot is too light to create meaningful friction.
Official Resources
🎬 Video: Braking with In-Line Skates (video) — https://youtu.be/phN9uBIXkAw
Req 2c8 — Forward Crossover
The forward crossover on in-line skates uses the same mechanics as in ice and roller skating: you cross one foot over the other while turning to maintain speed through a curve. The narrower in-line chassis makes the motion slightly different in feel but the technique is the same.
How to Perform a Forward Crossover (Turning Left)
- Begin skating in a gentle left-curving arc. Lean your whole body into the curve.
- Cross the right foot over the left. Pick up your right skate and step it to the left side of (and slightly in front of) your left skate. Push through the outside wheels of the right skate.
- Step the left foot out and under. As the right foot lands, step the left foot out to the left to create the outside edge of the new arc.
- Repeat. Right over, left out, right over, left out — keep the rhythm going around the curve.
For a right-hand turn, reverse: left crosses over, right steps out.
Why It Works
The crossing motion creates a lateral push component — each cross-step drives you into the curve without losing forward momentum. Without crossovers, you would simply coast through a curve and slow down. With crossovers, you can maintain or even accelerate through a turn.
Tips for In-Line Crossovers
Lean, do not tilt the head. The lean needs to come from your ankles and hips — not just head and shoulders. Your whole body should tilt slightly into the curve like a bicycle wheel leaning through a turn.
Keep the crossing foot parallel to the wheel row. As you set the crossing foot down, align it parallel to your direction of travel. Twisting the foot as you cross causes edge-catch.
Official Resources
🎬 Video: How to Turn on In-Line Skates (video) — https://youtu.be/RMIRnNr-PeQ
🎬 Video: 5 Steps to the Perfect Crossover (video) — https://youtu.be/2-ULGoMvk24
Req 2c9 — Forward Swizzles
A swizzle (also called a “fishbowl” or “scissor”) is a two-foot propulsion technique where both feet move outward and inward simultaneously, tracing a lemon or eye shape on the ground. Each swizzle propels you forward. Performing a series of linked swizzles means chaining them together smoothly for at least 40 feet.
How to Perform a Forward Swizzle
- Start in a shoulder-width parallel stance, both knees bent.
- Spread: Push both feet outward simultaneously by pressing through the inside edges. Your feet trace two arcs moving apart.
- Squeeze: Before your feet are too far apart (roughly hip to shoulder width), pull them back inward by pressing through the outside edges. The inward squeeze propels you forward.
- Repeat: Without stopping, begin the next outward spread immediately. Each swizzle flows directly into the next — this is what “linked” means.
The path your wheels trace looks like a series of connected lens shapes (like the eye icon) on the pavement.
What “Linked” Means
Linked swizzles have no pauses between each cycle. As the inward squeeze of one swizzle completes, the outward spread of the next begins. If you stop and reset between each swizzle, they are not linked.
Why This Skill Matters
Swizzles are an efficient, low-fatigue propulsion method and a great warm-up technique. They also build the inner and outer edge control that feeds into backward swizzles, crossovers, and advanced footwork.
Official Resources
🎬 Video: Forward Swizzles (video) — https://youtu.be/TbNlbqClkGQ
Req 2c10 — Backward Swizzles
The backward swizzle uses the same outward-and-inward arc motion as the forward swizzle, but propels you in the opposite direction. You need to chain them together for at least 40 feet — no pausing between cycles.
How to Perform a Backward Swizzle
- Stand facing forward, both feet parallel and shoulder-width apart.
- Spread outward: Push both heels outward simultaneously by pressing through the outside edges. Your feet move apart.
- Squeeze inward: Pull both toes back inward — the inner edge of the inward squeeze propels you backward.
- Link immediately: As the inward squeeze completes, begin the next outward heel push before your feet are fully together. This keeps the motion continuous.
Your feet trace two lens shapes on the pavement — same as forward swizzles, but your body is moving backward.
Key Differences from Forward Swizzles
In forward swizzles, you push out from the inside edge and pull in from the outside edge. In backward swizzles, the sequence reverses: push heels out (outside edge) and pull toes in (inside edge creates the propulsion).
Navigating Backward
As always during backward skating, you cannot see where you are going. Alternate glancing over each shoulder every 2–3 swizzle cycles. Keep your path straight by checking regularly.
Official Resources
🎬 Video: Backward Swizzles (video) — https://youtu.be/t3dO_3vh0Ig
Req 2c11 — Lunge Turn
A lunge turn is a dynamic direction change executed from significant speed — you drop into a low lunge position to lower your center of gravity and use edge control to steer sharply around an object. Your counselor will place an object (typically a cone) and you must approach at a strong pace and turn cleanly around it.
How to Perform a Lunge Turn
- Build strong speed. The lunge turn is most effective with momentum — approach the object at a real skating pace.
- Initiate the lunge. As you near the object, step one foot well forward and to the inside of the turn (the foot that will be closest to the object). This is your lead foot; your knee bends deeply as you commit weight to it.
- Trail the outside foot. The outside foot stays behind and to the outside of the turn, either lifted or lightly touching the pavement.
- Use your weight and edges to steer. The lead foot’s inside edge bites into the pavement and arcs you around the object. Your low center of gravity allows a sharper turn.
- Rise out of the lunge. After clearing the object, push up from the deep knee bend and resume normal skating.
Why “From a Strong Pace” Matters
At slow speeds, a lunge turn is not much different from a regular step-around. The requirement specifies a strong pace because real-world use of the lunge turn happens when you need to change direction quickly — avoiding an obstacle on a path, cutting around a pedestrian, navigating a descent. Your counselor is assessing whether you can maintain control during high-momentum direction changes.
Official Resources
🎬 Video: Maneuvering Around Objects (video) — https://youtu.be/__N7lV59GMI
Req 2c12 — Mohawk
A mohawk is a direction-change technique borrowed from ice skating: you transition from skating forward on one foot to skating backward on the other foot without stopping. The result is a smooth, continuous change of direction. It is one of the most elegant transitions in in-line skating.
How to Perform a Forward-to-Backward Mohawk
- Skate forward at a moderate pace. The mohawk works best with some momentum.
- Pick a turning direction — say, a left mohawk.
- Glide on your right foot. Shift your weight to the right foot and begin a forward glide.
- Open your left hip. Rotate your left hip outward (externally rotate the hip joint) so your left foot naturally turns to point away from your direction of travel — heel toward heel with the right foot.
- Step onto the left foot, backward. Set the left foot down pointing opposite to the direction of travel (heel-to-heel alignment). Your weight transfers to the left foot as it begins moving backward.
- Lift the right foot. Once balanced on the left foot in backward motion, lift the right foot and begin skating backward.
The transition from forward-right-foot to backward-left-foot is the mohawk. Done smoothly, there is no pause or step — just a continuous, flowing direction change.
Common Challenges
Not opening the hip far enough. If you cannot get heel-to-heel alignment, practice hip external rotation exercises off skates first. Stiff hip mobility is the primary limiter for this skill.
Losing speed through the transition. At first, the weight transfer will feel hesitant and cause a speed loss. As the motion becomes natural, speed maintenance improves.
Official Resources
🎬 Video: Perform a Mohawk (video) — https://youtu.be/ytPUoplawVU
Req 2c13 — One-Foot Downhill Slalom
This requirement combines downhill speed management, one-foot balance, and directional control. You need to weave (slalom) around at least four objects while balanced on one foot, on a gently sloped surface. The slope adds an element that flat-pavement skills do not have: gravity continuously accelerating you.
Finding the Right Slope
The slope should be gentle — noticeable but not steep. A parking lot with a gradual grade, a gently sloping path, or a slight hill with a flat run-out at the bottom all work. Your counselor will assess whether the slope provides enough challenge to evaluate the skill.
The run-out area must be clear. Before attempting any downhill skating, confirm that the bottom of the slope has a safe, clear area to stop or coast to a halt. Never skate downhill toward traffic, obstacles, or drop-offs.
How to Execute the One-Foot Downhill Slalom
- Position yourself at the top of the slope with cones (or markers) set up in a line down the hill, spaced 4–6 feet apart.
- Begin moving downhill — the slope will accelerate you.
- Shift your weight to one foot and lift the free foot off the pavement.
- Use subtle ankle rolls (edge pressure) on the gliding foot to steer around each cone, alternating your curve direction at each cone.
- Complete at least four consecutive cone turns on one foot.
- Use your heel brake or deceleration technique at the bottom to stop safely.
Speed Management
On a slope, you will accelerate faster than on flat pavement. Controlled edge pressure — pressing into the hillside edge of each curve — creates friction and limits speed buildup. If you feel too fast, steer into a sharper arc rather than going straight.
Official Resources
🎬 Video: One-Footed Slalom (video) — https://youtu.be/mzA573nx7W8
Req 2c14 — Passing from Behind
Passing someone from behind is one of the most common — and most hazard-prone — situations an in-line skater faces on a shared path. Your counselor wants you to explain the correct process.
How to Pass from Behind
1. Assess before you close the gap. As you approach someone from behind, evaluate the full picture before committing to a pass:
- Is there oncoming traffic in the passing lane?
- Is the person you are passing walking unpredictably (weaving, stopping, turning to look at their phone)?
- Is there enough clear space ahead after the pass to complete it without cutting back immediately?
2. Give an audible signal. Call “On your left!” (or “On your right!” if passing on the right) in a clear, calm voice well before you are alongside the person. Give enough warning that they have time to process your call — typically 15–20 feet before you are even with them.
3. Give maximum clearance. Pass with as wide a gap as the path allows. At least 4–6 feet of lateral clearance between you and the person you are passing. Pedestrians and slower skaters are unpredictable — they may step sideways just as you are passing.
4. Do not cut back in immediately. After passing, wait until you are well clear before returning to the right side of the path. A premature cut-back puts you directly in front of the person you just passed, which is alarming and potentially dangerous if they are still moving.
5. Make eye contact if possible. On narrower paths or when passing older adults or children, it helps to make brief eye contact or get a response to your verbal call before beginning the pass. This confirms they are aware of you.
Special Case: Passing Children
Children are particularly unpredictable. If a child is running, playing, or accompanied by a small dog or stroller, slow to near-walking pace, give maximum clearance, and only pass when it is completely safe — not just when it is legal or expected.
Official Resources
No official resources are listed in the requirements for this subrequirement.
Req 2c15 — Avoiding Obstacles
An “unforeseen obstacle” is something that appears suddenly — a pothole you did not see, a dog that darts into your path, a pedestrian stepping sideways. At skating speed, you need pre-practiced techniques to respond instantly. Your counselor wants you to describe at least three.
Three Ways to Avoid an Obstacle
1. Steer around (the A-frame turn). The most common avoidance technique: use edge pressure to curve sharply around the obstacle. Bend your knees, shift weight to one foot, and use a crisp inside-edge push to arc in the opposite direction from the obstacle. The A-frame position (knees wide, both feet edged) gives you maximum steering force. This works best for obstacles to one side of your path.
2. Jump over. For small obstacles — a stick, a crack, a bottle — a small hop clears the hazard. Push down with both feet simultaneously, flex upward, and land with knees bent. Keep the jump as compact as possible to maintain control. This requires good surface ahead and behind the obstacle.
3. The T-stop or heel-brake emergency stop. Sometimes the safest option is to stop before reaching the obstacle. An emergency heel brake or a quick T-stop (dragging one foot perpendicular to travel) can reduce speed enough to either stop or slow sufficiently to safely maneuver. This works when the obstacle is ahead with distance to spare.
4. Step-over. For a low flat obstacle (a fallen branch, a shallow curb), you can lift one foot and step over it, then the other foot. This requires slowing slightly and works better at moderate speeds.
5. The controlled fall. If none of the above is possible and impact is unavoidable, a controlled fall — dropping to the knees and sliding (with knee pads absorbing the impact) — is safer than a sudden unexpected fall. You choose the point of impact rather than being caught by surprise.
Official Resources
🎬 Video: In-Line Skating Safety (video) — https://youtu.be/NP5w-A5aRSc
Req 2c16 — Curb Techniques
Curbs are among the most common obstacles on urban skating routes. Knowing how to handle them safely allows you to skate on real city sidewalks and paths. You need to describe two techniques and demonstrate at least one.
Method 1: The Step-Down / Step-Up
This is the basic, reliable method for most skaters.
Going down (off the curb):
- Slow to a near-walking pace using your heel brake or T-stop.
- At the edge of the curb, step one foot down to the lower surface first.
- Let that foot absorb the small drop (bend the knee to cushion).
- Step the second foot down once balanced on the first.
- Resume skating normally.
Going up (onto the curb):
- Approach the curb at a slow, controlled pace.
- Lift one foot and place it on the higher surface, extending your step.
- Use that front foot to pull yourself up, transferring weight forward.
- Bring the second foot up behind.
- Resume skating.
The step method works for curbs up to about 4 inches in height.
Method 2: The Jump
This method is faster and more dynamic — suitable for experienced skaters who are comfortable with small airborne maneuvers.
Jumping down:
- Approach the curb edge at a controlled speed.
- Compress both knees as your front wheels reach the edge.
- Push down and forward with both feet to jump slightly outward and over the drop.
- Land with knees bent to absorb the impact.
- Roll away normally.
Jumping up:
- Approach the curb with enough speed to clear it.
- Compress and explode upward with both legs.
- Lift both skates simultaneously to clear the curb height.
- Land front wheels first on the higher surface, with knees soft.
Official Resources
🎬 Video: Maneuvering Curbs (video) — https://youtu.be/3hq3sID5emE
Req 2d — Skateboarding Overview
Option D is the Skating merit badge’s most knowledge-intensive and skill-diverse option. It covers history, benefits, safety, equipment anatomy, board assembly, maintenance, riding fundamentals, and trick demonstrations across five trick categories. Work through all 14 subrequirements in order with your counselor.
What You’ll Complete
- Req 2d1 — History of Skateboarding: Explain the history and evolution of skateboarding from its origins to today.
- Req 2d2 — Benefits of Skateboarding: Describe the physical and personal development benefits of skateboarding.
- Req 2d3 — Safety Rules & Courtesy: Explain safety rules, courtesy guidelines, right-of-way, and communication signals at skate parks.
- Req 2d4 — Protective Gear: Explain required protective gear and show how to wear it correctly.
- Req 2d5 — Street vs. Vert Styles: Describe the two main styles and common skate park features.
- Req 2d6 — Skateboard Anatomy: Explain all the parts of a skateboard.
- Req 2d7 — Build a Board: Build a complete skateboard from components.
- Req 2d8 — Skateboard Maintenance: Explain ongoing maintenance for cleaning, adjusting, and replacing parts.
- Req 2d9 — Stance: Explain regular vs. goofy stance and demonstrate your preferred stance.
- Req 2d10 — Push, Cruise & Carve: Demonstrate pushing, cruising, and carving on flat ground.
- Req 2d11 — Braking Techniques: Show at least two braking and stopping techniques.
- Req 2d12 — Ollie: Do a basic ollie and at least one variation.
- Req 2d13 — Drop-In from Coping: Show how to drop-in from coping.
- Req 2d14 — Three Trick Types: Demonstrate THREE skateboarding tricks from five available categories.
Before You Begin
Access to a skate park or large smooth paved area is needed for the skill requirements. A complete skateboard that fits you (deck size appropriate for your shoe size) and full protective gear are required for all skateboarding requirements. If you do not own a board, many skate parks offer board rentals or beginner sessions.
Official Resources
🎬 Video: Jamboree - The Park (video) — https://youtu.be/2MEZdB-qooU
Req 2d1 — History of Skateboarding
Your counselor wants you to explain skateboarding’s history — not just recite dates, but show that you understand how the sport evolved from a surf-inspired pastime to an Olympic discipline.
The Origins (Late 1950s – 1960s)
Skateboarding emerged on the beaches of California in the late 1950s. Surfers looking for something to do when the waves were flat nailed metal roller skate trucks to boards and “sidewalk surfed.” The first commercial skateboards appeared around 1959 — simple wooden planks with clay wheels. Companies like Makaha and Hobie sold complete setups, and the first skateboarding competitions were held by 1963.
The first skateboarding boom was short-lived. The clay wheels were dangerous on any pavement imperfections, causing frequent falls. By the mid-1960s, public interest had faded and many cities had banned skateboarding on streets.
The Urethane Revolution (1970s)
Skateboarding’s second life came in the 1970s with a single innovation: urethane wheels. Frank Nasworthy introduced the first urethane-wheeled boards (under the brand Cadillac Wheels) in 1972. Urethane wheels gripped the pavement smoothly, absorbed road vibration, and allowed dramatic increases in speed and control. The sport exploded.
The 1970s also brought the empty pool era. A severe drought in California left thousands of backyard swimming pools empty — and skaters discovered that the smooth, curved concrete walls were perfect for riding. Skating pools developed the arc-skating style that became vertical (vert) skateboarding. The Z-Boys — a legendary crew from Dogtown (Zephyr skate team) in Venice and Santa Monica — pioneered aggressive pool skating and influenced every era that followed.
Street Skating and the Modern Era (1980s–1990s)
The early 1980s introduced the concave deck — a slight cupping of the board’s width — which allowed skaters to grip the board with their feet and perform aerial tricks. Rodney Mullen invented the flatground ollie in 1982, a gravity-defying move in which the board leaves the ground with the skater’s feet on it without grabbing. The ollie became the foundation for virtually every modern skateboard trick.
Street skating exploded in the late 1980s as skaters moved from vert ramps onto urban environments — stairs, rails, ledges, and gaps. The 1990s saw the rise of technical street skating, with complex flip tricks, grinds, and slides becoming the dominant style.
Skateboarding Goes Global (2000s–Present)
Skateboarding became a global youth culture phenomenon in the 2000s, with skateboarding video games, films, and media reaching audiences in every country. Independent brands, rider-owned companies, and a grassroots distribution model gave skateboarding a distinctive counterculture identity.
In 2016, the IOC announced skateboarding would debut at the Tokyo 2020 Olympic Games. In 2021, skateboarding made its Olympic debut, with both street and park disciplines contested. The sport’s inclusion in the Olympics marked a new chapter — bringing mainstream recognition while the skateboarding community continued to evolve its own independent culture.
Official Resources
🎬 Video: How Has Skateboarding Changed Over the Years (video) — https://youtu.be/m4AQtoDBC00
🎬 Video: The Wild History of Skateboarding (video) — https://youtu.be/f9JWlMZa0GE
🎬 Video: The Evolution of Skateboard Tricks! (video) — https://youtu.be/w1mm3zDNyNI
Req 2d2 — Benefits of Skateboarding
The requirement gives you the five categories to cover: physical fitness, balance, coordination, perseverance, and creativity. Explain each in your own words with specific examples.
Physical Fitness
Skateboarding is a full-body workout. A single skate session can burn hundreds of calories and elevates heart rate significantly during intensive riding. Pumping a halfpipe builds cardiovascular endurance. Repetitive trick practice develops leg strength in the quads, hamstrings, calves, and glutes. The core muscles — abs, obliques, and back — are engaged constantly to maintain balance and execute rotations. Arm muscles are used in pumping and style-related movements.
Balance
Skateboarding demands exceptional balance — both static (holding a position) and dynamic (maintaining equilibrium while moving). Every moment on a skateboard requires micro-adjustments of weight distribution. Beginner skateboarders often remark that improving skating balance carries over noticeably to other physical activities like surfing, snowboarding, martial arts, and even everyday walking.
Coordination
Skateboard tricks require precise timing and coordination between multiple body parts. An ollie requires the back foot to pop the tail while the front foot simultaneously slides up the board, at exactly the right moment. This level of coordination — timed movements across multiple limbs — improves neural pathways that benefit coordination in other activities.
Perseverance
Skateboarding is one of the most demanding sports for perseverance. Learning most tricks takes days, weeks, or even months of repeated attempts. Every skateboarder fails constantly — and keeps trying. This builds genuine grit and a healthy relationship with failure. The feeling of finally landing a trick after dozens of attempts is a direct, tangible reward for persistent effort.
Creativity
Skateboarding has no fixed scoring system in most of its forms (competition formats like park do have judges, but most skateboarding is free-form). This open-endedness encourages skaters to find their own style, invent new tricks, and see urban environments as canvases for creative expression. Every ledge, stair, and bank becomes an opportunity for creative problem-solving: how can I skate this?
Official Resources
🎬 Video: Benefits of Skateboarding (video) — https://youtu.be/VAh62ff8rys
🎬 Video: Physics of Skateboarding (video) — https://youtu.be/6bu_9sI7QTI
Req 2d3 — Safety Rules & Courtesy
Skate parks operate on an informal but important set of rules that protect everyone and make sessions productive and fun. Understanding these rules helps you fit in at any skate park and demonstrates maturity as a skateboarder.
General Safety Rules
Always wear protective gear. Helmet, knee pads, elbow pads, and wrist guards are required when skating at most public parks for youth skaters, and strongly recommended for all. There are no exceptions when you are learning.
Skate within your skill level. Attempting features well beyond your current ability — oversized ramps, very high rails, steep drops — dramatically increases injury risk. Progress is earned gradually.
Watch for others before dropping in. Before entering any obstacle (dropping into a bowl, entering a ramp from the deck, or pushing into a street section), visually confirm the feature is clear. Other skaters may be approaching from directions you cannot see.
Do not “snake” runs. “Snaking” is cutting in front of another skater who clearly had right-of-way. It is disrespectful and dangerous.
Keep the deck (top of ramp) clear. The deck is not a standing area. Wait off to the side until it is your turn to drop in.
Right-of-Way
The skater already in motion has right-of-way. If someone is mid-run on a feature, wait until they complete it before entering.
First to the obstacle goes first. Among skaters waiting their turn, the skater who arrives at the feature first takes the next run.
Longer runs yield to shorter entries. A skater completing a long full-park run has right-of-way over someone about to enter for a single-obstacle trick.
Communication Signals and Warnings
“I’ve got it” / “I’m going.” Before dropping in or starting a run at a busy park, a quick verbal signal lets nearby skaters know you are going. This is especially important at bowl lips and ramp decks where multiple skaters are queued.
“Ball!” If a board rolls into a shared area, immediately shout “Ball!” (or “Board!”) to alert skaters to the rolling hazard.
Make eye contact before crossing. At busy parks with intersecting lines, make eye contact with oncoming skaters before crossing their path. A nod or hand signal confirms they have seen you.
Shout “CLEAR!” for falls. If a skater falls into a shared area, the first person to see it shouts “Clear!” to stop incoming skaters.
Official Resources
🎬 Video: Skate Park Safety Rules (video) — https://youtu.be/Yw9bBDZ2kUo
🎬 Video: How to Ride Skateparks for Beginners (video) — https://youtu.be/zTVb4bmoiw0
🎬 Video: Skatepark Terrain (video) — https://youtu.be/qrq6KlaIe8Y
Req 2d4 — Protective Gear
This requirement has two parts: explain what each piece of gear does, and show how to wear it correctly. Bring your gear to the counselor meeting and demonstrate proper fitting for each piece.
Helmet
Purpose: Protects the skull and brain from direct impact. Head injuries are the most serious potential outcome of a skateboarding fall.
How to wear correctly:
- The helmet must sit level on your head — not tilted back exposing your forehead, and not pushed forward covering your eyes.
- Position it two finger-widths above your eyebrows.
- The side straps form a Y-shape that meets just below each ear.
- The chin strap is fastened and allows only two fingers to fit between strap and chin.
- The helmet should not wobble or shift when you shake your head. Adjust the fitting pads or dial system until secure.
What to look for: Look for helmets certified to CPSC (bicycling standard) or ASTM F1492 (skateboarding standard). Multi-impact certified skate helmets (like Triple Eight) handle repeated impacts better than single-impact bicycle helmets.
Knee Pads
Purpose: Protect the knee from direct impact and abrasion — crucial for falls on hard pavement or skating surfaces.
How to wear correctly:
- The hard cap must be centered directly over your kneecap.
- The straps should be snug — tight enough that the pad does not rotate when you bend your knee.
- The pad should not slide down your shin when you are in a skating stance.
Elbow Pads
Purpose: Protect the elbow joint and the bony point of the elbow (olecranon) from impact and road rash.
How to wear correctly:
- Center the cap over the point of the elbow.
- Secure both straps — the upper strap on the upper arm, the lower strap on the forearm.
- The pad should not shift when you bend your elbow.
Wrist Guards
Purpose: Prevent wrist fractures — the most common upper-body skateboarding injury. When you fall forward, the natural reflex is to catch yourself with outstretched hands. Wrist guards distribute the impact force across the forearm rather than concentrating it at the wrist joint.
How to wear correctly:
- The hard plastic splint should face the palm side of your hand.
- The guard extends from mid-palm to mid-forearm.
- All Velcro straps are fastened snugly — a loose wrist guard provides significantly less protection.
- Your fingers should have full range of motion while the guard is in place.
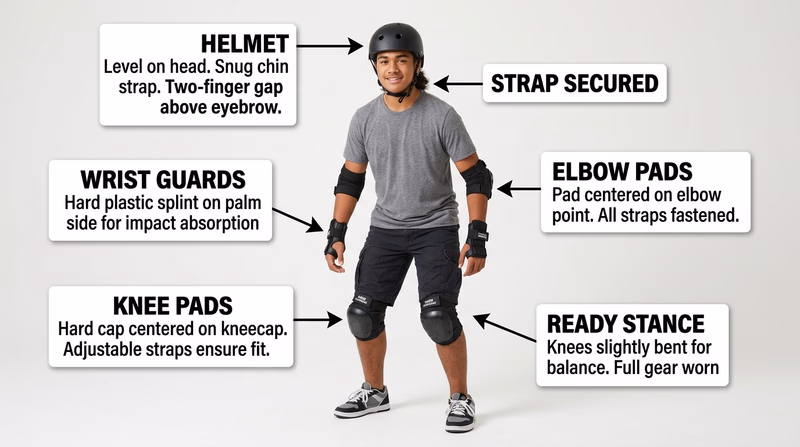
Full Gear Checklist
Complete before every skateboarding session- Helmet — level, two fingers above brow, chin strap snug (two-finger rule)
- Knee pads — centered on kneecap, straps secure, no slipping
- Elbow pads — centered on elbow point, both straps fastened
- Wrist guards — palm-side splint, all straps fastened, full finger mobility
Official Resources
Skateboarding Safety (website) Scouting America's official skateboarding safety guidance, covering required protective gear and how to use it correctly — the official reference for this requirement. Link: Skateboarding Safety (website) — https://www.scouting.org/health-and-safety/safety-moments/skateboard-safety/Req 2d5 — Street vs. Vert Styles
The Two Main Styles
Street Skateboarding
Street skating is performed on flat ground and urban obstacles — stairs, ledges, curbs, handrails, gaps, and banks. The goal is to use creative footwork and tricks to navigate and interact with these features. Street skating originated in real city environments and retains that identity even in purpose-built skate parks with street-style sections. Tricks like kickflips, grinds, slides, and manual pads dominate street skating. Street skateboarding was one of the two formats contested at the Olympics.
Vertical (Vert) Skateboarding
Vert skating takes place on large curved ramps — halfpipes and full pipes — where the skating surface transitions from a flat bottom to a near-vertical (or fully vertical) wall. Skaters build speed on the flat bottom, transition up the curved wall, and become airborne above the lip (coping). In the air, they perform grabs, rotations, and inverted tricks before landing back in the transition. Vert skating demands courage, timing, and aerial awareness. Tony Hawk’s 900 (two-and-a-half aerial rotations) performed at the 1999 X Games is one of the most famous vert tricks in history.
Common Skatepark Features
| Feature | Description |
|---|---|
| Quarter pipe | A quarter-circle curved ramp with one vertical wall; foundation of vert skating |
| Halfpipe | Two quarter pipes facing each other; skaters ride back and forth between them |
| Bowl / pool | A curved, enclosed skating surface resembling an empty swimming pool; allows 360° transitions |
| Bank / wedge ramp | A flat angled ramp (no curved transition); good for speed and approach |
| Manual pad | A low, flat-topped platform used for manual (wheelie) tricks |
| Rail | A metal or PVC cylindrical bar used for grind and slide tricks |
| Ledge | A low, flat-topped concrete or metal surface used for grind and slide tricks |
| Spine | Two back-to-back quarter pipes sharing a top coping; allows transfer tricks between them |
| Funbox | A multi-sided box structure featuring rails, ledges, and angled sides |
| Stairs and gap | A stair set with a landing area; used for ollie-over and trick-down tricks |
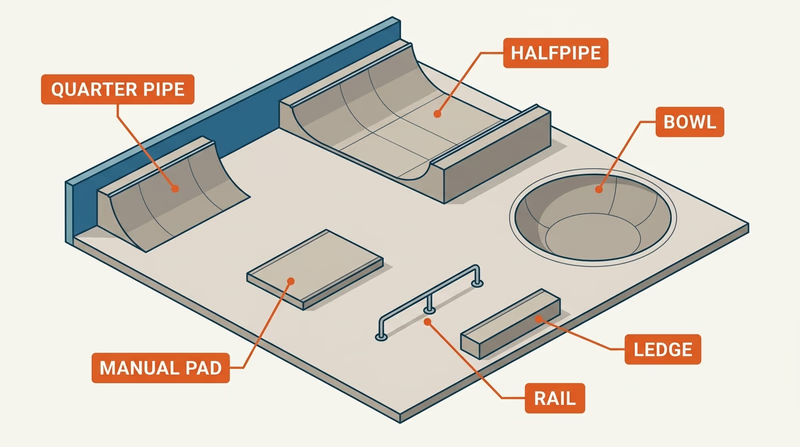
Official Resources
No official resources are listed in the requirements for this subrequirement.
Req 2d6 — Skateboard Anatomy
Before you build a board in Requirement 2d7, you need to know every part and what it does. Your counselor wants you to explain each component clearly.
The Complete Skateboard
Deck The wooden platform you stand on. Most street decks are 7–8.5 inches wide and made from 7–9 plies of Canadian maple glued together with alternating grain direction for strength and flex. The nose is the front (usually narrower or more pointed); the tail is the rear (usually wider or more square). The concave is the slight cup across the width — it lets your feet feel the edges and helps with board control. Decks are typically coated with grip tape on top.
Grip Tape A sandpaper-like adhesive layer applied to the top of the deck. Grip tape provides traction for your shoes, helping you keep your feet on the board during tricks.
Trucks Two metal axle assemblies mounted on the underside of the deck (one under the nose, one under the tail). Each truck consists of:
- Baseplate — the flat mounting plate screwed to the deck
- Hanger — the T-shaped metal bar that holds the axle
- Axle — the rod running through the hanger that the wheels attach to
- Kingpin — the large bolt running through the center of the truck that holds the hanger to the baseplate; its tightness controls truck responsiveness
- Bushings — soft polyurethane cushions around the kingpin that absorb turning pressure; softer = easier turning, harder = more stable
Wheels Four polyurethane wheels (one on each end of each truck axle). Measured in diameter (50–60mm for street; 55–65mm for park/vert) and hardness (durometer rating — 78A–101A; softer = more grip and smoother ride; harder = faster and better for tricks on smooth surfaces).
Bearings Two per wheel, eight total. Ball bearings inside the wheel hub allow wheels to spin. Rated ABEC-1 through ABEC-9 (higher = more precision) or by the industry’s own “Bones Reds” style standard.
Hardware Eight bolts and eight nuts (four per truck) that mount the trucks to the deck. Standard hardware is 7/8" for most setups; longer hardware (1"–1.25") accommodates risers.
Risers (optional) Hard plastic pads placed between the truck baseplate and the deck to raise the board height. Risers reduce wheel bite (wheels touching the deck during sharp turns) and can soften the ride slightly.
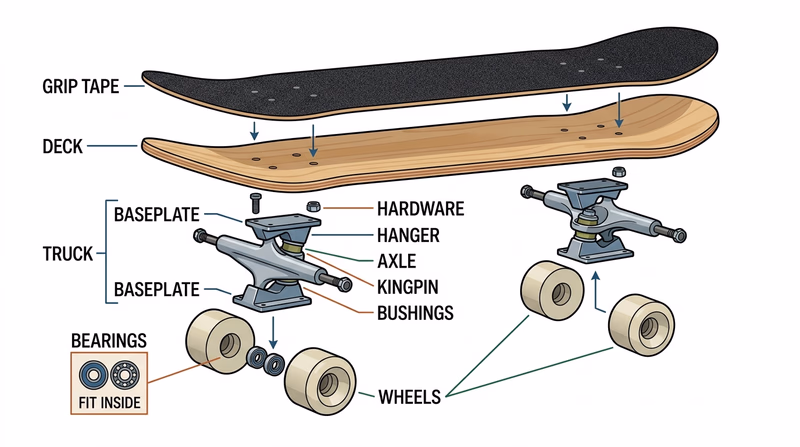
Official Resources
How to Select a Skateboard (video) A guided walkthrough of selecting skateboard components — deck size, truck width, wheel hardness, and more — directly applicable to understanding skateboard anatomy. Link: How to Select a Skateboard (video) — https://player.vimeo.com/video/901305105Req 2d7 — Build a Board
This hands-on requirement asks you to assemble a complete skateboard from components in the correct sequence. Have all your components ready before you begin.
What You Need
- Deck
- Grip tape
- 2 trucks
- 4 wheels
- 8 bearings (+ 8 bearing spacers if included)
- 8 hardware bolts and 8 nuts
- Skate tool (or hardware wrench and screwdriver)
Assembly Order
Step 1: Apply grip tape to the deck. Peel the backing off the grip tape. Starting at one end of the deck, carefully lay the grip tape down from one end to the other, pressing it firmly as you go to eliminate air bubbles. Use a skate tool or screwdriver handle to burnish (rub firmly) the edges so the tape adheres completely. Score and fold the excess tape over the edge, then use the edge of the skate tool to tear it cleanly around the deck perimeter. Use a nail or skate tool tip to poke holes through the grip tape at each truck mounting hole.
Step 2: Mount the trucks to the deck. Insert a bolt through each mounting hole from the top of the deck (through the grip tape). Flip the deck over and align the truck baseplate over the bolts. Thread on the nuts by hand, then tighten with the skate tool until the trucks are firm but not so tight that you strip the hardware. Check that all eight bolts and nuts are secure.
Step 3: Install bearings into the wheels. Press one bearing into each side of each wheel (two per wheel = eight total). Use the axle of the truck or a bearing press to seat each bearing fully — it should be flush with the wheel surface. If bearing spacers are included, place one between the two bearings inside the wheel.
Step 4: Mount wheels to trucks. Slide each wheel onto the truck axle. Thread on the axle nut and tighten until the wheel has a small amount of play (about 1mm of lateral wobble) but spins freely. Overtightening the axle nut compresses the bearings and prevents free spin.
Step 5: Final check. Spin each wheel — it should spin freely and smoothly. Check that all truck hardware is tight. Test the trucks by applying sideways pressure to the board: they should respond smoothly without binding. Your board is ready to ride.
Official Resources
🎬 Video: How to Assemble a Skateboard (video) — https://youtu.be/A6E403WMOXk
Req 2d8 — Skateboard Maintenance
A well-maintained skateboard is safer and more responsive. Your counselor wants you to explain the three maintenance areas: cleaning, adjusting bolts, and replacing parts.
Cleaning
Bearings. Bearings collect dirt, dust, and grit that causes grinding and slows wheel spin. To clean: remove wheels, pop out bearings, remove rubber shields if present, soak in a dedicated bearing cleaner or isopropyl alcohol, agitate to loosen debris, air-dry completely, and apply 1–2 drops of bearing oil before reinstalling. Never use WD-40 on bearings — it is a solvent that strips lubrication.
Grip tape. Grip tape loses effectiveness as dirt builds up in the abrasive surface. Use a rubber grip tape cleaner (a stiff rubber block) to scrub the tape surface — this pulls dirt out of the grit. An old medium-bristle toothbrush with mild soap and minimal water also works. Allow to dry fully.
Deck underside and trucks. Wipe down with a dry cloth. Remove caked mud with a dry brush. Avoid soaking any wood components — water degrades the deck laminate.
Adjusting Bolts
Truck tightness (kingpin bolt). The kingpin controls how responsive the trucks are to lean input.
- Tighter kingpin = stiffer trucks = more stable at speed but less turning response
- Looser kingpin = more responsive turning but more wobble at high speed
Adjust with a skate tool (3/8" socket on the kingpin nut). Changes of a quarter-turn at a time let you feel the difference before adjusting further. Beginners typically benefit from slightly tighter trucks; advanced skaters often prefer looser for trick responsiveness.
Wheel nuts. If a wheel is wobbling more than normal or not spinning freely, check the axle nut tightness. Tighten if loose; loosen slightly if the bearing is being compressed.
Hardware bolts. Check hardware before each major session. Loose truck bolts cause the truck to shift under the deck, which feels unstable and can cause falls.
Replacing Parts
Wheels. Replace when wheels are worn down (smaller diameter, flat spots), cracked, or have chunks missing. Different setups for different skating: harder wheels (99A–101A) for smooth park/street, softer wheels (78A–87A) for rough pavement or cruising.
Bearings. Replace when cleaning no longer improves spin quality, when bearings are visibly rusty, or when the wheel rumbles during rolling.
Grip tape. Replace when the grit is worn smooth in key foot zones (front foot area, tail pocket) or when the tape is peeling from the deck edge.
Deck. Replace when the deck is cracked, has significant razor tail (the back tail ground to a thin point), or feels dead/soft underfoot (the wood has lost its stiffness from water or repeated impacts).
Official Resources
How to Maintain Your Skateboard (website) A beginner-focused maintenance guide covering bearing cleaning, truck adjustment, and when to replace worn components — a practical reference for this requirement. Link: How to Maintain Your Skateboard (website) — https://www.skatexs.com/blogs/news/9432593-skateboard-maintenance-for-beginnersReq 2d9 — Stance
Your stance determines which foot is at the front of the board. This affects everything — how you push, turn, and perform tricks. Understanding both stances (and why people have different ones) is fundamental skateboarding knowledge.
Regular vs. Goofy Stance
Regular stance: Left foot forward, right foot at the tail. The majority of skateboarders ride regular.
Goofy stance: Right foot forward, left foot at the tail. Roughly one in three skateboarders rides goofy.
Neither stance is better or worse — they are simply mirror images of each other. All tricks can be performed from either stance.
How to Find Your Stance
If you are not sure which foot is your natural front foot, try these tests:
The push test. Stand on a smooth floor in socks. Slide one foot forward — the foot that instinctively slides forward is likely your front foot.
The push-from-behind test. Have a friend gently push you from behind without warning. The foot you step forward to catch yourself is typically your natural front foot.
The sliding test. Run on a slippery surface and slide — the foot you naturally lead with is usually your front foot.
Most people find their preferred stance immediately when they first stand on a skateboard.
Switch, Fakie, and Nollie
Once you know your natural stance, you will hear these terms:
- Switch: Riding with your non-dominant foot forward (i.e., opposite of your natural stance). Very difficult; requires relearning all tricks.
- Fakie: Riding backward in your natural stance (tail-first, but feet in normal position).
- Nollie: An ollie performed by popping the nose instead of the tail while riding normally.
For this requirement, you only need to identify your stance and demonstrate it by standing on the board correctly.
Demonstration
Stand on the skateboard on a flat, stable surface (even on carpet or grass is fine for the stance demonstration). Your front foot should be just behind the front truck bolts, angled slightly forward. Your back foot should be on or near the tail, centered across the board width.
Official Resources
🎬 Video: Goofy vs. Regular Stance (video) — https://youtu.be/fdSzhc7HXJ0
Req 2d10 — Push, Cruise & Carve
This requirement tests the three fundamental movement skills on a skateboard: generating speed (pushing), maintaining it (cruising), and steering (carving). All three are demonstrated on flat ground.
Pushing
- Start in your natural stance with both feet on the board.
- Place your front foot over the front truck bolts, angled slightly forward (about 30–45°).
- Shift your weight to the front foot.
- Lower the back foot off the board to the ground.
- Push backward along the pavement with the back foot — a smooth, deliberate stroke.
- After the push, bring the back foot back up to the board in riding position (parallel to the deck, slightly angled, over the rear truck).
- Repeat as needed to build and maintain speed.
The quality of a push comes from using the whole foot — a full flat-footed stroke, not just a toe-push.
Cruising
Cruising is simply riding in a balanced, upright position at comfortable speed without pushing or turning aggressively. Both feet are on the board. Focus on:
- Balanced weight distribution. Neither too much weight on the nose (which dips the nose) nor the tail (which drags the tail). Center your weight between both trucks.
- Relaxed knees. Slightly bent knees absorb small pavement irregularities and lower your center of gravity.
- Eyes forward. Look where you are going, 20–30 feet ahead, not at the board.
Carving
Carving is steering the skateboard in smooth, flowing arcs — like a surfer carving a wave. It uses truck lean (pressure through the toes or heels) to change direction.
- Toeside carve (heelside turn): Press your toes down — the board will tilt and turn in the direction your toes point (away from you).
- Heelside carve (toeside turn): Press down through your heels — the board tilts and turns toward you.
Keep your knees bent and fluid during carves. The key is body lean — your whole body lean into the turn, not just ankle pressure.
Official Resources
How to Push on a Skateboard (video) Step-by-step guide to the fundamental pushing motion — correct foot placement, body position, and the complete push stroke. Link: How to Push on a Skateboard (video) — https://player.vimeo.com/video/901305608 How to Turn on a Skateboard (video) Covers heel-side and toe-side carving on flat ground, with technique cues for smooth, controlled direction changes. Link: How to Turn on a Skateboard (video) — https://player.vimeo.com/video/901305658Req 2d11 — Braking Techniques
Skateboards have no mechanical brakes — stopping is entirely a rider skill. You need to demonstrate at least two of the stopping methods below.
Method 1: Foot Drag
The most basic stop for beginners.
- Slowly lower your back foot off the board until the sole of your shoe makes contact with the pavement.
- Apply gentle downward pressure — just enough to create friction.
- Increase pressure gradually to decelerate smoothly.
The drawback: foot dragging wears out shoe soles quickly. It is most useful at low speed.
Method 2: Tail Drag (Tail Scrape)
Useful for moderate speed stops.
- Apply downward pressure with your back foot on the tail of the board.
- This raises the nose and brings the tail into contact with the pavement.
- The friction from the tail scraping decelerates the board.
Note: this method wears down the tail over time. It is less precise than a power slide but more reliable than foot drag at moderate speeds.
Method 3: Power Slide (Advanced)
A rapid stop used by more experienced skateboarders.
- From moderate to fast speed, twist your body and the board 90° so the board slides sideways relative to your direction of travel.
- The wheels scrape across the pavement rather than rolling, creating rapid friction and deceleration.
- A successful power slide leaves a satisfying rubber stripe on the pavement.
Power slides require good balance and body rotation timing. They are the most effective stopping method at speed but take significant practice.
Method 4: Stepping Off
Sometimes the simplest stop is stepping off the board and letting it coast to a stop naturally. At slow speed, this is a valid and safe technique.
- Shift weight to the front foot.
- Step off with the back foot and let the foot take your weight.
- Stop the board with your foot or pick it up.
At high speed, jumping off a moving skateboard without control is dangerous. Reserve this for slow-speed situations.
Official Resources
🎬 Video: How to Stop a Skateboard (video) — https://youtu.be/gLikGjxWCUQ
Req 2d12 — Ollie
The ollie is the foundational trick of modern skateboarding. Invented by Rodney Mullen on flat ground in 1982, the ollie makes the board appear to stick to the rider’s feet as they leave the ground — without any hand-grab. Every other flip trick, most grinds, and countless other maneuvers start from or are built on the ollie. You need to land a basic ollie and at least one variation.
How to Ollie
- Foot position. Front foot centered on the board, slightly behind the front truck bolts. Back foot: toes on the tail, centered left-to-right.
- Crouch. Bend your knees into a low crouch — this loads your legs with spring energy.
- Pop the tail. Snap your back foot downward explosively, slamming the tail into the ground. The tail hitting the ground sends the board upward.
- Slide the front foot. As the tail hits, slide your front foot up toward the nose — the friction of your shoe against the grip tape carries the board up and levels it in the air.
- Suck up your legs. Pull your knees toward your chest to let the board rise fully.
- Land with bent knees. As the board levels out, press your feet down onto the bolts and land with knees bent to absorb the impact.
The ollie requires dozens to hundreds of attempts for most people. Start stationary before trying while moving.
Ollie Variations
Higher ollie. Pop more explosively and crouch deeper. The same mechanics, more commitment.
Ollie off a curb (ollie down). Ride toward a curb drop, ollie just before the edge, and land on the lower surface. Easier than a flat-ground ollie because the drop gives you extra air time.
Ollie up a curb (ollie up). Approach a curb, ollie with enough height to clear the lip, and land on the higher surface.
Rolling ollie. Execute a standard ollie while moving forward. Requires the same mechanics as the stationary version, with added timing challenges.
Official Resources
How to Ollie on Skateboard (video) A step-by-step ollie tutorial with detailed slow-motion breakdown of foot placement, pop timing, and front-foot slide — essential preparation for your counselor demonstration. Link: How to Ollie on Skateboard (video) — https://player.vimeo.com/video/901305845Req 2d13 — Drop-In from Coping
Dropping in is one of the most psychologically challenging beginner skills in skateboarding — and one of the most rewarding to conquer. You stand at the top of a ramp with your tail on the coping (the metal pipe at the lip of a ramp), lean forward, and commit your weight forward to ride down the transition.
What Is Coping?
Coping is the metal or concrete pipe that runs along the top lip of a halfpipe, bowl, or quarter pipe. It marks the transition from the deck (the flat area at the top) to the skating surface below. When you drop in, your tail rests on the coping as you set up at the lip.
How to Drop In
Place the tail on the coping. Roll your board to the lip so the tail (including the back wheels and tail) hooks on the coping. The front of the board should be pointing down the ramp.
Position your feet. Back foot firmly on the tail (to keep the board hooked on the coping). Front foot on the board just behind the front truck bolts.
Stand up straight. Do not lean back. Many beginners hunch or lean backward in fear — this actually causes you to fall. You need to lean forward.
Commit your weight forward. This is the critical moment. Shift your weight forward and over the board by leaning your upper body and pressing the front foot down onto the ramp surface. The board will follow your weight down the transition.
Bend your knees as you go. As the board begins to roll down the ramp, bend your knees to absorb the motion and lower your center of gravity.
Ride out at the bottom. As you reach the flat bottom of the ramp, straighten slightly and ride out into the park.
The Mental Challenge
The difficulty of dropping in is entirely mental. Physically, it is not a complex motion — it is simply leaning forward. But standing at the lip of a ramp with a significant drop in front of you triggers a strong protective lean-back instinct. The only way through it is to commit. Half-committed drop-ins (leaning back at the last second) cause the back wheels to slip off the coping and a fast fall.
Official Resources
No official resources are listed in the requirements for this subrequirement.
Req 2d14 — Three Trick Types
You must choose exactly 3 trick categories from the five listed below and demonstrate at least one trick from each chosen category. Read through all five options and decide which three play to your current skills.
Your Options
- Req 2d14a — Flat Ground Tricks: Tricks performed on flat pavement, including manuals, 180s, and flatland footwork.
- Req 2d14b — Flip & Shove-It Tricks: Tricks in which the board rotates beneath the rider — kickflips, heelflips, shove-its, and variations.
- Req 2d14c — Grind & Slide Tricks: Tricks where the trucks or board slides along a rail, ledge, or coping — 50-50 grinds, nosegrinds, boardslides, and more.
- Req 2d14d — Air & Grab Tricks: Tricks performed in the air, usually off a ramp or transition, where the skater grabs part of the board during the airborne phase.
- Req 2d14e — Footplant Tricks: Tricks where the skater briefly touches one foot to a surface (ramp lip, ground) during an aerial maneuver.
Choosing Your Three
Consider your current skill set and where you will be practicing:
If you skate mostly flat ground: Options A (Flat Ground), B (Flip & Shove-It), and E (Footplant) are most accessible without a ramp.
If you have regular ramp access: Options C (Grind & Slide), D (Air & Grab), and E (Footplant) are easier to learn with transition skateboarding experience.
Most beginners tend to find flat ground tricks (A) and shove-it tricks (B) the most accessible starting point, combined with one ramp-based trick category.
Req 2d14a — Flat Ground Tricks
Flat ground tricks are performed on level pavement without ramps, rails, or obstacles. They are the most accessible trick category for beginners — all you need is a smooth surface. Demonstrate at least one clear flat ground trick for your counselor.
What Counts as a Flat Ground Trick
Any trick performed on flat pavement counts. Common examples:
Manual (one-foot wheelie): Balance on the back two wheels while rolling — nose lifted, tail not touching the ground. Hold for distance. A nose manual does the reverse (nose wheels only).
180 ollie: An ollie in which you rotate your body and board 180° during the airborne phase. You land riding in the opposite direction (fakie). Both frontside 180 (rotating toward your toes) and backside 180 (rotating toward your heels) count.
Casper (advanced): A trick where the board flips to grip-tape-down and balances on your foot briefly before being flipped back. More advanced — include if it is in your repertoire.
No-comply (footplant crossover): A trick where the front foot steps off, plants on the ground, and the board is redirected. Sometimes categorized with footplant tricks, but the flat ground version is widely recognized as a flat trick.
Counselor Demonstration Tips
For a manual, ride smoothly for at least 3–5 feet on the back wheels with the nose clearly elevated. For a 180, land clean in fakie position without stepping off. Clean landings and clear technique matter more than height or distance.
Official Resources
🎬 Video: Flatland Tricks (video) — https://youtu.be/-LwtQJFqNOA
Req 2d14b — Flip & Shove-It Tricks
Flip and shove-it tricks involve the board rotating beneath the rider while the rider is airborne. The skater launches the board into a specific rotation, then catches it with their feet as it completes the rotation. Demonstrate at least one trick from this category.
Shove-It (Pop Shove-It)
A shove-it rotates the board 180° horizontally (around the vertical axis) without flipping. The board spins under the rider and they land back on it.
Backside pop shove-it (beginner-friendly):
- Start from ollie position.
- Pop the tail and simultaneously scoop the tail outward with your back foot (back foot pushes the tail forward and away).
- The board rotates 180° horizontally under you.
- Land with both feet on the bolts.
The shove-it is often one of the first flip-category tricks beginners learn because it only requires board rotation, not a flip.
Kickflip
A kickflip adds a vertical flip (the board rolls once over its long axis) to the ollie.
- Pop the tail as in an ollie.
- The front foot slides up and kicks outward at a slight angle off the toe-side edge, flicking the board into a flip.
- The board rotates once (nose over tail from rider’s perspective).
- Catch it with your feet as it completes the flip.
- Land with both feet on the bolts.
Heelflip
Similar to a kickflip but flips the opposite direction — the board rolls from the heel side. The front foot slides and kicks off the heel-side edge.
Official Resources
🎬 Video: Flip a Skateboard (video) — https://youtu.be/MDkVYN6Rk_I
🎬 Video: Shove-It (video) — https://youtu.be/fBAW51ilpLw
Req 2d14c — Grind & Slide Tricks
Grind and slide tricks involve the skateboard (or specifically, the trucks) making contact with and traveling along a rail, ledge, or coping. The board “grinds” on the metal trucks or “slides” on the deck surface. These tricks require enough speed to get onto the obstacle, balance while grinding, and a clean exit. Demonstrate at least one trick from this category.
Types of Grinds
50-50 grind: Both trucks are on the obstacle simultaneously. This is the most basic grind and the standard starting point. Approach the obstacle at an angle, ollie onto it with both trucks, balance, and ride or jump off the end.
5-0 grind: Only the back truck is on the obstacle, with the nose elevated. Similar to a manual but on an elevated surface.
Nosegrind: Only the front truck is on the obstacle, with the tail elevated. More difficult than the 5-0.
Boardslide: The board is turned 90° so the deck itself (between the trucks) slides along the obstacle, rather than the trucks grinding. Classic ledge and rail trick.
Noseslide: The nose portion of the deck slides along the obstacle, with the board at 90°.
Approach and Exit
Most grind tricks are approached with an angled run-up (about 30–45° to the obstacle) to allow the ollie to carry the board up and onto it. The exit can be a ride-off at the end of the obstacle or a kickout (kick the tail to disengage) and return to riding direction.
Official Resources
🎬 Video: Grind Tricks (video) — https://youtu.be/SKrntystOnE
🎬 Video: Doing a Slide (video) — https://youtu.be/IPDoNdZvGxk
Req 2d14d — Air & Grab Tricks
Air tricks involve the skater leaving the skating surface — most often launching above the lip of a ramp or bowl — and grabbing part of the board during the airborne phase. The grab stabilizes the board, adds style, and in more advanced tricks, allows rotations. Demonstrate at least one trick from this category.
Common Air and Grab Tricks
Frontside air: Approach the lip of a ramp riding frontside (your toes toward the wall). Launch above the lip, grab the toe-side edge of the board (most commonly a melon grab or frontside grab), and land back in the transition.
Indy grab: In the air, reach down with your back hand and grab the toe-side edge of the board between the trucks. One of the most classic and versatile grab tricks.
Stalefish grab: Grab the heel-side edge of the board between the trucks with your back hand, reaching behind your back leg.
Mute grab: Reach with the front hand across to grab the toe-side edge between the trucks. Requires more flexibility than the Indy.
Method air: A classic vert trick — the board is grabbed on the heel-side edge with the back hand while the knees are bent up and back, creating a distinctive silhouette.
Executing an Air and Grab
- Build enough speed to launch clearly above the lip — at least a foot of air is needed to have time to grab and let go before landing.
- As you go airborne, commit to the grab: reach down deliberately and grab the board.
- Hold the grab briefly, then release before your wheels reach the transition again.
- Bend your knees upon landing to absorb the impact.
Official Resources
🎬 Video: Frontside Air (video) — https://youtu.be/4tz-HFSoEZY
🎬 Video: Grab Tricks (video) — https://youtu.be/UEYsZH49H_o
Req 2d14e — Footplant Tricks
Footplant tricks involve the skater briefly removing one foot from the board, planting it on a surface (the ramp lip, a ledge, or the ground), and then returning the foot to the board to continue riding. They combine aerial balance with precise foot timing. Demonstrate at least one trick from this category.
Common Footplant Tricks
Boneless: A classic, creative trick. While riding toward a curb or the lip of a ramp:
- Reach down with your front hand and grab the board’s toe-side edge.
- Plant your front foot on the ground (or the lip surface).
- Use the planted foot to spring upward, jumping the board into the air.
- Return your front foot to the board while airborne.
- Land and ride away.
The boneless has a distinctive, old-school feel and is one of the most iconic footplant tricks in skateboarding history.
Andrecht (ramp version): On a ramp, the skater plants a foot on the coping at the lip while grabbing the board. Named after Simi Valley skater Dave Andrecht.
Slob plant / mute plant: A footplant combined with a mute grab, where the rider grabs the board while planting a foot on the lip.
What Makes a Footplant Recognizable
For your counselor demonstration, the key elements are:
- One foot clearly leaves the board.
- That foot contacts a surface (ground, lip, ledge).
- The foot returns to the board.
- The trick is completed with a landing back on the board.
The boneless on flat ground or off a curb is the most accessible footplant trick for beginners and clearly satisfies the requirement.
Official Resources
🎬 Video: How to Boneless (video) — https://youtu.be/wUZpFX0CS1g
Extended Learning
A. Congratulations!
You have earned the Skating merit badge. Whether you chose ice, roller, in-line, or skateboarding, you have built real skills — safety awareness, equipment knowledge, physical technique, and the discipline to practice until something clicks. Skating is a sport you can pursue for a lifetime, and the skills you have developed here are a foundation for wherever you want to go next.
B. Deep Dive: The Physics of Skating
Every skating discipline is governed by the same physical forces. Understanding the physics behind your movements helps you learn faster and troubleshoot problems more effectively.
Friction and edges. Ice skates, roller skates, and in-line skates all exploit the relationship between edge angle and friction. A flat blade glides because it has minimal contact surface. Angling the blade creates edge contact and friction, which steers and stops you. More edge angle = more friction = more steering force and more braking.
Center of gravity. Every balance problem in skating comes down to where your center of gravity is relative to your base of support. When you bend your knees, you lower your center of gravity and widen your effective base — both of which increase stability. This is why “bend your knees” is the universal skating coaching cue.
Momentum and angular momentum. Spins and rotations in skating involve angular momentum. When you pull your arms in during a spin, you spin faster — this is conservation of angular momentum, the same principle that figure skaters use to accelerate their scratch spins. Understanding this helps you control rotations in any trick or turn.
Urethane chemistry. The soft urethane wheels used on roller and in-line skates have a property called viscoelastic deformation — they momentarily deform around small surface irregularities and then spring back, absorbing vibration without losing energy. This is why urethane wheels grip and absorb road buzz far better than hard plastic or clay wheels.
C. Deep Dive: Choosing the Right Gear
The quality of your gear affects everything — comfort, performance, and safety. Here is what matters most across all four disciplines.
Ice skates. For serious skating, rental skates are a starting point but not ideal. Skates that fit well (snug heel, right stiffness for your level) make every skill easier. Entry-level figure skates from Jackson Ultima, Graf, and Riedell are good starting points. Hockey skates from Bauer, CCM, and True are excellent brands. Get your skates sharpened by a qualified shop — a good edge makes stopping and turning dramatically more effective.
Roller skates. For recreational skating, Moxi, Impala, and Riedell make excellent quad skates at various price points. For more serious skating, upgrading wheels (softer for outdoor, harder for indoor) and bearings makes a noticeable difference without requiring a new skate.
In-line skates. For fitness and recreational skating, look at K2, Rollerblade, and Powerslide. Fit is critical — try on skates with the socks you will skate in. The boot should feel snug everywhere but not painful. Never buy online without trying first.
Skateboards. Buy components separately from a local skate shop rather than a complete board from a big-box retailer. Local shop complete setups (around $120–160) use professional-quality decks, trucks, and wheels. Big-box boards often use inferior materials that make learning significantly harder.
D. Deep Dive: Training Off the Skates
Skating is a whole-body sport. Targeted off-skates training accelerates your progress and reduces injury risk.
Balance and proprioception. Stand on one foot with your eyes closed. Use a balance board or wobble disc. These exercises directly improve the ankle stability and balance control that translate to every skating discipline.
Hip mobility. Many advanced skating moves — mohawks, crossovers, drop-ins, grabs — require hip external rotation that typical daily movement does not develop. Hip circles, pigeon pose, and hip flexor stretches all help.
Core strength. Every spin, trick, and direction change originates from the core. Planks, dead bugs, and rotational exercises build the trunk stability that keeps you upright at speed.
Ankle strength. Calf raises, single-leg calf raises, and resistance band ankle work build the fine motor control that makes edge work precise. Strong ankles are the single most useful physical quality for any skating discipline.
E. Skating Experiences
Ready to push your skating further? These experiences are worth exploring.
US Figure Skating Test Track
Local Roller Derby League
Inline Marathon Racing
Your Local Skate Park
F. Organizations
The national governing body for figure skating in the United States, overseeing competitive skating, learn-to-skate programs, and athlete development.
Organization: US Figure Skating — https://www.usfigureskating.org/
The national governing body for ice hockey, including skating programs, learn-to-play clinics, and youth development across the country.
Organization: USA Hockey — https://www.usahockey.com/
Governs competitive roller sports in the US, including artistic, speed, and jam skating, as well as roller derby sanctioning.
Organization: USA Roller Sports — https://www.teamusa.org/USA-Roller-Sports
Promotes in-line skating worldwide, provides safety certification programs, and supports recreational and competitive skaters globally.
Organization: International Inline Skating Association (IISA) — https://www.iisa.org/
An international non-profit that uses skateboarding to empower youth in Afghanistan, Cambodia, South Africa, and beyond through skate education programs.
Organization: Skateistan — https://skateistan.org/
A non-profit organization creating inclusive skating spaces and programming for women, girls, and transgender skaters in the Pacific Northwest and beyond.
Organization: Skate Like a Girl — https://www.skatelikeagirl.com/